(Declaration): No reloading without permission!
Introduction
onLayout() and onMeasure() are the keys to customizing View. You may know how it works, but you don't know why it works that way?We often see it when we look at some books and sources, and today we're going to talk about its real role in customizing the View.
1. onLayout() method
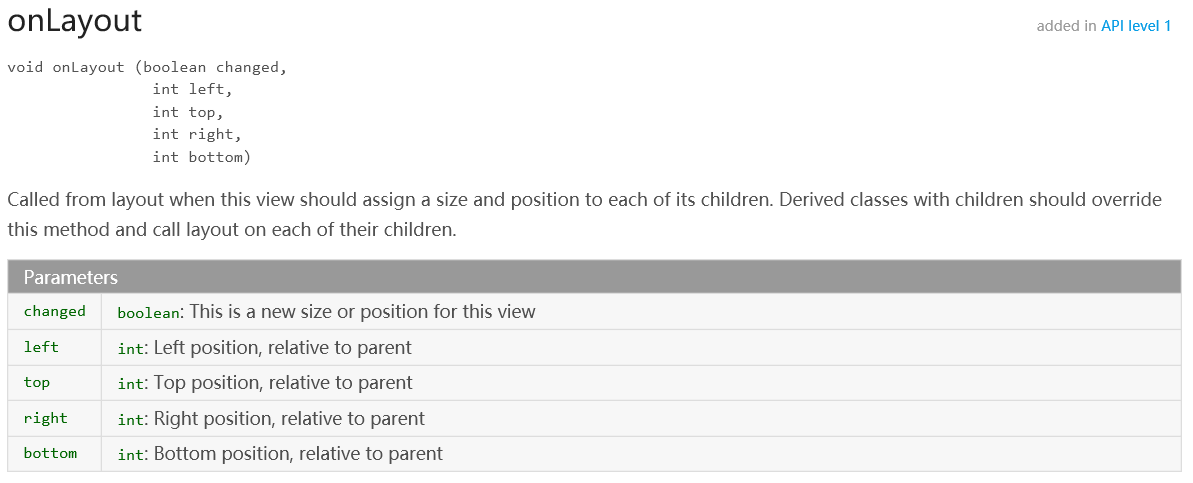
Intention: Called from the layout when this view should assign size and position to each of its subviews.Derived classes with Subclasses should override this method and call the layout on each subclass.
So let me take a simple example to see what it does.We create a new MyViewGroup that inherits ViewGroup and does nothing by default.
/**
 * @Created by xww.
 * @Creation time 2018/8/15.
 */

public class MyViewGroup extends ViewGroup {

    public MyViewGroup(Context context, AttributeSet attrs) {
        super(context, attrs);
    }

    @Override
    protected void onLayout(boolean changed, int l, int t, int r, int b) {

    }

    /**
     * Switch Pages
     */
    public void scrollPage(int index) {
        scrollTo(index * getWidth(), 0);
    }
}
We reference our MyViewGroup control in the layout and add a view to it.Here we add three subviews, View1, View2, and View3:
<ImageView xmlns:android="http://schemas.android.com/apk/res/android"
    android:layout_width="match_parent"
    android:layout_height="match_parent"
    android:src="@mipmap/ic_launcher" />
<FrameLayout xmlns:android="http://schemas.android.com/apk/res/android"
android:layout_width="match_parent"
android:layout_height="match_parent"
android:background="@android:color/holo_blue_bright">
<ImageView
android:layout_width="match_parent"
android:layout_height="match_parent"
android:src="@mipmap/ic_launcher" />
</FrameLayout><LinearLayout xmlns:android="http://schemas.android.com/apk/res/android"
android:layout_width="match_parent"
android:layout_height="match_parent"
android:background="@android:color/darker_gray"
android:orientation="vertical">
<TextView
android:layout_width="match_parent"
android:layout_height="wrap_content"
android:gravity="center"
android:text="textview Test 1"
android:textSize="50sp" />
<TextView
android:layout_width="match_parent"
android:layout_height="wrap_content"
android:gravity="center"
android:text="textview Test 2"
android:textSize="50sp" />
<TextView
android:layout_width="match_parent"
android:layout_height="wrap_content"
android:gravity="center"
android:text="textview Test 3"
android:textSize="50sp" />
<TextView
android:layout_width="match_parent"
android:layout_height="wrap_content"
android:gravity="center"
android:text="textview Test 4"
android:textSize="50sp" />
</LinearLayout>Then add View1, View2, and View3 to MyViewGroup, respectively, with the following code:
public class MainActivity extends AppCompatActivity {

    private MyViewGroup myView;
    private RadioGroup rg;

    @Override
    protected void onCreate(Bundle savedInstanceState) {
        super.onCreate(savedInstanceState);
        setContentView(R.layout.activity_main);
        initView();
    }

    private void initView() {
        myView = findViewById(R.id.myView);
        rg = findViewById(R.id.rg);

        View view1 = LayoutInflater.from(this).inflate(R.layout.view1, null);
        View view2 = LayoutInflater.from(this).inflate(R.layout.view2, null);
        View view3 = LayoutInflater.from(this).inflate(R.layout.view3, null);
        myView.addView(view1);
        myView.addView(view2);
        myView.addView(view3);

        for (int i = 0; i < 3; i++) {
            RadioButton radioButton = new RadioButton(this);
            if (i == 0) {
                radioButton.setChecked(true);
            }
            radioButton.setId(i);
            rg.addView(radioButton);
        }
        rg.setOnCheckedChangeListener(new RadioGroup.OnCheckedChangeListener() {
            @Override
            public void onCheckedChanged(RadioGroup group, int checkedId) {
                myView.scrollPage(checkedId);
            }
        });
    }
}
Our main layout layout I've done some work to make it stand out, and the layout code is as follows:
<LinearLayout xmlns:android="http://schemas.android.com/apk/res/android"
    xmlns:app="http://schemas.android.com/apk/res-auto"
    xmlns:tools="http://schemas.android.com/tools"
    android:layout_width="match_parent"
    android:layout_height="match_parent"
    android:orientation="vertical"
    tools:context="com.example.x.earthquakeclient.MainActivity">

    <RadioGroup
        android:id="@+id/rg"
        android:layout_width="match_parent"
        android:layout_height="wrap_content"
        android:gravity="center"
        android:orientation="horizontal" />

    <com.example.x.earthquakeclient.MyViewGroup
        android:id="@+id/myView"
        android:layout_width="match_parent"
        android:layout_height="match_parent" />
</LinearLayout>
Then run the project to see the effect:
You can see that there is nothing. We added three subviews to it. How can we get there?The reason is that although we override the onLayout() method, we did not do anything, which is equivalent to not doing anything with the layout of the subview, and it certainly does not show up.
Then I modify the code in MyViewGroup to do a horizontal layout operation on the subview in the onLayout() method:
    @Override
    protected void onLayout(boolean changed, int l, int t, int r, int b) {
        final int childCount = getChildCount();
        for (int i = 0; i < childCount; i++) {
            View childView = getChildAt(i);
            childView.layout(i * getWidth(), t, (i + 1) * getWidth(), b);
        }
    }
Let's run it again and see what we're doing. I set the background color to distinguish it!

You can see that our subview is displayed, and ImageView on the first page is correct because we only have one control.But the question arises, where are the pictures and text on the second and third pages?The reason is that in the onLayout() method, it lays out one of the outermost parent containers, so each of our parent containers can be displayed, but the child views inside the parent container cannot be displayed.In that case, let's set aside and look at our other protagonist, the onMeasure() method.
2. onMeasure() method
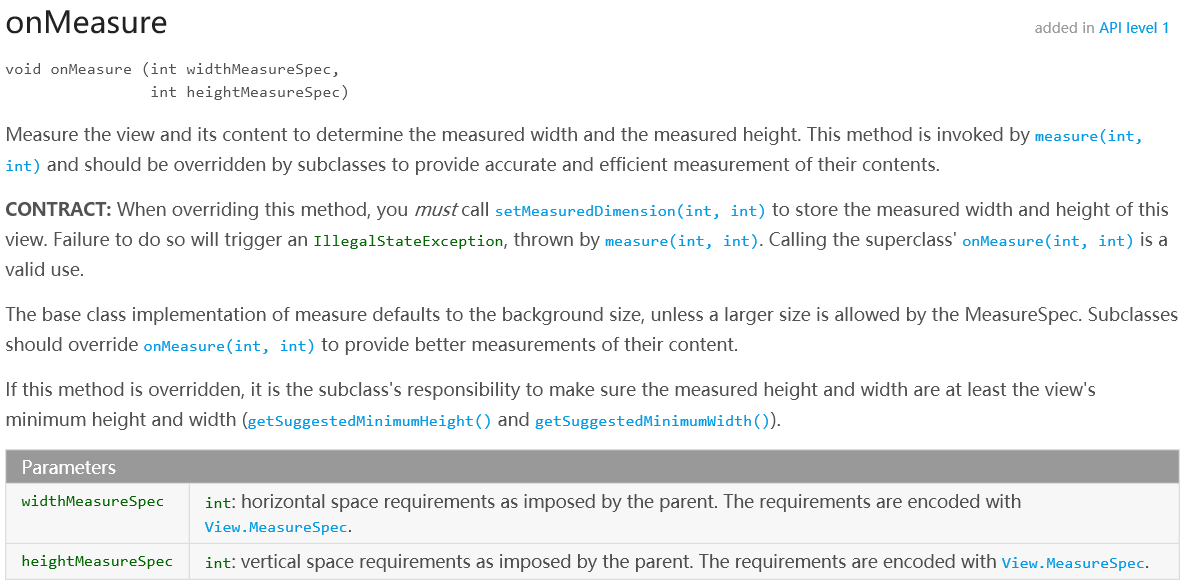
Intention: Measure the view and its contents to determine the width and height of the measurement.This method is called by measure(int, int) and should be overridden by subclasses to provide an accurate and efficient measure of its content.
onMeasure() is the measurement view and the contents of the view. We use this method to iterate through the view content and measure it in turn to set its width and height, so I modify the code of MyViewGroup and rewrite the onMeasure() method as follows:
    @Override
    protected void onMeasure(int widthMeasureSpec, int heightMeasureSpec) {
        super.onMeasure(widthMeasureSpec, heightMeasureSpec);
        final int childCount = getChildCount();
        for (int i = 0; i < childCount; i++) {
            View childView = getChildAt(i);
            childView.measure(widthMeasureSpec, heightMeasureSpec);
        }
    }
I'll run the project again and see how it works:

Now it works as we expected.Through this example, we further understand the real role that onLayout() and onMeasure() play in customizing View s.