JWT can be understood as an encrypted string, which consists of three parts: header, payload and signature
It is used by the header and payload encrypted by base64 The JWT string is formed by connecting the strings, then encrypting them with salt secret combination through the encryption method declared in the header, and then forming the JWT string
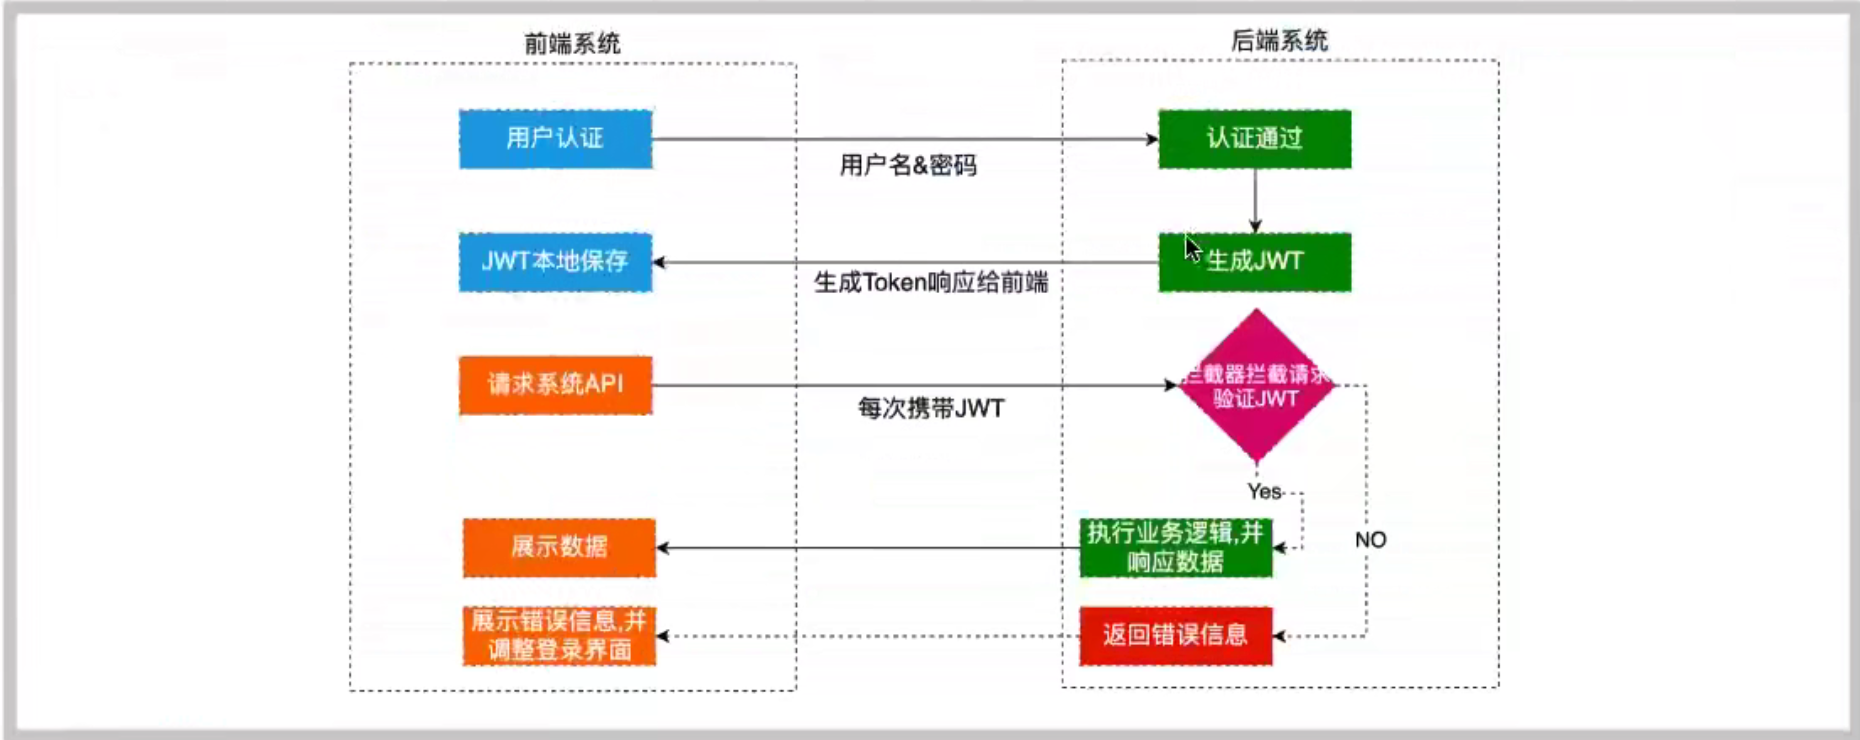
In the past, I introduced the related concepts and basic operations of JWT. Next, I introduced how to integrate JWT in SpringBoot to realize login and registration
Environment construction #
1. Create a new spring boot project JWT demo, and introduce the jar package needed later in the project
  <dependencies>
        <dependency>
            <groupId>org.springframework.boot</groupId>
            <artifactId>spring-boot-starter-web</artifactId>
        </dependency>
        <dependency>
            <groupId>org.springframework.boot</groupId>
            <artifactId>spring-boot-starter-test</artifactId>
            <scope>test</scope>
        </dependency>
        <!--introduce mybatis-->
        <dependency>
            <groupId>org.mybatis.spring.boot</groupId>
            <artifactId>mybatis-spring-boot-starter</artifactId>
            <version>2.1.3</version>
        </dependency>
        <!--introduce mysql-->
        <dependency>
            <groupId>mysql</groupId>
            <artifactId>mysql-connector-java</artifactId>
            <version>8.0.25</version>
        </dependency>
        <!--introduce druid Database connection pool-->
        <dependency>
            <groupId>com.alibaba</groupId>
            <artifactId>druid</artifactId>
            <version>1.2.1</version>
        </dependency>
        <!--introduce lombok-->
        <dependency>
            <groupId>org.projectlombok</groupId>
            <artifactId>lombok</artifactId>
            <version>1.18.12</version>
        </dependency>
        <dependency>
            <groupId>org.mybatis.spring.boot</groupId>
            <artifactId>mybatis-spring-boot-starter-test</artifactId>
            <version>2.1.3</version>
        </dependency>
        <!--introduce jwt-->
        <dependency>
            <groupId>com.auth0</groupId>
            <artifactId>java-jwt</artifactId>
            <version>3.4.0</version>
        </dependency>
    </dependencies>
2. Database structure

There is a JWT library with a User table
3. Configuration file application properties
server.port=8989

spring.datasource.type=com.alibaba.druid.pool.DruidDataSource
spring.datasource.driver-class-name=com.mysql.cj.jdbc.Driver
spring.datasource.url=jdbc:mysql://localhost:3306/JWT?characterEncoding=utf8&useSSL=false&serverTimezone=UTC&rewriteBatchedStatements=true
spring.datasource.username=root
spring.datasource.password=12345678

#Packages scanned by mybatis
mybatis.type-aliases-package=com.ylc
#mapper file path
mybatis.mapper-locations=classpath:/**/*.xml

#Enable sql print log logging Level is followed by the package of the method interface corresponding to mybatis
logging.level.com.ylc.jwtdemo.dao=debug
4. Create a new User class under the Entity package
import lombok.Data;

@Data
public class User {
    private  String username;
    private  String password;
    private  int id;
}
5. Create a new UserDao under Dao package
@Mapper
public interface UserDao {

    User login(User user);
}
6. Create a new USerService under Service package
public interface UserService {
    User login(User user);//Login interface
}
7. Implementation class UserServiceImp of UseService
import java.util.HashMap;
import java.util.Map;

@Service
public class UserServiceImpI implements UserService {

    @Autowired
    private UserDao userDao;

    @Override
    public User login(User user) {
        User userdb=userDao.login(user);
        if(userdb!=null)
        {
            Map<String,String> map=new HashMap<>();
            map.put("name",userdb.getUsername());
            return userdb;
        }
        throw  new RuntimeException("Login failed");
    }
}
8. Create a new UserController under the controller package
@RestController
public class UserController {

    @Autowired
    private UserService userService;

    @GetMapping("/user/login")
    public Map<String,Object> login(User user)
    {
        log.info("user name:"+user.getUsername());
        log.info("password:"+user.getPassword());
        Map<String,Object> map=new HashMap<>();
        try {
            userService.login(user);
            map.put("msg","Login succeeded");
            map.put("code","200");
        }
        catch (Exception ex)
        {
            map.put("msg","Login failed");
        }

        return map;
    }
}
9. Create a new Usermapper file under the resource folder
<?xml version="1.0" encoding="UTF-8"?>
<!DOCTYPE mapper PUBLIC "-//mybatis.org//DTD Mapper 3.0//EN" "http://mybatis.org/dtd/mybatis-3-mapper.dtd">
<!--namespace It refers to the fully qualified class name to be configured-->
<mapper namespace="com.ylc.jwtdemo.dao.UserDao">
    <select id="login" parameterType="com.ylc.jwtdemo.entity.User" resultType="com.ylc.jwtdemo.entity.User">
        select *from user where username=#{username} and password=#{password}
    </select>
</mapper>
10. JWT tool class JwtUtils
/**
 * JWT Tool class
 * @author yanglingcong
 * @date 2021/12/31 11:24 AM
 */
public class JwtUtils {
    //Authentication is equivalent to saving the private key on the server
    private  static  final String  secret="##@$%@#S#WS";


    /**
     * Generate token
     * @author yanglingcong
     * @date 2021/12/31 11:23 AM
     * @param map
     * @return String
     */
    public static  String getToken(Map<String,String> map)
    {
        Calendar instance=Calendar.getInstance();
        //By default, it expires in seven days
        instance.add(Calendar.DATE,7);
        //Create JWT
        JWTCreator.Builder builder = JWT.create();

        //payload
        map.forEach((k,v)->{
            builder.withClaim(k,v);
        });
        //Specify token expiration time
        builder.withExpiresAt(instance.getTime());

        String token=builder.sign(Algorithm.HMAC256(secret));
        return token;
    }

    /**
     * Validate token
     * @author yanglingcong
     * @date 2021/12/31 11:26 AM
     * @param token
     */
    public  static  DecodedJWT  verify(String token) {
        return  JWT.require(Algorithm.HMAC256(secret)).build().verify(token);
    }

}
Overview of the whole project

Test and verify whether it can connect to the database
visit: localhost:8989/user/login?username=ylc&password=123456

Introduction of JWT #
@Slf4j
@RestController
public class UserController {

    @Autowired
    private UserService userService;

    @GetMapping("/user/login")
    public Map<String,Object> login(User user)
    {
        log.info("user name:"+user.getUsername());
        log.info("password:"+user.getPassword());
        Map<String,Object> map=new HashMap<>();
        try {
            userService.login(user);
            map.put("msg","Login succeeded");
            map.put("code","200");

            Map<String,String> payload=new HashMap<>();
            payload.put("name",user.getUsername());
            String token= JwtUtils.getToken(payload);
            map.put("token",token);
        }
        catch (Exception ex)
        {
            map.put("msg","Login failed");
        }

        return map;
    }

    @PostMapping("/test/verity")
    public  Map<String,String> verityToken(String token)
    {
        Map<String, String> map=new HashMap<>();
        log.info("token by"+token);
        try {
            DecodedJWT verify = JwtUtils.verify(token);
            map.put("msg","Validation succeeded");
            map.put("state","true");
        }
        catch (Exception exception)
        {
            map.put("msg","Validation failed");
            exception.printStackTrace();
        }
        return map;
    }
}
Login operation
visit: http://localhost:8989/user/login?username=ylc&password=123456

Verification operation
visit: http://localhost:8989/test/verity

However, it is unreasonable for us to write this in the actual project. The code generated by token is placed in the Controller, and the business logic cannot be placed in the Controller layer. If many interfaces need tokens for verification and protection, each interface needs to add such a piece of code, resulting in code redundancy.
Program optimization #
If a web project uses interceptors for optimization, and if a spring cloud project intercepts at the gateway layer, the following shows how to use interceptors to intercept
It is better to put the token generated by JWT in the http request header, so there is no need to pass the token as a parameter
Create a new interceptor JwtInterceptor
/**
 * JWT Interceptor
 * @author yanglingcong
 * @date 2021/12/31 12:39 PM
 */
public class JwtInterceptor implements HandlerInterceptor {
    @Override
    public boolean preHandle(HttpServletRequest request, HttpServletResponse response, Object handler) throws Exception {
        HashMap<String, String> map=new HashMap<>();
        //Get token from http request header
        String token = request.getHeader("token");
        try {
            //If the verification is successful, release the request
            DecodedJWT verify = JwtUtils.verify(token);
            return true;
        }
        catch (Exception exception)
        {
            map.put("msg","Validation failed:"+exception);
        }
        String json = new ObjectMapper().writeValueAsString(map);
        response.setContentType("application/json:charset=UTF=8");
        response.getWriter().println(json);
        return false;
    }
}
Then register the interceptor in the filter and create a new filter InterceptConfig
/**
 * @author yanglingcong
 */
@Configuration
public class InterceptConfig implements WebMvcConfigurer {
    @Override
    public void addInterceptors(InterceptorRegistry registry) {
        //Add interceptor
        registry.addInterceptor(new JwtInterceptor())
                //The intercepted path requires token verification
                .addPathPatterns("/test/verity")
                //Release path
                .excludePathPatterns("/user/login");
    }
}
The login does not need to be intercepted. If other requests need to verify the token, they will be put into the path of the interceptor
Test verification
Putting a token in the http request header will be intercepted by the interceptor to verify the validity of the token

summary #
This is the general process of the actual project of integrating JWT with SpringBoot, but the details of the secret (private key) must be different for each user. It is written dead here, and the private key must be saved in a safe place. Including that the payload part cannot store sensitive password information, and so on, which can also be optimized.
Project code: Clrs/SpringBoot+JWT simple Demo
Original address: JWT+SpringBoot actual combat - fried stewed fried sugar chestnut - blog Garden \
If you think this article is helpful to you, please praise it, pay attention to it and support it