introduction
This article is [theory] it's time to thoroughly understand the BERT model Sister articles. In this paper, we pass 🤗 The transformers library is used to practice using the pre trained BERT model.
We will mainly focus on the emotion recognition task in practical text classification and the question and answer task in natural language reasoning.
Note that the embedded representation, embedding, embedded vector, vector representation and representation mentioned in this paper are the same thing.
Explore the BERT model of pre training
stay Theory In, we know how to use masking language modeling and next sentence prediction task to pre train BERT model.
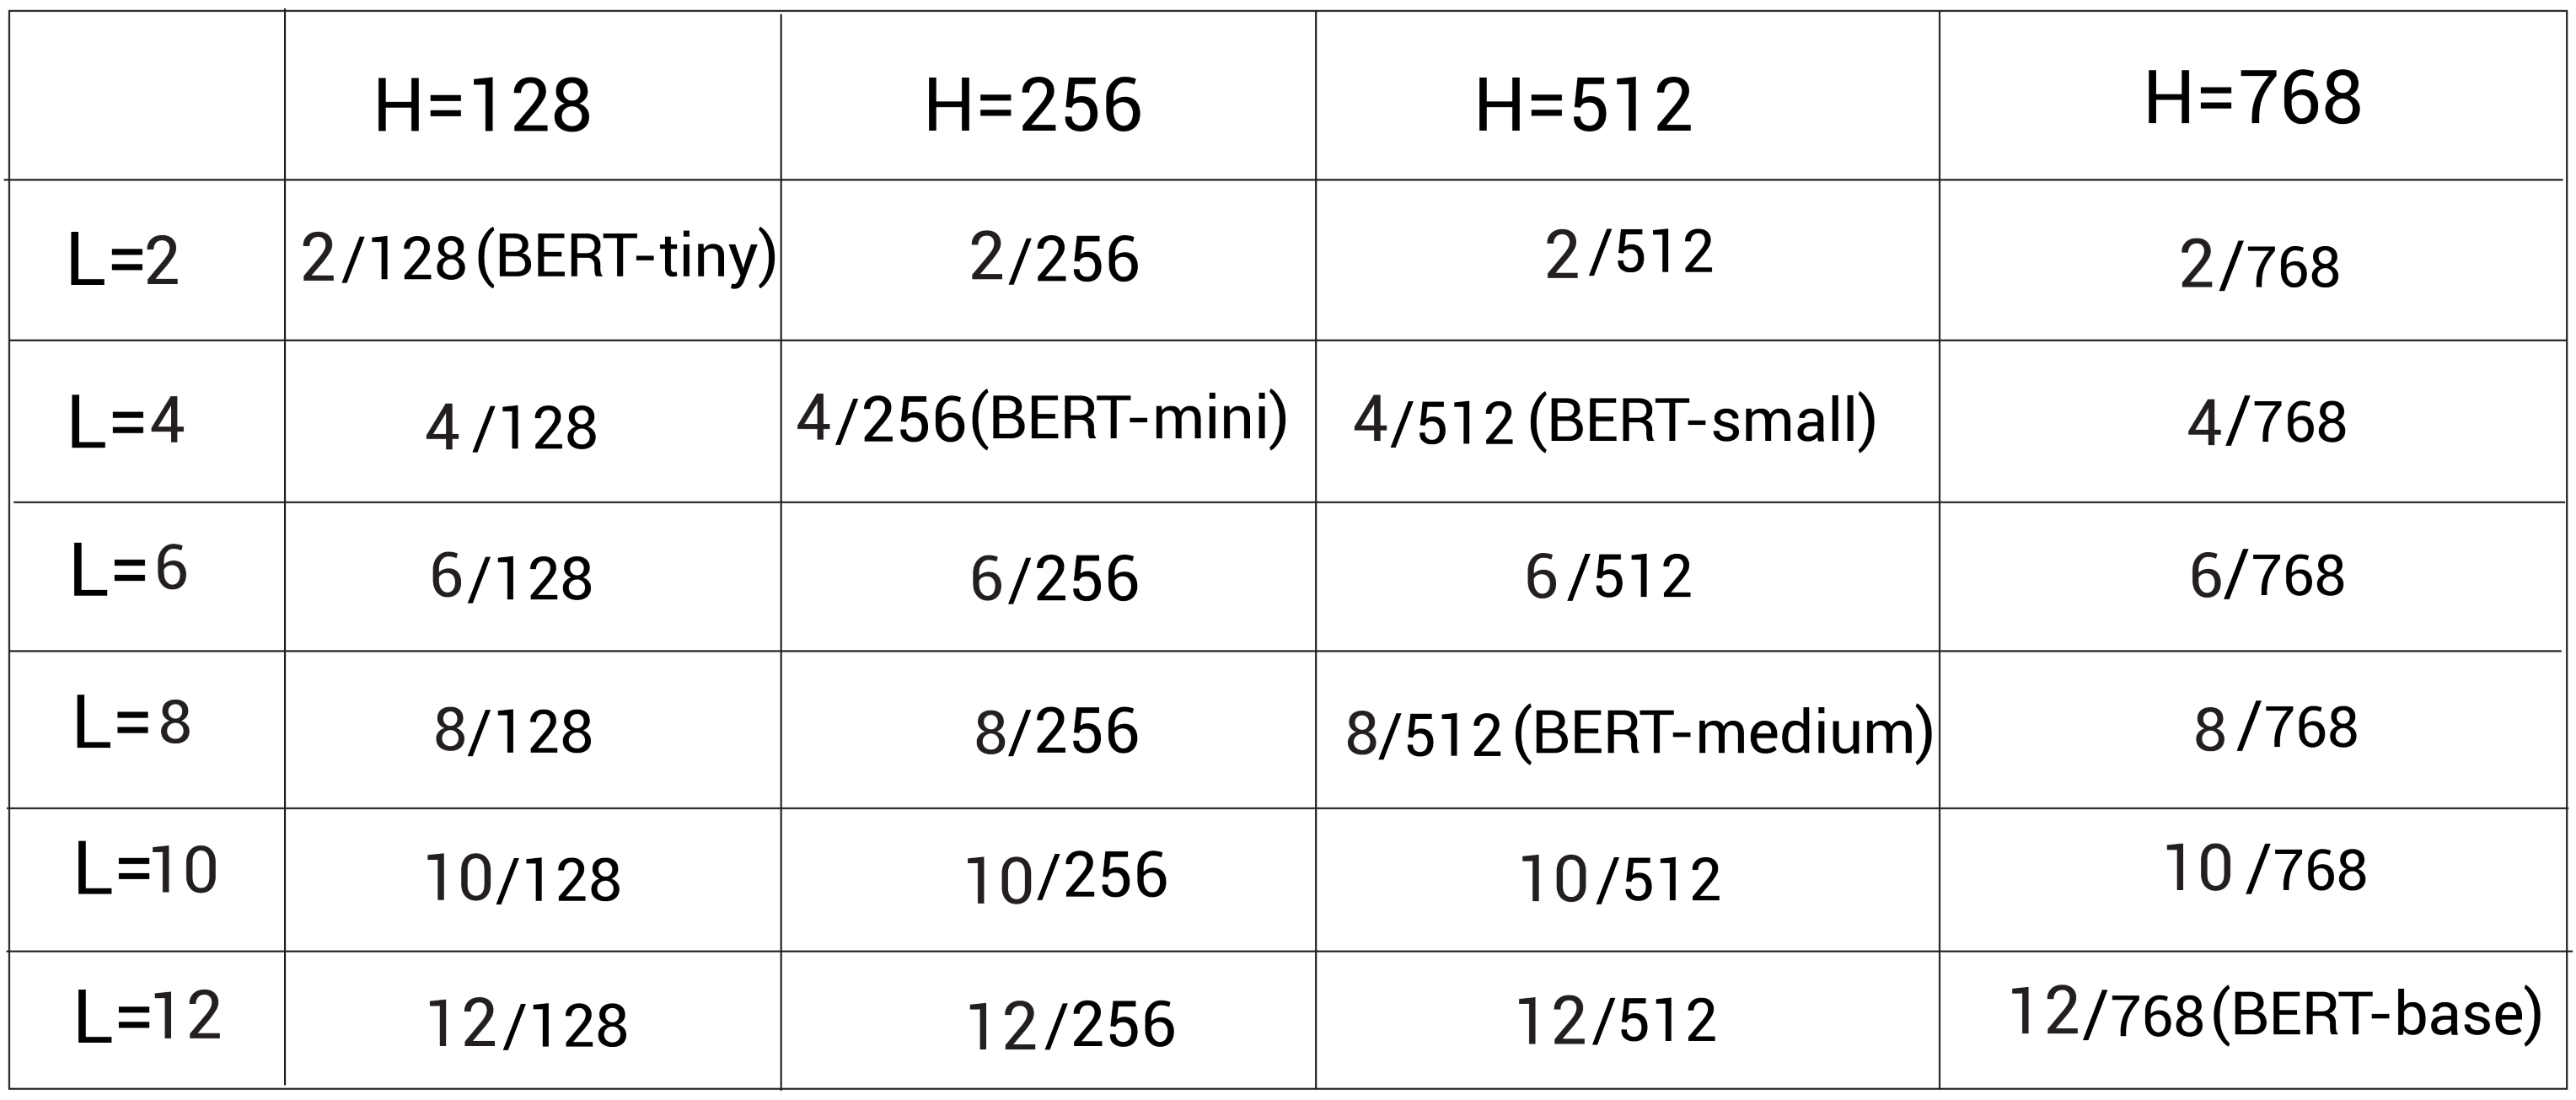
However, pre training the BERT model from the start is very resource consuming, so we can download the pre trained BERT model. Google open source pre trained BERT model, we can https://github.com/google-research/bert Download from. They open source a variety of configurations, as shown in the figure below. L L L represents the number of encoder layers, H H H stands for hidden cell size:
The pre training model can also be used in Bert uncased and Bert cased formats. In Bert uncased, all tags are lowercase, but the tags in Bert uncased are not converted to lowercase, but are directly used for training.
Among them, the Bert uncased model is the most commonly used, but if we are in a named entity recognition task, we should keep the case, so we should use the Bert cased model. In addition, Google also released the pre training model using the whole word masking (WwM) method.
We can use the pre training model in the following two ways:
- Feature extractor as embedded representation
- The BERT model is pre trained by fine tuning downstream tasks such as text classification and question and answer
In the following article, we will learn how to use these two methods.
Extract the embedded representation from the pre trained BERT
We understand it through an example. Consider a sentence I love Paris. Suppose we want to extract the context embedding of each tag in the sentence. First, we segment the sentence, and then feed it to the pre trained BERT model, which will return the embedded representation of each tag. In addition to the tag level (word level) embedded representation, we can also obtain the sentence level representation.
In this section, we will learn how to extract word level and sentence level embedded representations from the pre trained BERT model.
Suppose we want to complete an emotion analysis task, and then we have the following data set:
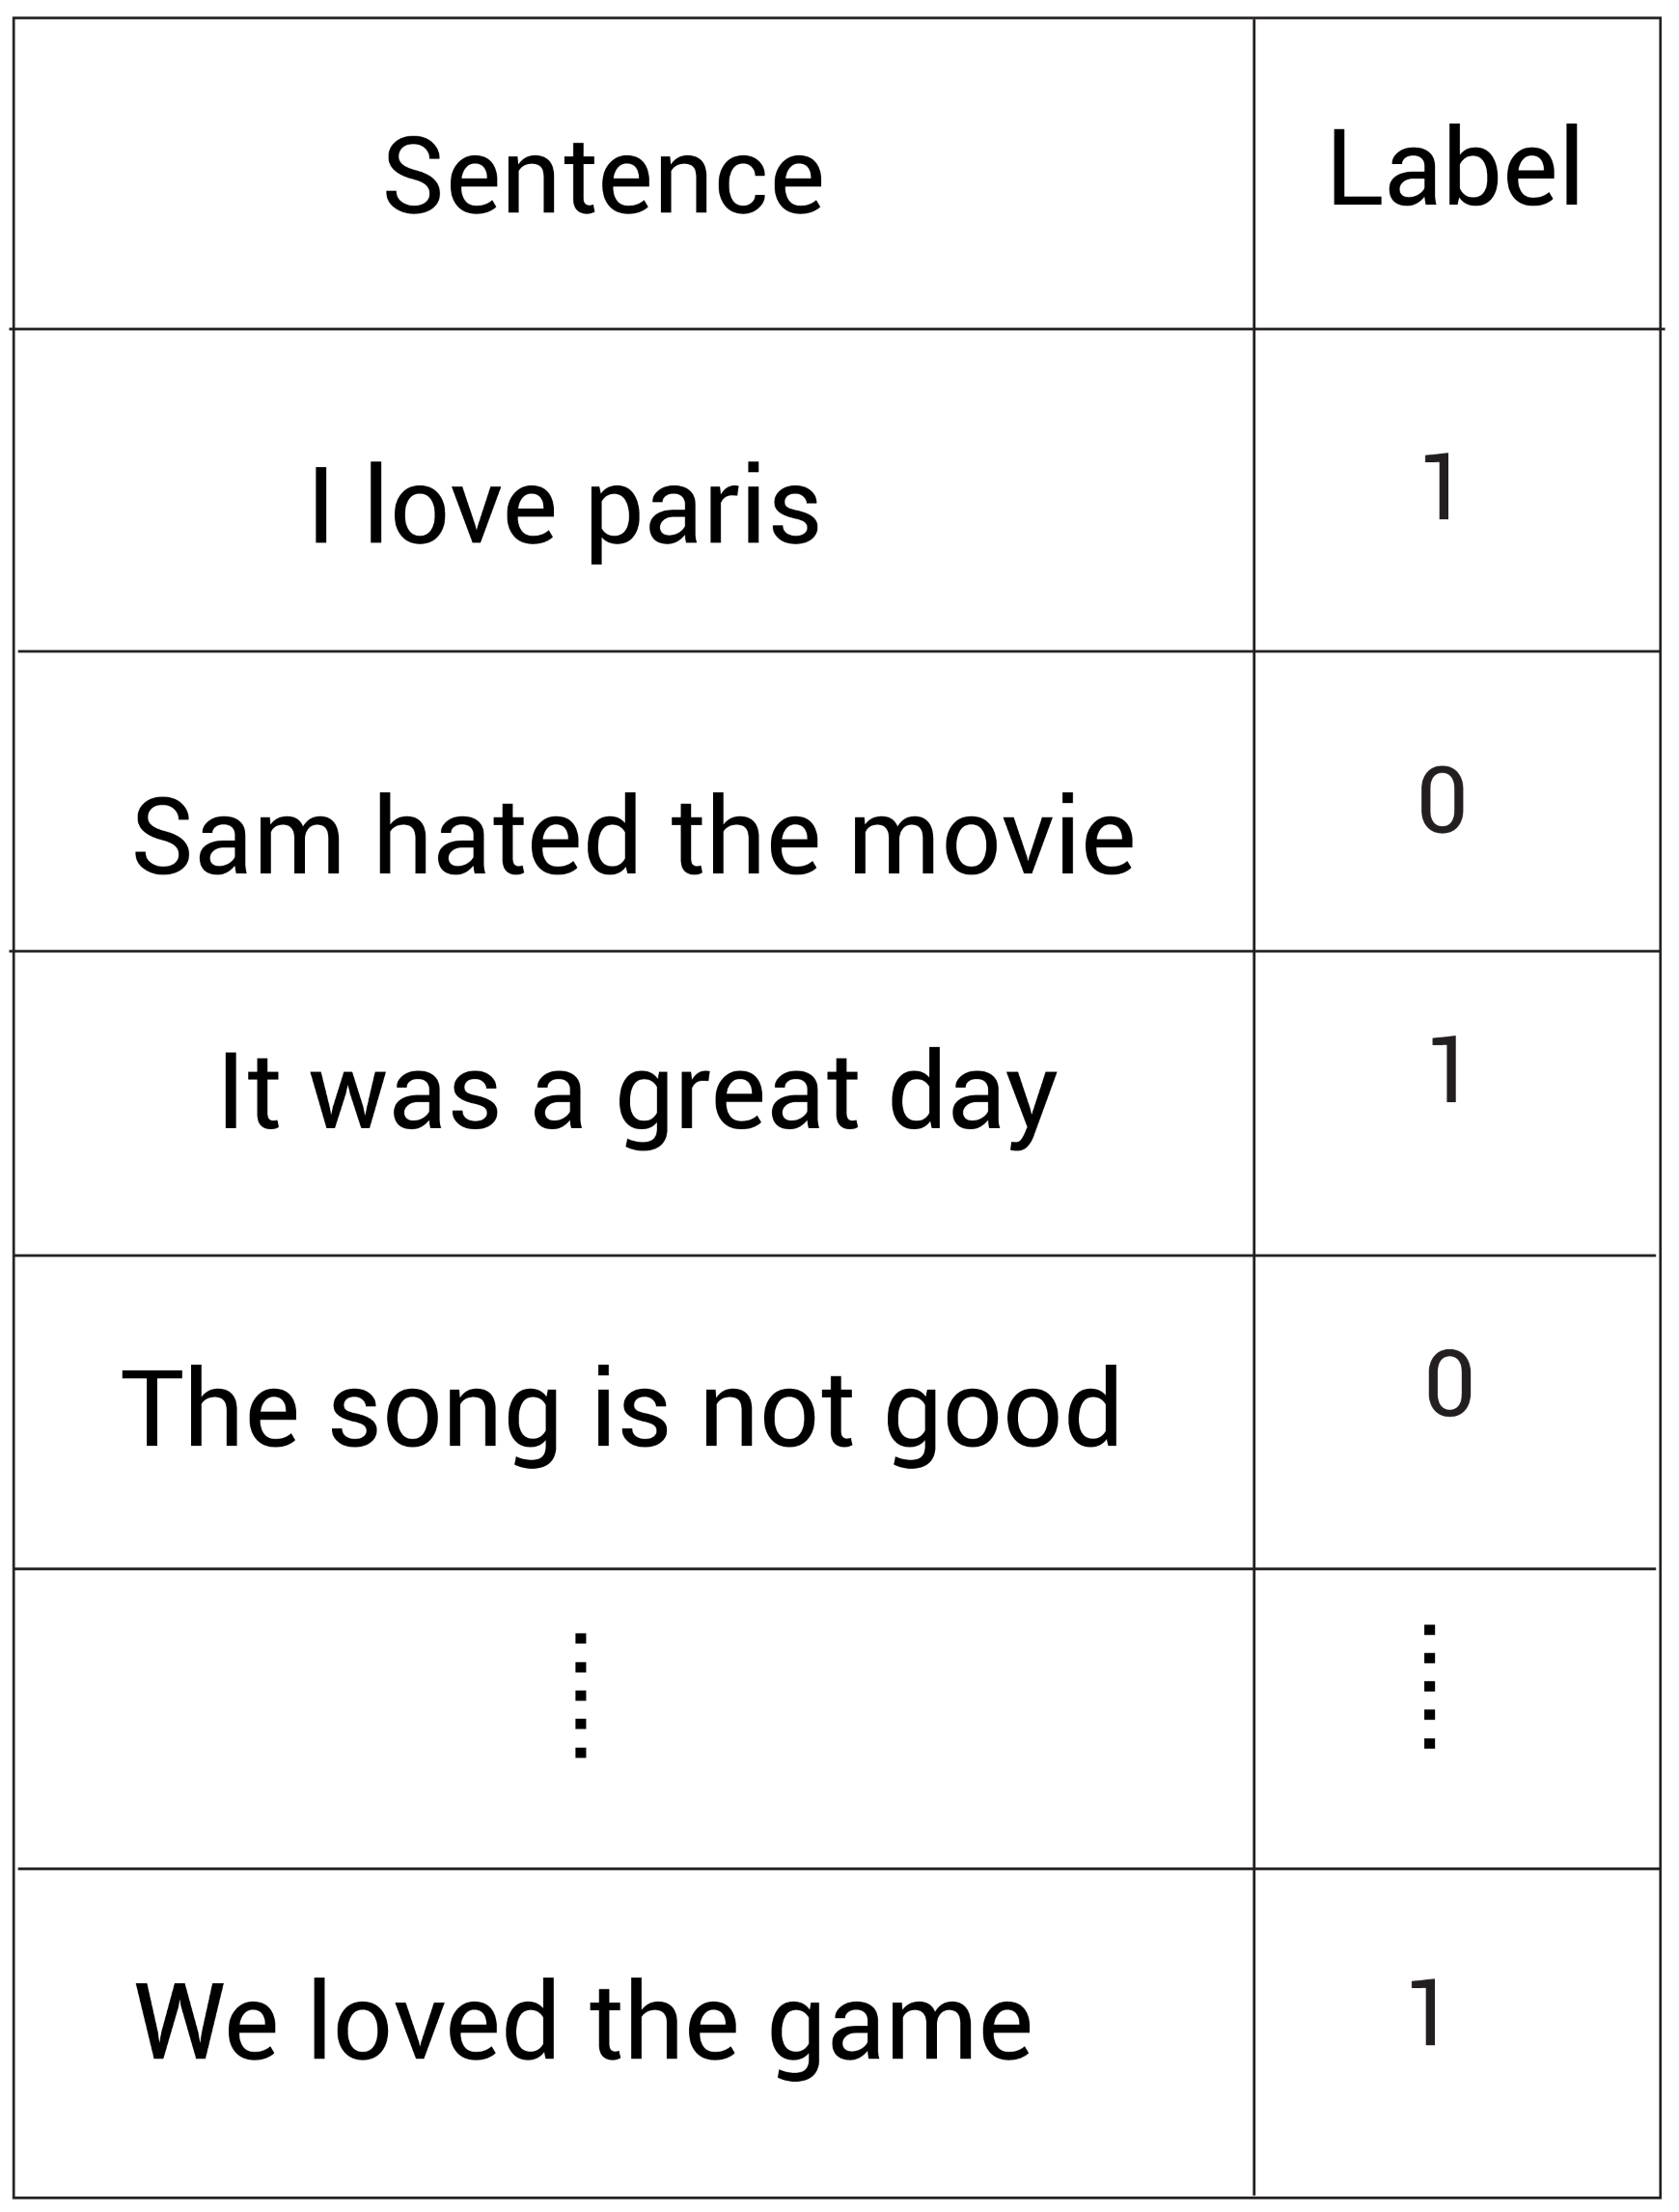
We have sentences and corresponding tags, where 1 1 1 stands for positive emotion and 0 0 0 represents negative emotion. We can use a given data set to train a classifier to classify the emotion of sentences.
First, we need to vectorize the text in the dataset. We can use methods such as TF-IDF and word2vec for vectorization. However, since we already know that BERT can learn the context embedded representation of words, why not directly use the pre trained BERT model to quantify the sentences in the dataset?
Consider the first sentence in our dataset: I love Paris. First, we use the WordPiece word splitter to segment words and get the words (marks) after word segmentation:
tokens = [I, love, Paris]
Then add [CLS] and SEP marks:
tokens = [ [CLS], I, love, Paris, [SEP] ]
Similarly, we can perform the same operation on all sentences in the training set. But the length of each sentence is not fixed. So we need to ensure that the length of all word lists is consistent. Suppose we keep the sentence length in the dataset as 7 7 7. If we look at the word list above, its length is 5 5 5. In order to meet the length of 7 7 7, we need to add a new filling mark called [PAD], so that the list of words we get is as follows:
tokens = [ [CLS], I, love, Paris, [SEP], [PAD], [PAD] ]
In this way, the length of our word list becomes 7 7 It's seven. The next step is to make our model understand that the [PAD] tag is used for filling rather than the actual tag. Therefore, we introduce an attention mask. We set all the actual marker positions in the attention mask to 1 1 1, and the [PAD] mark positions are set to 0 0 0, we have the following attention mask:
attention_mask = [ 1,1,1,1,1,0,0]
Next, we map all tags to a separate tag ID. It is assumed that the mapped tag ID is as follows:
token_ids = [101, 1045, 2293, 3000, 102, 0, 0]
It means that the ID of the tag [CLS] is 101 101 101; DI marked I is 1045 1045 1045 wait.
Now, we will token_ids and attention_mask is used as the input of the BERT model, and then the corresponding embedded representation of each tag is obtained.
The following figure shows how we use the pre trained BERT model to obtain the embedded representation. For clarity, we draw the tag itself instead of its ID. Once we feed the tag as input to BERT, encoder 1 calculates the embedded representation of all tags, and then transmits it to the next encoder - encoder 2. Encoder 2 takes the embedded representation calculated by encoder 1 as input, then outputs a new embedded representation, and then continues to pass it to the next encoder. In this way, each encoder passes its output embedded representation to the next encoder above it. The final encoder returns the final embedded representation of all tags in our sentence.
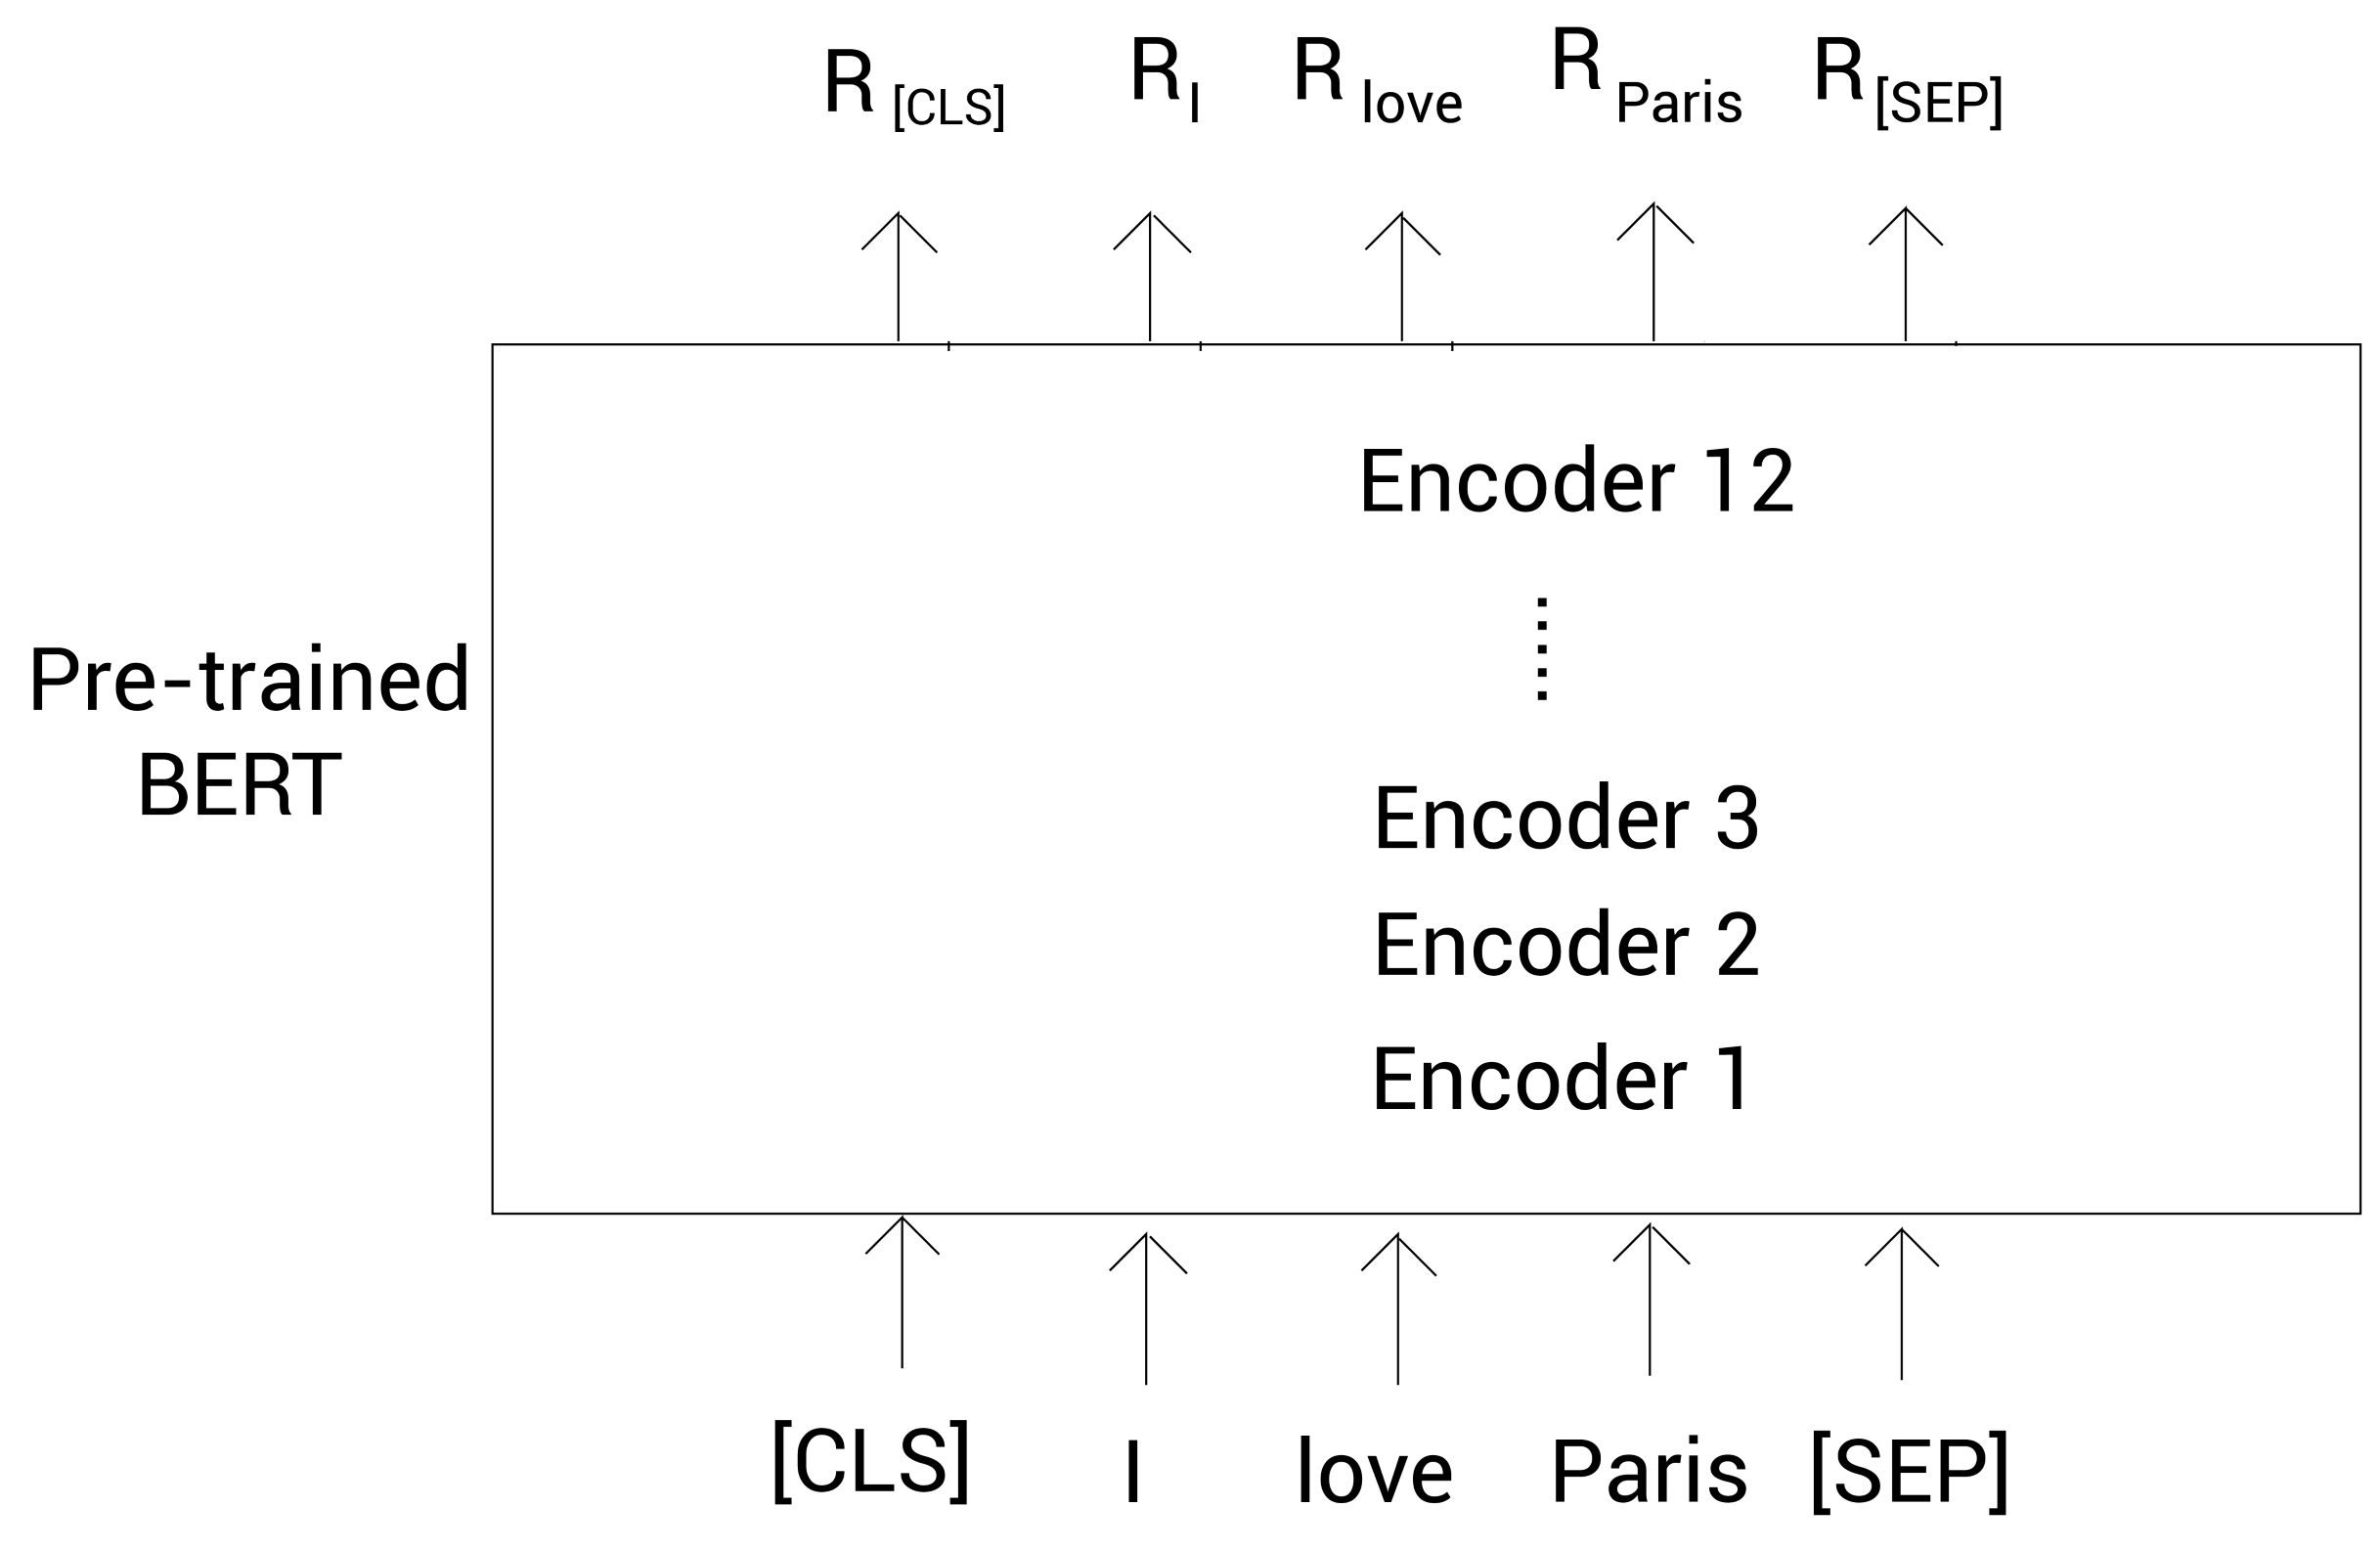
such R [CLS] R_{\text{[CLS]}} R[CLS] is the embedding of the tag [CLS], R I R_I RI # is the embedding of tag I, and so on.
In this example, the embedded representation size of each tag is 768.
Now we have the embedded representation of each word in the sentence. How can we get the embedded representation of the whole sentence?
We have a [CLS] tag at the beginning of the sentence, and the output of this tag will save the aggregate information of the whole complete sentence. Therefore, we can ignore the embedding of all other tags and only use the output embedding of [CLS] tag as the representation of our sentence.
In the same way, we can calculate the vector representation of all sentences in the training set. Once we have these sentence representations, we can use them as input to train a classifier to complete the emotion recognition task.
Note that it is not always a good idea to use the output vector marked [CLS] as a sentence representation. An effective way to obtain sentence representation is to average or pool all tags.
In the next section, we will learn how to use Hugging Face 🤗 The transformers library is provided to implement these things.
Hugging Face transformers
Hugging Face🤗 Headquartered in New York, it is a start-up company focusing on natural language processing, artificial intelligence and distributed systems. Their chat robot technology has always been popular, but more famous is their contribution to the NLP open source community. Hugging Face has been committed to the democratization of NLP technology in natural language processing, hoping that everyone can use the most advanced NLP technology (SOTA, state of the art), rather than being embarrassed by the lack of training resources. Their transformers library provides both TesnforFlow and PyTorch versions.
We can use pip to install transformers:
pip install transformers==4.10.0
Generate BERT embedding
In this section, we will learn how to extract embedded representations from the pre trained BERT model. Consider the sentence: I love Paris. Let's see how to get the contextual word embedding of all words in the sentence.
First, we introduce the required packages:
from transformers import BertModel, BertTokenizer
import torch
Let's download the pre trained BERT model. We can start from https://huggingface.co/models Page to view all available pre training models. We use the BERT base uncased model, which is based on 12 encoder layers and trained in lowercase tags, indicating that the size of the vector is 768.
Download and load the pre trained Bert base uncased model:
model = BertModel.from_pretrained('bert-base-uncased')
Let's download and load the word breaker used to pre train the Bert base uncased model:
tokenizer = BertTokenizer.from_pretrained('bert-base-uncased')
Now let's look at how to handle input.
Preprocessing input
Defining sentences:
sentence = 'I love Paris'
Participle and get the mark after participle:
tokens = tokenizer.tokenize(sentence)
print(tokens)
Output:
['i', 'love', 'paris']
Next, we add the [CLS] tag to the header of the tag list; Add [SEP] to the end of the tag list:
tokens = ['[CLS]'] + tokens + ['[SEP]']
print(tokens)
Output:
['[CLS]', 'i', 'love', 'paris', '[SEP]']
Now our tag list tokens size is 5 5 5. Suppose we want to keep the length of tokens as 7 7 7; At this point, we add two padding marks [PAD] to the end of tokens:
tokens = tokens + ['[PAD]'] + ['[PAD]']
tokens
Output:
['[CLS]', 'i', 'love', 'paris', '[SEP]', '[PAD]', '[PAD]']
Next, we create an attention masking attention_mask:
attention_mask = [1 if i!= '[PAD]' else 0 for i in tokens]
attention_mask
Output:
[1, 1, 1, 1, 1, 0, 0]
Next, we convert all tags into corresponding ID S:
token_ids = tokenizer.convert_tokens_to_ids(tokens)token_ids
Output:
[101, 1045, 2293, 3000, 102, 0, 0]
Now, let's pass the token_ids and attention_mask to Tensor:
token_ids = torch.tensor(token_ids).unsqueeze(0)attention_mask = torch.tensor(attention_mask).unsqueeze(0)
Next, we feed these two variables to the pre trained BERT model to obtain the embedded representation.
Get embedded representation
As shown in the following code, we will use token_ids and attention_mask incoming model gets embedded representation. Note that the output returned by the model is a tuple with two values. The first value represents the hidden state, indicating hidden_rep, which contains the embedded representation of all tags obtained from the final encoder (encoder 12); Second value CLS_ The head contains an embedded representation of the [CLS] tag:
hidden_rep, cls_head = model(token_ids, attention_mask=attention_mask,return_dict=False)
hidden_rep contains the embedded representation of all words in the input. Let's print its shape:
print(hidden_rep.shape)
Output:
torch.Size([1, 7, 768]) # [batch_size, sequence_length, hidden_size]
Our batch size is 1 1 1; The sequence length is the length of the tag list, which is 7 7 7; The hidden size is the embedded representation size, which is 768 768 768.
We can get the embedded representation of each representation in the following way:
- hidden_rep[0][0] returns the embedded representation of the first tag [CLS]
- hidden_rep[0][1] returns the embedded representation of the second tag I
- hidden_rep[0][2] returns the embedded representation of the third tag love
In this way, we get the context representation of all tags. This is basically a contextual word embedded representation of all words in a given sentence.
Now, let's look at cls_head. It contains the embedded representation of the [CLS] tag. Let's print its shape:
print(cls_head.shape)
Output:
torch.Size([1, 768]) # [batch_size, hidden_size]
We know cls_head contains the aggregate representation of the whole sentence, so we can use this object as the embedded representation of the sentence I love Paris.
We learned how to extract embedding from the pre trained BERT model. However, these are embeddings obtained only from the topmost encoder layer of BERT (i.e. encoder 12). Can we also extract embedding from all encoder layers of BERT?
We'll learn how to do this in the next section.
Extract embedded from all encoder layers of BERT
We already know how to extract embedding from pre trained BERT. How to extract embedding from all encoder layers of BERT?
Assume that the input layer is h 0 h_0 h0, the first encoder layer is h 1 h_1 h1, the second encoder layer is h 2 h_2 h2, and so on. The last encoder layer is h 12 h_{12} h12:

BERT researchers have experimented with extracting embedding from different encoder layers.
For example, in the NER task, researchers have used the trained BERT model to extract features. They experimented with the characteristics of different encoder layers and obtained the following F1 values:
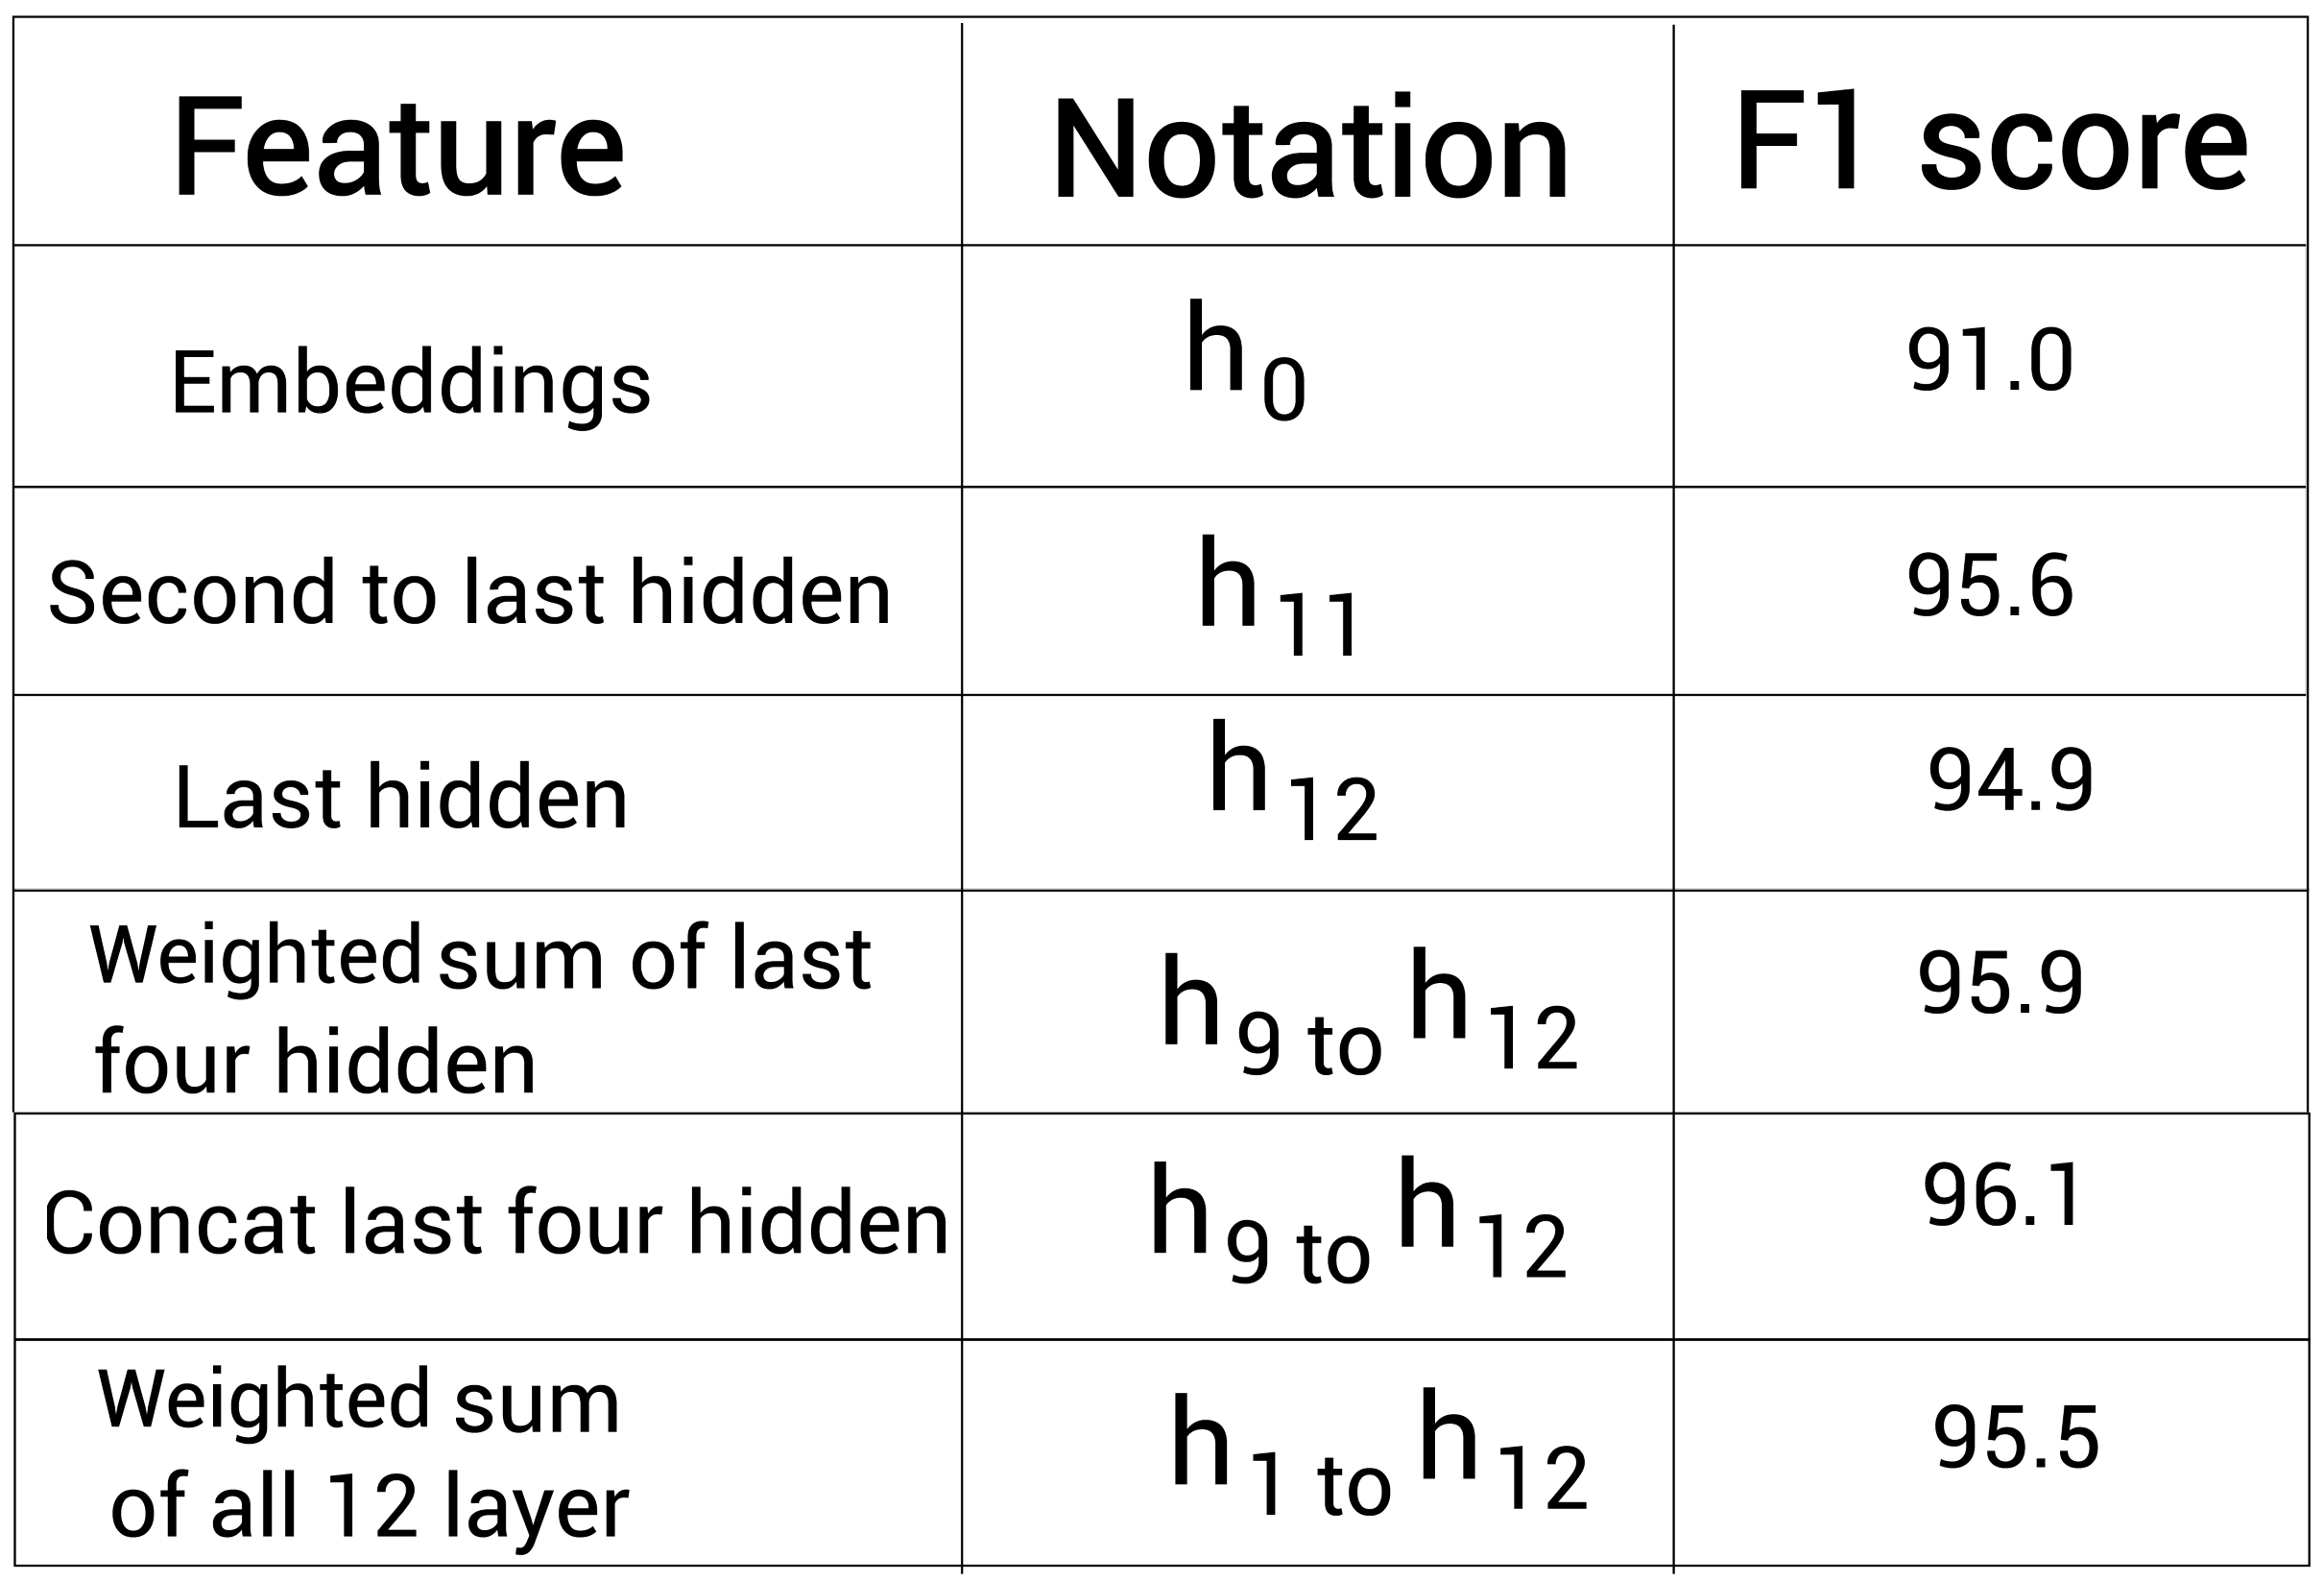
As shown in the above table, the best F1 value - 96.1% can be obtained by splicing the representation of the last four encoder layers. This shows that we can not only extract the output of the last encoder layer, but also try to use other encoder layers.
Now, we'll learn how to use transformers to extract embedded representations from all encoder layers.
Extract embedded representation
First, we import the necessary packages:
from transformers import BertModel, BertTokenizer
import torch
Then, download the pre trained BERT model and word splitter. As we can see, when downloading the pre trained BERT model, we need to set the output_hidden_states=True, so we can get the embedding of all encoder layers:
model = BertModel.from_pretrained('bert-base-uncased', output_hidden_states = True)
tokenizer = BertTokenizer.from_pretrained('bert-base-uncased')
Next, let's preprocess the input.
Preprocessing input
Suppose we still consider the example we saw in the previous section. First, we segment the sentence and add [CLS] and [SEP] markers:
sentence = 'I love Paris'
tokens = tokenizer.tokenize(sentence)
tokens = ['[CLS]'] + tokens + ['[SEP]']
Suppose we need to ensure that the length of the tag list is 7 7 7. Therefore, we add the fill mark [PAD] and define the attention mask:
tokens = tokens + ['[PAD]'] + ['[PAD]']attention_mask = [1 if i!= '[PAD]' else 0 for i in tokens]
Next, we convert tokens to the corresponding ID:
token_ids = tokenizer.convert_tokens_to_ids(tokens)
Now, we convert the token_ids and attention_mask to Tensor:
token_ids = torch.tensor(token_ids).unsqueeze(0)
attention_mask = torch.tensor(attention_mask).unsqueeze(0)
In this way, we have finished processing, and now we can get the embedded.
Get embedded representation
Because we set output when defining the model_ hidden_ States = true to get the embedding from all encoder layers. Now the model returns a tuple of three elements:
last_hidden_state, pooler_output, hidden_states = model(token_ids, attention_mask = attention_mask, return_dict = False)
In the above code, the analysis is as follows:
- First value, last_hidden_state contains embedded representations of all tags, but only from the last encoder layer (encoder 12)
- pooler_output represents the embedded representation corresponding to the [CLS] tag obtained from the last encoder layer, which can be further processed by a linear and tanh activation function
- hidden_states contains embedded representations of all tags from all encoder layers
Now let's look at each value one by one.
First, let's take a look at last_hidden_state, we output its shape:
last_hidden_state.shape.shape
Output:
torch.Size([1, 7, 768]) # [batch_size, sequence_length, hidden_size]
Our batch size is 1 1 1. The sequence length is the length of the tag list, which is 7 7 7. The hidden size is the size of the embedded representation. Here is 768 768 768.
We can obtain the embedded representation of each tag by a method similar to the following:
-
last_hidden_state[0][0] outputs the embedded representation of the first tag [CLS]
-
last_hidden_state[0][1] outputs the embedded representation of the second tag I
-
last_hidden_state[0][2] outputs the embedded representation of the third tag love
Similarly, we can get the embedded representation of all tags from the last encoder layer.
Next, let's look at pooler_output, which contains the embedded representation corresponding to the [CLS] tag obtained by the last encoder layer. We print its shape:
pooler_output.shape
Output:
torch.Size([1, 768]) # [batch_size, hidden_size]
We know that the [CLS] tag saves the aggregate representation of the whole sentence. We can use pooler_output is used as the sentence representation of the sentence I love Paris.
Finally, let's take a look at hidden_states. It is a tuple containing 13 values, saved from the input layer h 0 h_0 h0# to the last encoder layer h 12 h_{12} All embedded representations of h12 +
len(hidden_states)
Output:
13
We can see that these 13 values contain the representations of all layers:
-
hidden_states[0] contains an input embedding layer h 0 h_0 Embedded representation of all tags of h0 +
-
hidden_states[1] contains the first encoder embedding layer h 1 h_1 Embedded representation of all markers of h1 +
-
hidden_states[2] contains the second encoder embedding layer h 2 h_2 Embedded representation of all tags of h2 +
-
hidden_states[12] contains the last encoder embedding layer h 1 2 h_12 Embedded representation of all marks of h1 # 2
We then print hidden_ Shape of states [0]:
hidden_states[0].shape
Output:
torch.Size([1, 7, 768]) # [batch_size, sequence_length, hidden_size]
Then, print hidden_ Shape of states [1]:
hidden_states[1].shape
Output:
torch.Size([1, 7, 768])
In this way, we can get the embedded representation corresponding to the tags of all encoder layers. Let's learn how to put the pre trained BERT model
Apply to downstream tasks, such as emotion analysis.
Fine tune BERT for downstream tasks
Note that fine tuning means we won't train BERT from scratch. Instead, use the pre trained BERT, and then update its weight parameters according to the task.
In this section, we will learn how to fine tune the BERT model for the following downstream tasks:
-
Text classification
-
Natural language reasoning
-
Named entity recognition
-
Q & a task
Text classification
Let's first learn how to fine tune the BERT model for a text classification task. Suppose what we need to do is emotion recognition. In the emotion recognition task, our goal is to judge whether a sentence is positive or negative. Suppose we have a dataset containing sentences and corresponding tags.
Consider the sentence: I love Paris. First, of course, word segmentation, and then add [CLS] and [SEP] tags.
Then we input these tags into the BERT model to get the embedded representation of each tag.
Next, we only take the embedded representation corresponding to the [CLS] tag R [CLS] R_{\text{[CLS]}} R[CLS], ignoring all other tags. Because we know that the embedding of [CLS] contains the aggregate representation of the whole sentence. We will R [CLS] R_{\text{[CLS]}} R[CLS] is fed to a classifier (feedforward neural network with softmax function), and then the classifier is trained to do emotion recognition task.
wait! How is this different from what we saw at the beginning of this section? What is the difference between fine tuning the pre trained BERT model and using the pre trained BERT model as the feature extractor?
In the section of extracting embedded representation from pre trained BERT, we know that after extracting the embedded representation of sentences, we will R [CLS] R_{\text{[CLS]}} R[CLS] provides a classifier and trains the classifier to perform classification. Similarly, during fine-tuning, we will also R [CLS] R_{\text{[CLS]}} R[CLS] feeds a classifier and trains the classifier to perform classification.
The difference is that when we fine tune the pre trained BERT model, we will also update the parameters of BERT when we update the parameters of the classifier. However, when we use the pre trained BERT model as the feature extractor, we only update the parameters of the classifier, not the pre trained BERT model.
During fine tuning, we can adjust the parameters of BERT model in the following two ways:
- The parameters of the pre trained BERT model are updated with the classifier
- Only the parameters of the classifier are updated without updating the parameters of the pre trained BERT model. At this time, this method is similar to the case where the pre trained BERT model is used as the feature extractor.
The following figure illustrates how we fine tune the pre trained BERT model for an emotion classification task:

As we can see, we feed the tag list to the BERT model and get the embedding of these tags. Then we take the embedding of [CLS] mark as the input of feedforward neural network and carry out the classification task.
In the next section, let's fine tune the pre trained BERT model through the code to better understand the working principle of fine tuning.
Fine tune BERT for emotion recognition
Let's explore how to use the IMDB dataset to fine tune the pre trained BERT model for emotion analysis tasks. The IMDB dataset consists of movie reviews and their corresponding emotions.
Introduce dependency
First, we install the necessary dependencies:
!pip install nlp==0.4.0
!pip install transformers==4.10.0
Introduce the necessary packages:
from transformers import BertForSequenceClassification, BertTokenizerFast, Trainer, TrainingArguments
from nlp import load_dataset
import torch
import numpy as np
Load models and datasets
First, we use the nlp package to download and load the dataset:
!gdown https://drive.google.com/uc?id=11_M4ootuT7I1G0RlihcC0cA3Elqotlc-
dataset = load_dataset('csv', data_files='./imdbs.csv', split='train')
Let's view the data types:
type(dataset)
Output:
nlp.arrow_dataset.Dataset
Next, split the data set into training and test sets:
dataset = dataset.train_test_split(test_size=0.3)
We output the dataset:
{'test': Dataset(features: {'text': Value(dtype='string', id=None), 'label': Value(dtype='int64', id=None)}, num_rows: 30),
 'train': Dataset(features: {'text': Value(dtype='string', id=None), 'label': Value(dtype='int64', id=None)}, num_rows: 70)}
Now let's create training and test sets:
train_set = dataset['train']
test_set = dataset['test']
Next, we download and load the pre trained BERT model. In this example, we use the pre trained BERT base uncased model. Because we are doing sequence classification, we can use the BertForSequenceClassification class:
model = BertForSequenceClassification.from_pretrained('bert-base-uncased')
Next, we download and load the word splitter for pre training the Bert base uncased model.
Here we use the BertTokenizerFast class to create a word breaker instead of the BertTokenizer. Because BertTokenizer fast has many advantages over BertTokenizer. We will discuss this in the next section.
tokenizer = BertTokenizerFast.from_pretrained('bert-base-uncased')
Now that we have loaded the dataset hull model, let's start preprocessing the dataset.
Preprocessing dataset
We can use our word splitter to quickly preprocess data sets. For example, consider the sentence: I love Paris.
First, we segment words and add [CLS] and [SEP] Tags:
tokens = [ '[CLS]', 'I', 'love', 'Paris', '[SEP]' ]
Next, we map the tag to a separate input ID. Suppose we get the following ID:
input_ids = [101, 1045, 2293, 3000, 102]
Then, we need to add segment ID (tag type ID).?? What fragment ID? Suppose there are two sentences in our input. In this case, the fragment ID is used to distinguish the two sentences. All tags from the first sentence are mapped to 0; All tags from the second sentence are mapped to 1. Because we have only one sentence here, all tags will be mapped to 0:
token_type_ids = [0, 0, 0, 0, 0]
Now we need to create an attention mask. We know that attention mask is used to distinguish between real markers and filled markers [PAD]. Suppose our tag list length should be 5 5 5. The length of our tag list here should be 5 5 5, so there is no need to add [PAD] mark. Then our attention mask will be as follows:
attention_mask = [1, 1, 1, 1, 1]
We can use the word splitter to do the above manual steps for us. Just pass the sentence to the word breaker:
tokenizer('I love Paris')
The output is as follows. We can see that the input sentence is segmented and mapped to input_ids,token_type_ids and attention_mask:
{
'input_ids': [101, 1045, 2293, 3000, 102],
'token_type_ids': [0, 0, 0, 0, 0],
'attention_mask': [1, 1, 1, 1, 1]
}
Through the word splitter, we can also pass in any number of sentences and fill them dynamically. We need to set padding to True and the maximum sentence length max_length. For example, in the following code, we pass in three sentences and put max_ Set length to 5:
tokenizer(['I love Paris', 'birds fly','snow fall'], padding = True, max_length=5)
The previous code will return the following. As we can see, all sentences are mapped to input_ids,token_type_ids and attention_mask. There are only two marks in the second and third sentences. After adding [CLS] and [SEP], there will be four marks. Because we set padding to True and max_length is set to 5, so an additional [PAD] mark will be added in the second and third sentences, which is why the median value of attention mask in the second and third sentences is 0:
{
'input_ids': [[101, 1045, 2293, 3000, 102], [101, 5055, 4875, 102, 0], [101, 4586, 2991, 102, 0]],
'token_type_ids': [[0, 0, 0, 0, 0], [0, 0, 0, 0, 0], [0, 0, 0, 0, 0]], 'attention_mask': [[1, 1, 1, 1, 1], [1, 1, 1, 1, 0], [1, 1, 1, 1, 0]]
}
Look, we can easily preprocess data sets through word segmentation. Therefore, we can define the following functions to preprocess the dataset:
def preprocess(data):
  return tokenizer(data['text'], padding=True, truncation=True)
Now we use the preprocess function to preprocess the training and test data sets:
train_set = train_set.map(preprocess, batched=True,
                          batch_size=len(train_set))
test_set = test_set.map(preprocess, batched=True, batch_size=len(test_set))
Next, we use set_format function to select the columns we need in the dataset:
train_set.set_format('torch',
                      columns=['input_ids', 'attention_mask', 'label'])
test_set.set_format('torch',
                     columns=['input_ids', 'attention_mask', 'label'])
In this way, our data set is ready. You can start training the model.
Training model
Let's first define the batch size and epoch size:
batch_size = 8
epochs = 2
Define warm-up steps and weight falloff:
warmup_steps = 500
weight_decay = 0.01
Define training parameters:
training_args = TrainingArguments(
    output_dir='./results',
    num_train_epochs=epochs,
    per_device_train_batch_size=batch_size,
    per_device_eval_batch_size=batch_size,
    warmup_steps=warmup_steps,
    weight_decay=weight_decay,
    logging_dir='./logs'
)
Then define the trainer:
trainer = Trainer(
    model=model,
    args=training_args,
    train_dataset=train_set,
    eval_dataset=test_set
)
Start training:
trainer.train()
After the training, we can evaluate the model through the evaluate function:
trainer.evaluate()
Output is:
{'epoch': 2.0,
 'eval_loss': 0.6827354431152344,
 'eval_runtime': 2.131,
 'eval_samples_per_second': 14.078,
 'eval_steps_per_second': 1.877}
In this way, we can fine tune the pre trained BERT model. Now that we have learned how to fine tune the BERT model for a text classification task, in the next section, we will look at how to fine tune the BERT model for a natural language reasoning task.
Natural language reasoning
In natural language reasoning, the goal of our model is to determine whether the hypothesis is true, false or neutral under a given premise. Let's learn how to solve natural language reasoning tasks by fine tuning BERT.
Consider the following dataset.
We have a premise and a labeled hypothesis, indicating whether they are implication, contradiction or uncertainty:

Now, the goal of our model is to determine whether sentence pairs (premise hypothesis pairs) are implication, contradiction or uncertainty. Let's see how to do this through an example. Consider the following premises - assumptions:
Premise: He is playing
Hypothesis: He is sleeping
First, we segment the sentence, and then add [CLS] and [SEP] markers:
tokens = [ [CLS], He, is, playing, [SEP], He, is, sleeping [SEP]]
Now, we feed these tags to the pre trained BERT model and get the embedding of each word.
We take out the embedded representation of the [CLS] tag R [CLS] R_{\text{[CLS]}} R[CLS], and feed it to a classifier (feedforward network + softmax), which will return the probability of whether the sentence is implied, contradictory or uncertain:

Fine tune BERT for Q & A tasks
In this section, we learn how to use a pre trained question answering BERT model to do question answering tasks. First, we import the necessary packages:
from transformers import BertForQuestionAnswering, BertTokenizer
import torch
Now let's download and load the model. We use the Bert large uncased whole word masking finetuned SQUAD model, which is fine tuned on the SQUAD dataset:
model = BertForQuestionAnswering.from_pretrained('bert-large-uncased-whole-word-masking-finetuned-squad')
Then we download and load the word splitter:
tokenizer = BertTokenizer.from_pretrained('bert-large-uncased-whole-word-masking-finetuned-squad')
Preprocessing input
First, we define the input of BERT as questions and text paragraphs:
question = "What is the immune system?"
paragraph = "The immune system is a system of many biological structures and processes within an organism that protects against disease. To function properly, an immune system must detect a wide variety of agents, known as pathogens, from viruses to parasitic worms, and distinguish them from the organism's own healthy tissue."
Add [CLS] and [SEP] marks to questions and paragraphs:
question = '[CLS] ' + question + '[SEP]'
paragraph = paragraph + '[SEP]'
Then, segment the questions and paragraphs:
question_tokens = tokenizer.tokenize(question)
paragraph_tokens = tokenizer.tokenize(paragraph)
Combine questions and paragraph markers and convert them to input_ids:
tokens = question_tokens + paragraph_tokens
input_ids = tokenizer.convert_tokens_to_ids(tokens)
Next, define segment_ids. Here, segment_ids will map all tags from the problem to 0; Map all tags from paragraphs to 1:
segment_ids = [0] * len(question_tokens)
segment_ids += [1] * len(paragraph_tokens)
Then, put the input_ids and segment_ids to Tensor:
input_ids = torch.tensor([input_ids])
segment_ids = torch.tensor([segment_ids])
Get answers
We will input_ids and segment_ids is input into the model, and it will return the scores of all marks as the start and end positions of the answer:
start_scores, end_scores = model(input_ids, token_type_ids = segment_ids, return_dict = False)
Then we find start_index is the tag index corresponding to the starting position score of the highest answer, and end_index, which is the mark index corresponding to the end position score of the highest answer:
start_index = torch.argmax(start_scores)
end_index = torch.argmax(end_scores)
OK, we can output the problem fragment between the start index and the end index:
print(' '.join(tokens[start_index:end_index+1]))
Output:
a system of many biological structures and processes within an organism that protects against disease
Named entity recognition
In named entity recognition (NER), our goal is to classify named entities into preset categories. For example, consider the sentence: Jeremy lives in Paris, where Jeremy should be classified as a person's name and Paris should be classified as a place.
Now, we learn how to fine tune the pre trained BERT model to do NER tasks. First, we segment the sentence, and then add [CLS] and [SEP] markers. Then, we feed these tags to the pre trained BERT model to obtain the embedded representation of each tag. Then, these embedded representations are fed to a classifier (feedforward network + softmax function). Finally, the classifier returns the category corresponding to each named entity.
As shown in the figure below:
