preface
For students with JavaScript foundation, it is actually easy to get started with TypeScript. You can gradually transition from JS application to TS application by simply mastering its basic type system.
// js
const double = (num) => 2 * num

// ts
const double = (num: number): number => 2 * num
However, when the application becomes more and more complex, it is easy to set some variables to any type, and TypeScript becomes AnyScript. In order to let you have a deeper understanding of TypeScript's type system, this article will focus on its advanced types to help you get rid of AnyScript.
generic paradigm
Before we talk about advanced types, we need to briefly understand what generics are.
Generics is an important concept in strongly typed languages. Rational use of generics can improve the reusability of code and make the system more flexible. Here is Wikipedia's description of generics:
Generics allow programmers to use some later specified types when writing code in strongly typed programming languages, and indicate these types as parameters when instantiating.
Generics are represented by a pair of angle brackets (< >), and the characters in angle brackets are called type variables, which are used to represent types.
function copy<T>(arg: T): T {
 if (typeof arg === 'object') {
 return JSON.parse(
  JSON.stringify(arg)
 )
 } else {
 return arg
 }
}
This type T is uncertain when the copy function is not called. Only when copy is called can we know what type T represents.
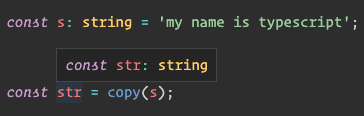
const str = copy<string>('my name is typescript')

In VS Code, we can see that the parameters and return values of the copy function already have types, that is, when we call the copy function, we assign a string to the type variable T. In fact, we can omit angle brackets when calling copy. Through the type derivation of TS, we can determine that T is string.
Advanced type
In addition to the basic types such as string, number and boolean, we should also understand some advanced usage in some type declarations.
& cross type
The simple point of cross type is to merge multiple types into one type. Personally, it is more reasonable to call it "merge type", and its grammatical rules are consistent with the symbol of logical "and".
T & U
If I now have two classes, a button and a hyperlink, and now I need a button with a hyperlink, I can use the cross type to implement it.
interface Button {
 type: string
 text: string
}

interface Link {
 alt: string
 href: string
}

const linkBtn: Button & Link = {
 type: 'danger',
 text: 'Jump to Baidu',
 alt: 'Jump to Baidu',
 href: 'http://www.baidu.com'
}
Union type (|)
The syntax rule of a union type is consistent with the sign of logical or, indicating that its type is any of the connected types.
T | U
For example, in the previous Button component, our type attribute can only specify several fixed strings.
interface Button {
 type: 'default' | 'primary' | 'danger'
 text: string
}

const btn: Button = {
 type: 'primary',
 text: 'Button'
}
Type alias (type)
If the cross type and union type mentioned above need to be used in multiple places, you need to declare an alias for the two types by means of type alias. The syntax of type alias is similar to that of declaring variables. You only need to replace const and let with type keywords.
type Alias = T | U

type InnerType = 'default' | 'primary' | 'danger'

interface Button {
 type: InnerType
 text: string
}

interface Alert {
 type: ButtonType
 text: string
}
Type index (keyof)
keyof is similar to object Keys, which is used to obtain the union type of keys in an interface.
interface Button {
 type: string
 text: string
}

type ButtonKeys = keyof Button
// Equivalent to
type ButtonKeys = "type" | "text"
Take the previous Button class as an example. The type of Button comes from another class ButtonTypes. According to the previous writing, the Button class needs to be modified every time ButtonTypes is updated. If we use keyof, we won't have this trouble.
interface ButtonStyle {
 color: string
 background: string
}
interface ButtonTypes {
 default: ButtonStyle
 primary: ButtonStyle
 danger: ButtonStyle
}
interface Button {
 type: 'default' | 'primary' | 'danger'
 text: string
}

// After using keyof, the type will be modified automatically after the ButtonTypes are modified
interface Button {
 type: keyof ButtonTypes
 text: string
}
Type constraints (extensions)
The extensions keyword here is different from the inheritance function of using extensions after class. The main function used within generics is to restrict generics. Let's take the copy method we wrote earlier as another example:
type BaseType = string | number | boolean
// Here is the parameter of copy
// It can only be string, number and Boolean
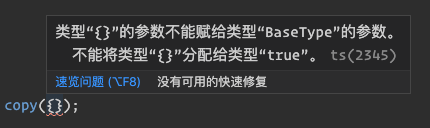
function copy<T extends BaseType>(arg: T): T {
return arg
}

If we pass in an object, there will be a problem.
Extensions is often used together with keyof. For example, we have a method to obtain the value of an object, but the object is uncertain. We can use extensions and keyof for constraints.
function getValue<T, K extends keyof T>(obj: T, key: K) {
 return obj[key]
}

const obj = { a: 1 }
const a = getValue(obj, 'a')
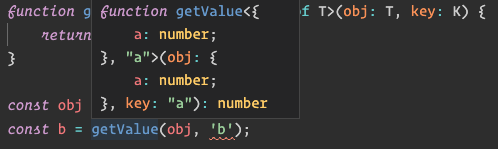
The getValue method here can constrain the value of the key according to the passed in parameter obj, so that the value of the key can only be the key value of the passed in object.
Type mapping (in)
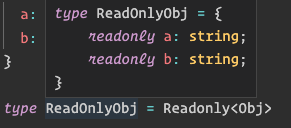
The in keyword is mainly used for type mapping, traversing the keys of existing interfaces or traversing joint types. The following uses the built-in generic interface Readonly as an example.
type Readonly<T> = {
 readonly [P in keyof T]: T[P];
};

interface Obj {
 a: string
 b: string
}

type ReadOnlyObj = Readonly<Obj>
We can construct this logic. First, keyof Obj obtains a joint type 'a' | 'b'.
interface Obj {
 a: string
 b: string
}

type ObjKeys = 'a' | 'b'

type ReadOnlyObj = {
 readonly [P in ObjKeys]: Obj[P];
}
Then P in ObjKeys is equivalent to executing the logic of forEach once, traversing 'a' | 'b'
type ReadOnlyObj = {
 readonly a: Obj['a'];
 readonly b: Obj['b'];
}
Finally, you can get a new interface.
interface ReadOnlyObj {
 readonly a: string;
 readonly b: string;
}
Condition type (U? X: y)
The syntax rules of conditional types are consistent with ternary expressions, which are often used in some cases with uncertain types.
T extends U ? X : Y
The above means that if T is a subset of U, it is type X, otherwise it is type Y. The following uses the built-in generic interface Extract as an example.
type Extract<T, U> = T extends U ? T : never;
Return if the type in T exists in U, otherwise discard. Suppose that our two classes have three common attributes, which can be extracted through Extract.
interface Worker {
 name: string
 age: number
 email: string
 salary: number
}

interface Student {
 name: string
 age: number
 email: string
 grade: number
}


type CommonKeys = Extract<keyof Worker, keyof Student>
// 'name' | 'age' | 'email'
Tool generics
There are many built-in tool generics in TypesScript. Readonly and Extract are introduced earlier. The built-in generics are in the built-in lib es5. d. TS has definitions, so it can be used directly without any dependency. Let's take a look at some commonly used tool generics.
Partial
type Partial<T> = {
 [P in keyof T]?: T[P]
}
Partial is used to set all the attributes of an interface to optional status. First, get all the attributes of type variable t through keyof T, then traverse through in, and finally add a? After the attribute.
When we write a React component through TypeScript, if the component properties have default values, we can change the property values into optional values through Partial.
import React from 'react'

interface ButtonProps {
 type: 'button' | 'submit' | 'reset'
 text: string
 disabled: boolean
 onClick: () => void
}

// Change the props attribute of the button component to optional
const render = (props: Partial<ButtonProps> = {}) => {
 const baseProps = {
 disabled: false,
 type: 'button',
 text: 'Hello World',
 onClick: () => {},
 }
 const options = { ...baseProps, ...props }
 return (
 <button
  type={options.type}
  disabled={options.disabled}
  onClick={options.onClick}>
  {options.text}
 </button>
 )
}
Required
type Required<T> = {
 [P in keyof T]-?: T[P]
}
The function of Required is just opposite to that of Partial, which is to change all optional attributes in the interface to Required. The difference is to change the "Required" attribute in Partial? Replaced with -.
Record
type Record<K extends keyof any, T> = {
 [P in K]: T
}
Record accepts two type variables. The type generated by record has the attribute existing in type K and the value is type T. One of the doubts here is to add a type constraint, extends keyof any, to the code piece of type K. We can first see what keyof any is.

Generally, type K is always constrained in string | number | symbol, which is exactly the type of object index, that is, type K can only be specified as these types.
We often construct an array of an object in business code, but the array is not convenient for indexing, so we sometimes take a field of the object as an index, and then construct a new object. Suppose there is an array of goods list. To find the goods named "daily nuts" in the goods list, we generally search by traversing the array, which is cumbersome. For convenience, we will rewrite this array into an object.
interface Goods {
 id: string
 name: string
 price: string
 image: string
}

const goodsMap: Record<string, Goods> = {}
const goodsList: Goods[] = await fetch('server.com/goods/list')

goodsList.forEach(goods => {
 goodsMap[goods.name] = goods
})
Pick
type Pick<T, K extends keyof T> = {
 [P in K]: T[P]
}
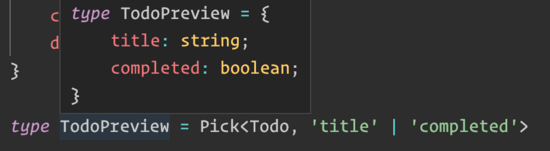
Pick is mainly used to extract some attributes of the interface. Students who have done Todo tools know that the Todo tool will only fill in the description information when editing, and only the title and completion status when previewing, so we can extract the two attributes of the Todo interface through the pick tool to generate a new type TodoPreview.
interface Todo {
 title: string
 completed: boolean
 description: string
}

type TodoPreview = Pick<Todo, "title" | "completed">

const todo: TodoPreview = {
 title: 'Clean room',
 completed: false
}
Exclude
type Exclude<T, U> = T extends U ? never : T
The function of Exclude is just opposite to that of Extract described earlier. If the type in T does not exist in U, it will be returned, otherwise it will be discarded. Now let's take the two previous classes as examples to see the return results of Exclude.
interface Worker {
 name: string
 age: number
 email: string
 salary: number
}

interface Student {
 name: string
 age: number
 email: string
 grade: number
}


type ExcludeKeys = Exclude<keyof Worker, keyof Student>
// 'name' | 'age' | 'email'

The salary that the Worker does not exist in the Student is taken out.
Omit
type Omit<T, K extends keyof any> = Pick<
 T, Exclude<keyof T, K>
>
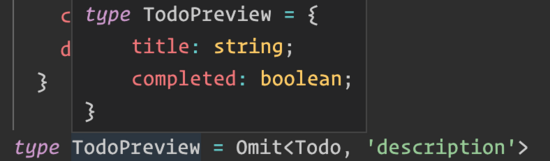
Omit is just the opposite of Pick. First, use exclude < keyof T, k > to get the attributes that exist in type t but K does not exist, and then construct a new type from these attributes. In the previous Todo case, the TodoPreview type only needs to exclude the description attribute of the interface, which is simpler than the previous Pick.
interface Todo {
 title: string
 completed: boolean
 description: string
}

type TodoPreview = Omit<Todo, "description">

const todo: TodoPreview = {
 title: 'Clean room',
 completed: false
}
summary
If you only master some basic types of TypeScript, it may be difficult to use TypeScript easily. Recently, TypeScript released version 4.0 and added more functions. If you want to use it well, you can only keep learning and mastering it. I hope all friends who read this article can gain something and get rid of AnyScript.