1, Foreword
Ah Chang summarized and recorded here how to build a cluster of redis hash slot partition solutions through docker [3 master and 3 slave]
Knowledge involved:
- redis
- docker basic instruction
- linux
- Hash slot partition
2, Theory
Before building, you need to know three partition algorithms built in the redis cluster: hash remainder partition, consistent hash algorithm partition and hash slot partition
1. Hash remainder partition
- Description diagram
-
introduce
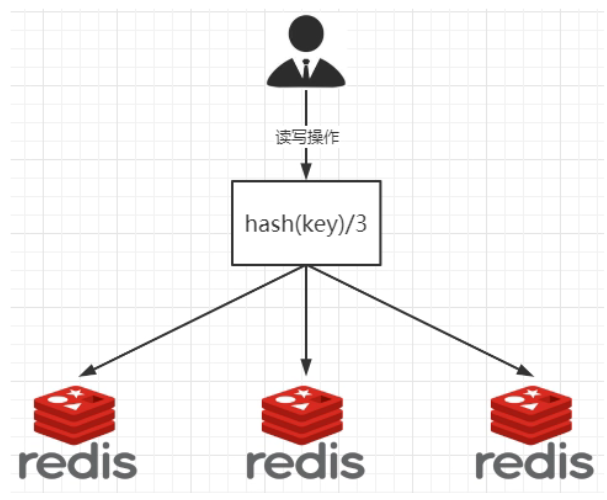
By fetching the remainder of the key, you can directly determine whether it stores or reads a redis.
200 million records are 200 million K and V. if we cannot use a single machine, we must distribute multiple machines. Suppose there are three machines forming a cluster. Each read and write operation is based on the formula: hash (key)% n machines, and the hash value is calculated to determine which node the data is mapped to.
-
advantage
Simple and crude, direct and effective, just estimate the data and plan the nodes.
For example, 3, 8 and 10 sets can ensure data support for a period of time. The Hash algorithm is used to make a fixed part of the requests fall on the same server, so that each server can process a fixed part of the requests (and maintain the information of these requests), which plays the role of load balancing + divide and conquer.
-
shortcoming
It is troublesome to expand or shrink the originally planned nodes.Regardless of expansion or contraction, every data change causes a node change, and the mapping relationship needs to be recalculated. There is no problem when the number of servers is fixed. If elastic expansion or fault shutdown is required, the original modulus formula will change: Hash(key)/3 will become Hash(key) /?. At this time, the result of the remainder operation of the address will change greatly, and the server obtained according to the formula will become uncontrollable. A redis machine goes down. Due to the change in the number of redis, it will cause the hash to fetch all the remaining data and shuffle again.
2. Consistent hash algorithm partition
-
Description diagram
-
introduce
Distributed cache data changes and mapping problems. A machine goes down, the number of denominators changes, and the natural remainder is not OK.
-
objective
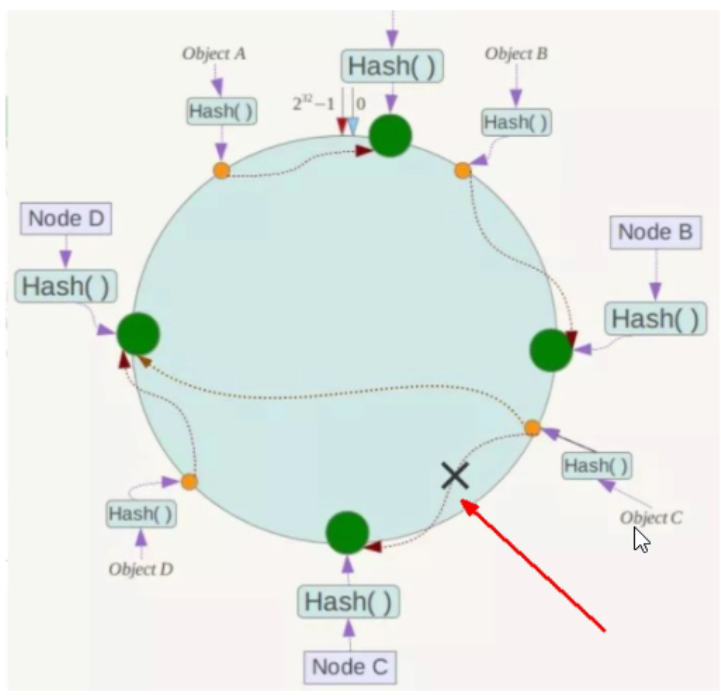
In order to migrate as little data as possible when the number of nodes changes
Arrange all storage nodes on the ending Hash ring. Each key will find the adjacent storage node clockwise after calculating the Hash.
When a node joins or exits, it only affects the subsequent nodes clockwise adjacent to the node on the Hash ring.
-
advantage
- Fault tolerance of consistent hash algorithm
- Scalability of consistent hash algorithm
-
shortcoming
- When the number of nodes is small, the data skew problem of consistent hash algorithm will appear
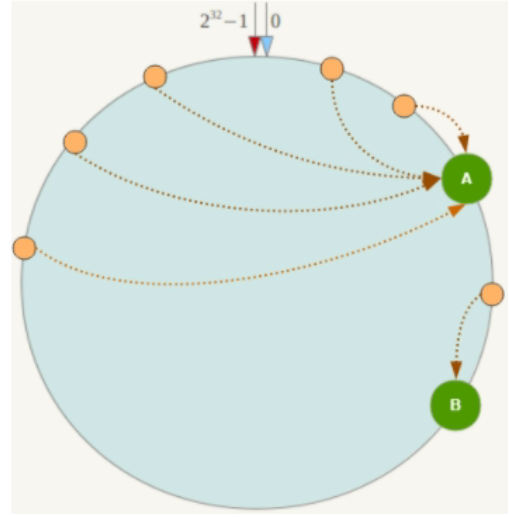
- When the number of nodes is small, the data skew problem of consistent hash algorithm will appear
3. Hash slot partition
- Description diagram
-
introduce
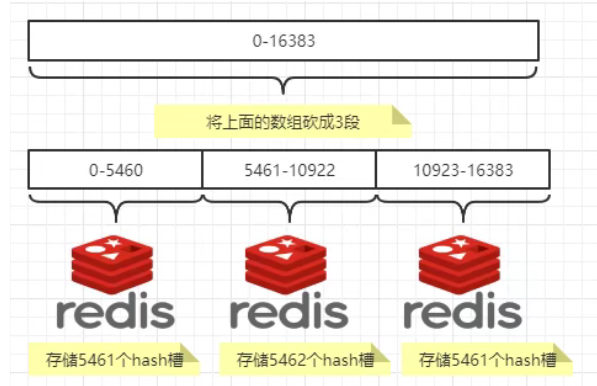
According to the above consistent hash algorithm partition, the hash slot partition is further derived, which is divided into hashing slots. Its essence is an array. The array [0,2 ^ 14 - 1] forms a hash slot space.
A cluster can only have 16384 slots, numbered 0-16383 (0-2 ^ 14-1). These slots will be allocated to all primary nodes in the cluster, which is not required by the allocation policy. You can specify which numbered slots are assigned to which master node. The cluster records the correspondence between nodes and slots. After solving the relationship between the node and the slot, you need to hash the key, and then take the remainder of 16384. If the remainder is several, the key will fall into the corresponding slot. slot = CRC16(key) % 16384. The data is moved by slots. Because the number of slots is fixed, it is easier to handle, so the problem of data movement is solved.
-
objective
To solve the problem of uniform distribution, another layer is added between data and nodes. This layer is called Hashi slot, which is used to manage the relationship between data and nodes. Now it is equivalent to a slot on the node and data in the slot. [it's a bit like reverse proxy one position of the array into one operation]
The slot solves the granularity problem, which is equivalent to increasing the granularity, which is convenient for data movement.
Hash solves the mapping problem. The hash value of key is used to calculate the slot, which is convenient for data distribution.
Then the theory is over. Now I'll use docker to build the corresponding Redis cluster.
3, 3 master and 3 slave Redis clusters
1. Ensure that the Docker service is started
systemctl start docker
2. Create 6 redis instances of docker container
- docker command
#Node-1
docker run -d --name redis-node-1 --net host --privileged=true -v /data/redis/share/redis-node-1:/data redis:6.0.8 --cluster-enabled yes --appendonly yes --port 6381

#Node-2
docker run -d --name redis-node-2 --net host --privileged=true -v /data/redis/share/redis-node-2:/data redis:6.0.8 --cluster-enabled yes --appendonly yes --port 6382

#Node-3
docker run -d --name redis-node-3 --net host --privileged=true -v /data/redis/share/redis-node-3:/data redis:6.0.8 --cluster-enabled yes --appendonly yes --port 6383

#Node-4
docker run -d --name redis-node-4 --net host --privileged=true -v /data/redis/share/redis-node-4:/data redis:6.0.8 --cluster-enabled yes --appendonly yes --port 6384

#Node-5
docker run -d --name redis-node-5 --net host --privileged=true -v /data/redis/share/redis-node-5:/data redis:6.0.8 --cluster-enabled yes --appendonly yes --port 6385

#Node-6
docker run -d --name redis-node-6 --net host --privileged=true -v /data/redis/share/redis-node-6:/data redis:6.0.8 --cluster-enabled yes --appendonly yes --port 6386
- Instruction description
- docker run: creates and runs a docker container instance
- --name redis-node-6: container name
- --net host: use the IP and port of the host. The default is
- --privileged=true: obtain the root user permission of the host machine
- -v /data/redis/share/redis-node-6:/data: container volume, host address: docker internal address
- redis:6.0.8: redis image and version number
- --Cluster enabled yes: enables the redis cluster
- --appendonly yes: enable aof persistence
- --port 6386: redis port number

3. Building cluster relationships
- Enter the container - take node1 as an example
docker exec -it redis-node-1 /bin/bash
- Building relationships
Note that you can only execute the command after entering the docker container, and pay attention to your real IP address. Achang's IP here is 192.168.88.128
redis-cli --cluster create 192.168.88.128:6381 192.168.88.128:6382 192.168.88.128:6383 192.168.88.128:6384 192.168.88.128:6385 192.168.88.128:6386 --cluster-replicas 1

#--Cluster replicas 1 means creating a slave node for each master

4. View cluster status
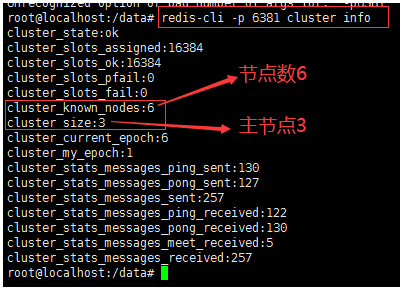
- View the cluster status - take node-16381 as the entry point
redis-cli -p 6381 cluster info
- View cluster nodes
redis-cli -p 6381 cluster nodes

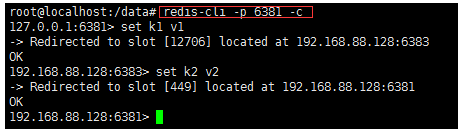
5. Read / write storage of cluster
- The cluster node can be switched between read and write storage through the - c parameter
When reading and writing a key, it will calculate the slot of the node where the key is located. Each operation corresponds to each node before reading and writing
redis-cli -p 6381 -c
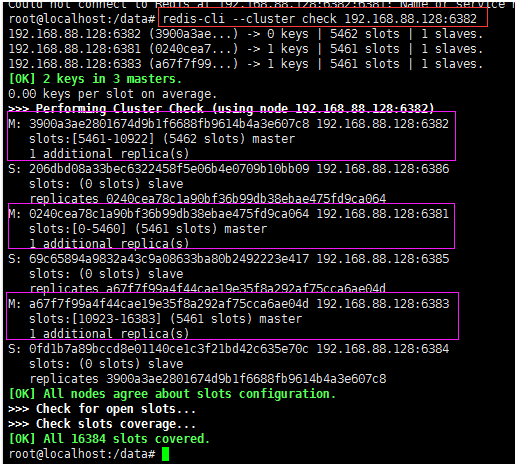
6. View cluster information
redis-cli --cluster check 192.168.88.128:6382
7. About failover migration
If our node1 node goes down, its slave node will be used as a new Master. If the node1 node returns to the king later, it can only be the slave node of the new Master again.
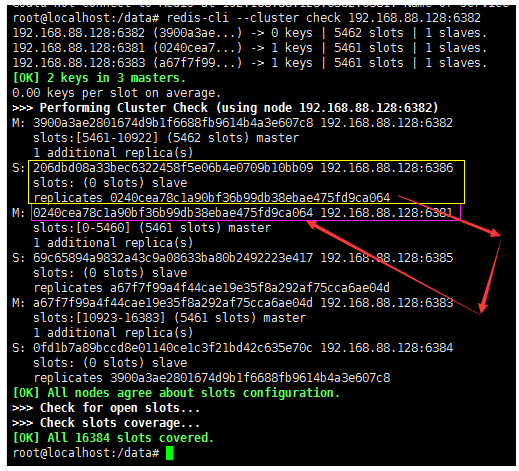
In our case, the slave node of node-1 node is node-6, so when node-1 goes down, node 6 will become a new master.
4, Master-slave capacity expansion
1. Create a node to expand
Here, we add a pair of master-slave nodes 6387 and 6388, and 6387 is the master and 6388 is the slave
#Node-7, master node
docker run -d --name redis-node-7 --net host --privileged=true -v /data/redis/share/redis-node-7:/data redis:6.0.8 --cluster-enabled yes --appendonly yes --port 6387

#Node-8, slave node
docker run -d --name redis-node-8 --net host --privileged=true -v /data/redis/share/redis-node-8:/data redis:6.0.8 --cluster-enabled yes --appendonly yes --port 6388

docker ps
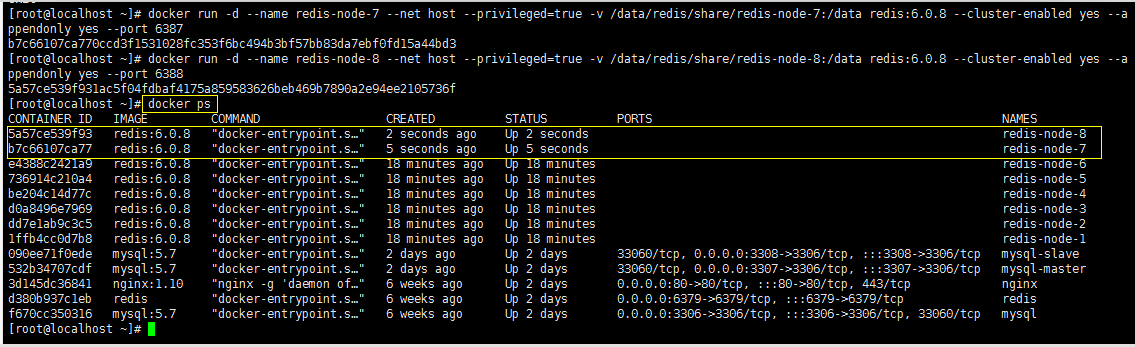
2. Enter the 6387 container instance
docker exec -it redis-node-7 /bin/bash
3. Add the new 6387 node (empty slot number) to the original cluster as a master node
-
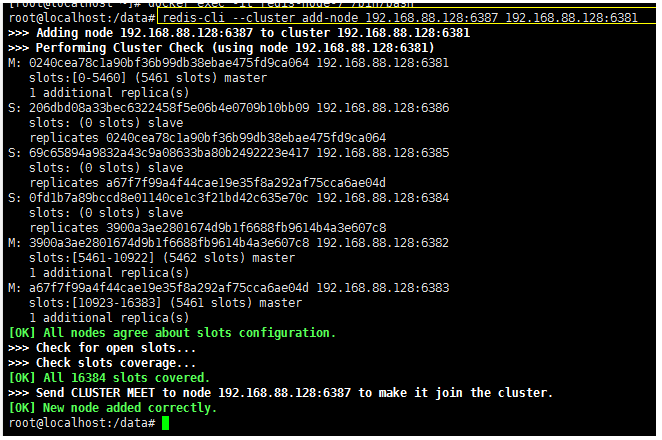
Add nodes to the cluster
Add the new 6387 to the cluster as a master node
redis-cli --cluster add-node 192.168.88.128:6387 192.168.88.128:6381
#6387 is the node to be added as a master
#6381 is the leader in the original cluster node, which is equivalent to 6387 paying homage to the wharf of 6381 to find organizations to join the cluster
-
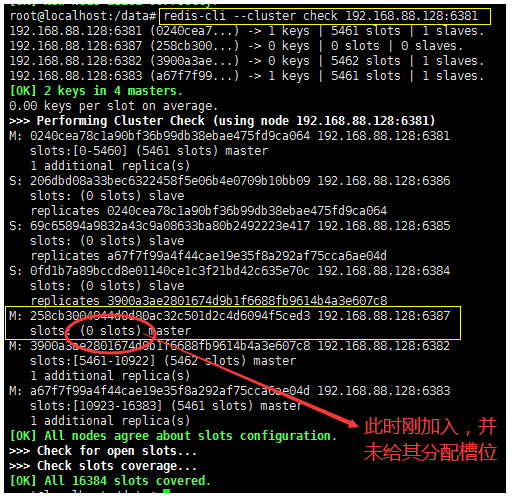
Check the cluster for the first time
redis-cli --cluster check 192.168.88.128:6381
-
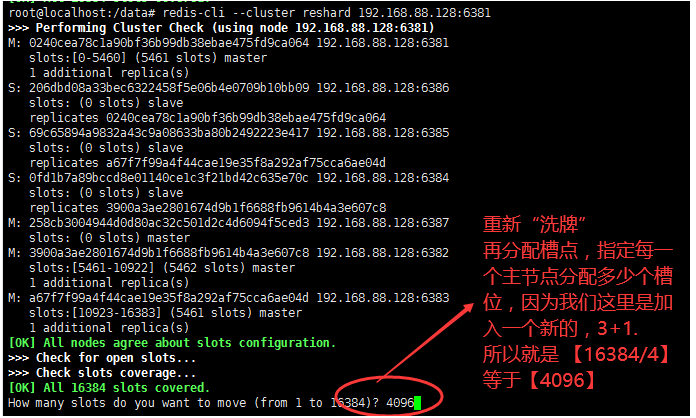
Reassign slot number - reshard
redis-cli --cluster reshard 192.168.88.128:6381
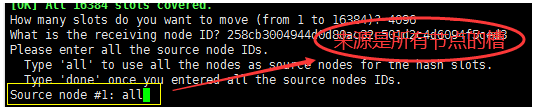
- Specify the number of node slots to be reallocated 4096 ------ 16384 / 4
- Assign to "who" is the new machine node7
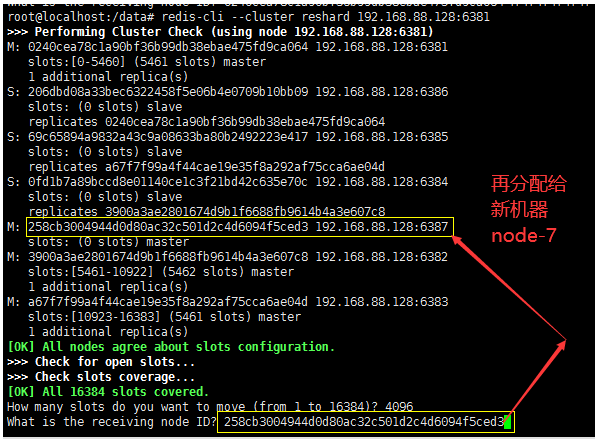
- Specify the source, which is all nodes - all
- Continue allocation - yes

- View the results after slot allocation
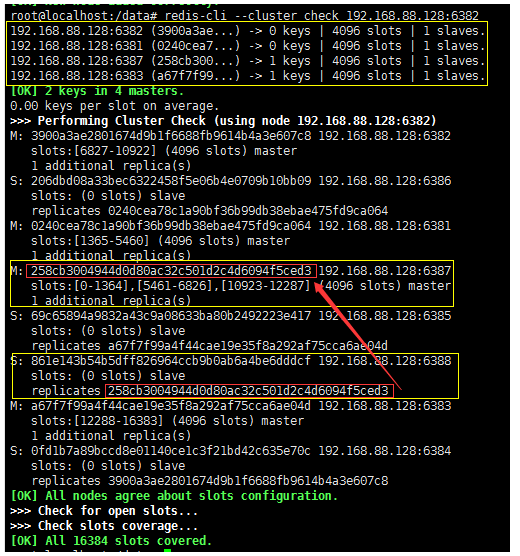
redis-cli --cluster check 192.168.88.128:6381
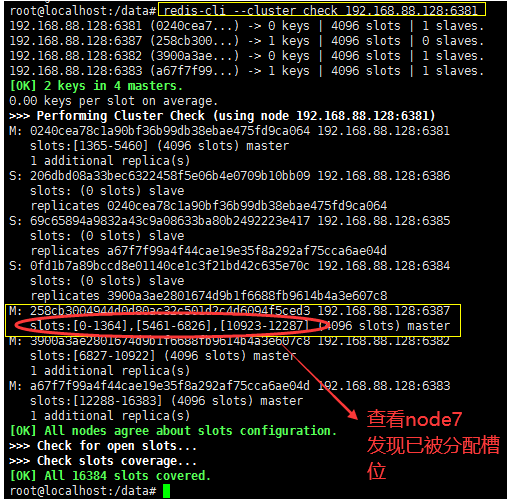
The above node-7 nodes are reassigned to [0-1364], [5461-6826], [10923-12287]
The conclusion is: it cuts out the nodes of the previous three slots and assigns them to the new node node-7
4. Join node-8 from node to Redis cluster
redis-cli --cluster add-node 192.168.88.128:6388 192.168.88.128:6387 --cluster-slave --cluster-master-id 258cb3004944d0d80ac32c501d2c4d6094f5ced3
#258cb3004944d0d80ac32c501d2c4d6094f5ced3 ------ This is the number of 6387 according to your actual situation
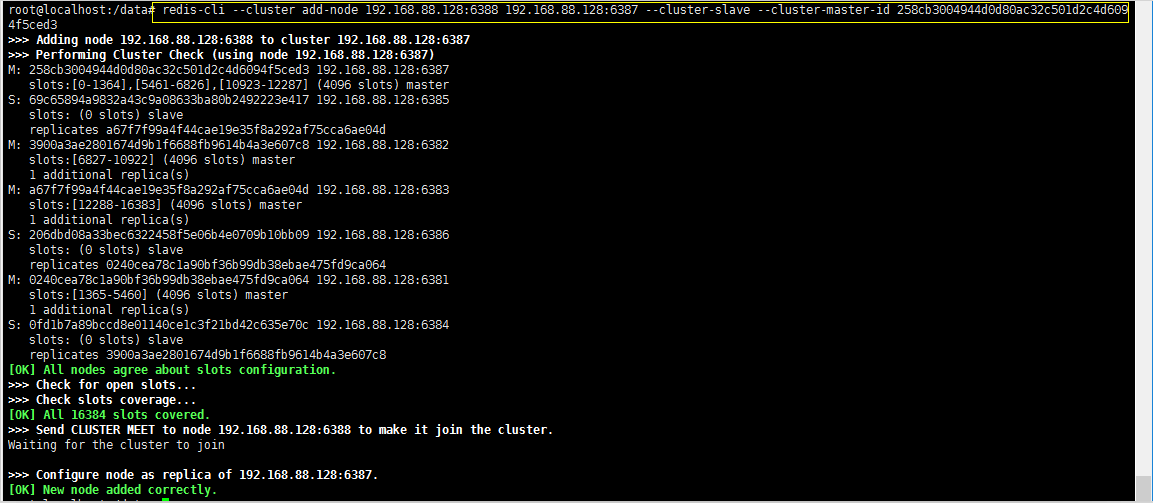
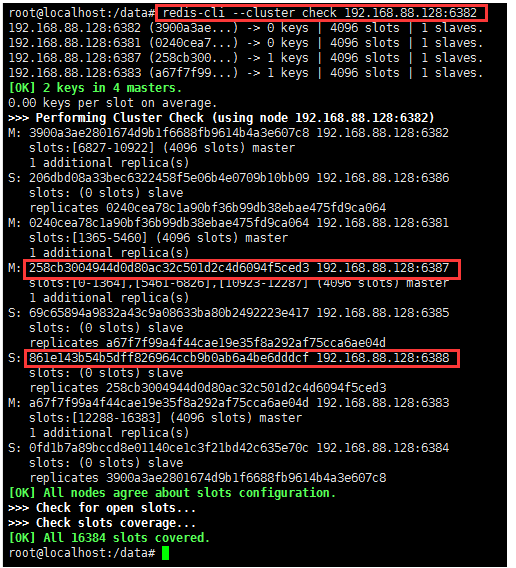
5. Check the cluster again
redis-cli --cluster check 192.168.88.128:6382
At this time, there are four nodes, and node-7 is the master node and node-8 is the slave node of node-7.
Then here the master-slave expansion is over!
5, Master-slave volume reduction
1. Explain
Offline 6387 and 6388. If you want to delete a pair of master-slave nodes, you need to offline 6388 nodes first and then 6387 nodes
2. Check cluster condition 1 to obtain the node ID of 6388
redis-cli --cluster check 192.168.88.128:6382
3. Remove from node 6388 in the cluster
redis-cli --cluster del-node 192.168.88.128:6388 861e143b54b5dff826964ccb9b0ab6a4be6dddcf

4. Check cluster node status
redis-cli --cluster check 192.168.88.128:6382

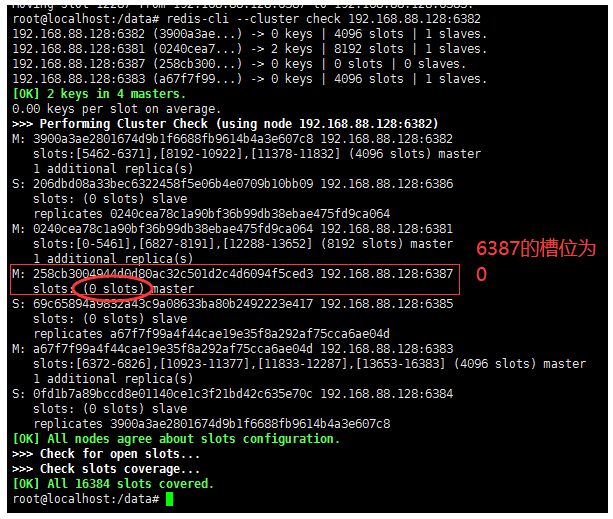
5. Empty and reassign the slot number of 6387. In this example, all the cleared slot numbers are given to 6381
redis-cli --cluster reshard 192.168.88.128:6381

#Process, send all 4096 slots in 6387 to 6381
4096 #Specifies the slot to assign
6381 of id #Specifies who receives the slot
6387 of id #From whom did source get it to the recipient above
yes
6. Check the cluster
redis-cli --cluster check 192.168.88.128:6382
7. Delete 6387
redis-cli --cluster del-node 192.168.88.128:6387 258cb3004944d0d80ac32c501d2c4d6094f5ced3
#258cb3004944d0d80ac32c501d2c4d6094f5ced3 is the node id of 6387

8. Check the cluster
redis-cli --cluster check 192.168.88.128:6382
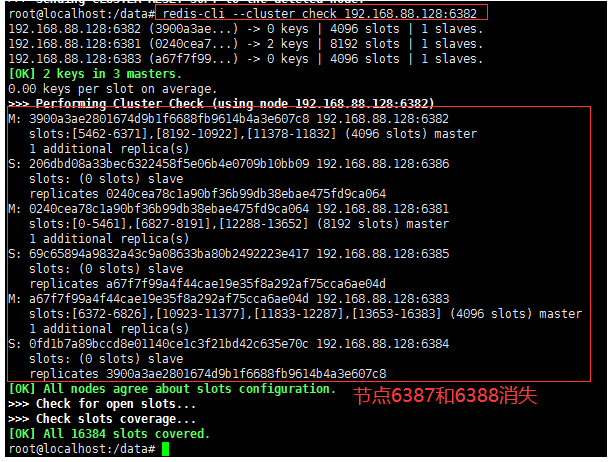
At this time, a pair of master-slave 6387 and 6388 nodes are deleted
This is the content of this record sharing. Thank you for seeing it here!!!