Learn JavaScript, one of the technologies - Ajax, which is too common.
brief introduction
AJAX is fully called Asynchronous JavaScript and XML. From its name, we can see that it is asynchronous JS and XML (but now more json is used to transmit data, while XML becomes less used)
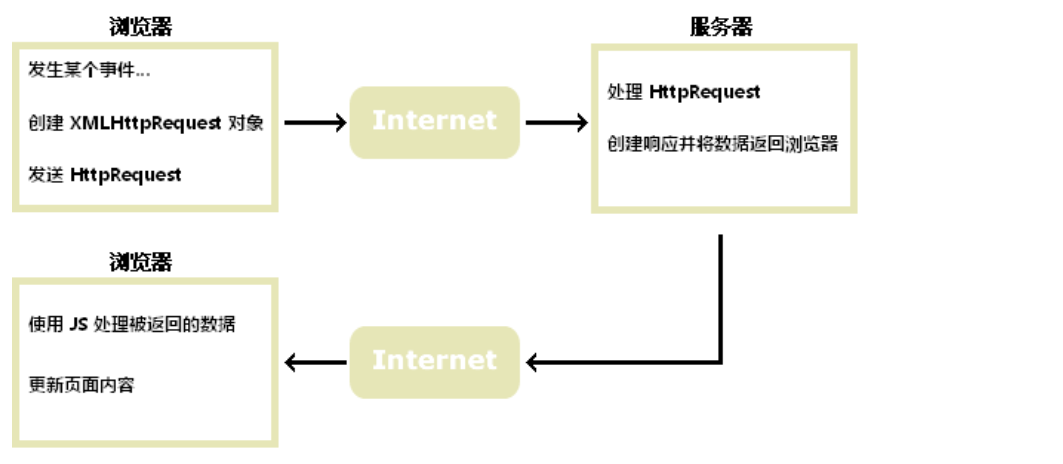
Through AJAX, you can send asynchronous requests to the server in the browser. The biggest advantage is that you can get data without refresh.
The development of AJAX comes from Google search suggestions (AJAX creates a highly dynamic web interface: when you type content in Google's search box, JavaScript will send characters to the server, and the server will return to the suggestion list). It became popular with the release of Google search suggestions in 2005.
To tell the truth, this technology is very common now. It can be said that it was a major update of web technology. After all, traditional web pages (without AJAX) must reload the entire page if they need to update content. AJAX makes web pages update asynchronously by exchanging a small amount of data with the server in the background. This means that some parts of the web page can be updated without reloading the entire page.
Of course, the use of AJAX also has advantages and disadvantages.
- advantage
- 1: You can communicate with the server without refreshing the page.
- 2: Updating part of the page content according to the user's events will make the data request server obtain faster.
- shortcoming
- It is useless to browse history, so there can be no rollback.
- There is a cross domain problem (homology), which will make the data unsafe. Of course, it can also be solved through other settings
- The returned data cannot be obtained in the page source code.
Prepare in advance
Because AJAX is a request server technology, we must first build a server to have interactive operation. For this, we simply use the fast, open and minimalist Web development framework Express based on the Node.js platform to build a server. (speaking of Nodejs, I feel like I have to take time to talk about Nodejs. Now I can simply install my steps to build the server. Even different nodes can build the server according to my steps).
-
Installing node is not a demonstration. After all, there are many online resources, and its installation is very simple.
It mainly uses its npm software manager. In fact, it is a bit like YUM in Redhat to obtain the server framework of Express.
-
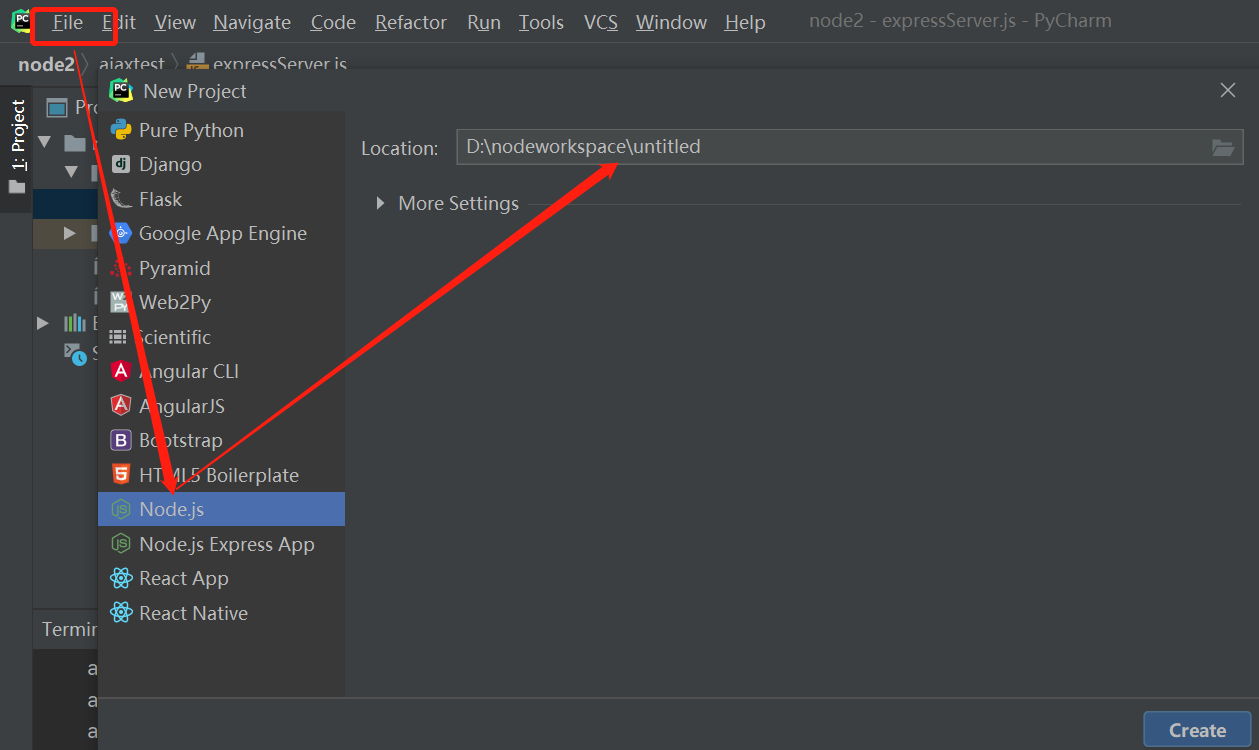
Create server
- I use the paid version of pycharm. There are many ways to crack it online. Baidu can do it by itself. This is not demonstrated anymore.
- Create a nodejs project.
Because it is created with pycharm, there is no need to initialize the node project. If it is created with other software or without software, you need to create a file and then initialize:
// The first step is to create a file
// Step 2: open cmd cd to the created file, and then enter npm init --yes to initialize
-
Because npm is built into node, you can use npm to follow the express server framework
Open pycharm

~~~cmd
// The default path is the path of the project
 npm install express --save
~~~
-
Create a js file in the project and configure the express server as follows
//1. Introduce express server const express=require("express"); //2 create application object const app=express(); //3 create a routing rule //request is a parameter that represents the encapsulation of the requested message //Response is also a parameter name, which represents the encapsulation of response message //Only monitor get requests. If you monitor post, you need to write app.post. Of course, the two can be written together app.get('/',(request,response)=>{ // It is convenient to obtain the response number, regardless of security, and the directly returned data can cross domains response.setHeader("Access-Control-Allow-Origin","*"); response.send("HELLO WORD"); }) app.post('/',(request,response)=>{ // It is convenient to obtain the response number, regardless of security, and the directly returned data can cross domains response.setHeader("Access-Control-Allow-Origin","*"); response.send("HELLO WORD--post"); }) //4: Listening port start service app.listen(8000,() =>{ console.log("Service monitoring started") }) -
Start the server and check whether the configuration is successful.
node Configured js Name (if it is not a path of course, you need to bring a path or cd To path)
For example, name .js
  node test

It can be seen that the monitoring port is useless, and then enter in the browser: http://127.0.0.1:8000/

Code demonstration
We need to understand the http protocol, because the most commonly used access protocol in browsers, this protocol will not be expanded. Otherwise, this length is a little too long. If you need to write an article later.
The two most commonly used methods in this protocol are GET and POST
AJAX steps
1: Create object
// 1: Create an object and create an instance through XMLHttpRequest
    const  xhr=new XMLHttpRequest();
Supplement:
This involves the browser version. Some older versions do not support XMLHttpRequest because older versions of Internet Explorer (IE5 and IE6) use ActiveX objects.
For better compatibility (of course, there are few lower versions of browsers in current browser versions). It will be written as follows:
var xhr;
if (window.XMLHttpRequest)
{
    //  IE7+, Firefox, Chrome, Opera, Safari browser execution code
    xhr=new XMLHttpRequest();
}
else
{
    // IE6, IE5 browser execution code
    xhr=new ActiveXObject("Microsoft.XMLHTTP");
}
2: Initialize and set the requested method and url
This is mainly the open(method,url,async) method of XMLHttpRequest.
| parameter | Parameter interpretation |
|---|---|
| method | Type of request; GET or POST, etc |
| url | That is, the requested address |
| async | true (asynchronous) or false (synchronous), Ajax is generally asynchronous |
//GET method request
xhr.open('GET','http://127.0.0.1:8000/',true);

//xhr.open('POST','http://127.0.0.1:8000/',true);
3: Send request
This uses the send(string) method.
| method | explain |
|---|---|
| send() | Generally, this parameter free method is used when the get method or post method has no parameters |
| send(string) | This kind of send method with parameters will only be used when post is with parameters |
//  Send a GET request or a POST request without parameters
xhr.send();
// POST with parameter request
xhr.send('parameter'); //Parameters are generally in the format of a = 1 & B = 5. Of course, other formats can also be used. It depends on your processing method of parameters.
4: Server response
After all, the request still needs a response, otherwise it doesn't make much sense
To get a response from the server, use the responseText or responseXML property of the XMLHttpRequest object.
| attribute | describe |
|---|---|
| responseText | Get the response data in string form. |
| responseXML | Get the response data in XML. |
| response | The format of the obtained data changes according to the format set by responseType |
Of course, many other properties can be obtained from the response. Only some properties that will be used are listed.
There will be a final event: onreadystatechange event. When the request is sent to the server, some response based tasks need to be performed. The onreadystatechange event is triggered whenever the readyState changes.
The readyState property holds the status information of XMLHttpRequest.
Here are three important properties of the XMLHttpRequest object.
| attribute | describe |
|---|---|
| onreadystatechange | Store the function (or function name) and call it whenever the readyState property changes. |
| readyState | The status of XMLHttpRequest is stored. Changes from 0 to 4. 0: request uninitialized 1: server connection established 2: request received 3: request processing 4: request completed and response ready |
| status | 200: "OK" 404: no page found (of course, there are many, such as 302503, which are not listed. These are some response codes of html protocol) |
Note: readyState only refers to the requested status code. The success of obtaining resources depends on the status of status
xhr.onreadystatechange=function(){
   if(xhr.readyState==4 && xhr.status==200 ){
      var str=xhr.responseText;
   }
}
Code demonstration
Because this article pays attention to the use of ajax, and for the use of Nodejs and Express, you can use the above preparation.
Because the two requests get and post overlap too much, a complete post request is demonstrated separately.
Purpose of demonstration:
  Display the data returned by the server in the interface(Data is a json format).
Through the previous preparation, you can know that the server you configured is useless. Now you can directly see the complete code on the:
The following code is directly available. Remember to start the Express server when running
First: Backstage
//1. Introduce express server
const express=require("express");
//2 create application object
const app=express();

//3 create a routing rule
   //request is a parameter that represents the encapsulation of the requested message
   //Response is also a parameter name, which represents the encapsulation of response message
app.get('/',(request,response)=>{

    // It is convenient to obtain the response number, regardless of security, and the directly returned data can cross domains
  response.setHeader("Access-Control-Allow-Origin","*");
    // const strjson='[{"name": "Zhang San", "age":12},{"name": "Li Si", "age: 14}, {" name ":" Wang Wu "," age: 12}]';
  const json_data=JSON.parse(strjson)
  response.send(json_data);
})

app.post('/',(request,response)=>{

    // It is convenient to obtain the response number, regardless of security, and the directly returned data can cross domains
  response.setHeader("Access-Control-Allow-Origin","*");

  const strjson='[{"name":"Zhang San","age":12},{"name":"Li Si","age":14},{"name":"Wang Wu","age":12}]' ;
  const json_data=JSON.parse(strjson)
  response.send(json_data);
})


//4: Listening port start service
app.listen(8000,() =>{
    console.log("Service monitoring started")
})
Second front page
<!DOCTYPE html>
<html lang="en">
<head>
    <meta charset="UTF-8">
    <title>Title</title>


</head>
<body>
<h1>post Request back data</h1>
<button id="ocl">click</button>
<div id="data">

</div>
<script>
    var divdata=document.getElementById("data");
    var buttonclick=document.getElementById("ocl");
    var tabledata=document.createElement("table");
    buttonclick.onclick=function () {
        const xhr=new XMLHttpRequest();
        //When sending a post request, the native Ajax written by itself needs to add this request header, which is equal to telling the server that the parameters a = 1 & B = 1 sent by itself correspond to the key value pair parameters. Why not write key value pairs until it is more convenient.
        //

        // You know how many json you transfer, so you can use this method directly. You don't need xhr.responseText to get the string, and then turn to json

        xhr.responseType="json";
        xhr.open("POST","http://127.0.0.1:8000/",true);
         xhr.setRequestHeader("Content-Type","application/x-www-form-urlencoded");
        xhr.send("a=1&b=1");
        xhr.onreadystatechange=function () {
         if(xhr.readyState==4 && xhr.status==200){
            const jsondata=xhr.response;
            for(let i=1;i<jsondata.length;i++){
               const obj=jsondata[i];
               const name=obj["name"]
               const age=obj["age"];
               // console.log(obj);
               // console.log(name);
               // console.log(age);
               //This place is the document operation HTML element of js. If you need to talk about html and document later
               const tre= document.createElement("tr");
               const td1= document.createElement("td");
               td1.append(name);
               const td2= document.createElement('td');
               td2.append(age);
               tre.append(td1);
               tre.append(td2);
               tabledata.append(tre)

            }
           divdata.append(tabledata)
         }
        }

    }

</script>
</body>
</html>
Page results:
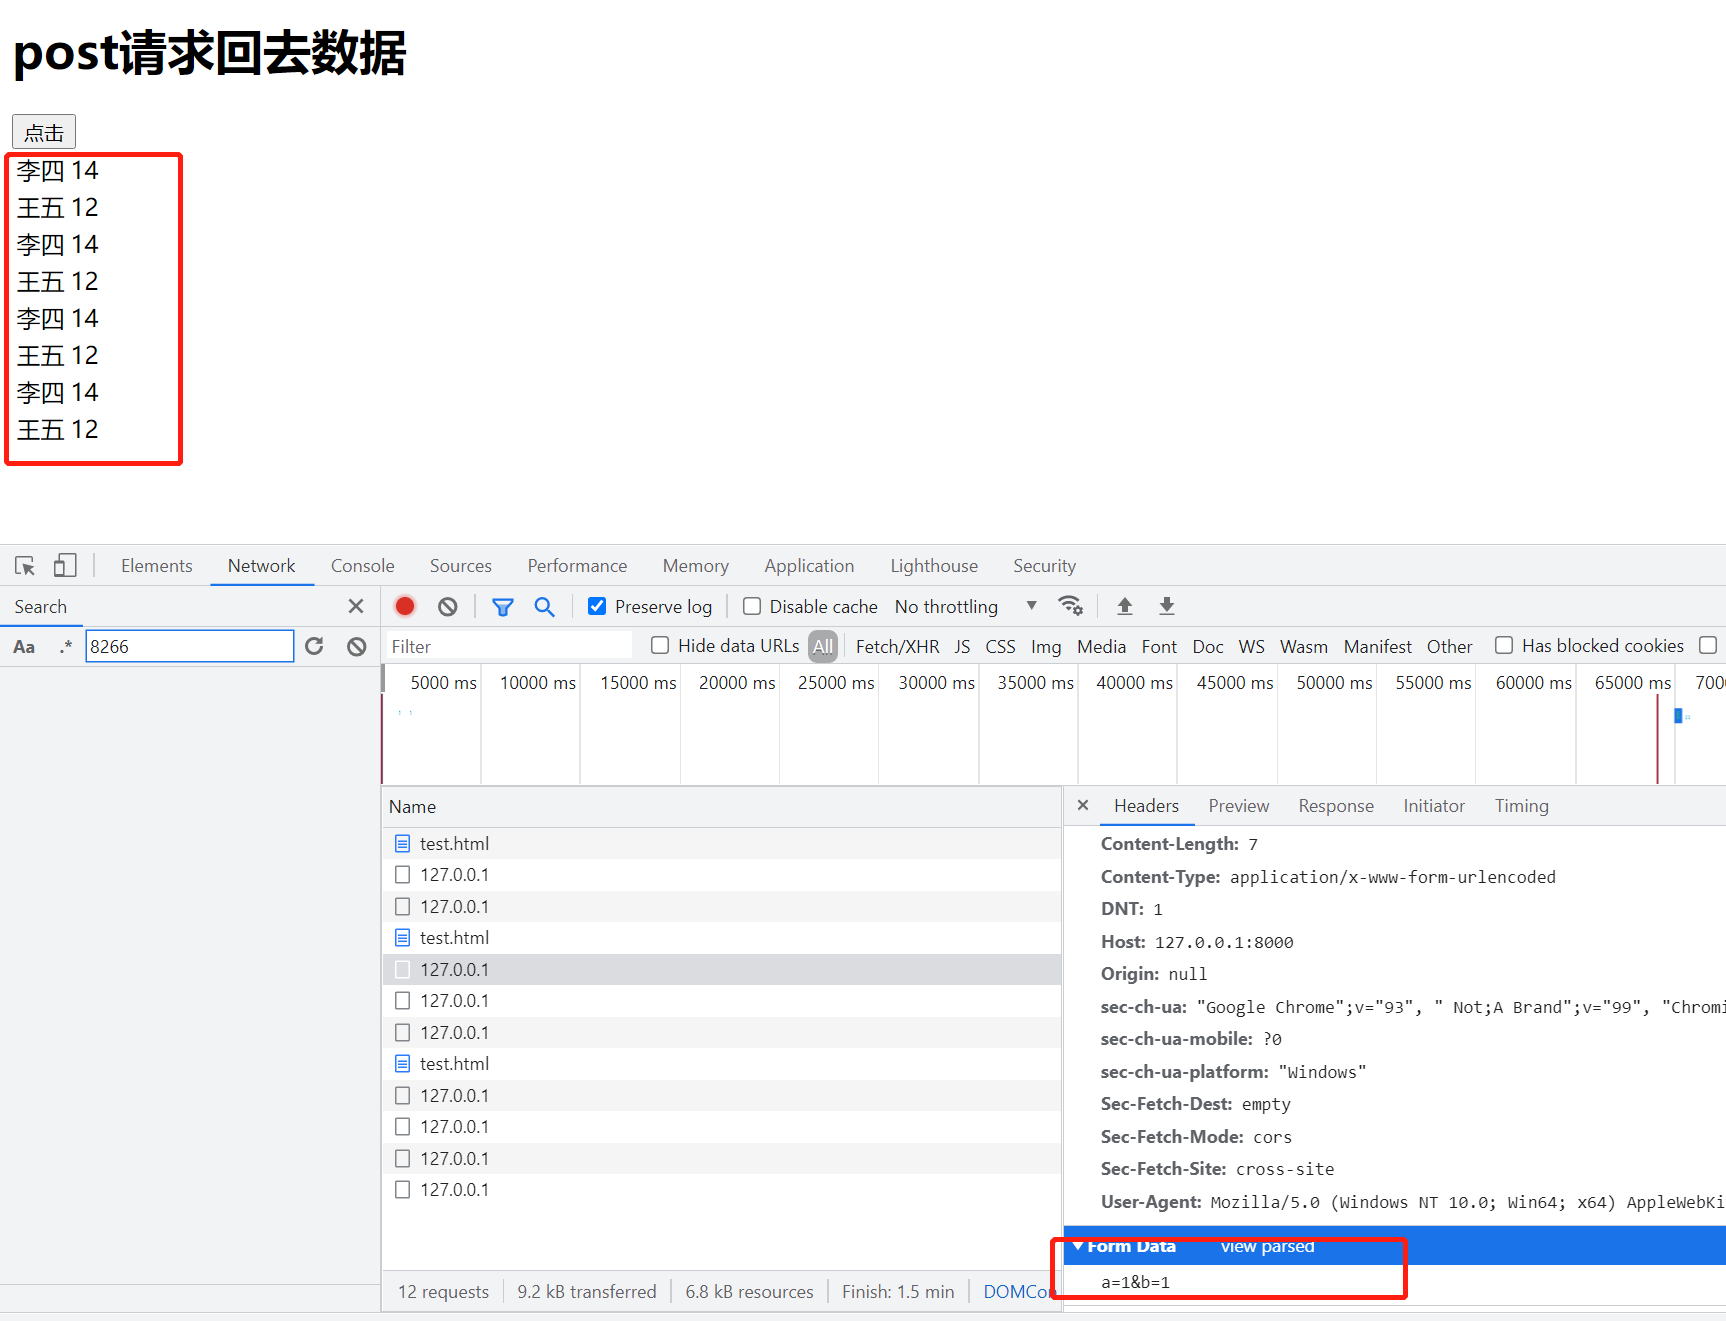
Clicking this button will always add data without refreshing the page. You can also see the parameters below. Originally, I wanted to write another one to use AJAX according to jquery, and then encapsulate one by myself through the original AJAX. Let's write this later. Let's first understand AJAX and how to use it.