catalogue
3, Deploy node and web to server
1. Server side preparation tool
1, Create node service (PC)
We create services on the local computer in a minimalist way without any additional functions
1. Create a new server folder
2. Enter the server folder, use npm init or yarn init, and then enter all the way
3. Yarn address cors (express encapsulates the framework of http and other plug-ins, and cors solves cross domain)
4. Create a new server in the server JS, the code is as follows:
var express = require('express')
var cors = require('cors');
var app = express();
app.use(cors())
app.post('/api/test', (req, res) => {
res.json({
code: 0,
message: 'success',
content: 'Interface call succeeded',
})
})
app.listen(4000, () => {
console.log('Listening on port 4000');
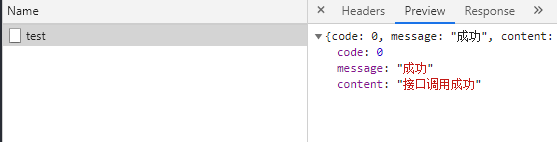
})5. Start, enter node server (or node server.js), and see the dos window as follows, indicating that the interface service has been started

6. Using the interface calling tool postman, you can directly call and try to get the return value, which proves that the interface is OK
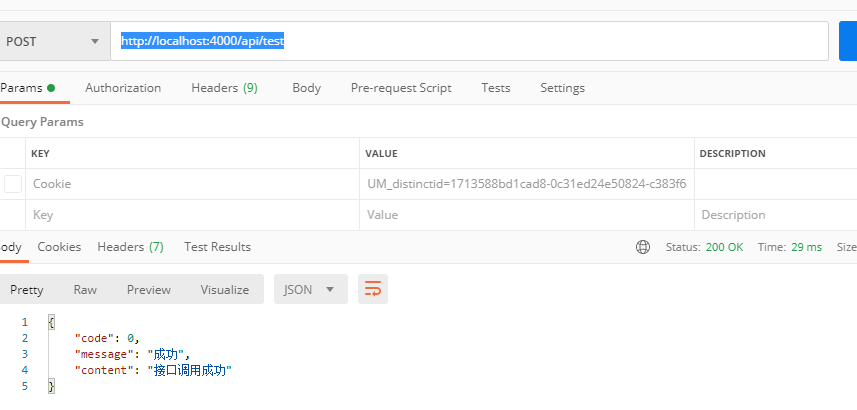
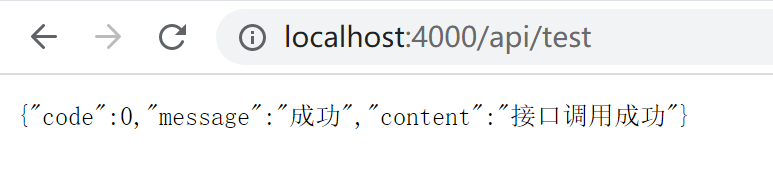
Or the interface can be accessed directly in the browser by using the get method
var express = require('express')
var cors = require('cors');

var app = express();
app.use(cors())

app.get('/api/test', (req, res) => {
    res.json({
        code: 0,
        message: 'success',
        content: 'Interface call succeeded',
    })
})

app.listen(4000, () => {
    console.log('Listening on port 4000');
})
2, Create web project (PC)
To create a web, use the most commonly used scaffold, create react app
1.npx create-react-app web
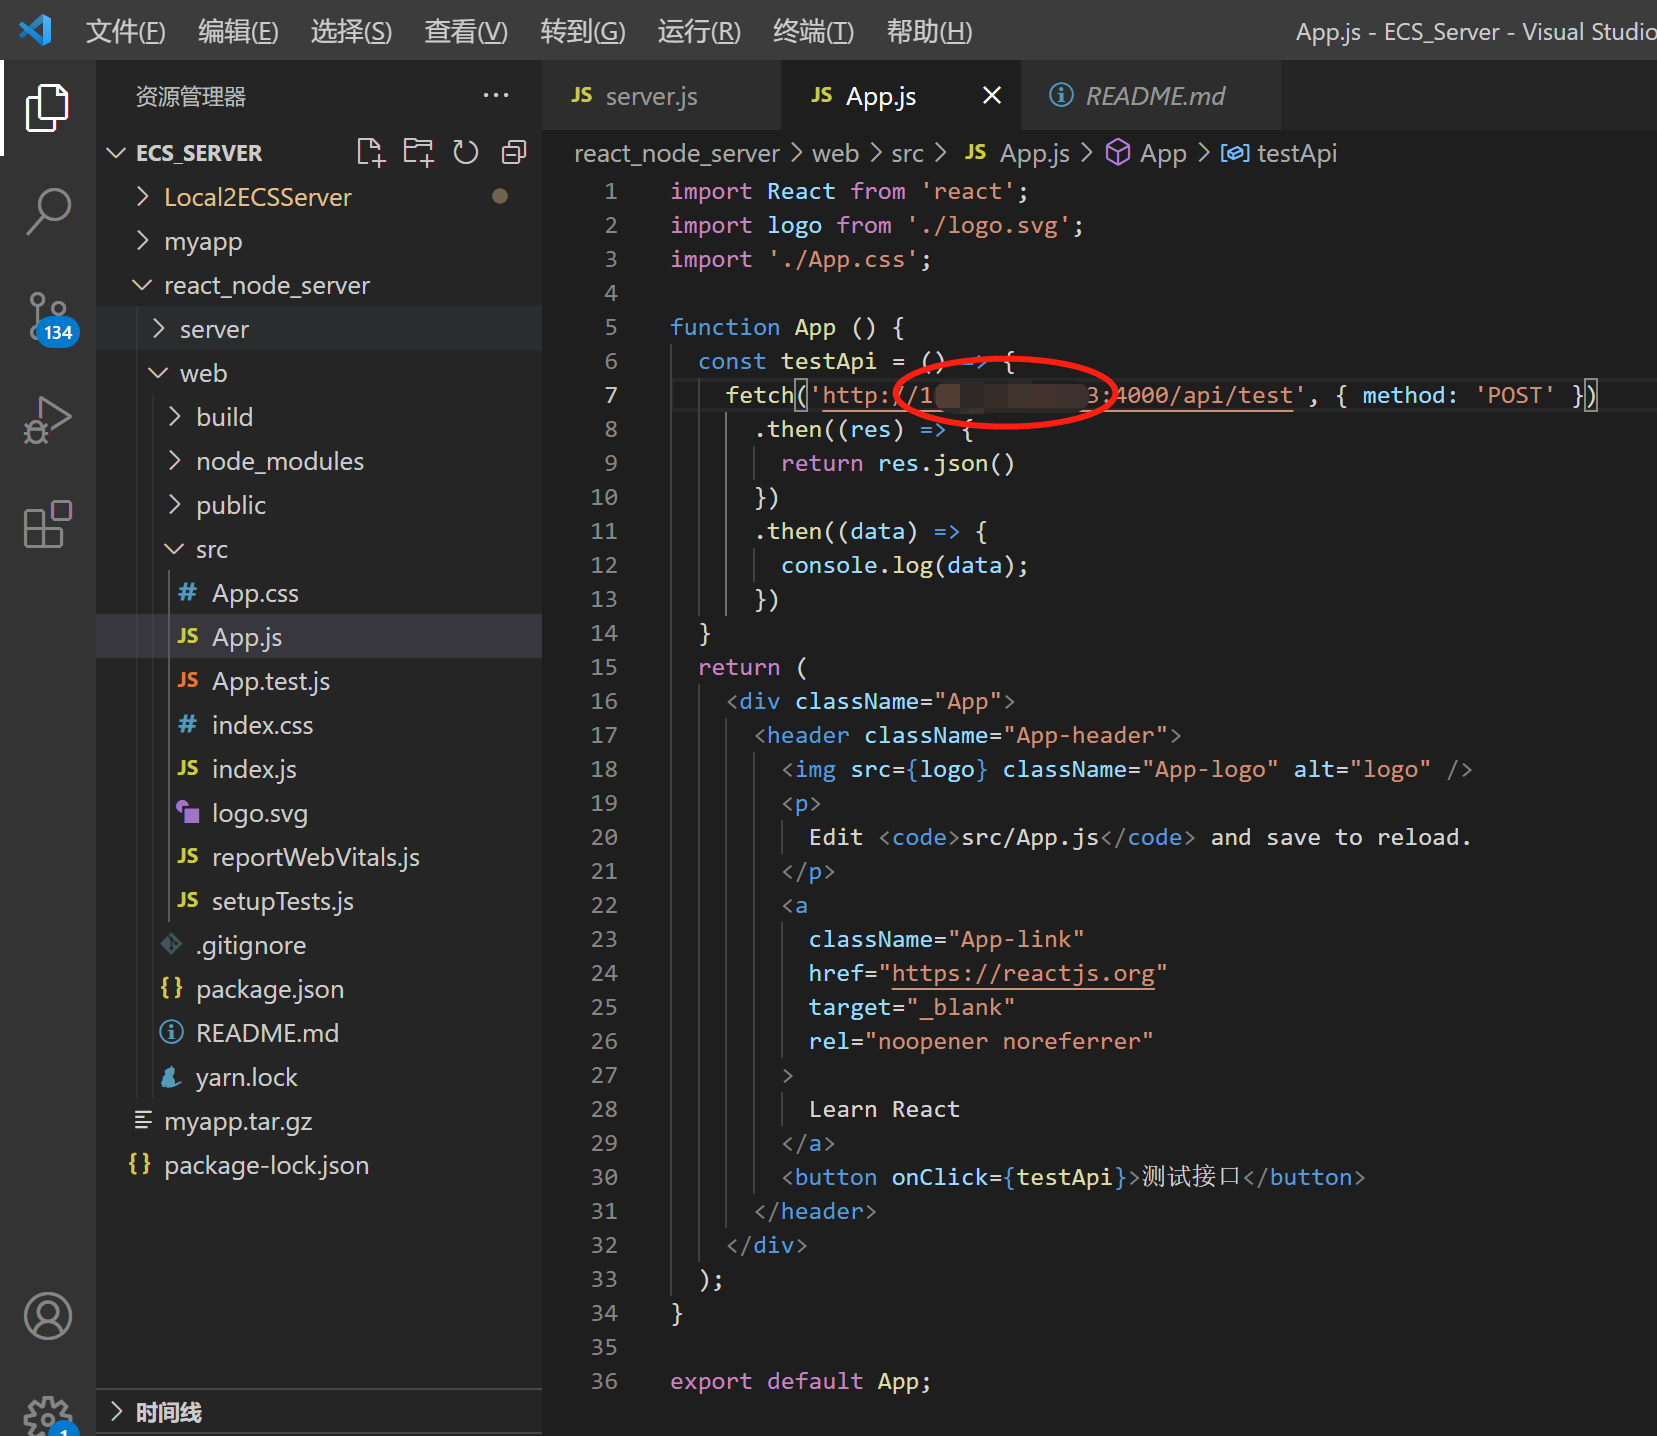
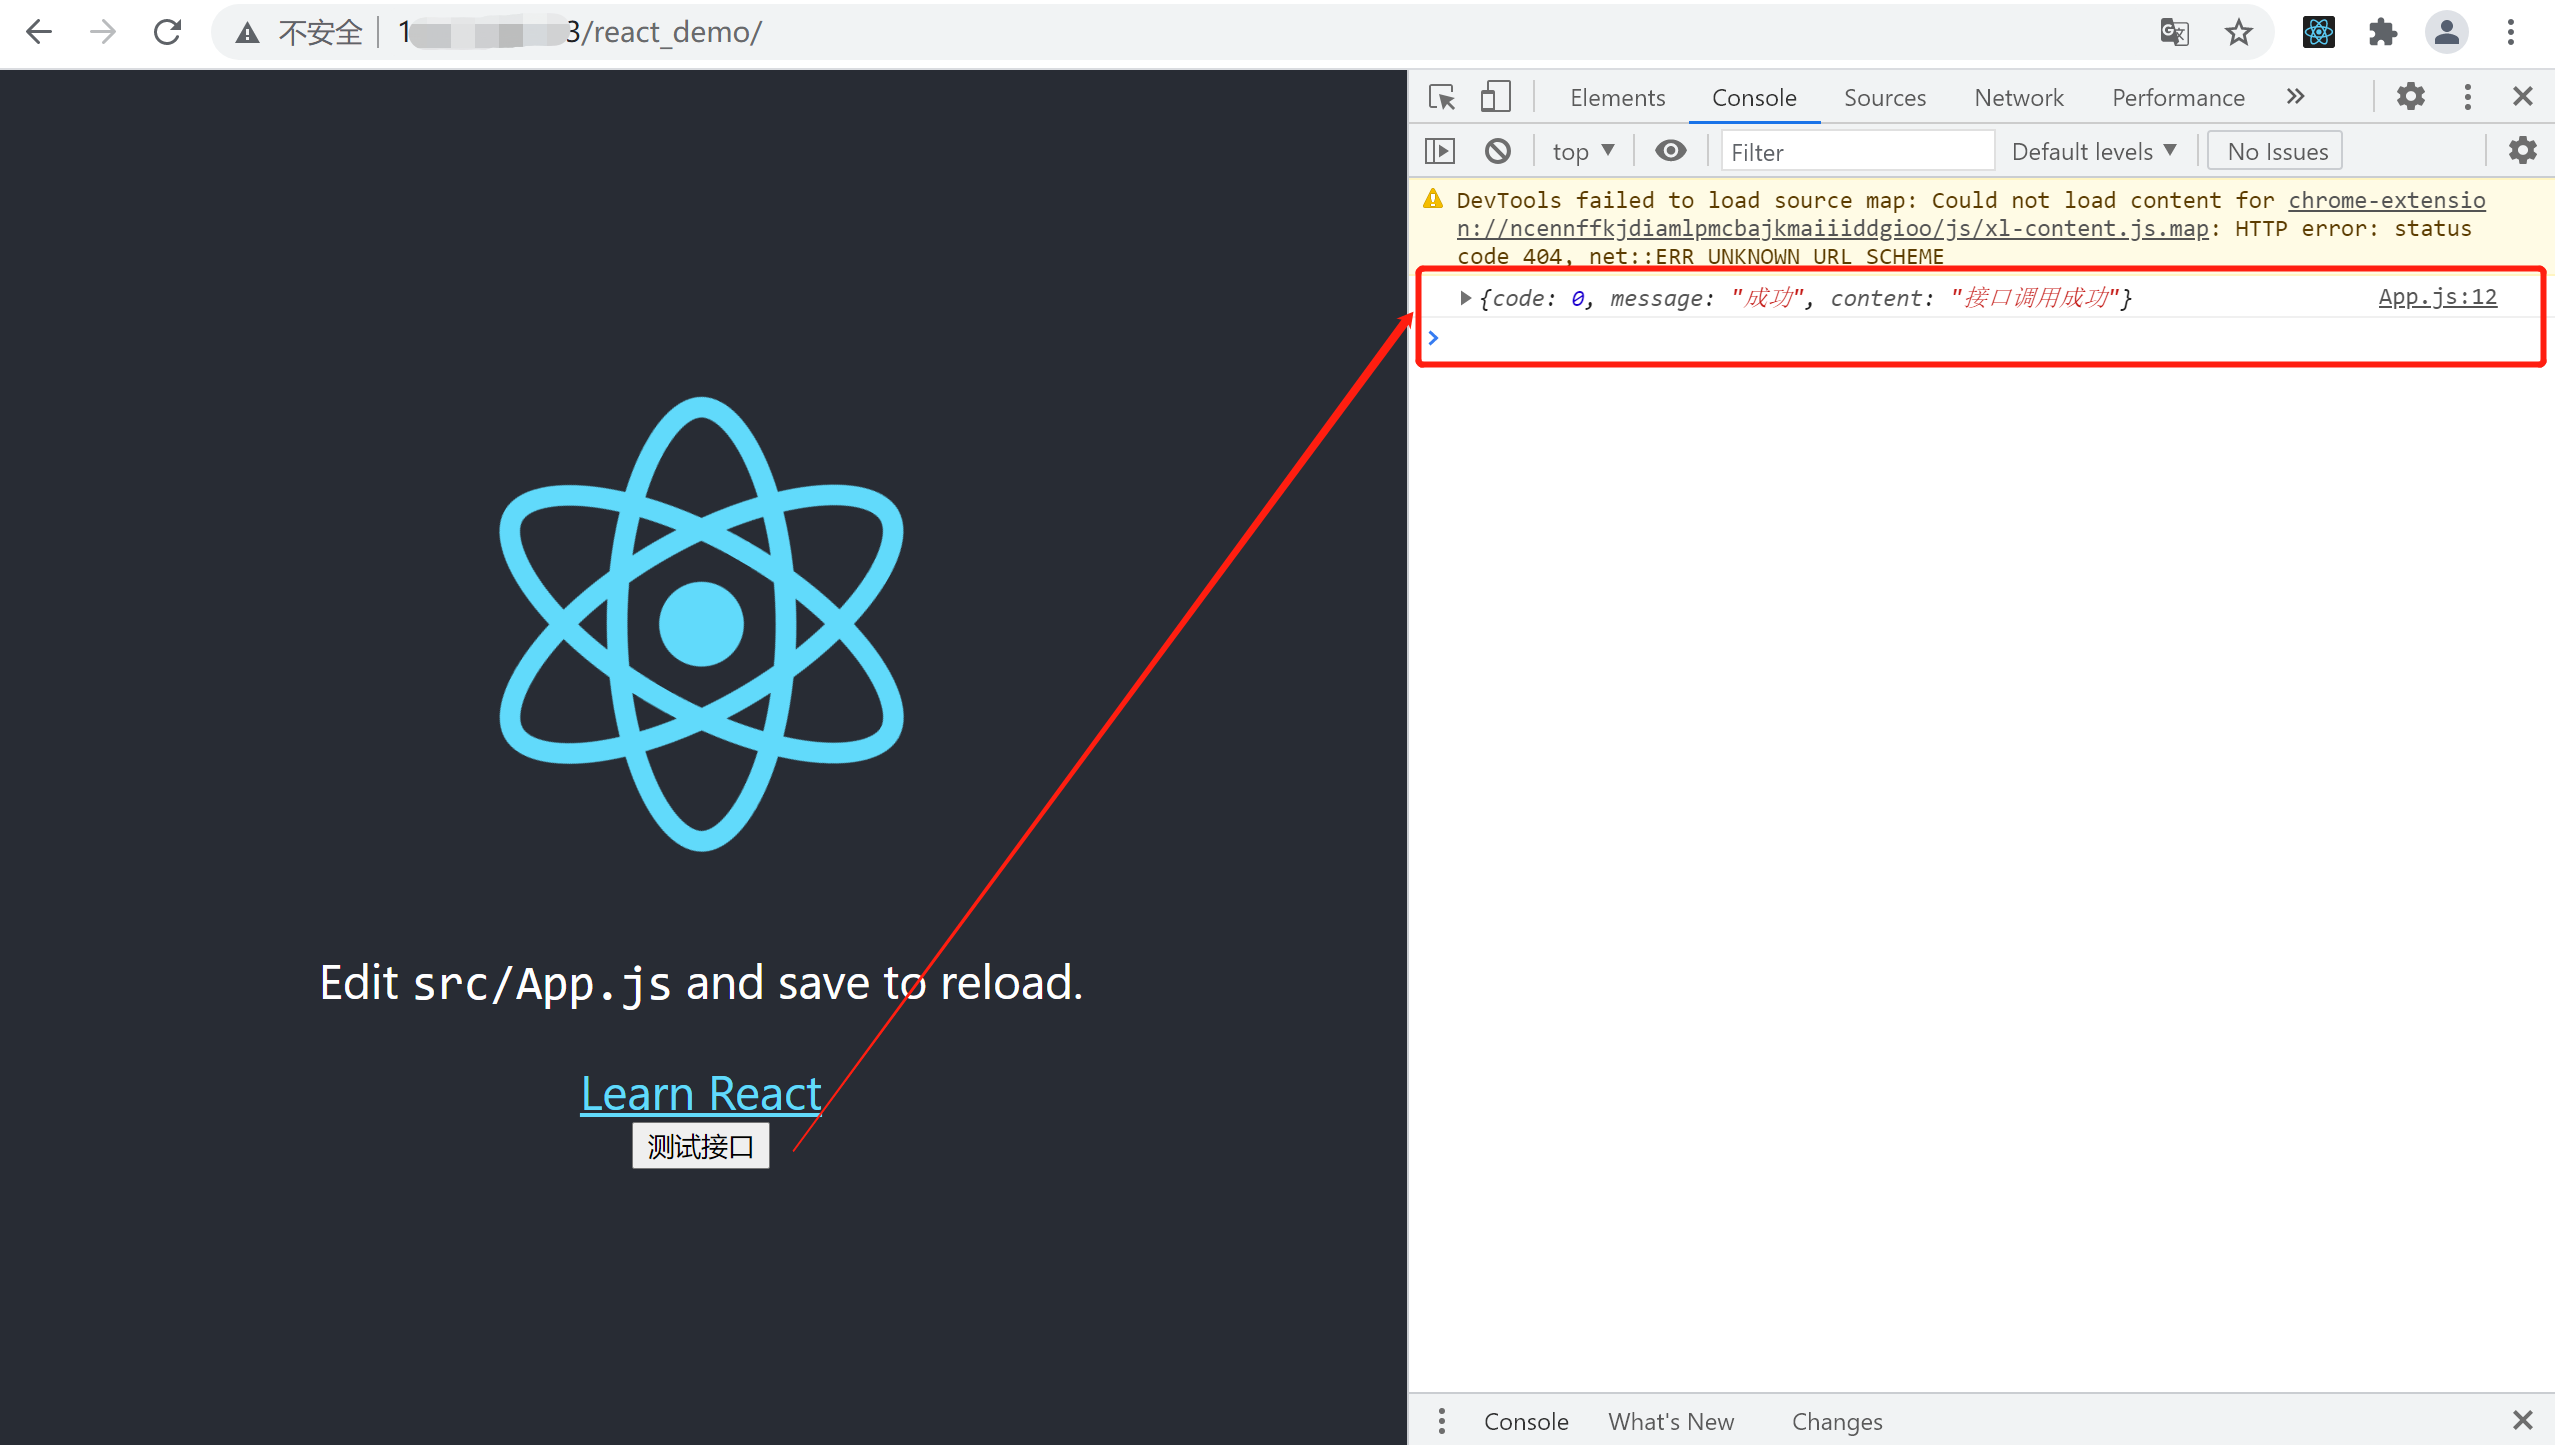
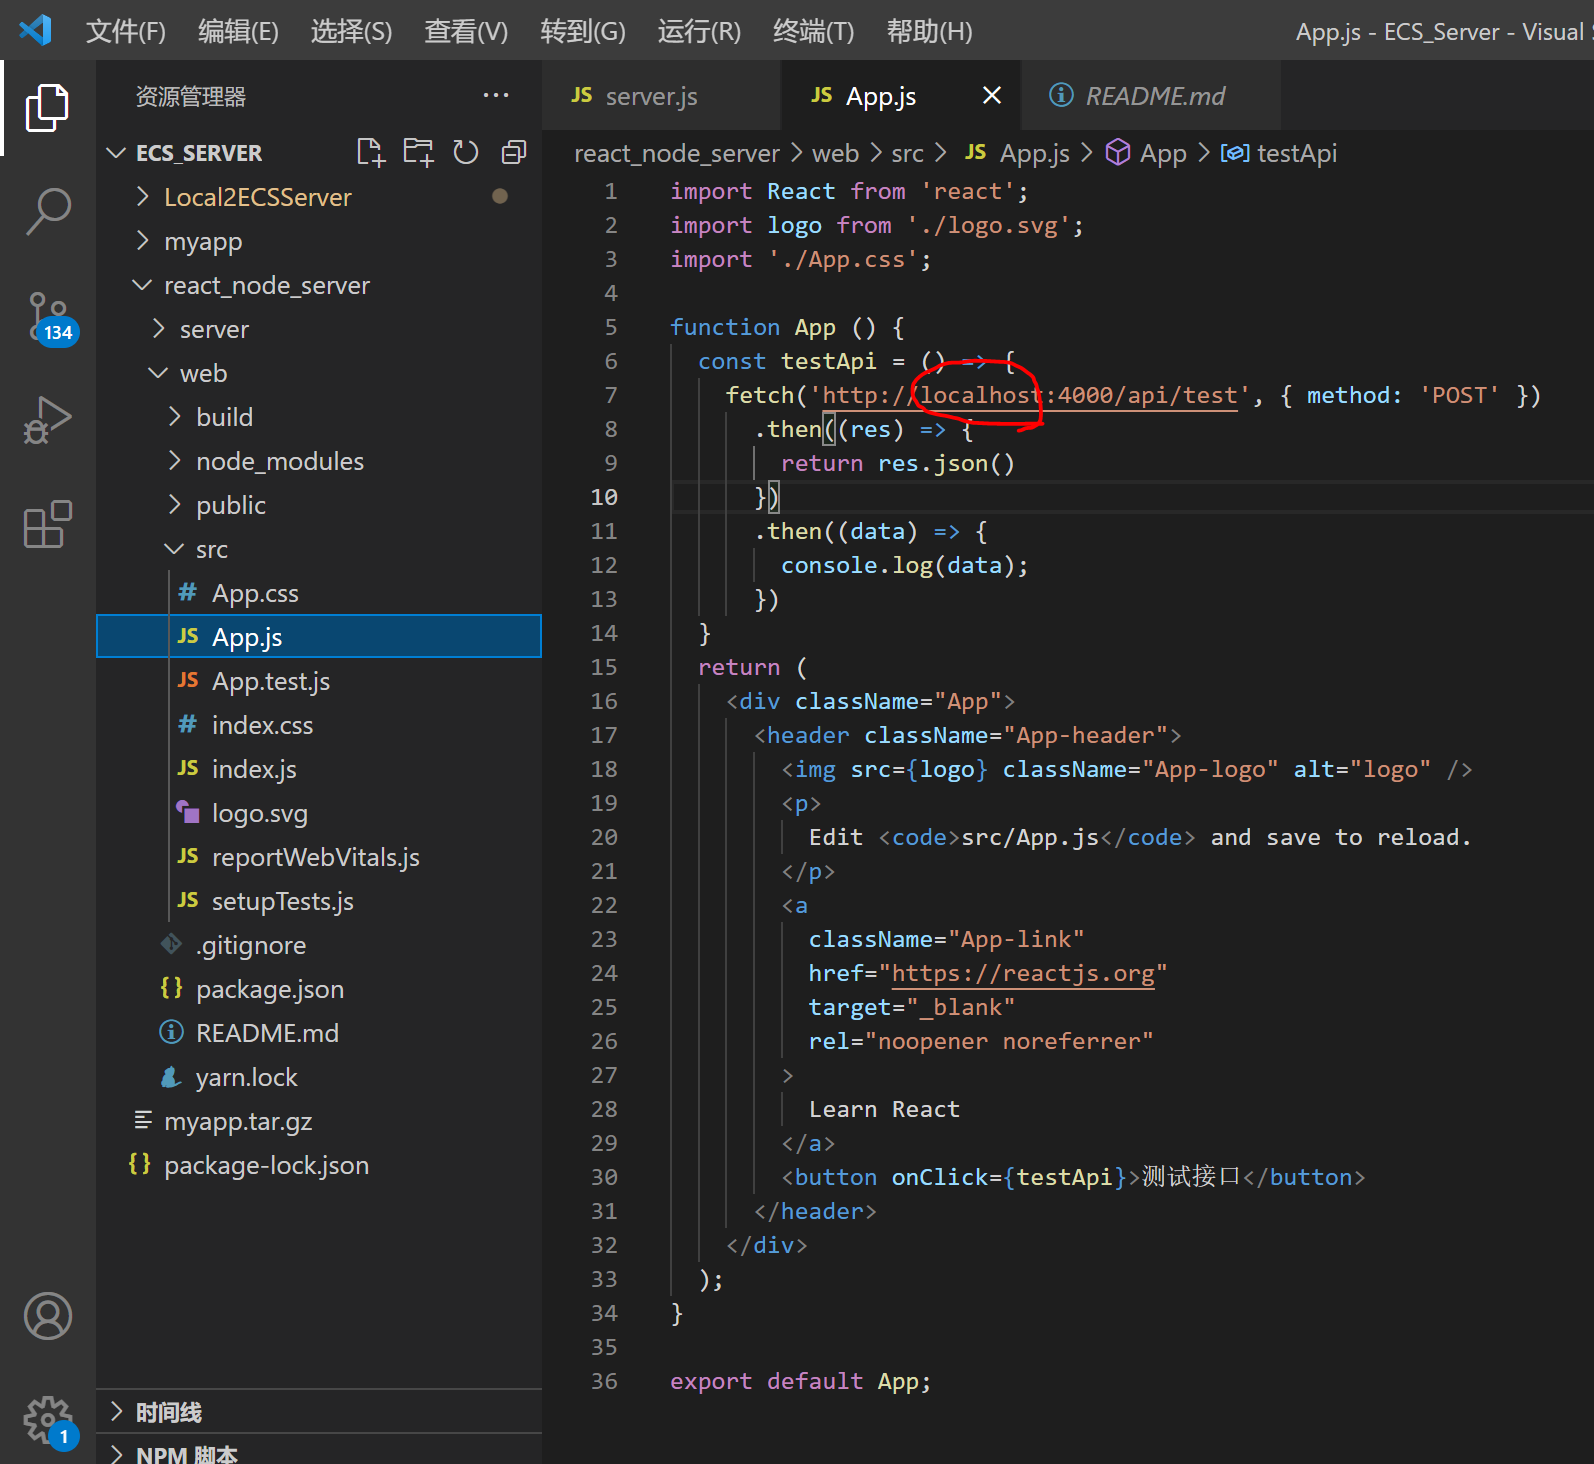
2. Open app JS we use the native fetch call interface to run the view console network
import React from 'react';
import logo from './logo.svg';
import './App.css';
function App() {
const testApi = () => {
fetch('http://localhost:4000/api/test', { method: 'POST' })
.then((res) => {
return res.json()
})
.then((data) => {
console.log(data);
})
}
return (
<div className="App">
<header className="App-header">
<img src={logo} className="App-logo" alt="logo" />
<p>
Edit <code>src/App.js</code> and save to reload.
</p>
<a
className="App-link"
href="https://reactjs.org"
target="_blank"
rel="noopener noreferrer"
>
Learn React
</a>
<button onClick={testApi}>Test interface</button>
</header>
</div>
);
}
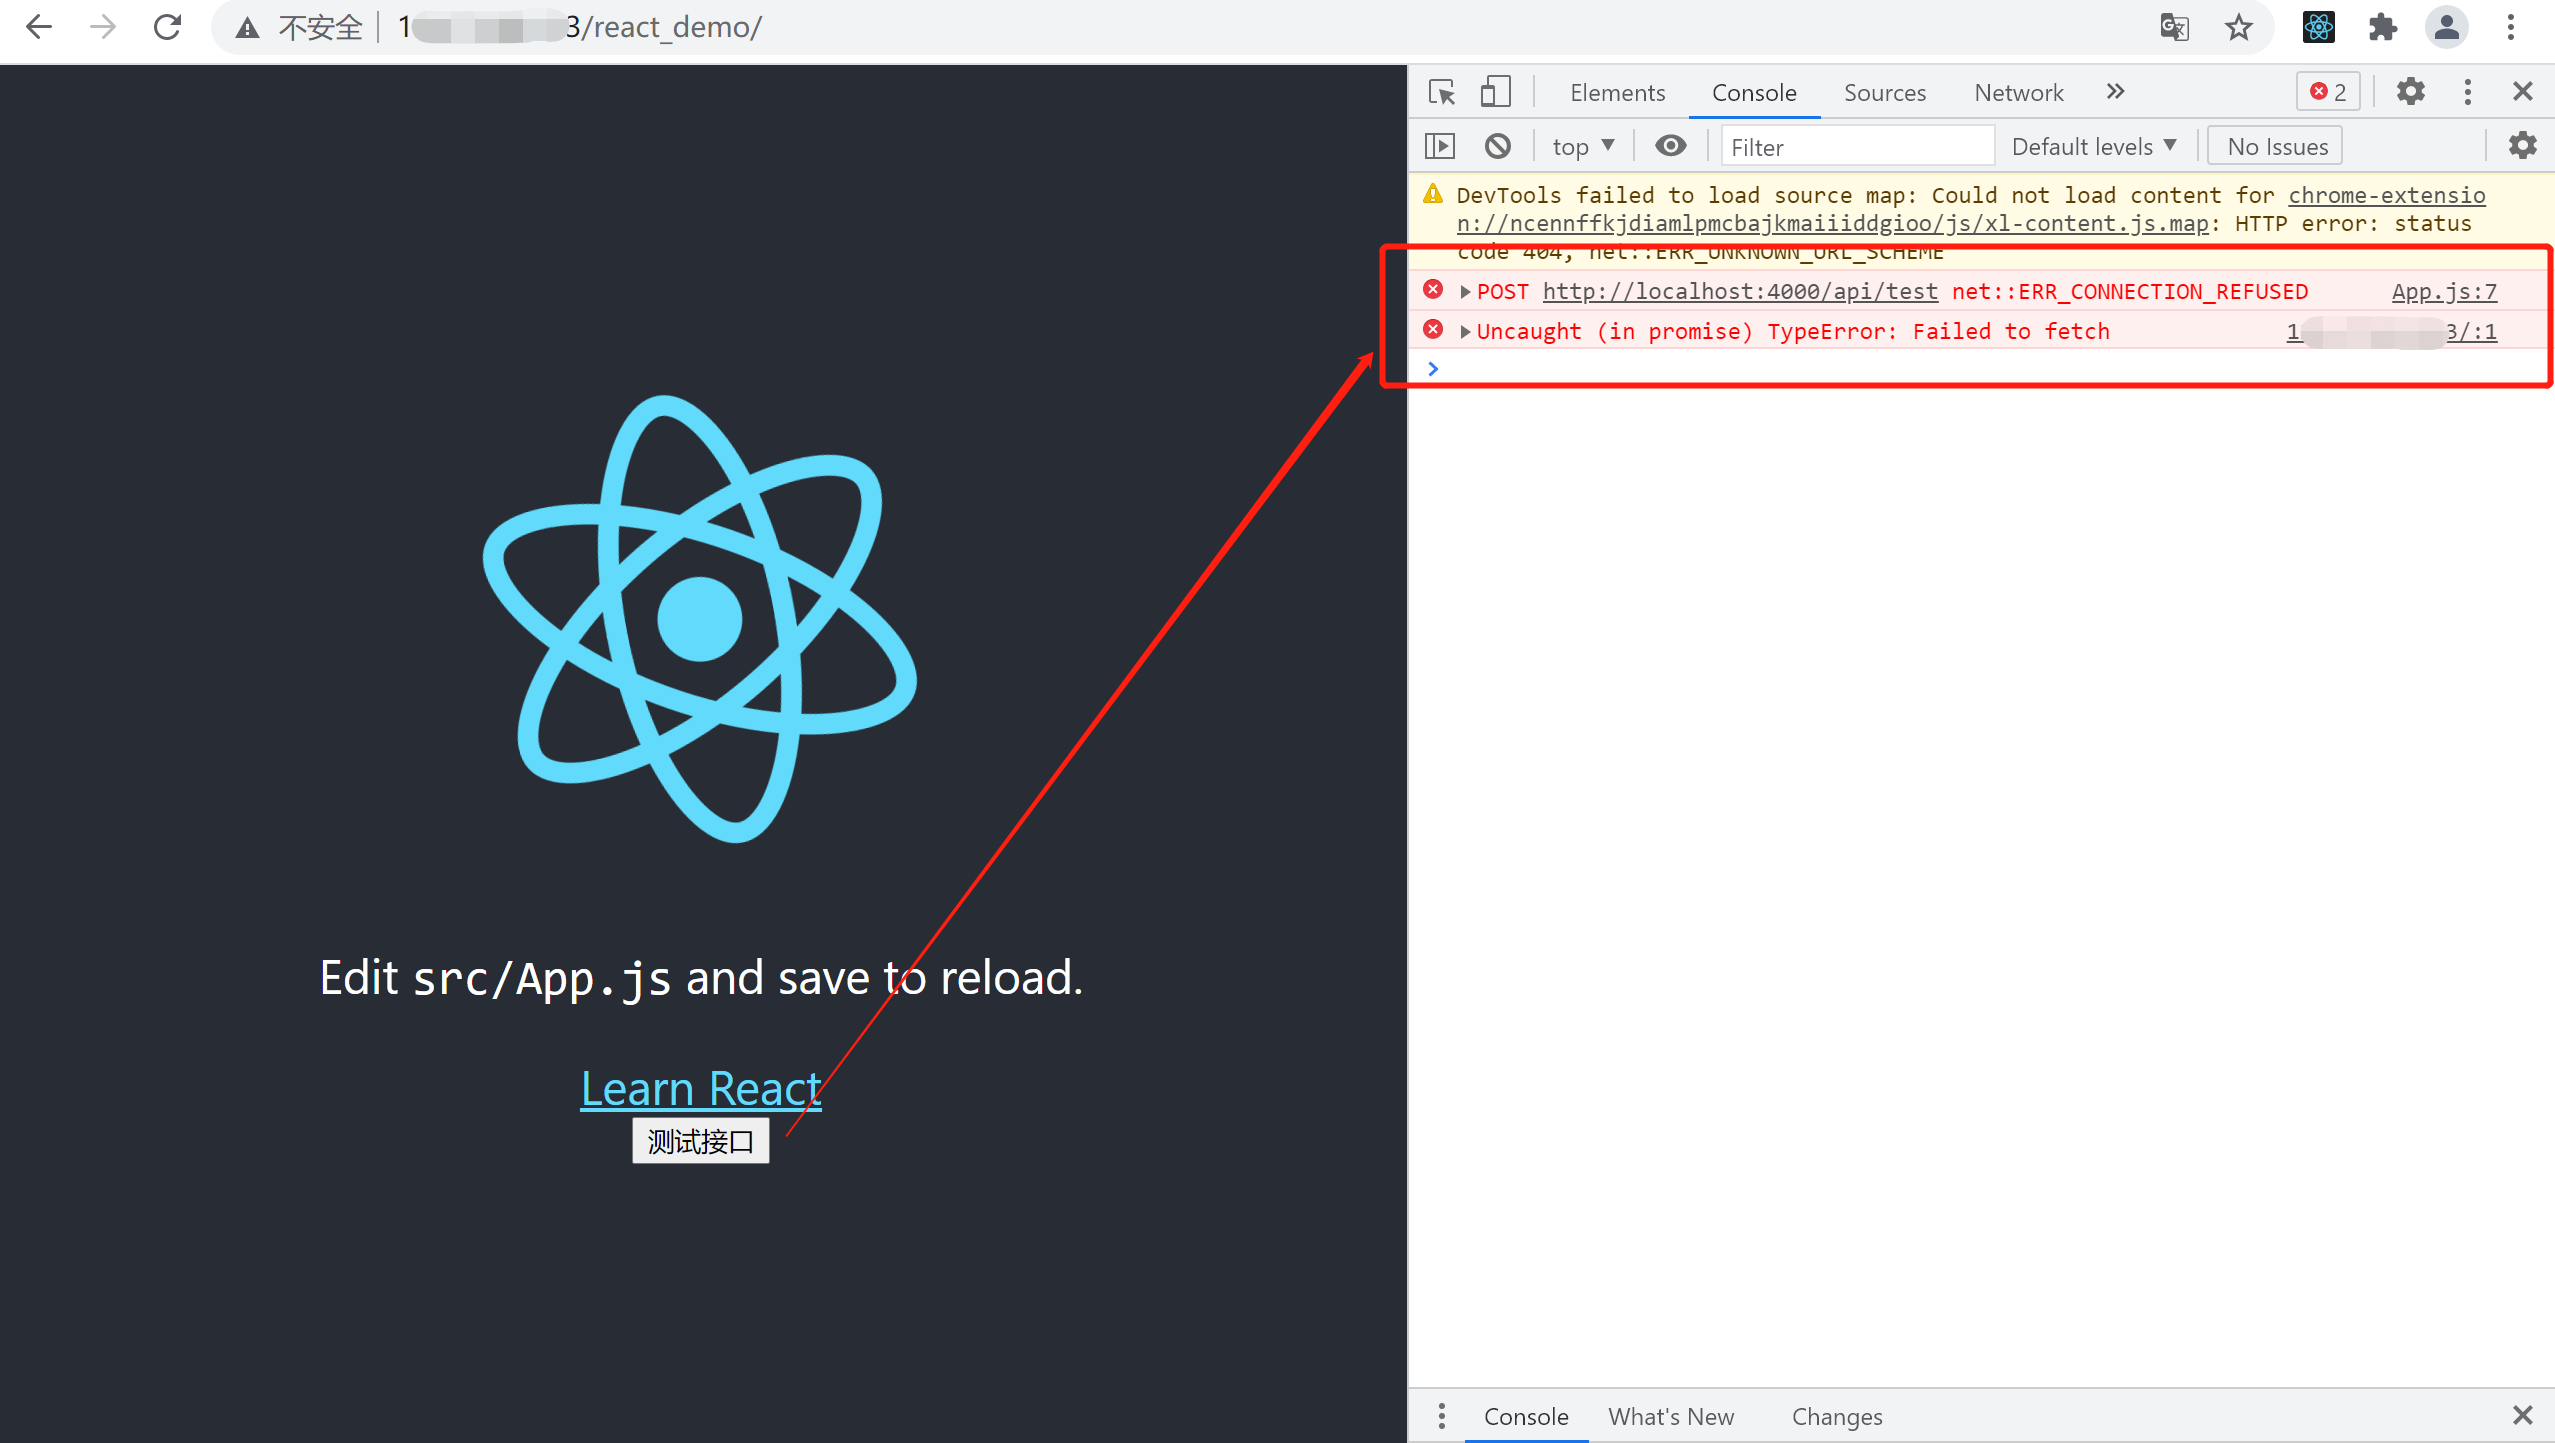
export default App; 3.npm run start starts the react project, click the "test interface" button, and the local call succeeds as follows:
(the local computer calls the interface incorrectly. After the web is deployed to the server, it can call the interface on the public IP)
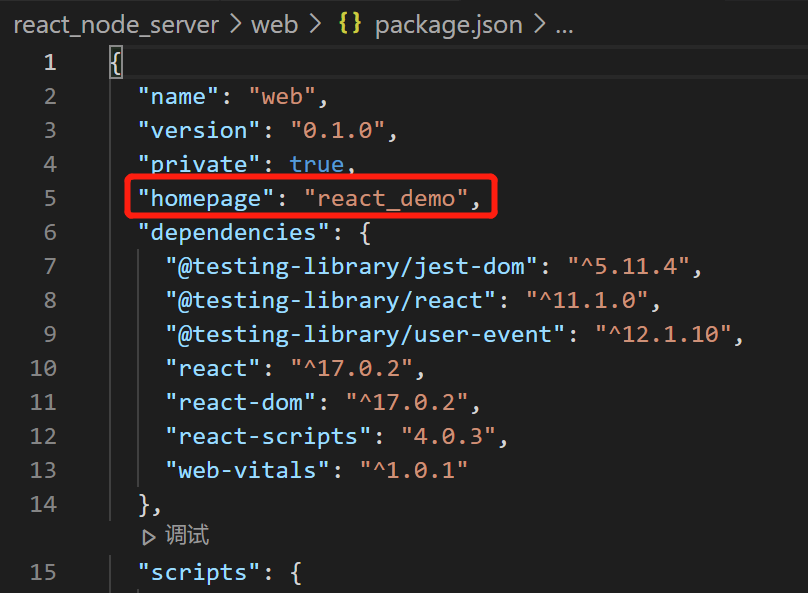
4. Compile and package web
npm run build package project
Note: it needs to be in package JSON: add "home": "react_demo"
3, Deploy node and web to server
1. Server side preparation tool
Install in sequence
nginx
Install nginx, refer to https://www.runoob.com/linux/nginx-install-setup.html
To configure the global nginx command, refer to https://www.cnblogs.com/NTWang/p/13066602.html
git
yum -y install git
nvm (not required)
node version management tool
curl -o- https://raw.githubusercontent.com/nvm-sh/nvm/v0.38.0/install.sh | bash source ~/.bashrc / / enables the current shell to read the shell file with the path filepath and execute all the statements in the file in turn. It is usually used to re execute the newly modified initialization file to make it take effect immediately without logging off and logging in again
node
Download and install node
nvm i stable / / install the latest stable version of node
After installing node using nvm, directly running the node command will report an error node: command not found?
forever
node daemon
npm i forever -g / / reference https://www.cnblogs.com/pxjbk/archive/2018/12/24/10169830.html forever list items being guarded
Never stop project directory} stop daemon
forever start project directory startup daemon
2. Deploy node services
1. Create a www folder in the server, and then create a directory to store node items in the www folder
cd var
mkdir www
cd www
mkdir react_demo_server / / store node items
2. Upload the node project of the local computer to the ECS through git or scp commands
get into react_node_server/server catalogue
scp -r * root@xxx.xxx.xxx.xxx:/var/www/react_demo_server
node_modules Dependencies are also uploaded to ECs. You can also pass through the server without uploading npm i Download dependency
3. Run node service
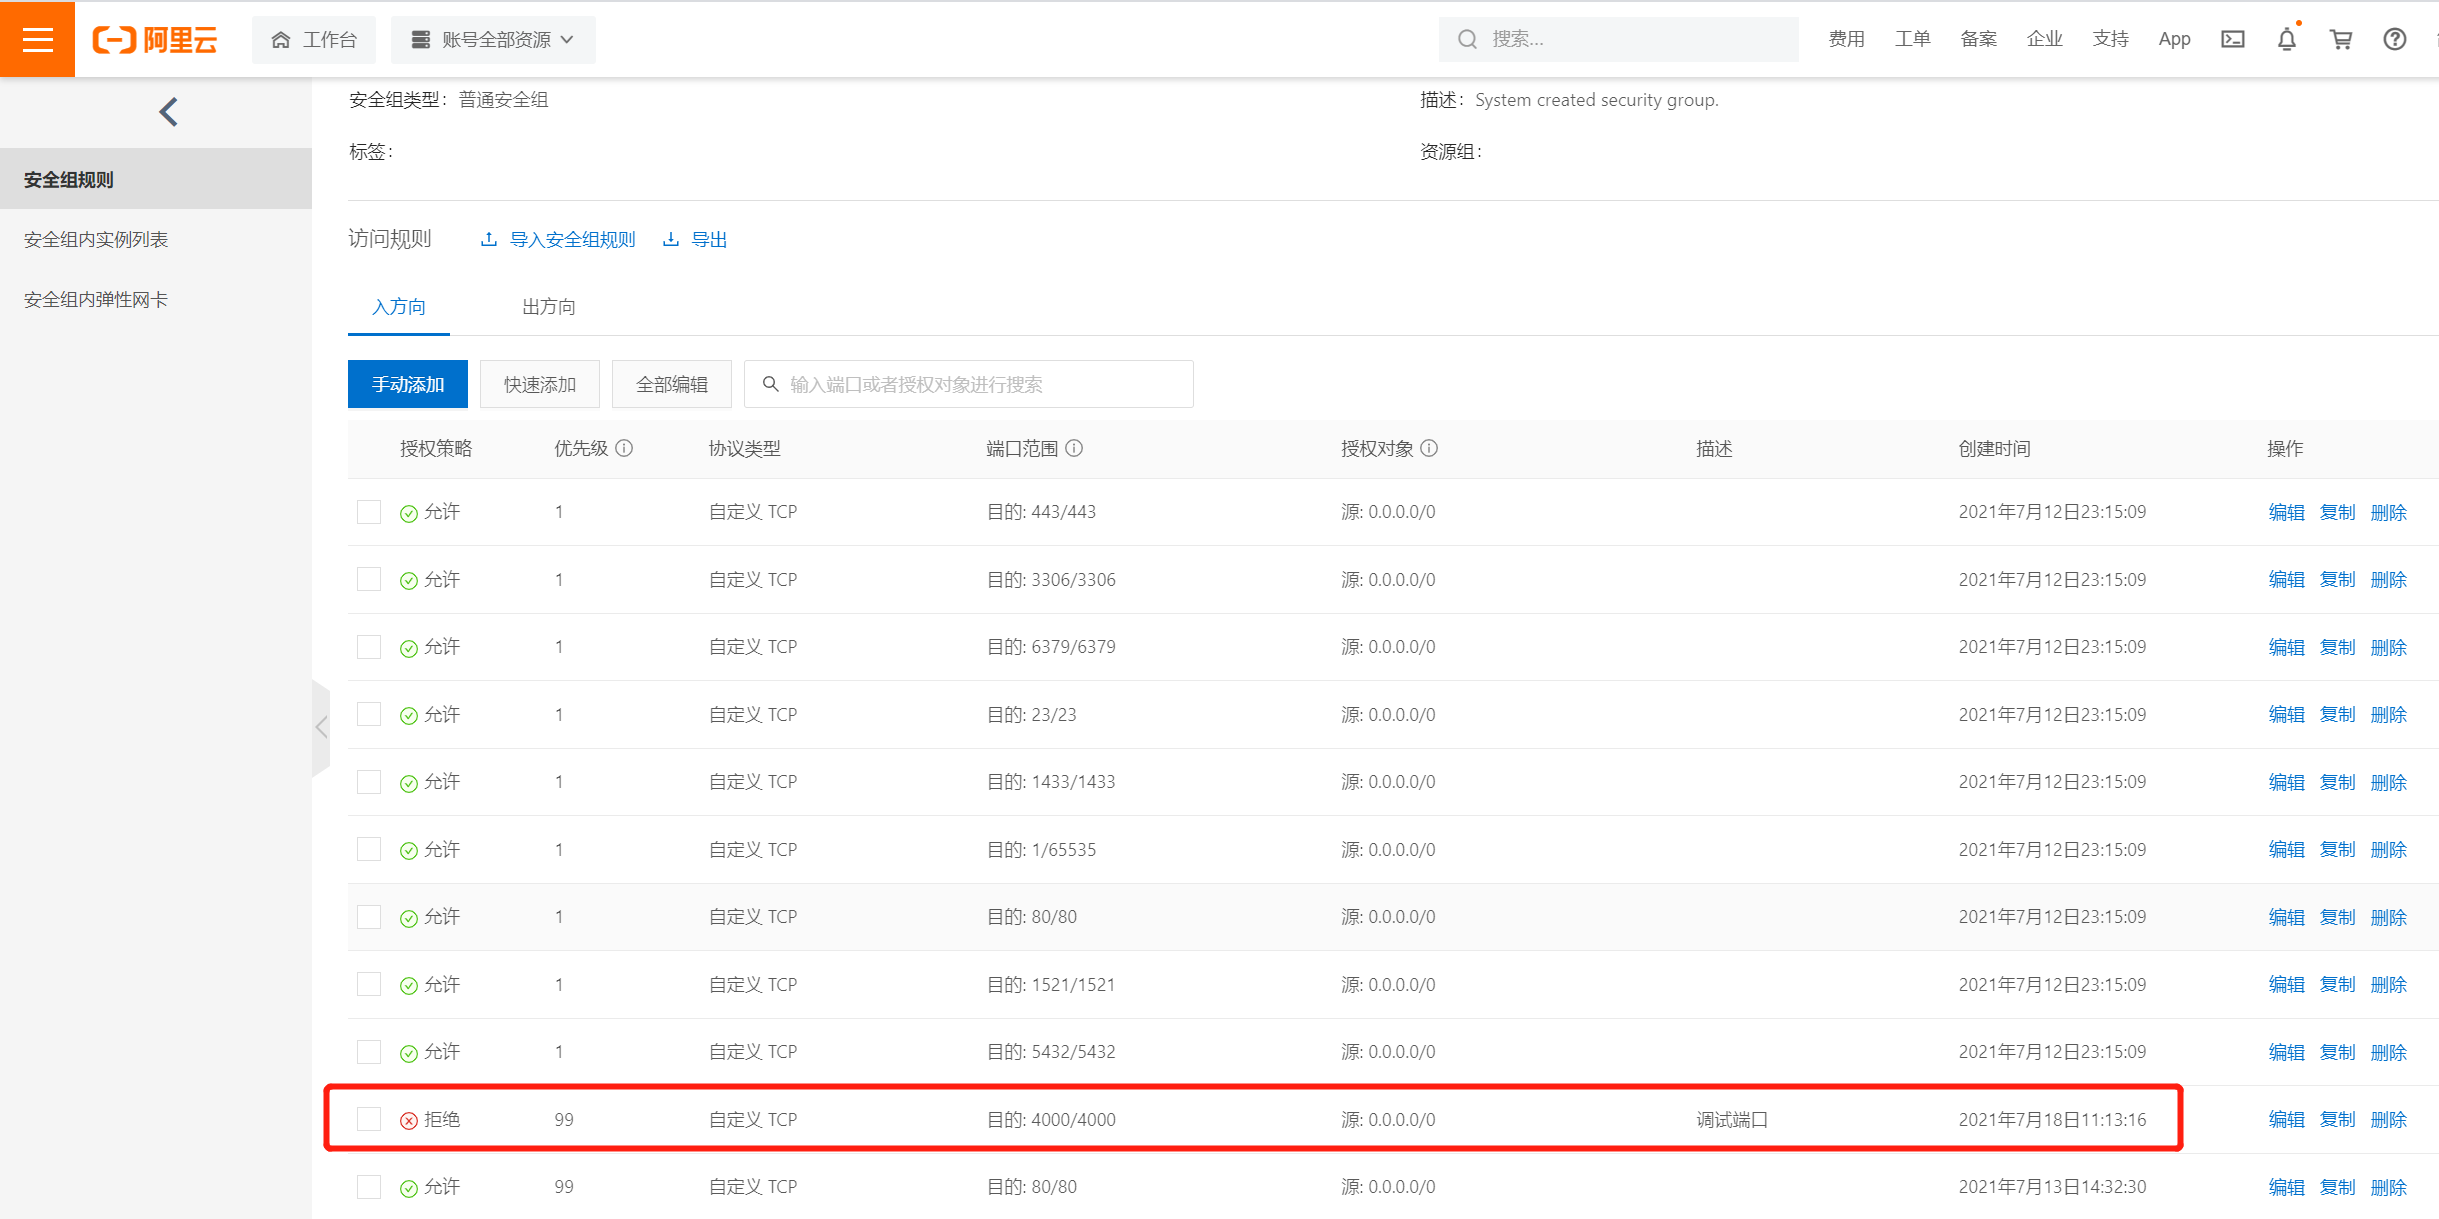
node server.js (the node service is configured with port 4000, and security group rules need to be added on the alicloud console)
Here, port 4000 of Alibaba cloud security group rules is set to allow or disable, which does not affect interface access.
4. Test interface (click "test interface" on the web page after [3. Deploy web])
Click test on the test page, view the console and see the returned results, then the front-end and back-end deployment is completed.
5. The node daemon runs permanently
Finally, use the forever to guard the node process (if we run directly with the node, the ndoe service will also be shut down when the remote link of the server is closed)
forever start /var/www/react_demo_server/server.js
3. Deploy web
1. The web project is packaged on the local computer, which has been packaged earlier
2. Create a directory for storing web projects in the www folder of the server
cd var/www
mkdir react_demo / / store the web project
3. Upload the web (build directory) of the local computer to the ECS through git or scp command
get into web catalogue
scp -r build/* root@xxx.xxx.xxx.xxx:/var/www/react_demo
4. Configure nginx in ECs and start nginx
open nginx Profile editing: vim /usr/local/nginx/conf/nginx.conf
 The following contents are copied and placed in server inside ps:Multiple sites can be configured
# react_demo
location /react_demo {
    root /var/www;
    index  index.html index.htm;
}
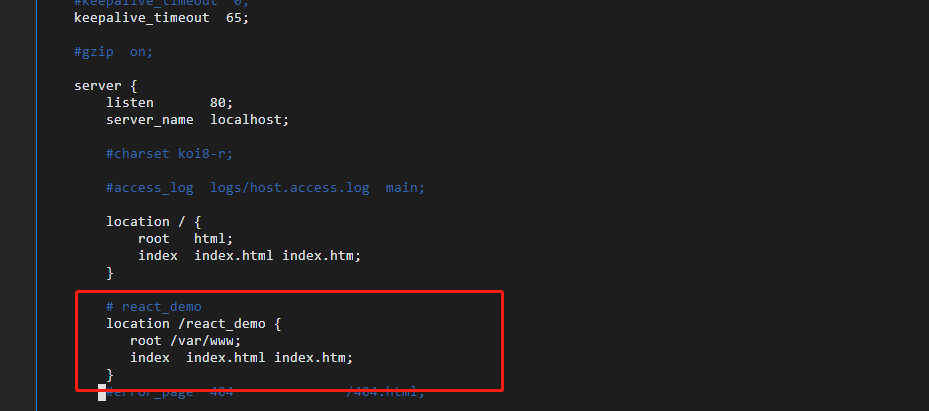
Start nginx:/ nginx
Open the server address in the local computer browser+react_demo",For example: xxx.xxx.xxx.xxx/react_demo,
Normal opening instructions web The deployment is complete and successful.
If page message 404 appears, it needs to be checked nginx Configuration, file path.
If you are loading resource 404, you need to look at the resource loading path to see hoempage Configuration and nginx Whether it corresponds.
Note: the local computer browser can open XXX respectively xxx. xxx. XXX and XXX xxx. xxx. xxx/react_ Demo access to different site content.
5. Differences between two ways of writing web project call server interface IP
Premise: the web project is compiled, packaged and uploaded to the ECS through build, and then run using nginx
localhost and actual public IP
5.1 when the IP port is set to localhost, you cannot access the interface in the ECS
6.2} when the IP port is set to the public IP of a specific ECs, you can access the interface in the ECS