Alibaba cloud OSS (Object Storage Service) is a massive, safe, low-cost and highly reliable cloud storage service, which is suitable for storing any type of files. In practical application development, it can be conveniently used for image management, file management, etc., and provide image access and file download services for applications.
What is "best practice"? That is, use client direct transmission and temporary authorization. Direct transmission from the client avoids the two-step data transmission from the client to the application server and then from the application server to Alibaba cloud OSS. Temporary authorization, in the official words of Alibaba OSS, is to use STS (Security Token Service) to issue a user-defined time limit and permission access certificate for third-party applications or sub users (i.e. users whose user identity is managed by yourself). Generally speaking, if the authorized information is accidentally leaked, illegal access can continue your customized effective practice at most, and can ensure data security to the greatest extent.
Assuming that you have opened Alibaba cloud OSS service and created relevant bucket s, the following will describe in detail the process from creating Alibaba cloud temporary authorization sub account to Java Springboot back-end integration permission verification, and then to obtaining temporary permissions at the front-end for file upload. Among them, the front-end call is divided into two ways, which are to upload OSS through Vue and wechat applet.
1. Bucket and sub account configuration
1.1 bucket configuration
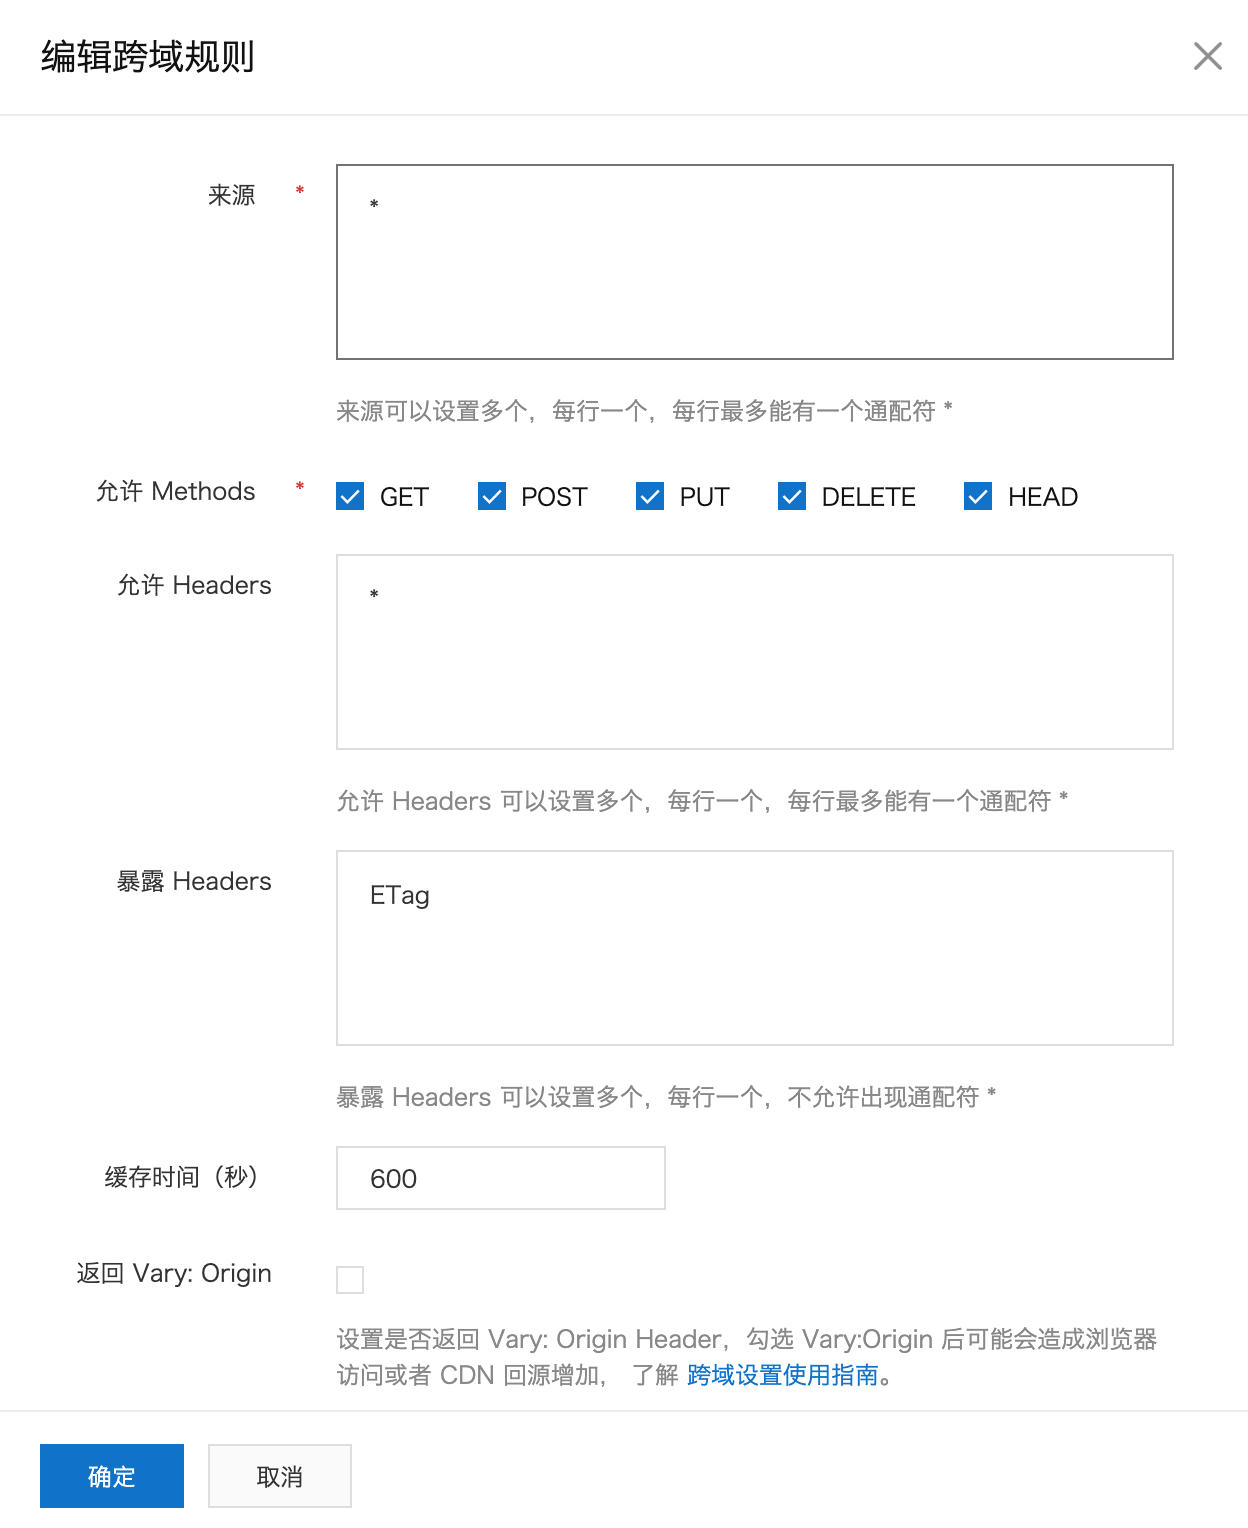
Because the client-side direct transmission is used, it involves cross domain access in the upload process. In addition, in order to support multipart upload, the following configuration needs to be carried out in the bucket:
- Source:*
- method: check as needed
- allowed header: *
- expose header: ETag
- Cache time: 600 seconds by default
1.2 sub accounts and related configurations
Because temporary authorization is used, it needs to be coordinated through sub accounts. Alibaba cloud has a detailed introduction to the configuration process, which will not be repeated here, but can be used for reference here.
After configuring the sub account and related policies, you will get the following information:
- accesskey of sub account
- secret of sub account
- Role arn
In addition, after opening the OSS service, the bucket has the following information: - region information to which the bucket belongs
- bucket name
The above five information are necessary conditions for temporary authorization.
2 Springboot integrated STS
Integrate STS through Springboot application and provide temporary token through specified interface.
2.1 adding dependent packages
Need to build in the application Add the following dependency packages under the dependencies node in the gradle file (the following is the gradle method, similar to using maven to build a project).
implementation('com.aliyun:aliyun-java-sdk-core:4.5.1')
implementation('com.aliyun:aliyun-java-sdk-sts:3.0.1')
2.2 configuring properties
In application Add the following configuration in the properties configuration folder (or in the properties file corresponding to the startup environment), that is, the sub account related information and bucket related information obtained in step 1.
#oss related configuration
oss.region=<oss-cn-hangzhou>
oss.bucket=<bucket name>
oss.accesskey.id=<accesskey character string>
oss.accesskey.secret=<secret character string>
oss.role.arn=<role arn Information, roughly in the format'acs:ram::role id:role/Policy name'>
2.3 create tool class for generating temporary authorization token
Create a tool class to generate a temporary token according to the configuration information in the previous step. The complete code is as follows:
import com.alibaba.fastjson.JSONObject;
import com.aliyuncs.DefaultAcsClient;
import com.aliyuncs.exceptions.ClientException;
import com.aliyuncs.profile.DefaultProfile;
import com.aliyuncs.profile.IClientProfile;
import com.aliyuncs.sts.model.v20150401.AssumeRoleRequest;
import com.aliyuncs.sts.model.v20150401.AssumeRoleResponse;
import org.slf4j.Logger;
import org.slf4j.LoggerFactory;

import java.util.ArrayList;
import java.util.Arrays;
import java.util.List;

/**
 * ali oss Temporary access authorization
 */
public class OssUtil {
    public static Logger logger = LoggerFactory.getLogger(OssUtil.class);
    public static final String ACCESS_KEY_ID = "ACCESS_KEY_ID";
    public static final String ACCESS_KEY_SECRET = "ACCESS_KEY_SECRET";
    public static final String SECURITY_TOKEN = "SECURITY_TOKEN";
    public static final String EXPIRATION = "EXPIRATION";
    //The CN Hangzhou area is used here, which depends on the actual situation
    private static final String REGION = "cn-hangzhou";
    private static final String STS_API_VERSION = "2015-04-01";

    public static JSONObject getCredit(String userName, String roleArn, String accessKeyId, String accessKeySecret, String bucketName) throws ClientException {
        // The temporary name used for Alibaba cloud background audit can be transferred according to the actual business, and the specific content will not affect the use of services
        String roleSessionName = userName;
        //The policy permission at runtime. The permission is maximized here, which can be determined according to the actual situation. At runtime, the actual permission is the intersection of the permission set here and the policy permission configured by the role in the first step
        JSONObject policyObject = new JSONObject();
        policyObject.fluentPut("Version", "1");
        List<JSONObject> statements = new ArrayList<>();
        statements.add(new JSONObject().fluentPut("Effect", "Allow").fluentPut("Action", Arrays.asList("oss:PutObject")).fluentPut("Resource", Arrays.asList("acs:oss:*:*:" + bucketName, "acs:oss:*:*:" + bucketName + "/*")));
        policyObject.fluentPut("Statement", statements);
        logger.info("ali policy: {}", policyObject.toString());

        //Execute role authorization
        IClientProfile profile = DefaultProfile.getProfile(REGION, accessKeyId, accessKeySecret);
        DefaultAcsClient client = new DefaultAcsClient(profile);
        final AssumeRoleRequest request = new AssumeRoleRequest();
        request.setVersion(STS_API_VERSION);
        request.setRoleArn(roleArn);
        request.setRoleSessionName(roleSessionName);
        request.setPolicy(policyObject.toJSONString());
		//Effective practice of temporary authorization, from 900 to 3600
        request.setDurationSeconds(900L);
        final AssumeRoleResponse response = client.getAcsResponse(request);

        JSONObject jsonObject = new JSONObject();
        jsonObject.put(ACCESS_KEY_ID, response.getCredentials().getAccessKeyId());
        jsonObject.put(ACCESS_KEY_SECRET, response.getCredentials().getAccessKeySecret());
        jsonObject.put(SECURITY_TOKEN, response.getCredentials().getBizSecurityToken());
        jsonObject.put(EXPIRATION, response.getCredentials().getExpiration());
        return jsonObject;
    }
}
2.4 create controller
Create the controller OssController, which is used to provide the interface to obtain the temporary token. The complete code is as follows:
For image type files, in order to facilitate management and use of relevant processing functions (such as watermark, image weight, clipping), they are placed in a separate directory. Therefore, the storage locations of files are divided into image and ordinary files.
import com.alibaba.fastjson.JSONObject;
import com.aliyuncs.exceptions.ClientException;
import org.slf4j.Logger;
import org.slf4j.LoggerFactory;
import org.springframework.beans.factory.annotation.Value;
import org.springframework.web.bind.annotation.PostMapping;
import org.springframework.web.bind.annotation.RequestMapping;
import org.springframework.web.bind.annotation.RestController;

@RestController
@RequestMapping("/oss")
public class OssController {
    private Logger logger = LoggerFactory.getLogger(this.getClass());

    @Value("${oss.region}")
    private String ossRegion;

    @Value("${oss.bucket}")
    private String ossBucket;

    @Value("${oss.accesskey.id}")
    private String ossAccessKeyId;

    @Value("${oss.accesskey.secret}")
    private String ossAccessKeySecret;

    @Value("${oss.role.arn}")
    private String ossRoleArn;

    /**
     * Obtain authorization information
     *
     * @param type Authorization type, picture type or ordinary file type
     * @return
     * @throws ClientException
     */
    @PostMapping("/getCredit")
    public JSONObject getCredit(string type) throws ClientException {
        JSONObject jsonObject = new JSONObject();
        JSONObject creditInfo;
        String basePath;
        switch (type) {
            case image:
                basePath = "image";
                break;
            default:
                basePath = "file";
        }
        creditInfo = OssUtil.getCredit("<The user name can be generated according to the actual business or written as a static user name>", ossRoleArn, ossAccessKeyId, ossAccessKeySecret, this.ossBucket);
        //File storage area
        jsonObject.put("region", ossRegion);
        //Temporary access accessKey
        jsonObject.put("accessKeyId", creditInfo.getString(OssUtil.ACCESS_KEY_ID));
        //Temporary access to accessKeySecret
        jsonObject.put("accessKeySecret", creditInfo.getString(OssUtil.ACCESS_KEY_SECRET));
        //Temporary visit
        jsonObject.put("securityToken", creditInfo.getString(OssUtil.SECURITY_TOKEN));
        //Temporary access expiration time
        jsonObject.put("expiration", creditInfo.getString(OssUtil.EXPIRATION));
        //bucket name
        jsonObject.put("bucket", this.ossBucket);
        //Base directory for storing files
        jsonObject.put("basePath", String.format("oss/%s", basePath));
        return jsonObject;
    }
}
After creating the controller, start the SpringBoot project, and you can http://localhost: Obtain temporary authorization information from the port / oss/getCredit address.
3 Vue project integration OSS file upload
3.1 dependencies
Integrating OSS file upload in Vue project depends on aliyun OSS SDK package, which can be uploaded directly in public The index reference label is as follows:
<script src="//gosspublic.alicdn.com/aliyun-oss-sdk-5.2.0.min.js"></script>
Or use the package management tool npm to install Ali OSS. The reference is as follows:
npm install ali-oss --save
In addition, the axios component is used to send the request in the project, which can be determined according to the actual situation.
3.2 OSS file upload tool
Create OSS js tool js file. The complete code is as follows:
import Vue from 'vue';
/**
/ * Upload a file
*/
const uploadAction = async option => {
  //Temporary authorization information obtained from the background
  let client = new OSS.Wrapper({
    region: option.token.region,
    accessKeyId: option.token.accessKeyId,
    accessKeySecret: option.token.accessKeySecret,
    stsToken: option.token.securityToken,
    bucket: option.token.bucket
  });

  let filePath = '/' + option.fileName;
  //Replace multiple / with one / to prevent multiple / in the oss file path from causing an empty directory
  filePath = filePath.replace(/[\/]+/g, '\/');
  return client.multipartUpload(
    filePath,
    option.file, {
      //Upload process callback. The parameter is (upload file information, upload percentage). User defined operations can be passed through the progress attribute of option. The default is to print the current upload progress
      progress: function* (p) {
        (option.progress || console.log)(option.file, 'Uploading Progress: ' + p * 100)
      }
    }
  )
}

/**
 * Upload multiple files
 */
const uploadFiles = async (files, fileDir, progress = console.log) => {
  let credit = await Vue.axios.post("/oss/getCredit");
  let urls = [];
  for (let index = 0; index < files.length; index++) {
    let res = await uploadAction({
      //File information to be uploaded
      file: files[index],
      //Temporary access authorization information
      token: credit.data,
      //Upload the file name. To prevent the file from being overwritten (duplicate files uploaded by oss will overwrite files with the same name), use the timestamp to generate a new file name, which can be determined according to the actual business
      fileName: (credit.data.basePath + `/${fileDir}/` + new Date().getTime()),
	  //Optional parameter, the operation triggered during image upload
      progress: progress
    });
    if (res.name) {
      urls.push(`${res.name}`);
    }
  }
  //Returns the upload results of multiple files, which are the path addresses of multiple oss files (excluding the host path)
  return urls;
}

export default {
  upload: uploadFiles
}

Vue.prototype.$upload = uploadFiles;
3.3 uploading files in Vue page
Introduce OSS. In the previous step into the page JS or in main JS can be introduced. The usage method is as follows: put the tag with input type of file in the page and set the change time as follows. After selecting the file, the file upload can be performed automatically. In practical application, you can use other picture or file upload components according to the actual situation. You only need to customize the upload process as the following upload method.
<template>
  <div class="oss-demo-cont">
  	<input type="file" multiple="multiple" ref="fileRef" id="file-input" @change="upload($event.target.files,'test')" />
  </div>
</template>
<script>
export default {
  name: "UploadTest",
  data () {
    return {
    }
  },
  methods: {
    async upload (files, dir) {
      //Picture address after uploading
      let urls = await this.$upload(files, dir);
      console.log(urls);
    }
  },
  mounted () {
  }
}
</script>
4 wechat applet integration OSS file upload
4.1 wechat applet domain name white list
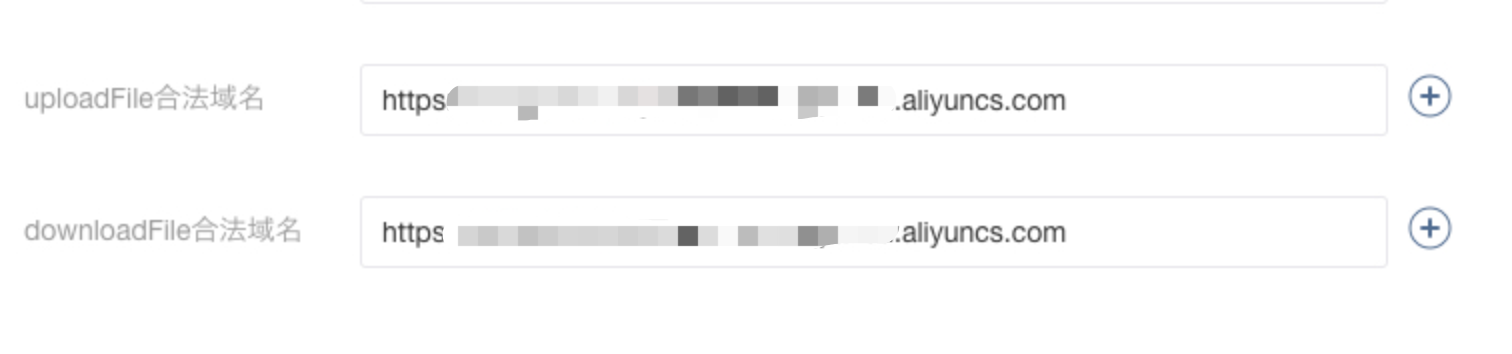
In order to make the upload work normally, you need to add the bucket main domain name of OSS to the white list of applet domain names. Click the corresponding bucket in the OSS console to view the corresponding bucket domain name in the bucket overview information. As shown below:

Then, in the applet management background, add the Bucket Internet access domain name to the list of legal domain names uploaded and downloaded respectively, as shown in the following figure:
4.2 create js tool class
To upload OSS files in wechat applet, you need to add crypto JS and JS Base64 tools, which can be used for reference here . At present, the applet supports npm package management. If you install the above two dependent tools through npm and execute "Tools > build npm" in wechat development tool, you can use the corresponding dependent packages in the applet.
Create js file request js, the complete code is as follows:
import crypto from 'crypto-js';
import {
  Base64
} from 'js-base64';
//Need to replace with actual address
const ossHost = '<oss bucket address>';
//Need to replace with actual address
const apiHost = '<Background interface address>';
let post = (url, data = {}) => {
  return new Promise((resolve, reject) => {
    doRequest(url, resolve, reject, data);
  });
}

let doRequest = (url, resolve, reject, data = {}, method = "POST") => {
  wx.request({
    url: url,
    data: data,
    method: method,
    header: {
      'Content-Type': 'application/x-www-form-urlencoded',
      'Accept': 'application/json'
    },
    success: res => {
      resolve(res.data);
    },
    fail: error => {
      reject(error);
    },
    complete: () => {}
  });
}

/**
 * Obtain oss temporary authorization information
 */
let getUploadParams = async () => {
  const date = new Date();
  date.setHours(date.getHours() + 1);
  const policyText = {
    expiration: date.toISOString(),
    conditions: [
      // Limit upload size.
      ["content-length-range", 0, 1024 * 1024 * 1024],
    ],
  };
  const res = await post(`${apiHost}/oss/getCredit`);
  const policy = Base64.encode(JSON.stringify(policyText));
  const signature = crypto.enc.Base64.stringify(crypto.HmacSHA1(policy, res.data.accessKeySecret));
  return {
    OSSAccessKeyId: res.data.accessKeyId,
    signature,
    policy,
    'x-oss-security-token': res.data.securityToken,
    basePath: res.data.basePath
  }
}

/**
 * Upload a file
 * @param {object} param Authorization information
 * @param {string} localFilePath Local picture path
 * @param {string} dir Remote directory
 */
let uploadOne = (param, localFilePath, dir) => {
  return new Promise((resolve) => {
    let remotePath = `${param.basePath}/${dir}/${new Date().getTime()}`.replace(/[\/]+/g, '\/');
    wx.uploadFile({
      url: ossHost,
      filePath: localFilePath,
      name: 'file',
      formData: {
        key: remotePath,
        ...param
      },
      success: (res) => {
        console.log('Upload results ' + localFilePath, res);
        //Alibaba cloud successfully uploaded and put it back. The status code is 204
        if (res.statusCode === 204) {
          resolve(remotePath);
        } else {
          resolve("");
        }
      },
      fail: err => {
        console.log('Upload failed ' + localFilePath, err);
        resolve("");
      }
    });
  });
}

/**
 * Batch upload pictures
 * @param {array} localFilePathList Local picture address list
 * @param {string} uploadDir Remote upload directory
 */
let upload = async (localFilePathList, uploadDir) => {
  let param = await getUploadParams();
  let urlList = [];
  if (localFilePathList.length <= 0) {
    return urlList;
  }
  for (let i = 0; i < localFilePathList.length; i++) {
    if (!localFilePathList[i]) {
      continue;
    }
    //File path and address uploaded to oss
    let aliurl = await uploadOne(param, localFilePathList[i], uploadDir);
    if (!!aliurl) {
      urlList.push(`${aliurl}`);
    }
  }
  //Path and address of multiple oss files uploaded
  return urlList;
}
/**
 * Select an image and upload it to return to the final image array after uploading
 * @param {*} oraList Original image array
 * @param {*} ossSubPath Image upload oss path
 */
const chooseImage = (oraList, ossSubPath) => {
  return new Promise((resolve) => {
    wx.chooseImage({
      count: 9 - (oraList || []).length,
      sizeType: ['original', 'compressed'],
      sourceType: ['album', 'camera'],
      success: async (res) => {
        let uploadRes = await upload(res.tempFilePaths, ossSubPath);
        console.log(`upload result:${JSON.stringify(uploadRes)}`);
        let uploaderList = (oraList || []).concat(uploadRes);
        resolve(uploaderList);
      },
      fail: error => {
        console.log(`upload error:${JSON.stringify(error)}`);
        resolve(oraList);
      }
    })
  });
}

export default {
  post,
  upload,
  chooseImage
}
4.3 upload pictures on the applet Page
The Page page of the applet can select and upload pictures by clicking a view component. Other trigger components can be used according to the actual situation. The complete code of wxml file is as follows:
<view>
	<view bindtap='chooseImage'>
		Click to select image upload
	</view>
</view>
The complete code of the corresponding js file is as follows:
//The path corresponding to the upload tool js file depends on the actual situation
import request from '../../../utils/request';
Page({

  /**
   * Initial data of the page
   */
  data: {

  },

  /**
   * Life cycle function -- listening for page loading
   */
  onLoad(options) {

  },

  /**
   * Life cycle function -- monitor the completion of the first rendering of the page
   */
  onReady() {

  },

  /**
   * Life cycle function -- monitor page display
   */
  onShow() {

  },

  /**
   * Life cycle function -- listening for page hiding
   */
  onHide() {

  },

  /**
   * Life cycle function -- monitor page unloading
   */
  onUnload() {

  },

  /**
   * Page related event handling function -- listening to user drop-down actions
   */
  onPullDownRefresh() {

  },

  /**
   * Handler for bottom pull event on page
   */
  onReachBottom() {

  },

  /**
   * Users click on the upper right corner to share
   */
  onShareAppMessage() {

  },
  save() {
    util.chooseImage(this.data.oilCardUploaderList, "/test").then(res => {
      console.log('Upload results', res);
    });
  }
})
5 reference
[1] STS temporarily authorizes access to OSS
[2] Practice of direct transmission of wechat applet