This article, in the form of a Demo, describes the use of APT and bytecode instrumentation, and how to use them to optimize code design.
1, Introduction of Demo
1.1 requirements description
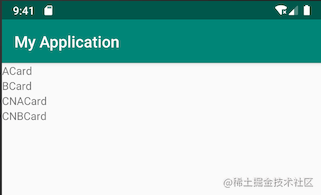
Assuming that there is such a scenario, we have an application to display various cards, including CNACard and CNBCard, which are only displayed at home, ExpACard and ExpBCard, which are only displayed abroad, and ACard and BCard, which are to be displayed at home and abroad.
1.2 simple code structure design
Firstly, each Card is designed, and all of them implement the same interface ICard:
public interface ICard {
    String getCardName();
}

public class ACard implements ICard {
    @Override
    public String getCardName() { return "ACard"; }
}

public class BCard implements ICard {
    @Override
    public String getCardName() { return "BCard"; }
}

public class CNACard implements ICard { /*...*/ }

public class CNBCard implements ICard { /*...*/ }

public class ExpACard implements ICard { /*...*/ }

public class ExpBCard implements ICard { /*...*/ }
Next, a Card registrar is required. Only registered cards will be effective and displayed:
class CardRegister {

    private List<ICard> mCardList = new ArrayList<>();

    void register(ICard card) {
        mCardList.add(card);
    }

    List<ICard> getCardList() {
        return mCardList;
    }
    // ...
}
With the above types of cards and Card registrars, we need to design an init() method to register the cards to be displayed:
public class CardManager {

    public static void init() {
        // Card that will be displayed at home and abroad
        CardRegister.getInstance().register(new ACard());
        CardRegister.getInstance().register(new BCard());

        if (Feature.sIsCN) { // Card displayed only in China
            CardRegister.getInstance().register(new CNACard());
            CardRegister.getInstance().register(new CNBCard());
        } else { // Card only displayed abroad
            CardRegister.getInstance().register(new ExpACard());
            CardRegister.getInstance().register(new ExpBCard());
        }
    }

    public static List<ICard> getAllCard() {
        return CardRegister.getInstance().getCardList();
    }
}
In the above code, we use Feature to control the registration of domestic cards or foreign cards. Then we need to call the CardManager.init() method in Application to enable our registration process to take effect.
public class MyApplication extends Application {

    @Override
    public void onCreate() {
        super.onCreate();
        CardManager.init();
    }
}
Finally, we show the list of registered cards in Activity:
public class MainActivity extends AppCompatActivity {

    @Override
    protected void onCreate(Bundle savedInstanceState) {
        super.onCreate(savedInstanceState);
        // ... ...
        recyclerView.setAdapter(new RecyclerView.Adapter() {
            @NonNull
            @Override
            public RecyclerView.ViewHolder onCreateViewHolder(@NonNull ViewGroup viewGroup, int i) {
                return new RecyclerView.ViewHolder(new TextView(MainActivity.this)) {};
            }

            @Override
            public void onBindViewHolder(@NonNull RecyclerView.ViewHolder viewHolder, int i) {
                ((TextView) viewHolder.itemView).setText(CardManager.getAllCard().get(i).getCardName());
            }

            @Override
            public int getItemCount() {
                return CardManager.getAllCard().size();
            }
        });
    }
}
1.3 effect display
The operation display results are as follows:
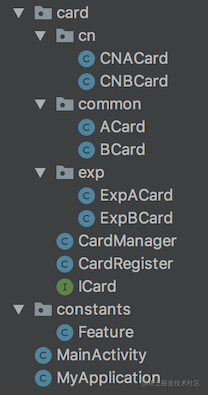
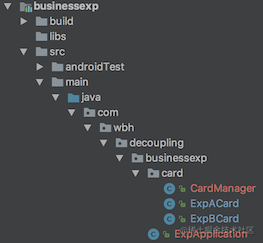
The directory structure of the code is as follows:
1.4 summary
An obvious disadvantage of the above code structure is that the packaged apk contains all cards and resources.
2, Code structure transformation
We need to isolate domestic and foreign codes and resources, split them into two module s, and use multi-channel packaging to package them into domestic and foreign apks respectively.
2.1 create a public business module
Create a business layer module named BusinessLayer, migrate the codes of public related businesses to this module, that is, ICard, ACard, BCard, CardRegister and Activity, and re create a new CardManager. Only ACard and BCard are registered:
public class CardManager {

    public static void init() {
        registerCard(new ACard());
        registerCard(new BCard());
    }

    public static void registerCard(ICard card) {
        CardRegister.getInstance().register(card);
    }

    public static List<ICard> getAllCard() {
        return CardRegister.getInstance().getCardList();
    }
}
You also need to call the CardManager.init() method in LayerApplication.
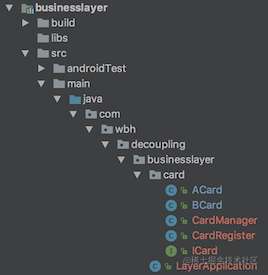
The code structure of BusinessLayer is as follows:
2.2 create channel business module
Create modules for domestic and overseas businesses, named BusinessCN and BusinessExp respectively. Both modules need to rely on the public module BusinessLayer in build.gradle,
// build.gradle
dependencies {
    // ... ...
    implementation project(path: ':businesslayer')
}
To migrate relevant business codes to their respective modules, you also need to create a new CardManager in the two modules to register the Card and call CardManager.init() in the Application
// module BusinessCN
public class CnCardManager {

    public static void init() {
        CardManager.registerCard(new CNACard());
        CardManager.registerCard(new CNBCard());
    }
}
// module BusinessExp
public class ExpCardManager {

    public static void init() {
        CardManager.registerCard(new ExpACard());
        CardManager.registerCard(new ExpBCard());
    }
}
Here, we need to explain the Application. Because multiple applications are used here, conflicts will occur during compilation. We need to take BusinessCn as an example:
There is a conflict between LayerApplication registered in BusinessLayer and CnApplication registered in BusinessCn. You need to use tools:replace declaration in AndroidManifest.xml of BusinessCn to replace LayerApplication with CnApplication.
<manifest xmlns:android="http://schemas.android.com/apk/res/android"
    xmlns:tools="http://schemas.android.com/tools"
    package="com.wbh.decoupling.businesscn" >

    <application
        android:name=".CnApplication"
        tools:replace="android:name">
    </application>

</manifest>
Because LayerApplication is replaced, both CnApplication and ExpApplication need to inherit LayerApplication to ensure that the code in LayerApplication will be executed.
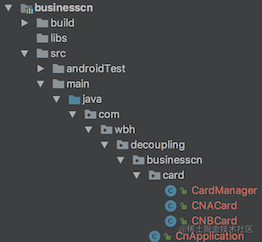
The code structures of the two module s are as follows:
2.3 adjust main items
In the main project, all the codes in src are migrated to their corresponding module s, so there is no code in src. However, in build.gradle, we use channel packaging to make different apk packages for domestic and foreign situations. The configuration of build.gradle is as follows:
android {
    // ... ...
    flavorDimensions 'test'
    productFlavors {
        cn {}
        exp {}
    }
}

dependencies {
    // ... ...
    cnImplementation project(path: ':businesscn')
    expImplementation project(path: ':businessexp')
}
Through gradlew assemblycnrelease and gradlew assemblyexprelease, different apk packages can be packaged without exp Card code in cn apk package or cn Card code in exp apk package.
2.4 summary
Summarize the above reconstructed code structure.
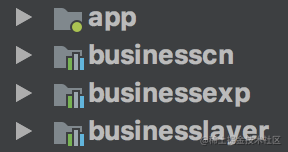
- The module BusinessLayer contains all business codes that are public;
- modlue BusinessCn only contains domestic business codes and relies on BusinessLayer;
- module BusinessExp only contains foreign business codes and relies on BusinessLayer;
- In the main project app, the cn channel relies on businesscn and the exp channel relies on BussinessExp through channel packaging.
In fact, the code has been well isolated here, but this is only a Demo after all. The scenario is relatively simple, and the business scenario in actual work is often much more complex than the Demo.
3, APT further code structure transformation
Carefully observe each module. There is a XXCardManager class and an init() method. Each Card is registered in the form of CardManager.registerCard(...). From this perspective, we use APT + javapoet to automatically generate these codes.
3.1 specify the generated code content
Let's sort out the following ideas and make clear what the code to be generated is:
- In order to facilitate subsequent management (see the following content to understand), the generated code is uniformly placed in the com.wbh.decoupling.generate package;
- Multiple module s will generate multiple cardmanagers, so you need to add a suffix after the class name to distinguish;
// com.wbh.decoupling.generate

public class CardManager_??? {

    public static void init() {
        CardManager.registerCard(new ???Card());
        CardManager.registerCard(new ???Card());
    }
}
3.2 introduction of APT
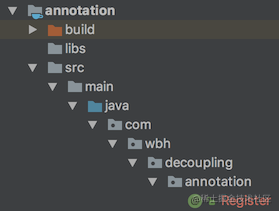
3.2.1 create annotation module
Create a java module named annotation to store the code related to annotation.
Create a Register annotation:
@Retention(RetentionPolicy.SOURCE)
@Target(ElementType.TYPE)
public @interface Register {
}
3.2.2 create annotation processor module
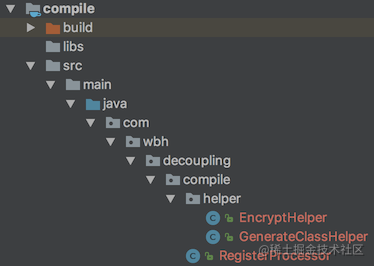
Create a Java module named compile to store the code related to annotation processing.
- The following three dependencies are introduced in build.gradle
dependencies {
    implementation project(path: ":annotation")
    implementation 'com.google.auto.service:auto-service:1.0-rc3'
    annotationProcessor 'com.google.auto.service:auto-service:1.0-rc4'
    implementation 'com.squareup:javapoet:1.8.0'
}
- Auto service is to register the processor more conveniently
- javapoet is for easier code generation
- Create an annotation processor and register it
@AutoService(Processor.class)
public class RegisterProcessor extends AbstractProcessor{

    private Map<String, TypeElement> mMap = new HashMap<>();
    private ProcessingEnvironment mProcessingEnvironment;

    @Override
    public synchronized void init(ProcessingEnvironment processingEnvironment) {
        super.init(processingEnvironment);
        mProcessingEnvironment = processingEnvironment;
    }

    @Override
    public SourceVersion getSupportedSourceVersion() {
        return SourceVersion.latestSupported();
    }

    @Override
    public Set<String> getSupportedAnnotationTypes() {
        return Collections.singleton(Register.class.getCanonicalName());
    }

    @Override
    public boolean process(Set<? extends TypeElement> set, RoundEnvironment roundEnvironment) {
        for (Element element : roundEnvironment.getElementsAnnotatedWith(Register.class)) {
            processElement(element);
        }

        if (roundEnvironment.processingOver()) {
            generateCode();
        }
        return true;
    }

    private void processElement(Element element) {
        TypeElement typeElement = (TypeElement) element;
        String qualifiedName = typeElement.getQualifiedName().toString();
        if (mMap.get(qualifiedName) == null) {
            mMap.put(qualifiedName, typeElement);
        }
    }

    private void generateCode() {
        if (mMap.isEmpty()) return;

        Set<TypeElement> set = new HashSet<>();
        set.addAll(mMap.values());

        GenerateClassHelper helper = new GenerateClassHelper(mProcessingEnvironment, set);
        helper.generateCode();
    }

}
-
Use @ AutoService to register this processor automatically, and the META-INF/services/javax.annotation.processing.Processor file will be generated under build/classes/java/main:
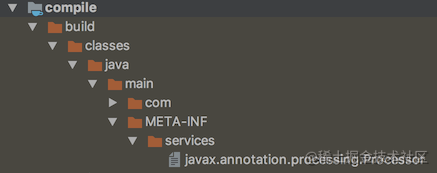
Open this file as follows:com.wbh.decoupling.compile.RegisterProcessor
If you do not register with annotations, you need to manually implement META-INF/services/javax.annotation.processing.Processor.
-
Collect all elements annotated by Register in the process() method, and then generate code through the GenerateClassHelper class. Because the process() method will be executed many times, use roundEnvironment.processingOver() to judge that the code will be generated only at the last time.
- Let's implement the code of GenerateClassHelper:
public class GenerateClassHelper {

    private static final String PACKAGE_NAME = "com.wbh.decoupling.generate";
    private static final String CLASS_NAME_PREFIX = "CardManager_";
    private static final String METHOD_NAME = "init";
    private static final ClassName CARD_MANAGER = ClassName.get("com.wbh.decoupling.businesslayer.card", "CardManager");

    private Filer mFiler;
    private Elements mElementUtils;

    private Set<TypeElement> mElementSet;

    public GenerateClassHelper(ProcessingEnvironment processingEnvironment, Set<TypeElement> set) {
        mFiler = processingEnvironment.getFiler();
        mElementUtils = processingEnvironment.getElementUtils();
        mElementSet = set;
    }


    public void generateCode() {
        try {
            JavaFile javaFile = JavaFile.builder(PACKAGE_NAME, getGenTypeSpec()).build();
            javaFile.writeTo(mFiler);
        } catch (IOException e) {
            e.printStackTrace();
        }
    }

    private TypeSpec getGenTypeSpec() {
        return TypeSpec.classBuilder(getClassName())
                .addModifiers(Modifier.PUBLIC)
                .addMethod(getGenInitMethodSpec())
                .build();
    }

    private String getClassName() {
        for (TypeElement element : mElementSet) {
            // It is unreasonable to use the md5 of the first class obtained as the suffix of the generated class name, which may cause problems
            return CLASS_NAME_PREFIX + EncryptHelper.md5String(mElementUtils.getPackageOf(element).getQualifiedName().toString());
        }
        return "";
    }

    private MethodSpec getGenInitMethodSpec() {
        String format = "$T.registerCard(new $T())";
        CodeBlock.Builder builder = CodeBlock.builder();
        for (TypeElement typeElement : mElementSet) {
            ClassName className = ClassName.get(typeElement);
            builder.addStatement(format, CARD_MANAGER, className);
        }

        CodeBlock codeBlock = builder.build();
        return MethodSpec.methodBuilder(METHOD_NAME)
                .addModifiers(Modifier.PUBLIC)
                .addModifiers(Modifier.STATIC)
                .addCode(codeBlock)
                .build();
    }

}
The GenerateClassHelper uses the javapool library to generate code. JavaFile, TypeSpec, MethodSpec, CodeBlock, etc. are all javapool. The code is based on the CardManager??? We want to generate??? Class.
3.2.3 using custom annotations and parsers in business
Each build.gradle in BusinessLayer, BusinessCn and BusinessExp relies on two module s, annotation and compile
dependencies {
    implementation project(path: ':annotation')
    annotationProcessor project(path: ':compile')
}
Then add @ Register annotation to the Card class to be registered, such as:
@Register
public class ACard implements ICard {
}
Finally, when we run the code, we can automatically generate the code related to CardManager, which is in the build/generated/source/apt directory.
Let's look at the directory of BusinessLayer:
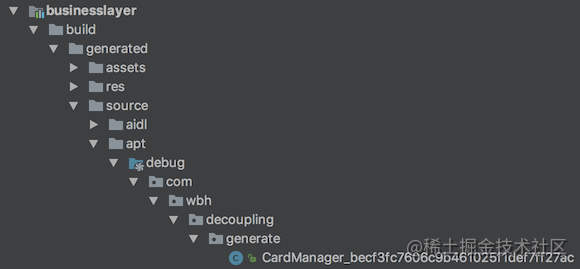
Open CardManager_becf3fc7606c9b461025f1def7ff27ac file:
package com.wbh.decoupling.generate;

import com.wbh.decoupling.businesslayer.card.ACard;
import com.wbh.decoupling.businesslayer.card.BCard;
import com.wbh.decoupling.businesslayer.card.CardRegister;

public class CardManager_becf3fc7606c9b461025f1def7ff27ac {
  public static void init() {
    CardManager.registerCard(new ACard());
    CardManager.registerCard(new BCard());
  }
}
Similar files will be generated in other module s, which will not be shown here.
Since the CardManager is automatically generated through APT, the CardManager class in each module we handwritten can be deleted.
3.3 various types of files generated by calling annotations
So here's the problem, CardManager??? How to call these files after they are automatically generated? We don't know how many module s there may be now or in the future, nor do we know these cardmanagers??? The specific name of the.
A simple and crude method is to traverse the dex file.
This method is mainly used to traverse all classes starting with com.wbh.decoupling.generate in the dex file, which is also the reason why we mentioned to put all generated classes under this package, and then call the init() method of these classes in a reflective way.
Create a CrossCompileUtils class in BusinessLayer to complete these operations, and then call CrossCompileUtils.init() method in Application to execute the process and see the implementation of the code.
public class CrossCompileUtils {

    private static final String GENERATE_CODE_PACKAGE_NAME = "com.wbh.decoupling.generate";
    private static final String METHOD_NAME = "init";

    public static void init(Context context) {
        try {
            List<String> targetClassList = getTargetClassList(context, GENERATE_CODE_PACKAGE_NAME);
            for (String className : targetClassList) {
                Class<?> cls = Class.forName(className);
                Method method = cls.getMethod(METHOD_NAME);
                method.invoke(null);
            }
        } catch (Exception e) {
            e.printStackTrace();
        }
    }

    // Gets all classes starting with target
    private static List<String> getTargetClassList(Context context, String target) {
        List<String> classList = new ArrayList<>();

        try {
            ApplicationInfo info = context.getPackageManager().getApplicationInfo(context.getPackageName(), 0);
            String path = info.sourceDir;
            DexFile dexFile = new DexFile(path);

            Enumeration<String> entries = dexFile.entries();
            while (entries.hasMoreElements()) {
                String name = entries.nextElement();
                if (name.startsWith(target)) {
                    classList.add(name);
                }
            }

        } catch (Exception e) {
            e.printStackTrace();
        }

        return classList;
    }
}
There is an obvious defect in this method, that is, the whole process is carried out at runtime. The more code, the more time-consuming the process, which will have a significant impact on cold start.
4, Modification and optimization of bytecode pile insertion
This method mainly inserts the corresponding bytecode in the compilation period, and puts the time-consuming in the compilation period to optimize the runtime efficiency.
4.1 specify the code of pile insertion
Let's sort out the next main tasks and generate the class AsmCrossCompileUtils during compilation. There is an init () method in this class, which will call all cardmanagers_ XXX.init():
package com.wbh.decoupling.generate;

public class AsmCrossCompileUtils {

    public static void init() {
        CardManager_becf3fc7606c9b461025f1def7ff27ac.init();
        CardManager_dc2db21188334cfca97494d99700395.init();
    }
}
Assuming that the above classes have been generated, CrossCompileUtils can be changed to:
public class CrossCompileUtils {
    public static void init(Context context) {
        initByAsm();
    }

    private static void initByAsm() {
        try {
            Class cls = Class.forName("com.wbh.decoupling.generate.AsmCrossCompileUtils");
            Method method = cls.getMethod(METHOD_NAME);
            method.invoke(null);
        } catch (Exception e) {
            e.printStackTrace();
        }
    }
}
This method only needs to pass through one reflection, and its performance is much better than that of traversing dex.
There are two key points in this method: one is how to obtain the various classes generated by annotations, and the other is how to generate the AsmCrossCompileUtils class.
4.2 customize gradle plugin
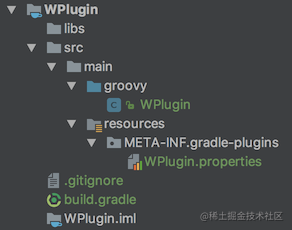
We create a module (any type is OK), name it WPlugin as the name of the plug-in, delete all files in the src directory, only the main directory, delete all files in the main directory, and then create a groovy directory in the main directory (because the syntax of gradle is groovy), The plug-in code we wrote is in this directory.
Next, we need to configure build.gradle and delete the original build.gradle content. The configuration is as follows:
apply plugin: 'groovy'  // Because the plugin is written in groovy syntax, you need to apply this plug-in

dependencies {
    implementation fileTree(dir: 'libs', include: ['*.jar'])
    implementation gradleApi() // Various gradle APIs are required in custom plug-ins
}

sourceCompatibility = "1.7"
targetCompatibility = "1.7"

group = 'com.wbh.decoupling.plugin'  // Group of custom plug-ins
version = '1.0.0'  // The version number of the custom plug-in
Then we create a groovy file in the groovy directory, named WPlugin:
import org.gradle.api.Plugin
import org.gradle.api.Project

class WPlugin implements Plugin<Project> {

    @Override
    void apply(Project project) {
        println('this is my WPlugin')
    }
}
The entry of the plug-in code execution is the apply() method here, but we still need to register the plug-in. Create the resources directory under the main directory, create the META-INF.gradle-plugins directory under this directory, and then create the xxx.properties file under this directory. XXX here represents the name of the plug-in when we apply it to other projects. apply plugin: 'xxx', we still name it WPlugin. The contents written in this file are as follows:
implementation-class=WPlugin
Implementation class is used to configure the plug-in entry class. Here, we configure our custom WPlugin class.
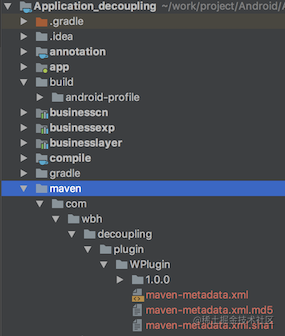
So far, the structure of the whole custom plug-in has been completed. See the directory structure as follows:
4.3 publishing plugin
Before using a custom plug-in, you have to publish the plug-in.
Here, we publish the plug-ins to the local directory, create a maven directory in the root directory to store the plug-ins we publish, and then configure them in build.gradle as follows:
apply plugin: 'maven'

uploadArchives {
    repositories {
        mavenDeployer {
            repository(url: uri('../maven'))  // Specify the directory to publish to
        }
    }
}
Then click upload archives below to run the publish plug-in.
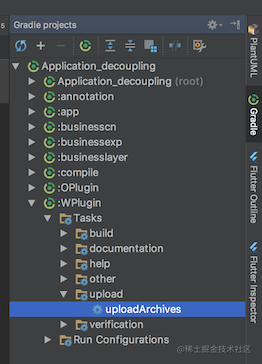
Next, we can see the plug-ins we released in the maven directory.
4.4 using a custom plugin
Use the custom plug-in WPlugin in the app module, and configure it in build.gradle as follows:
apply plugin: WPlugin

buildscript {
    repositories {
        maven {
            url uri('../maven')
        }
    }
    dependencies {
        classpath 'com.wbh.decoupling.plugin:WPlugin:1.0.0'
    }
}
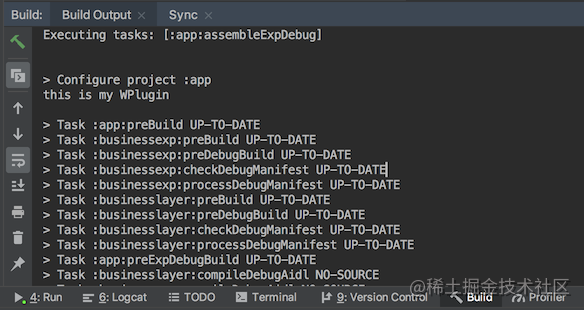
Then Sync Gradle, we can see the content printed by WPlugin in the Build window.
 So far, we have finished how to customize, publish, and use the gradle plug-in.
Next, we should improve the content of this WPlugin.
4.5 custom Transform
To write Transform, we need to use gradle API, so we need to add the following dependencies in build.gradle:
implementation'com.android.tools.build:gradle-api:3.4.2'
Note: since the gradle plug-in uses the above dependencies, it needs to be configured as follows in build.grdle of the project using the plug-in:
buildscript {
    repositories {
        google()
        jcenter()
    }
    dependencies {
        classpath 'com.android.tools.build:gradle:3.4.2'
    }
}
Next, create a class to inherit Transform:
class WTransform extends Transform {

    @Override
    String getName() {
        return null
    }

    @Override
    Set<QualifiedContent.ContentType> getInputTypes() {
        return null
    }

    @Override
    Set<? super QualifiedContent.Scope> getScopes() {
        return null
    }

    @Override
    boolean isIncremental() {
        return false
    }

    @Override
    void transform(TransformInvocation transformInvocation) throws TransformException, InterruptedException, IOException {
        super.transform(transformInvocation)
    }
}
- getName(): returns the custom Transform name
- geInputTypes(): Specifies the input types to be processed by the Transform, mainly including QualifiedContent.DefaultContentType.CLASSES and QualifiedContent.DefaultContentType.RESOURCES, corresponding to. class file and java resource file
- getScopes(): Specifies the scope of the input file.
public interface QualifiedContent {
    enum Scope implements ScopeType {
        /** Only the project (module) content */
        PROJECT(0x01),
        /** Only the sub-projects (other modules) */
        SUB_PROJECTS(0x04),
        /** Only the external libraries */
        EXTERNAL_LIBRARIES(0x10),
        /** Code that is being tested by the current variant, including dependencies */
        TESTED_CODE(0x20),
        /** Local or remote dependencies that are provided-only */
        PROVIDED_ONLY(0x40),
    }
}
- Isincritical(): incremental compilation is currently supported
- transform(): the method of performing transformation. The input and output of this node can be obtained through the parameter transformInvocation:
Collection<TransformInput> inputs = transformInvocation.getInputs()
TransformOutputProvider outputProvider = transformInvocation.getOutputProvider()
TransformInput is divided into two types: jarinput and TransformInput#getjarinputs(), and directoryinput and TransformInput#getdirectoryinputs(). The TransformOutputProvider points to the file / directory output path.
4.6 register Transform
To make our customized Transform effective and participate in the compilation process, we also need to register WTransform. The registration process is very simple. Just register in Plugin.
class WPlugin implements Plugin<Project> {

    @Override
    void apply(Project project) {
        println('this is my WPlugin')
        def andr = project.extensions.getByName('android')
        andr.registerTransform(new WTransform())
    }
}
4.7 improve Transform
import com.android.build.api.transform.DirectoryInput
import com.android.build.api.transform.JarInput
import com.android.build.api.transform.QualifiedContent
import com.android.build.api.transform.Transform
import com.android.build.api.transform.TransformException
import com.android.build.api.transform.TransformInput
import com.android.build.api.transform.TransformInvocation
import com.android.build.api.transform.TransformOutputProvider
import com.android.build.api.transform.Format
import com.android.utils.FileUtils

class WTransform extends Transform {

    @Override
    String getName() {
        return 'WTransform'
    }

    @Override
    Set<QualifiedContent.ContentType> getInputTypes() {
        return Collections.singleton(QualifiedContent.DefaultContentType.CLASSES)
    }

    @Override
    Set<? super QualifiedContent.Scope> getScopes() {
        Set<? super QualifiedContent.Scope> set = new HashSet<>()
        set.add(QualifiedContent.Scope.PROJECT)
        set.add(QualifiedContent.Scope.SUB_PROJECTS)
        return set
    }

    @Override
    boolean isIncremental() {
        return false
    }

    @Override
    void transform(TransformInvocation transformInvocation) throws TransformException, InterruptedException, IOException {
        super.transform(transformInvocation)
        Collection<TransformInput> inputs = transformInvocation.getInputs()
        TransformOutputProvider outputProvider = transformInvocation.getOutputProvider()
        inputs.each {
            it.getJarInputs().each { jarInput ->
                transformJar(jarInput, outputProvider)
            }

            it.getDirectoryInputs().each { dirInput ->
                transformDir(dirInput, outputProvider)
            }
        }
    }

    private static void transformJar(JarInput jarInput, TransformOutputProvider outputProvider) {
        File dstFile = outputProvider.getContentLocation(
                jarInput.getName(),
                jarInput.getContentTypes(),
                jarInput.getScopes(),
                Format.JAR)
        FileUtils.copyFile(jarInput.getFile(), dstFile)
        println('jarInputFile ==> ' + jarInput.file.absolutePath)
        println('dstFile ==> ' + dstFile.absolutePath)
    }

    private static void transformDir(DirectoryInput dirInput, TransformOutputProvider outputProvider) {
        File dstDir = outputProvider.getContentLocation(
                dirInput.getName(),
                dirInput.getContentTypes(),
                dirInput.getScopes(),
                Format.DIRECTORY)
        FileUtils.copyDirectory(dirInput.getFile(), dstDir)
        println('directory input ==> ' + dirInput.file.absolutePath)
        println('dstDir ==> ' + dstDir.absolutePath)
    }
}
The transform() method simply takes all the input files / directories and copies them to the output path.
We reload the plug-in uploadArchives, and then clear project. When we rebuild the project, we can see our printed output in the build window:
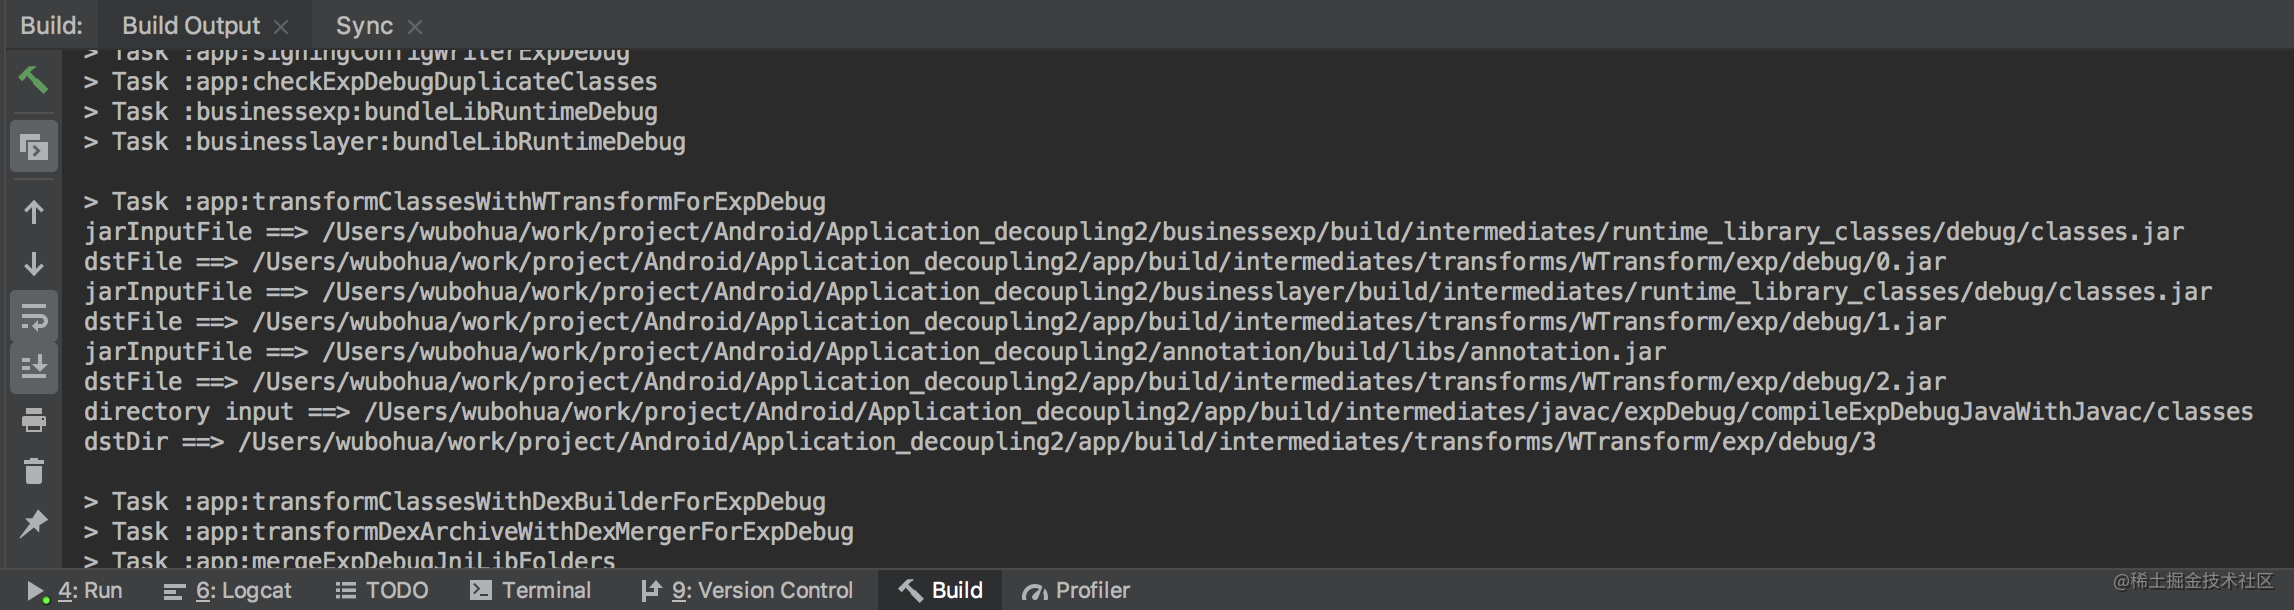
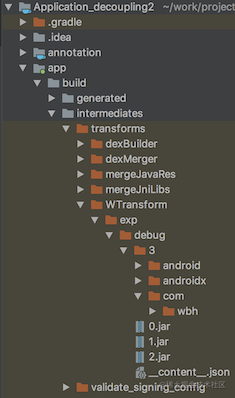
According to the input of printing, we can find the file generated by WTransform in the corresponding directory:
Since all files / directories will be copied again each time they are compiled, incremental compilation is supported:
class WTransform extends Transform {

    @Override
    boolean isIncremental() {
        return true
    }

    @Override
    void transform(TransformInvocation transformInvocation) throws TransformException, InterruptedException, IOException {
        super.transform(transformInvocation)
        boolean isIncremental = transformInvocation.isIncremental()
        println('isIncremental ==> ' + isIncremental)
        Collection<TransformInput> inputs = transformInvocation.getInputs()
        TransformOutputProvider outputProvider = transformInvocation.getOutputProvider()
        if (!isIncremental) {
            outputProvider.deleteAll()
        }
        inputs.each {
            it.getJarInputs().each { jarInput ->
                transformJar(jarInput, outputProvider, isIncremental)
            }

            it.getDirectoryInputs().each { dirInput ->
                transformDir(dirInput, outputProvider, isIncremental)
            }
        }
    }

    private static void transformJar(JarInput jarInput, TransformOutputProvider outputProvider, boolean isIncremental) {
        File dstFile = outputProvider.getContentLocation(
                jarInput.getName(),
                jarInput.getContentTypes(),
                jarInput.getScopes(),
                Format.JAR)
        println('jar input ==> ' + jarInput.file.absolutePath)
        println('dstFile ==> ' + dstFile.getAbsolutePath())

        if (!isIncremental) {
            FileUtils.copyFile(jarInput.file, dstFile)
            return
        }

        Status status = jarInput.status
        switch (status) {
            case Status.NOTCHANGED:
                break
            case Status.ADDED:
            case Status.CHANGED:
                FileUtils.deleteIfExists(dstFile)
                FileUtils.copyFile(jarInput.file, dstFile)
                break
            case Status.REMOVED:
                FileUtils.deleteIfExists(dstFile)
                break
        }
    }

    private static void transformDir(DirectoryInput dirInput, TransformOutputProvider outputProvider, boolean isIncremental) {
        File dstDir = outputProvider.getContentLocation(
                dirInput.getName(),
                dirInput.getContentTypes(),
                dirInput.getScopes(),
                Format.DIRECTORY)
        println('directory input ==> ' + dirInput.file.absolutePath)
        println('dstDir ==> ' + dstDir.absolutePath)

        if (!isIncremental) {
            FileUtils.copyDirectory(dirInput.getFile(), dstDir)
            return
        }

        String srcDirPath = dirInput.getFile().getAbsolutePath()
        String dstDirPath = dstDir.getAbsolutePath()

        Map<File, Status> fileStatusMap = dirInput.getChangedFiles()
        fileStatusMap.entrySet().each { Map.Entry<File, Status> changedFileMapEntry ->

            Status status = changedFileMapEntry.getValue()
            File inputFile = changedFileMapEntry.getKey()
            println('change file: ' + inputFile.getAbsolutePath() + ", status: " + status)
            String dstFilePath = inputFile.getAbsolutePath().replace(srcDirPath, dstDirPath)
            File dstFile = new File(dstFilePath)

            switch (status) {
                case Status.NOTCHANGED:
                    break
                case Status.REMOVED:
                    FileUtils.deleteIfExists(dstFile)
                    break
                case Status.ADDED:
                case Status.CHANGED:
                    FileUtils.deleteIfExists(dstFile)
                    FileUtils.copyFile(inputFile, dstFile)
                    break
            }
        }
    }
}
All incrementally compiled files have a Status status. You can do different corresponding operations according to the Status of the file.
- Status. Not changed: the file has not changed, so you do not need to copy it again
- Status.REMOVED: the file is deleted, so the corresponding output file should also be deleted
- Status.ADDED: this file is newly added, so you need to copy it to the output path
- Status.CHANGED: the file has been modified, so you need to copy it to the output path again
After the modification, we test the effect. After a complete compilation, create a Test.java class, and then run the compilation again. You can see the following print results:
> Task :app:transformClassesWithWTransformForExpDebug
isIncremental ==> true
jar input ==> /Users/wubohua/work/project/Android/Application_decoupling2/annotation/build/libs/annotation.jar
dstFile ==> /Users/wubohua/work/project/Android/Application_decoupling2/app/build/intermediates/transforms/WTransform/exp/debug/2.jar
jar input ==> /Users/wubohua/work/project/Android/Application_decoupling2/businessexp/build/intermediates/runtime_library_classes/debug/classes.jar
dstFile ==> /Users/wubohua/work/project/Android/Application_decoupling2/app/build/intermediates/transforms/WTransform/exp/debug/0.jar
jar input ==> /Users/wubohua/work/project/Android/Application_decoupling2/businesslayer/build/intermediates/runtime_library_classes/debug/classes.jar
dstFile ==> /Users/wubohua/work/project/Android/Application_decoupling2/app/build/intermediates/transforms/WTransform/exp/debug/1.jar
directory input ==> /Users/wubohua/work/project/Android/Application_decoupling2/app/build/intermediates/javac/expDebug/compileExpDebugJavaWithJavac/classes
dstDir ==> /Users/wubohua/work/project/Android/Application_decoupling2/app/build/intermediates/transforms/WTransform/exp/debug/3
change file: /Users/wubohua/work/project/Android/Application_decoupling2/app/build/intermediates/javac/expDebug/compileExpDebugJavaWithJavac/classes/com/wbh/decoupling/Test.class, status: ADDED
Modify the code of Test.java, for example, add a method, and then execute the compilation. You can see the following print:
> Task :app:transformClassesWithWTransformForExpDebug
isIncremental ==> true
jar input ==> /Users/wubohua/work/project/Android/Application_decoupling2/annotation/build/libs/annotation.jar
dstFile ==> /Users/wubohua/work/project/Android/Application_decoupling2/app/build/intermediates/transforms/WTransform/exp/debug/2.jar
jar input ==> /Users/wubohua/work/project/Android/Application_decoupling2/businessexp/build/intermediates/runtime_library_classes/debug/classes.jar
dstFile ==> /Users/wubohua/work/project/Android/Application_decoupling2/app/build/intermediates/transforms/WTransform/exp/debug/0.jar
jar input ==> /Users/wubohua/work/project/Android/Application_decoupling2/businesslayer/build/intermediates/runtime_library_classes/debug/classes.jar
dstFile ==> /Users/wubohua/work/project/Android/Application_decoupling2/app/build/intermediates/transforms/WTransform/exp/debug/1.jar
directory input ==> /Users/wubohua/work/project/Android/Application_decoupling2/app/build/intermediates/javac/expDebug/compileExpDebugJavaWithJavac/classes
dstDir ==> /Users/wubohua/work/project/Android/Application_decoupling2/app/build/intermediates/transforms/WTransform/exp/debug/3
change file: /Users/wubohua/work/project/Android/Application_decoupling2/app/build/intermediates/javac/expDebug/compileExpDebugJavaWithJavac/classes/com/wbh/decoupling/Test.class, status: CHANGED
Delete the Test.java file and then execute the compilation. The print results are as follows:
> Task :app:transformClassesWithWTransformForExpDebug
isIncremental ==> true
jar input ==> /Users/wubohua/work/project/Android/Application_decoupling2/annotation/build/libs/annotation.jar
dstFile ==> /Users/wubohua/work/project/Android/Application_decoupling2/app/build/intermediates/transforms/WTransform/exp/debug/2.jar
jar input ==> /Users/wubohua/work/project/Android/Application_decoupling2/businessexp/build/intermediates/runtime_library_classes/debug/classes.jar
dstFile ==> /Users/wubohua/work/project/Android/Application_decoupling2/app/build/intermediates/transforms/WTransform/exp/debug/0.jar
jar input ==> /Users/wubohua/work/project/Android/Application_decoupling2/businesslayer/build/intermediates/runtime_library_classes/debug/classes.jar
dstFile ==> /Users/wubohua/work/project/Android/Application_decoupling2/app/build/intermediates/transforms/WTransform/exp/debug/1.jar
directory input ==> /Users/wubohua/work/project/Android/Application_decoupling2/app/build/intermediates/javac/expDebug/compileExpDebugJavaWithJavac/classes
dstDir ==> /Users/wubohua/work/project/Android/Application_decoupling2/app/build/intermediates/transforms/WTransform/exp/debug/3
change file: /Users/wubohua/work/project/Android/Application_decoupling2/app/build/intermediates/javac/expDebug/compileExpDebugJavaWithJavac/classes/com/wbh/decoupling/Test.class, status: REMOVED
So far, we have finished the basic usage of Transform, and the logic now implemented by wttransform is only to copy the input code to the output.
4.8 get the class generated by annotation
When traversing the jar file, traverse and obtain all classes starting with com.wbh.decoupling.generate and collect them:
private static final String TARGET = 'com/wbh/decoupling/generate/'
private static List<String> sTargetList = new ArrayList<>()

private static void transformJar(JarInput jarInput, TransformOutputProvider outputProvider, boolean isIncremental) {
    File dstFile = outputProvider.getContentLocation(
            jarInput.getName(),
            jarInput.getContentTypes(),
            jarInput.getScopes(),
            Format.JAR)

    JarFile jarFile = new JarFile(jarInput.file)
    println(jarFile.name)
    jarFile.entries().each {
        if (it.name.contains(TARGET)) {
            sTargetList.add(it.name)
        }
    }
    // ... ...
}
After collecting the class files generated by annotations, generate fixed class files and call the class files generated by these annotations in this class file:
// com.wbh.decoupling.generate

public class AsmCrossCompileUtils {

    public static void init() {
        CardManager_becf3fc7606c9b461025f1def7ff27ac.init();
        CardManager_dc2db21188334cfca97494d99700395.init();
    }
}
The next main task is to generate this class file.
4.9 introduction of ASM
ASM is a Java bytecode manipulation framework. We use this framework to generate bytecode files. Using this framework requires a certain understanding of bytecode specifications, which will not be explained in detail here.
For convenience, a studio plug-in ASM Bytecode Outline is needed here. This plug-in can be used to view the bytecode file compiled by a class file, as well as the ASM code that generates the bytecode file, and the installation process.
We first write our own AsmCrossCompileUtils.java class, and then right-click to select Show Bytecode outline 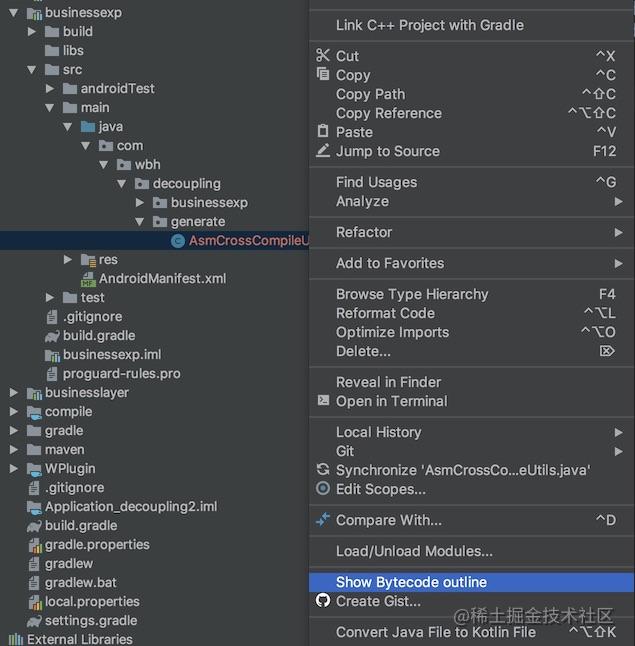
Then, this file will be automatically compiled to generate bytecode file:
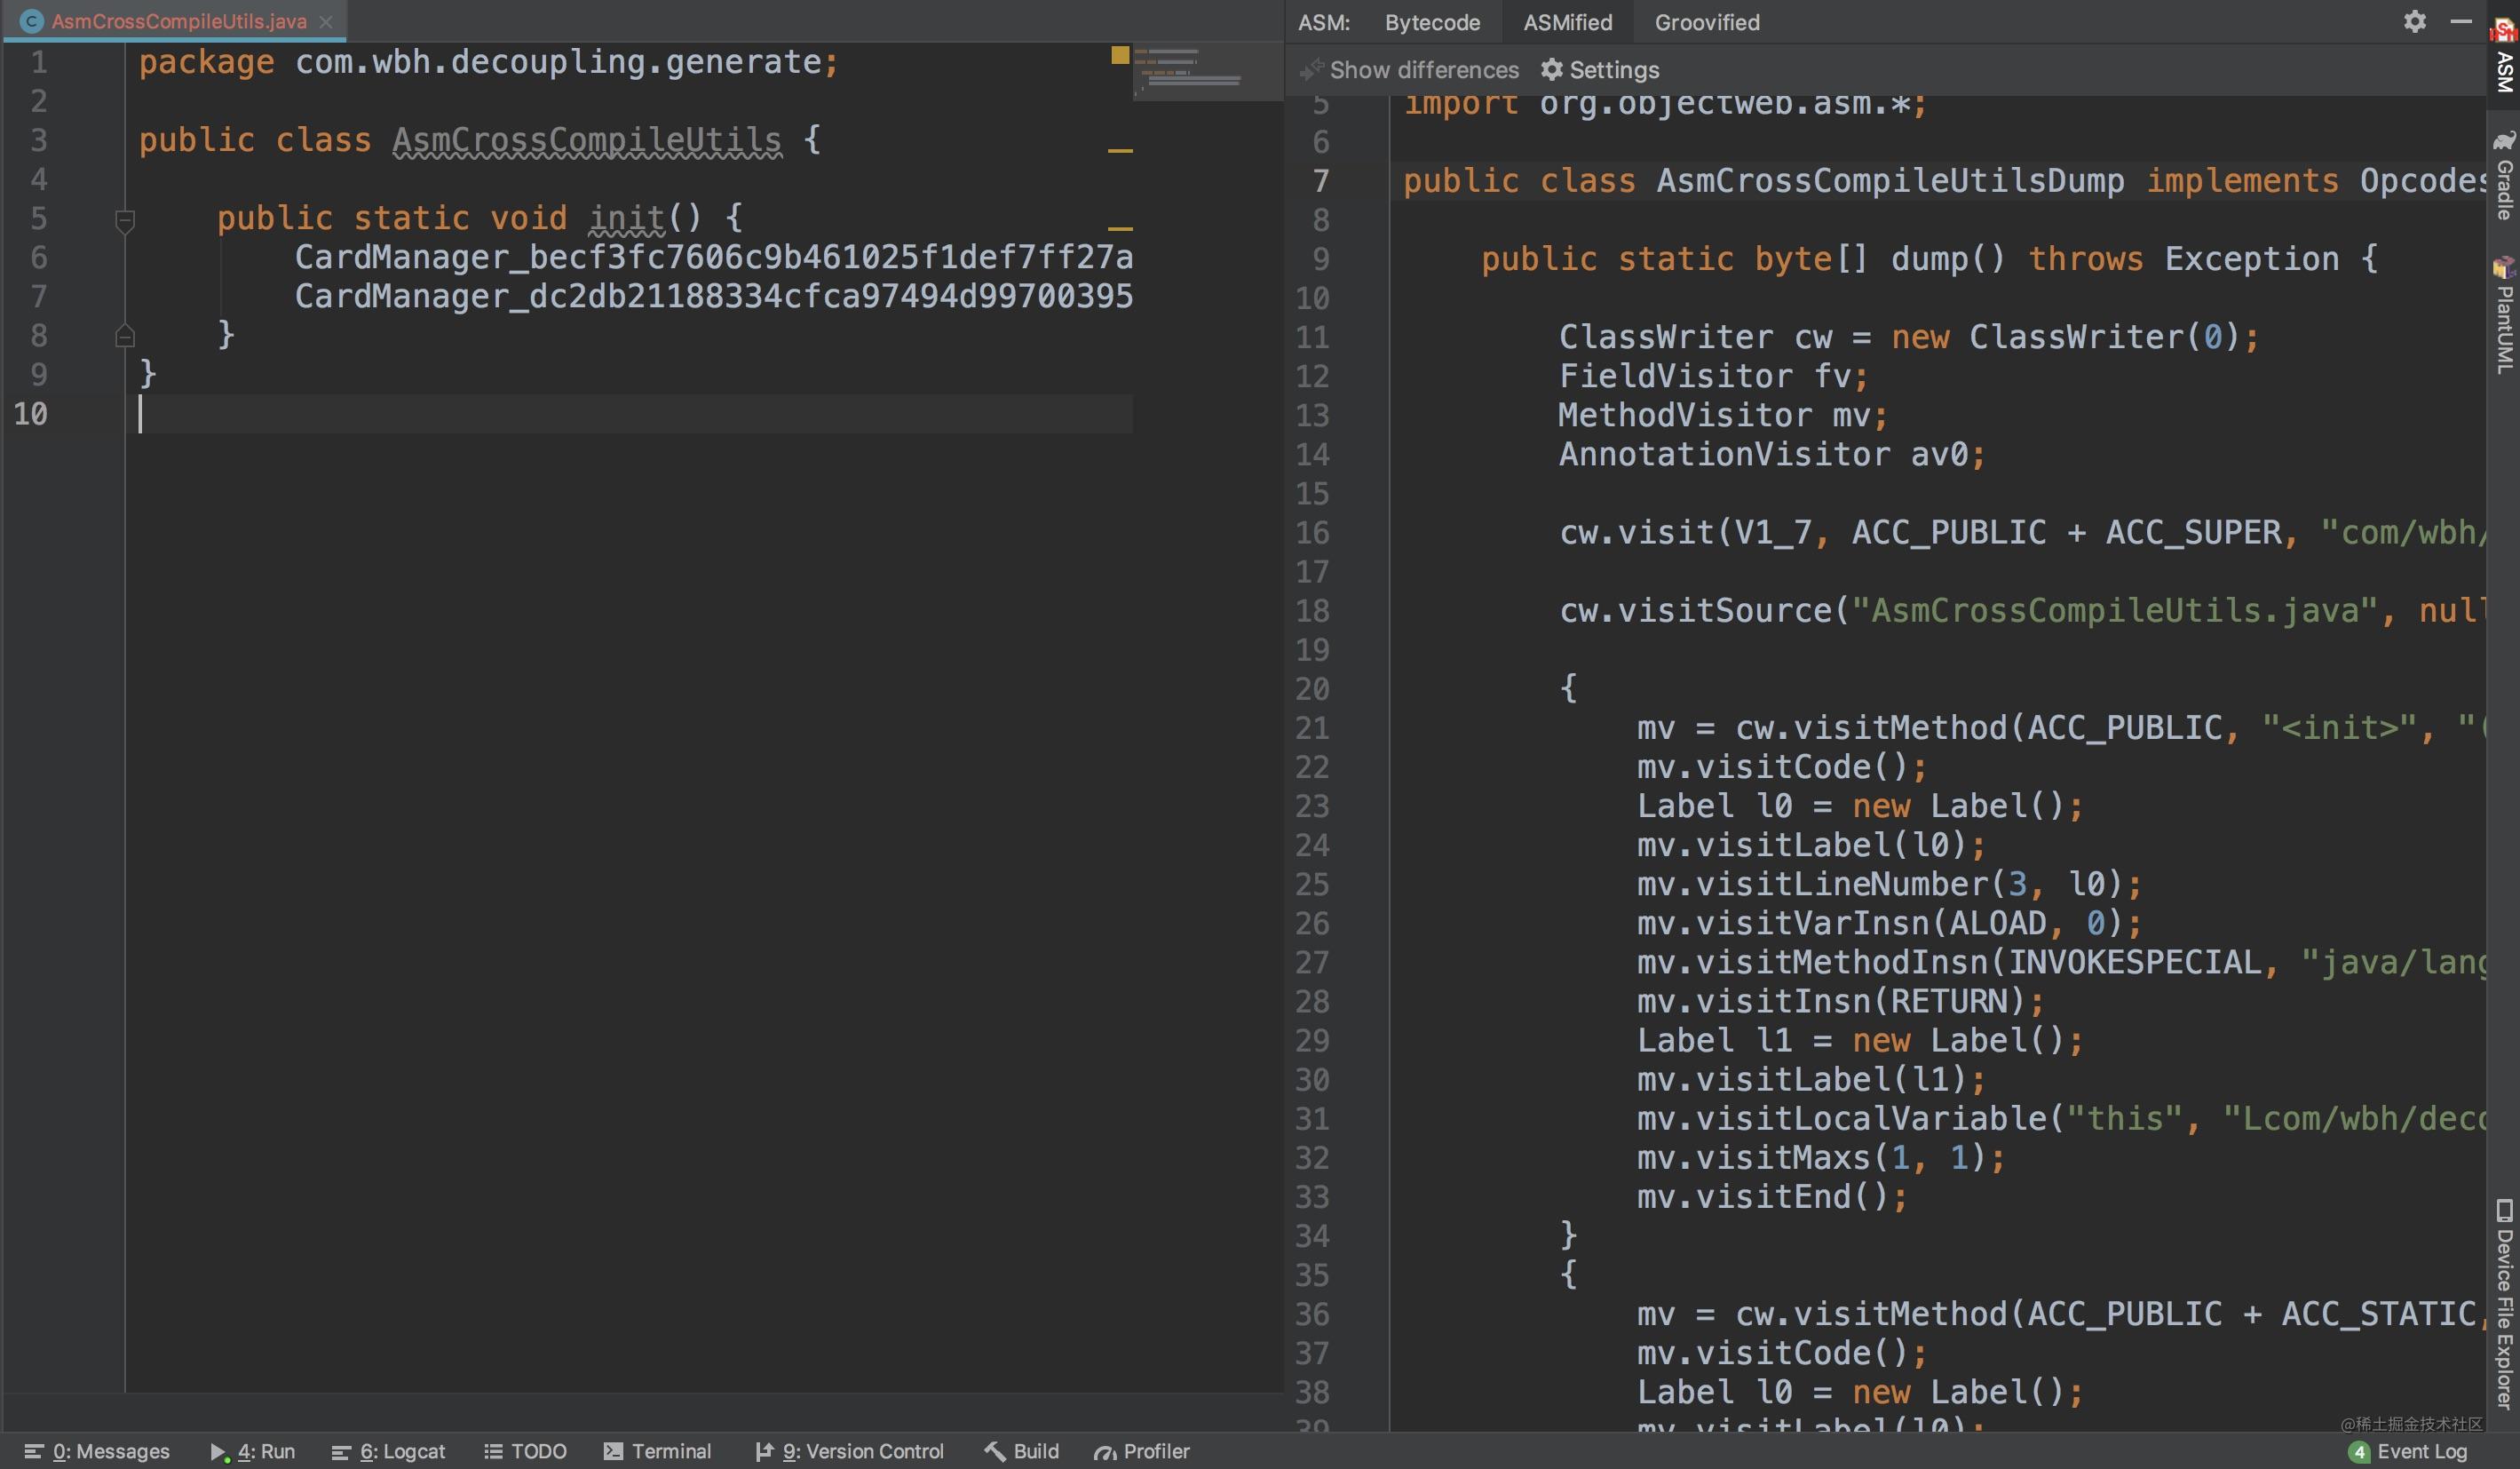
We copy the generated ASM code into WPlugin, and also need to introduce the dependency implementation 'org.ow2.asm:asm:6.0'
import java.util.*;

import org.objectweb.asm.*;

public class AsmCrossCompileUtilsDump implements Opcodes {

    public static byte[] dump() throws Exception {

        ClassWriter cw = new ClassWriter(0);
        FieldVisitor fv;
        MethodVisitor mv;
        AnnotationVisitor av0;

        cw.visit(V1_7, ACC_PUBLIC + ACC_SUPER, "com/wbh/decoupling/generate/AsmCrossCompileUtils", null, "java/lang/Object", null);

        cw.visitSource("AsmCrossCompileUtils.java", null);

        {
            mv = cw.visitMethod(ACC_PUBLIC, "<init>", "()V", null, null);
            mv.visitCode();
            Label l0 = new Label();
            mv.visitLabel(l0);
            mv.visitLineNumber(3, l0);
            mv.visitVarInsn(ALOAD, 0);
            mv.visitMethodInsn(INVOKESPECIAL, "java/lang/Object", "<init>", "()V", false);
            mv.visitInsn(RETURN);
            Label l1 = new Label();
            mv.visitLabel(l1);
            mv.visitLocalVariable("this", "Lcom/wbh/decoupling/generate/AsmCrossCompileUtils;", null, l0, l1, 0);
            mv.visitMaxs(1, 1);
            mv.visitEnd();
        }
        {
            mv = cw.visitMethod(ACC_PUBLIC + ACC_STATIC, "init", "()V", null, null);
            mv.visitCode();
            Label l0 = new Label();
            mv.visitLabel(l0);
            mv.visitLineNumber(6, l0);
            mv.visitMethodInsn(INVOKESTATIC, "com/wbh/decoupling/generate/CardManager_becf3fc7606c9b461025f1def7ff27ac", "init", "()V", false);
            Label l1 = new Label();
            mv.visitLabel(l1);
            mv.visitLineNumber(7, l1);
            mv.visitMethodInsn(INVOKESTATIC, "com/wbh/decoupling/generate/CardManager_dc2db21188334cfca97494d99700395", "init", "()V", false);
            Label l2 = new Label();
            mv.visitLabel(l2);
            mv.visitLineNumber(8, l2);
            mv.visitInsn(RETURN);
            mv.visitMaxs(0, 0);
            mv.visitEnd();
        }
        cw.visitEnd();

        return cw.toByteArray();
    }
}
Analyze this ASM code. The first code block in the dump() method is generating the constructor byte code of the target class AsmCrossCompileUtils, and the second code block is generating the init() method. Let's sort out this Code:
class AsmCrossCompileUtilsDump implements Opcodes {

    private static final String CLASS_PATH = 'com/wbh/decoupling/generate/'
    private static final String CLASS_SIMPLE_NAME = 'AsmCrossCompileUtils'
    private static final String CLASS_FULL_NAME = CLASS_PATH + CLASS_SIMPLE_NAME
    private static final String JAVA_FILE_NAME = CLASS_SIMPLE_NAME + '.java'
    private static final String CLASS_FILE_NAME = CLASS_SIMPLE_NAME + '.class'

    static void injectClass(TransformOutputProvider outputProvider, List<String> list) {
        File dstFile = outputProvider.getContentLocation(
                CLASS_SIMPLE_NAME,
                Collections.singleton(QualifiedContent.DefaultContentType.CLASSES),
                Collections.singleton(QualifiedContent.Scope.PROJECT),
                Format.DIRECTORY)
        byte[] bytes = dump(list)
        File file = new File(dstFile.absolutePath + File.separator + CLASS_PATH)
        file.mkdirs()

        FileOutputStream fos = new FileOutputStream(new File(file, CLASS_FILE_NAME))
        fos.write(bytes)
    }

    // ASM framework generates bytecode of AsmCrossCompileUtils class
    private static byte[] dump(List<String> list) throws Exception {

        ClassWriter cw = new ClassWriter(0)
        cw.visit(V1_7, ACC_PUBLIC + ACC_SUPER, CLASS_FULL_NAME, null, "java/lang/Object", null)
        cw.visitSource(JAVA_FILE_NAME, null)
        visitConstructionMethod(cw)
        visitInitMethod(cw, list)
        cw.visitEnd()

        return cw.toByteArray()
    }

    // Generate constructor code
    private static void visitConstructionMethod(ClassWriter cw) {
        MethodVisitor mv = cw.visitMethod(ACC_PUBLIC, "<init>", "()V", null, null)
        mv.visitCode()
        Label l0 = new Label()
        mv.visitLabel(l0)
        mv.visitLineNumber(3, l0)
        mv.visitVarInsn(ALOAD, 0)
        mv.visitMethodInsn(INVOKESPECIAL, "java/lang/Object", "<init>", "()V", false)
        mv.visitInsn(RETURN)
        Label l1 = new Label()
        mv.visitLabel(l1)
        mv.visitLocalVariable("this", "Lcom/wbh/decoupling/generate/AsmCrossCompileUtils;", null, l0, l1, 0)
        mv.visitMaxs(1, 1)
        mv.visitEnd()
    }

    // Generate the init static method and call the @Param list in the method to specify the init() method of the class.
    private static void visitInitMethod(ClassWriter cw, List<String> list) {
        MethodVisitor mv = cw.visitMethod(ACC_PUBLIC + ACC_STATIC, "init", "()V", null, null)
        mv.visitCode()

        int lineNumber = 6

        for (int i = 0; i < list.size(); i++) {
            String it = list.get(i)

            Label l = new Label()
            mv.visitLabel(l)
            mv.visitLineNumber(lineNumber, l)
            String owner = it.substring(0, it.indexOf('.'))
            mv.visitMethodInsn(INVOKESTATIC, owner, "init", "()V", false)
            lineNumber++
        }

        Label l = new Label()
        mv.visitLabel(l)
        mv.visitLineNumber(lineNumber, l)
        mv.visitInsn(RETURN)
        mv.visitMaxs(0, 0)
        mv.visitEnd()
    }
}
The logic here will save the bytecode file generated by ASM framework to the output directory of Transform. Then we need to call the logic here in the WTransform Code:
class WTransform extends Transform {
    @Override
    void transform(TransformInvocation transformInvocation) throws TransformException, InterruptedException, IOException {
        super.transform(transformInvocation)
        sTargetList.clear()
        // ... ...
        injectClass(outputProvider)
    }

    private static void injectClass(TransformOutputProvider outputProvider) {
        AsmCrossCompileUtilsDump.injectClass(outputProvider, sTargetList)
    }
}
So far, all the logic of Transform has been written, and then the AsmCrossCompileUtils class we wrote ourselves needs to be deleted. Finally, recompile and release our plug-in, and rerun the code. You can see that the Activity can display each registered Card normally.
5, Summary
5.1 Demo full code address
5.2 comparison of APT and Transform
The code is compiled to generate apk, which can be summarized as. Java -- >. Class -- >. DEX
APT is executed in the. java generation. class process, which is supported by the java language.
The execution of Transform code generates. dex in. class, which is supported by Android. In fact, the process of. class generating. dex goes through a Transform chain, and the Transform we defined is a node of this chain. The confusion and syntax desugation in the apk compilation process we know are also nodes of this chain.
APT can only be used to generate new class files, and Transform can also insert and delete codes on the original class files, which will be more powerful than APT.
5.3 about bytecode stakes
To learn bytecode instrumentation, you still need to learn Groovy syntax and bytecode rules first. Although Groovy syntax is very similar to Java, it can be written directly with Java rules, but it is only similar after all. Then there is the bytecode plug-in. Although some studio plug-ins can assist in writing, they still need to be modified according to the actual scenario in the actual business. If you don't understand the bytecode rules, it's still difficult to write.