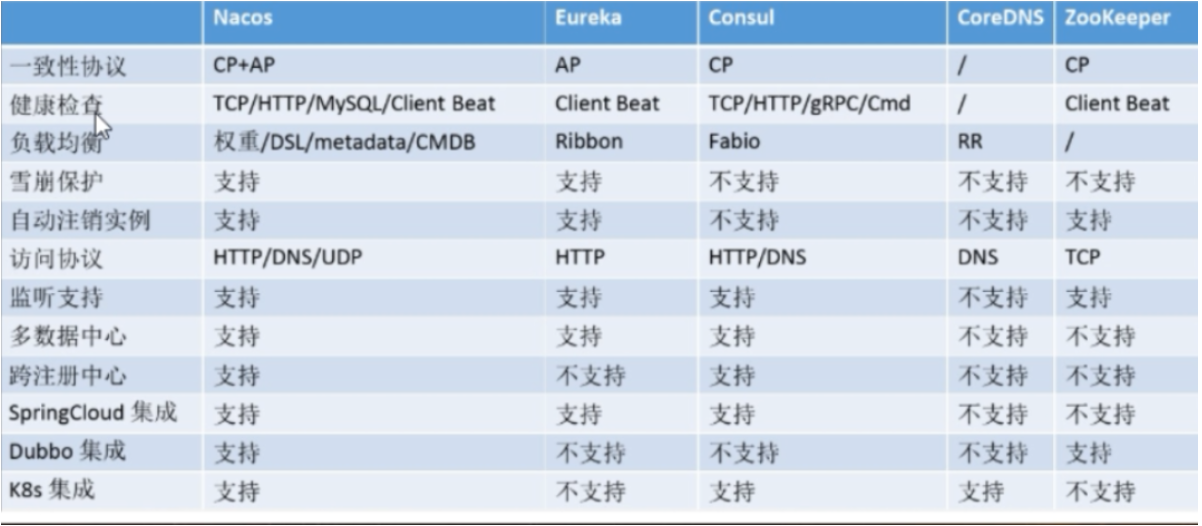
Springcloud alibaba Nacos as service registry
Nacos service provider registration
Create a new microservice provider cloudalibaba provider payment9001 (simulated payment providing module)
Related dependencies required to introduce pom
Compared with the previous study of Eureka registry. More nacos related dependencies
<dependency>
    <groupId>com.alibaba.cloud</groupId>
    <artifactId>spring-cloud-starter-alibaba-nacos-discovery</artifactId>
</dependency>
 <dependencies>
        <dependency>
            <groupId>org.springframework.boot</groupId>
            <artifactId>spring-boot-starter-web</artifactId>
        </dependency>

        <dependency>
            <groupId>org.springframework.boot</groupId>
            <artifactId>spring-boot-starter-actuator</artifactId>
        </dependency>

        <dependency>
            <groupId>com.alibaba.cloud</groupId>
            <artifactId>spring-cloud-starter-alibaba-nacos-discovery</artifactId>
        </dependency>
        <dependency>
            <groupId>org.springframework.boot</groupId>
            <artifactId>spring-boot-devtools</artifactId>
            <scope>runtime</scope>
            <optional>true</optional>
        </dependency>
        <dependency>
            <groupId>org.projectlombok</groupId>
            <artifactId>lombok</artifactId>
            <optional>true</optional>
        </dependency>
        <dependency>
            <groupId>org.springframework.boot</groupId>
            <artifactId>spring-boot-starter-test</artifactId>
        </dependency>
    </dependencies>
After that, we modify the yaml configuration file
server:
 port: 9001

spring:
  application:
    name: nacos-provider
  cloud:
   nacos:
    discovery:
     server-addr: 127.0.0.1:8848 #Configure Nacos address

# Exposure to be monitored
management:
  endpoints:
   web:
    exposure:
      include: '*'
Create a main startup class (note that the @ EnableDiscoveryClient client service discovery annotation is enabled)
package com.dzu.sprinhcloud.alibaba;

import org.springframework.boot.SpringApplication;
import org.springframework.boot.autoconfigure.SpringBootApplication;
import org.springframework.cloud.client.discovery.EnableDiscoveryClient;

@EnableDiscoveryClient
@SpringBootApplication
public class PaymentMain9001 {
    public static void main(String[] args) {
        SpringApplication.run(PaymentMain9001.class, args);
    }
}
Write the core business class information in the controller
package com.dzu.sprinhcloud.alibaba.controller;

import org.springframework.beans.factory.annotation.Value;
import org.springframework.web.bind.annotation.GetMapping;
import org.springframework.web.bind.annotation.PathVariable;
import org.springframework.web.bind.annotation.RestController;

/**
 * @author chenruxu
 * @date
 */
@RestController
public class PaymentController {
    @Value("${server.port}")
    private String serverPort;

    @GetMapping(value = "/payment/nacos/{id}")
    public String getPyment(@PathVariable("id") Integer id){
        return "nacos register ,serverPort: "+serverPort+"\t id: "+id;
    }
}
Service provider testing
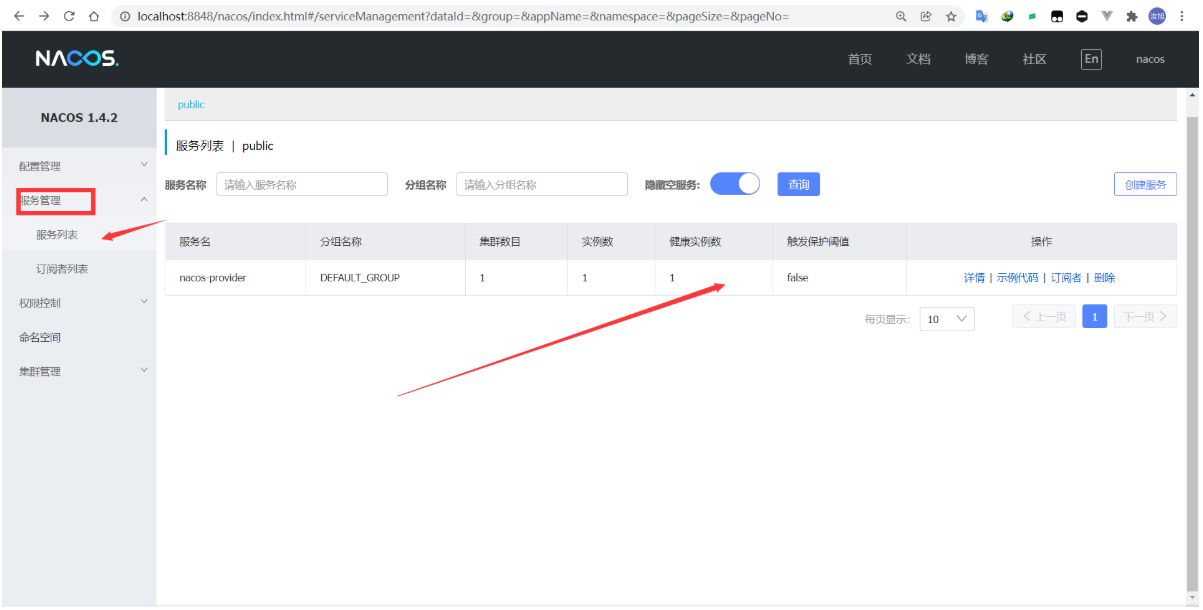
Start the nacos service registry first. Then the access test is carried out in the project of starting 9001

After successful access, you can see that the service has been registered in the visual interface of nacos. By this time, the operation of registering the service provider into nacos has been completed.
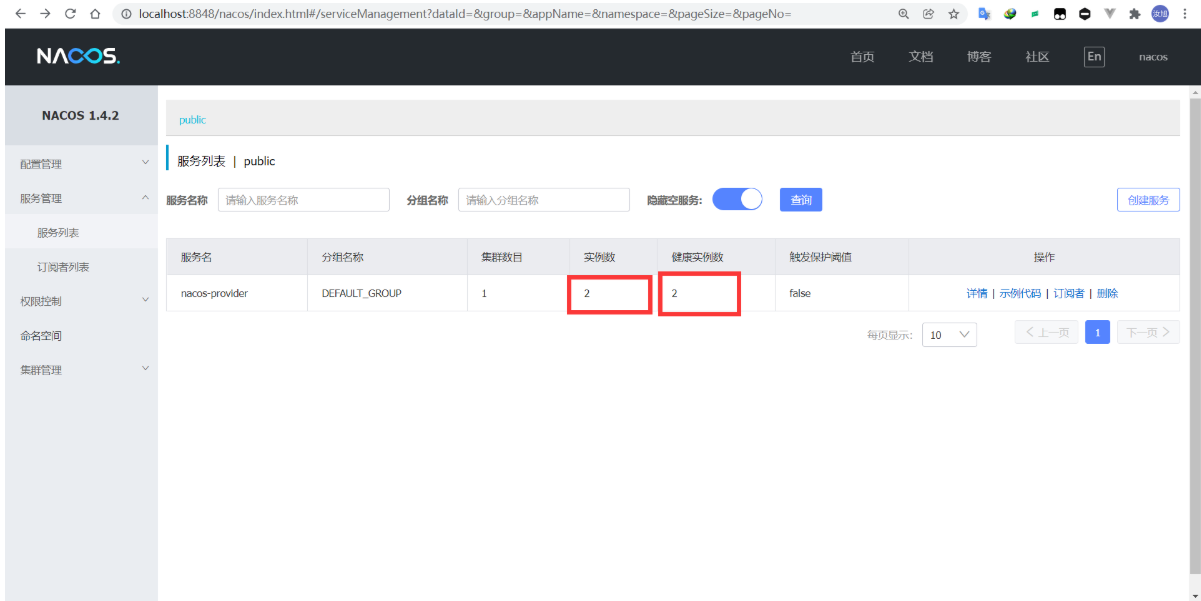
nacos has its own load balancing function. In order to test, we establish an identical cloudalibaba provider payment9002 module for testing.
After completing the 9002 module, start the 9001 and 9002 projects for testing. Two registration instances will appear in nacos.
Nacos based consumer creation
Create a new consumer module cloudalibaba-consumer-nacos-order83
pom file is the same as above
Modify the configuration file of yaml.
server:
  port: 83

Spring:
  application:
    name: nacos-order-consumer

  cloud:
    nacos:
      discovery:
        server-addr: localhost:8848

# The name of the microservice that the consumer will access (the microservice provider successfully registered in nacos)
service-url:
  nacos-user-service: http://nacos-provider
Main startup class
package com.dzu.springcloud.alibaba;

import org.springframework.boot.SpringApplication;
import org.springframework.boot.autoconfigure.SpringBootApplication;
import org.springframework.cloud.client.discovery.EnableDiscoveryClient;

@EnableDiscoveryClient
@SpringBootApplication
public class OrderNacosMain83 {
    public static void main(String[] args) {
        SpringApplication.run(OrderNacosMain83.class, args);
    }
}
Create a new resttemplate configuration class. ribbon is integrated in nacos. You can configure and operate load balancing through resttemplate
package com.dzu.springcloud.alibaba.config;

import org.springframework.cloud.client.loadbalancer.LoadBalanced;
import org.springframework.context.annotation.Bean;
import org.springframework.context.annotation.Configuration;
import org.springframework.web.client.RestTemplate;

@Configuration
public class ApplicationContextConfig {
    @Bean
    @LoadBalanced// Comments should be added when resttemplate is combined with ribbon for load balancing
    public RestTemplate getRestTemplate(){
        return new RestTemplate();
    }
}
Create the controller class to complete the preparation of the core calling business
package com.dzu.springcloud.alibaba.controller;

import lombok.extern.slf4j.Slf4j;
import org.springframework.beans.factory.annotation.Value;
import org.springframework.web.bind.annotation.GetMapping;
import org.springframework.web.bind.annotation.PathVariable;
import org.springframework.web.bind.annotation.RestController;
import org.springframework.web.client.RestTemplate;

import javax.annotation.Resource;

@RestController
@Slf4j
public class OrderNacosController {
    @Resource
    private RestTemplate restTemplate;

    @Value("${service-url.nacos-user-service}")
    private String serverUrl;

    @GetMapping(value = "/consumer/payment/nacos/{id}")
    public String paymeentInfo(@PathVariable("id") Long id){
        return restTemplate.getForObject(serverUrl+"/payment/nacos/"+id,String.class );
    }
}
After writing, open the 83 service to complete the test. At this time, through the call of the consumer module, you can observe the relevant functions of load balancing through the port number.

At this time, the rest micro service project built through nacos can access the service provider through consumers.