First understand what it is, then understand how to do it, then understand why
As the beginning of the series, this paper tries to make you have a general understanding of fabric through a simple process of fabric application development.
preface
Put three pictures first:

The first is Gartner 2017's technology maturity curve. As a blockchain practitioner, you don't want it to be over touted or brainless. Blockchain is not omnipotent, but in some directions, especially in the field of strong demand for sensitive information encryption and sharing, it does have its advantages.
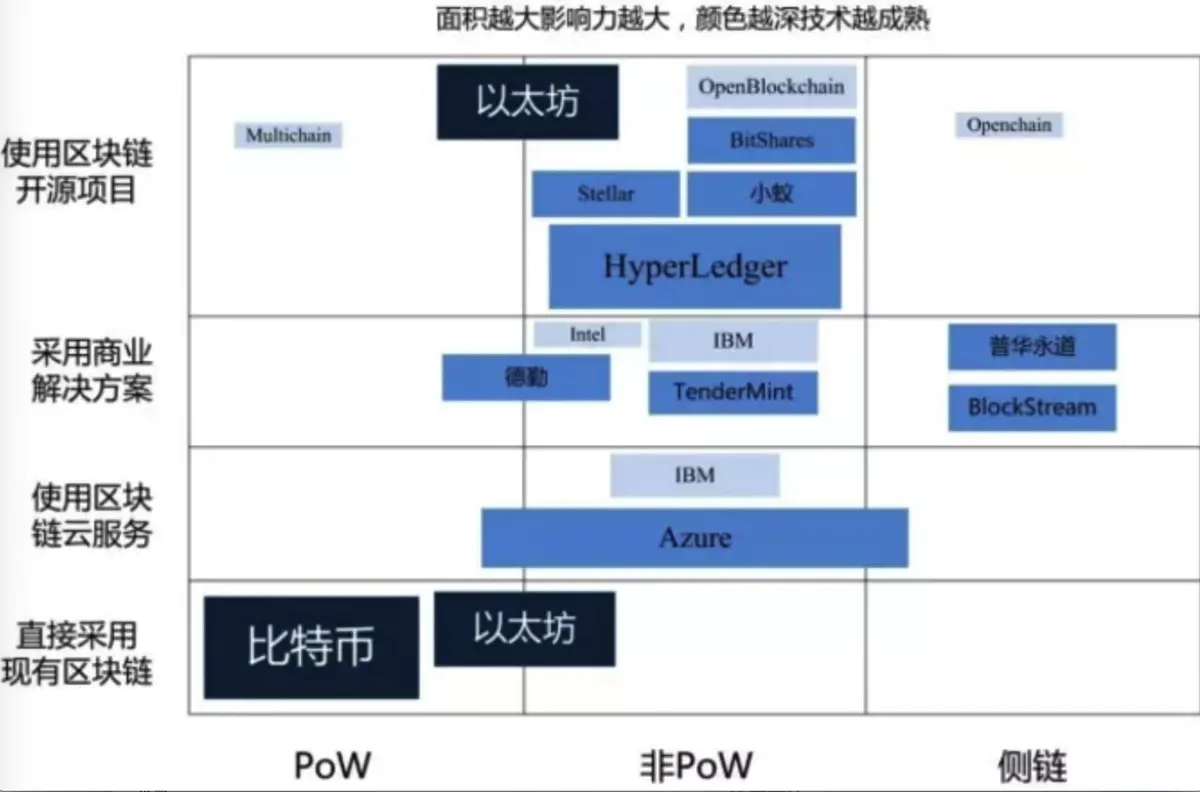
The second is the current development and application of major blockchain projects. In the field of public chain, bitcoin is still on top of the world. Ethereum follows closely, and enterprise level commercial solutions are in full bloom. However, the Hyperledger of IMB is gradually becoming the first choice of alliance chain solutions.
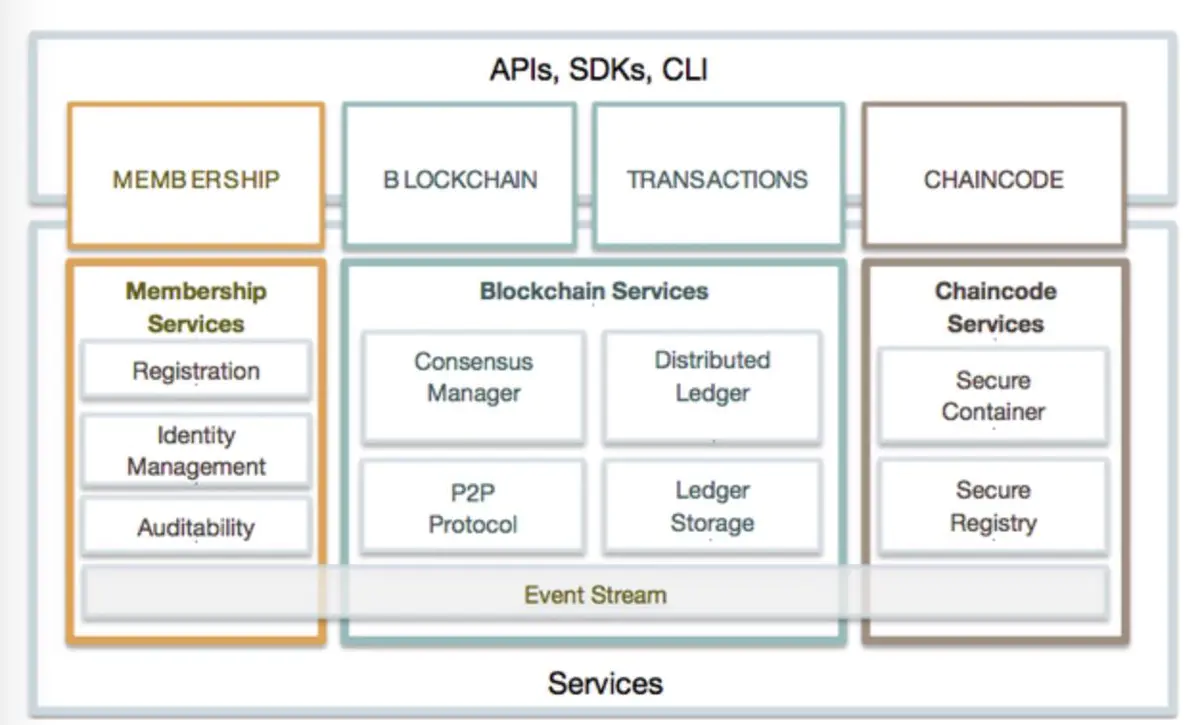
The third is the overall functional diagram after Hyperledger Fabric 1.0. It can be seen from this that the greatest advantages of Fabric over other alliance chain schemes are as follows: first, the native MSP(Member Service Provider), i.e. personnel organization permission management; second, the network node topology map conforms to the organization relationship requirements of the alliance chain; third, each module is pluggable and friendly to developers.
What is Hyperledger Fabric
In short, Hyperledger Fabric is an open-source blockchain solution of IBM.
Wikipedia Introduction on:

Official website Introduction:
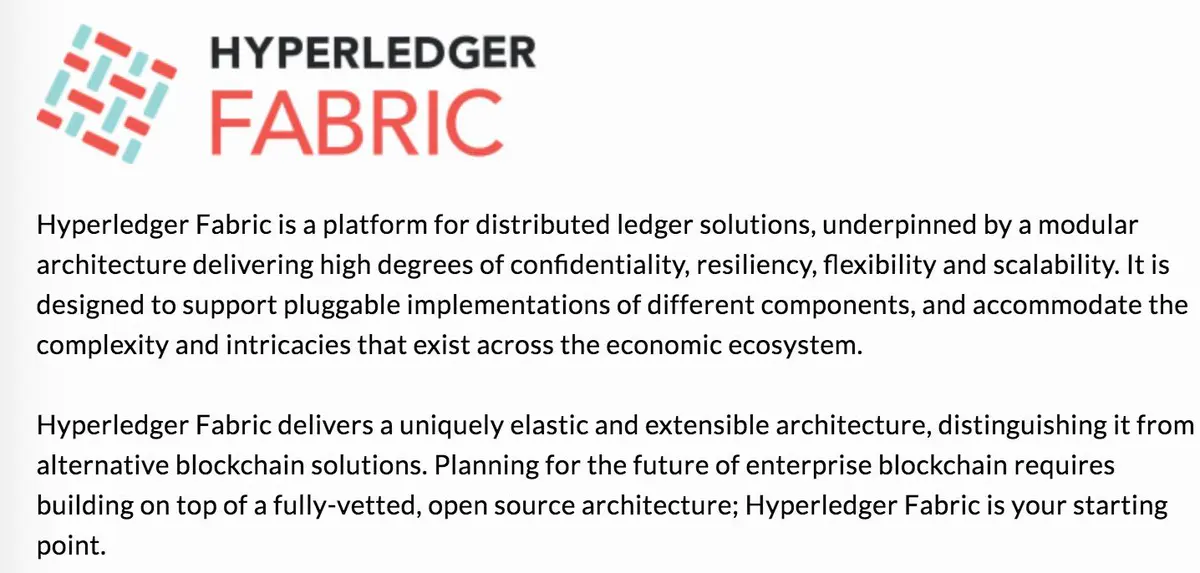
Key words: distributed, identity, flexibility, scalability, pluggable
That is, distributed (also translated into "decentralization"), confidential (PKI authority authentication + information encryption transmission), flexible and scalable (node types are diverse, nodes can be reused, different channel business authority isolation), and component plug and play (CA, sorting component, encryption component plug and play) are supported
Environment construction
Because the theme of this article is Fabric development, the basic environment building steps are omitted. By default, you can complete the building in one minute (you can't destroy the great promise of one hour demo development stated by the blogger 😆)
1. centos (or ubuntu) try to use the kernel to compare the new version

linux.jpg
2,docker

After installing docker, it is better to add the docker hub image of Alibaba. Please refer to the official website for the steps account.aliyun.com
3,docker-compose

4,go

Fabric environment deployment & running ex amp le
Download fabric source
mk dir -p $GOPATH/src/github.com/hyperledger
cd $GOPATH/src/github.com/hyperledger
git clone https://github.com/hyperledger/fabric.git
After downloading
cd $GOPATH/src/github.com/hyperledger/fabric
git checkout release-1.1(1.1 Is the latest stable version)
Download docker images of fabric components in batch (you can also download all components for local compilation and operation, but it is too cumbersome, not recommended)
cd $GOPATH/src/github.com/hyperledger/fabric/examples/e2e_cli/
source download-dockerimages.sh -c x86_64-1.1.0 -f x86_64-1.1.0
Start downloading image, hold on a moment
docker images viewing local images
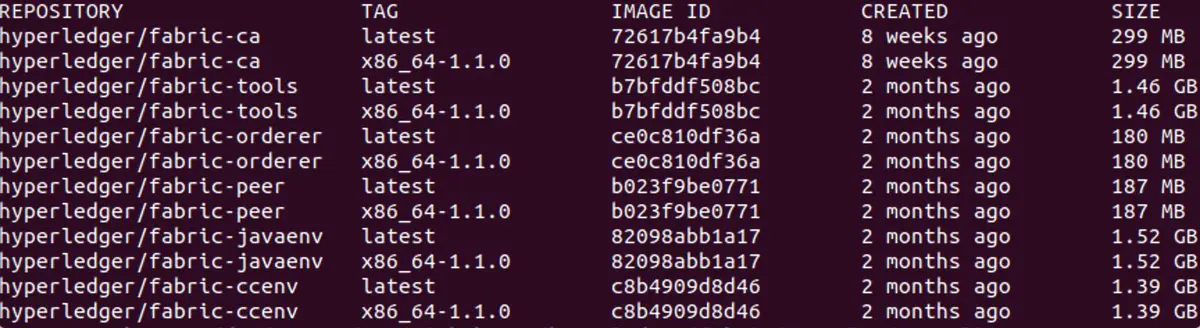
This is just a few main images, including CA, sorting, nodes, Java & go chain code correlation. In real development, kafka, zookeeper, couchdb and other supports are also needed, which are also introduced through docker image.
Here is a dependency diagram of the main image of fabric. You can experience it first.
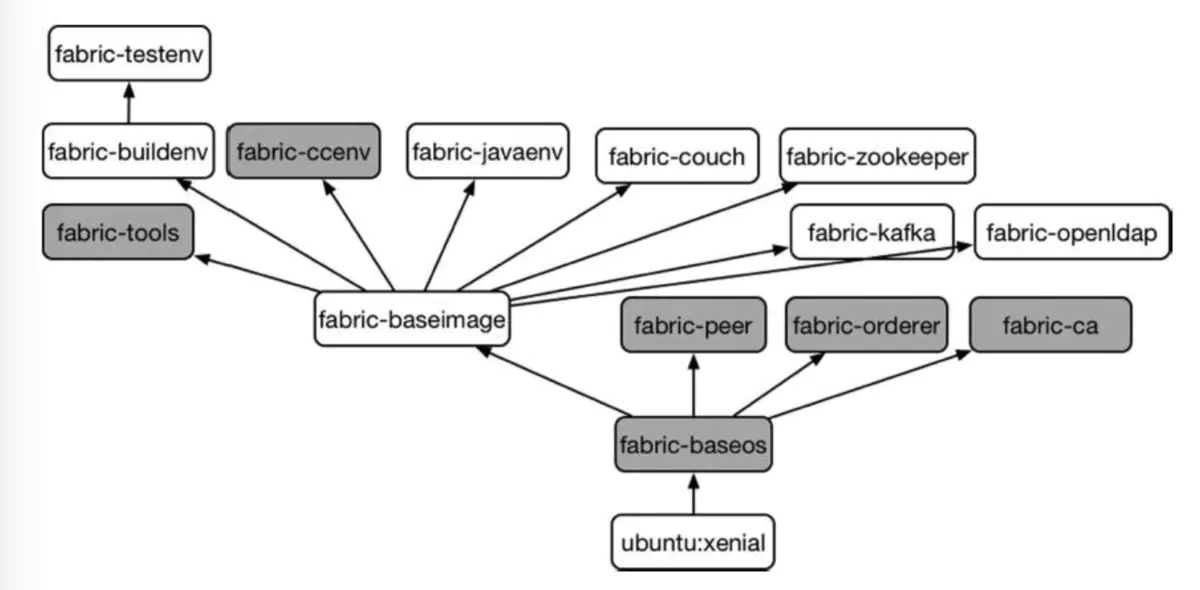
ok. After the environment is deployed, enter the example directory
cd $GOPATH/src/github.com/hyperledger/fabric/examples/e2e_cli
Let's take a look at the example file

Surprise or not? An example contains so many configuration files, don't be afraid, which docker.yaml All are docker compose configuration files of different network topologies, crypto-config.yaml It is used to initialize the PKI environment for network nodes, CA and users (the generated files are stored in the cryto config directory, and you can enter the tree command to feel Manual squint), configtx.yaml It is used to generate channel and order initialization information (the generated file is stored in the channel artifacts directory). The example directory stores the smart contract code. The rest of the. sh file is the example to execute the command.
Clear the docker network environment before running
docker rm $(docker ps -qa)
docker network prune
Run
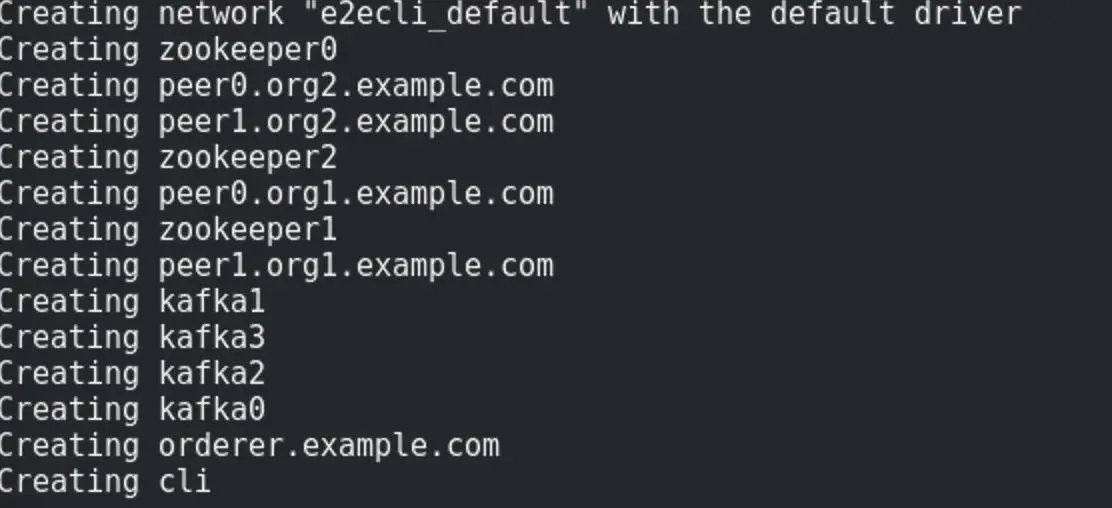
./network_setup.sh up
After a long period of printing, it will appear at the end of execution
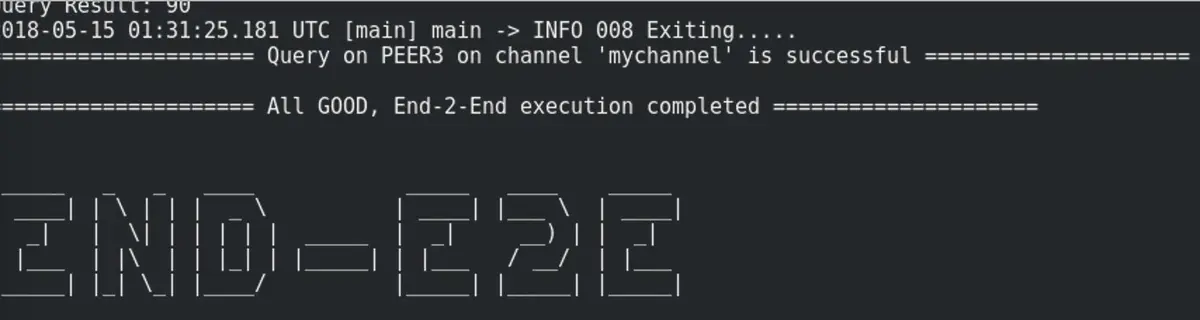
If an error is reported in the middle of the process, it may be caused by the inconsistency between the fabric version and the images version. You can download the fabric source code or image again.
First, docker ps looks at the current container
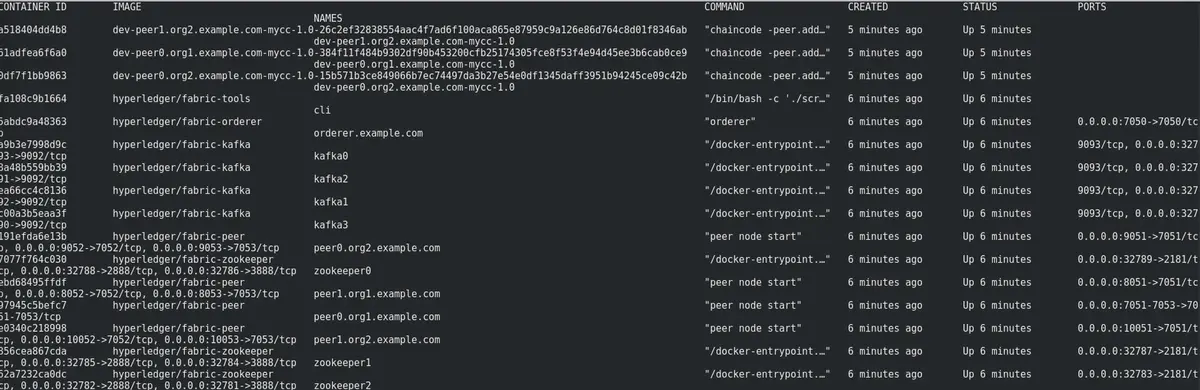
take it easy. In fact, the network structure is very simple. Four peer nodes are used to propose transactions (or to endorse, or to commit), order nodes are used to receive transactions and verify, kafka and zookeeper clusters are used to do specific sorting consensus, and cli is used to provide developers with command-line operation access. Four peer nodes belong to two different organizations (org1, org2). It is clear that this is a relatively simple topology of alliance chain.
Do you think wtf when you see a large command screen in the first instance? What the hell?
Well, the official ex amp le is to set up the network, initialize the contract, query & trade all at once, so it's a little complicated. In fact, the author intends to analyze the configuration file and execution process of Liezi in subsequent chapters. Here is a brief introduction
The whole example is divided into three parts
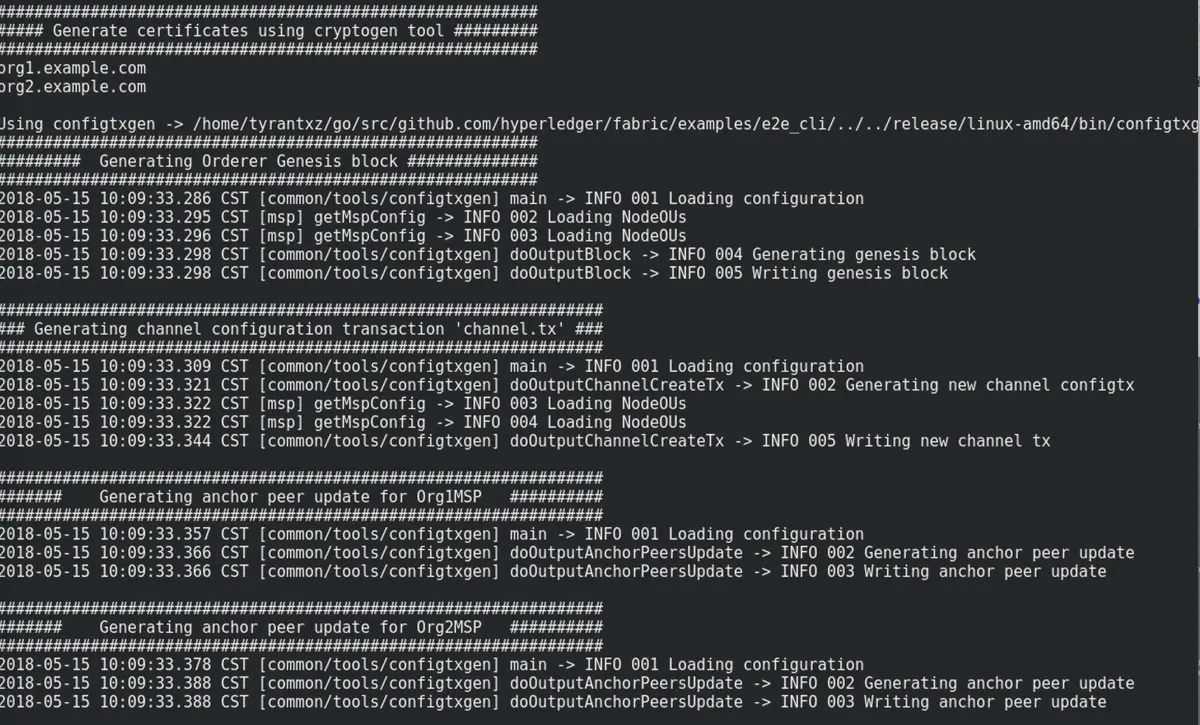
First:
According to crypto-config.yaml Generate public and private keys and digital certificates of CA (peer) users (admin s) in different organizations
according to configtx.yaml Generate creation block, channel initialization configuration, anchor node configuration (can be omitted)

Second:
Generate the network according to the docker compose file. The default is to use docker compose- cli.yaml .

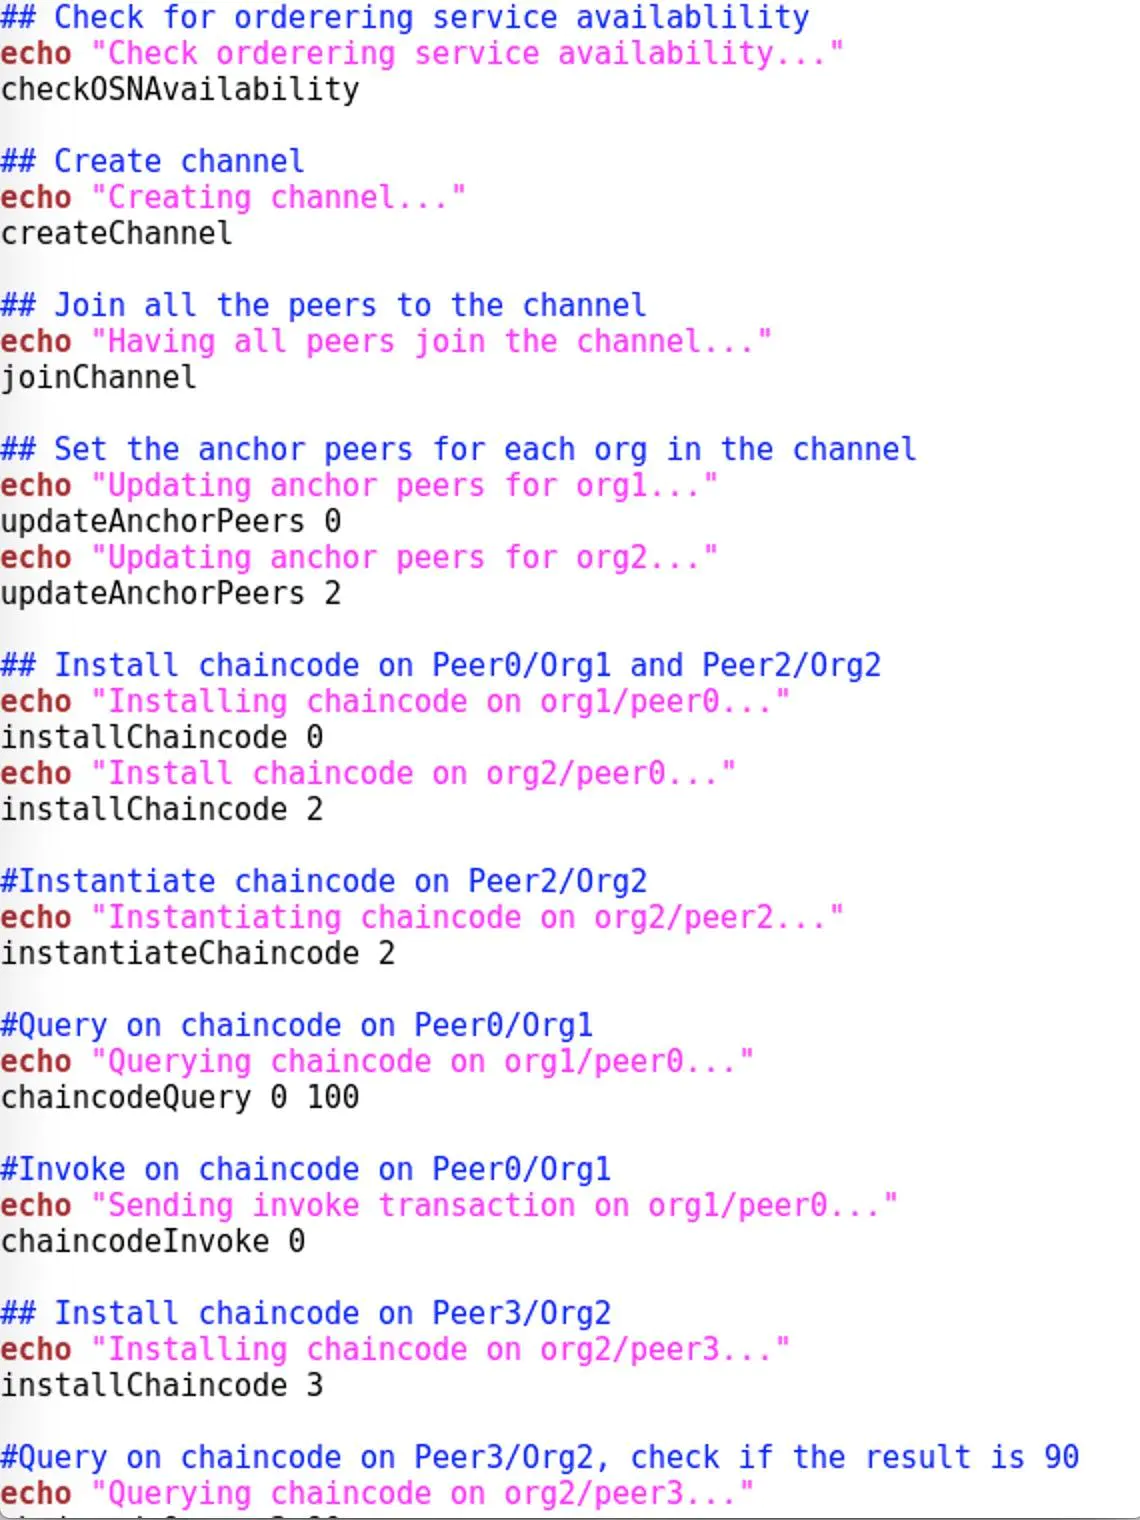
The third part:
As the following code notes, create the channel, add the peer to the channel according to the configuration file, install and initialize the chaincode, query & invoke operations
How about it? Is it clear.
Here's an extra sentence: Fabric development configuration has always been a big head, but don't fall into the "ocean" of configuration in the first place. First of all, we should know what it is, then learn to do one or two simple examples, and then go deep into why. The cognitive spiral is on the rise.
Transaction process
Have you fainted? Have you fainted? I'll show you a time sequence diagram of a transaction cut off from the fabric official website
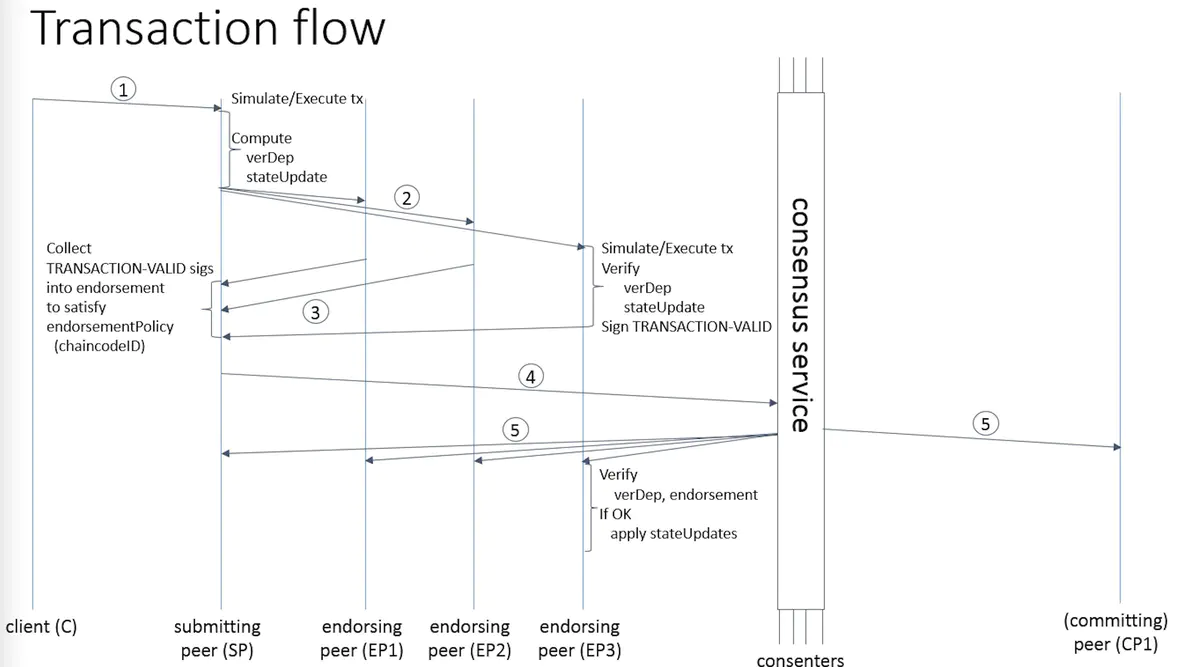
Don't pay attention to the details. At the beginning, just have an intuitive impression of the node types and transaction processes in the fabric network. As shown above, nodes must be included in a transaction process:
client: it can be understood as a C-end user who initiates a query or an invoke command through the command line or sdk
Peer: a node in a fabric network. Note that the nodes in a fabric can also be divided into several types according to their needs (ordinary peer, endorsing peer, committer peer, anchor peer, and can switch according to their needs). The basic reason why so many types should be divided is to reduce the burden of peer, and the same peer can be reused in different channel s.
Consensus: consensus service. PBFT (Byzantine fault tolerance algorithm) was supported by fabric before 0.6, and kafka, solo and PBFT were officially supported after the 1.0 revision. However, the current version only supports the first two (to be added later)
Develop a small demo
Well, the preparation knowledge has been completed, and we will enter the most exciting module, take you to build a demo based on the fabric network from scratch, and encapsulate the sdk to make a simple call.
Scenario: account management
Requirement: add, delete, modify and query
Network topology: 1ca + 1org (2peer) + 1couchdb + 1order + 2chaincode
Although the example is small, it can basically simulate a simple alliance chain network.
mkdir -p $GOPATH/src/github.com/hyperledger/fabric-demo
cd $GOPATH/src/github.com/hyperledger/fabric-demo
Create three new directories under fabric demo

Store network initialization file, network configuration file and contract code respectively.
As usual, clean up the docker container and network before initialization:
docker rm $(docker ps -qa)
docker network prune
Then the production node PKI file and the creation block and other basic configurations:
cd basic-network/
./generate.sh
Note: because these configurations already exist in my demo file, all this step can be skipped. This step is mainly for the situation that the initial file is empty or the configuration file needs to be regenerated after the network topology changes. And docker-compose.yml The path of the CA in the file needs to be updated synchronously.

start-up
cd account
./startFabric.sh
Finally, print this to indicate successful execution

For the initialization process, please refer to startFabric.sh Source code
First, execute the start.sh File to initialize all network nodes. The configuration of nodes is based on docker under basic network- compose.yml file

After the network is initialized successfully, a channel will be created and two peer s will be added to the specified channel

After success, load chaincode into two peer s respectively, and perform ledger initialization

The last piece of information printed on the command line is the information display after the successful initialization of the ledger.
ok, the network is set up successfully. At this time, docker ps views the container information

It is simple and clear. A CA center is used for public and private key production, certificate issuance, permission verification of all nodes and users under org1, oderder node, containerized chaincode, two peer nodes, and a couchdb
couchdb
Here's the introduction of couchdb. In fact, there are three types of data storage in fabric network. One is the account book itself, that is, the blockchain data, which is stored in the form of files; the second is the index database of block data and historical data; the third is the state database, which stores the business data we perform in chaincode. The first one and the second one can't be replaced. The third state database adopts levelDB by default and also supports couchdb. These will be described in the following chapters.
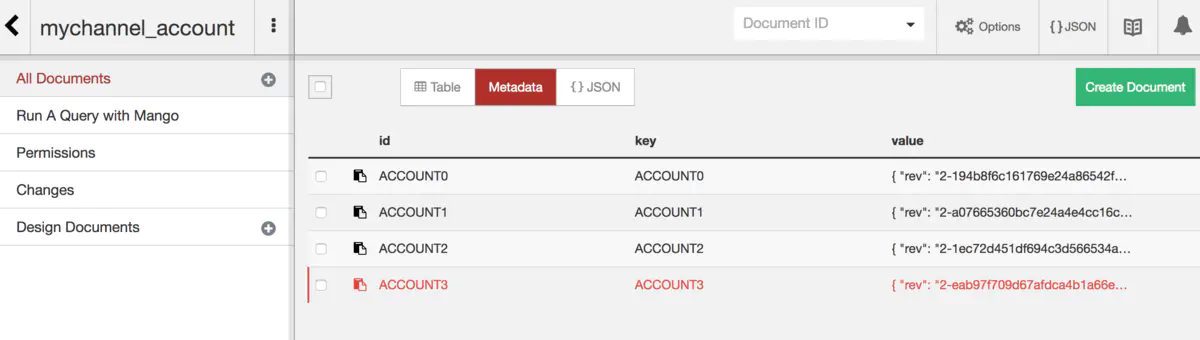
How to access couchdb? If port 5984 is exposed above, you can directly access it http://fabric Host ip:5984/_utils
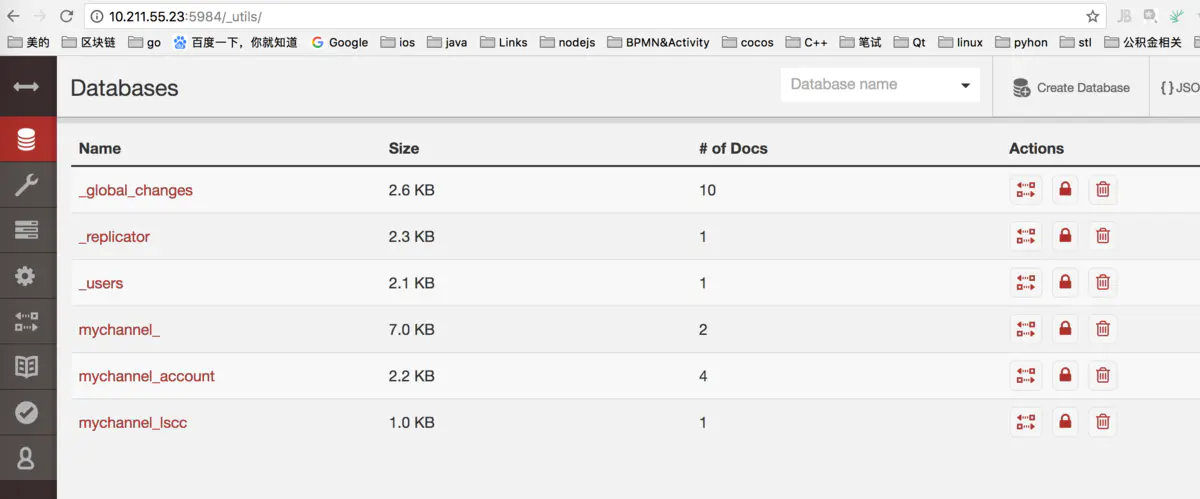
It can directly see whether the account data I initialized is very convenient. couchdb can also combine with elastic search to achieve more rich retrieval of status data. Note here that through coudb, you can add, delete and modify the state data, but it does not violate the tamperability of the blockchain, because you still cannot modify the data of the blockchain itself.
Write chainCode
chaincode (smart contract) is actually an interface, through which specific business operations can be realized.
Fabric's chaincode interface is also very simple, only the Init and Invoke methods need to be implemented, and the specific business implementation judges and distributes the input method name in the Invoke.
show me the code
package main

import (
    "bytes"
    "encoding/json"
    "fmt"
    "strconv"

    "github.com/hyperledger/fabric/core/chaincode/shim"
    sc "github.com/hyperledger/fabric/protos/peer"
)

type SmartContract struct {
}

type Account struct {
    Name   string `json:"name"`
    Gender string `json:"gender"`
    Age    string `json:"age"`
    Mail   string `json:"mail"`
}

func (s *SmartContract) Init(APIstub shim.ChaincodeStubInterface) sc.Response {
    return shim.Success(nil)
}


func (s *SmartContract) Invoke(APIstub shim.ChaincodeStubInterface) sc.Response {

    function, args := APIstub.GetFunctionAndParameters()
    if function == "query" {
        return s.query(APIstub, args)
    } else if function == "init" {
        return s.initAccont(APIstub)
    } else if function == "create" {
        return s.create(APIstub, args)
    } else if function == "list" {
        return s.list(APIstub)
    } else if function == "update" {
        return s.update(APIstub, args)
    }

    return shim.Error("Invalid Smart Contract function name.")
}

func (s *SmartContract) query(APIstub shim.ChaincodeStubInterface, args []string) sc.Response {

    if len(args) != 1 {
        return shim.Error("Incorrect number of arguments. Expecting 1")
    }

    carAsBytes, _ := APIstub.GetState(args[0])
    return shim.Success(carAsBytes)
}

func (s *SmartContract) initAccont(APIstub shim.ChaincodeStubInterface) sc.Response {
    Accounts := []Account{
        Account{Name: "wesker", Gender: "male", Age: "26", Mail: "wesker@gmail.com"},
        Account{Name: "jill", Gender: "female", Age: "21", Mail: "jill@gmail.com"},
        Account{Name: "leon", Gender: "male", Age: "22", Mail: "leon@gmail.com"},
        Account{Name: "chris", Gender: "male", Age: "25", Mail: "chris@gmail.com"},
    }

    i := 0
    for i < len(Accounts) {
        fmt.Println("i is ", i)
        accountAsBytes, _ := json.Marshal(Accounts[i])
        APIstub.PutState("ACCOUNT"+strconv.Itoa(i), accountAsBytes)
        fmt.Println("Added", Accounts[i])
        i = i + 1
    }

    return shim.Success(nil)
}

func (s *SmartContract) create(APIstub shim.ChaincodeStubInterface, args []string) sc.Response {

    if len(args) != 5{
        return shim.Error("Incorrect number of arguments. Expecting 5")
    }

    var account = Account{Name: args[1], Gender: args[2], Age: args[3], Mail: args[4]}
        fmt.Println("New Added:", account)
    accountAsBytes, _ := json.Marshal(account)
        fmt.Println("New args[0]:", args[0])
        fmt.Println("New accountAsBytes:", accountAsBytes)
    APIstub.PutState(args[0], accountAsBytes)

    return shim.Success(nil)
}

func (s *SmartContract) list(APIstub shim.ChaincodeStubInterface) sc.Response {

    startKey := "ACCOUNT0"
    endKey := "ACCOUNT999"

    resultsIterator, err := APIstub.GetStateByRange(startKey, endKey)
    if err != nil {
        return shim.Error(err.Error())
    }
    defer resultsIterator.Close()

    // buffer is a JSON array containing QueryResults
    var buffer bytes.Buffer
    buffer.WriteString("[")

    bArrayMemberAlreadyWritten := false
    for resultsIterator.HasNext() {
        queryResponse, err := resultsIterator.Next()
        if err != nil {
            return shim.Error(err.Error())
        }
        // Add a comma before array members, suppress it for the first array member
        if bArrayMemberAlreadyWritten == true {
            buffer.WriteString(",")
        }
        buffer.WriteString("{\"Key\":")
        buffer.WriteString("\"")
        buffer.WriteString(queryResponse.Key)
        buffer.WriteString("\"")

        buffer.WriteString(", \"Record\":")
        // Record is a JSON object, so we write as-is
        buffer.WriteString(string(queryResponse.Value))
        buffer.WriteString("}")
        bArrayMemberAlreadyWritten = true
    }
    buffer.WriteString("]")

    fmt.Printf("- listAllAcount:\n%s\n", buffer.String())

    return shim.Success(buffer.Bytes())
}

func (s *SmartContract) update(APIstub shim.ChaincodeStubInterface, args []string) sc.Response {
        fmt.Println("Account update start")
    if len(args) != 2 {
        return shim.Error("Incorrect number of arguments. Expecting 2")
    }

    accountAsBytes, _ := APIstub.GetState(args[0])
    account := Account{}

    json.Unmarshal(accountAsBytes, &account)
    account.Name = args[1]
        fmt.Println("Account update name:",args[1])
    accountAsBytes, _ = json.Marshal(account)
    APIstub.PutState(args[0], accountAsBytes)

        fmt.Println("Account update end")
    return shim.Success(nil)
}

func main() {

    err := shim.Start(new(SmartContract))
    if err != nil {
        fmt.Printf("Error creating new Smart Contract: %s", err)
    }
}
It mainly implements two methods of customized SmartContract interface, Init and Invoke. Pass in Invoke shim.ChaincodeStubInterface To achieve the specific operation of adding, deleting and changing accounts. The detailed implementation of chaincode will be described in the following chapters. This is mainly to give you an intuitive impression that the amazing "smart contract" is actually so easy.
sdk simple encapsulation call
The network is ok. After the contract is installed, only the application layer calls.
In fact, Fabric provides two ways for C-end users: one is through the cli container entry, and the other is sdk. The Fabric official website supports a variety of SDKs. The official release s are node and Java. In addition, there are also SDKs such as Go and Python, which are highly active. The author has tested the sdk of Java and Go, indicating that there is not much difference in function and performance, maybe considering the audience problem, the official focus is on node and Java. In view of the fact that most blogs on the Internet are based on node, this blog is intended to be based on Java sdk
In this demo, the blogger simply encapsulates several main methods of java sdk, including admin account registration and login, channel initialization, ordinary user registration and login, and ordinary user Query and Invoke operations on peer.
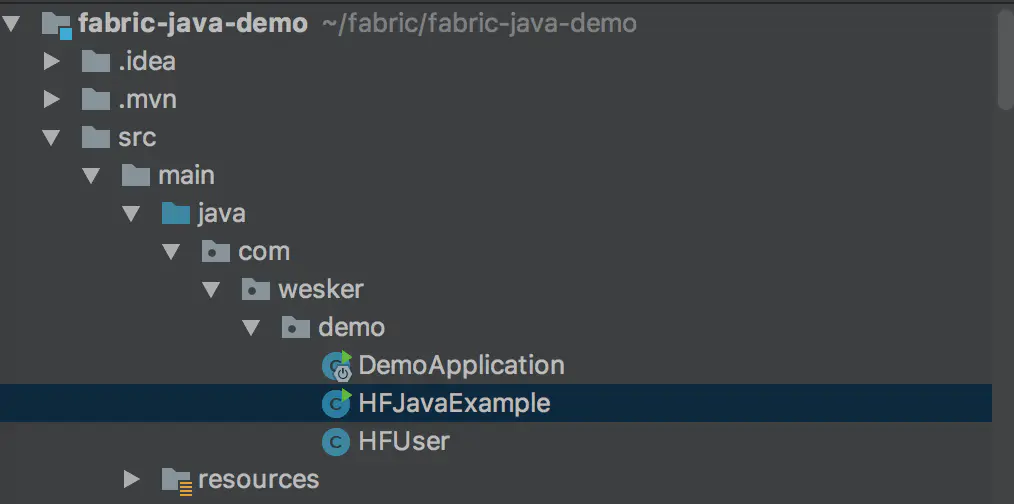
The following is the project structure diagram of demo.
Give a brief description of the key code
One is pom.xml Import fabric SDK from
<dependency>
            <groupId>org.hyperledger.fabric-sdk-java</groupId>
            <artifactId>fabric-sdk-java</artifactId>
            <version>1.1.0-alpha</version>
</dependency>
Two User interfaces to implement Fabric
/**
 * @program: HFUser
 * @description: Implement User interface
 * @author: Zhun.Xiao
 * @create: 2018-05-13 11:11
 **/
public class HFUser implements User, Serializable {


    private String name;
    private String account;
    private String affiliation;
    private String mspId;
    private Set<String> roles;
    private Enrollment enrollment;

    public HFUser(String name, String affiliation, String mspId, Enrollment enrollment) {
        this.name = name;
        this.affiliation = affiliation;
        this.mspId = mspId;
        this.enrollment = enrollment;
    }

    @Override
    public String getName() {
        return name;
    }

    public void setName(String name) {
        this.name = name;
    }

    @Override
    public String getAccount() {
        return account;
    }

    public void setAccount(String account) {
        this.account = account;
    }

    @Override
    public String getAffiliation() {
        return affiliation;
    }

    public void setAffiliation(String affiliation) {
        this.affiliation = affiliation;
    }

    @Override
    public String getMspId() {
        return mspId;
    }

    public void setMspId(String mspId) {
        this.mspId = mspId;
    }

    @Override
    public Set<String> getRoles() {
        return roles;
    }

    public void setRoles(Set<String> roles) {
        this.roles = roles;
    }

    @Override
    public Enrollment getEnrollment() {
        return enrollment;
    }

    public void setEnrollment(Enrollment enrollment) {
        this.enrollment = enrollment;
    }
}
Three are the storage of admin and ordinary user certificates. Because it is an instance program, the certificates are simply stored in the current directory, ending with tail.
The main function of HFJavaExample records the process of query and operation in a normal user call chain network.
        HFCAClient caClient = getHfCaClient("http://10.211.55.23:7054", null);
        // enroll or load admin
        HFUser admin = getAdmin(caClient);
        log.info(admin.toString());
        // register and enroll new user
        HFUser hfUser = getUser(caClient, admin, "wesker");
        log.info(hfUser.toString());
        // get HFC client instance
        HFClient client = getHfClient();
        // set user context
        client.setUserContext(admin);
        // get HFC channel using the client
        Channel channel = getChannel(client);
        log.info("Channel: " + channel.getName());
        // query alll account list
        queryBlockChain(client, "list");
        //update
        invokeBlockChain(client, "update", "ACCOUNT1", "jill_1");
        // query by condition
        queryBlockChain(client, "query", "ACCOUNT1");
Right click run to track the running process according to the content printed by idea

It can also be found on the server where the fabric is located
docker logs -f orderer.example.com
Trace the docker log of orderer to see how to submit the block information

Or through
docker logs -f peer0.org1.example.com
perhaps
docker logs -f peer1.org1.example.com
View data write and synchronization

You can also view the status data through couchdb browser.
How are you? Are you happy? It's that simple.
summary
Through the implementation of a simple demo, let's talk about hyperledger There is an intuitive impression about the features, transactions and development of fabric. Many of them just click to the end. It's estimated that many students will be confused after reading it. B ut it doesn't matter. As long as the environment can be deployed successfully, the official example can be run successfully, and then the demo of the blogger can be run, I think you've been very successful. After all, it took you only an hour to master the blogger and more than n days to make it clear White things 😆
Attached:
demo profile address: https://github.com/wesker8088/fabric-account.git
demo sdk example address: https://github.com/wesker8088/fabric-java-demo.git
29 people like it
Author: fermented glutinous rice wine
Link: https://www.jianshu.com/p/e16345cc2cde
Source: Jianshu
The copyright belongs to the author. For commercial reprint, please contact the author for authorization. For non-commercial reprint, please indicate the source.