Analysis of AI compiler TVM deployment example
AI compiler TVM (I) -- a simple example
summary
What is TVM?
TVM can be called a collection of many tool sets. These tools can be combined to realize the acceleration and deployment of some neural networks. That's why it's called TVM Stack. TVM is widely used. It can almost support most neural network weight frameworks on the market (ONNX, TF, Caffe2, etc.), and can also be deployed on almost any platform, such as Windows, Linux, Mac, ARM, etc.
reference
https://oldpan.me/archives/the-first-step-towards-tvm-1
https://mp.weixin.qq.com/s?__biz=Mzg3ODU2MzY5MA==&mid=2247484929&idx=1&sn=3fcce36b5a50cd8571cf932a23083667&chksm=cf109e04f86717129c3381ebeec2d0c1f7baf6ed057c66310662f5935beea88baf23e99898f4&token=1276531538&lang=zh_CN#rd
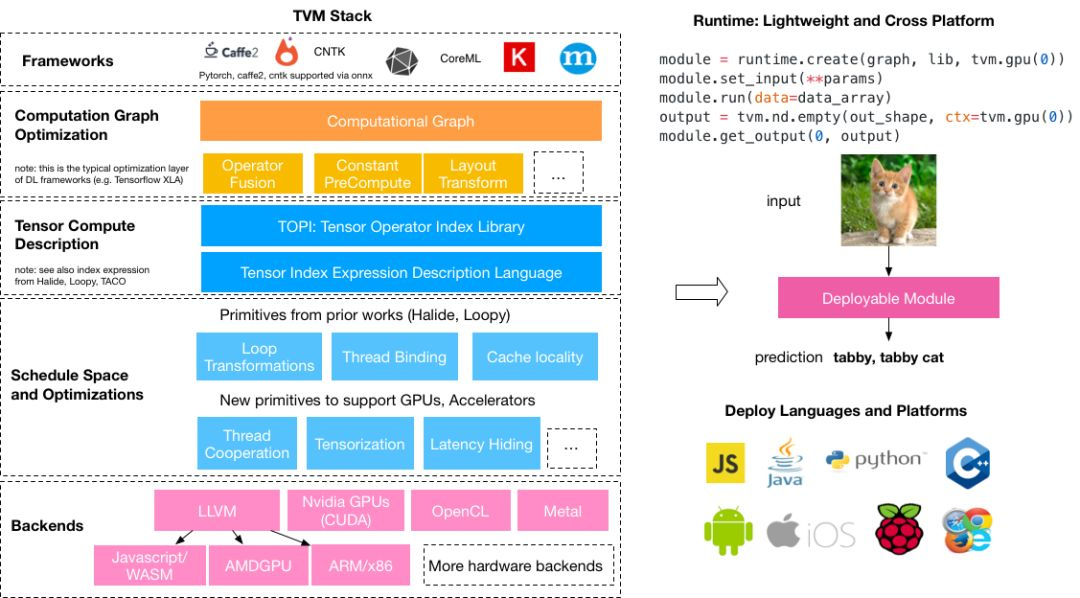
Describe it with the following picture, which comes from( https://tvm.ai/about):

stack_tvmlang
Just know the core functions of TVM: TVM can optimize the trained model, package the model, and put the optimized model on any platform to run, which can be said to be closely related to the landing application.
TVM contains many things and knowledge concepts, including not only a series of steps such as neural network optimization, quantization and op fusion, but also the support of other more detailed technologies (Halide, LLVM), so that TVM has very powerful functions. If you want to know more about TVM, you can directly search TVM keywords on Zhihu. Those big guys have a lot of introduction articles about TVM. You can go and have a look.
In fact, there are many libraries for model optimization, whether it's TensorRT from Nvidia or torch from pytoch JIT module is doing some model optimization work. I won't say more here. You can see the following articles if you are interested:
Use the C + + front end (libtorch) of Pytorch to read the pre training weight and predict it
Speed up the neural network with TensorRT (read the ONNX model and run it)
Using TensorRT to accelerate deep learning
Start using
Why use TVM?
If you want to transplant the training model to the Window side, ARM side (raspberry pie, a series of other boards using the kernel) or some other platforms, and use the CPU or GPU to run it, you hope to optimize the model to make the model operate faster on the platform (which has nothing to do with the algorithm design of the model itself) and realize the landing application research, Then TVM is the best choice. In addition, the TVM source code is jointly built by C + + and python. Reading the relevant source code is also conducive to the improvement of programming.
install
In fact, there is nothing to say about installation. The official examples are very detailed. You can move there and follow the official steps step by step.
However, there are two points to note:
- It is recommended to install llvm. Although llvm is optional for TVM, llvm is almost necessary if you want to deploy to CPU
- Because TVM is a project of Python and C + +, python can be said to be the front end of C + +. After installing the official tutorial and compiling the C + + side, it is recommended to select the official Method 1 to set the python side, so that the source code can be modified and recompiled at will, and the python side can be used directly without any modification.
(method 1 is officially recommended)
Export Onnx model by pytoch
Here is a simple example to demonstrate how TVM is used.
The first thing to do is to get a trained model. Here, select mobilenet-v2 in the github warehouse. The model code and the weight trained on ImageNet have been provided. Transplant the model code in github to the local, then invoke and load the trained weights.
import torch

import time

from models.MobileNetv2 import mobilenetv2


model = mobilenetv2(pretrained=True)

example = torch.rand(1, 3, 224, 224)   #Hypothetical input


with torch.no_grad():

    model.eval()

    since = time.time()

    for i in range(10000):

        model(example)

    time_elapsed = time.time() - since

    print('Time elapsed is {:.0f}m {:.0f}s'.

          format(time_elapsed // 60, time_elapsed (% 60)) # print out time
Here, the trained model weight is loaded, the input is set, and it has been run continuously for 10000 times on the python side. The time spent here is 6m2s.
Then export the pytoch model as ONNX model: import torch
from models.MobileNetv2 import mobilenetv2


model = mobilenetv2(pretrained=True)

example = torch.rand(1, 3, 224, 224) # hypothetical input


torch_out = torch.onnx.export(model,

                              example,

                              "mobilenetv2.onnx",

                              verbose=True,

                              export_params=True # output with parameters

                              )
This gives mobilenetv2 Onnx is the model weight in onnx format. Parameter output is required here, because the onnx model needs to be read directly for prediction.
After exporting, it is recommended to use Netron to view the structure of the model. You can see that the model is exported from pytoch-1.0.1, with a total of 152 OPS, as well as information such as input id and input format. You can drag the mouse to view more detailed information:

mobilenetv2-test
So far, the mobilenet-v2 model has been successfully exported.
Using TVM to read and predict ONNX model
After the Python model is imported in the normal format of tvonx, it can be imported successfully. Here is an image of the plane:
tvm_plane

This image belongs to 404: 'airline' in ImageNet classification, that is, aircraft.
Next, we will use TVM to deploy onnx model and predict this image. import onnx
import time

import tvm

import numpy as np

import tvm.relay as relay

from PIL import Image


onnx_model = onnx.load('mobilenetv2.onnx ') # import model


mean = [123., 117., 104.] # train mean and std of data set on ImageNet

std = [58.395, 57.12, 57.375]


def transform_image(image): # define a conversion function to convert an image in PIL format into a numpy format array of format dimensions

    image = image - np.array(mean)

    image /= np.array(std)

    image = np.array(image).transpose((2, 0, 1))

    image = image[np.newaxis, :].astype('float32')

    return image


img = Image.open('../datasets/images/plane.jpg').resize((224, 224)) # here, resize the image to a specific size

x = transform_image(img)
The resulting x is the ndarray of the [1,322424] dimension. This scheme conforms to the NCHW format standard and is also a general tensor format.
Next, set the target port llvm, that is, deploy it to the CPU. Here, the Relay IR in TVM is used. In short, this IR can read the model, build an executable calculation diagram according to the order of the model, and carry out a series of optimization on this calculation diagram. (now TVM mainly promotes Relay instead of NNVM, and Relay can be called the second generation NNVM).
target = 'llvm'


input_name = '0'  #Note that here is the input id of the model in the previously exported onnx model, and here is 0

shape_dict = {input_name: x.shape}

#Use the onnx front end in Relay to read the exported onnx model

sym, params = relay.frontend.from_onnx(onnx_model, shape_dict)
sym and params exported in the above code are the core things to be used next. Params is the weight information in the exported model, which is represented by dic in python:
Screenshot from 2019-03-12 14-57-18
SYM is a function function representing the structure of the calculation diagram. This function contains the flow process of the calculation diagram and various parameter information required in some calculations. The optimization of the network after Relay IR is mainly the process of optimizing this sym:
fn (%v0: Tensor[(1, 3, 224, 224), float32],

    %v1: Tensor[(32, 3, 3, 3), float32],

    %v2: Tensor[(32,), float32],

    %v3: Tensor[(32,), float32],

    %v4: Tensor[(32,), float32],

    %v5: Tensor[(32,), float32],

    ...

    %v307: Tensor[(1280, 320, 1, 1), float32],

    %v308: Tensor[(1280,), float32],

    %v309: Tensor[(1280,), float32],

    %v310: Tensor[(1280,), float32],

    %v311: Tensor[(1280,), float32],

    %v313: Tensor[(1000, 1280), float32],

    %v314: Tensor[(1000,), float32]) {

  %0 = nn.conv2d(%v0, %v1, strides=[2, 2], padding=[1, 1], kernel_size=[3, 3])

  %1 = nn.batch_norm(%0, %v2, %v3, %v4, %v5, epsilon=1e-05)

  %2 = %1.0

  %3 = clip(%2, a_min=0, a_max=6)

  %4 = nn.conv2d(%3, %v7, padding=[1, 1], groups=32, kernel_size=[3, 3])

  ...

  %200 = clip(%199, a_min=0, a_max=6)

  %201 = mean(%200, axis=[3])

  %202 = mean(%201, axis=[2])

  %203 = nn.batch_flatten(%202)

  %204 = multiply(1f, %203)

  %205 = nn.dense(%204, %v313, units=1000)

  %206 = multiply(1f, %v314)

  %207 = nn.bias_add(%205, %206)

  %207

}
Next, the calculation chart model needs to be optimized. Here, the optimization level is 3:
with relay.build_config(opt_level=3):

    intrp = relay.build_module.create_executor('graph', sym, tvm.cpu(0), target)


dtype = 'float32'

func = intrp.evaluate(sym)
Finally, get the func that can run directly.
The optimization levels are divided into these types:
OPT_PASS_LEVEL = {

    "SimplifyInference": 0,

    "OpFusion": 1,

    "FoldConstant": 2,

    "CombineParallelConv2D": 3,

    "FoldScaleAxis": 3,

    "AlterOpLayout": 3,

    "CanonicalizeOps": 3,

}
Finally, input the parameters of the image x array and model that have been converted to format into this func and return the maximum value in the output array
output = func(tvm.nd.array(x.astype(dtype)), **params).asnumpy()

print(output.argmax())
The output obtained here is 404, which is consistent with the classification mark of the image described above in ImageNet, indicating that TVM correctly reads the onnx model and applies it to the prediction stage.
In addition, test the running speed of the optimized model separately and compare it with the running speed of pytorch directly before. The final running time is 3m20s, which is nearly twice as fast as the previous 6m2s.
since = time.time()

for i in range(10000):

    output = func(tvm.nd.array(x.astype(dtype)), **params).asnumpy()

time_elapsed = time.time() - since

print('Time elapsed is {:.0f}m {:.0f}s'.

      format(time_elapsed // 60, time_elapsed (% 60)) # print out time
Of course, this comparison is not very standardized, but we can roughly analyze some usability of TVM.
Here we will learn what TVM is and the use of a simple example. Next, we will involve the analysis of some TVM design structure and source code. The knowledge points that may be involved include:
- Simple compiler principle
- C + + special syntax and template meta programming
- Neural network model optimization process
- Code deployment
Wait, it may change at any time.
Artificial intelligence has begun to enter the embedded era, and all kinds of AI chips are about to begin. Running complex network models on cheap and low-power boards may no longer be an unreachable fantasy. I don't know what the future will be, but the framework of TVM has begun to take a small step.
AI compiler TVM (II) -- using TVM to complete the deployment of C + + end
preface
In the previous section, we briefly introduced what TVM is and how to use Relay IR to compile network weights and then run them.
TVM
The example in the above article is very simple, but what is more needed in practice is to use TVM to deploy applications. The simplest and direct is to run the neural network model in the embedded system. Like raspberry pie. That's the most important thing, isn't it? Therefore, before going deep into TVM, we still have to go through the basic practice process. Only the practice process can make us better understand what TVM can do.
This section mainly introduces how to compile the neural network using TVM, export the dynamic link library file, and finally deploy it on the raspberry pie side (PC side) to run.
Environment construction
Environment construction? What can I say?
Nonsense, you need to build the TVM environment before you can use it. The official installation tutorial is the most detailed. Here, it is recommended to look at the official documents, which are very detailed and specific, and grasp the key points very well.
However, two points should be emphasized:
- LLVM needs to be installed, because the main running environment mentioned in this article is CPU (raspberry GPU is not used temporarily, and the memory is a little small), so LLVM is necessary
- To install the cross compiler:
Cross Compiler
What is cross compiler? It can compile and generate executable files that can run directly on raspberry pie on PC platform. In TVM, we need to use cross compiler to compile and optimize the model on the PC side, and then generate a dynamic link library suitable for raspberry pie (arm Architecture).
With this dynamic link library, you can directly call the TVM runtime environment of raspberry pie to call this dynamic link library and perform the forward operation of neural network.
How to install it? Here, you need to install a cross compiler called / usr / bin / arm linux gnueabihf-g + +. In the Ubuntu system, you can directly sudo apt get install G + + - arm linux gnueabihf. Note that the name cannot be wrong. You need the HF (hard float) version.
After installation, execute / usr / bin / arm linux gnueabihf-g + + - V to see the output information:
1prototype@prototype-X299-UD4-Pro:~/$ /usr/bin/arm-linux-gnueabihf-g++ -v

2Using built-in specs.

3COLLECT_GCC=/usr/bin/arm-linux-gnueabihf-g++

4COLLECT_LTO_WRAPPER=/usr/lib/gcc-cross/arm-linux-gnueabihf/5/lto-wrapper

5Target: arm-linux-gnueabihf

6Configured with: ../src/configure -v --with-pkgversion='Ubuntu/Linaro 5.4.0-6ubuntu1~16.04.9' --with-bugurl=file:///usr/share/doc/gcc-5/README.Bugs --enable-languages=c,ada,c++,java,go,d,fortran,objc,obj-c++ --prefix=/usr --program-suffix=-5 --enable-shared --enable-linker-build-id --libexecdir=/usr/lib --without-included-gettext --enable-threads=posix --libdir=/usr/lib --enable-nls --with-sysroot=/ --enable-clocale=gnu --enable-libstdcxx-debug --enable-libstdcxx-time=yes --with-default-libstdcxx-abi=new --enable-gnu-unique-object --disable-libitm --disable-libquadmath --enable-plugin --with-system-zlib --disable-browser-plugin --enable-java-awt=gtk --enable-gtk-cairo --with-java-home=/usr/lib/jvm/java-1.5.0-gcj-5-armhf-cross/jre --enable-java-home --with-jvm-root-dir=/usr/lib/jvm/java-1.5.0-gcj-5-armhf-cross --with-jvm-jar-dir=/usr/lib/jvm-exports/java-1.5.0-gcj-5-armhf-cross --with-arch-directory=arm --with-ecj-jar=/usr/share/java/eclipse-ecj.jar --disable-libgcj --enable-objc-gc --enable-multiarch --enable-multilib --disable-sjlj-exceptions --with-arch=armv7-a --with-fpu=vfpv3-d16 --with-float=hard --with-mode=thumb --disable-werror --enable-multilib --enable-checking=release --build=x86_64-linux-gnu --host=x86_64-linux-gnu --target=arm-linux-gnueabihf --program-prefix=arm-linux-gnueabihf- --includedir=/usr/arm-linux-gnueabihf/include

7Thread model: posix

8gcc version 5.4.0 20160609 (Ubuntu/Linaro 5.4.0-6ubuntu1~16.04.9)
Raspberry pie environment construction
Because the neural network is compiled by TVM on the PC side, only the runtime environment of TVM needs to be compiled on the raspberry pie side (TVM can be divided into two parts, one is compilation time, the other is runtime, and the two can be disassembled).
The official command is attached here. Note that llvm needs to be installed at the raspberry pie end. The llvm at the raspberry pie end can find the compiled compressed package at the llvm official. After decompression, add environment variables:
1git clone --recursive https://github.com/dmlc/tvm

2cd tvm

3mkdir build

4cp cmake/config.cmake build   #Modify config. Here Cmake makes it support llvm

5cd build

6cmake ..

7make runtime
Compiling TVM runtime on raspberry pie doesn't take long.
Complete deployment
After the environment is set up, let the deployment begin.
First of all, we still need a test model of our own. Here we use the model weight trained before to recognize the gesture of scissors, stone and paper, and then export the ONNX model using pytoch. See the following two articles for specific export steps.
- Use the C + + front end (libtorch) of Pytorch to read the pre training weight and predict it
- The use of C + + side (libtorch) of Pytorch in Windows
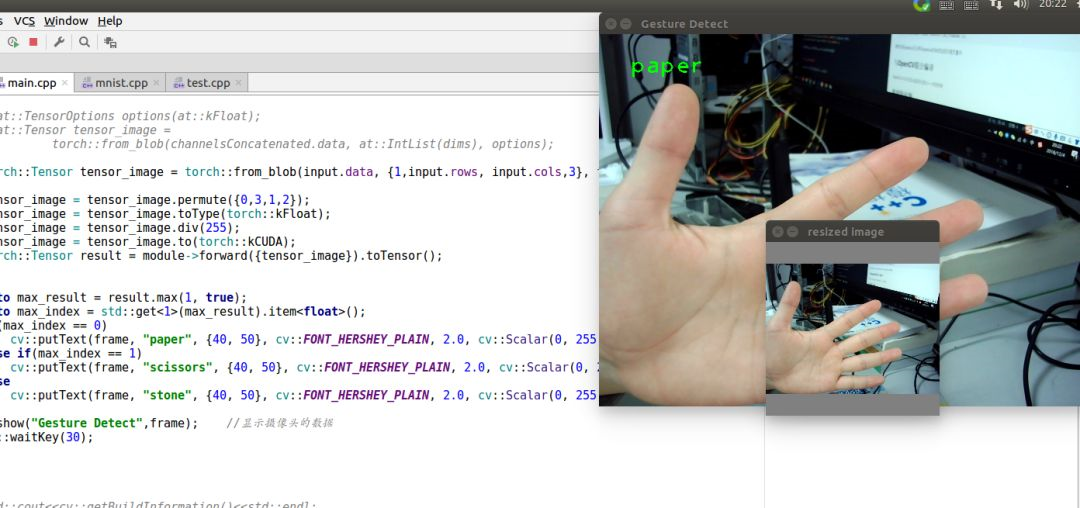
(the above figure is a previous weight model for identifying scissors, stone and cloth)
OK, there is a model called mobilenetv2-128_S.onnx, this model is the ONNX model derived from pytoch. Take a look at it with Netron:
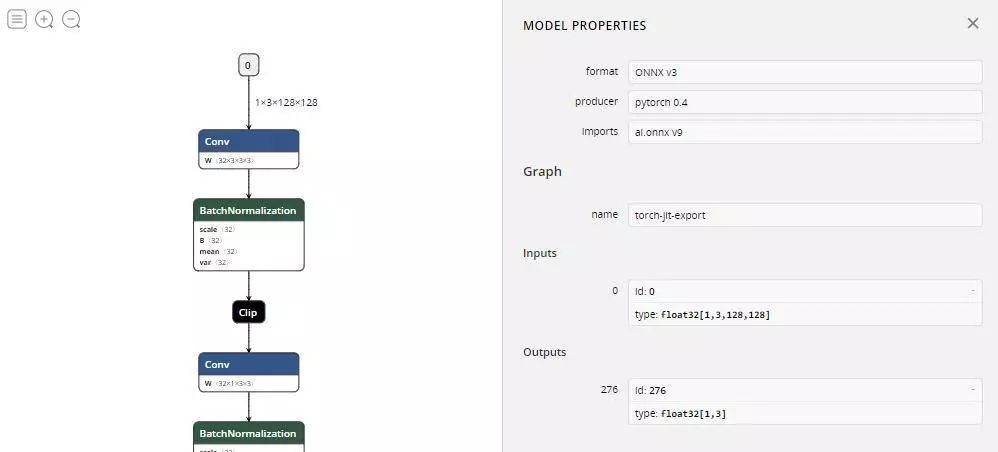
The input and output of the whole model are clearly described in the figure above.
test model
After getting the model, first test whether the model can work correctly. Similar to the previous article on TVM, use the PYTHON front end of TVM to read it The onnx model is then compiled and run. Finally, the test image is used to test whether it can work correctly. The core code is as follows:
 1onnx_model = onnx.load('../test/new-mobilenetv2-128_S.onnx')

 2

 3img = Image.open('../datasets/hand-image/paper.jpg').resize((128, 128))

 4

 5img = np.array(img).transpose((2, 0, 1)).astype('float32')

 6img = img/255.0           #Note that the tensor range in pytoch is 0-1

 7x = img[np.newaxis, :]

 8

 9target = 'llvm'

10

11input_name = '0'      #You need to pay attention here, because it is generated The input code of onnx model is 0, so it is changed to 0 here

12shape_dict = {input_name: x.shape}

13sym, params = relay.frontend.from_onnx(onnx_model, shape_dict)

14

15with relay.build_config(opt_level=3):

16    intrp = relay.build_module.create_executor('graph', sym, tvm.cpu(0), target)

17

18dtype = 'float32'

19func = intrp.evaluate(sym)

20

21#Output inferred results

22tvm_output = intrp.evaluate(sym)(tvm.nd.array(x.astype(dtype)), **params).asnumpy()

23max_index = tvm_output.argmax()

24print(max_index)
The output result of this model is the output value of three gestures (the order is cloth, scissors and stone respectively). The printed value of the above code is 0, which means that paper can be recognized correctly Jpg input image. It shows that there is no problem in this transformation process.
Export dynamic link library
The above step is just to The onnx model is read and predicted by TVM. If it needs to be deployed, the dynamic link library of the whole model needs to be exported. As for why it is a dynamic link library, in fact, TVM has many export modes (you can also export static libraries), but I won't elaborate here:
In short, all the functions in the neural link library are exported.
How to export? In fact, the official has a very detailed export description. I won't repeat it here, just show the core code and annotate it.
See the following code:
 1#The beginning is also reading onnx model

 2

 3onnx_model = onnx.load('../../test/new-mobilenetv2-128_S.onnx')

 4img = Image.open('../../datasets/hand-image/paper.jpg').resize((128, 128))

 5

 6#The following pictures are read only for testing

 7img = np.array(img).transpose((2, 0, 1)).astype('float32')

 8img = img/255.0    # remember pytorch tensor is 0-1

 9x = img[np.newaxis, :]

10

11#Here, we first test on the CPU of the PC, so we use LLVM for export

12target = tvm.target.create('llvm')

13

14input_name = '0'  # change '1' to '0'

15shape_dict = {input_name: x.shape}

16sym, params = relay.frontend.from_onnx(onnx_model, shape_dict)

17

18#After using the optimized information of TVM

19with relay.build_config(opt_level=2):

20    graph, lib, params = relay.build_module.build(sym, target, params=params)

21

22dtype = 'float32'

23

24from tvm.contrib import graph_runtime

25

26#The following functions export the required dynamic link library} address, which can be defined by yourself

27print("Output model files")

28libpath = "../tvm_output_lib/mobilenet.so"

29lib.export_library(libpath)

30

31#The following function exports the structure of neural network and saves it in json file

32graph_json_path = "../tvm_output_lib/mobilenet.json"

33with open(graph_json_path, 'w') as fo:

34    fo.write(graph)

35

36#The weight parameters of the neural network model are derived from the following function

37param_path = "../tvm_output_lib/mobilenet.params"

38with open(param_path, 'wb') as fo:

39    fo.write(relay.save_param_dict(params))

40#---------------- the export model phase has ended--------

41

42#Next, load the exported model to test whether the exported model can work normally

43loaded_json = open(graph_json_path).read()

44loaded_lib = tvm.module.load(libpath)

45loaded_params = bytearray(open(param_path, "rb").read())

46

47#The execution platform here is CPU

48ctx = tvm.cpu()

49

50module = graph_runtime.create(loaded_json, loaded_lib, ctx)

51module.load_params(loaded_params)

52module.set_input("0", x)

53module.run()

54out_deploy = module.get_output(0).asnumpy()

55

56print(out_deploy)
The above code output [[13.680096 -7.218611 -6.7872353]], because the input image is paper Jpg, so the first of the three numbers is the largest and there is no problem.
After executing the code, you can get the three files you need
- mobilenet.so
- mobilenet.json
- mobilenet.params
After three files are obtained, the C + + end of TVM is used to read and run.
Deploy C + + model with TVM on PC side
How to use the C + + end of TVM to deploy, the official also has more detailed documents. Here, use TVM and OpenCV to read a picture, and use the previously exported dynamic link library to run the neural network to infer this picture.
The required header files are:
1#include <cstdio>

2#include <dlpack/dlpack.h>

3#include <opencv4/opencv2/opencv.hpp>

4#include <tvm/runtime/module.h>

5#include <tvm/runtime/registry.h>

6#include <tvm/runtime/packed_func.h>

7#include <fstream>
In fact, only the runtime of TVM is needed here. In addition, dlpack is a structure for storing tensors. OpenCV is used to read pictures, and fstream is used to read json and parameter information:
 1tvm::runtime::Module mod_dylib =

 2    tvm::runtime::Module::LoadFromFile("../files/mobilenet.so");

 3

 4std::ifstream json_in("../files/mobilenet.json", std::ios::in);

 5std::string json_data((std::istreambuf_iterator<char>(json_in)), std::istreambuf_iterator<char>());

 6json_in.close();

 7

 8// parameters in binary

 9std::ifstream params_in("../files/mobilenet.params", std::ios::binary);

10std::string params_data((std::istreambuf_iterator<char>(params_in)), std::istreambuf_iterator<char>());

11params_in.close();

12

13TVMByteArray params_arr;

14params_arr.data = params_data.c_str();

15params_arr.size = params_data.length();
After reading the information, build the graph_runtime in TVM by using the previously read information:
1int dtype_code = kDLFloat;

2int dtype_bits = 32;

3int dtype_lanes = 1;

4int device_type = kDLCPU;

5int device_id = 0;

6

7tvm::runtime::Module mod = (*tvm::runtime::Registry::Get("tvm.graph_runtime.create"))

8        (json_data, mod_dylib, device_type, device_id);
Then use the function in TVM to establish an input tensor type and allocate space:
1DLTensor *x;

2int in_ndim = 4;

3int64_t in_shape[4] = {1, 3, 128, 128};

4TVMArrayAlloc(in_shape, in_ndim, dtype_code, dtype_bits, dtype_lanes, device_type, device_id, &x);
DLTensor is a flexible structure that can contain various types of tensors. After creating this tensor, you need to transfer the image information read in OpenCV into this tensor structure:
1//Here we still read papar Png this picture

2image = cv::imread("/home/prototype/CLionProjects/tvm-cpp/data/paper.png");

3

4cv::cvtColor(image, frame, cv::COLOR_BGR2RGB);

5cv::resize(frame, input,  cv::Size(128,128));

6

7float data[128 * 128 * 3];

8//In this function, the image data in OpenCV is transformed into CHW

9Mat_to_CHW(data, input);
It should be noted that because the image data in OpenCV is saved in the order of (128128,3), it needs to be adjusted here, where mat_ to_ The specific contents of CHW function are:
 1void Mat_to_CHW(float *data, cv::Mat &frame)

 2{

 3    assert(data && !frame.empty());

 4    unsigned int volChl = 128 * 128;

 5

 6    for(int c = 0; c < 3; ++c)

 7    {

 8        for (unsigned j = 0; j < volChl; ++j)

 9            data[c*volChl + j] = static_cast<float>(float(frame.data[j * 3 + c]) / 255.0);

10    }

11

12}
Of course, don't forget to divide by 255.0, because in pytoch, the range of all weight information is 0-1.
After converting the image data in OpenCV, copy the converted image data to the previous tensor type:
1//x is the previous tensor type, and data is the floating-point space opened up previously

2memcpy(x->data, &data, 3 * 128 * 128 * sizeof(float));
Then set the input (x) and output (y) of the running diagram:
 1// get the function from the module(set input data)

 2tvm::runtime::PackedFunc set_input = mod.GetFunction("set_input");

 3set_input("0", x);

 4

 5// get the function from the module(load patameters)

 6tvm::runtime::PackedFunc load_params = mod.GetFunction("load_params");

 7load_params(params_arr);

 8

 9DLTensor* y;

10int out_ndim = 2;

11int64_t out_shape[2] = {1, 3,};

12TVMArrayAlloc(out_shape, out_ndim, dtype_code, dtype_bits, dtype_lanes, device_type, device_id, &y);

13

14// get the function from the module(run it)

15tvm::runtime::PackedFunc run = mod.GetFunction("run");

16

17// get the function from the module(get output data)

18tvm::runtime::PackedFunc get_output = mod.GetFunction("get_output");
Ready to run:
1run();

2get_output(0, y);

3

4//Print out the output information

5auto result = static_cast<float*>(y->data);

6for (int i = 0; i < 3; i++)

7    cout<<result[i]<<endl;
The final output message is
113.8204

2-7.31387

3-6.8253
It can be seen that after successfully identifying the picture of cloth, the deployment on the C + + side has been completed.
Deployment on raspberry pie
The deployment of raspberry pie is actually very simple. The difference from the above steps is that you need to set the target for raspberry Pie:
1target = tvm.target.arm_cpu('rasp3b')Click in to find that rasp3b corresponds to - target = armv7l Linux gnueabihf:
 1trans_table = {

 2    "pixel2":    ["-model=snapdragon835", "-target=arm64-linux-android -mattr=+neon"],

 3    "mate10":    ["-model=kirin970", "-target=arm64-linux-android -mattr=+neon"],

 4    "mate10pro": ["-model=kirin970", "-target=arm64-linux-android -mattr=+neon"],

 5    "p20":       ["-model=kirin970", "-target=arm64-linux-android -mattr=+neon"],

 6    "p20pro":    ["-model=kirin970", "-target=arm64-linux-android -mattr=+neon"],

 7    "rasp3b":    ["-model=bcm2837", "-target=armv7l-linux-gnueabihf -mattr=+neon"],

 8    "rk3399":    ["-model=rk3399", "-target=aarch64-linux-gnu -mattr=+neon"],

 9    "pynq":      ["-model=pynq", "-target=armv7a-linux-eabi -mattr=+neon"],

10    "ultra96":   ["-model=ultra96", "-target=aarch64-linux-gnu -mattr=+neon"],

11}
Another change is that it is exported CC = "/ usr / bin / arm linux gnueabihf-g + +" needs to be added during so. At this time, / usr / bin / arm linux gnueabihf-g + + is the cross compiler downloaded before.
1path_lib = '../tvm/deploy_lib.so'

2lib.export_library(path_lib, cc="/usr/bin/arm-linux-gnueabihf-g++")
At this time, you can export several files needed by raspberry pie, then move these files to raspberry pie, and then deploy them by using the C + + deployment code mentioned above.
the questions concerned
I'm sure you still have a lot of doubts here. Limited to space (I'm a little tired of writing), here are some key things:
speed
It can be said without hesitation that the speed increase is obvious for this model. In the PC deployment, the running speed of the gesture detection model deployed by TVM is about 5 times that of libtorch, and the accuracy has not been tested, but no obvious difference has been found in the demonstration process with camera. Of course, further tests are needed, so I won't say more here.
In raspberry pie, this model has not reached real-time (53ms), but there is still a lot of optimization space for TVM. Real time is only a time relationship.
Level of support
Of course, because TVM is still in the development stage, there are some layers that are not supported, such as mobilenetv2-128 above_ S. When the onnx model was first read using the Relay IR front end, it was prompted that there was no support for the flatten layer in TVM, mobilenetv2-128_ S. There is a flat layer in onnx, so an error is prompted.
But is this a problem? As long as you carefully look at the source code of TVM and get familiar with the structure, you can add layers by yourself. However, in fact, the operation function of flatten already exists in TVM, but the front-end interface of onnx is not displayed, and the front-end interface of onnx is batch_ The flatten function is actually batch_flatten is a special version of flatten, so you can successfully read your own model by simply modifying the source code and recompiling it.
reference
https://oldpan.me/archives/the-first-step-towards-tvm-1
https://mp.weixin.qq.com/s?__biz=Mzg3ODU2MzY5MA==&mid=2247484929&idx=1&sn=3fcce36b5a50cd8571cf932a23083667&chksm=cf109e04f86717129c3381ebeec2d0c1f7baf6ed057c66310662f5935beea88baf23e99898f4&token=1276531538&lang=zh_CN#rd