This article is shared from Huawei cloud community< [technology sharing] serialization and deserialization of Apache Avro data & & flinksql parsing Avro data >, author: third uncle of Nanpai.
Technical background
With the rapid development of the Internet, cutting-edge technologies such as cloud computing, big data, artificial intelligence AI and the Internet of things have become the mainstream high-tech technologies in today's era, such as e-commerce websites, face recognition, driverless, smart home, smart city, etc., which not only facilitate people's daily necessities, What's more, a large amount of data is collected, clear and analyzed by various system platforms all the time, and it is particularly important to ensure the low delay, high throughput and security of data. Apache Avro serializes and transmits binary data through Schema, which ensures the high-speed transmission of data on the one hand and the security of data on the other hand, At present, avro is more and more widely used in various industries. How to process and parse avro data is particularly important. This paper will demonstrate how to serialize and generate avro data and use FlinkSQL for parsing.
This article is a demo of avro parsing. Currently, FlinkSQL is only applicable to simple avro data parsing, and complex nested avro data is not supported temporarily.
Scene introduction
This paper mainly introduces the following three key contents:
- How to serialize and generate Avro data
- How to deserialize and parse Avro data
- How to parse Avro data using FlinkSQL
prerequisite
- To learn what avro is, you can refer to the quick start guide on the apache avro official website
- Understand avro application scenarios
Operation steps
1. Create a new avro maven project and configure pom dependency
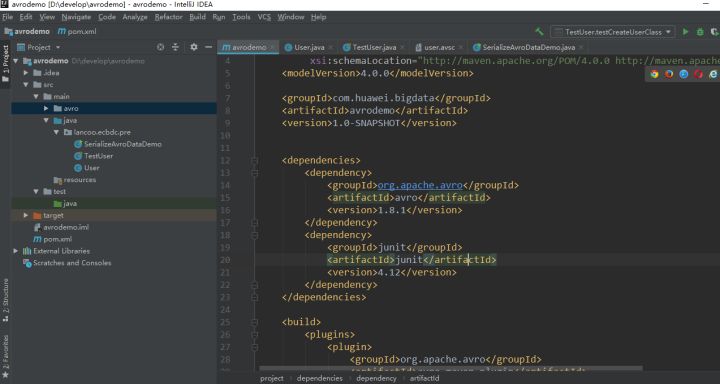
pom file contents are as follows:
<?xml version="1.0" encoding="UTF-8"?>
<project xmlns="http://maven.apache.org/POM/4.0.0"
         xmlns:xsi="http://www.w3.org/2001/XMLSchema-instance"
         xsi:schemaLocation="http://maven.apache.org/POM/4.0.0 http://maven.apache.org/xsd/maven-4.0.0.xsd">
    <modelVersion>4.0.0</modelVersion>

    <groupId>com.huawei.bigdata</groupId>
    <artifactId>avrodemo</artifactId>
    <version>1.0-SNAPSHOT</version>
    <dependencies>
        <dependency>
            <groupId>org.apache.avro</groupId>
            <artifactId>avro</artifactId>
            <version>1.8.1</version>
        </dependency>
        <dependency>
            <groupId>junit</groupId>
            <artifactId>junit</artifactId>
            <version>4.12</version>
        </dependency>
    </dependencies>

    <build>
        <plugins>
            <plugin>
                <groupId>org.apache.avro</groupId>
                <artifactId>avro-maven-plugin</artifactId>
                <version>1.8.1</version>
                <executions>
                    <execution>
                        <phase>generate-sources</phase>
                        <goals>
                            <goal>schema</goal>
                        </goals>
                        <configuration>
                            <sourceDirectory>${project.basedir}/src/main/avro/</sourceDirectory>
                            <outputDirectory>${project.basedir}/src/main/java/</outputDirectory>
                        </configuration>
                    </execution>
                </executions>
            </plugin>
            <plugin>
                <groupId>org.apache.maven.plugins</groupId>
                <artifactId>maven-compiler-plugin</artifactId>
                <configuration>
                    <source>1.6</source>
                    <target>1.6</target>
                </configuration>
            </plugin>
        </plugins>
    </build>

</project>
Note: the above pom file configures the paths for automatically generating classes, namely ${project.basedir}/src/main/avro / and ${project.basedir}/src/main/java /. After this configuration, when executing the mvn command, the plug-in will automatically generate class files from the avsc schema in this directory and put them in the latter directory. If the avro directory is not generated, you can create it manually.
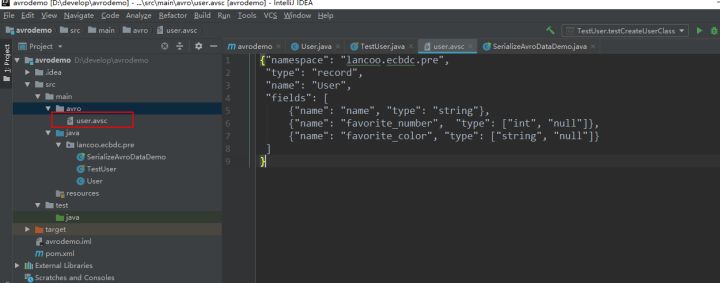
2. Define schema
Use JSON to define the schema for Avro. Schema consists of basic types (null,boolean, int, long, float, double, bytes and string) and complex types (record, enum, array, map, union, and fixed). For example, the following defines a user's schema, creates an Avro directory in the main directory, and then creates a new file user avsc :
{"namespace": "lancoo.ecbdc.pre",
 "type": "record",
 "name": "User",
 "fields": [
     {"name": "name", "type": "string"},
     {"name": "favorite_number",  "type": ["int", "null"]},
     {"name": "favorite_color", "type": ["string", "null"]}
 ]
}
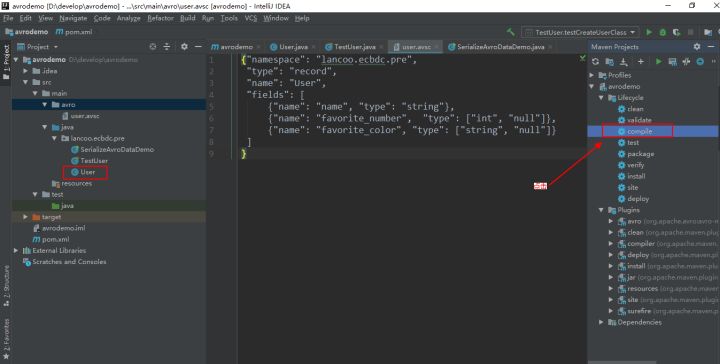
3. Compile schema
Click compile of maven projects project to compile, and the namespace path and User class code will be created automatically
4. Serialization
Create the TestUser class to serialize the generated data
User user1 = new User();
user1.setName("Alyssa");
user1.setFavoriteNumber(256);
// Leave favorite col or null

// Alternate constructor
User user2 = new User("Ben", 7, "red");

// Construct via builder
User user3 = User.newBuilder()
        .setName("Charlie")
        .setFavoriteColor("blue")
        .setFavoriteNumber(null)
        .build();

// Serialize user1, user2 and user3 to disk
DatumWriter<User> userDatumWriter = new SpecificDatumWriter<User>(User.class);
DataFileWriter<User> dataFileWriter = new DataFileWriter<User>(userDatumWriter);
dataFileWriter.create(user1.getSchema(), new File("user_generic.avro"));
dataFileWriter.append(user1);
dataFileWriter.append(user2);
dataFileWriter.append(user3);
dataFileWriter.close();
After executing the serializer, avro data is generated in the sibling directory of the project
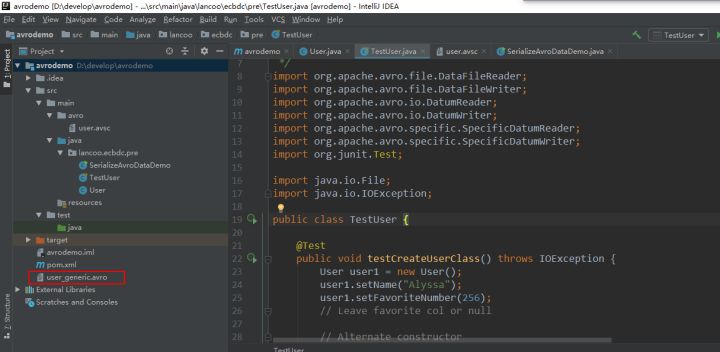
user_generic.avro is as follows:
Objavro.schema�{"type":"record","name":"User","namespace":"lancoo.ecbdc.pre","fields":[{"name":"name","type":"string"},{"name":"favorite_number","type":["int","null"]},{"name":"favorite_color","type":["string","null"]}]}So far, avro data has been generated.
5. Deserialization
Parsing avro data through deserialization code
// Deserialize Users from disk
DatumReader<User> userDatumReader = new SpecificDatumReader<User>(User.class);
DataFileReader<User> dataFileReader = new DataFileReader<User>(new File("user_generic.avro"), userDatumReader);
User user = null;
while (dataFileReader.hasNext()) {
    // Reuse user object by passing it to next(). This saves us from
    // allocating and garbage collecting many objects for files with
    // many items.
    user = dataFileReader.next(user);
    System.out.println(user);
}
Perform deserialization code parsing_ generic. avro

avro data parsing succeeded.
6. user_generic.avro upload to hdfs path
hdfs dfs -mkdir -p /tmp/lztest/
hdfs dfs -put user_generic.avro /tmp/lztest/

7. Configure flyserver
- Prepare avro jar package
Add flick SQL Avro - * jar,flink-sql-avro-confluent-registry-*.jar into the flinkserver lib, and execute the following command on all the flinkserver nodes
cp /opt/huawei/Bigdata/FusionInsight_Flink_8.1.2/install/FusionInsight-Flink-1.12.2/flink/opt/flink-sql-avro*.jar /opt/huawei/Bigdata/FusionInsight_Flink_8.1.3/install/FusionInsight-Flink-1.12.2/flink/lib
chmod 500 flink-sql-avro*.jar
chown omm:wheel flink-sql-avro*.jar

- At the same time, restart the FlinkServer instance. After restarting, check whether the avro package is uploaded
hdfs dfs -ls /FusionInsight_FlinkServer/8.1.2-312005/lib

8. Writing FlinkSQL
CREATE TABLE testHdfs(
  name String,
  favorite_number int,
  favorite_color String
) WITH(
  'connector' = 'filesystem',
  'path' = 'hdfs:///tmp/lztest/user_generic.avro',
  'format' = 'avro'
);CREATE TABLE KafkaTable (
  name String,
  favorite_number int,
  favorite_color String
) WITH (
  'connector' = 'kafka',
  'topic' = 'testavro',
  'properties.bootstrap.servers' = '96.10.2.1:21005',
  'properties.group.id' = 'testGroup',
  'scan.startup.mode' = 'latest-offset',
  'format' = 'avro'
);
insert into
  KafkaTable
select
  *
from
  testHdfs;
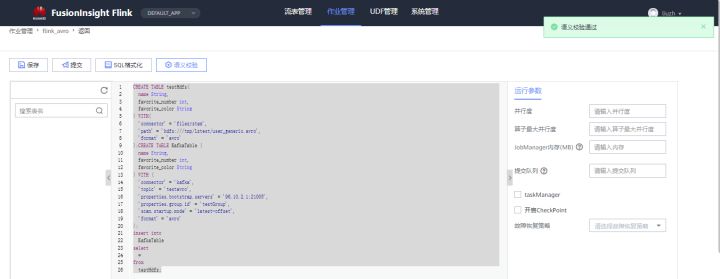
Save submit task
9. Check whether there is data in the corresponding topic

FlinkSQL successfully parsed avro data.
Click focus to learn about Huawei cloud's new technologies for the first time~