article You can find the starting address here , master the latest knowledge in one step!
Write in front
Webpack can be regarded as a mainstay in the front-end construction tools. It can appear in any scene, such as daily business development, front-end infrastructure tools, advanced front-end interviews, etc.
You may be confused about its internal implementation mechanism. In daily work, you still don't understand the meaning and application mode of various parameters based on Webpack Plugin/Loader.
In fact, all these reasons are essentially based on Webpack workflow without a clear understanding, resulting in the so-called "no way to start with API" development.
In this article, from the perspective of how to package the module analysis project, we will use the most popular, concise and clear code to take you to uncover the mystery behind the webpack and take you to implement a simple version of webpack. From then on, we will have a clear understanding of any underlying development related to webpack.
Here we only talk about "dry goods" and take you into the workflow of webpack with the most easy to understand code.
I hope you can master the pre knowledge
Tapable The package is essentially a library for us to create custom events and trigger custom events, similar to the EventEmitter Api in Nodejs.
The plug-in mechanism in Webpack is based on the decoupling of Tapable implementation and packaging process. All forms of plug-ins are based on Tapable implementation.
For learning purposes, we will focus on the Webpack Node Api process. In fact, the npm run build command we use daily at the front end also calls the bin script through the environment variable to call the Node Api to perform compilation and packaging.
The AST analysis inside Webpack also depends on Babel for processing, if you are not very familiar with Babel. I suggest you read these two articles first "Front end infrastructure" takes you to travel in Babel's world,#Enter the world of Babel plug-in developers from Tree Shaking.
Of course, I will explain the application of these contents in Webpack in detail later, but I hope you can click the document above to learn a little about the pre knowledge before reading the article.
Process combing
Before we start, let's sort out the whole packaging process.
Here is just a comb of the whole process. Now you don't need to think about what happens in each step in detail. We will take you to connect them step by step in the next steps.

As a whole, we will analyze the Webpack packaging process from the above five aspects:
- Initialization parameter phase.
This step will start from our configuration`webpack.config.js`Read the corresponding configuration parameters and`shell`The parameters passed in the command are combined to obtain the final packaging configuration parameters.
- Start compilation preparation phase
In this step, we will call`webpack()`Method returns a`compiler`Method to create our`compiler`Object and register each`Webpack Plugin`. Locate the in the configuration portal`entry`Code, calling`compiler.run()`Method.
- Module compilation phase
Analyze from the entry module and call the matching file`loaders`Process the file. At the same time, analyze the modules that the module depends on, and compile the module recursively.
- Complete the compilation phase
After the recursion is completed, each reference module passes`loaders`When the processing is completed, the interdependence between modules is obtained.
- Output file phase
Sort out module dependencies and output the processed files to`ouput`In the disk directory of.
Next, let's explore in detail what happened at each step.
Create directory
Sharp tools make good work. First, let's create a good directory to manage the packaging tool we need to implement!
Let's create such a directory:
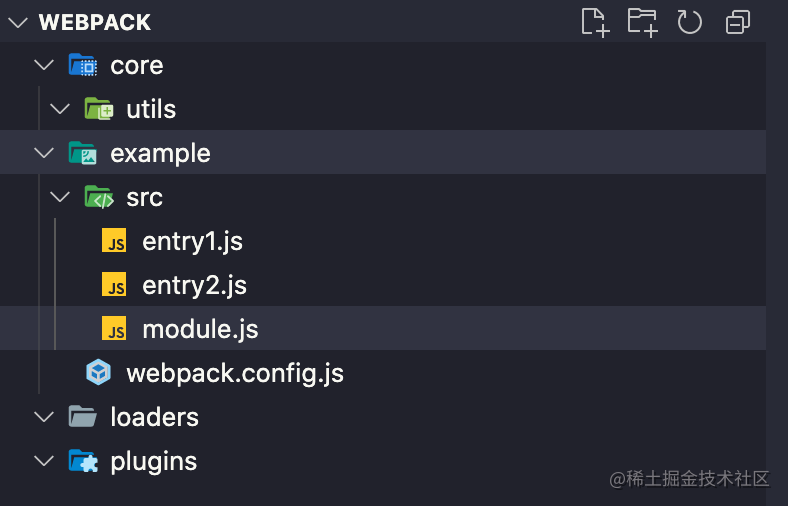
- webpack/core stores the core code of webpack that we will implement.
- webpack/example holds the instance project we will use to package.
+ `webpack/example/webpak.config.js`configuration file.
+ `webpack/example/src/entry1`First entry file
+ `webpack/example/src/entry1`Second entry file
+ `webpack/example/src/index.js`Module file
- webpack/loaders store our custom loaders.
- webpack/plugins store our custom plugins.
Initialization parameter phase
Often, there are two ways to pass packaging parameters to webpack in the daily use stage. Let's see how to pass parameters first:
Cli command line pass parameters
Usually, when we call the webpack command, we sometimes pass in certain command line parameters, such as:
webpack --mode=production
# Call the webpack command to execute packaging and pass in the mode of production
webpack.config.js pass parameters
Another way, I believe, is more commonplace.
We use webpack.config.js to export an object under the project root directory for webpack configuration:
const path = require('path')
// Introducing loader and plugin
module.exports = {
mode: 'development',
entry: {
main: path.resolve(__dirname, './src/entry1.js'),
second: path.resolve(__dirname, './src/entry2.js'),
},
devtool: false,
// The base directory, an absolute path, is used to resolve the entry point and loader from the configuration.
// In other words, all relative paths of entry and loader are relative to this path
context: process.cwd(),
output: {
path: path.resolve(__dirname, './build'),
filename: '[name].js',
},
plugins: [new PluginA(), new PluginB()],
resolve: {
extensions: ['.js', '.ts'],
},
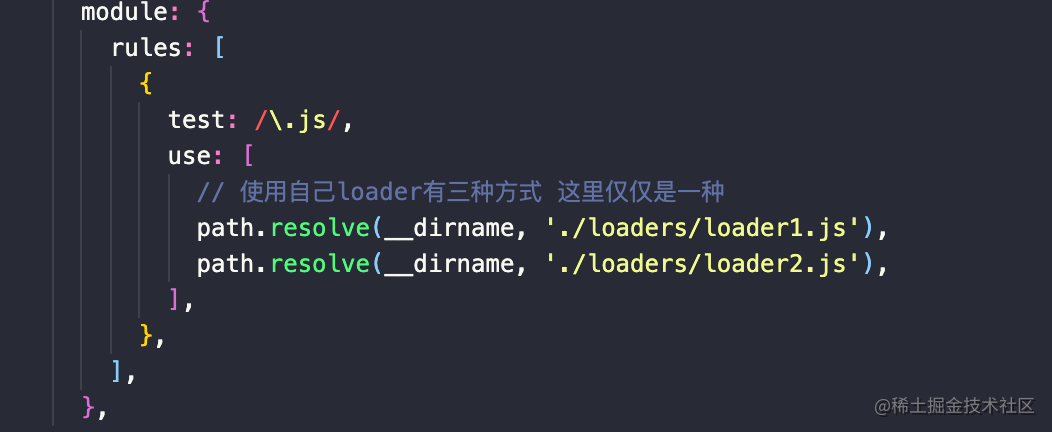
module: {
rules: [
{
test: /\.js/,
use: [
// There are three ways to use your own loader. Here is just one
path.resolve(__dirname, '../loaders/loader-1.js'),
path.resolve(__dirname, '../loaders/loader-2.js'),
],
},
],
},
};At the same time, this configuration file is also the instance configuration under the example project. Next, let's modify the content in example/webpack.config.js to the above configuration.
Of course, you don't need to understand the loader and plugin here at present. Next, we will gradually implement these things and add them to our packaging process.
Implement the merge parameter phase
This step, let's really start to implement our webpack!
First, let's create a new index.js file under webpack/core as the core entry file.
At the same time, create a webpack.js file under the webpack/core as the implementation file of the webpack() method.
First, we know that the compiler object is obtained through the webpack() method in NodeJs Api.

At this point, let's supplement the logic in index.js according to the original webpack interface format:
- We need a webpack method to execute the call command.
- At the same time, we introduce the webpack.config.js configuration file to pass in the webpack method.
// index.js
const webpack = require('./webpack');
const config = require('../example/webpack.config');
// Step 1: initialize the parameters and synthesize the parameters according to the configuration file and shell parameters
const compiler = webpack(config);
Well, it looks good. Next, let's implement webpack.js:
function webpack(options) {
// Merge parameters to get the merged parameter mergeOptions
const mergeOptions = _mergeOptions(options);
}
// Merge parameters
function _mergeOptions(options) {
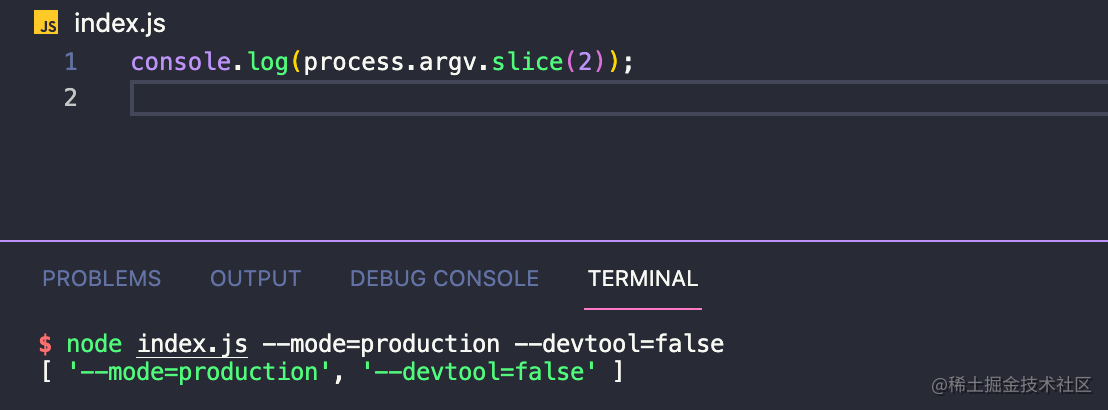
const shellOptions = process.argv.slice(2).reduce((option, argv) => {
// argv -> --mode=production
const [key, value] = argv.split('=');
if (key && value) {
const parseKey = key.slice(2);
option[parseKey] = value;
}
return option;
}, {});
return { ...options, ...shellOptions };
}
module.export = webpack;What we need to add here is
In the webpack file, you need to export a method named webpack and accept the configuration object passed in from the outside. This is what we talked about above.
Of course, the logic of merging parameters is to finally merge the external incoming object with the incoming parameters when executing the shell.
In Node Js, we can obtain the parameters passed in the shell command through process.argv.slice(2), such as:
Of course_ The mergeOptions method is a simple method to merge configuration parameters. I believe it is a piece of cake for everyone.
Congratulations 🎉, A thousand mile trip begins with one step. In this step, we have completed the first step in the packaging process: merging configuration parameters.
Compilation phase
After getting the final configuration parameters, we need to do the following in the webpack() function:
- Create a compiler object with parameters. We can see that in the official case, a compiler object is returned by calling the webpack(options) method. At the same time, the code started by calling the compiler.run() method is packaged.
- Register the webpack plugin we defined.
- Find the corresponding packaging entry file according to the incoming configuration object.
Create compiler object
Let's complete the logic code in index.js first:
// index.js
const webpack = require('./webpack');
const config = require('../example/webpack.config');
// Step 1: initialize the parameters and synthesize the parameters according to the configuration file and shell parameters
// Step 2: call Webpack(options) to initialize the compiler object
// The webpack() method returns a compiler object

const compiler = webpack(config);

// Call the run method for packaging
compiler.run((err, stats) => {
  if (err) {
    console.log(err, 'err');
  }
  // ...
});
As you can see, the core compilation implementation lies in the compiler.run() method returned by the webpack() method.
Let's improve this webpack() method step by step:
// webpack.js
function webpack(options) {
  // Merge parameters to get the merged parameter mergeOptions
  const mergeOptions = _mergeOptions(options);
  // Create compiler object
  const compiler = new Compiler(mergeOptions)

  return compiler
}

// ...
Let's also create a new compiler.js file in the webpack/core directory as the core implementation file of the compiler:
// compiler.js
// Compiler class for core compilation implementation
class Compiler {
  constructor(options) {
    this.options = options;
  }

  // The run method starts compilation
  // At the same time, the run method accepts the callback passed externally
  run(callback) {
  }
}

module.exports = Compiler
At this point, our Compiler class will first build a basic skeleton code.
At present, we have:
- webpack/core/index.js is used as the entry file for packaging commands. This file references the webpack implemented by ourselves and the external webpack.config.js(options). Call webpack(options).run() to start compilation.
- The webpack/core/webpack.js file currently handles the merging of parameters and passes in the merged parameter new Compiler(mergeOptions), and returns the created Compiler object.
- webpack/core/compiler. At this time, our compiler is just a basic skeleton, and there is a run() startup method.
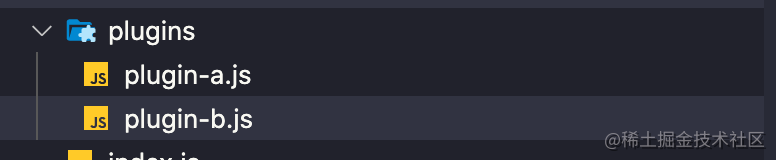
Write Plugin
Remember that we used two plugins -- plugina and pluginB plug-ins in webpack.config.js. Let's implement them in turn:
Before implementing Plugin, we need to improve the compiler method:
const { SyncHook } = require('tapable');

class Compiler {
  constructor(options) {
    this.options = options;
    // Create plugin hooks
    this.hooks = {
      // Hook at start of compilation
      run: new SyncHook(),
      // Execute before outputting the asset to the output directory (before writing to the file)
      emit: new SyncHook(),
      // Execute all when compilation is complete
      done: new SyncHook(),
    };
  }

  // The run method starts compilation
  // At the same time, the run method accepts the callback passed externally
  run(callback) {}
}

module.exports = Compiler;
Here, we create an attribute hooks in the constructor of the Compiler class. Its value is the three attributes run, emit and done.
The values of these three attributes are the SyncHook method of tabable, which we mentioned above. In essence, you can simply understand the SyncHook() method as an Emitter Event class.
After we return an object instance through new SyncHook(), we can add event listener for this object through this.hook.run.tap('name',callback) method, and then execute all tap registered events through this.hook.run.call().
Of course, there are many hooks in the real source code of webpack. And there are synchronous / asynchronous hooks respectively. We will explain the process more clearly for you, so we only list three common and simple synchronous hooks.
At this point, we need to understand that we can register the hook on the compiler.hooks.run.tap instance object returned by the Compiler class.
Next, let's switch back to webpack.js and fill in the logic about plug-in registration:
const Compiler = require('./compiler');

function webpack(options) {
  // Merge parameters
  const mergeOptions = _mergeOptions(options);
  // Create compiler object
  const compiler = new Compiler(mergeOptions);
  // Loading plug-ins
  _loadPlugin(options.plugins, compiler);
  return compiler;
}

// Merge parameters
function _mergeOptions(options) {
  const shellOptions = process.argv.slice(2).reduce((option, argv) => {
    // argv -> --mode=production
    const [key, value] = argv.split('=');
    if (key && value) {
      const parseKey = key.slice(2);
      option[parseKey] = value;
    }
    return option;
  }, {});
  return { ...options, ...shellOptions };
}

// Loading plug-in functions
function _loadPlugin(plugins, compiler) {
  if (plugins && Array.isArray(plugins)) {
    plugins.forEach((plugin) => {
      plugin.apply(compiler);
    });
  }
}

module.exports = webpack;
Here we call compiler after creating the completed object. The loadPlugin method registers the plug-in.
Students who have been in contact with webpack plug-in development may have known it more or less. Any webpack plug-in is a class (of course, the class is essentially a funciton syntax sugar), and each plug-in must have an apply method.
This apply method will accept a compiler object. What we have done above is to call the apply method of the incoming plugin in turn and pass in our compiler object.
Here, I ask you to remember the above process. When we write a webpack plugin, we essentially operate the compiler object, which affects the packaging results.
Maybe you don't quite understand the meaning of this sentence at this time. After we complete the whole process in series, I will reveal the answer for you.
Next, let's write these plug-ins:
Students who do not understand plug-in development can go and have a look Official introduction In fact, it's not very difficult. Personally, I strongly suggest that if you don't understand it, you can go and see it first and then come back. You will gain something in combination with the content of the above change.
First, let's create a file:
// plugin-a.js
// Plug in A
class PluginA {
  apply(compiler) {
    // Register synchronization hook
    // The compiler object here is the instance created by new Compiler()
    compiler.hooks.run.tap('Plugin A', () => {
      // call
      console.log('PluginA');
    });
  }
}

module.exports = PluginA;
// plugin-b.js
class PluginB {
apply(compiler) {
compiler.hooks.done.tap('Plugin B', () => {
console.log('PluginB');
});
}
}
module.exports = PluginB;Seeing this, I believe most of the students have reacted. Isn't compiler.hooks.done.tap the SyncHook instance created through tapable and registered events through the tap method we mentioned above?
you 're right! Indeed, the webpack plug-in essentially listens to events on the compiler through the publish subscribe mode. Then, the listening events are triggered during the packaging and compilation process, so as to add some logic to affect the packaging results.
On the apply method of each plug-in, we subscribe to the corresponding events through tap in the compilation preparation stage (that is, when calling the webpack() function). When our compilation execution reaches a certain stage, we publish the corresponding events to tell the subscriber to execute the monitored events, so as to trigger the corresponding plugin in different life cycles of the compilation stage.
So you should be clear here that when we develop the webpack plug-in, the compiler object stores all the relevant properties of this package, such as the configuration of options package and various properties we will talk about later.
Find entry
After that, most of our content will be put in compiler.js to implement the core process of packaging.
Any packaging requires an entry file. Next, let's really enter the packaging and compilation stage. The first thing is that we need to find the corresponding entry file according to the entry configuration file path.
// compiler.js
const { SyncHook } = require('tapable');
const { toUnixPath } = require('./utils');

class Compiler {
  constructor(options) {
    this.options = options;
    // Relative path and path Context parameters
    this.rootPath = this.options.context || toUnixPath(process.cwd());
    // Create plugin hooks
    this.hooks = {
      // Hook at start of compilation
      run: new SyncHook(),
      // Execute before outputting the asset to the output directory (before writing to the file)
      emit: new SyncHook(),
      // Execute all when compilation is complete
      done: new SyncHook(),
    };
  }

  // The run method starts compilation
  // At the same time, the run method accepts the callback passed externally
  run(callback) {
    // When the run mode is called, the plugin that starts compiling is triggered
    this.hooks.run.call();
    // Get portal configuration object
    const entry = this.getEntry();
  }

  // Get entry file path
  getEntry() {
    let entry = Object.create(null);
    const { entry: optionsEntry } = this.options;
    if (typeof entry === 'string') {
      entry['main'] = optionsEntry;
    } else {
      entry = optionsEntry;
    }
    // Make entry an absolute path
    Object.keys(entry).forEach((key) => {
      const value = entry[key];
      if (!path.isAbsolute(value)) {
        // When converting to absolute path, the unified path separator is/
        entry[key] = toUnixPath(path.join(this.rootPath, value));
      }
    });
    return entry;
  }
}

module.exports = Compiler;
// utils/index.js
/**
*
* The unified path separator is mainly used to facilitate the subsequent generation of module ID s
* @param {*} path
* @returns
*/
function toUnixPath(path) {
return path.replace(/\\/g, '/');
}In this step, we obtain the absolute path of the entry file through options.entry processing.
Here are a few points to note:
- this.hooks.run.call()
In us_ In the loadePlugins function, each incoming plug-in is subscribed in the compiler instance object, so when we call the run method, it is equivalent to actually starting the compilation. This stage is equivalent to telling the subscriber that the publication starts executing the subscription. At this point, we execute all tap listening methods about run through this.hooks.run.call(), thus triggering the corresponding plugin logic.
- this.rootPath:
In the above external webpack.config.js, we have configured a context: process.cwd(). In fact, the default value of this context in the real webpack is process.cwd().
You can see a detailed explanation of it here Context.
In short, this path is the directory path of our project startup. Any relative path in entry and loader is the relative path for the context parameter.
Here we use this.rootPath to save this variable in the constructor.
- toUnixPath tool method:
Because file separation paths are different under different operating systems. Here, we use \ to replace / / in the path to replace the module path. Later, we will use the path of the module relative to the rootPath as the unique ID of each file, so the path separator is handled uniformly here.
- Processing method of entry:
There are actually many kinds of entry configurations in webpack. Here we consider two common configuration methods:
entry:'entry1.js'

// In essence, this code will be converted into
entry: {
    main:'entry1.js
}
entry: {
'entry1':'./entry1.js',
'entry2':'/user/wepback/example/src/entry2.js'
}Either of these two methods will be finally transformed into the form of {[module name]: [module absolute path]...} through the getEntry method. The geEntry() method is actually very simple, so I won't cumbersome the implementation process of this method here.
In this step, we get an object with key as entryname and value as entryAbsolutePath through getEntry method. Let's start the compilation process from the entry file.
Module compilation phase
Above, we talked about the preparations for the compilation phase:
- Directory / file base logic supplement.
- Register the webpack plug-in through hooks.tap.
- The getEntry method obtains the object of each entry.
Next, let's continue to improve compiler.js.
In the module compilation phase, we need to do the following events:
- Analyze the entry file according to the entry file path, match the entry file, and process the corresponding loader.
- Compile the entry file processed by the loader with webpack.
- Analyze the dependency of the entry file, and repeat the above two steps to compile the corresponding dependency.
- If there are dependent files in the nested file, the dependent module is called recursively for compilation.
- After recursive compilation, chunk s containing multiple modules are assembled
First, let's add the corresponding logic to the constructor of compiler.js:
class Compiler {
  constructor(options) {
    this.options = options;
    // Create plugin hooks
    this.hooks = {
      // Hook at start of compilation
      run: new SyncHook(),
      // Execute before outputting the asset to the output directory (before writing to the file)
      emit: new SyncHook(),
      // Execute all when compilation is complete
      done: new SyncHook(),
    };
    // Save all entry module objects
    this.entries = new Set();
    // Save all dependent module objects
    this.modules = new Set();
    // All code block objects
    this.chunks = new Set();
    // Document object for storing this output
    this.assets = new Set();
    // Store the file name of all the output of this compilation
    this.files = new Set();
  }
  // ...
 }
Here, we save the corresponding resource / module objects generated during the compilation phase by adding some column attributes to the compiler constructor.
About entries\modules\chunks\assets\files, these Set objects are attributes that run through our core packaging process. They are used to store different resources in the compilation stage, so as to finally generate the compiled file through the corresponding attributes.
Analyze the entry file according to the entry file path
As mentioned above, we can already use this.getEntry() in the run method; Get the corresponding entry object ~
Next, let's start from the portal file to analyze the portal file!
class Compiler {
    // The run method starts compilation
  // At the same time, the run method accepts the callback passed externally
  run(callback) {
    // When the run mode is called, the plugin that starts compiling is triggered
    this.hooks.run.call();
    // Get portal configuration object
    const entry = this.getEntry();
    // Compile entry file
    this.buildEntryModule(entry);
  }

  buildEntryModule(entry) {
    Object.keys(entry).forEach((entryName) => {
      const entryPath = entry[entryName];
      const entryObj = this.buildModule(entryName, entryPath);
      this.entries.add(entryObj);
    });
  }


  // Module compilation method
  buildModule(moduleName,modulePath) {
    // ...
    return {}
  }
}
Here we add a method called buildeentrymodule as the entry module compilation method. Loop the entry object to get the name and path of each entry object.
For example, if we pass in entry: {Main: '. / SRC / main. JS'} at the beginning, the formal parameter entry obtained by buildingentrymodule is {main: "/src... [your absolute path]"}. At this time, the entryName accepted by our buildModule method is main, and the entrypath is the absolute path corresponding to the entry file main.
After the compilation of a single entry is completed, we will return an object in the buildModule method. This object is the object after we compile the entry file.
Compiling method of buildModule module
Before coding, let's sort out the buildModule method and what it needs to do:
- buildModule accepts two parameters for module compilation. The first is the name of the entry file to which the module belongs, and the second is the path of the module to be compiled.
- The premise of code compilation in buildModule method is to read the file source code according to the entry file path through fs module.
- After reading the contents of the file, all matching loader is called to process the module and get the result after return.
- After getting the results processed by the loader, babel analyzes the code processed by the loader and compiles the code. (this step of compilation is mainly aimed at the require statement and modifying the path of the require statement in the source code).
- If the entry file does not depend on any module (require statement), the compiled module object is returned.
- If there are dependent modules in the entry file, recursive buildModule method is used for module compilation.
Read file contents
- We first call the fs module to read the contents of the file.
const fs = require('fs');
// ...
class Compiler {
      //...
      // Module compilation method
      buildModule(moduleName, modulePath) {
        // 1. Read the original code of the file
        const originSourceCode =
          ((this.originSourceCode = fs.readFileSync(modulePath, 'utf-8'));
        // moduleCode is the modified code
        this.moduleCode = originSourceCode;
      }

      // ...
 }
Call loader to process the matching suffix file
- Next, after we get the specific contents of the file, we need to match the corresponding loader to compile our source code.
Implement simple custom loader
Before compiling the loader, let's implement the custom loader passed in above.
Create a new loader-1.js in the webpack/loader directory, loader-2.js:
First of all, we need to be clear. Simply speaking, loader is essentially a function that accepts our source code as an input parameter and returns the processed results.
For more details about the features of loader, you can See here , because this article mainly describes the packaging process, we simply handle loader in reverse order. For more specific loader/plugin development, I will supplement it in detail in subsequent articles.
// loader is essentially a function that accepts the original content and returns the converted content.
function loader1(sourceCode) {
  console.log('join loader1');
  return sourceCode + `\n const loader1 = 'https://github.com/19Qingfeng'`;
}

module.exports = loader1;
function loader2(sourceCode) {
console.log('join loader2');
return sourceCode + `\n const loader2 = '19Qingfeng'`;
}
module.exports = loader2;Processing files using loader
After making it clear that loader is a simple function, let's give the content to the matching loader for processing before module analysis.
// Module compilation method
  buildModule(moduleName, modulePath) {
    // 1. Read the original code of the file
    const originSourceCode =
      ((this.originSourceCode = fs.readFileSync(modulePath)), 'utf-8');
    // moduleCode is the modified code
    this.moduleCode = originSourceCode;
    //  2. Call loader for processing
    this.handleLoader(modulePath);
  }

  // Matching loader processing
  handleLoader(modulePath) {
    const matchLoaders = [];
    // 1. Get all incoming loader rules
    const rules = this.options.module.rules;
    rules.forEach((loader) => {
      const testRule = loader.test;
      if (testRule.test(modulePath)) {
        if (loader.loader) {
          // Only consider loader {test: / \. JS $/ g, use: ['babel loader ']}, {test: / \. JS $/, loader:' Babel loader '}
          matchLoaders.push(loader.loader);
        } else {
          matchLoaders.push(...loader.use);
        }
      }
      // 2. Execute the loader in reverse order to pass in the source code
      for (let i = matchLoaders.length - 1; i >= 0; i--) {
        // At present, we only support the loader mode of importing absolute path externally
        // require importing the corresponding loader
        const loaderFn = require(matchLoaders[i]);
        // Synchronize my every compiled moduleCode through the loader
        this.moduleCode = loaderFn(this.moduleCode);
      }
    });
  }
Here, we use the handleLoader function to match the incoming file path to the loader with the corresponding suffix, execute the loader in reverse order, process our code this.moduleCode, and synchronously update each moduleCode.
Finally, in each module compilation, this.moduleCode will be processed by the corresponding loader.
webpack module compilation phase
In the previous step, we experienced that the loader processed our entry file code, and the processed code was saved in this.moduleCode.
At this point, after being processed by the loader, we will enter the internal compilation stage of webpack.
What we need to do here is: compile the current module, and change the path introduced by all dependent module (require()) statements of the current module into a relative path relative to the following path (this.rootPath).
In short, you need to understand that the result of our compilation here is to change the dependent module path in the source code into a path relative to the path, and establish the basic module dependency. Later, I will tell you why to compile for path.
Let's continue to improve the buildModule method:
const parser = require('@babel/parser');
const traverse = require('@babel/traverse').default;
const generator = require('@babel/generator').default;
const t = require('@babel/types');
const tryExtensions = require('./utils/index')
// ...
  class Compiler {
     // ...

     // Module compilation method
      buildModule(moduleName, modulePath) {
        // 1. Read the original code of the file
        const originSourceCode =
          ((this.originSourceCode = fs.readFileSync(modulePath)), 'utf-8');
        // moduleCode is the modified code
        this.moduleCode = originSourceCode;
        //  2. Call loader for processing
        this.handleLoader(modulePath);
        // 3. Call webpack to compile the module to obtain the final module object
        const module = this.handleWebpackCompiler(moduleName, modulePath);
        // 4. Return the corresponding module
        return module
      }

      // Call webpack for module compilation
      handleWebpackCompiler(moduleName, modulePath) {
        // Calculate the relative path of the current module relative to the project startup root directory as the module ID
        const moduleId = './' + path.posix.relative(this.rootPath, modulePath);
        // Create module object
        const module = {
          id: moduleId,
          dependencies: new Set(), // The absolute path address of the module on which the module depends
          name: [moduleName], // The entry file to which the module belongs
        };
        // Call babel to analyze our code
        const ast = parser.parse(this.moduleCode, {
          sourceType: 'module',
        });
        // Depth first traversal syntax Tree
        traverse(ast, {
          // When a require statement is encountered
          CallExpression:(nodePath) => {
            const node = nodePath.node;
            if (node.callee.name === 'require') {
              // Obtain the relative path of the introduced module in the source code
              const moduleName = node.arguments[0].value;
              // Find the module absolute path. The current module path + require() corresponds to the relative path
              const moduleDirName = path.posix.dirname(modulePath);
              const absolutePath = tryExtensions(
                path.posix.join(moduleDirName, moduleName),
                this.options.resolve.extensions,
                moduleName,
                moduleDirName
              );
              // Generate moduleId - add the module ID for the following path into the new dependent module path
              const moduleId =
                './' + path.posix.relative(this.rootPath, absolutePath);
              // Modify the require in the source code through babel to become__ webpack_require__ sentence
              node.callee = t.identifier('__webpack_require__');
              // Modify all the modules introduced by the require statement in the source code to be processed relative to the following path
              node.arguments = [t.stringLiteral(moduleId)];
              // Add the dependency caused by the require statement for the current module (the content is the module ID relative to the root path)
              module.dependencies.add(moduleId);
            }
          },
        });
        // After traversal, generate new code according to AST
        const { code } = generator(ast);
        // Mount the new generated code for the current module
        module._source = code;
        // Returns the current module object
        return module
      }
  }
This step completes our webpack compilation phase.
It should be noted that:
- Here, we use babel related APIs to compile the require statement. If you don't know much about babel related APIs, you can view my other two articles in the front knowledge. I won't be a burden here
- At the same time, a tryExtensions() tool method is referenced in our code. This method is aimed at the tool method with incomplete suffix name. You can see the specific content of this method later.
- For each file compilation, we will return a module object, which is the top priority.
+ `id`Property, indicating the current module pin`this.rootPath`Relative directory of.
+ `dependencies`Property, which is a`Set`All modules that the module depends on are saved internally ID.
+ `name`attribute,It indicates which entry file the module belongs to.
+ `_source`Property, which holds the module itself`babel`Compiled string code.
tryExtensions method implementation
We have such a configuration in webpack.config.js above:

Students who are familiar with webpack configuration may know that resolve.extensions is aimed at adding suffixes to files according to the incoming rules without writing file suffixes when introducing dependencies.
After understanding the principle, let's take a look at the implementation of utils/tryExtensions method:
/**
 *
 *
 * @param {*} modulePath Module absolute path
 * @param {*} extensions Extension array
 * @param {*} originModulePath Original incoming module path
 * @param {*} moduleContext Module context (current module directory)
 */
function tryExtensions(
  modulePath,
  extensions,
  originModulePath,
  moduleContext
) {
  // Try the no extension option first
  extensions.unshift('');
  for (let extension of extensions) {
    if (fs.existsSync(modulePath + extension)) {
      return modulePath + extension;
    }
  }
  // No matching file
  throw new Error(
    `No module, Error: Can't resolve ${originModulePath} in  ${moduleContext}`
  );
}
This method is very simple. We check the incoming file through fs.existsSync and traverse successively in combination with extensions to find out whether the corresponding matching path exists. If found, we will return directly. If not found, a friendly prompt error is given.
Pay attention to extensions.unshift(''); This is to prevent the user from trying to find the suffix directly if it has been passed in. If the file can be found, it will be returned directly. It will try in turn when it cannot be found.
Recursive processing
After the processing in the previous step, we can call buildModule for the entry file to get such a return object.
Let's take a look at the returned results from running webpack/core/index.js.
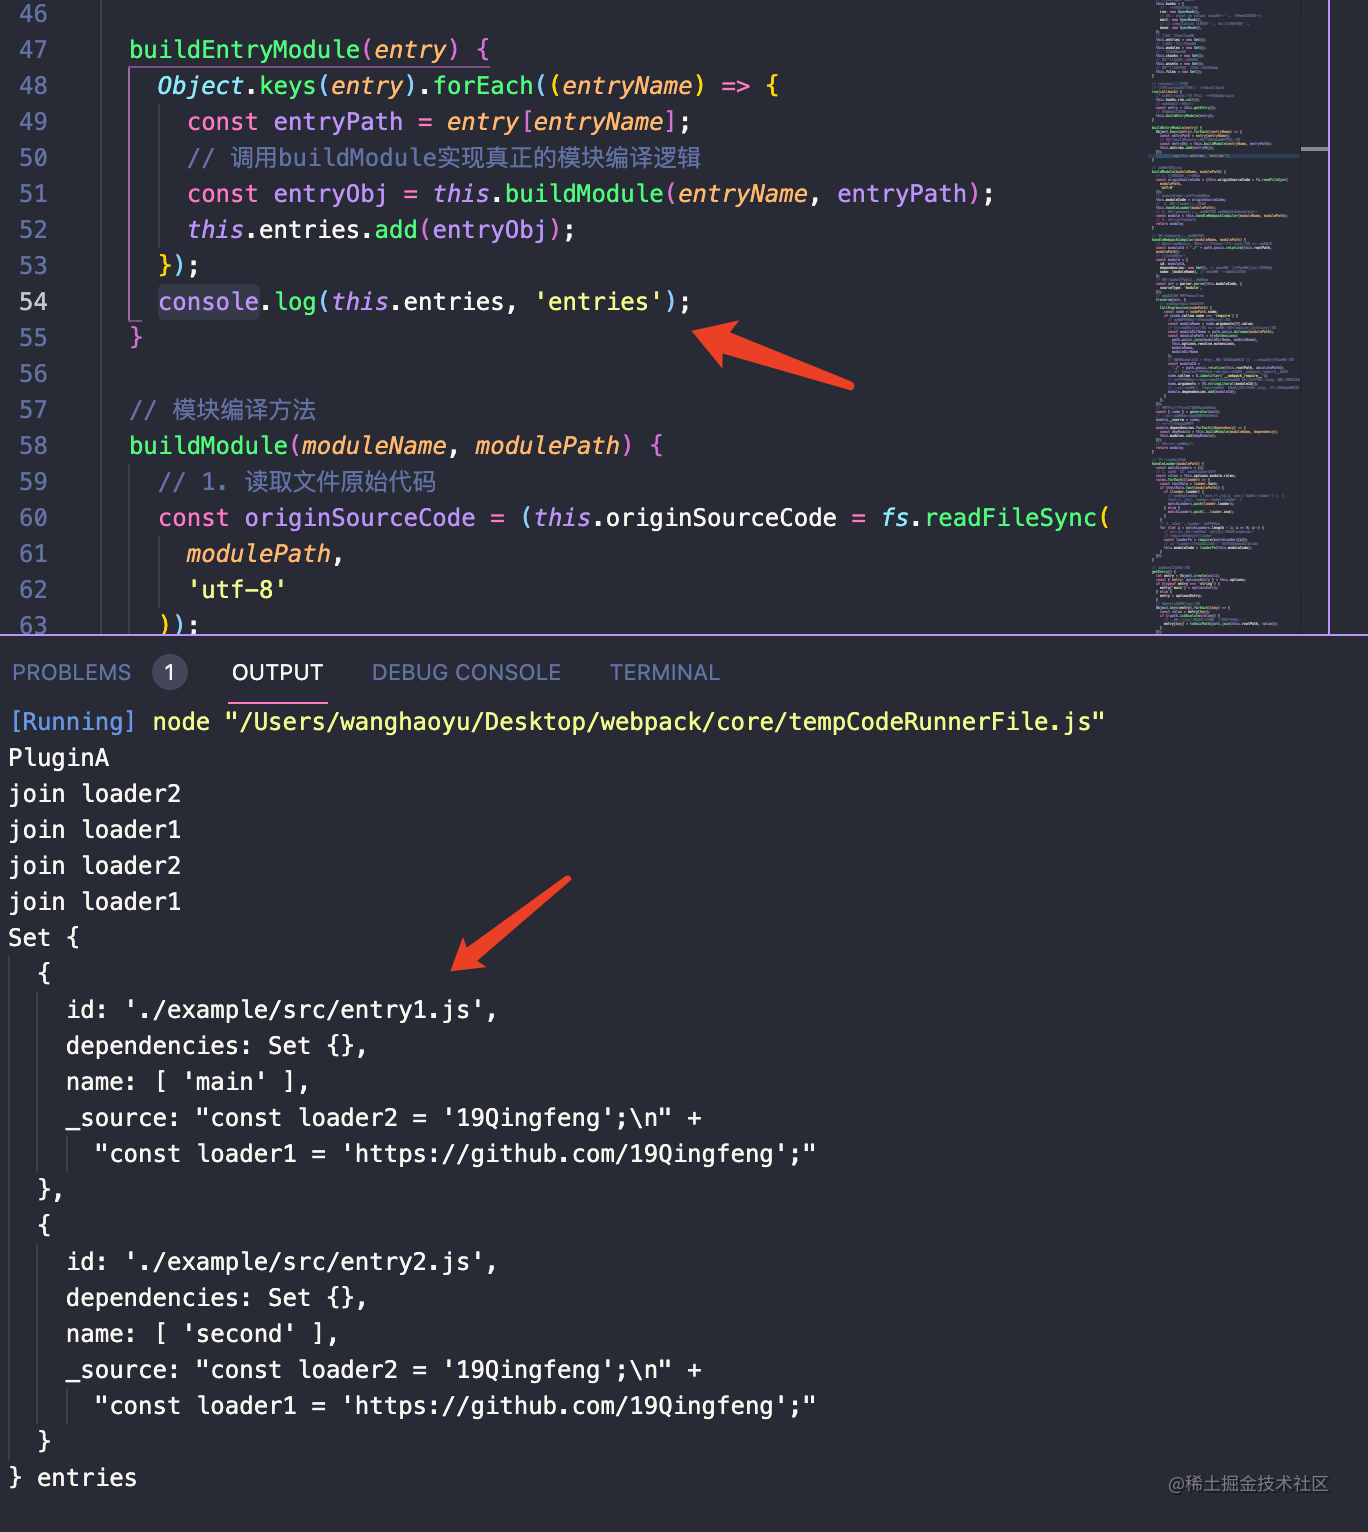
I printed the entries object after processing in buildingentrymodule. You can see, as we expected before:
- The id is the module of each module relative to the following path. (context:process.cwd()) configured here) is the webpack directory.
- Dependencies are the internal dependencies of the module, which has not been added here at present.
- Name is the name of the entry file to which the module belongs.
- _ Source is the compiled source code of the module.
At present_ The content in source is based on
At this point, let's open the src directory and add some dependencies and contents to our two entry files:
// webpack/example/entry1.js
const depModule = require('./module');

console.log(depModule, 'dep');
console.log('This is entry 1 !');


// webpack/example/entry2.js
const depModule = require('./module');

console.log(depModule, 'dep');
console.log('This is entry 2 !');

// webpack/example/module.js
const name = '19Qingfeng';

module.exports = {
  name,
};
At this point, let's rerun webpack/core/index.js:
OK, so far, our compilation for entry can come to an end temporarily.
In short, in this step, we analyze and compile the entry method to get an object. Add this object to this.entries.
Next, let's deal with the dependent modules.
In fact, the dependent modules are the same steps:
- Check whether there are dependencies in the entry file.
- If there are dependencies, recursively call the buildModule method to compile the module. The passed in moduleName is the entry file to which the current module belongs. modulePath is the absolute path of the currently dependent module.
- Similarly, check recursion to check whether there are still dependencies inside the dependent module. If so, compile the module with recursive dependencies. This is a depth first process.
- Save each compiled module into this.modules.
Next, we just need to make a slight change in the handleWebpackCompiler method:
 // Call webpack for module compilation
  handleWebpackCompiler(moduleName, modulePath) {
    // Calculate the relative path of the current module relative to the project startup root directory as the module ID
    const moduleId = './' + path.posix.relative(this.rootPath, modulePath);
    // Create module object
    const module = {
      id: moduleId,
      dependencies: new Set(), // The absolute path address of the module on which the module depends
      name: [moduleName], // The entry file to which the module belongs
    };
    // Call babel to analyze our code
    const ast = parser.parse(this.moduleCode, {
      sourceType: 'module',
    });
    // Depth first traversal syntax Tree
    traverse(ast, {
      // When a require statement is encountered
      CallExpression: (nodePath) => {
        const node = nodePath.node;
        if (node.callee.name === 'require') {
          // Obtain the relative path of the introduced module in the source code
          const moduleName = node.arguments[0].value;
          // Find the module absolute path. The current module path + require() corresponds to the relative path
          const moduleDirName = path.posix.dirname(modulePath);
          const absolutePath = tryExtensions(
            path.posix.join(moduleDirName, moduleName),
            this.options.resolve.extensions,
            moduleName,
            moduleDirName
          );
          // Generate moduleId - add the module ID for the following path into the new dependent module path
          const moduleId =
            './' + path.posix.relative(this.rootPath, absolutePath);
          // Modify the require in the source code through babel to become__ webpack_require__ sentence
          node.callee = t.identifier('__webpack_require__');
          // Modify all the modules introduced by the require statement in the source code to be processed relative to the following path
          node.arguments = [t.stringLiteral(moduleId)];
          // Add the dependency caused by the require statement for the current module (the content is the module ID relative to the root path)
          module.dependencies.add(moduleId);
        }
      },
    });
    // After traversal, generate new code according to AST
    const { code } = generator(ast);
    // Mount the new generated code for the current module
    module._source = code;
    // Recursive dependency depth traversal is added if there are dependent modules
    module.dependencies.forEach((dependency) => {
      const depModule = this.buildModule(moduleName, dependency);
      // Add any compiled dependent module objects to the modules object
      this.modules.add(depModule);
    });
    // Returns the current module object
    return module;
  }
Here we add such a code:
    // Recursive dependency depth traversal is added if there are dependent modules
    module.dependencies.forEach((dependency) => {
      const depModule = this.buildModule(moduleName, dependency);
      // Add any compiled dependent module objects to the modules object
      this.modules.add(depModule);
    });
Here, we recursively call buildModule for the dependent module, and add the output module object into this.modules.
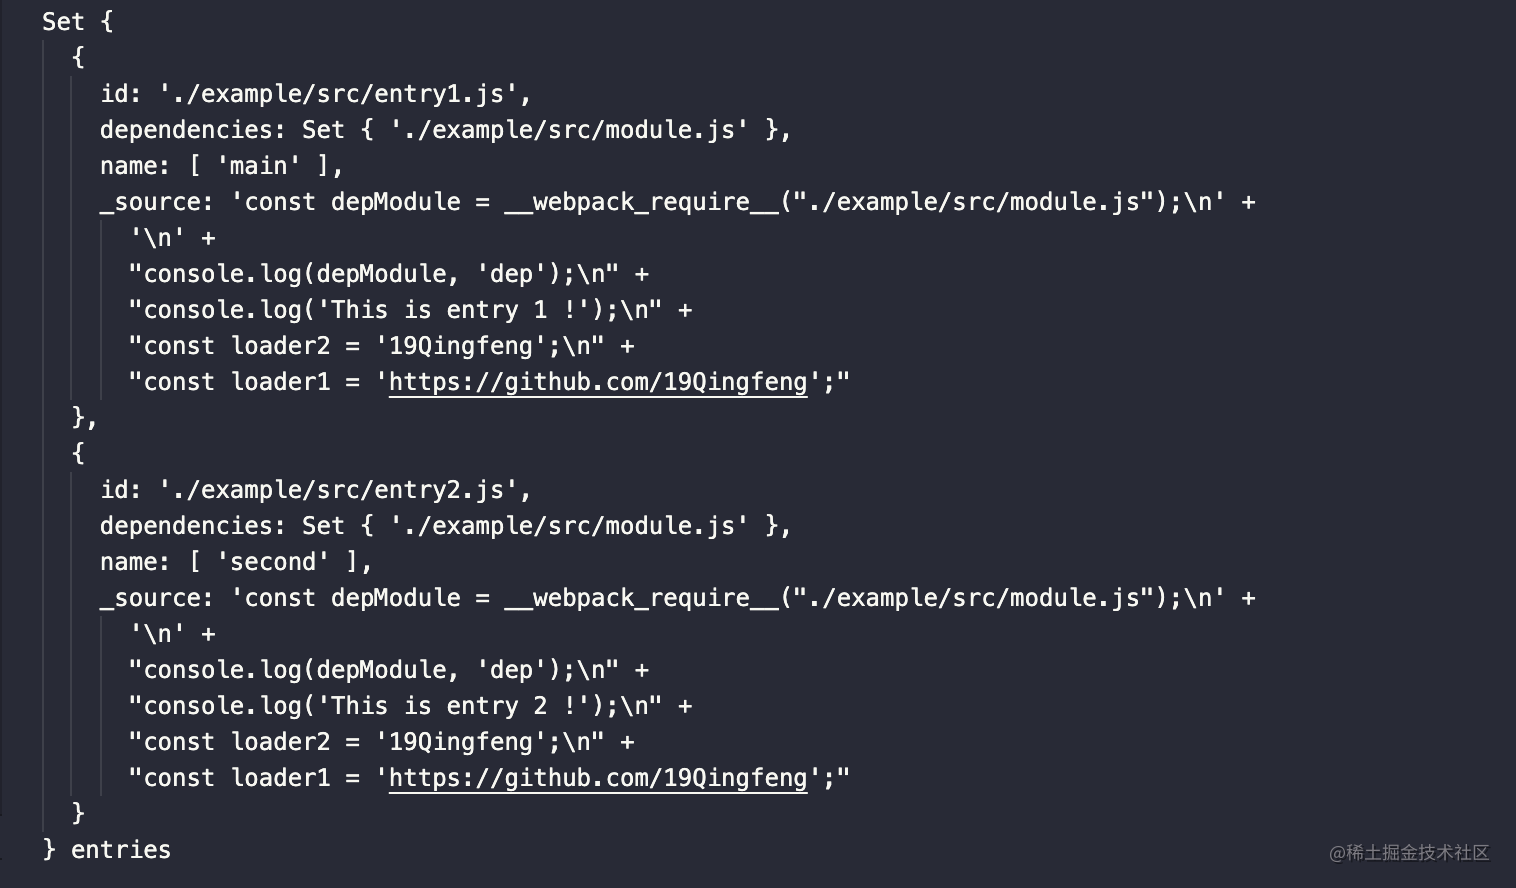
At this point, let's run webpack/core/index.js again to compile. Here, I print assets and modules after buildingentrymodule compilation:
Set {
  {
    id: './example/src/entry1.js',
    dependencies: Set { './example/src/module.js' },
    name: [ 'main' ],
    _source: 'const depModule = __webpack_require__("./example/src/module.js");\n' +
      '\n' +
      "console.log(depModule, 'dep');\n" +
      "console.log('This is entry 1 !');\n" +
      "const loader2 = '19Qingfeng';\n" +
      "const loader1 = 'https://github.com/19Qingfeng';"
  },
  {
    id: './example/src/entry2.js',
    dependencies: Set { './example/src/module.js' },
    name: [ 'second' ],
    _source: 'const depModule = __webpack_require__("./example/src/module.js");\n' +
      '\n' +
      "console.log(depModule, 'dep');\n" +
      "console.log('This is entry 2 !');\n" +
      "const loader2 = '19Qingfeng';\n" +
      "const loader1 = 'https://github.com/19Qingfeng';"
  }
} entries
Set {
  {
    id: './example/src/module.js',
    dependencies: Set {},
    name: [ 'main' ],
    _source: "const name = '19Qingfeng';\n" +
      'module.exports = {\n' +
      '  name\n' +
      '};\n' +
      "const loader2 = '19Qingfeng';\n" +
      "const loader1 = 'https://github.com/19Qingfeng';"
  },
  {
    id: './example/src/module.js',
    dependencies: Set {},
    name: [ 'second' ],
    _source: "const name = '19Qingfeng';\n" +
      'module.exports = {\n' +
      '  name\n' +
      '};\n' +
      "const loader2 = '19Qingfeng';\n" +
      "const loader1 = 'https://github.com/19Qingfeng';"
  }
} modules
You can see that we have successfully added the dependency module.js to modules, and it has also been processed by loader. But we found it repeated twice.
This is because the module.js has been referenced twice. It has been relied on by both entry1 and entry2. During recursive compilation, we built the same module twice.
Let's deal with this problem:
    handleWebpackCompiler(moduleName, modulePath) {
       ...
        // Modify the require in the source code through babel to become__ webpack_require__ sentence
          node.callee = t.identifier('__webpack_require__');
          // Modify all the modules introduced by the require statement in the source code to be processed relative to the following path
          node.arguments = [t.stringLiteral(moduleId)];
          // The array converted to ids is easy to handle
          const alreadyModules = Array.from(this.modules).map((i) => i.id);
          if (!alreadyModules.includes(moduleId)) {
            // Add the dependency caused by the require statement for the current module (the content is the module ID relative to the root path)
            module.dependencies.add(moduleId);
          } else {
            // If it already exists, it is not necessary to add it into the module compilation, but it is still necessary to update the entry that the module depends on
            this.modules.forEach((value) => {
              if (value.id === moduleId) {
                value.name.push(moduleName);
              }
            });
          }
        }
      },
    });
    ...
    }
Here, in each dependency transformation of code analysis, first judge whether the current module already exists in this.module object (judged by the unique module id path).
If it does not exist, add it into the dependency for compilation. If the module already exists, it proves that the module has been compiled. So we don't need to compile it again at this time. We just need to update the chunk to which the module belongs and add the current chunk name to its name attribute.
Run it again. Let's look at the print results:
Set {
  {
    id: './example/src/entry1.js',
    dependencies: Set { './example/src/module.js' },
    name: [ 'main' ],
    _source: 'const depModule = __webpack_require__("./example/src/module.js");\n' +
      '\n' +
      "console.log(depModule, 'dep');\n" +
      "console.log('This is entry 1 !');\n" +
      "const loader2 = '19Qingfeng';\n" +
      "const loader1 = 'https://github.com/19Qingfeng';"
  },
  {
    id: './example/src/entry2.js',
    dependencies: Set {},
    name: [ 'second' ],
    _source: 'const depModule = __webpack_require__("./example/src/module.js");\n' +
      '\n' +
      "console.log(depModule, 'dep');\n" +
      "console.log('This is entry 2 !');\n" +
      "const loader2 = '19Qingfeng';\n" +
      "const loader1 = 'https://github.com/19Qingfeng';"
  }
} entries
Set {
  {
    id: './example/src/module.js',
    dependencies: Set {},
    name: [ 'main', './module' ],
    _source: "const name = '19Qingfeng';\n" +
      'module.exports = {\n' +
      '  name\n' +
      '};\n' +
      "const loader2 = '19Qingfeng';\n" +
      "const loader1 = 'https://github.com/19Qingfeng';"
  }
} modules
At this point, our "module compilation phase" is basically over. In this step, we analyze all modules from the entry file.
- Starting from the entry, read the contents of the entry file and call the matching loader to process the entry file.
- Analyze the dependencies through babel, and replace all dependent paths with paths relative to the project startup directory options.context at the same time.
- If there are dependencies in the entry file, recursively compile the dependent modules in the above steps.
- Add the compiled object of each dependent module to this.modules.
- Add the compiled object of each entry file to this.entries.
Compilation completion phase
In the previous step, we completed the compilation between modules and filled the contents of module and entry respectively.
After recursive compilation of all modules, we need to combine the final output chunk modules according to the above dependencies.
Let's continue to transform our Compiler:
class Compiler {
// ...
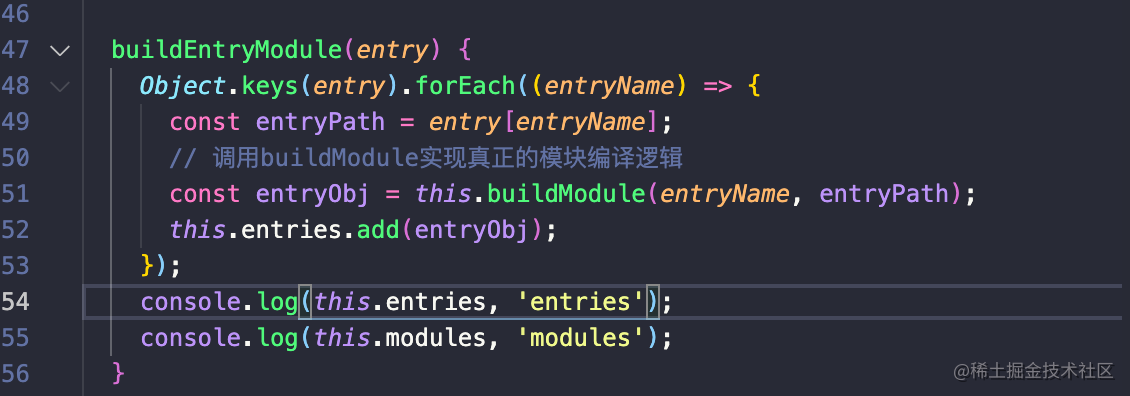
buildEntryModule(entry) {
Object.keys(entry).forEach((entryName) => {
const entryPath = entry[entryName];
// Call buildModule to realize the real module compilation logic
const entryObj = this.buildModule(entryName, entryPath);
this.entries.add(entryObj);
// According to the interdependence between the current entry file and the module, it is assembled into chunk s containing all the dependent modules of the current entry
this.buildUpChunk(entryName, entryObj);
});
console.log(this.chunks, 'chunks');
}
// Assemble chunks according to the entry file and dependent modules
buildUpChunk(entryName, entryObj) {
const chunk = {
name: entryName, // Each entry file acts as a chunk
entryModule: entryObj, // entry compiled object
modules: Array.from(this.modules).filter((i) =>
i.name.includes(entryName)
), // Find all module s related to the current entry
};
// Add chunk to this.chunks
this.chunks.add(chunk);
}
// ...
}Here, we find all the dependent files of the corresponding entry through the name attribute of each module according to the corresponding entry file.
Let's see what this.chunks will eventually output:
Set {
  {
    name: 'main',
    entryModule: {
      id: './example/src/entry1.js',
      dependencies: [Set],
      name: [Array],
      _source: 'const depModule = __webpack_require__("./example/src/module.js");\n' +
        '\n' +
        "console.log(depModule, 'dep');\n" +
        "console.log('This is entry 1 !');\n" +
        "const loader2 = '19Qingfeng';\n" +
        "const loader1 = 'https://github.com/19Qingfeng';"
    },
    modules: [ [Object] ]
  },
  {
    name: 'second',
    entryModule: {
      id: './example/src/entry2.js',
      dependencies: Set {},
      name: [Array],
      _source: 'const depModule = __webpack_require__("./example/src/module.js");\n' +
        '\n' +
        "console.log(depModule, 'dep');\n" +
        "console.log('This is entry 2 !');\n" +
        "const loader2 = '19Qingfeng';\n" +
        "const loader1 = 'https://github.com/19Qingfeng';"
    },
    modules: []
  }
}
In this step, we get two chunk s of the final output in the Webpack.
They each have:
- Name: name of the current entry file
- entryModule: the compiled object of the entry file.
- modules: an array of all module objects that the entry file depends on. The format of each element is consistent with that of entryModule.
At this point, the compilation is completed, and the link of assembling chunk is successfully completed.
Output file phase
Let's put this.chunks assembled after all the compilation in the previous step.
Analyze raw packaged output
Here, I make the following changes in webpack/core/index.js:
- const webpack = require('./webpack');
+ const webpack = require('webpack')

...
Using the original webpack instead of our own webpack, we first package it.
After running webpack/core/index.js, we will get two files in webpack/src/build: main.js and second.js. Let's take one of the main.js to see its contents:
(() => {
  var __webpack_modules__ = {
    './example/src/module.js': (module) => {
      const name = '19Qingfeng';

      module.exports = {
        name,
      };

      const loader2 = '19Qingfeng';
      const loader1 = 'https://github.com/19Qingfeng';
    },
  };
  // The module cache
  var __webpack_module_cache__ = {};

  // The require function
  function __webpack_require__(moduleId) {
    // Check if module is in cache
    var cachedModule = __webpack_module_cache__[moduleId];
    if (cachedModule !== undefined) {
      return cachedModule.exports;
    }
    // Create a new module (and put it into the cache)
    var module = (__webpack_module_cache__[moduleId] = {
      // no module.id needed
      // no module.loaded needed
      exports: {},
    });

    // Execute the module function
    __webpack_modules__[moduleId](module, module.exports, __webpack_require__);

    // Return the exports of the module
    return module.exports;
  }

  var __webpack_exports__ = {};
  // This entry need to be wrapped in an IIFE because it need to be isolated against other modules in the chunk.
  (() => {
    const depModule = __webpack_require__(
      /*! ./module */ './example/src/module.js'
    );

    console.log(depModule, 'dep');
    console.log('This is entry 1 !');

    const loader2 = '19Qingfeng';
    const loader1 = 'https://github.com/19Qingfeng';
  })();
})();
Here I manually delete the redundant comments generated after packaging and simplify the code.
Let's analyze the code generated by the original package:
The packaged code of webpack defines a__ webpack_require__ The function of replaces the require method inside NodeJs.
At the same time, the bottom
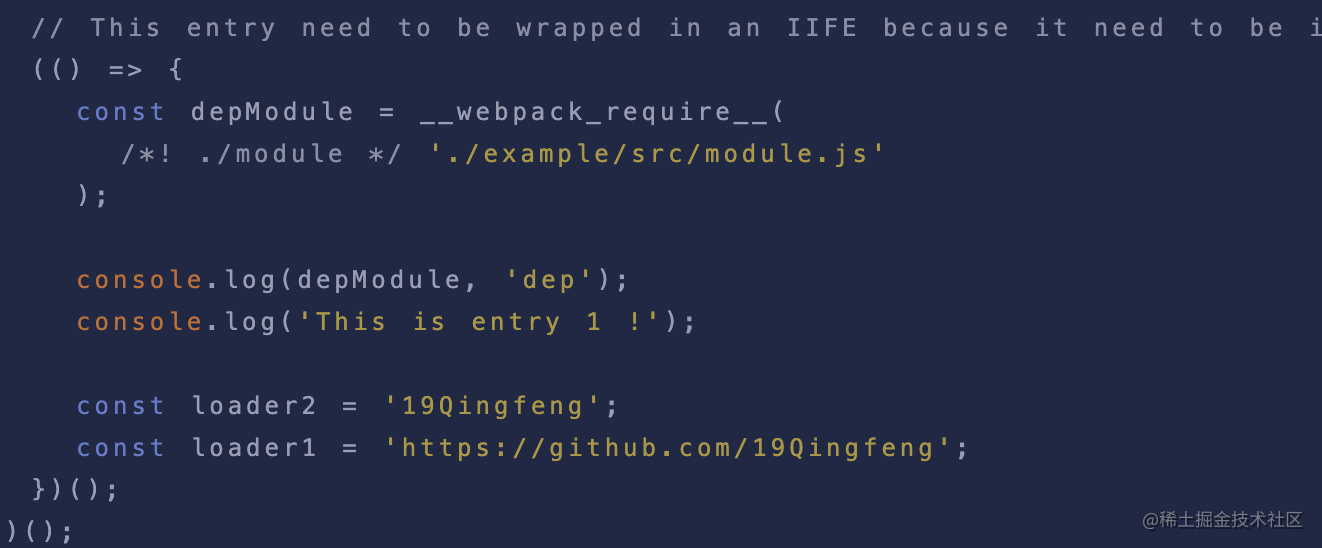
This code is familiar to everyone. This is our compiled entry file code. At the same time, the code at the top is an object defined by all modules that the entry file depends on:
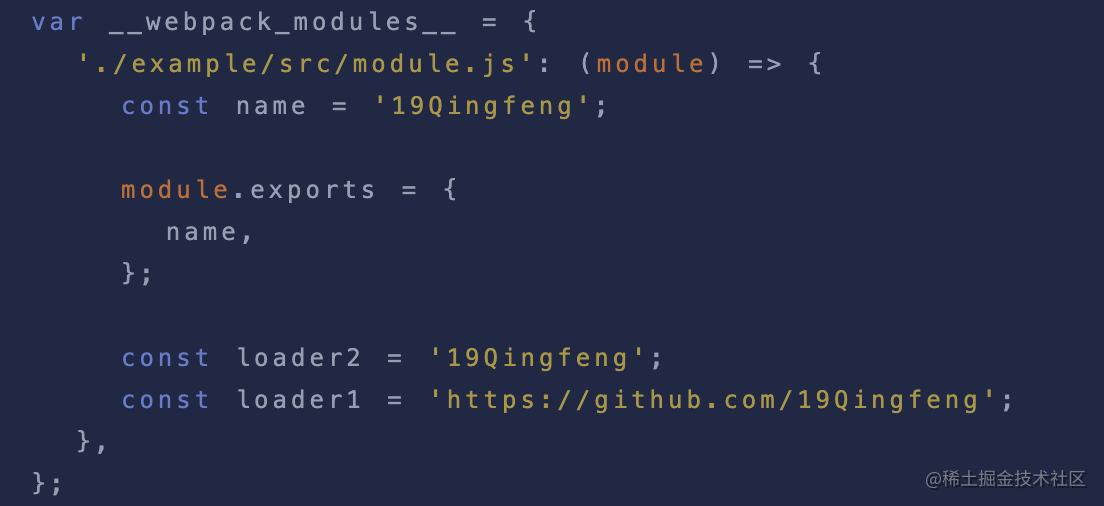
Here is a definition__ webpack__ For the object of modules, * * the key of the object is the relative path of the dependent module relative to the following path, and the value of the object is the compiled code of the dependent module`
Output file phase
Next, after analyzing the original packaged code of webpack, let's continue with the previous step. Try to output the final effect through our this.chunks.
Let's go back to the run method on the Compiler:
   class Compiler {

   }
  // The run method starts compilation
  // At the same time, the run method accepts the callback passed externally
  run(callback) {
    // When the run mode is called, the plugin that starts compiling is triggered
    this.hooks.run.call();
    // Get portal configuration object
    const entry = this.getEntry();
    // Compile entry file
    this.buildEntryModule(entry);
    // Export list; Each chunk is then converted into a separate file and added to the output list assets
    this.exportFile(callback);
  }
After the buildingentrymodule module is compiled, we implement the logic of exporting the file through this.exportFile method.
Let's take a look at this.exportFile method:
 // Add chunk to the output list
  exportFile(callback) {
    const output = this.options.output;
    // Generate assets content according to chunks
    this.chunks.forEach((chunk) => {
      const parseFileName = output.filename.replace('[name]', chunk.name);
      // In assets {'main.js':' generated string code... '}
      this.assets.set(parseFileName, getSourceCode(chunk));
    });
    // Call the Plugin emit hook
    this.hooks.emit.call();
    // First judge whether the directory exists. If fs.write does not exist, create it first
    if (!fs.existsSync(output.path)) {
      fs.mkdirSync(output.path);
    }
    // Save all generated file names in files
    this.files = Object.keys(this.assets);
    // Generate a packaged file from the contents of assets and write it to the file system
    Object.keys(this.assets).forEach((fileName) => {
      const filePath = path.join(output.path, fileName);
      fs.writeFileSync(filePath, this.assets[fileName]);
    });
    // Trigger hook when finished
    this.hooks.done.call();
    callback(null, {
      toJson: () => {
        return {
          entries: this.entries,
          modules: this.modules,
          files: this.files,
          chunks: this.chunks,
          assets: this.assets,
        };
      },
    });
  }
exportFile does the following:
- First, obtain the output configuration of the configuration parameters, iterate over our this.chunks, and replace [name] in output.filename with the corresponding entry file name. At the same time, add the file name and file content to this.assets according to the contents of chunks.
- Call the emit hook function of plugin before writing the file to disk.
- Judge whether the output.path folder exists. If it does not exist, create a new folder through fs.
- Store all the file names generated by this packaging (the array composed of the key value of this.assets) into files.
- Loop this.assets and write the files to the corresponding disk in turn.
- When all packaging processes are completed, the done hook of the webpack plug-in is triggered.
- At the same time, echo the NodeJs Webpack APi and call the run method to pass in two parameters for the externally passed callback.
In general, this.assets is also relatively simple, that is, it obtains assets by analyzing chunks, and then outputs the corresponding code to disk.
Take a closer look at the code above and you'll find that. this.assets the value of each element in the Map generates the code corresponding to the module by calling the getSourceCode(chunk) method.
So how does the getSourceCode method generate our final compiled code according to the chunk? Let's have a look!
getSourceCode method
First, let's briefly clarify the responsibilities of this method. We need the getSourceCode method to accept the incoming chunk object. This returns the source code of the chunk.
No more nonsense. In fact, I used a lazy method here, but it doesn't prevent you from understanding the webpack process. We analyzed the original webpack packaged code, only the entry file and module dependency are different in each packaging, and the require method is the same.
To grasp the differences of each time, let's take a look at its implementation:
// webpack/utils/index.js

...


/**
 *
 *
 * @param {*} chunk
 * name Property entry file name
 * entryModule Entry file module object
 * modules Dependent module path
 */
function getSourceCode(chunk) {
  const { name, entryModule, modules } = chunk;
  return `
  (() => {
    var __webpack_modules__ = {
      ${modules
        .map((module) => {
          return `
          '${module.id}': (module) => {
            ${module._source}
      }
        `;
        })
        .join(',')}
    };
    // The module cache
    var __webpack_module_cache__ = {};

    // The require function
    function __webpack_require__(moduleId) {
      // Check if module is in cache
      var cachedModule = __webpack_module_cache__[moduleId];
      if (cachedModule !== undefined) {
        return cachedModule.exports;
      }
      // Create a new module (and put it into the cache)
      var module = (__webpack_module_cache__[moduleId] = {
        // no module.id needed
        // no module.loaded needed
        exports: {},
      });

      // Execute the module function
      __webpack_modules__[moduleId](module, module.exports, __webpack_require__);

      // Return the exports of the module
      return module.exports;
    }

    var __webpack_exports__ = {};
    // This entry need to be wrapped in an IIFE because it need to be isolated against other modules in the chunk.
    (() => {
      ${entryModule._source}
    })();
  })();
  `;
}
...
This code is actually very, very simple, far less difficult than you think! It's a little back to nature, isn't it? Ha ha.
In the getSourceCode method, we obtain the corresponding by combining the chunk s:
- Name: the name of the output file corresponding to the entry file.
- entryModule: stores the compiled object of the entry file.
- Modules: an object that stores all modules that the entry file depends on.
We implemented it by string splicing__ webpack__ At the same time, the code of the entry / exit file is spliced through ${entryModule._source} at the bottom.
Here, we mentioned why we need to convert the path of the module's require method to the path relative to the context. I believe we all know why. Because what we finally achieved__ webpack_require__ Methods are all required methods implemented for the relative path between the module and the path.
At the same time, if it is not clear how the require method changes, it is called__ webpack_require__ Method students can go back to our compilation chapter and review it carefully ~ we changed the require method call into__ webpack_require__.
be accomplished
So far, let's go back to webpack/core/index.js. Rerun this file and you will find that there will be an additional build directory in the webpack/example directory.

In this step, we will perfectly realize our own webpack.
In fact, for the implementation of a simple version of the webpack core, I still hope you can fully understand the compiler object while understanding its workflow.
In any subsequent underlying development related to webpack, you should really know the usage of compiler. Understand how various attributes on the compiler affect the compilation and packaging results.
Let's make a perfect ending with a flow chart:
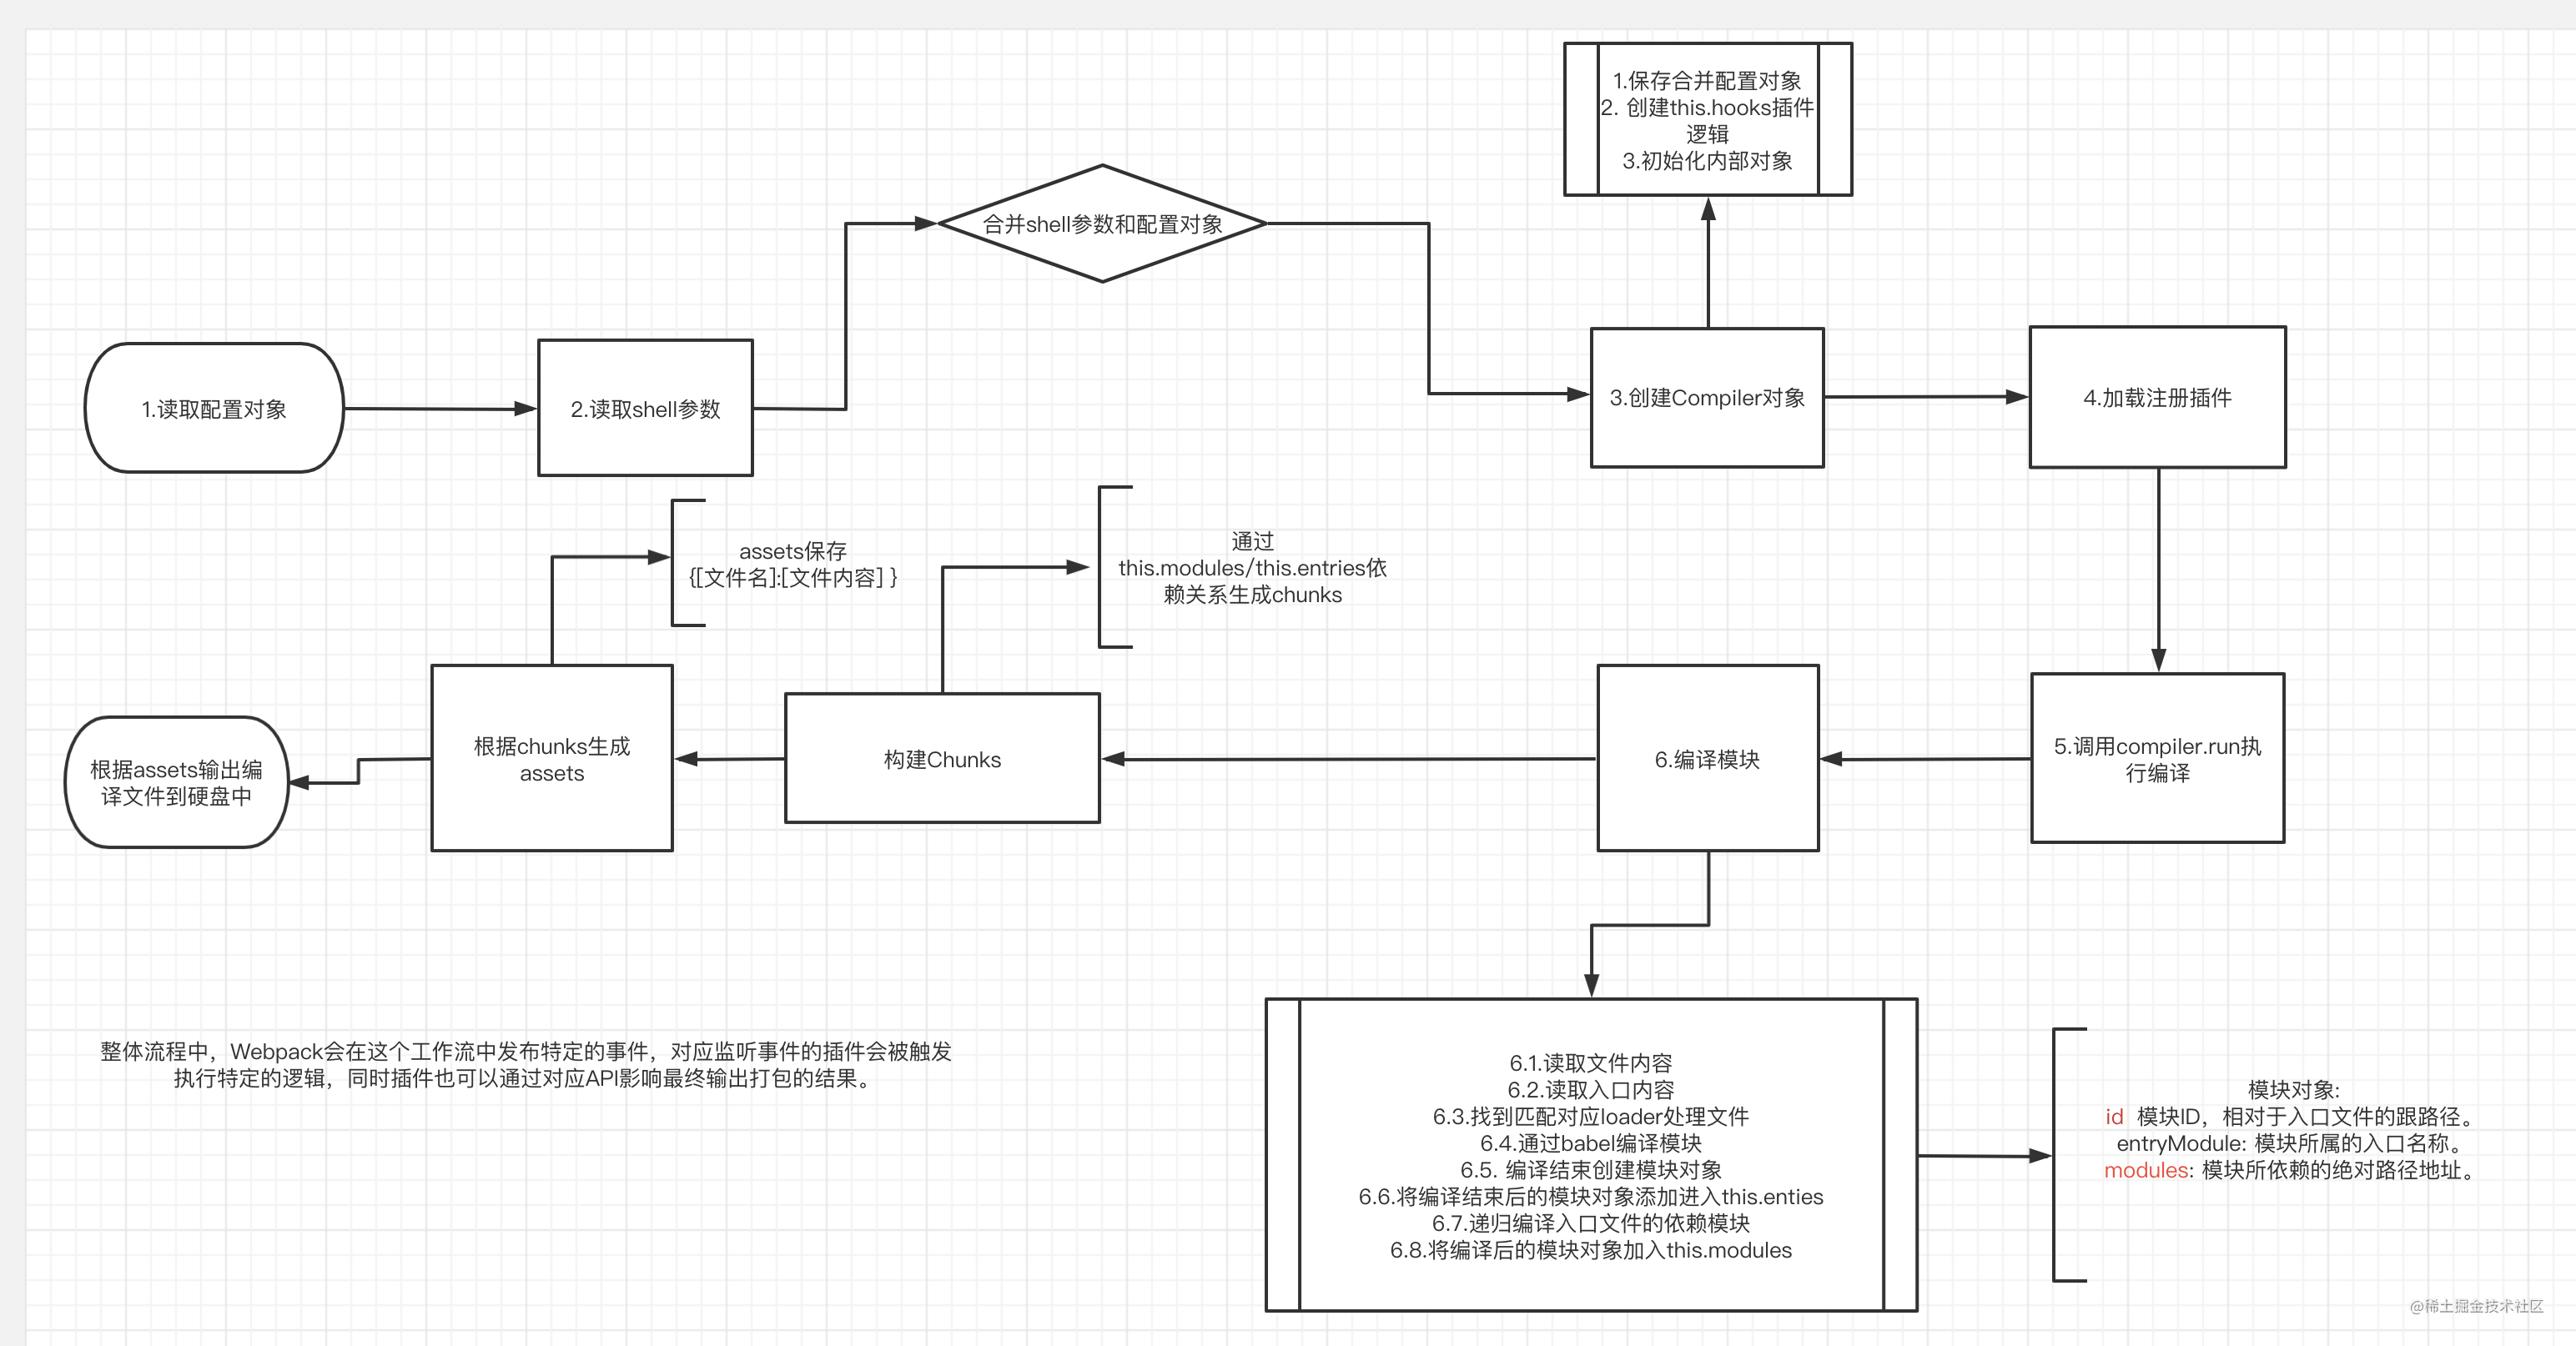
Write at the end
First of all, thank everyone who can see here.
This article has a certain knowledge threshold and most of the code. I admire everyone who can read to the end.
The article will come to an end here for the implementation of a simple version of webpack. In fact, this is only the most basic version of webpack workflow.
But it is through such a small 🌰 We can really get started with the core workflow of webpack. I hope this article can play a better auxiliary role in understanding webpack.
In fact, after understanding the basic workflow, the development of loader and plugin is easy to come by. The development introduction of these two parts in this article is relatively superficial. Later, I will update the detailed development process of loader and plugin respectively. Interested students can pay attention in time 😄.
The code in the article can be found in Download here , I will continue to improve the logical processing of more workflows in the code base of this simple version of webpack.
At the same time, the code here I want to emphasize is the explanation of the source code process. The real webpack will be much more complex than here. Here, it is deliberately simplified for your convenience, but the core workflow is basically consistent with the source code.