preface
[personal learning notes, please correct any errors]
YOLO-V5 code warehouse address: https://github.com/ultralytics/yolov5
1, Conv module
Before introducing each module, you need to introduce the most basic Conv module in YOLOV5.
class Conv(nn.Module):
    def __init__(self, c1, c2, k=1, s=1, p=None, g=1, act=True):
    			# ch_in, ch_out, kernel, stride, padding, groups
        super(Conv, self).__init__()
        self.conv = nn.Conv2d(c1, c2, k, s, autopad(k, p), groups=g, bias=False)
        self.bn = nn.BatchNorm2d(c2)
        self.act = nn.Hardswish() if act else nn.Identity()

    def forward(self, x):
        return self.act(self.bn(self.conv(x)))

    def fuseforward(self, x):
        return self.act(self.conv(x))
The Conv module here is the combination of [convolution] + [BN] + [activation]. The activation function uses [hardwish], and [nn.Identity] is simply understood as a placeholder for returning input.
Among them, [autopad(k,p)] is an automatic padding function,
def autopad(k, p=None):  # kernel, padding
    # Pad to 'same'
    if p is None:
        p = k // 2 if isinstance(k, int) else [x // 2 for x in k]  # auto-pad
    return p
Conv operates as follows:

2, Focus module
class Focus(nn.Module):
    def __init__(self, c1, c2, k=1, s=1, p=None, g=1, act=True):
        super(Focus, self).__init__()
        # 4 times the number of channels
        self.conv = Conv(c1 * 4, c2, k, s, p, g, act)
    def forward(self, x):
        return self.conv(torch.cat([x[..., ::2, ::2], x[..., 1::2, ::2], x[..., ::2, 1::2], x[..., 1::2, 1::2]], 1))
The operation of the Focus module is shown in the figure
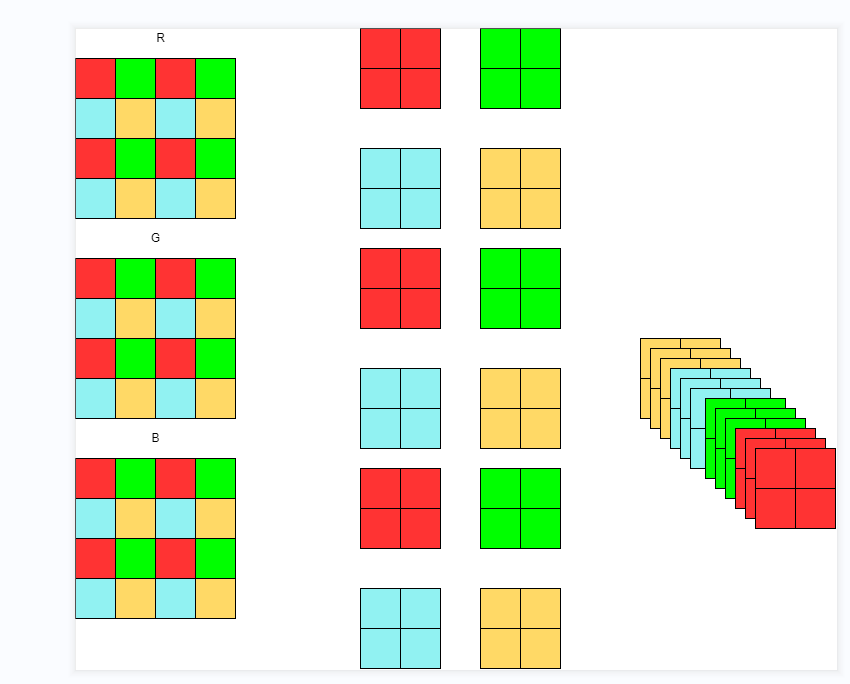
The operation of the Focus module is: take out every other pixel on the three RGB channels, as shown in the figure above, so that each channel can generate four channels, that is, halve the height and width and change the channel to four times.
3, Bottleneck module
Bottleneck module defined
class Bottleneck(nn.Module):
    def __init__(self, c1, c2, shortcut=True, g=1, e=0.5):  # ch_in, ch_out, shortcut, groups, expansion
        super(Bottleneck, self).__init__()
        c_ = int(c2 * e)  # hidden channels
        self.cv1 = Conv(c1, c_, 1, 1)
        self.cv2 = Conv(c_, c2, 3, 1, g=g)
        self.add = shortcut and c1 == c2

    def forward(self, x):
        return x + self.cv2(self.cv1(x)) if self.add else self.cv2(self.cv1(x))
Flowchart of Bottleneck module
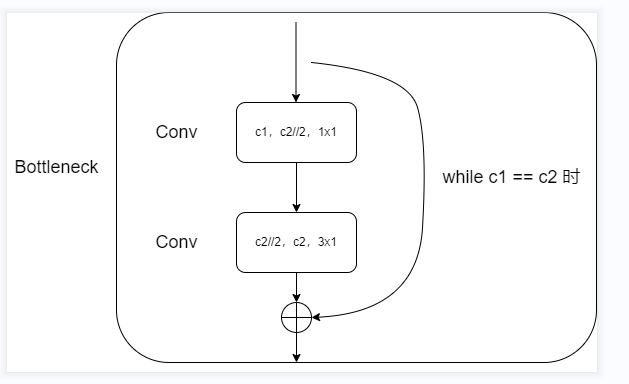
When the number of input channels [c1] and the number of output channels [c2] are equal, there is a shortcut connection.
The first [Conv]: change the number of input channels into half of the number of output channels through the convolution kernel of 1x1,
The second [Conv]: normal ordinary convolution (it can be changed into group convolution by changing super parameters).
Note: the number of channels here is halved through the parameter [e]. When e == 1, the number of channels remains unchanged!
IV BottleneckCSP module
class BottleneckCSP(nn.Module):
    def __init__(self, c1, c2, n=1, shortcut=True, g=1, e=0.5):
    			 # ch_in, ch_out, number, shortcut, groups, expansion
        super(BottleneckCSP, self).__init__()
        c_ = int(c2 * e)  # hidden channels
        self.cv1 = Conv(c1, c_, 1, 1)
        self.cv2 = nn.Conv2d(c1, c_, 1, 1, bias=False)
        self.cv3 = nn.Conv2d(c_, c_, 1, 1, bias=False)
        self.cv4 = Conv(2 * c_, c2, 1, 1)
        self.bn = nn.BatchNorm2d(2 * c_)  # applied to cat(cv2, cv3)
        self.act = nn.LeakyReLU(0.1, inplace=True)
        self.m = nn.Sequential(*[Bottleneck(c_, c_, shortcut, g, e=1.0) for _ in range(n)])

    def forward(self, x):
        y1 = self.cv3(self.m(self.cv1(x)))
        y2 = self.cv2(x)
        return self.cv4(self.act(self.bn(torch.cat((y1, y2), dim=1))))
BottleneckCSP module flow chart defined
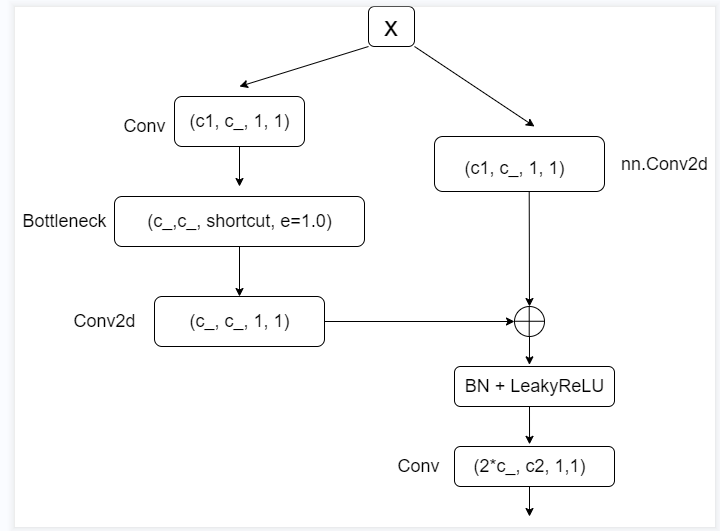
The input [x] passes through two different modules, then connects with [shortcut], and finally convolutes with [BN] + [LeakyReLU] and ordinary [Conv].
Module 1 (left): halve the number of channels through 1x1 convolution, and then pass through a [Bottleneck] module. The parameter [e] here controls the number of channels in the hidden layer in the Bottleneck module. Then it passes through a [Conv2d] module (without BN and activation function).
Module 2 (right): halve the number of channels through 1x1 convolution (without BN and activation function).
V SSP module
class SPP(nn.Module):
    # Spatial pyramid pooling layer used in YOLOv3-SPP
    def __init__(self, c1, c2, k=(5, 9, 13)):
        super(SPP, self).__init__()
        c_ = c1 // 2  # hidden channels
        self.cv1 = Conv(c1, c_, 1, 1)
        self.cv2 = Conv(c_ * (len(k) + 1), c2, 1, 1)
        self.m = nn.ModuleList([nn.MaxPool2d(kernel_size=x, stride=1, padding=x // 2) for x in k])

    def forward(self, x):
        x = self.cv1(x)
        return self.cv2(torch.cat([x] + [m(x) for m in self.m], 1))
Defined SPP module flow chart
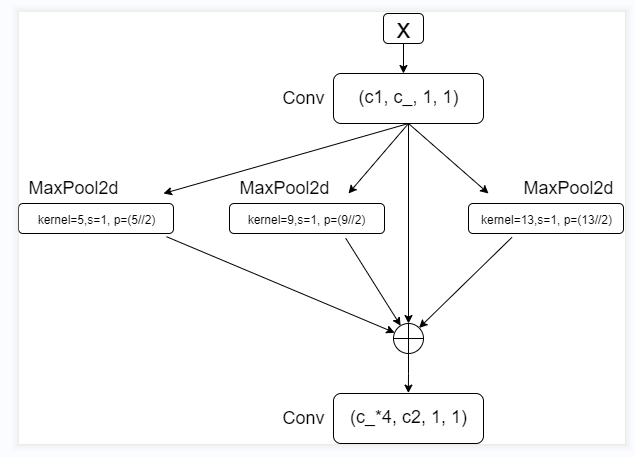
Halve the number of input channels through a [Conv] module, pool the ma x imum values of three different convolution cores to obtain the output of the same size and number of channels, and then concat enate in dimension 1. After splicing, scale the number of channels to the number of channels of c2 through [Conv].
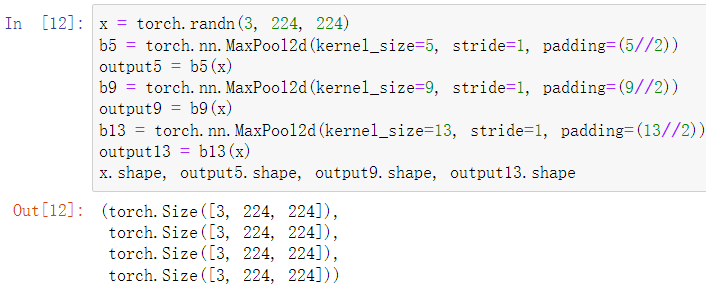
After the maximum pool down sampling of three different convolution cores, the number of output channels is the same, which is convenient for the subsequent splicing operation.
Vi Detect module
The entire class definition code is not given here.
# Class initialization function
self.m = nn.ModuleList(nn.Conv2d(x, self.no * self.na, 1) for x in ch)

# In the forward function
for i in range(self.nl):
    x[i] = self.m[i](x[i])  # conv
    bs, _, ny, nx = x[i].shape  # x(bs,255,20,20) to x(bs,3,20,20,85)
    x[i] = x[i].view(bs, self.na, self.no, ny, nx).permute(0, 1, 3, 4, 2).contiguous()
Flow chart of detection module defined
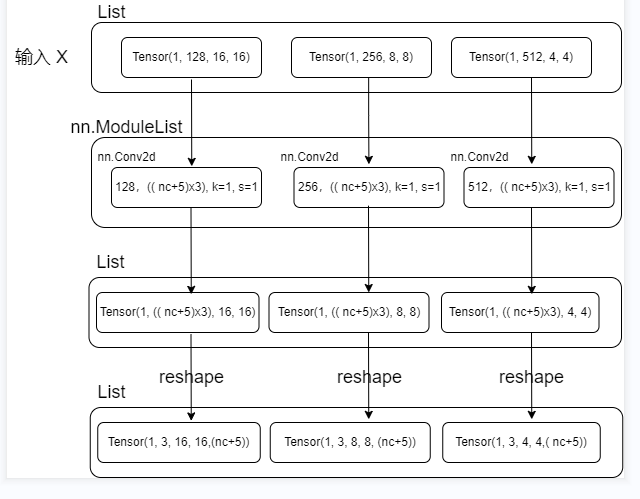
Input [x] is the result obtained on three characteristic graphs. The shape is shown in the figure. Each characteristic graph obtains a characteristic graph with the same number of channels but the same size as the original input through different convolution operations [nn.ModuleList]. Then resize the shape to:
(batch_size, num_anchors, h, w, (number of categories + confidence + width and height of prediction frame + horizontal axis coordinates of center point))
summary
Here, the modules used in YOLOV5 are basically introduced.