1, Realization effect
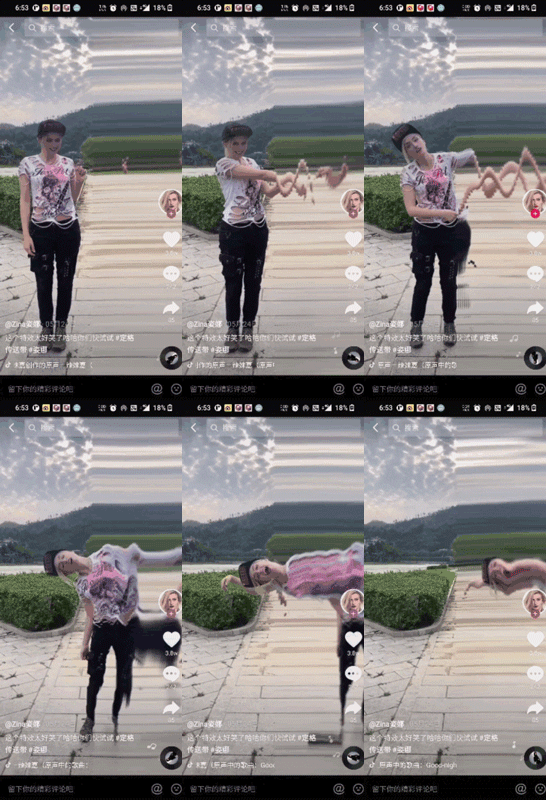
1.1 tiktok first, the special effect of the conveyor belt.

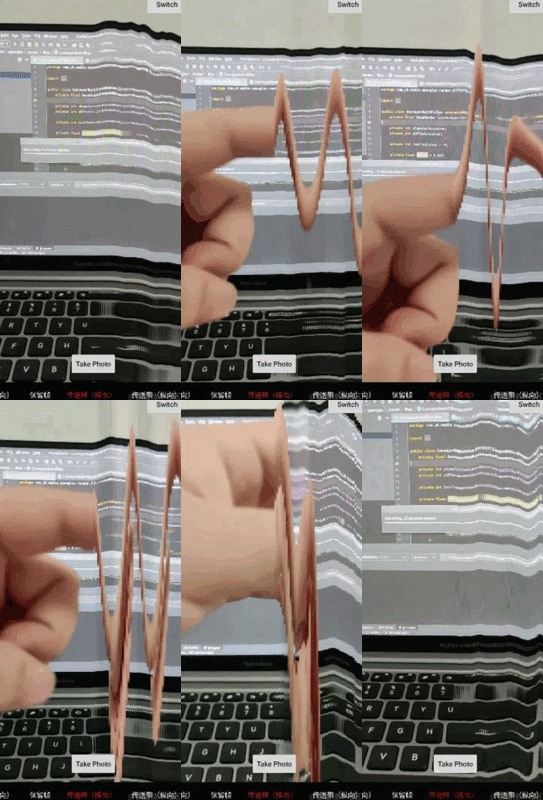
From the above tiktok, we can see that the special effect of the belt conveyer is characterized by the following characteristics
- The left half of the screen is a normal preview video
- The right half of the screen is like a conveyor belt, constantly transporting the picture to the right
According to the characteristics of this special effect, we can make all kinds of interesting videos
1.2 the author realizes the conveyor belt effect

Tiktok's effect is basically consistent with the realization of the jitter.
So, how should we implement this special effect?
In fact, the introduction of the challenge of the blue line challenge tiktok has been put to a core knowledge point Fbo. Yes, yes, it was right. Then the blue line challenge effect was used by Fbo, and the next conveyor belt special effects also needed to retain the previous frame function using Fbo.
Next, we will analyze and implement the special effects
2, Special effect analysis
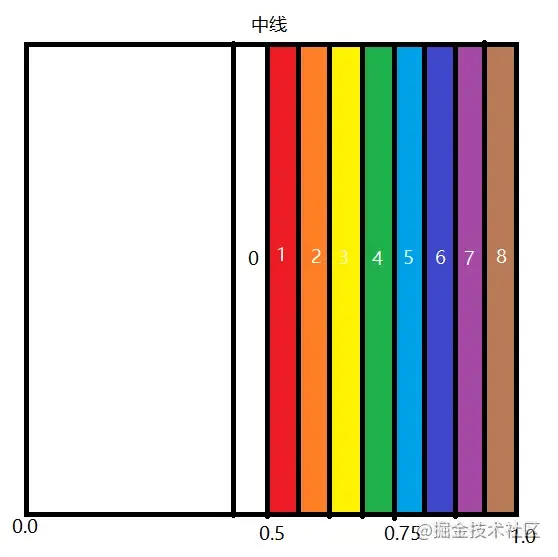
First, according to the above rendering, we can simply draw a schematic diagram, as shown in the figure below (the more small grids, the finer the picture)

We analyze it horizontally
In OpenGLES, the starting position of the horizontal direction of the texture coordinate is on the left (to be exact, it is in the upper left corner. Here, only the horizontal effect is analyzed, so the punctuation 0.0 on the drawing is arbitrarily marked on the left for analysis). According to the above effect drawing, we know that the special effect has two characteristics
- The left half of the screen is a normal preview video
- The right half of the screen is like a conveyor belt, constantly transporting the picture to the right
Here, I use the word "transportation", so we have to know what it transports first
2.1 what is delivered?
By analyzing the special effect image, we know that the right half of the image is constantly moving to the right, while the left half is previewed normally. It looks like it is constantly moving from the edge of the left half to the right, so we can draw a small conclusion from here
It transports the edge area of the left half. According to the above figure, it is exactly the picture of the 0 area on the left of the central line
Well, knowing this, we can see it at a glance
2.2 how is it transported?
Previously, we know that it transports the picture of area 0. Next, let's analyze how it transports
- During preview, the camera picture is generally displayed normally, and the picture in area 0 is also refreshed normally one frame
- When the 0 area displays the first frame (f1 for short, followed by f, and the number is the frame order), move it to the 1 area
- When f2 is displayed in the 0 area, move f1 in the 1 area to the 2 area and f2 in the 0 area to the 1 area
- And so on, you can continuously transport the pictures in area 0 to the right
2.3 Fbo
In fact, after knowing what it is and how to transport it, we still can't know how to realize this special effect
Now, it's time for Fbo to appear. It has been described in detail in the previous chapter of blue line challenge special effects. Now let's briefly introduce it
- You can convert Oes textures to 2D textures
- Texture data can be left off the screen
Here, if we want to realize the special effect, we need to use its function of retaining frame data
2.4 special effect realization
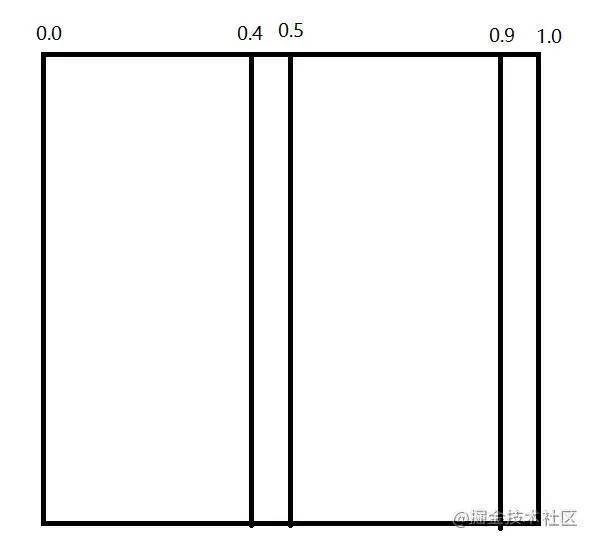
In the above, we already know how the special effect transports data, so let's understand how to use Fbo to implement it through the following figure
It can be seen from the above analysis that the special effect transports the edge area of the left half. How to implement the following steps:
- Firstly, assuming that the step size of each small cell is 0.1, the edge region of the left half is 0.4 ~ 0.5
- Fbo can save the previous frame, so we will save the data of the previous frame during rendering
- During rendering, there will be two textures, one is the normal preview texture of the camera, and the other is the saved previous frame. At this time, we need to judge in the shader
- When the texture coordinate x is less than 0.5, the normal preview screen of the camera is displayed
- When the texture coordinate x is greater than 0.5, the saved previous frame will be displayed. However, it should be noted that it is not the data of the previous frame corresponding to the coordinates, that is, it is not the data of the 0.5 ~ 1.0 area, but the data of the 0.4 ~ 0.9 area. You can think about why. You will have an answer when you implement it later
In this way, when the camera continuously generates preview data, the right half will continuously transport the edge area of the left half to the right
3, Concrete implementation
Previously, we analyzed the whole implementation process of the special effect, and the next is the specific implementation
First of all, let's start with the shader code we are most concerned about
3.1 shaders
Vertex Shader
attribute vec4 aPos;
attribute vec2 aCoordinate;
varying vec2 vCoordinate;
void main(){
    vCoordinate = aCoordinate;
    gl_Position = aPos;
}
With regard to vertex shaders, there is no special treatment for slice shaders
precision mediump float;
uniform sampler2D uSampler;
uniform sampler2D uSampler2;
varying vec2 vCoordinate;
uniform float uOffset;
void main(){
    if (vCoordinate.x < 0.5) {
        gl_FragColor = texture2D(uSampler, vCoordinate);
    } else {
        gl_FragColor = texture2D(uSampler2, vCoordinate - vec2(uOffset, 0.0));
    }
}
For the slice shader, the key lies in the if judgment in the main() function. As mentioned earlier, it will judge the texture coordinates
- When x is less than 0.5, the camera preview screen is displayed
- When x is greater than 0.5, the data of the previous frame is displayed, and the data corresponding to the coordinate offset to the left is taken (uOffset is the offset, which can be understood as the width of the small grid)
So why offset?
This is because through the above, we can know that the special effect is transported from the edge area of the left half. If we take the coordinates from the corresponding coordinates, we won't get the coordinates of the left half. All have to offset the width of a small grid to get the corresponding data. In this way, when rendering each frame, Take 0.4 ~ 0.9 area data and display it to 0.5 ~ 1.0 area, so as to realize the special effect of the conveyor belt
After knowing how to realize the effect, we can also realize the vertical conveyor belt effect, just change the x in the slice shader to y
precision mediump float;
uniform sampler2D uSampler;
uniform sampler2D uSampler2;
varying vec2 vCoordinate;
uniform float uOffset;
void main(){
    if (vCoordinate.y < 0.5) {
        gl_FragColor = texture2D(uSampler, vCoordinate);
    } else {
        gl_FragColor = texture2D(uSampler2, vCoordinate - vec2(0.0, uOffset));
    }
}
3.2 Java code implementation
The following is the Java code implementation
A lastRender is used to retain the data of the previous frame, so that it can be used in the next rendering
public class ConveyorBeltHFilter extends BaseFilter {
    private final BaseRender lastRender;

    private int uSampler2Location;
    private int uOffsetLocation;

    private int lastTextureId = -1;

    private float offset = 0.01f;

    public ConveyorBeltHFilter(Context context) {
        super(
                context,
                "render/filter/conveyor_belt_h/vertex.frag",
                "render/filter/conveyor_belt_h/frag.frag"
        );

        lastRender = new BaseRender(context);

        lastRender.setBindFbo(true);
    }

    @Override
    public void onCreate() {
        super.onCreate();
        lastRender.onCreate();
    }

    @Override
    public void onChange(int width, int height) {
        super.onChange(width, height);
        lastRender.onChange(width, height);
    }

    @Override
    public void onDraw(int textureId) {
        super.onDraw(textureId);
        lastRender.onDraw(getFboTextureId());
        lastTextureId = lastRender.getFboTextureId();
    }

    @Override
    public void onInitLocation() {
        super.onInitLocation();
        uSampler2Location = GLES20.glGetUniformLocation(getProgram(), "uSampler2");
        uOffsetLocation = GLES20.glGetUniformLocation(getProgram(), "uOffset");
    }

    @Override
    public void onActiveTexture(int textureId) {
        super.onActiveTexture(textureId);
        GLES20.glActiveTexture(GLES20.GL_TEXTURE1);
        GLES20.glBindTexture(GLES20.GL_TEXTURE_2D, lastTextureId);
        GLES20.glUniform1i(uSampler2Location, 1);
    }

    @Override
    public void onSetOtherData() {
        super.onSetOtherData();
        GLES20.glUniform1f(uOffsetLocation, offset);
    }
}
Tiktok is the realization of the whole process of the special effect of the conveyor belt. Hope you love it!!!
4, GitHub
github address: https://github.com/JYangkai/M...
- ConveyorBeltHFilter.java
- ConveyorBeltVFilter.java
Original link: https://juejin.cn/post/699849...
end of document
Your favorite collection is my greatest encouragement!
Welcome to follow me, share Android dry goods and exchange Android technology.
If you have any opinions on the article or any technical problems, please leave a message in the comment area for discussion!