Preface
- I'm an Android Developer. I'll just introduce the hybrid development of Android and Flutter here.
- There are many related articles on the Internet about the mixed development of native and Flutter, which are basically done by using the methods of FlutterView and FlutterFragment. However, in the new version of Flutter SDK 1.12, the Flutter team deleted the package io.flutter.facade.Flutter. The two methods above are directly cool, and it is impossible to get the Flutter object in Android project at all. So I can only go to the official documents, run down the new integration method, make a note here, and also say that I will step down the pit.
- Official documentation of Flutter: https://flutter.cn/docs/development/add-to-app
- This article is applicable to flutter SDK version 1.12
Note: under the description, this link is a Chinese document, but there are still many chapters that haven't been translated, such as the chapter integrating the fluent module into the Android project. ios has been translated. The big guys like to play ios, so translate ios first?
Preparation
Create a new Android project
- This is optional. You can create a new Android project or use an existing Android project.
Configure Android project
- Currently, Flutter only supports armeabi-v7a and arm64-v8a architectures.
android {
  //...
  defaultConfig {
    ndk {
      // Limited architecture, only supported by Flutter: armeabi-v7a and arm64-v8a (currently version 1.12)
      abiFilters 'armeabi-v7a', 'arm64-v8a'
    }
  }
}
- Flutter uses the features of Java 8 and supports Java 8
android {
  //...
  compileOptions {
    sourceCompatibility 1.8
    targetCompatibility 1.8
  }
}
Create a new Flutter Module
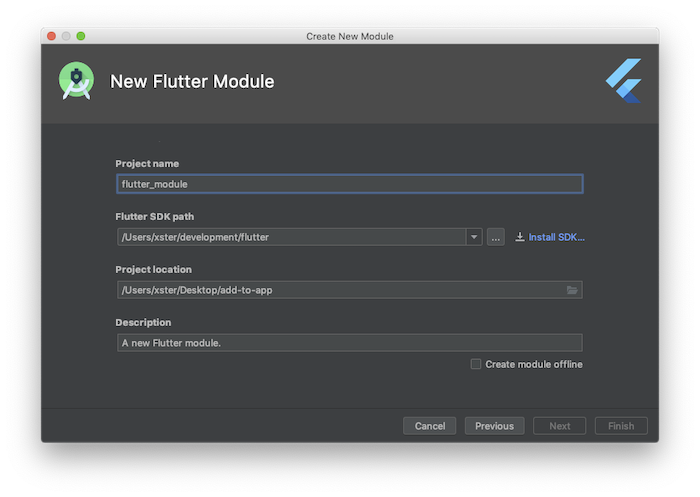
- New Flutter Module

- Setting up the shuttle module

Import the fluent module
Automatic import
Note: Android Studio supports automatic import, provided that Android project and Flutter Module are in the same folder.
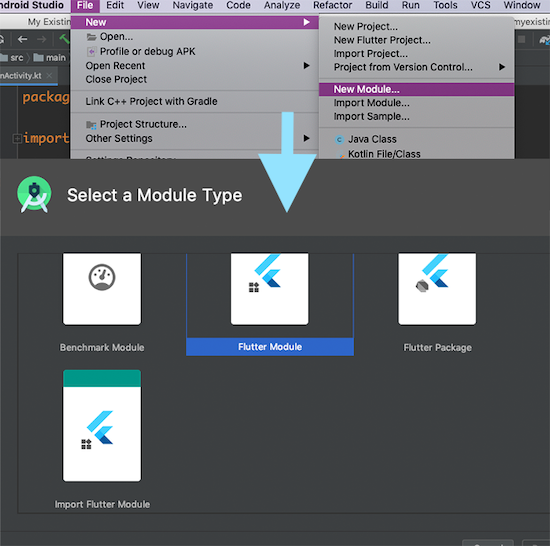
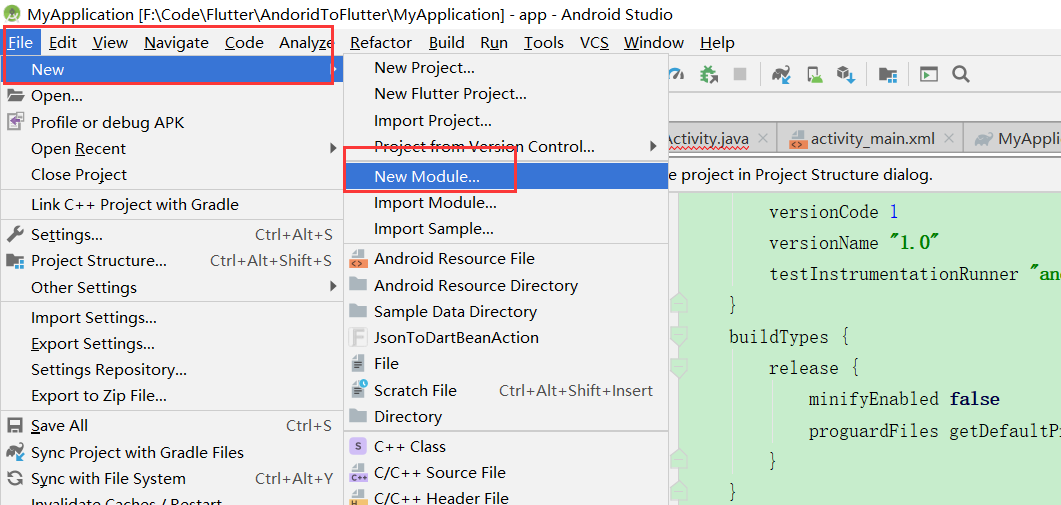
- Select: "New Module"

- Select "import shuttle module"

- Select your shuttle module project folder
Manual import
Note: you only need to set it. The above automatic import is the default code generation.
- MyApp/app/build.gradle, add the following dependencies
dependencies {
  implementation project(':flutter')
}
- MyApp/settings.gradle, settings.gradle, add the following code: "fluent_module" is the project name, write your own project name (code on the official website)
include ':app'
setBinding(new Binding([gradle: this]))
evaluate(new File(
  settingsDir.parentFile,
  'flutter_module/.android/include_flutter.groovy'
))
- Generally, the following code forms are generated by default
include ':app'
setBinding(new Binding([gradle: this]))
evaluate(new File(
  settingsDir,
  '../flutter_module/.android/include_flutter.groovy'
))
- Explain the differences of path symbols
- /: root
- . /: current directory
- ... /: parent directory (previous directory)
- settingsDir: get the full path of the current project, including the project folder
- settingsDir.parentFile: get the upper level path of the project folder
Flutter and Android UI interaction
Add a single Flutter page
In the form of fluteractivity, it is very convenient to present the fluter interface
- Precondition: fluteractivity must be registered in AndroidManifest.xml
<activity
  android:name="io.flutter.embedding.android.FlutterActivity"
  android:theme="@style/AppTheme"
  android:configChanges="orientation|keyboardHidden|keyboard|screenSize|locale|layoutDirection|fontScale|screenLayout|density|uiMode"
  android:hardwareAccelerated="true"
  android:windowSoftInputMode="adjustResize"
  />
- Start the default route of the fluent module (simplest form)
Intent intent = FlutterActivity.createDefaultIntent(this);
startActivity(intent);
In this way, you can directly jump to the Flutter interface. In fact, you can start fluteractivity and load the Ui of Flutter in fluteractivity.
- Selectively jump to a routing interface
Intent intent = FlutterActivity.withNewEngine()
                .initialRoute("/you/route/") //Set your routing address
                .build(this);
startActivity(intent);
In fact, the createDefaultIntent() method encapsulates the withNewEngine().build(launchContext) method. If you are interested, you can click into the code.
- Using cached fluterengine
//Use cached fluterengine (minimize startup standard latency)
FlutterEngine flutterEngine = new FlutterEngine(this);  //Initial routing
//Fluterengine. Getnavigationchannel(). Setinitialroute ("your / route / here"); / / custom route
//Start executing Dart code to warm up the fluterengine.
flutterEngine.getDartExecutor().executeDartEntrypoint(DartExecutor.DartEntrypoint.createDefault());
//Cache the fluterengine to be used by the fluteractivity.
FlutterEngineCache.getInstance().put("my_engine_id", flutterEngine);
Intent intent = FlutterActivity
        .withCachedEngine("my_engine_id")
        .build(this);

//Click event of a button
findViewById(R.id.flutter_button).setOnClickListener(v -> {
        startActivity(intent);
    });
Note: actually fluteractivity. Withnewengine() Mode jump is to generate a new fluterengine object. Each fluterengine has a very important warm-up time. This means that starting a standard fluteractivity has a short delay before the Flutter experience becomes visible. To minimize this delay, we can preheat the fluterengine before arriving at the fluteractivity, and then use the cached fluterengine. This situation is especially significant in debug installation. There will be a period of time when the screen will be black, and the FlutterEngine will be cached in advance, which can avoid this situation, improve the interaction experience, and recommend.
Add FlutterFragment
- Note: there are quite a lot of places available for FlutterFragment, which can be used to display a sliding drawer, tabbed content, a page in ViewPager, etc. of course, if FlutterActivity can be solved, it is recommended to use FlutterActivity, because FlutterActivity is easier to use.
If an activity is equally applicable for your application needs, consider using a fluteractivity instead of a fluterafragment, which is quick and easy to use
- Using FlutterFragment
public class MyActivity extends FragmentActivity {
    private FlutterFragment flutterFragment;

    @Override
    protected void onCreate(Bundle savedInstanceState) {
        super.onCreate(savedInstanceState);
        setContentView(R.layout.my_activity_layout);

          //Start the FlutterFragment directly
        FragmentManager fragmentManager = getSupportFragmentManager();
        //Default route, equivalent to: initialRoute("/")
        //FlutterFragment flutterFragment = FlutterFragment.createDefault();
        FlutterFragment flutterFragment = FlutterFragment.withNewEngine()
                .initialRoute("/")   //Route setting
                .build();
        fragmentManager
                .beginTransaction()
                .add(R.id.flutter_ui, flutterFragment, "flutter_fragment")
                .commit();
    }
}
- R. id.fluent UI: the id of a Fragment in the layout file
- Where the pit ratio is compared
- FlutterFragment cannot be forced into Fragment type. The part involving forced conversion will burst red, but it will not affect the operation.
- Reason: after looking at the FlutterFragment, it's OK for the subclass to convert strongly to the parent class if it inherits the Fragment, but it's a pity that the Support package is used in FlutterFragment, and the Android x package is used for me, which makes the two objects unable to convert strongly.
That is: the subclass of support.v4.app.Fragment can't be forced into Android x.fragment.app.fragment? This error is really a blood pit.

-Solution: I have only found the possible reasons, but I really can't find a solution. Possible solutions
-If you report an error, you can report it. Stay there. It doesn't affect the operation of the program. Buddha system point
-Wait for the Flutter team to delete the support package in this FlutterFragment and replace it with Android X
-There are other ways to solve this problem. I would like to comment
- Use the above code to show your fluent page
- Synchronize the FlutterFragment cycle with the Activity
public class MyActivity extends FragmentActivity {
    @Override
    public void onPostResume() {
        super.onPostResume();
        flutterFragment.onPostResume();
    }

    @Override
    protected void onNewIntent(@NonNull Intent intent) {
        flutterFragment.onNewIntent(intent);
    }

    @Override
    public void onBackPressed() {
        flutterFragment.onBackPressed();
    }

    @Override
    public void onRequestPermissionsResult(
        int requestCode,
        @NonNull String[] permissions,
        @NonNull int[] grantResults
    ) {
        flutterFragment.onRequestPermissionsResult(
            requestCode,
            permissions,
            grantResults
        );
    }

    @Override
    public void onUserLeaveHint() {
        flutterFragment.onUserLeaveHint();
    }

    @Override
    public void onTrimMemory(int level) {
        super.onTrimMemory(level);
        flutterFragment.onTrimMemory(level);
    }
}
- Using cached fluterengine
//Use cached fluterengine (minimize startup standard latency)
FragmentManager fragmentManager = getSupportFragmentManager();
FlutterEngine flutterEngine = new FlutterEngine(this);  //Initial routing
// Fluterengine. Getnavigationchannel(). Setinitialroute ("/"); / / custom route
//Start executing Dart code to warm up the fluterengine.
flutterEngine.getDartExecutor().executeDartEntrypoint(DartExecutor.DartEntrypoint.createDefault());
FlutterEngineCache.getInstance().put("my_engine_id", flutterEngine);//Cache the fluterengine to use.

//Click events
findViewById(R.id.flutter_button).setOnClickListener(v -> {
        FlutterFragment flutterFragment = FlutterFragment.withCachedEngine("my_engine_id").build();
        fragmentManager
                .beginTransaction()
                .add(R.id.flutter_ui, flutterFragment, "flutter_fragment")
                .commit();
    });
Basically the same as using the fluteractivity caching mechanism above
- After the cache code is written on the official website of Flutter, here comes the code separately:
flutterFragment.withCachedEngine("my_engine_id").build();
- It's really a beep. I thought with cachedaengine ("my engine [ID"). Build() directly wrote the cached FlutterEngine into the flutterfragment object. In fact, build() returned the flutterfragment object. The above code just takes the set flutterfragment.
- Guess the intention of the code on the official website, is it like this:
fragmentManager
          .beginTransaction()
          .add(R.id.flutter_ui, flutterFragment.withCachedEngine("my_engine_id").build(), "flutter_fragment")
          .commit();

