This part mainly introduces some common special effects based on Canvas's drawing system.
1 twist effect
Bitdrawpms is used to process the distorted image. This effect is mainly to display the distortion effects such as "water wave rippling" and "red flag flying" on the APP, which is very flexible. drawBitmapmesh is defined as follows:
public void drawBitmapMesh (Bitmap bitmap,
                int meshWidth,int meshHeight,
                float[] verts,int vertOffset,
                int[] colors,int colorOffset,Paint paint)
There are several key parameters (other parameters are relatively easy to understand):
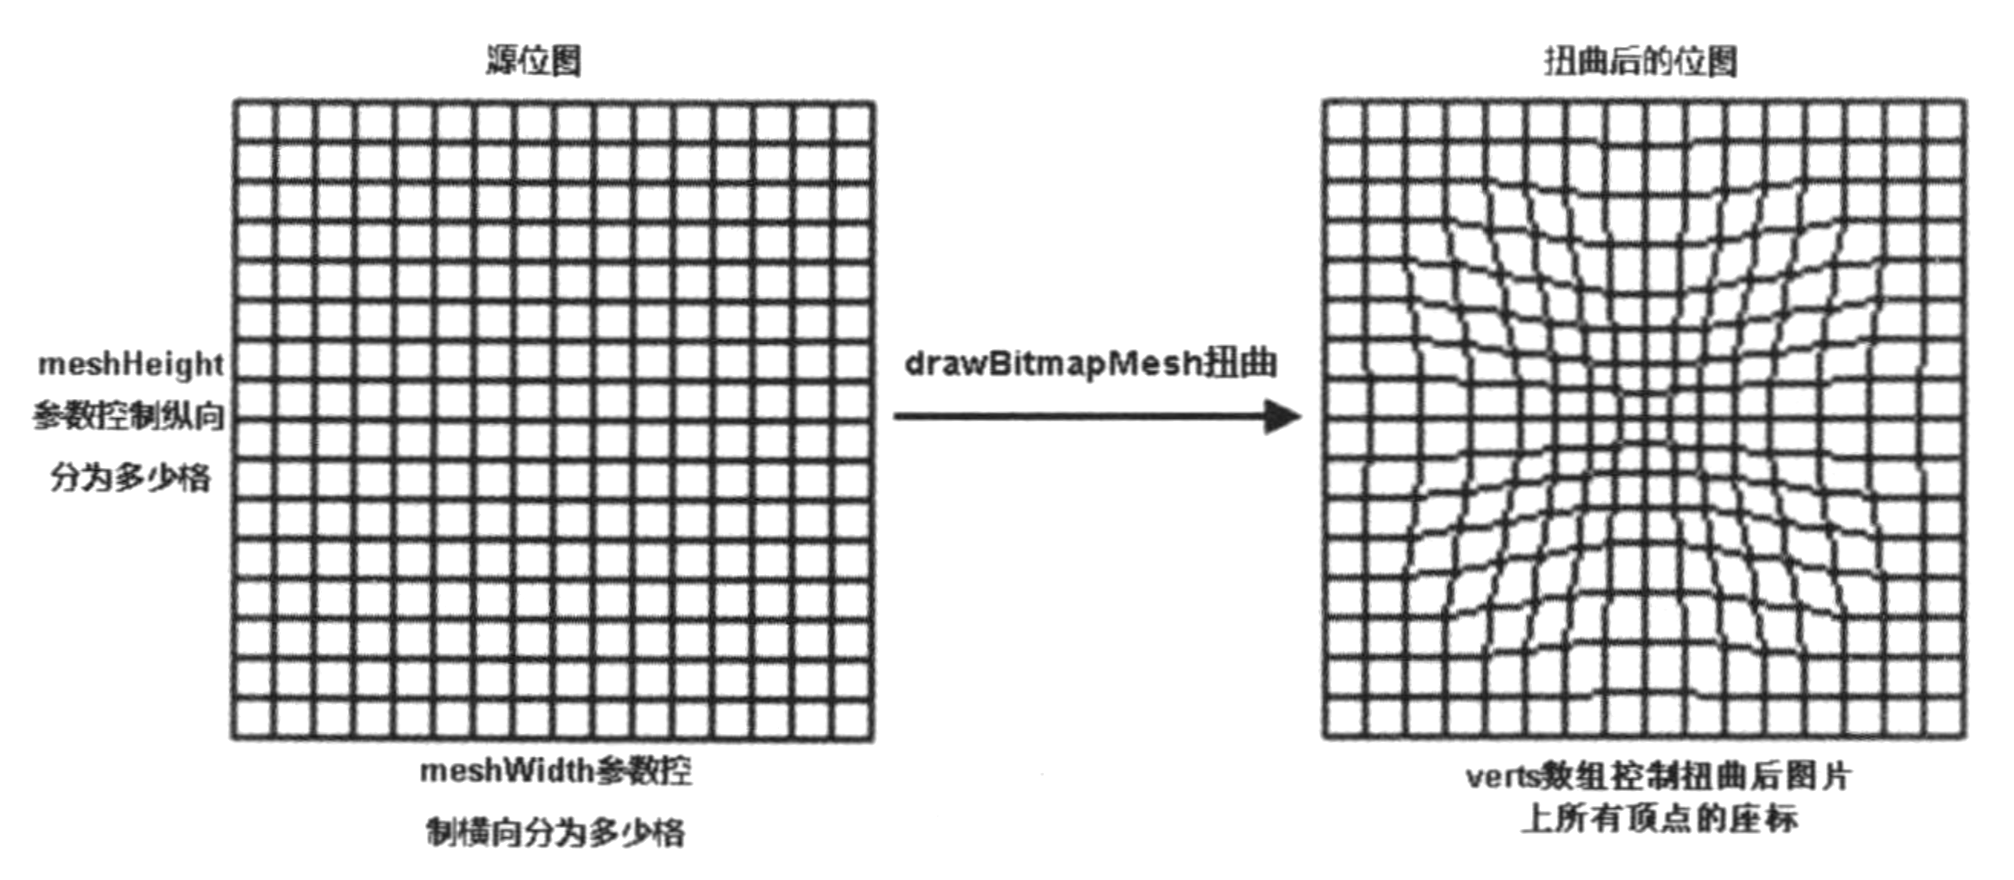
- meshWidth and meshHeight: how many squares to divide the picture horizontally / vertically.
- verts: this parameter is an array with a length len of (meshWidth+1)*(meshHeight+1)*2, which records the vertices of the distorted bitmap. The recording format is: (x1,y1), (x2,y2), (x3,y3)... This method mainly controls the distortion effect of Bitmap bitmap through these array elements (we will learn more in the actual demo below).
The actual effect of bitdrawpmesh distortion is shown as follows:

For more explanation of drawBitmapmesh method, please refer to the document: Detailed explanation of Android Canvas drawBitmapMesh.
@2. drawBitmapmesh actual combat (drawBitmapmesh effect display)
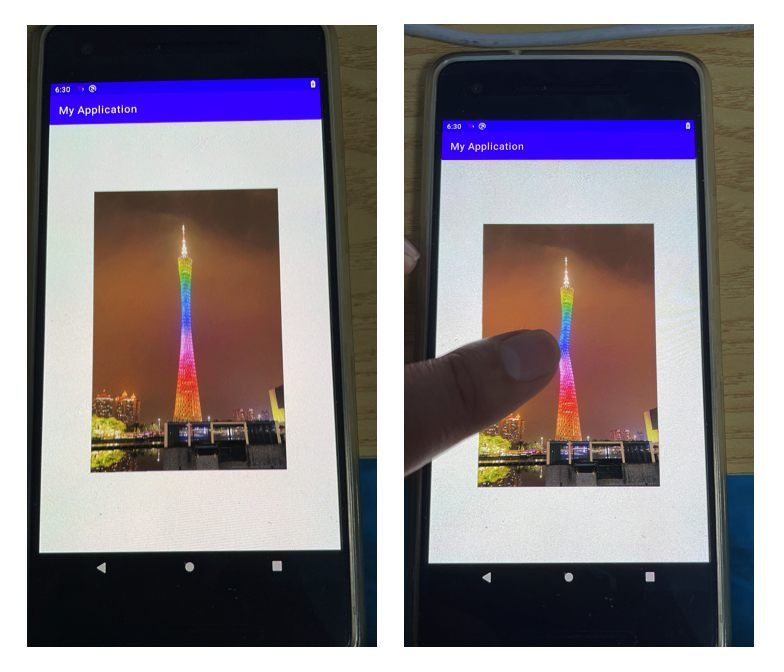
Realization function: touch the screen and display the distortion effect of drawBitmapmesh at the touch. The running effect of the program is as follows:

For this program, the key codes of custom View are as follows:
public class MyView extends View {
    private static final String TAG = "MyView";
    private Matrix initMatrix = new Matrix();
    private int h,w;
    //Related variables built for drawBitmapMesh, start
    private final static int WIDTH =20;
    private final static int HEIGHT =20;
    private final static int COUNT = (WIDTH+1)*(HEIGHT+1);
    private float[] verts = new float[COUNT*2];
    private float[] origs = new float[COUNT*2];
    //Related variables built for drawBitmapMesh, end
    public Bitmap bitmap = null;
    float offsetStartX=0.0f,offsetStartY=0.0f;//Centered display adjustment

    public MyView(Context context) {
        super(context);
        init(context);
    }

    private void init(Context context){
        //1 get bitmap
        initMatrix.reset();
        initMatrix.setScale(1.0f,1.0f);
        try {
            InputStream isImage = context.getAssets().open("test6.png");
            bitmap = BitmapFactory.decodeStream(isImage);
            w = bitmap.getWidth();
            h = bitmap.getHeight();
            bitmap = Bitmap.createBitmap(bitmap,0,0, w, h, initMatrix, true);
        } catch (IOException e) {
            e.printStackTrace();
        }

        //2. Build origs array (processing data) and verts array (saving original data) according to the specified method of drawBitmapMesh
        int index=0;
        for(int i=0;i<HEIGHT+1;i++){
            float fy=(h*i)/HEIGHT;
            for(int j=0;j<WIDTH+1;j++){
                float fx=(w*j)/WIDTH;
                //The record format is: (x1,y1), (x2,y2), (x3,y3), and so on
                origs[index*2+0]=verts[index*2+0]=fx;
                origs[index*2+1]=verts[index*2+1]=fy;
                index++;
            }
        }
    }

    @Override
    protected void onDraw(Canvas canvas) {
        canvas.drawColor(Color.WHITE);
        //Center display
        offsetStartX = (canvas.getWidth()-bitmap.getWidth())*1.0f/2;
        offsetStartY = (canvas.getHeight()-bitmap.getHeight())*1.0f/2;
        canvas.translate(offsetStartX,offsetStartY);
        //5 bitmap drawing. When the vert array changes, the local part of the picture will be adjusted accordingly.
        canvas.drawBitmapMesh(bitmap,WIDTH,HEIGHT,verts,0,null,0,null);
    }

    private void wrap(float x,float y){
        //4 key algorithm, distortion effect design, and construct distortion effect according to the input event coordinates.
        for(int i=0;i<COUNT*2;i+=2){
            float dx = x-origs[i];
            float dy = y-origs[i+1];
            float d = (float)Math.sqrt(dx*dx+dy*dy);
            float pull = 200000.f/(d*d*d);
            if(pull>=1){
                verts[i] = x;
                verts[i+1] = y;
            }else{
                verts[i] = origs[i]+dx*pull;
                verts[i+1] = origs[i+1]+dy*pull;
            }
        }
        invalidate();
    }

    @Override
    public boolean onTouchEvent(MotionEvent event) {
        //3 coordinate correction is made here to match the central display.
        wrap(event.getX()-offsetStartX,event.getY()-offsetStartY);
        return true;
    }
}
The implementation code in MainActivity is:
public class MainActivity extends AppCompatActivity {
    private static String TAG = "MainActivity";
    @Override
    protected void onCreate(Bundle savedInstanceState) {
        super.onCreate(savedInstanceState);
        setContentView(new MyView(this));
    }
}
2 shader effects
@1. Concept basis of shader and interpretation of derived classes
Here, the filling mode of Paint brush is mainly used to show the filling effect of shader. In the Android APP, the shader class (for more information about shader class interpretation, see the documentation: Detailed explanation of Android Shader class )Is an abstract class. Its derived classes are as follows:
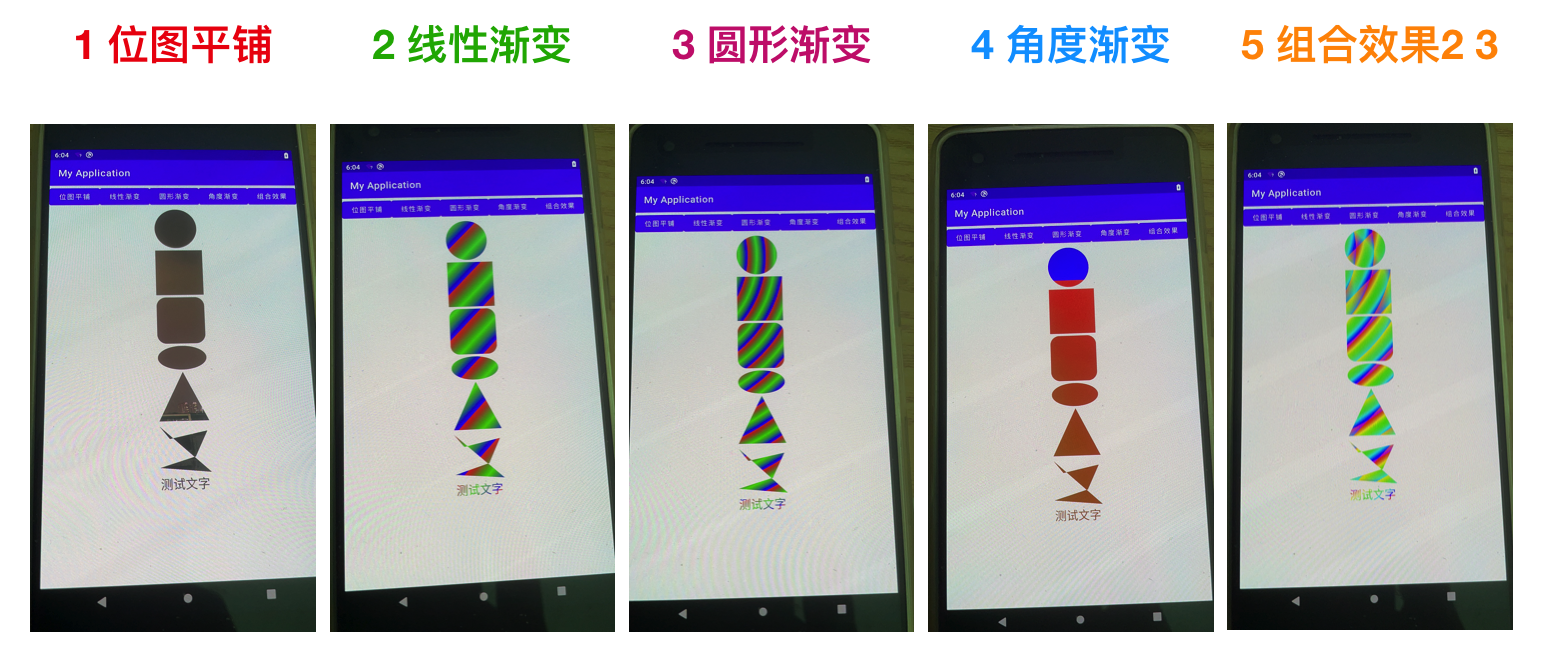
- BitmapShader: Detailed explanation of Android BitmapShader class , bitmap tile.
- LinearGradient: Detailed explanation of Android LinearGradient class , linear gradient.
- RadialGradient: Detailed explanation of Android radiogradient class , circular gradient.
- SweepGradient: Detailed explanation of Android SweepGradient class , angle gradient.
- ComposeGradient: Detailed explanation of Android ComposeShader class , combination effect.
Shader is the meaning of shader (just like skin, but the clothes we see a person wearing also depend on the environment, such as light, shadow, etc., that is to say, shader can be understood as the final effect of the overall presentation of clothes on a person). For more interpretation of shader, please see the article: OpenGL Basics (01) Basics The second part of the.
@2. Actual combat of shader effect (show 5 kinds of shader derived special effects)
Realization function: respond to five shader effects by pressing the key, and the effects are as follows:

For this program, the key codes of custom View are as follows:
public class MyView extends View {
    private static final String TAG = "MyView";
    public Paint paint = new Paint();
    private Path path = new Path();

    public MyView(Context context,AttributeSet attrs){
        super(context,attrs);
        init();
    }

    private void init(){
        paint.setAntiAlias(true);//Anti-Aliasing
        paint.setColor(Color.RED);//stroke color
        paint.setStyle(Paint.Style.FILL);//Fill mode
        paint.setStrokeWidth(4f);//Set brush thickness
        paint.setTextSize(48f);
    }

    public void setShader(Shader shader){
        paint.setShader(shader);
        invalidate();
    }

    @Override
    protected void onDraw(Canvas canvas) {
        canvas.drawColor(Color.WHITE);
        drawsth(canvas,paint,path,440f);
    }

    //Test: draw basic graphics, irregular graphics and text
    private void drawsth(Canvas canvas, Paint paint,Path path,float offset){

        //Paint draws a circle. Parameters: center coordinates (x,y), radius r, brush paint
        canvas.drawCircle(100f+offset,100f,90f,paint);
        //Paint draws a rectangle. Parameters: upper left corner coordinates (x,y), lower right corner coordinates (x,y), brush paint
        canvas.drawRect(10f+offset,200f,210f+offset,400f,paint);
        //Paint draws a rounded rectangle. Parameters: upper left corner coordinates (x,y), lower right corner coordinates (x,y), rounded radius in X direction, rounded radius in Y direction, brush paint
        canvas.drawRoundRect(10f+offset,410f,210f+offset,610f,40f,40f,paint);
        //Paint draws an ellipse. Parameters: coordinates of the upper left corner (x,y), coordinates of the lower right corner (x,y) [parameters represent the ellipse inscribed in the rectangle], brush paint
        canvas.drawOval(10f+offset,620f,210f+offset,720f,paint);

        //Path draws the triangle, moveto represents the first coordinate, and lineto represents the second and third coordinates respectively. and so on.
        path.moveTo(110f+offset,730f);
        path.lineTo(10f+offset,930f);
        path.lineTo(210f+offset,930f);
        path.close();
        canvas.drawPath(path,paint);
        //Path draws irregular multipoint polygons
        path.moveTo(10f+offset,950f);
        path.lineTo(50f+offset,1000f);
        path.lineTo(200f+offset,970f);
        path.lineTo(150f+offset,1070f);
        path.lineTo(10f+offset,1110f);
        path.lineTo(210f+offset,1130f);
        path.close();
        canvas.drawPath(path,paint);

        //Note: this coordinate (x,y) is not the upper left corner of the text, but a position close to the lower left corner.
        canvas.drawText("Test text",10f+offset,1190f,paint);
    }
}
The implementation code in MainActivity is as follows:
public class MainActivity extends AppCompatActivity implements View.OnClickListener {
    private static String TAG = "MainActivity";
    private Shader[] shaders = new Shader[5];
    private int[] colors = new int[]{Color.RED,Color.GREEN,Color.BLUE};
    private MyView myView;
    private Button btn1,btn2,btn3,btn4,btn5;
    private Bitmap bitmap = null;

    @Override
    protected void onCreate(Bundle savedInstanceState) {
        super.onCreate(savedInstanceState);
        setContentView(R.layout.shaderlayout);
        Button btn1 = findViewById(R.id.btn1);
        Button btn2 = findViewById(R.id.btn2);
        Button btn3 = findViewById(R.id.btn3);
        Button btn4 = findViewById(R.id.btn4);
        Button btn5 = findViewById(R.id.btn5);
        myView = findViewById(R.id.myView);

        try {
            InputStream isImage = getAssets().open("test6.png");
            bitmap = BitmapFactory.decodeStream(isImage);
        } catch (IOException e) {
            e.printStackTrace();
        }
		//Create 5 kinds of derived class objects of shader s to test the effect respectively
        shaders[0] = new BitmapShader(bitmap,Shader.TileMode.REPEAT, Shader.TileMode.MIRROR);
        shaders[1] = new LinearGradient(0f,0f,100f,100f,colors,null, Shader.TileMode.REPEAT);
        shaders[2] = new RadialGradient(100f,100f,80f,colors,null, Shader.TileMode.REPEAT);
        shaders[3] = new SweepGradient(160f,160f,colors,null);
        shaders[4] = new ComposeShader(shaders[1],shaders[2], PorterDuff.Mode.ADD);
    }

    @Override
    public void onClick(View v) {
        switch (v.getId()){
            case R.id.btn1:myView.setShader(shaders[0]);break;
            case R.id.btn2:myView.setShader(shaders[1]);break;
            case R.id.btn3:myView.setShader(shaders[2]);break;
            case R.id.btn4:myView.setShader(shaders[3]);break;
            case R.id.btn5:myView.setShader(shaders[4]);break;
            default:break;
        }
    }
}
For this program, shaderlayout The XML layout reference file is as follows:
<?xml version="1.0" encoding="utf-8"?>
<LinearLayout xmlns:android="http://schemas.android.com/apk/res/android"
    android:layout_width="match_parent"
    android:layout_height="match_parent"
    android:orientation="vertical">
    <LinearLayout
        android:layout_width="match_parent"
        android:layout_height="wrap_content"
        android:orientation="horizontal"
        android:visibility="visible">

        <Button
            android:id="@+id/btn1"
            android:layout_width="wrap_content"
            android:layout_height="wrap_content"
            android:layout_weight="20"
            android:onClick="onClick"
            android:text="@string/BitmapShader" />

        <Button
            android:id="@+id/btn2"
            android:layout_width="wrap_content"
            android:layout_height="wrap_content"
            android:layout_weight="20"
            android:onClick="onClick"
            android:text="@string/LinearGradient" />

        <Button
            android:id="@+id/btn3"
            android:layout_width="wrap_content"
            android:layout_height="wrap_content"
            android:layout_weight="20"
            android:onClick="onClick"
            android:text="@string/RadialGradient" />

        <Button
            android:id="@+id/btn4"
            android:layout_width="wrap_content"
            android:layout_height="wrap_content"
            android:layout_weight="20"
            android:onClick="onClick"
            android:text="@string/SweepGradient" />

        <Button
            android:id="@+id/btn5"
            android:layout_width="wrap_content"
            android:layout_height="wrap_content"
            android:layout_weight="20"
            android:onClick="onClick"
            android:text="@string/ComposeGradient" />
    </LinearLayout>

    <com.ags.myapplication.MyView
        android:id="@+id/myView"
        android:layout_width="match_parent"
        android:layout_height="match_parent"
        android:background="@mipmap/ic_launcher" />
</LinearLayout>