- Configure Baidu map
Configure Baidu map
Get SHA1
- Get it from the command line in Android Studio. The steps are as follows:
Click Terminal in the lower left corner - Enter D:\Android\jre\bin and enter the command keytool -list -v -keystore debug.keystore
-
Get Baidu map key (AK)
- Enter the official website of Baidu map, register baidu account first, and then apply to become a developer. These two steps are very simple, so they are not explained here.
After becoming a developer, click to get the key:
Here I have created an application and can go to the next step.
Configure Android Studio
In fact, there are detailed steps on Baidu map's official website, which can be referred to on the official website.
First, download the development kit:

After downloading, unzip and copy the development package to the project (the screenshot takes the development package of ordinary map service as an example, and the development package of step riding navigation is the same)
1. Add jar file
Open the unzipped development package folder and find Baidu lbs_ Copy the android.jar file to the app/libs directory of the project, as shown in the figure: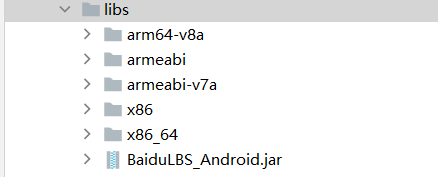
2. Add so file
There are two ways to add so files to a project.
Method 1:
In the downloaded development package, copy the so file folder corresponding to the CPU architecture to the app/libs directory, as shown in the figure:
Configure the sourceSets tag in the android block in the build.gradle file in the app directory. If the tag is not used, it will be added. The detailed configuration code is as follows:
sourceSets {
           main {
               jniLibs.srcDir 'libs'
           }
    }
Add jar files to the project
In the project configuration, we need to integrate the jar files added earlier into our project.
In the libs directory, select each jar file (there is only one BaiduLbs_Android.jar here) and right-click and select Add As Library... To find the corresponding description of the jar file that the project depends on in the dependencies block of build.gradle in the app directory, as shown below: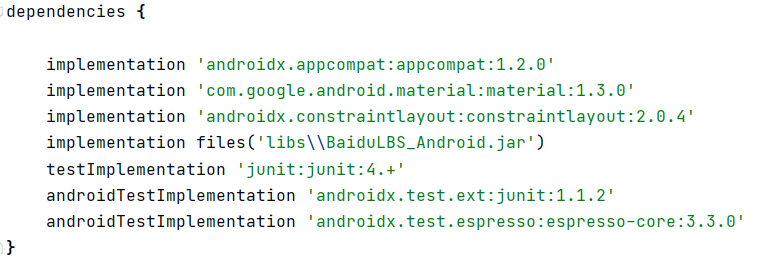
So far, the configuration of Android Studio development environment has been completed. Next, use Baidu map.
Display map
Configure the AndroidManifest.xml file
- stay < Add the following code to application > to configure the development key (AK):
<meta-data
            android:name="com.baidu.lbsapi.API_KEY"
            android:value="vw7ktfEvWB2ISqAkN3i2ObmFQOeRtse9" />
AK here is the application you started to create.
-
Add the following permission statement outside < application / >:
-
<!-- Access the network and request map related business data, including map data, route planning, POI Search, etc -->
<uses-permission android:name="android.permission.INTERNET" />
<!-- Obtain the network state, and perform data request network conversion according to the network state switching -->
<uses-permission android:name="android.permission.ACCESS_NETWORK_STATE" />

<!-- Read external storage. If developers use so Dynamic loading function and so If the file is placed in an external storage area, you need to apply for the permission, otherwise you don't need it -->
<uses-permission android:name="android.permission.READ_EXTERNAL_STORAGE" />
<!-- Write external storage. If the developer uses an offline map and the data is written in the external storage area, you need to apply for this permission -->
<uses-permission android:name="android.permission.WRITE_EXTERNAL_STORAGE" />
Step 2: add a map container in the layout file
MapView is a subclass of View, which is used to place maps in Android View. MapView is used in the same way as other views provided by Android.
<com.baidu.mapapi.map.MapView
    android:id="@+id/bmapView"
    android:layout_width="match_parent"
    android:layout_height="match_parent"
    android:clickable="true" />
Step 3 map initialization
Note: "SDKInitializer.initialize(getApplicationContext())" needs to be called before each functional component of the SDK is used. Therefore, it is recommended to initialize the Context referenced by the SDK as a global variable when the application is created.
Create a custom Application and complete SDK initialization in its onCreate method. The example code is as follows:
public class DemoApplication extends Application {
    @Override
    public void onCreate() {
        super.onCreate();
        //Before using SDK components, initialize the context information and pass in ApplicationContext
        SDKInitializer.initialize(this);
        //Since 4.3.0, all interfaces of Baidu map SDK support Baidu coordinates and National Survey Bureau coordinates. Use this method to set the coordinate type you use
        //It includes BD09LL and GCJ02 coordinates. The default is BD09LL coordinates.
        SDKInitializer.setCoordType(CoordType.BD09LL);
    }
}
Declare the Application in the AndroidManifest.xml file

Create a map Activity and manage the MapView lifecycle
Note: when using maps in a project, it is very important to pay special attention to reasonably managing the map life cycle.
The following example code briefly describes the management of the map lifecycle:
public class MainActivity extends Activity {
    private MapView mMapView = null;
    @Override
    protected void onCreate(Bundle savedInstanceState) {
        super.onCreate(savedInstanceState);
        setContentView(R.layout.activity_main);
        //Get map control reference
        mMapView = (MapView) findViewById(R.id.bmapView);
    }
    @Override
    protected void onResume() {
       super.onResume();
       //When the activity executes onResume, execute mMapView. onResume() to realize map life cycle management
       mMapView.onResume();
    }
    @Override
    protected void onPause() {
      super.onPause();
      //When the activity executes onPause, execute mMapView. onPause() to realize map life cycle management
      mMapView.onPause();
    }
    @Override
    protected void onDestroy() {
      super.onDestroy();
      //When the activity executes onDestroy, execute mMapView.onDestroy() to realize map life cycle management
      mMapView.onDestroy();
    }
}
Complete the above work to display the map in your application:

Display positioning
Configure the AndroidManifest.xml file
1. Add the following permission statement
<!-- This permission is used for network location -->
<uses-permission android:name="android.permission.ACCESS_COARSE_LOCATION" />
<!-- This permission is used to access GPS location -->
<uses-permission android:name="android.permission.ACCESS_FINE_LOCATION" />
2. Declare the located service component in the Application tag
<service android:name="com.baidu.location.f"
    android:enabled="true"
    android:process=":remote"/>
3. Turn on the positioning layer of the map
mBaiduMap.setMyLocationEnabled(true);
4. Construct map data
We obtain the location data by inheriting the abstract class BDAbstractListener and rewriting its onreceivelocation method, and pass it to MapView.
public class MyLocationListener extends BDAbstractLocationListener {
        @Override
        public void onReceiveLocation(BDLocation location) {
            //After mapView is destroyed, it is not in the location where new reception is processed
            if (location == null || mMapView == null){
                return;
            }
            MyLocationData locData = new MyLocationData.Builder()
                    .accuracy(location.getRadius())
                    // Set the direction information obtained by the developer here, clockwise 0-360
                    .direction(location.getDirection()).latitude(location.getLatitude())
                    .longitude(location.getLongitude()).build();
            mBaiduMap.setMyLocationData(locData);
    }
}
5. Initiate location through LocationClient
//Positioning initialization
mLocationClient = new LocationClient(this);

//Set LocationClient related parameters through LocationClientOption
LocationClientOption option = new LocationClientOption();
option.setOpenGps(true); // Turn on gps
option.setCoorType("bd09ll"); // Set coordinate type
option.setScanSpan(1000);

//Setting locationClientOption
mLocationClient.setLocOption(option);

//Register LocationListener listener
MyLocationListener myLocationListener = new MyLocationListener();
mLocationClient.registerLocationListener(myLocationListener);
//Turn on map positioning layer
mLocationClient.start();
6. Correctly manage the life cycle of each part
@Override
protected void onResume() {
    mMapView.onResume();
    super.onResume();
}

@Override
protected void onPause() {
    mMapView.onPause();
    super.onPause();
}

@Override
protected void onDestroy() {
    mLocationClient.stop();
    mBaiduMap.setMyLocationEnabled(false);
    mMapView.onDestroy();
    mMapView = null;
    super.onDestroy();
}
After completing the above work, you can display the blue dot of the current position in your map application, as shown below:

Here, due to virtual machine reasons, you can only locate Guinea. Finally, I use the usb interface to connect the mobile phone and run it after opening the location permission. The results are as follows:

This is the end of the experiment