Preface
Android Design Patterns Series: Welcome your attention and keep updating:
1. definition
Separating the construction of a complex object from its representation enables the same construction process to create different representations.
2. introduction
- The builder model belongs to the creation model.
- Builder mode is mainly used to create complex objects, users can not care about its construction process and details.
- For example, when we want to assemble a computer, we choose CPU, memory, hard disk and so on, and then give it to the assembler. The assembler will assemble the computer. We don't need to care how to assemble it.
3.UML class diagram
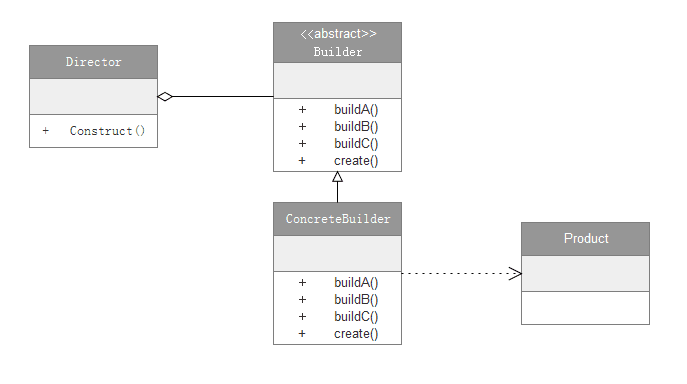
Role description:
- Product (product class): Complex objects to be created. In this class diagram, the product class is a concrete class, not an abstract class. In practical programming, a product class can be composed of an abstract class and its different implementations, or it can be composed of several abstract classes and their implementations.
- Builder (abstract builder): To create abstract interfaces for products, there is usually at least one abstract method for creating products and one abstract method for returning products. Abstract classes are introduced to make it easier to extend.
- ConcreteBuilder (Actual Builder): Inherits the Builder class and implements all abstract methods of the abstract class. Realize the specific construction process and details.
- Director (Commander Class): Assign different builders to create products and unify assembly processes.
4. implementation
4.1 Define specific Product categories: computers
public class Computer {
    private String mCPU;
    private String mMemory;
    private String mHD;

    public void setCPU(String CPU) {
        mCPU = CPU;
    }

    public void setMemory(String memory) {
        mMemory = memory;
    }

    public void setHD(String HD) {
        mHD = HD;
    }
}
4.2 Definition of an abstract Builder: The process of assembling a computer
public abstract class Builder {
    public abstract void buildCPU(String cpu);//Assemble CPU

    public abstract void buildMemory(String memory);//Assembly memory

    public abstract void buildHD(String hd);//Assemble hard disk

    public abstract Computer create();//Return to the assembled computer
}
4.3 Create Concrete Builder: Installer
public class ConcreteBuilder extends Builder {
    //Create product instances
    private Computer mComputer = new Computer();

    @Override
    public void buildCPU(String cpu) {//Assemble CPU
        mComputer.setCPU(cpu);
    }

    @Override
    public void buildMemory(String memory) {//Assembly memory
        mComputer.setMemory(memory);
    }

    @Override
    public void buildHD(String hd) {//Assemble hard disk
        mComputer.setHD(hd);
    }

    @Override
    public Computer create() {//Return to the assembled computer
        return mComputer;
    }
}
4.4 Define Director: The Boss Delegates Tasks to the Installer
public class Director {
    private Builder mBuild = null;

    public Director(Builder build) {
        this.mBuild = build;
    }

    //Command Installers to Assemble Computers
    public void Construct(String cpu, String memory, String hd) {
        mBuild.buildCPU(cpu);
        mBuild.buildMemory(memory);
        mBuild.buildHD(hd);
    }
}
4.5 Test Method
   public void CreatComputer() {
        Builder builder = new ConcreteBuilder();//Create an instance of the builder. (Installer)
        Director direcror = new Director(builder);//Create commander instances and assign builders accordingly. (Boss assigns tasks)
        direcror.Construct("i7-6700", "Samsung DDR4", "Seagate 1 T");//Assemble computer
    }
5. Application scenarios
- When creating complex objects, there are complex changes in the process of building objects.
- The same construction process, different execution order, produce different results.
- When different configurations of building objects produce different results.
6. advantages
- Good encapsulation, hiding internal build details.
- It is easy to decouple and decouple the product itself from the product creation process. The same creation process can be used to get different products. That is to say, details depend on abstraction.
- Easy to expand, specific builder classes are independent of each other, adding new specific builders without modifying the original library code.
- It is easy to precisely control the creation of objects, because the specific builder is independent, so it can gradually refine the construction process, without any impact on other modules.
7. disadvantages
- Generate redundant Build objects and Dirextor classes.
- The products created by the builder model generally have many similarities, and their components are similar. If there are great differences among products, it is not suitable to use the builder model, so its scope of use is limited.
- If the internal changes of products are complex, it may lead to the need to define many specific builder classes to achieve such changes, resulting in a huge system.
8. Source code analysis in Android
AlertDialog.Builder in Android uses the Builder pattern to build AlertDialog.
8.1 Simple Use of AlertDialog.Builder
        AlertDialog.Builder builder = new AlertDialog.Builder(activity);//Create a Builder object
        builder.setIcon(R.drawable.icon);
        builder.setTitle("Title");
        builder.setMessage("information");
        builder.setPositiveButton("Sure?",
                new DialogInterface.OnClickListener() {
                    @Override
                    public void onClick(DialogInterface dialog, int which) {

                    }
                });
        AlertDialog alertDialog = builder.create();//Create an AlertDialog object
        alertDialog.show();//Show Alert Dialog
Builder objects are used to build Icon, Title, Message and so on, hiding the construction process and details of AlertDialog.
8.2 Alert Dialog Related Source Code Analysis
//AlertDialog source code
public class AlertDialog extends Dialog implements DialogInterface {
    private AlertController mAlert;//Accept the parameters of Builder member variable P

    AlertDialog(Context context, @StyleRes int themeResId, boolean createContextThemeWrapper) {
        super(context, createContextThemeWrapper ? resolveDialogTheme(context, themeResId) : 0, createContextThemeWrapper);
        mWindow.alwaysReadCloseOnTouchAttr();
        mAlert = AlertController.create(getContext(), this, getWindow());//Create an AlertController object
    }

    @Override
    public void setTitle(CharSequence title) {//Set Title
        super.setTitle(title);
        mAlert.setTitle(title);//Save it in the AlertController object
    }

    public void setMessage(CharSequence message) {//Setting Message
        mAlert.setMessage(message);//Save it in the AlertController object
    }

    public void setIcon(@DrawableRes int resId) {//Set Icon
        mAlert.setIcon(resId);//Save it in the AlertController object
    }


    @Override
    protected void onCreate(Bundle savedInstanceState) {
        super.onCreate(savedInstanceState);
        mAlert.installContent();//Install the contents of AlertDialog
    }

    //Alert Dialog Other Codes

    public static class Builder {
        private final AlertController.AlertParams P;//The parameters needed to build the AlertDialog object are stored in P

        public Builder(Context context) {
            this(context, resolveDialogTheme(context, 0));
        }

        public Builder(Context context, int themeResId) {
            P = new AlertController.AlertParams(new ContextThemeWrapper(
                    context, resolveDialogTheme(context, themeResId)));//Initialize the AlertParams object
        }

        public Context getContext() {
            return P.mContext;
        }

        public android.app.AlertDialog.Builder setTitle(CharSequence title) {
            P.mTitle = title;//Save title to P
            return this;
        }

        public android.app.AlertDialog.Builder setMessage(CharSequence message) {
            P.mMessage = message;//Save message
            return this;
        }


        public android.app.AlertDialog.Builder setIcon(@DrawableRes int iconId) {
            P.mIconId = iconId;//Save IconId
            return this;
        }

        //Other Builder Codes

        public android.app.AlertDialog create() {//Building Alert Dialog
            final android.app.AlertDialog dialog = new android.app.AlertDialog(P.mContext, 0, false);//Create an AlertDialog object
            P.apply(dialog.mAlert);//Set the parameters in P to Alert Controller
            //Other settings
            return dialog;
        }
    }
}
//Dialog source code
public class Dialog implements DialogInterface, Window.Callback, KeyEvent.Callback, View.OnCreateContextMenuListener, Window.OnWindowDismissedCallback {
//Other code outlines
public void show() {
//The preceding code is outlined
if (!mCreated) {
dispatchOnCreate(null);//Distribution of onCreate
} else {
final Configuration config = mContext.getResources().getConfiguration();
mWindow.getDecorView().dispatchConfigurationChanged(config);
}
onStart();//Call onStart()
mDecor = mWindow.getDecorView();
//Setting Parametric Layout Parameters
mWindowManager.addView(mDecor, l);//Add to Windows Manager
mShowing = true;
sendShowMessage();
}
void dispatchOnCreate(Bundle savedInstanceState) {//Distribution of onCreate
if (!mCreated) {
onCreate(savedInstanceState);//Call the onCreate method of AlertDialog to create the AlertDialog view
mCreated = true;
}
}
}//Alert Controller source code
public class AlertController {
//Other code outlines
public void installContent() {//Installation contents
int contentView = selectContentView();//Choose the right layout
mWindow.setContentView(contentView);//Layout added to Window s
setupView();//Add the elements that need to be built in the dialog.mAlert object to Window s one by one, that is to say, building the layout we set takes place in this step.
}
}8.3 Simple process description:
- After setting various attributes (such as setTitle()) through AlertDialog.Builder, these attribute information will be stored in the P variable, the type of P variable is AlertController.AlertParams.
Calling builder.create() returns an AlertDialog object.
2.1 The builder. create () method first creates an AlertDialog object, which initializes Windows Manager and Windows when constructed.
2.2 After the AlertDialog object is created by builder. create (), P.apply(dialog.mAlert) is called; that is, the elements stored in the P variable to construct the AlertDialog object are set to dialog.mAlert, and the dialog.mAlert type is AlertController.Call the show() method of AlertDialog to show the interface.
3.1 The show () method calls dispatchOnCreate(null), dispatchOnCreate(null) calls onCreate(),onCreate() calls mAlert.installContent(); that is, install the contents of AlertDialog.
3.2 The mWindow.setContentView (mAlert Dialog Layout) is called in installContent (); that is, the mAlert Dialog Layout layout is added to Windows.
3.3 After calling mWindow.setContentView (mAlert DialogLayout), setupView() will be added to mWindows one by one.
3.4 is finally shown by adding view to mWindows Manager.
8.4 Summary:
- The builder pattern hides this complex build process, showing Alert Dialog in just a few lines of simple code.
- There are no abstract builders, directors and other roles in the builder of Alert Dialog. AlertDialog.Builder also plays the roles of Builder, ConcreteBuilder, Director and so on, which is a simplification of Android and worth learning and using.