Basic introduction and advanced series of articles on Android development are being released and shared with you. Interested partners can follow bloggers! Explore and learn Android technology together to help you fight on the road of programming!
catalogue
5, Set parameters for drop-down boxes and list boxes in the xml file
Hello, Hello, I'm grey ape, a program ape who can write bug s!
I've been studying in the direction of Android recently, so today I'm here to summarize the detailed use tutorials of radio boxes, check boxes, drop-down boxes and list boxes most often used in Android development,
After that, we will update more technologies related to the introduction of Android for you to learn, so you are welcome to pay attention to me and learn together!
1, RadioButton radio box
The use of radio button in radio box is based on RadioGroup. The reason is that we know that the selection of radio box is mutually exclusive, that is, only one option can be selected. So how to achieve the mutual exclusion of radio box options?
RadioGroup plays a role. The radio box option RadioButton in RadioGroup will automatically form mutual exclusion, so that you can select one of the options.
The isChecked() method is used to judge whether a radio box is selected. When the radio box is selected, it returns true, otherwise it returns false.
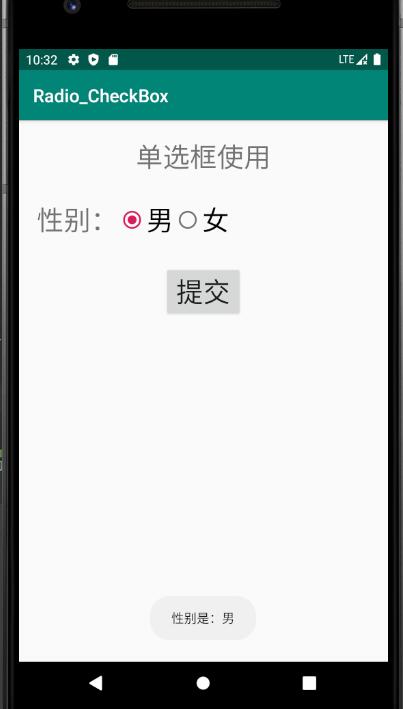
Next, we introduce the specific use of radio boxes through a practical case. After selecting gender and submitting through the button, the selected content can be obtained in the background and returned to the message box of the front-end interface to display the selected content.
Establish a radio box interface in the XML file to select gender. You can see where the radio button is placed
<?xml version="1.0" encoding="utf-8"?>
<androidx.constraintlayout.widget.ConstraintLayout xmlns:android="http://schemas.android.com/apk/res/android"
    xmlns:app="http://schemas.android.com/apk/res-auto"
    xmlns:tools="http://schemas.android.com/tools"
    android:layout_width="match_parent"
    android:layout_height="match_parent"
    tools:context=".MainActivity">

    <TextView
        android:id="@+id/title1"
        android:layout_width="wrap_content"
        android:layout_height="wrap_content"
        android:text="Radio box usage"
        android:textSize="30dp"
        app:layout_constraintTop_toTopOf="parent"
        app:layout_constraintLeft_toLeftOf="parent"
        app:layout_constraintRight_toRightOf="parent"
        android:layout_marginTop="20dp"
        />

    <TextView
        android:id="@+id/title_sex"
        android:layout_width="wrap_content"
        android:layout_height="wrap_content"
        android:text="Gender:"
        android:textSize="30dp"
        app:layout_constraintTop_toBottomOf="@id/title1"
        app:layout_constraintLeft_toLeftOf="parent"
        android:layout_marginLeft="20dp"
        android:layout_marginTop="30dp"

        />


    <RadioGroup
        android:layout_width="wrap_content"
        android:layout_height="wrap_content"
        app:layout_constraintLeft_toRightOf="@id/title_sex"
        app:layout_constraintBottom_toBottomOf="@id/title_sex"
        android:orientation="horizontal"
        android:layout_marginTop="30dp"

        >

        <RadioButton
            android:id="@+id/man"
            android:layout_width="wrap_content"
            android:layout_height="wrap_content"
            android:textSize="30dp"
            android:text="male"
            />


        <RadioButton
            android:id="@+id/woman"
            android:layout_width="wrap_content"
            android:layout_height="wrap_content"
            android:textSize="30dp"
            android:text="female"
            />


    </RadioGroup>

    <Button
        android:id="@+id/tijiao"
        android:layout_width="wrap_content"
        android:layout_height="wrap_content"
        android:text="Submit"
        android:textSize="30dp"
        android:layout_marginTop="30dp"
        app:layout_constraintLeft_toLeftOf="parent"
        app:layout_constraintRight_toRightOf="parent"
        app:layout_constraintTop_toBottomOf="@id/title_sex"
        ></Button>

</androidx.constraintlayout.widget.ConstraintLayout>
The idea of obtaining the selected content of the radio box is to set a parameter to receive the selected content, and then judge whether each radio box is selected. If it is selected, the content will be assigned to the parameter.
MainActivity. The code of java file is as follows:
package com.example.radio_checkbox;

import androidx.appcompat.app.AppCompatActivity;

import android.os.Bundle;
import android.view.View;
import android.widget.Button;
import android.widget.RadioButton;
import android.widget.Toast;

public class MainActivity extends AppCompatActivity {

    @Override
    protected void onCreate(Bundle savedInstanceState) {
        super.onCreate(savedInstanceState);
        setContentView(R.layout.activity_main);
        //Get the properties of three controls
        Button bt1 = findViewById(R.id.tijiao);
        final RadioButton men = findViewById(R.id.man);
        final RadioButton women = findViewById(R.id.woman);

        //Add event listener for submit button
        bt1.setOnClickListener(new View.OnClickListener() {
            @Override
            public void onClick(View v) {

                String sex = "";    //Define sex to receive radio box selections
                if (men.isChecked())sex="male";    //If you click male
                else if (women.isChecked()) sex="female";    //If you click on a female
                else sex="Not selected";     //If not clicked

                //Output the selection information in the prompt box
                Toast.makeText(MainActivity.this,"Gender is:" + sex,Toast.LENGTH_LONG).show();
            }
        });

    }
}
The effect of selecting and submitting is as follows:
2, CheckBox check box
We know that the options of the check box can be selected by more than one, so it is obvious that the options of the check box must not be mutually exclusive like the radio box. Therefore, the check box control does not need to be placed in a container, but can be set directly.
The isChecked() method is also used to judge whether a check box is selected. When the check box is selected, it returns true, otherwise it returns false.
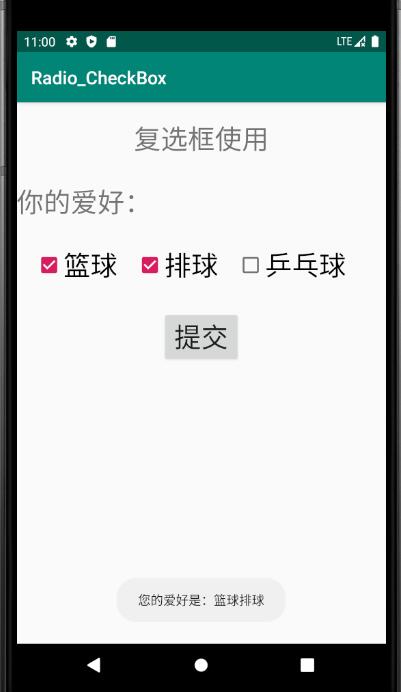
Next, we introduce the specific use of the check box through a practical case. After selecting a hobby and submitting it through the button, you can get multiple selected contents in the background and return to the front-end interface message box to display all selected contents.
Create a check box interface in the XML file to select hobbies. The code is as follows:
<?xml version="1.0" encoding="utf-8"?>
<androidx.constraintlayout.widget.ConstraintLayout xmlns:android="http://schemas.android.com/apk/res/android"
    xmlns:app="http://schemas.android.com/apk/res-auto"
    xmlns:tools="http://schemas.android.com/tools"
    android:layout_width="match_parent"
    android:layout_height="match_parent"
    tools:context=".MainActivity">

    <TextView
        android:id="@+id/title1"
        android:layout_width="wrap_content"
        android:layout_height="wrap_content"
        android:text="Check box usage"
        android:textSize="30dp"
        app:layout_constraintTop_toTopOf="parent"
        app:layout_constraintLeft_toLeftOf="parent"
        app:layout_constraintRight_toRightOf="parent"
        android:layout_marginTop="20dp"
        />


    <TextView
        android:id="@+id/title_aihao"
        android:layout_width="wrap_content"
        android:layout_height="wrap_content"
        android:text="Your hobbies:"
        android:textSize="30dp"
        app:layout_constraintTop_toBottomOf="@id/title1"
        app:layout_constraintLeft_toLeftOf="parent"

        android:layout_marginTop="30dp"
        />

    <CheckBox
        android:id="@+id/lanqiu"
        android:layout_width="wrap_content"
        android:layout_height="wrap_content"
        android:text="Basketball"
        android:textSize="30dp"
        app:layout_constraintTop_toBottomOf="@id/title_aihao"
        app:layout_constraintLeft_toLeftOf="parent"
        android:layout_marginLeft="20dp"
        android:layout_marginTop="30dp"
        />


    <CheckBox

        android:id="@+id/paiqiu"
        android:layout_width="wrap_content"
        android:layout_height="wrap_content"
        android:text="Volleyball"
        android:textSize="30dp"
        app:layout_constraintTop_toBottomOf="@id/title_aihao"
        app:layout_constraintLeft_toRightOf="@id/lanqiu"
        android:layout_marginLeft="20dp"
        android:layout_marginTop="30dp"
        />


    <CheckBox

        android:id="@+id/pingpangqiu"
        android:layout_width="wrap_content"
        android:layout_height="wrap_content"
        android:text="Table Tennis"
        android:textSize="30dp"
        app:layout_constraintTop_toBottomOf="@id/title_aihao"
        app:layout_constraintLeft_toRightOf="@id/paiqiu"
        android:layout_marginLeft="20dp"
        android:layout_marginTop="30dp"
        />

    <Button
        android:id="@+id/tijiao"
        android:layout_width="wrap_content"
        android:layout_height="wrap_content"
        android:text="Submit"
        android:textSize="30dp"
        android:layout_marginTop="30dp"
        app:layout_constraintLeft_toLeftOf="parent"
        app:layout_constraintRight_toRightOf="parent"
        app:layout_constraintTop_toBottomOf="@id/lanqiu"
        ></Button>

</androidx.constraintlayout.widget.ConstraintLayout>
The idea of obtaining the selected content of the check box is to set a parameter to receive the selected content, and then judge whether each check box is selected. If it is selected, the content will be added to the parameter. Finally, after all the check boxes are judged, the text of all the selected items will be stored in the parameter.
MainActivity. The code of java file is as follows:
package com.example.radio_checkbox;

import androidx.appcompat.app.AppCompatActivity;

import android.os.Bundle;
import android.view.View;
import android.widget.Button;
import android.widget.CheckBox;
import android.widget.RadioButton;
import android.widget.Toast;

public class MainActivity extends AppCompatActivity {

    @Override
    protected void onCreate(Bundle savedInstanceState) {
        super.onCreate(savedInstanceState);
        setContentView(R.layout.activity_main);
        //Get the properties of the four controls
        Button bt1 = findViewById(R.id.tijiao);
        final CheckBox laiqiu = findViewById(R.id.lanqiu);
        final CheckBox paiqiu = findViewById(R.id.paiqiu);
        final CheckBox pingpangqiu = findViewById(R.id.pingpangqiu);

        //Add event listener for submit button
        bt1.setOnClickListener(new View.OnClickListener() {
            @Override
            public void onClick(View v) {

                String info = "";    //Define sex to receive radio box selections
                if (laiqiu.isChecked()) info += "Basketball";    //If you click basketball
                if (paiqiu.isChecked()) info += "Volleyball";    //If you click volleyball
                if (pingpangqiu.isChecked()) info += "Table Tennis"; //If you click table tennis

                //Output the selection information in the prompt box
                Toast.makeText(MainActivity.this,"Your hobbies are:" + info,Toast.LENGTH_LONG).show();
            }
        });

    }
}
The effect of selecting and submitting is as follows:
3, Spinner drop-down box
The use of the Spinner drop-down box requires the establishment of a Spinner control, so there must be a little partner asking how to add the options in Spinner. Don't worry! Different from the method of adding text to the drop-down box in html, the selected text of the Spinner drop-down box is not written in the Spinner control, but separately written in the array or an xml file. Here, I will first introduce the method of using the array to store the text content of the Spinner drop-down box, and the method of xml storage will be introduced later.
The first is to generate a Spinner drop-down box control in the xml interface.
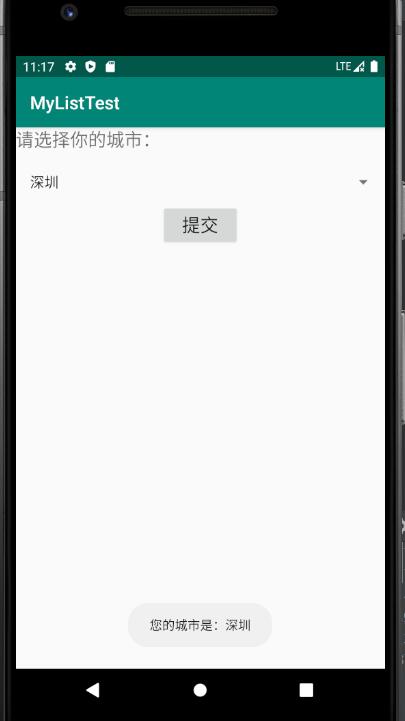
The same effect we want to achieve is to select the displayed City, and then submit it through the button. After that, we can get the selected content in the background and return to the message box of the front-end interface to display the selected content.
The xml interface code is as follows:
<?xml version="1.0" encoding="utf-8"?>
<androidx.constraintlayout.widget.ConstraintLayout xmlns:android="http://schemas.android.com/apk/res/android"
    xmlns:app="http://schemas.android.com/apk/res-auto"
    xmlns:tools="http://schemas.android.com/tools"
    android:layout_width="match_parent"
    android:layout_height="match_parent"
    tools:context=".MainActivity">


    <TextView
        android:id="@+id/text1"
        android:layout_width="wrap_content"
        android:layout_height="wrap_content"
        android:text="Please select your city:"
        android:textSize="20dp"
        ></TextView>


    <Spinner
        android:id="@+id/sp1"
        android:layout_width="match_parent"
        android:layout_height="wrap_content"
        app:layout_constraintTop_toBottomOf="@id/text1"
        android:layout_marginTop="10dp"
        ></Spinner>

    <Button
        android:id="@+id/tijiao"
        android:layout_width="wrap_content"
        android:layout_height="wrap_content"
        android:text="Submit"
        android:textSize="20dp"
        app:layout_constraintTop_toBottomOf="@id/sp1"
        app:layout_constraintLeft_toLeftOf="parent"
        app:layout_constraintRight_toRightOf="parent"
        ></Button>


</androidx.constraintlayout.widget.ConstraintLayout>
The method to set the contents of the Spinner drop-down box using the array is as follows:
-
Create a string array to store each option,
-
Add the array to the ArrayAdapter container. The function of the ArrayAdapter is to store the array elements
-
Use Spinner's setAdapter() method to add ArrayAdapter to the drop-down box to complete the addition of elements
The idea of getting the selected content of the drop-down box is to set a parameter to receive the selected content and use Spinner's getselecteditem() The toString () method obtains the selected content and assigns it to the parameter.
MainActivity. The code of java file is as follows:
package com.example.mylisttest;

import androidx.appcompat.app.AppCompatActivity;

import android.os.Bundle;
import android.view.View;
import android.widget.AdapterView;
import android.widget.ArrayAdapter;
import android.widget.Button;
import android.widget.ListView;
import android.widget.Spinner;
import android.widget.Toast;

import java.util.List;

public class MainActivity extends AppCompatActivity {

    String [] data = {"Zhengzhou","Shenzhen","Beijing"};    //List box options

    @Override
    protected void onCreate(Bundle savedInstanceState) {
        super.onCreate(savedInstanceState);
        setContentView(R.layout.activity_main);
//Add options to specific containers
        ArrayAdapter arrayAdapter = new ArrayAdapter(MainActivity.this,android.R.layout.simple_list_item_1,data);


        //Gets the properties of the control
        Button bt1 = findViewById(R.id.tijiao);
        final Spinner sp1 = (Spinner)findViewById(R.id.sp1);

        //Add options to the drop-down box
        sp1.setAdapter(arrayAdapter);

        //Add event listener for submit button
        bt1.setOnClickListener(new View.OnClickListener() {
            @Override
            public void onClick(View v) {
                String info = "";
                info = sp1.getSelectedItem().toString();

                //Output the selection information in the prompt box
                Toast.makeText(MainActivity.this,"Your city is:" + info,Toast.LENGTH_LONG).show();
            }
        });


    }
}
The effect of selecting and submitting is as follows:
4, ListView listbox
The use and setting of the ListView list box is similar to that of the Spinner drop-down box. Their selection parameters are set outside the control. Similarly, the selection parameters of the ListView list box are written separately in an array or an xml file. The difference is that the ListView list box can only be clicked and cannot be selected, so we need to set the listening function for the ListView list box separately.
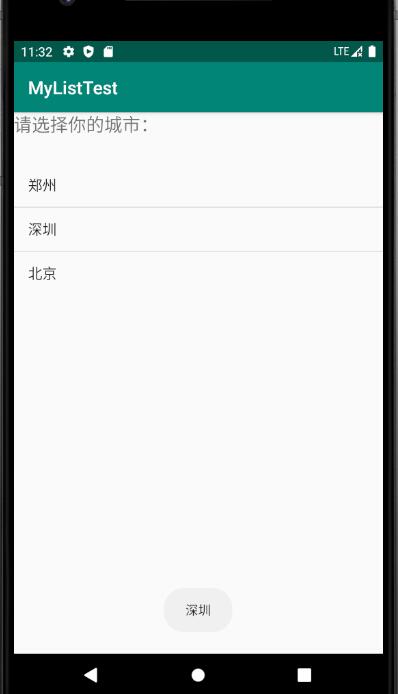
We set the ListView list box and display the content in the interface message box when the user clicks an option in the list box.
First, implement the ListView list box in the xml interface:
<?xml version="1.0" encoding="utf-8"?>
<androidx.constraintlayout.widget.ConstraintLayout xmlns:android="http://schemas.android.com/apk/res/android"
    xmlns:app="http://schemas.android.com/apk/res-auto"
    xmlns:tools="http://schemas.android.com/tools"
    android:layout_width="match_parent"
    android:layout_height="match_parent"
    tools:context=".MainActivity">


    <TextView
        android:id="@+id/text1"
        android:layout_width="wrap_content"
        android:layout_height="wrap_content"
        android:text="Please select your city:"
        android:textSize="20dp"
        ></TextView>

   <ListView
       android:id="@+id/lv1"
       android:layout_width="match_parent"
       android:layout_height="wrap_content"
       app:layout_constraintTop_toBottomOf="@id/text1"
       android:layout_marginTop="30dp"
       ></ListView>


</androidx.constraintlayout.widget.ConstraintLayout>
Listen to the ListView list box: set the setonitemclicklisten() listening method for the ListView list box and use the parent Getitematposition (position) method to get the clicked list box. And get the text.
MainActivity. The code of java file is as follows:
package com.example.mylisttest;

import androidx.appcompat.app.AppCompatActivity;

import android.os.Bundle;
import android.view.View;
import android.widget.AdapterView;
import android.widget.ArrayAdapter;
import android.widget.Button;
import android.widget.ListView;
import android.widget.Spinner;
import android.widget.Toast;

import java.util.List;

public class MainActivity extends AppCompatActivity {

    String [] data = {"Zhengzhou","Shenzhen","Beijing"};

    @Override
    protected void onCreate(Bundle savedInstanceState) {
        super.onCreate(savedInstanceState);
        setContentView(R.layout.activity_main);
        ArrayAdapter arrayAdapter = new ArrayAdapter(MainActivity.this,android.R.layout.simple_list_item_1,data);

        //Get the properties of the list box
        ListView lv1 = (ListView)findViewById(R.id.lv1);
        lv1.setAdapter(arrayAdapter);   //Add the information stored in the array to the list box

//        Add listening events to the list box
        lv1.setOnItemClickListener(new AdapterView.OnItemClickListener() {
            @Override
            public void onItemClick(AdapterView<?> parent, View view, int position, long id) {
                //Get the content clicked in the list box
                String strInfo = parent.getItemAtPosition(position).toString().trim();
                //Output content in message box
                Toast.makeText(MainActivity.this,strInfo,Toast.LENGTH_LONG).show();
            }
        });


    }
}
The effect of selecting and submitting is as follows:
5, Set parameters for drop-down boxes and list boxes in the xml file
In the above methods, we have introduced how to use arrays to set parameters for drop-down boxes and list boxes. Similarly, we also mentioned how to use xml files to set parameters for drop-down boxes and list boxes. Now let's talk about how to set parameters for drop-down boxes and list boxes in xml files. This method is also a frequently used parameter setting method later,
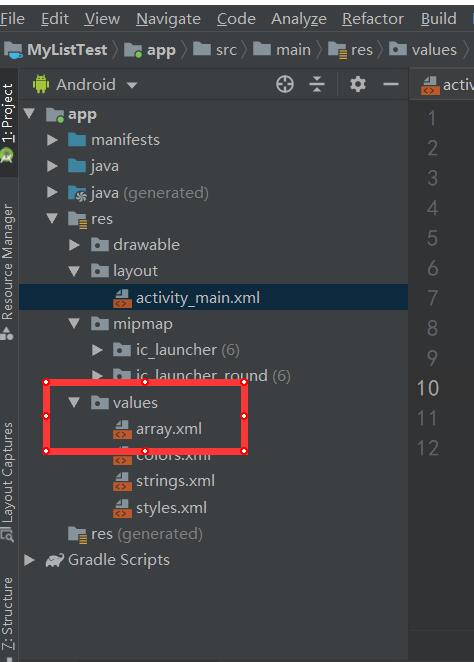
Let's take the following pull box as an example to set. The list box method is the same. The advantage of using this method to set parameters is that it eliminates the tedious task of adding array elements to the ArrayAdapter container, and it is convenient to add options in the XML file later. First, we should create an XML file under the res - > values file in the project, which I named array xml,
Then write our selected parameters to be set in the xml file as follows:
<?xml version="1.0" encoding="utf-8"?>
<resources>
<string-array name="array2">
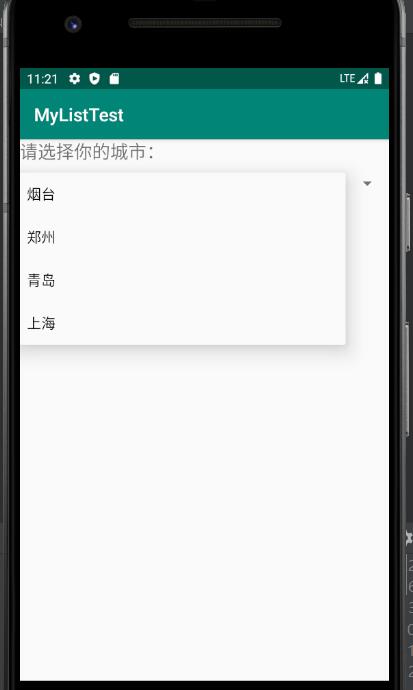
<item>Yantai</item>
<item>Zhengzhou</item>
<item>Qingdao</item>
<item>Shanghai</item>
</string-array>
</resources>After adding, directly find the code for setting the drop-down box in the xml interface file of the drop-down box, and add the android:entries attribute. The interface code is as follows:
<?xml version="1.0" encoding="utf-8"?>
<androidx.constraintlayout.widget.ConstraintLayout xmlns:android="http://schemas.android.com/apk/res/android"
    xmlns:app="http://schemas.android.com/apk/res-auto"
    xmlns:tools="http://schemas.android.com/tools"
    android:layout_width="match_parent"
    android:layout_height="match_parent"
    tools:context=".MainActivity">


    <TextView
        android:id="@+id/text1"
        android:layout_width="wrap_content"
        android:layout_height="wrap_content"
        android:text="Please select your city:"
        android:textSize="20dp"
        ></TextView>


    <Spinner
        android:id="@+id/sp1"
        android:layout_width="match_parent"
        android:layout_height="wrap_content"
        app:layout_constraintTop_toBottomOf="@id/text1"
        android:layout_marginTop="10dp"
        android:entries="@array/array2"
        ></Spinner>

    <Button
        android:id="@+id/tijiao"
        android:layout_width="wrap_content"
        android:layout_height="wrap_content"
        android:text="Submit"
        android:textSize="20dp"
        app:layout_constraintTop_toBottomOf="@id/sp1"
        app:layout_constraintLeft_toLeftOf="parent"
        app:layout_constraintRight_toRightOf="parent"
        ></Button>

</androidx.constraintlayout.widget.ConstraintLayout>
So in mainactivity Java file, you do not need to set the array and the corresponding container properties, you can directly use listening.
MainActivity. The code of java file is as follows:
package com.example.mylisttest;

import androidx.appcompat.app.AppCompatActivity;

import android.os.Bundle;
import android.view.View;
import android.widget.AdapterView;
import android.widget.ArrayAdapter;
import android.widget.Button;
import android.widget.ListView;
import android.widget.Spinner;
import android.widget.Toast;

import java.util.List;

public class MainActivity extends AppCompatActivity {


    @Override
    protected void onCreate(Bundle savedInstanceState) {
        super.onCreate(savedInstanceState);
        setContentView(R.layout.activity_main);

        //Gets the properties of the control
        Button bt1 = findViewById(R.id.tijiao);
        final Spinner sp1 = (Spinner)findViewById(R.id.sp1);

        //Add event listener for submit button
        bt1.setOnClickListener(new View.OnClickListener() {
            @Override
            public void onClick(View v) {
                String info = "";
                info = sp1.getSelectedItem().toString();

                //Output the selection information in the prompt box
                Toast.makeText(MainActivity.this,"Your city is:" + info,Toast.LENGTH_LONG).show();
            }
        });

    }
}
The effect is as follows:
This is the end of the introduction to the use of radio boxes, check boxes, drop-down boxes and list boxes in android. If there are deficiencies, you are welcome to comment and point out!
After that, I will continue to share more Android introduction and advanced technology with you. Interested partners can follow me and learn together!
If you think it's useful, remember to praise the collection and pay more attention!
The grey ape will make progress with you!