- **android:divider="#f00" * * color of split line
- android:dividerHeight = "2dp" the height of the splitter bar
- **android:cacheColorHint="#0fff" * * when the background image is used in the list, there will be a problem in the drop-down or pull-up: the background image is missing
- android:scrollingCache = "false" when the list uses the background image, there will be a problem in the drop-down or pull-up: black blocks appear
- **android:fadingEdge = "none" * * when you find the drop-down, shadows appear on the upper and lower edges
- android:listSelector="#0000" remove the background when clicking ltem
So how should it be used in actual development?
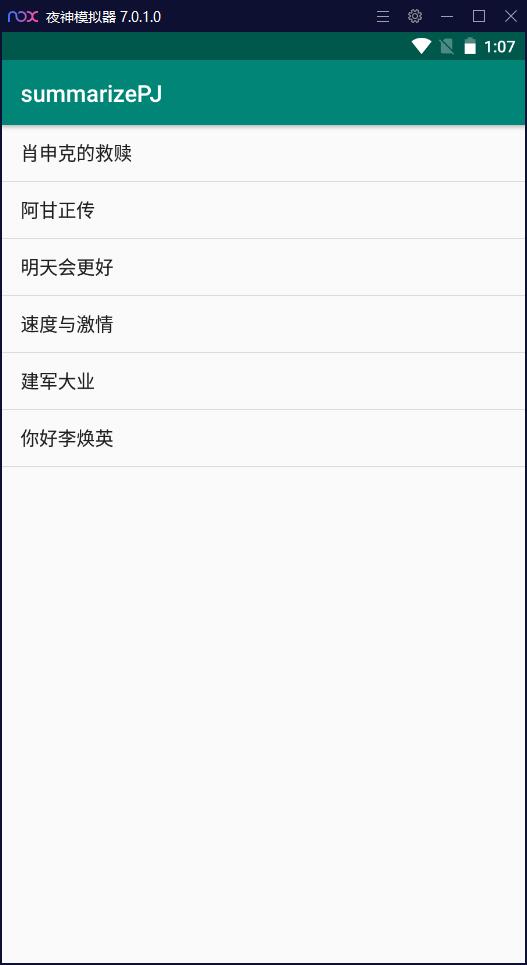
1) First, create a new project in activity_ main. Add listview control to the XML file, as shown below:
Set the width and height of the control to match_ The parent occupies the whole space
<?xml version="1.0" encoding="utf-8"?>

<androidx.constraintlayout.widget.ConstraintLayout xmlns:android="http://schemas.android.com/apk/res/android"

    xmlns:app="http://schemas.android.com/apk/res-auto"

    xmlns:tools="http://schemas.android.com/tools"

    android:layout_width="match_parent"

    android:layout_height="match_parent"

    tools:context=".moveice_view">


    <ListView

        android:id="@+id/moveiceList"

        android:layout_width="match_parent"

        android:layout_height="match_parent"

        tools:ignore="MissingConstraints">


    </ListView>

</androidx.constraintlayout.widget.ConstraintLayout>
2) Configure MainActivity code
The use of listview is to create a character array to store the contents of each line to be displayed. However, the parameters set in listview are of type Adapter. Obviously, string array cannot be directly passed in as parameters. Therefore, we need to use an ArrayAdapter class as a bridge to convert string array,
It may be a little logical and not easy to understand. Look directly at the following code:
package com.example.summarizepj;


import androidx.appcompat.app.AppCompatActivity;


import android.os.Bundle;

import android.view.View;

import android.widget.AdapterView;

import android.widget.ArrayAdapter;

import android.widget.ListView;

import android.widget.Toast;


public class moveice_view extends AppCompatActivity {


    ListView moveiceList;

    String [] moveice_arr = {"The Shawshank Redemption","Forrest Gump","Tomorrow will be better","Fast & Furious","Great cause of army building","Hello, Li Huanying"};

    @Override

    protected void onCreate(Bundle savedInstanceState) {

        super.onCreate(savedInstanceState);

        setContentView(R.layout.activity_moveice_view);


        moveiceList = findViewById(R.id.moveiceList);

        ArrayAdapter<String> adapter = new ArrayAdapter<String>(moveice_view.this,android.R.layout.simple_list_item_1,moveice_arr);

        moveiceList.setAdapter(adapter);


    }

}
Now let's explain the ArrayAdapter,
Here I use a TextView layout file included in the system: Android R.layout. simple_ expandable_ list_ item_ 1. It is convenient to call this. It has the following five parameters
-
android.R.layout.simple_list_item_1 one line text
-
android.R.layout.simple_list_item_2 one line title, one line text
-
android.R.layout.simple_list_item_single_choice radio button
-
android.R.layout.simple_list_item_multiple_choice multi selection button
-
android.R.layout.simple_list_item_checked checkbox
ArrayAdapter adapter = new ArrayAdapter( MainActivity.this, android.R.layout.simple_list_item_1, data); The code for creating an array adapter has three parameters. The first parameter is the context, which is the current Activity. The second parameter is a built-in layout in android sdk, which has only one TextView. This parameter indicates that the layout of each piece of data in our array is this view, That is to display every piece of data on this view; The third parameter is the data we want to display. listView will traverse each piece of data in data according to these three parameters, read out one and display it in the layout corresponding to the second parameter, thus forming the listView we see
After running the above code, you can get the following effect picture:
3, ListView click response event
====================
However, the above code does not respond when clicking the corresponding button. As we usually see on the app, there is an event triggered after clicking. Then we will add an event response to the listview control,
It should be noted here that the event listener added to the listview control is different from the usual method used to add listener to the button control. The setOnItemClickListener method is used here. The specific usage is as follows:
package com.example.summarizepj; import androidx.appcompat.app.AppCompatActivity; import android.os.Bundle; import android.view.View; import android.widget.AdapterView; import android.widget.ArrayAdapter; import android.widget.ListView; import android.widget.Toast; # Docker practice step by step **Catalog document:**   **①Docker brief introduction** **②Basic concepts** **③install Docker**  **④Use mirroring:**  **⑤Operation container:**  **⑥Access warehouse:**  **⑦Data management:**  **⑧Use network:**  **⑨Advanced network configuration:**  **⑩Safety:**  **⑪Underlying implementation:**  **⑫Other items:**  Chain picture transfer...(img-jY0RTdrZ-1628595992228)] **⑨Advanced network configuration:** [External chain picture transfer...(img-dLnjQ5Vp-1628595992229)] **⑩Safety:** [External chain picture transfer...(img-rFTgvWfU-1628595992229)] **⑪Underlying implementation:** [External chain picture transfer...(img-hQmUPaKV-1628595992230)] **⑫Other items:** [External chain picture transfer...(img-Gu2mNt0H-1628595992231)] **There is a need for a full version of the source code+Notes of friends[Click here for free](https://gitee.com/vip204888/java-p7)**