Then, the above implementation gradually expands several functions.
For example, you can view the address book and dial directly by clicking the contact entry.
In fact, functions are often accompanied by the mastery and use of components. When you master the use of all components, you can probably play flowers as you like.
The main technology involved in getting the address book and displaying it is the use of the ListView component (this function can also be completed after learning RecyclerView, and it seems to be more commonly used, but at present, it's easier to learn and use it temporarily).
You can understand what you're doing after reading the last article. The last article through train: Android Development -- implementing a dialer (I)_ Biangbangbing's blog - CSDN blog
Function description
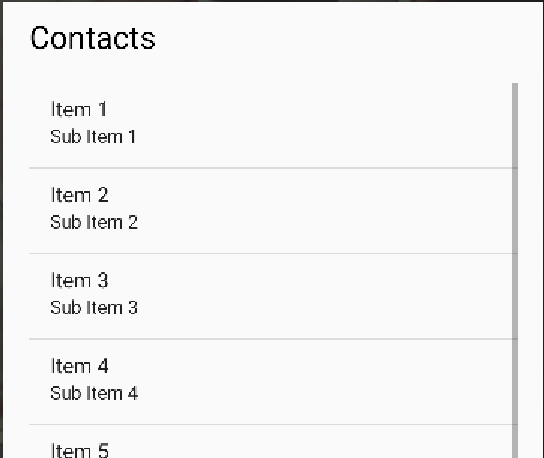
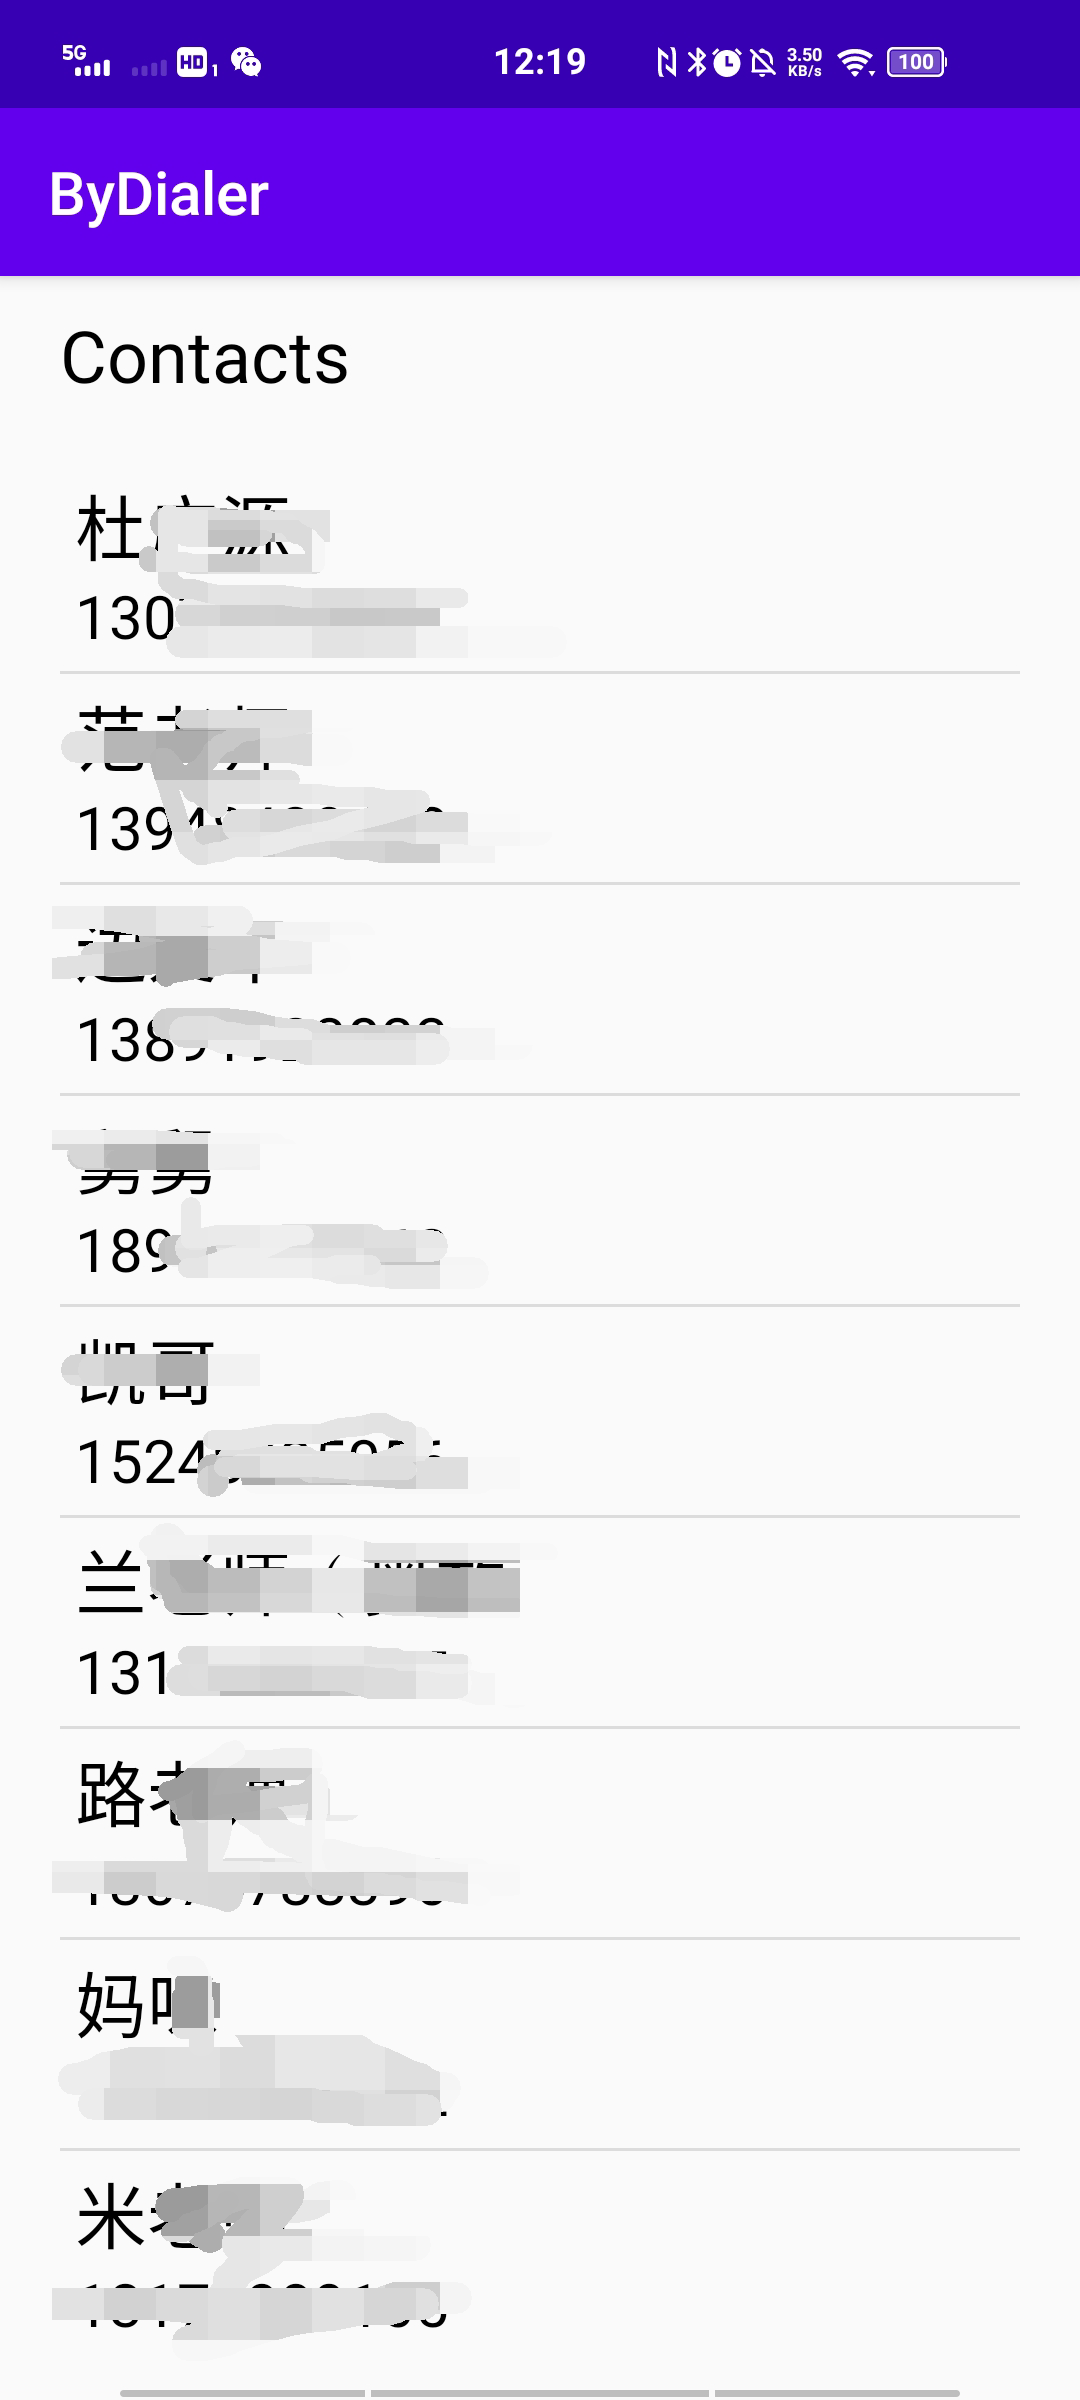
Click the contact button on the main page to jump to the address book page.
The address book page displays several contact entries. The contents of one entry include: contact name and telephone number (other contents can be designed and added by yourself).
engineering structure
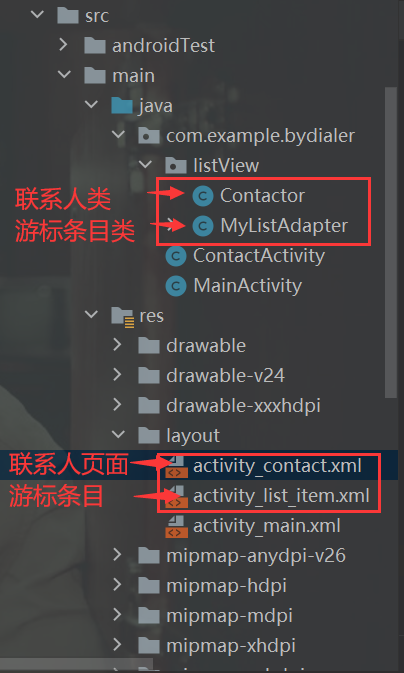
Add a contact page and a corresponding activity class; In addition, an item layout design and cursor class should be added to contact human beings.
Design & Coding
1. At the beginning, remember to design the main page, click the contact button and jump to the address book page.

2. Let's look at the layout design activity of the address book page_ contact. xml
- First, the overall layout is designed as linear layout. Set width, height, and vertical layout.
- The linear layout contains a text title - TextView, setting id, width, height, text, text size, text color, left and right margins, etc. (Note: padding is the inner margin and margin is the outer margin)
- Under the text box, the second component in the linear layout is ListView, which stores contact entries. Design id, width, height, margin, etc.
<?xml version="1.0" encoding="utf-8"?>
<LinearLayout xmlns:android="http://schemas.android.com/apk/res/android"
    android:layout_width="match_parent"
    android:layout_height="match_parent"
    android:orientation="vertical"
    android:padding="10dp">
    <TextView
        android:id="@+id/tv_1"
        android:layout_width="match_parent"
        android:layout_height="wrap_content"
        android:text="Contacts"
        android:textSize="24sp"
        android:layout_marginLeft="10dp"
        android:layout_marginBottom="10dp"
        android:textColor="@color/black">
    </TextView>
    <ListView
        android:id="@+id/lv"
        android:layout_width="match_parent"
        android:layout_height="wrap_content"
        android:padding="10dp"
        >

    </ListView>

</LinearLayout>
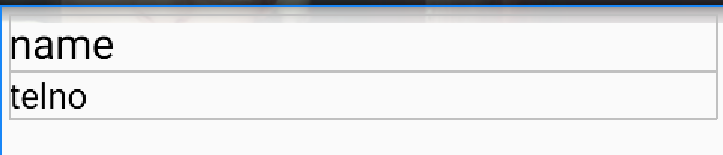
3. See what a ListView entry should look like. activity_list_item.xml (there is no corresponding activity designed to counter attack, which needs to be established manually under the layout file)
- It is a linear layout, and the design content is also id, width, height, margin, and vertical / horizontal distribution. (I chose vertical)
- Then the linear layout of the internal two text boxes textview, one for the name and one for the contact information. Their text tag is filled in casually first, and will be overwritten by the actual data taken out at that time.
<?xml version="1.0" encoding="utf-8"?>
<LinearLayout xmlns:android="http://schemas.android.com/apk/res/android"
    android:layout_width="match_parent"
    android:layout_height="match_parent"
    android:orientation="vertical"
    android:padding="5dp">
    <TextView
        android:id="@+id/name"
        android:layout_width="match_parent"
        android:layout_height="wrap_content"
        android:text="name"
        android:textSize="24sp"
        android:textColor="@color/black"></TextView>
    <TextView
        android:id="@+id/telno"
        android:layout_width="match_parent"
        android:layout_height="wrap_content"
        android:text="telno"
        android:textSize="20sp"
        android:textColor="@color/black"></TextView>

</LinearLayout>
4. Next, let's look at how to design the activity class - how to get the actual address book information and fill the data into each entry of listview.
- Contactor.java} contact (class / structure)
- Properties include name and phone number, both of which are strings.
- set and get methods containing constructors and two properties respectively.
package com.example.bydialer.listView;

public class Contactor {
    private String name;
    private String telno;

    public Contactor(String name, String telno) {
        this.name = name;
        this.telno = telno;
    }

    public void setName(String name) {
        this.name = name;
    }

    public void setTelno(String telno) {
        this.telno = telno;
    }

    public String getName() {
        return name;
    }

    public String getTelno() {
        return telno;
    }
}
- MyListAdapter.java is a class that controls the display of listview
- Design the data list passed in
- Number of entries in list
- How to display a piece of data in an item of the list
The video of this place is not explained very clearly. There is a blog article written very clearly: hang a big man's article - > BaseAdapter tutorial and method explanation - brief book
package com.example.bydialer.listView;

import android.annotation.SuppressLint;
import android.content.ContentResolver;
import android.content.Context;
import android.database.Cursor;
import android.net.Uri;
import android.util.Log;
import android.view.LayoutInflater;
import android.view.View;
import android.view.ViewGroup;
import android.widget.BaseAdapter;
import android.widget.ImageView;
import android.widget.TextView;

import com.example.bydialer.R;

import java.util.ArrayList;

public class MyListAdapter extends BaseAdapter {
    private Context context;
    private LayoutInflater layoutInflater;
    private ContentResolver contentResolver;
    private ArrayList<Contactor> list;


    public MyListAdapter(Context context,ArrayList<Contactor> list){
        this.context = context;
        this.layoutInflater = LayoutInflater.from(context);
        this.list = list;
    }


    @Override
    public int getCount() {
        return list.size();
    }

    @Override
    public Object getItem(int position) {
        return null;
    }

    @Override
    public long getItemId(int position) {
        return 0;
    }

    static class ViewHolder{
        public TextView name,telno;
    }

    @Override
    public View getView(int position, View convertView, ViewGroup parent) {
        ViewHolder holder = null;
        if(convertView == null){
            convertView = this.layoutInflater.inflate(R.layout.activity_list_item,null);
            holder = new ViewHolder();
            holder.name = (TextView) convertView.findViewById(R.id.name);
            holder.telno = (TextView) convertView.findViewById(R.id.telno);
            convertView.setTag(holder);
        }
        else{
            holder = (ViewHolder) convertView.getTag();
        }
        //Assign a value to the control
        holder.name.setText(list.get(position).getName());
        holder.telno.setText(list.get(position).getTelno());
        return convertView;
    }
}
- ContactActivity.java contact page, which is responsible for obtaining contact data and transmitting it to MyListAdapter
- Design and store the contact list of all contacts ArrayList < contact > list and content visitor contentrestolover
- Get the content visitor through getContentResolver method, get the entry cursor through the content visitor, traverse the cursor, get the contact name and phone number, and store them in ArrayList < contact > list.
- Design the Adapter manager of listview and pass in the contact information list just obtained.
- Design the method to call the target contact after clicking the list item, obtain the phone number of the item and dial this number.
package com.example.bydialer;

import androidx.appcompat.app.AppCompatActivity;

import android.annotation.SuppressLint;
import android.content.ContentResolver;
import android.content.Intent;
import android.database.Cursor;
import android.net.Uri;
import android.os.Bundle;
import android.util.Log;
import android.view.View;
import android.widget.AdapterView;
import android.widget.ListView;
import android.widget.TextView;
import android.widget.Toast;

import com.example.bydialer.listView.Contactor;
import com.example.bydialer.listView.MyListAdapter;

import java.util.ArrayList;

public class ContactActivity extends AppCompatActivity {

    private ContentResolver contentResolver;
    private ArrayList<Contactor> list = new ArrayList<>();
    private ListView mlv;

    @Override
    protected void onCreate(Bundle savedInstanceState) {
        super.onCreate(savedInstanceState);
        setContentView(R.layout.activity_contact);
        mlv = findViewById(R.id.lv);
        //Get content visitors
        this.contentResolver = getContentResolver();
        //Get the names of all the contacts
        Uri uri=Uri.parse("content://com.android.contacts/raw_contacts");
        Cursor cursor=contentResolver.query(uri,null,null,null,null);
        while(cursor.moveToNext()){
            @SuppressLint("Range") String _id=cursor.getString(cursor.getColumnIndex("_id"));  //Get id
            @SuppressLint("Range") String display_name=cursor.getString(cursor.getColumnIndex("display_name"));  //Get your name
            Log.i("test",""+_id+"\t\t\t"+display_name);
            Uri  uriData=Uri.parse("content://com.android.contacts/raw_contacts/"+_id+"/data "); / / get all the information of this object according to the ID
            Cursor contactsInfo=contentResolver.query(uriData,null,null,null,null);
            while (contactsInfo.moveToNext()){
                @SuppressLint("Range") String mimetype=contactsInfo.getString(contactsInfo.getColumnIndex("mimetype"));
                @SuppressLint("Range") String data1=contactsInfo.getString(contactsInfo.getColumnIndex("data1"));
                if("vnd.android.cursor.item/phone_v2".equals(mimetype)){
                    list.add(new Contactor(display_name,data1));
                    Log.i("test",""+mimetype+"\t\t\t"+data1);
                }
            }
        }
        mlv.setAdapter(new MyListAdapter(ContactActivity.this,this.list));
        mlv.setOnItemClickListener( new AdapterView.OnItemClickListener(){
            @Override
            public void onItemClick(AdapterView<?> parent, View view, int position, long id) {
                TextView tv = (TextView) findViewById(R.id.telno);
                String str = tv.getText().toString();
                System.out.println("str:"+str);
                if ((str !=null) && (!str.trim().equals(""))){
                    Intent intent = new Intent(Intent.ACTION_CALL, Uri.parse("tel:"+str));
                    startActivity(intent);
                }
            }
        });
    }

}
In this way, the basic functions are designed and tested
Test verification
Small tips & problem to be solved
- Is too laggy to get the contact information in MyListAdapter, and then it gets a lot of time. It will take a long time to display the information. The execution time is once, it should be in the wrong order, and it will get the information visitor through listview. It is more reasonable to get the information and directly traverse the list with the cursor.
- A bug is that when I click the contact to make a call, I will find that the clicked person is inconsistent with the number finally dialed. I feel that there is a problem with the relative position of the cursor. The item number obtained after detecting the clicked item is consistent with the number finally dialed on the operation console.
= > then I found my problem. I didn't add view when I went to the phone number, It is a direct findViewById. The one found in this way should be random. view.findViewById is the TextView item that finds the phone number from the view of the currently clicked item in the list. After modification, you can accurately call the clicked item.
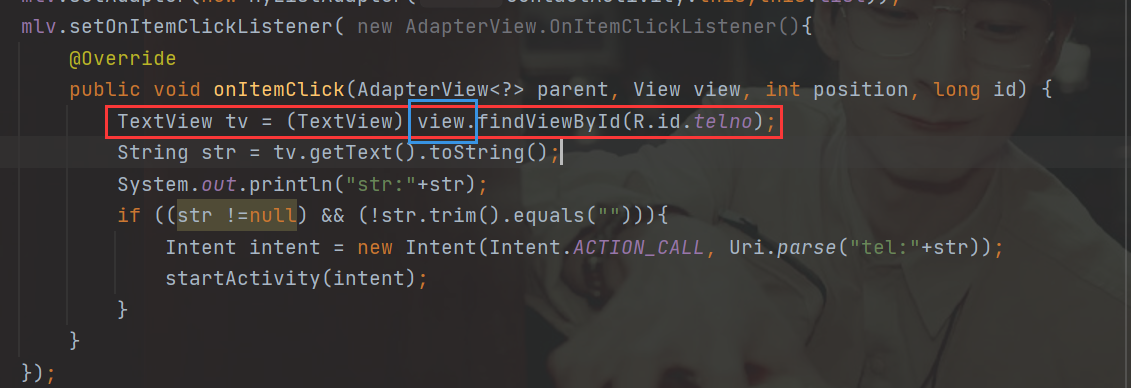
ps: contactactivity. ps is modified in the picture Java} click the item to dial the method. It hasn't been modified when it is given at the top.
The link of the last article has not been changed.
Project links also hung last time: GitHub - Biangbangbing/ByDial
Other functions need to learn more components and stack buff s. Welcome to make suggestions!