This note is used to record common Toolbar settings, such as Toolbar color settings, display the return button, and display three buttons on the right.
Before Android used ActionBar and Android5.0, Toolbar recommended ActionBar instead of ActionBar.
Recently, I started to use kotlin slowly. The code posted may be kotlin's code. Excuse me, if you have Java foundation, it's quite easy to use. You can refer to my kotlin learning notes.
1. Replace ActionBar with Toolbar
We first set the theme to NoActionBar, and then add ToolBar to the layout xml file
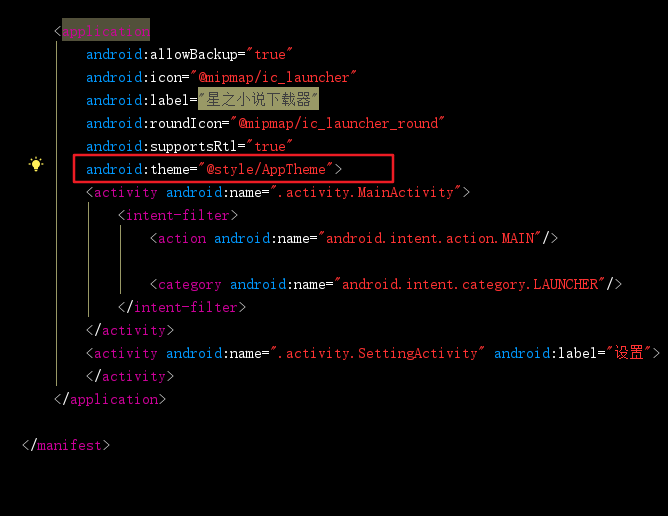
Enter Theme from the Android Manifest file and modify Theme
<!-- Base application theme. -->
<style name="AppTheme" parent="Theme.AppCompat.Light.NoActionBar">
    <!-- Customize your theme here. -->
    <item name="colorPrimary">@color/colorPrimary</item>
    <item name="colorPrimaryDark">@color/colorPrimaryDark</item>
    <item name="colorAccent">@color/colorAccent</item>
</style>
Layout xml files, add Toolbar
<?xml version="1.0" encoding="utf-8"?>
<android.support.constraint.ConstraintLayout
    xmlns:android="http://schemas.android.com/apk/res/android"
    xmlns:app="http://schemas.android.com/apk/res-auto"
    xmlns:tools="http://schemas.android.com/tools"
    android:layout_width="match_parent"
    android:fitsSystemWindows="true"
    android:layout_height="match_parent"
    tools:context="com.wan.noveldownloader.activity.MainActivity">
    <android.support.v7.widget.Toolbar
        android:id="@+id/toolbar"
        app:titleTextColor="@color/white"
        android:background="@color/colorPrimary"
        android:layout_width="match_parent"
        android:layout_height="wrap_content"/>
</android.support.constraint.ConstraintLayout>
Then, in the Activity code, use the setSupportToolbar to set the toolbar in
setContentView(R.layout.activity_main);
//findviewbyid finds the toolbar instance
setSupportToolbar(toolbar);
After that, you can see the result.
2. Modify the title text
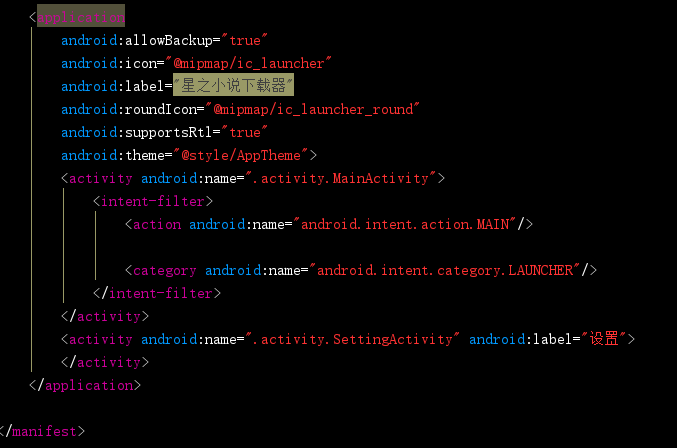
The default text displayed by Toolbar is actually the label of your current APP project. We can modify the label attribute of Activity in Android Manifest file to achieve the effect of modifying the text.

In the figure above, my APP has two Activities, in which toolbar in Main Activity does not define the label attribute, so the default label attribute is equal to the project name, all of which show the Star Novel Downloader.
The other SettingActivity has the label attribute, and all the text displayed is "Settings".
PS: If you do not want to display text, it is implemented by getSupportActionBar().setDisplayShowTitleEnabled(false) (after the setSupportToolbar method)
3. Modify the color
Modify background color
Modifying background color achieves effect by modifying toolbar's backgroundattribute
<android.support.v7.widget.Toolbar
    android:id="@+id/toolbar"
    android:background="@color/colorPrimary"
    android:layout_height="wrap_content"/>
Modify the heading text color
To modify the title TextColor attribute, you need to introduce the app namespace
<android.support.v7.widget.Toolbar
    android:id="@+id/toolbar"
    app:titleTextColor="@color/white"
    android:layout_width="match_parent"
    android:layout_height="wrap_content"/>
4. Display the left return button
Display the return button on the left by code
setSupportActionBar(toolbar)
getSupportActionBar().setHomeButtonEnabled(true)
getSupportActionBar().setDisplayHomeAsUpEnabled(true)
In Activity, you also need to rewrite the onOptions ItemSelected method and click the return button to achieve the return effect.
override fun onOptionsItemSelected(item: MenuItem?): Boolean {
    if(item.itemId == android.R.id.home){
        finish()
    }
    return super.onOptionsItemSelected(item)
}
5. Menu Button Displaying Toolbar
1. Create menu.xml
Create a menu folder in the res directory, and then create a menu.xml in the menu folder
<?xml version="1.0" encoding="utf-8"?>
<menu xmlns:android="http://schemas.android.com/apk/res/android"
      xmlns:app="http://schemas.android.com/apk/res-auto">
    <item android:title="Set up" android:id="@+id/menu_setting" app:showAsAction="always" android:icon="@drawable/icon_setting"/>
</menu>- title Title
- Icon icon
- showAsAction
There are several choices for this property- always: This value keeps the menu items on Action Bar.
- ifRoom: If there is enough space, this value will display the menu item on Action Bar.
- Nev: This value makes the menu item never appear on Action Bar.
- withText: This value enables the menu item to be displayed with its icon and menu text.
2. Rewriting the onCreateMenu method
Rewrite the onCreateMenu method in Activity to load the menu.xml file into APP
override fun onCreateOptionsMenu(menu: Menu?): Boolean {
    menuInflater.inflate(R.menu.menu,menu)
    return true
}
3. Rewriting opOptionSelect Method
Setting click events for each menu is similar to setting up listeners
override fun onOptionsItemSelected(item: MenuItem?): Boolean {
    if (item?.itemId ==R.id.menu_setting) {
        startActivity(SettingActivity::class.java)
    }
    return false
}
4.setSupportToolbar
The same steps as before