ImageView
1, Inheritance of ImageView
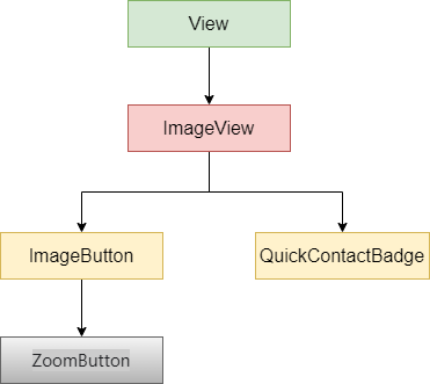
As can be seen from the above figure, ImageView inherits from the View component, and its main function is to display any Drawable object. In addition, ImageView also derives three ImageButton, QuickContactBadge and ZoomButton components.
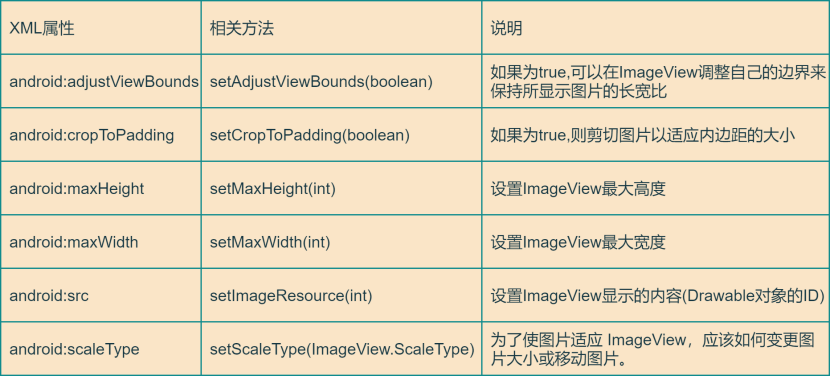
2, Common XML attributes supported by ImageView
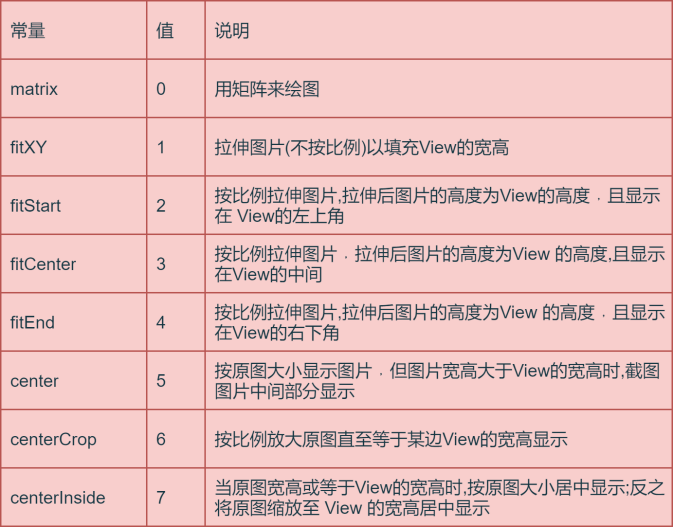
3, ImageView Constants supported by scaletype
4, ImageView load picture
In order to control the pictures displayed by ImageView, ImageView provides the following methods:
-
setlmageBitmap(Bitmap bm): use the Bitmap to set the picture displayed by the ImageView.
-
setlmageDrawable(Drawable drawable): use the Drawable object to set the picture displayed by the ImageView.
-
setlmageResource(int resld): use the image resource ID to set the image displayed by the ImageView.
-
Setlmageuri (Uri): use the Uri of the image to set the image displayed by the ImageView.
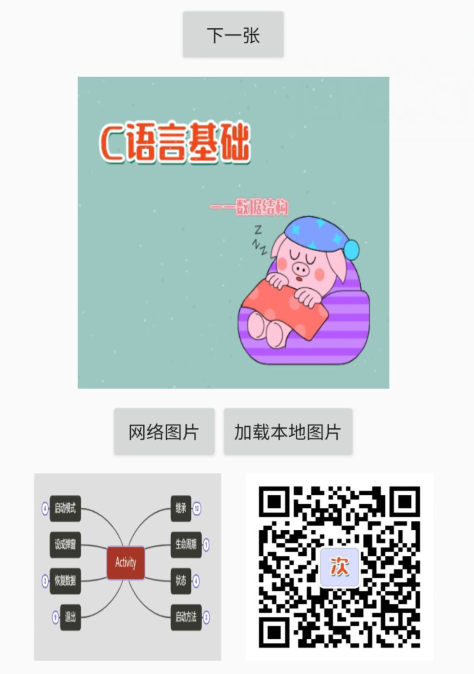
5, Example: use ImageView as a picture viewer
1. Create layout file
<?xml version="1.0" encoding="utf-8"?>
<LinearLayout xmlns:android="http://schemas.android.com/apk/res/android"
    android:layout_width="match_parent"
    android:layout_height="match_parent"
    android:orientation="vertical">
    <Button
        android:id="@+id/btn_next"
        android:layout_gravity="center_horizontal"
        android:layout_width="wrap_content"
        android:layout_marginTop="@dimen/dimen_20"
        android:layout_height="wrap_content"
        android:text="Next" />
    <ImageView
        android:id="@+id/iv_show"
        android:layout_width="250dp"
        android:layout_height="250dp"
        android:layout_marginTop="@dimen/dimen_10"
        android:layout_gravity="center"
        android:scaleType="fitXY"
        android:src="@mipmap/sc1"/>
    <LinearLayout
        android:layout_width="match_parent"
        android:orientation="horizontal"
        android:layout_marginTop="10dp"
        android:gravity="center_horizontal"
        android:layout_height="wrap_content">
        <Button
            android:id="@+id/btn_uri"
            android:layout_width="wrap_content"
            android:layout_height="wrap_content"
            android:text="Network picture" />

        <Button
            android:id="@+id/btn_open_photo_album"
            android:layout_width="wrap_content"
            android:layout_height="wrap_content"
            android:text="Load local picture" />
    </LinearLayout>
    <LinearLayout
        android:layout_width="match_parent"
        android:orientation="horizontal"
        android:layout_marginTop="@dimen/dimen_10"
        android:gravity="center_horizontal"
        android:layout_height="wrap_content">
        <ImageView
            android:id="@+id/iv_http_uri"
            android:layout_width="150dp"
            android:layout_height="150dp"
            android:layout_gravity="center"
            android:layout_marginRight="@dimen/dimen_10"
            android:scaleType="fitXY"
            />
        <ImageView
            android:id="@+id/iv_content_uri"
            android:layout_width="150dp"
            android:layout_height="150dp"
            android:layout_gravity="center"
            android:layout_marginLeft="@dimen/dimen_10"
            android:scaleType="fitXY"
            />
    </LinearLayout>
</LinearLayout>
2. Use code to make ImageView display pictures
public class ImageLoadActivity extends ActivityBase implements View.OnClickListener {
    private Button btnUri, btnNext,btnOpenPhotoAlbum;
    private ImageView ivShow,ivHttpUri,ivContentUri;
    int[] images = new int[]{R.mipmap.sc1, R.mipmap.sc2, R.mipmap.sc3};
    private int currentImage = 0;
    @Override
    protected void onCreate(Bundle savedInstanceState) {
        super.onCreate(savedInstanceState);
        setContentView(R.layout.activity_imageview_load);
        initData();
    }
    private void initData() {
        ivShow = findViewById(R.id.iv_show);
        ivHttpUri = findViewById(R.id.iv_http_uri);
        ivContentUri = findViewById(R.id.iv_content_uri);
        btnUri = findViewById(R.id.btn_uri);
        btnNext = findViewById(R.id.btn_next);
        btnOpenPhotoAlbum = findViewById(R.id.btn_open_photo_album);
        btnUri.setOnClickListener(this);
        btnNext.setOnClickListener(this);
        btnOpenPhotoAlbum.setOnClickListener(this);
    }

    @Override
    public void onClick(View v) {
            switch (v.getId()) {
                case R.id.btn_uri:
                    //Add permissions < uses permission @ android:name="android.permission.INTERNET" / >
                    Uri uri = Uri.parse("https://img-blog.csdnimg.cn/20210702150442684.png");
                    //Use the picture loading framework (Universal, ImageLoader, Picasso, Fresco, glass) to load pictures
                    //Take Picasso as an example. Here we use load(Uri) to load network pictures,
                    //But it can also load(File), load(String), load(int)
                    //Interested can see the source code, how it is implemented, not here. After all, this article focuses on ImageView
                    Picasso.with(this).load(uri).into(ivHttpUri);
                    break;
                case R.id.btn_next:
                    ivShow.setImageBitmap(BitmapFactory.decodeResource(getResources(),
                            images[++currentImage % images.length]));
                    break;
                case R.id.btn_open_photo_album:
                    Intent intent = new Intent(Intent.ACTION_PICK, null);
                    intent.setDataAndType(MediaStore.Images.Media.EXTERNAL_CONTENT_URI, "image/*");
                    startActivityForResult(intent, 2);
                    break;
                default:
                    break;
            }
    }
    @Override
    protected void onActivityResult(int requestCode, int resultCode, Intent data) {
        super.onActivityResult(requestCode, resultCode, data);
        if (requestCode == 2) {
            //Data returned from album
            Log.e(this.getClass().getName(), "Result:" + data.toString());
            if (data != null) {
                //Get the full path of the picture
                Uri uri = data.getData();
                Log.e(this.getClass().getName(), "Uri:" + uri);
                ivContentUri.setImageURI(uri);
            }
        }
    }
}
3. Operation effect
6, ImageView settings picture
Example:
   <ImageView
        android:id="@+id/iv_round"
        android:layout_width="300dp"
        android:layout_height="300dp"
        android:layout_gravity="center"
        android:background="@color/color_ff0000"
        android:src="@mipmap/sc1"/>

ImageView has two properties (src and background) that can set the image
-
src: is the "content" of the image (foreground, as shown in the blue pig figure above). When src is used to fill in the picture, it is filled directly according to the picture size without stretching; It needs to be used with android:scaleType. "src is only available for ImageView."
-
Background: background is the attribute that fills in the "background" (as shown in red in the figure above). Background is equal to src+scaleType(fitXY). "Background all views are available."
7, Set fillet and circle
1. Set fillet and circle through RoundedBitmapDrawable
//Set circle
private void roundBitmap(ImageView iv){
    Bitmap image = BitmapFactory.decodeResource(getResources(), R.mipmap.sc1);
    int cornerRadius = 0;
    //Take the longest edge as the fillet value. The larger the value, the more round it is.
    if (image.getWidth()<image.getHeight()) {
        cornerRadius = image.getHeight();
    } else {
        cornerRadius = image.getWidth();
    }
    RoundedBitmapDrawable roundedBitmapDrawable = RoundedBitmapDrawableFactory.create(getResources(), image);
    //Anti-Aliasing
    roundedBitmapDrawable.setAntiAlias(true);
    //Set fillet radius (small value is fillet, large value is circle)
    //For example: roundimg Setcornerradius (30) is the fillet
    roundedBitmapDrawable.setCornerRadius(cornerRadius);
    iv.setImageDrawable(roundedBitmapDrawable);
}
2. Use the picture loading frame to set, taking Picasso as an example
-
2.1 rewrite the Transformation interface
public class CircleCornerForm implements Transformation {

    @Override
    public Bitmap transform(Bitmap source) {
        int widthLight = source.getWidth();
        int heightLight = source.getHeight();
        Bitmap output = Bitmap.createBitmap(source.getWidth(), source.getHeight(), Bitmap.Config.ARGB_8888);
        Canvas canvas = new Canvas(output);
        Paint paintColor = new Paint();
        paintColor.setFlags(Paint.ANTI_ALIAS_FLAG);
        RectF rectF = new RectF(new Rect(0, 0, widthLight, heightLight));
        canvas.drawRoundRect(rectF, widthLight / 8, heightLight / 8, paintColor);//The greater the division, the smaller the angle
        Paint paintImage = new Paint();
        paintImage.setXfermode(new PorterDuffXfermode(PorterDuff.Mode.SRC_ATOP));
        canvas.drawBitmap(source, 0, 0, paintImage);
        source.recycle();
        return output;
    }
    //Returns the unique key of the transformation for caching purposes.
    @Override
    public String key() {
        return "CircleCornerForm";
    }
}
-
2.2 using CircleCornerForm
Uri uri = Uri.parse("https://img-blog.csdnimg.cn/20210702150442684.png");
Picasso.with(this).load(uri).transform(new CircleCornerForm()).into(ivRound);
8, Canvas: trying to use a recycled bitmap Android graphics. Bitmap@81c6fa
Principle: when the image is loaded for the first time, the system caches the Bitmap resources for reuse by ImageView next time.
Cause: first time loading image, calling BitmapDrawable. getBitmap(). The above error will be reported if the image is used again with the recycle () method.
9, Bitmapdrawable getBitmap(). recycle()
Free resources, clean up the picture cache, and force recycling. This does not release pixel data synchronously; If there are no other references, it just allows it to be garbage collected. The bitmap is marked "dead", which means that if getPixels() or setPixels() is called, it will throw an exception and nothing will be drawn. This operation cannot be undone, so you should call the bitmap only if you are sure it has no other use. "This is an advanced call and usually does not need to be called", because when there are no more references to this bitmap, the normal GC process will free this memory.
ImageButton
1, What is an ImageButton
ImageButton is a picture button. ImageButton inherits from ImageView, that is, all XML attributes and methods of ImageView can be used, so ImageButton will not be repeated.
2, Learn about ImageButton through examples
1. Create layout file
<?xml version="1.0" encoding="utf-8"?>
<LinearLayout xmlns:android="http://schemas.android.com/apk/res/android"
    android:layout_width="match_parent"
    android:layout_height="match_parent"
    android:gravity="center"
    android:orientation="vertical">
    <ImageButton
        android:layout_width="200dp"
        android:layout_height="200dp"
        android:layout_gravity="center"
        android:scaleType="fitXY"
        android:src="@mipmap/ibtn_bg1"/>
    <ImageButton
        android:layout_width="200dp"
        android:layout_height="200dp"
        android:layout_gravity="center"
        android:adjustViewBounds="true"
        android:scaleType="fitXY"
        android:src="@drawable/bg_ibtn_selector_bg"/>
</LinearLayout>
2. The operation effect is as follows:
-
The first ImageButton: android:src="@mipmap/ibtn_bg1" specifies a static picture. No matter how the user clicks, the ImageButton always displays the static picture.
-
The second ImageButton: android:src="@drawable/bg_ibtn_selector_bg". Two pictures are set in this drawable to ensure that users can switch pictures when clicking.
drawable/bg_ibtn_selector_bg as follows:
<?xml version ="1.0" encoding ="utf-8"?>
<selector xmlns:android="http://schemas.android.com/apk/res/android">
    <!--No Click to display picture-->
    <item android:state_pressed="false"
        android:drawable="@mipmap/ibtn_bg2"/>
    <!--Click to display the picture-->
    <item android:state_pressed="true"
        android:drawable="@mipmap/ibtn_bg1"/>
</selector>
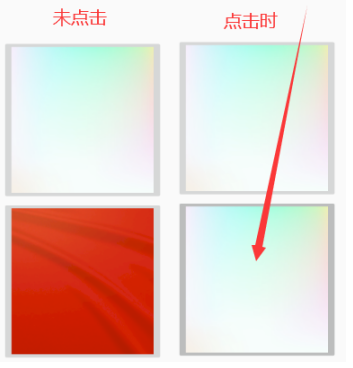
3, Causes and solutions of gray border of ImageButton
Look at the picture above, the function is realized, but there is a gray border around the picture, which is really ugly.
Cause: the ImageButton has a border by default. Or it can be said that part of the background will be reserved. In this way, when the user clicks, the background will change color (from light gray to dark gray, please refer to the above figure).
Solution:
-
1,android:background="@null"
-
2. android:background="@mipmap/ibtn_bg1", set the picture as the background directly.
-
3. android:background="#00000000", transparent border# 000000 is black and 00 is added in front to set the transparency.
Modify the above xml file:
<?xml version="1.0" encoding="utf-8"?>
<LinearLayout xmlns:android="http://schemas.android.com/apk/res/android"
    android:layout_width="match_parent"
    android:layout_height="match_parent"
    android:gravity="center"
    android:orientation="vertical">
    <ImageButton
        android:layout_width="200dp"
        android:layout_height="200dp"
        android:layout_gravity="center"
        android:background="@mipmap/ibtn_bg1"/>
    <ImageButton
        android:layout_width="200dp"
        android:layout_height="200dp"
        android:layout_marginTop="@dimen/dimen_10"
        android:layout_gravity="center"
        android:scaleType="fitXY"
        android:background="#00000000"
        android:src="@drawable/bg_ibtn_selector_bg"/>
</LinearLayout>
The operation effect is as follows:

"The ZoomButton is abandoned, so I won't describe it here."
QuickContactBadge
1, What is QuickContactBadge
QuickContactBadge inherits from ImageView, so its "essence is also a picture button", and its display picture can also be specified through the android:src attribute. The "additional function" of QuickContactBadge is that the picture can be associated with the specified contact in the mobile phone. When the user clicks the picture, the system will open the contact information interface of the corresponding contact.
2, Calling method of QuickContactBadge
To associate QuickContactBadge with a specific contact, you can call the following method.
-
Assigncontactfromemail (string emailaddress applsrclmainlress, Boolean lazylookup): associate the picture with the contact corresponding to the specified E-mail address.
-
assignContactFromPhone(String phoneNumber, boolean lazyLookup): associate the picture with the contact corresponding to the specified phone number.
-
assignContactUri(Uri contactUri): associate the picture with the contact corresponding to a specific Uri.
3, Learn about QuickContactBadge through examples
1. Create layout file
<?xml version="1.0" encoding="utf-8"?>
<LinearLayout xmlns:android="http://schemas.android.com/apk/res/android"
    android:layout_width="match_parent"
    android:layout_height="match_parent"
    android:gravity="center"
    android:orientation="vertical">
    <QuickContactBadge
        android:id="@+id/qcb_email"
        android:layout_width="200dp"
        android:layout_height="200dp"
        android:layout_gravity="center"
        android:background="@null"
        android:src="@mipmap/ibtn_bg1"/>
    <QuickContactBadge
        android:id="@+id/qcb_phone"
        android:layout_width="200dp"
        android:layout_height="200dp"
        android:layout_marginTop="@dimen/dimen_10"
        android:layout_gravity="center"
        android:scaleType="fitXY"
        android:background="@null"
        android:src="@drawable/bg_ibtn_selector_bg"/>
</LinearLayout>
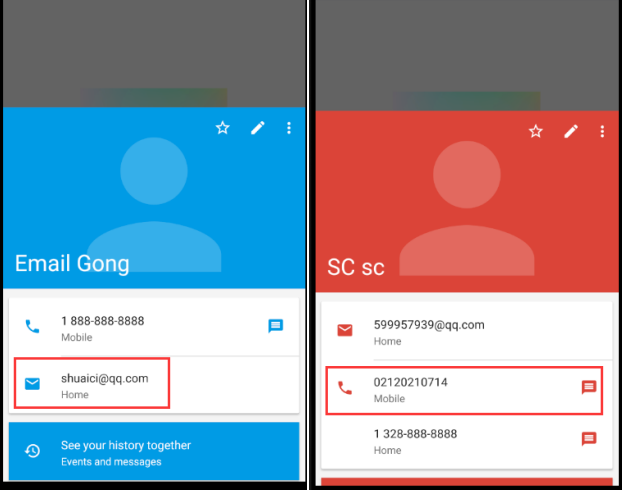
2. Connect QuickContactBadge to specific contacts
        //Associated control
        qcbEmail = findViewById(R.id.qcb_email);
        qcbPhone = findViewById(R.id.qcb_phone);
        //You must fill in the corresponding contact in the contact
        //Associate the picture with the contact corresponding to the specified E-mail address.
        qcbEmail.assignContactFromEmail("shuaici@qq.com",false);
        //Associate the picture with the contact corresponding to the specified phone number.
        qcbPhone.assignContactFromPhone("021-20210714",false);
3. Operation effect
See here, the contents of ImageView and its subclasses are basically "finished". I hope it can be helpful to you, MEDA. ha-ha