Develop an Android Gaode map plug-in from scratch
preface
After reading many blog posts, I found that there is little mention about how to use the mixed editing and interaction of Android and Dart in actual combat. In the actual project, fluent still needs to make a lot of use of some native functions, such as camera, map, accessing device, local album and other functions. Although a large number of third-party plug-ins provide these functions, in the actual project development, It may not meet the requirements, so you must master how to use Android or iOS native View and Dart to interact with native data in fluent. This time, the author accesses Gaode map in the project to show readers how to embed AndroidView in fluent and enable Dart to interact with Java.
Effect preview
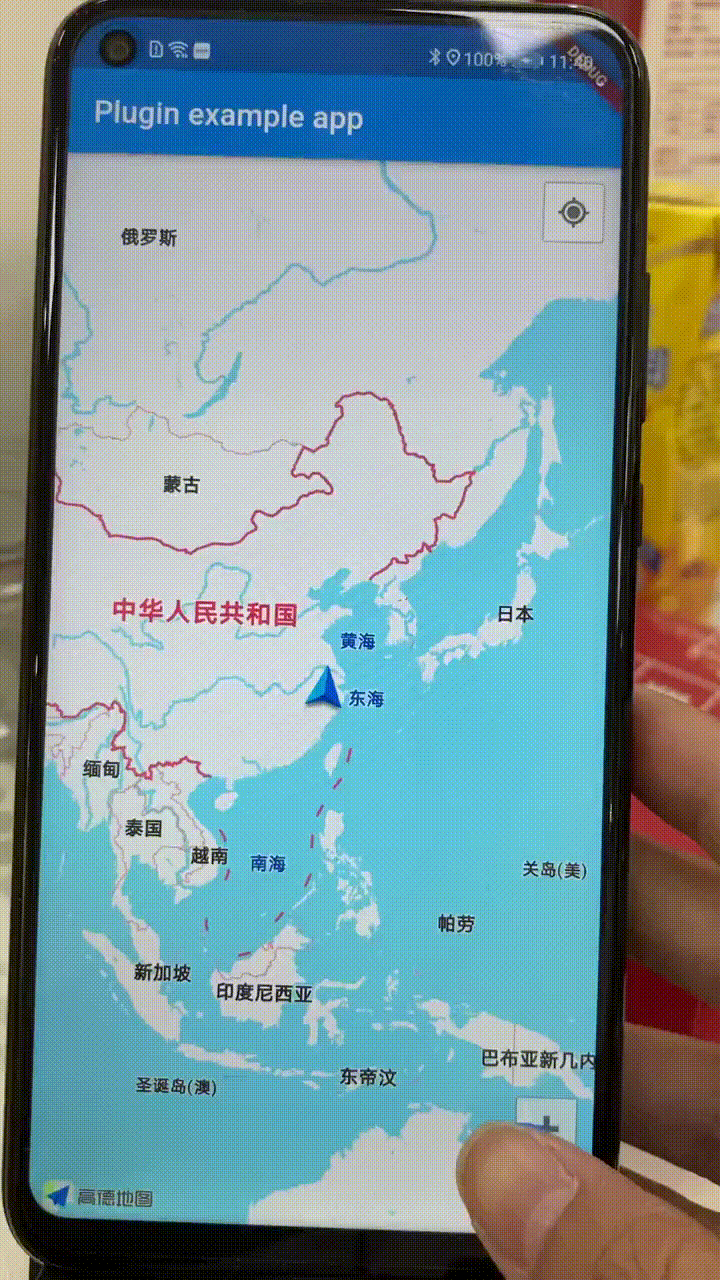
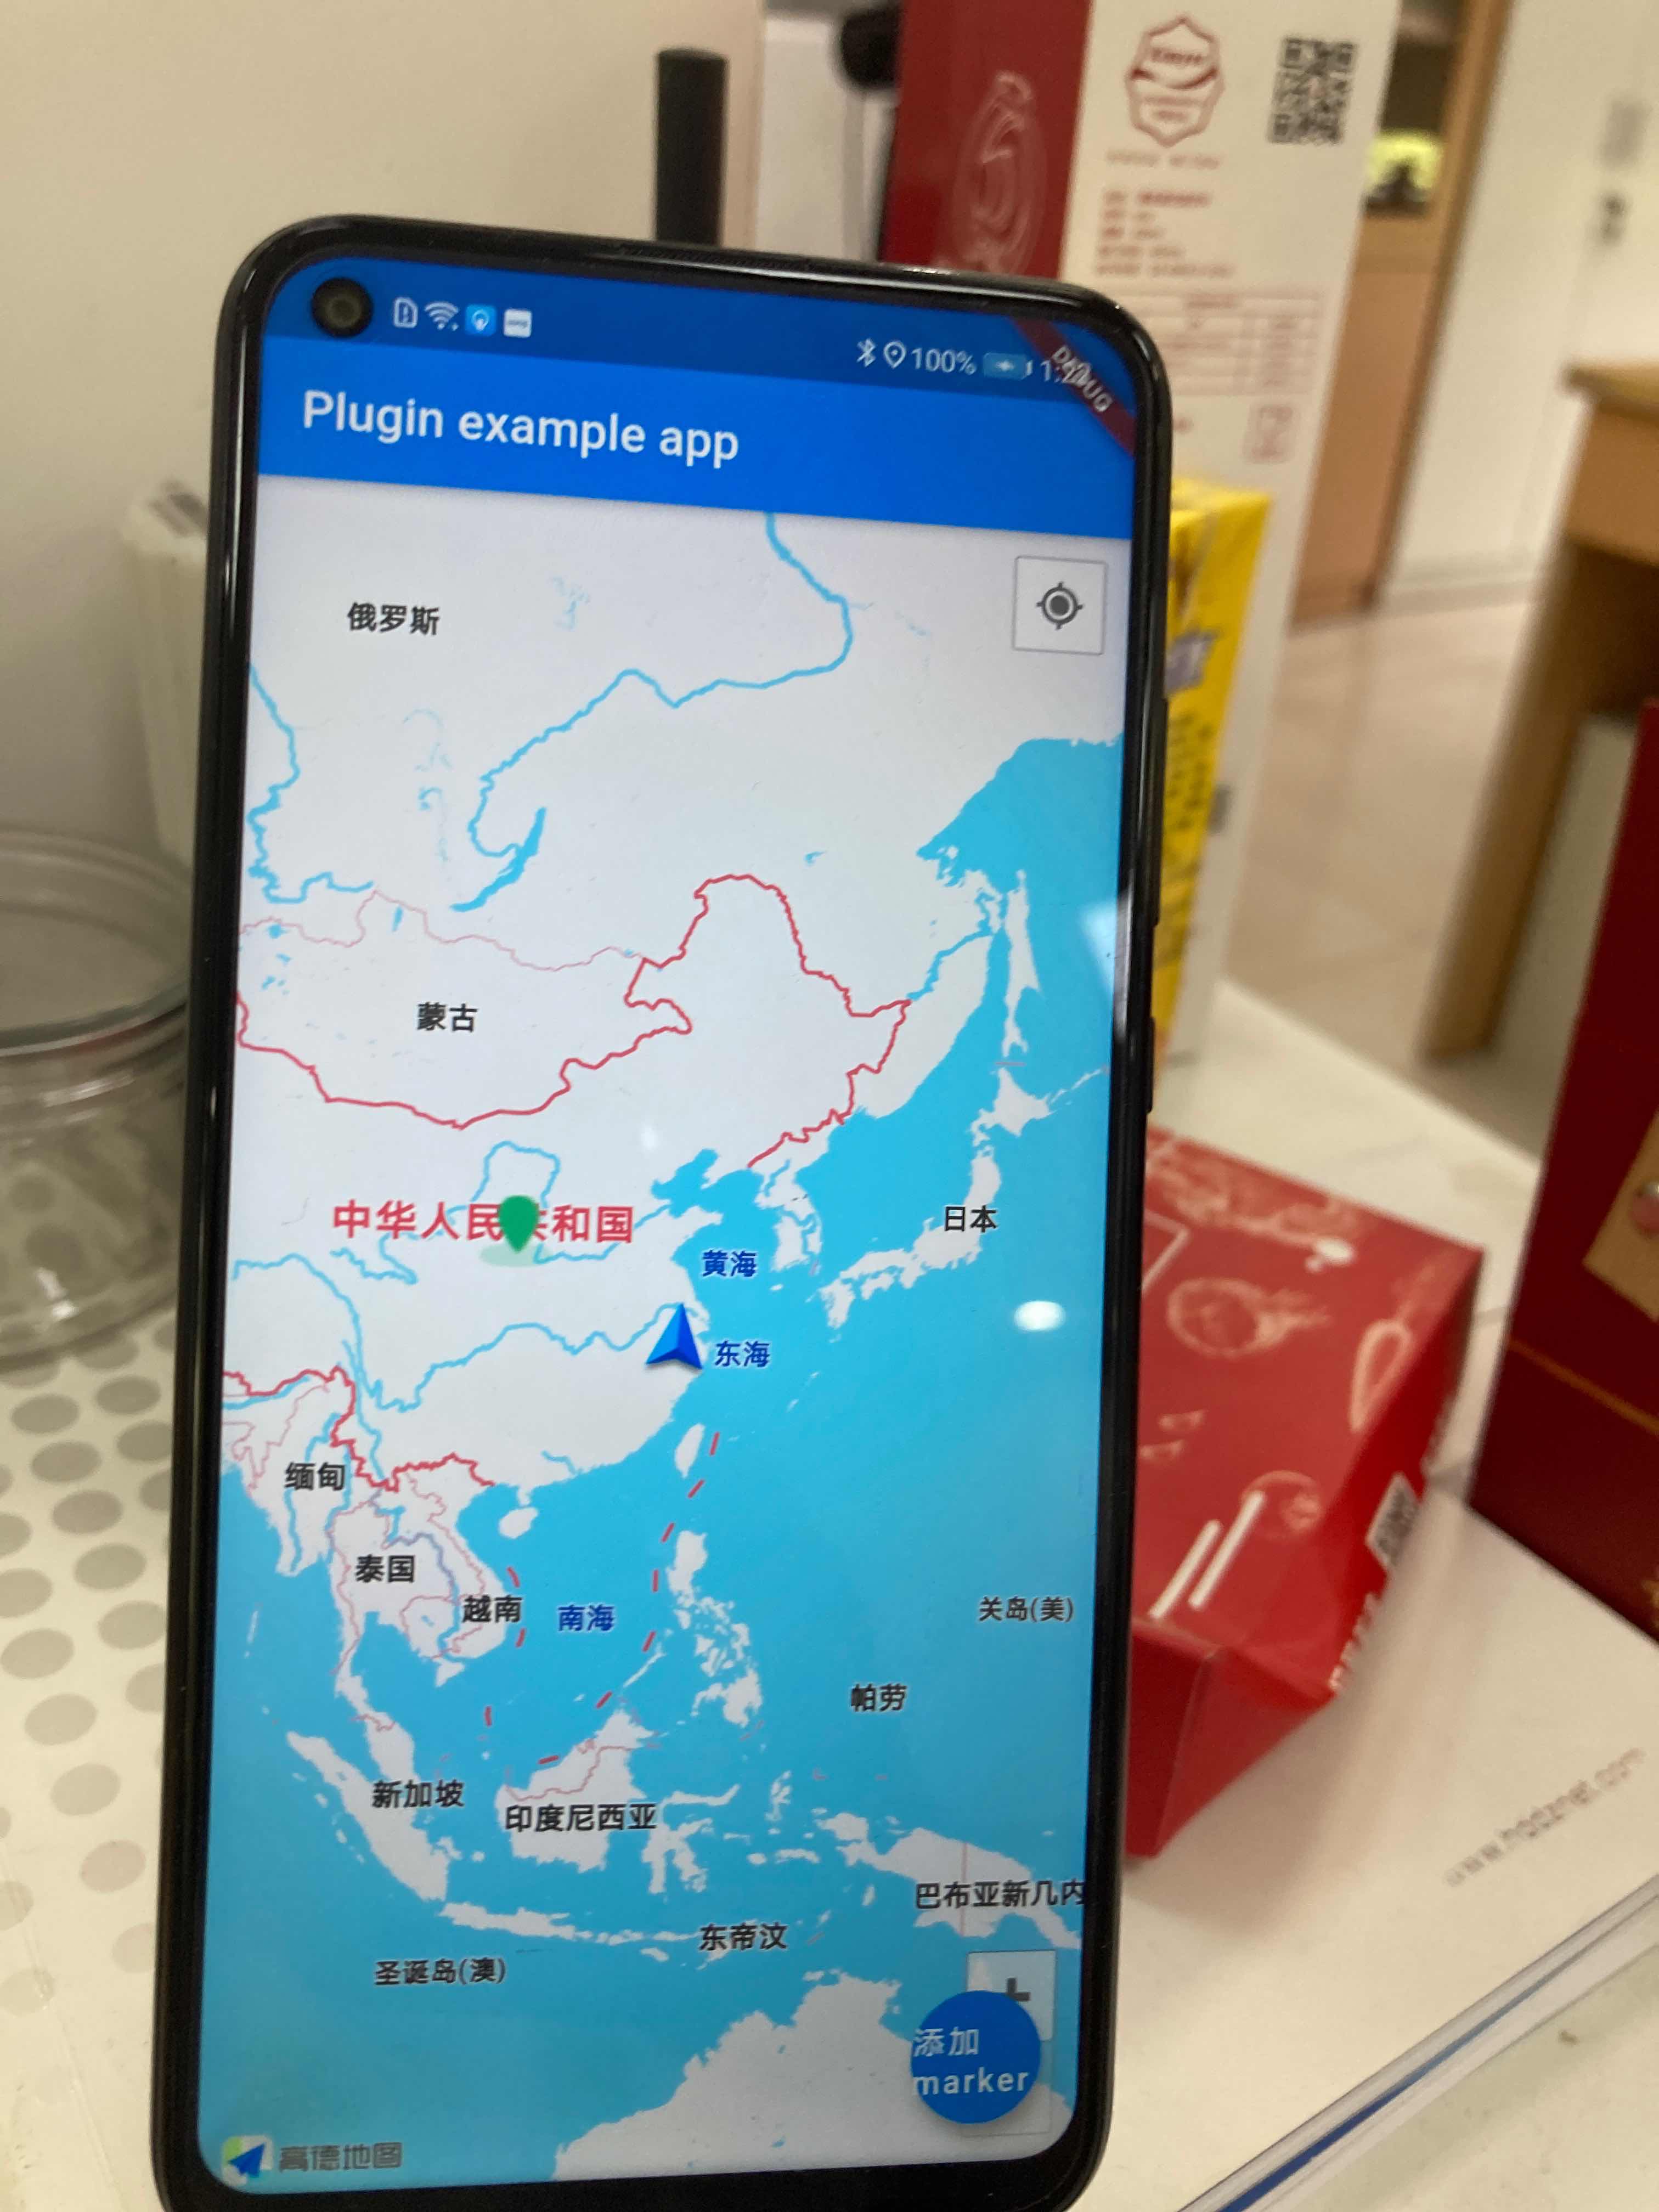
Enter Gaode map to display the individual's position, and take the individual's position as the center point, click the button to send parameters to the native layer through the Dart layer. Native dynamically generates a marker display according to the parameters sent by the Dart layer, and callback the parameters to the Dart layer.
Implementation requirements
| Implementation requirements | Is it implemented |
|---|---|
| 3D map | ✅ |
| Display positioning | ✅ |
| Customize marker display | ✅ |
| Dart sends data to Native | ✅ |
| Native sends data to Dart | ✅ |
development environment
| Flutter | 1.22.6.stable |
|---|---|
| Android SDK | minSdkVersion: 21 compileSdkVersion: 29 |
| Gradle | 6.5 |
| Test model | Huawei glory Play4T system Android 10 |
| IDE | Android Sutdio 4.2 |
Implementation process
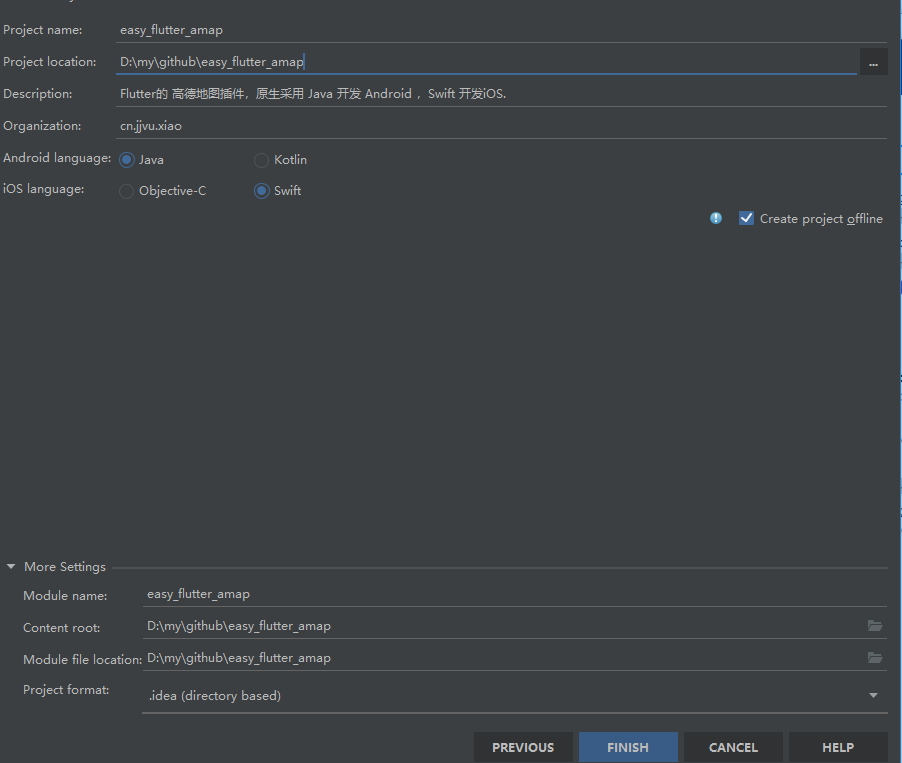
Step 1: create a new shuttle plugin project, and then configure some project information, as shown in Figure 1.
It is worth noting that the language of the plug-in uses Java for Android and Swift for iOS. This time mainly focuses on Android plug-in development. As for iOS plug-in development, the author will update it later
After Android Studio generates the project successfully, the structure of the project appears, as shown in Figure 2
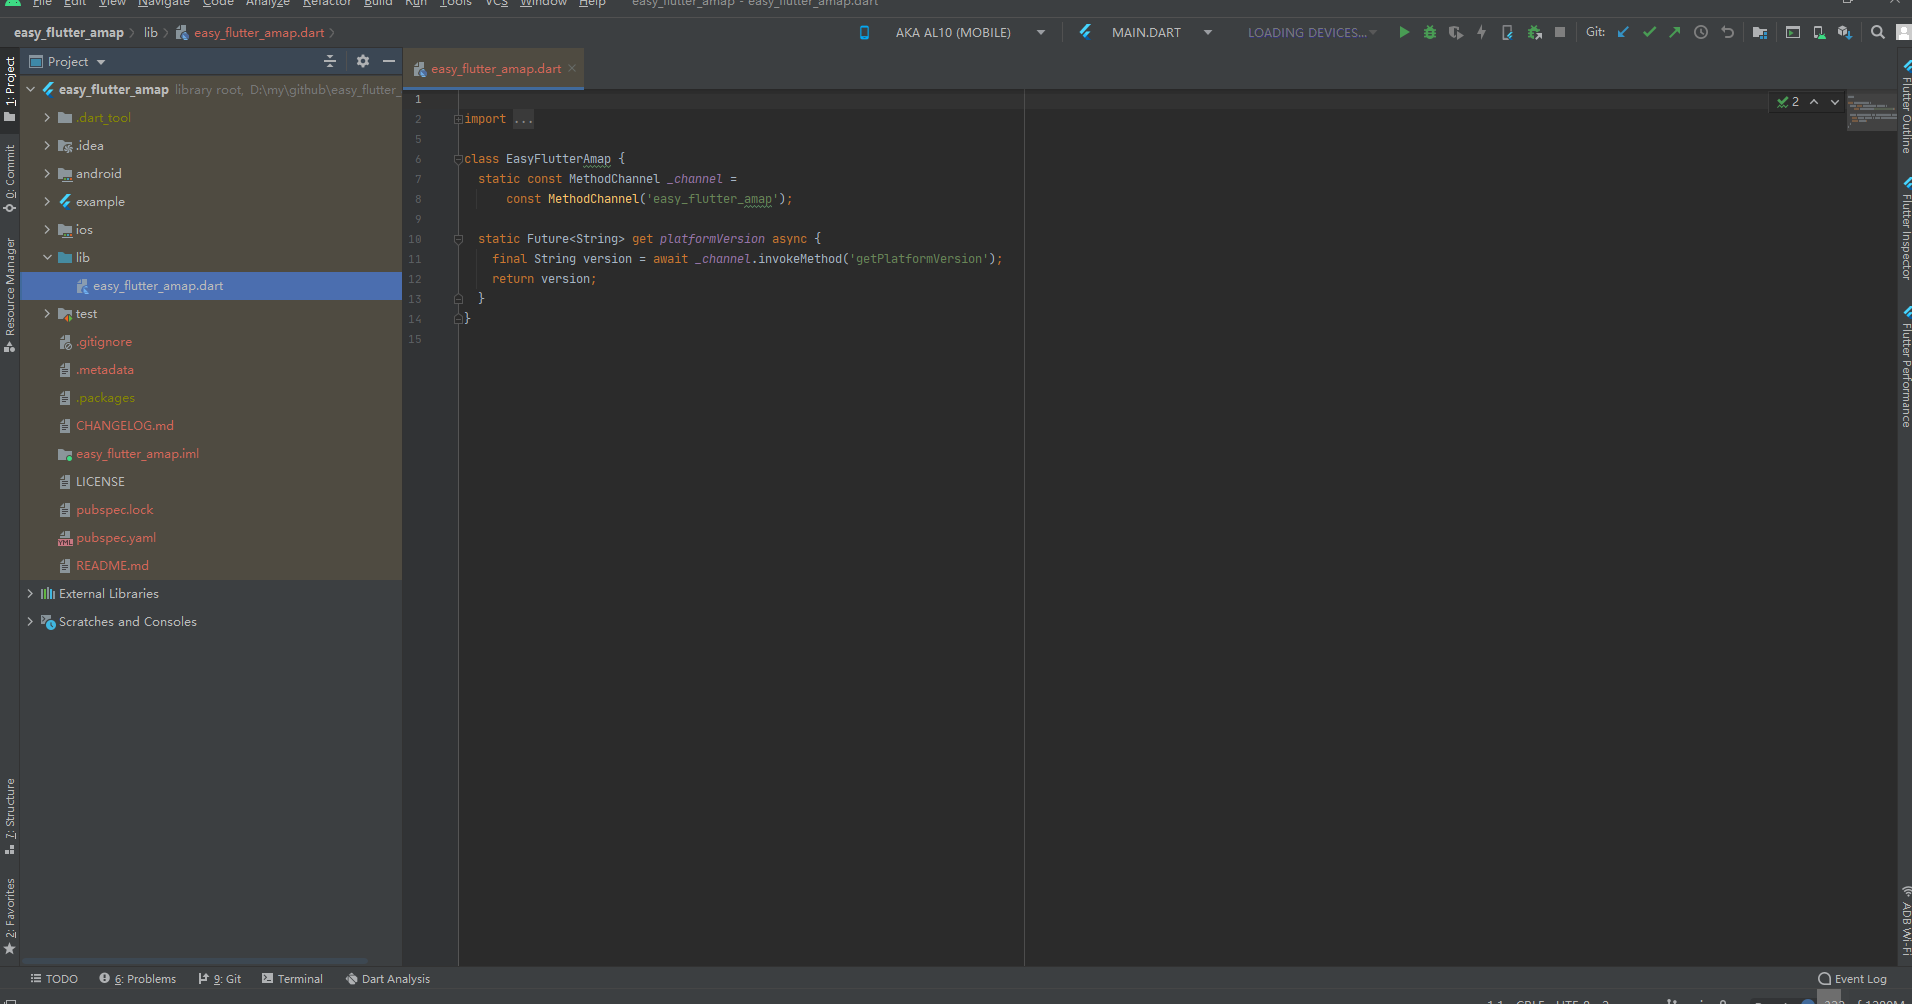
In fact, it seems to be no different from the ordinary fluent project. There is an example directory to test the plug-in functions. Then start writing native code plug-ins.
Step 2: write Android native plug-ins
Next is the key point: how to enter the editing of android native code? Many blog posts do not fully show how to enter the editing of android native code. At first, I thought it was to use Android Studio to directly open to the android folder under the root directory of the project to write android native code, but it didn't work at all. Various errors were reported, such as unable to find class xxx. Then we searched for the problem that we couldn't find the relevant classes of Flutter, the various import Flutter dependencies, and what environment variables were added. But it was not until I saw a teaching video of the Flutter plug-in that I realized that there was a problem with the way I opened it. Don't say much. Look at Figure 3
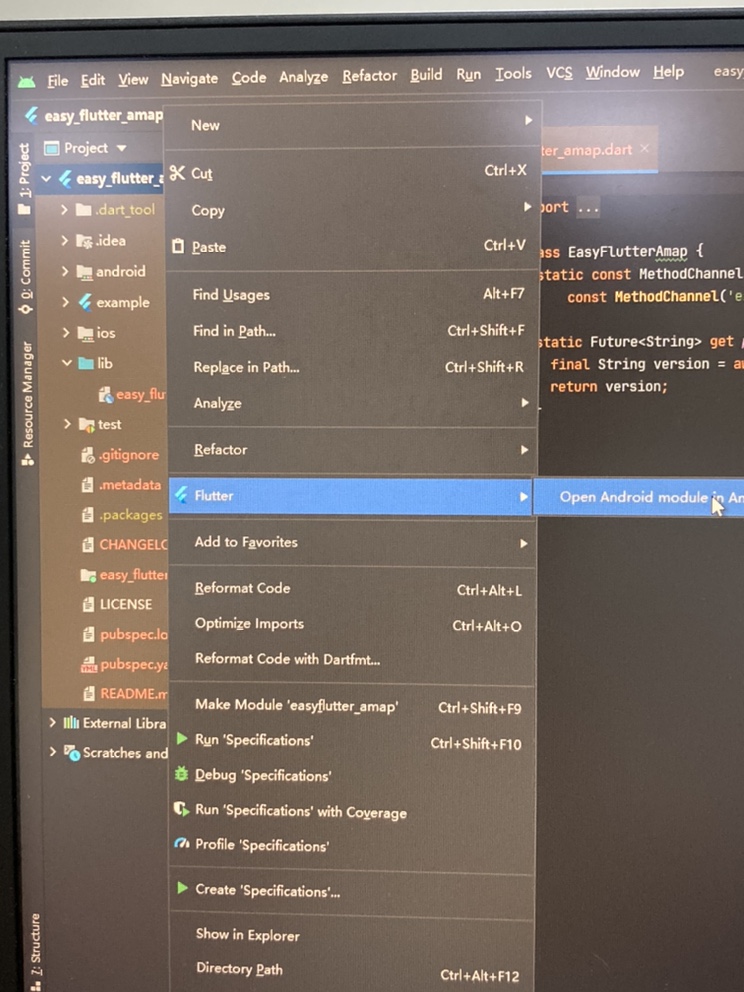
I believe you can see it clearly. Right click the project root directory, and then click fluent to lead out the Open Android Module in Android Studio. After waiting for gradle build for a while, you will enter the editing of Android native plug-ins. The results are shown in Figure 4

There is nothing red in the whole interface. Now you can officially write Android native code. It's worth noting that: remember the example directory for testing plug-ins we mentioned at the beginning? Yes, that example directory corresponds to the current app directory, and we need to be in easy_flutter_amap writes native code in this directory
To access Gaode map, you need to move to the official Gaode map open platform For the application key, the official website has a detailed application process and document reference.
This time, the latest 3D map of Gaode is used. First, it is in the build of the plug-in as shown in Figure 5 Gradle location adds the dependence of Gaode map
dependencies {
    implementation('com.amap.api:3dmap:7.8.0')
}
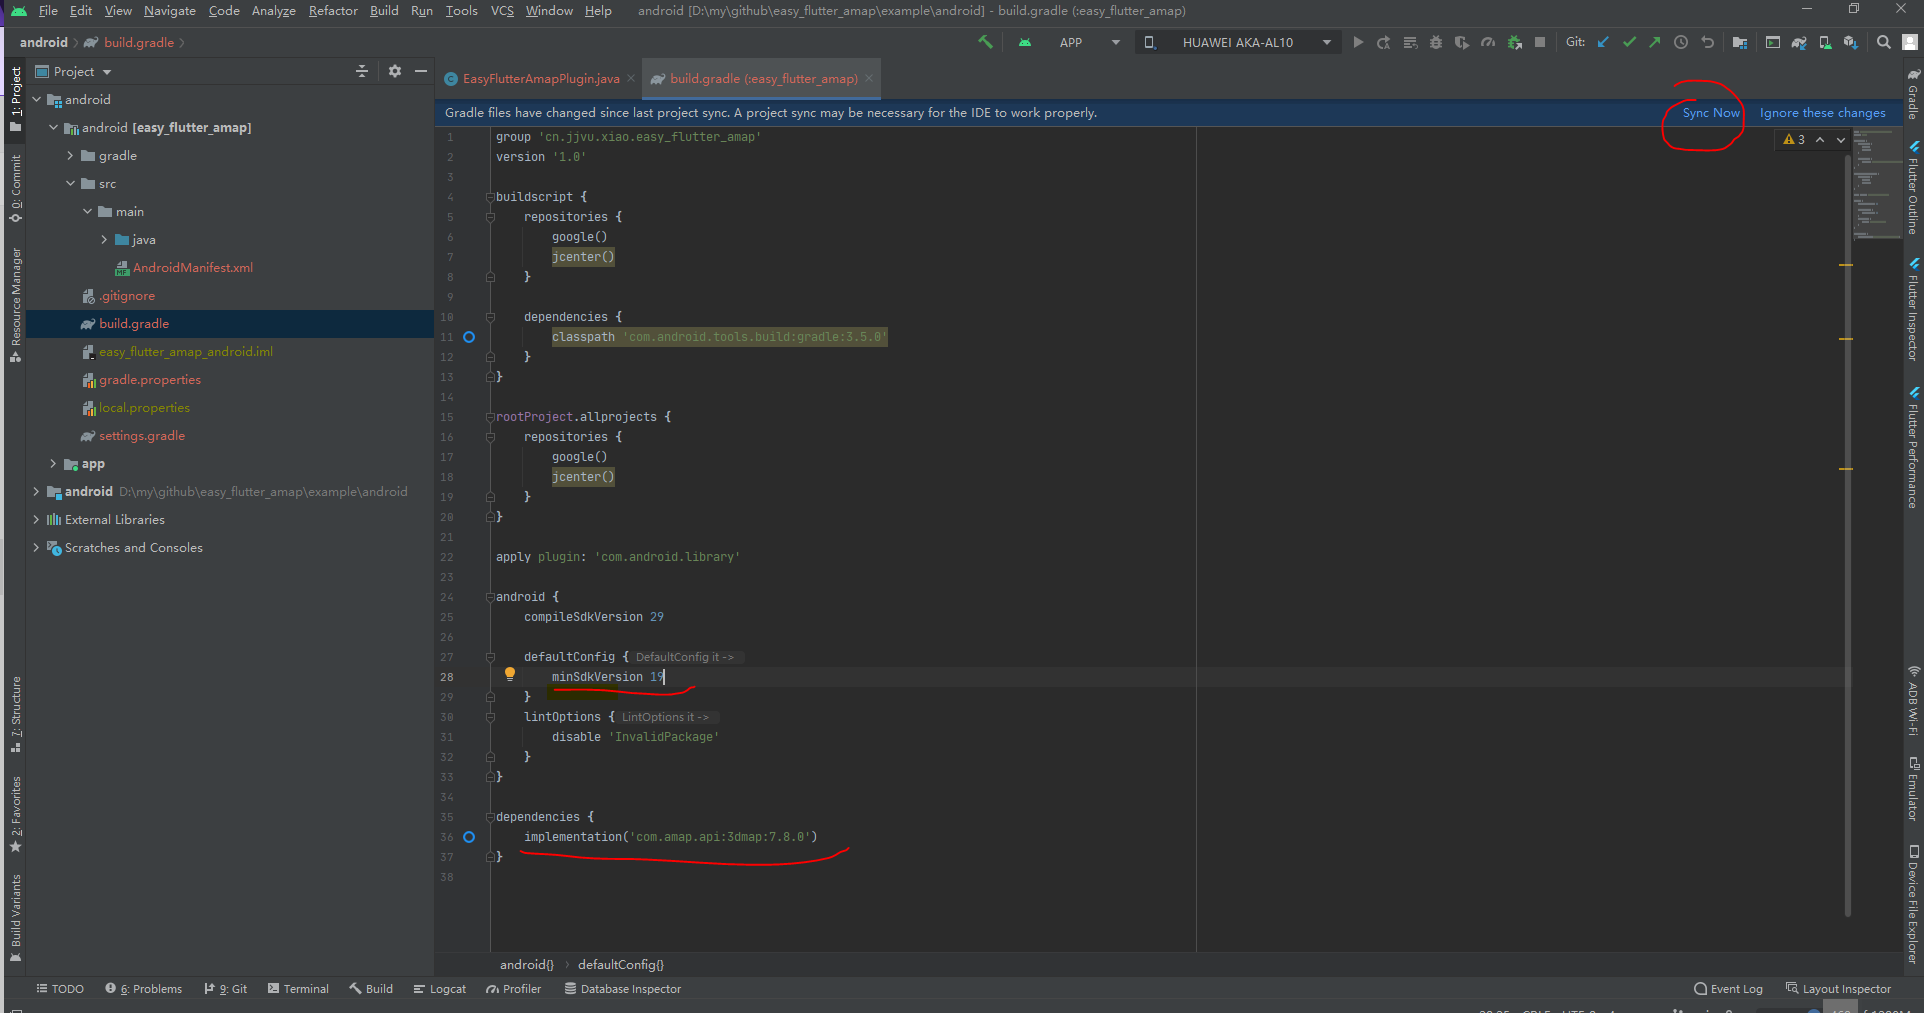
As shown in Figure 5, pay attention to the part of the code marked with the red line, set the minimum compatible version of the SDK to 19, and then click sync to start downloading the dependency of Gaode map.
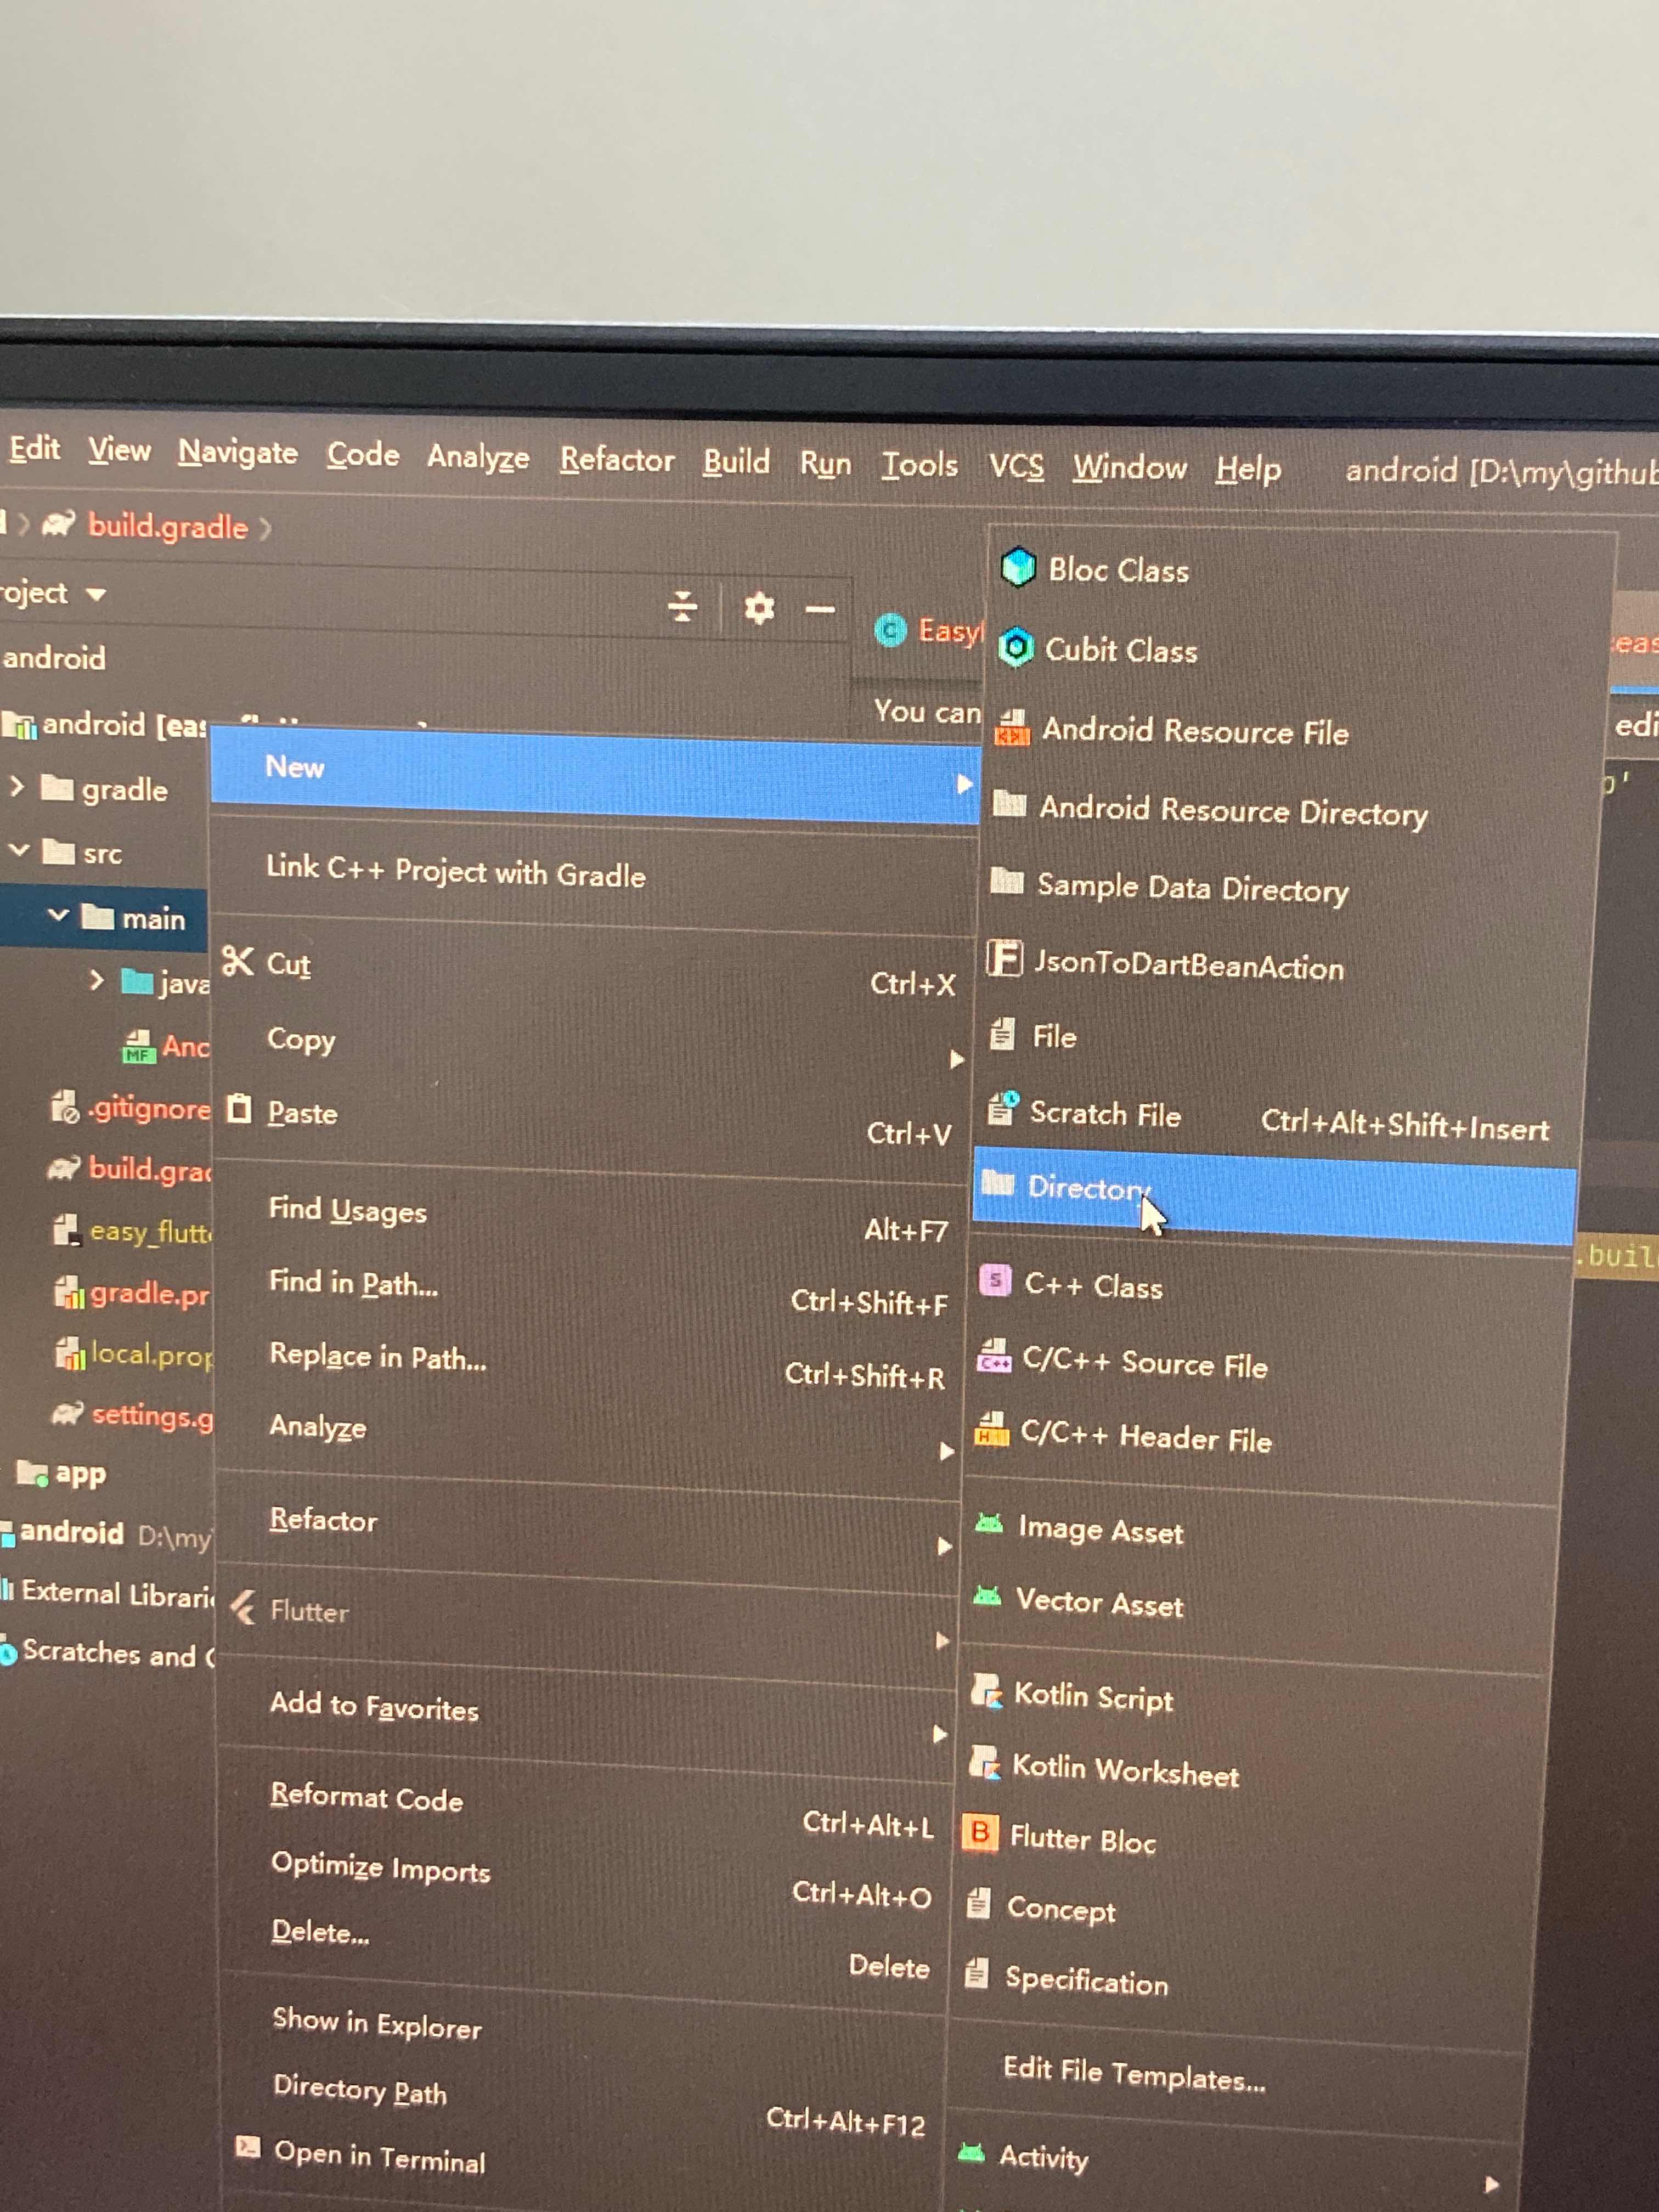
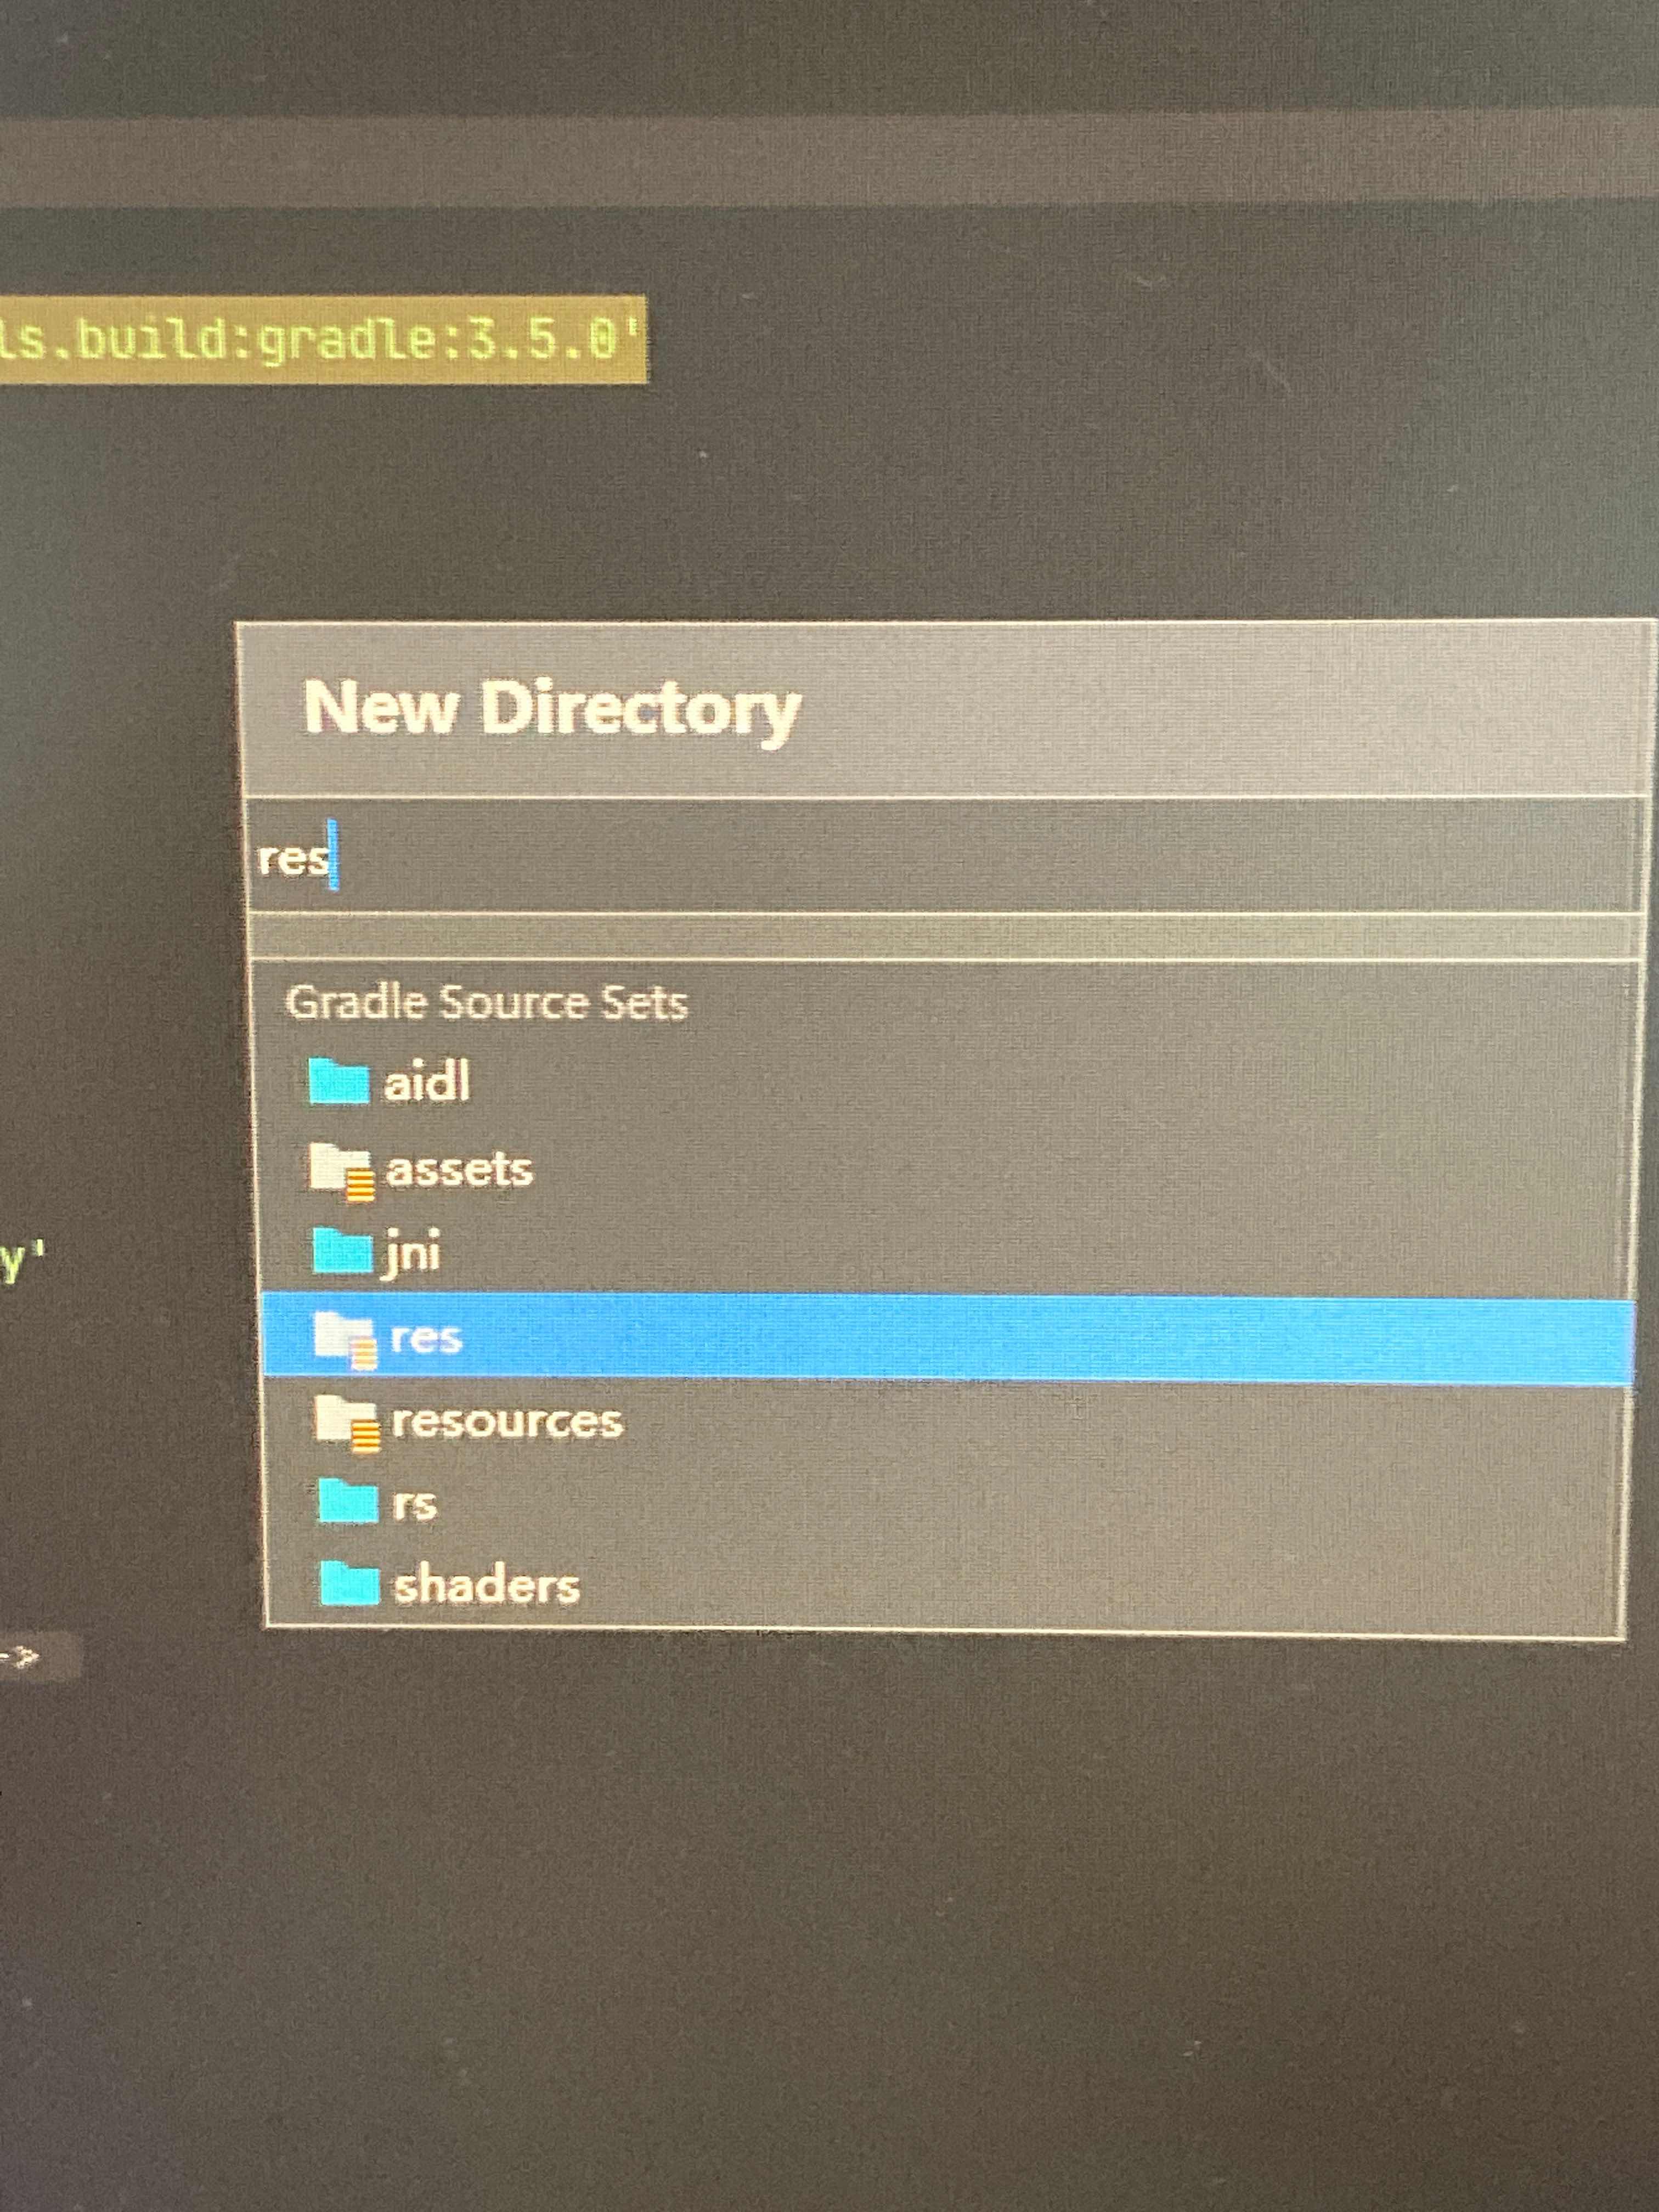
In my project directory, there is no res directory by default, so I need to create a res resource directory, as shown in Figure 6 and Figure 7
In this way, the res resource directory is successfully established, Next, create a drawable directory to store some icons (in fact, in the flutter project, the management of pictures is relatively complicated, because pictures can be put into both the assets directory and the native directory of the flutter project. If they are not managed properly, it is easy to see that the same pictures exist at multiple ends, increasing the volume of application apps. This is very strict in a company interviewed by the author (serious problems)
Add mime in the drawable folder in the res directory Png picture is used as an icon to display its own position, and the effect is shown in Figure 7-1

Then add location_marker.png picture is the picture marked with mark, as shown in Figure 7-2
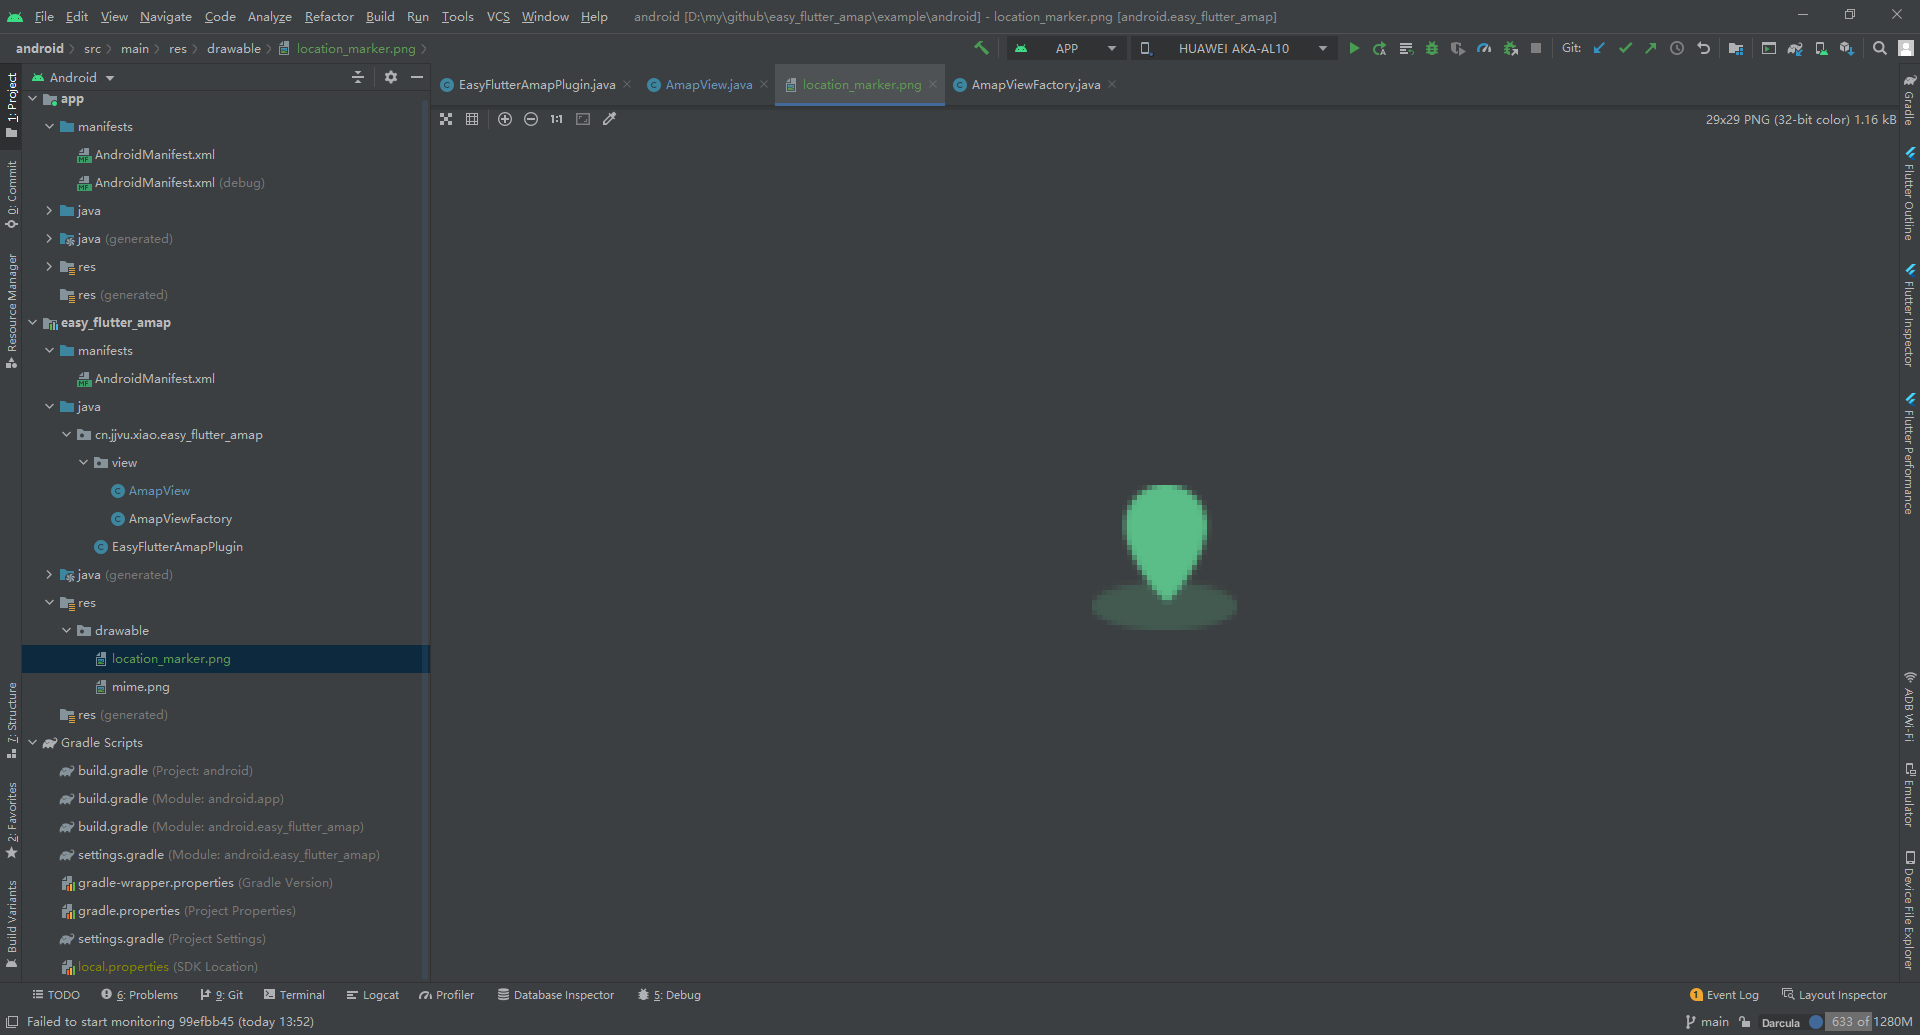
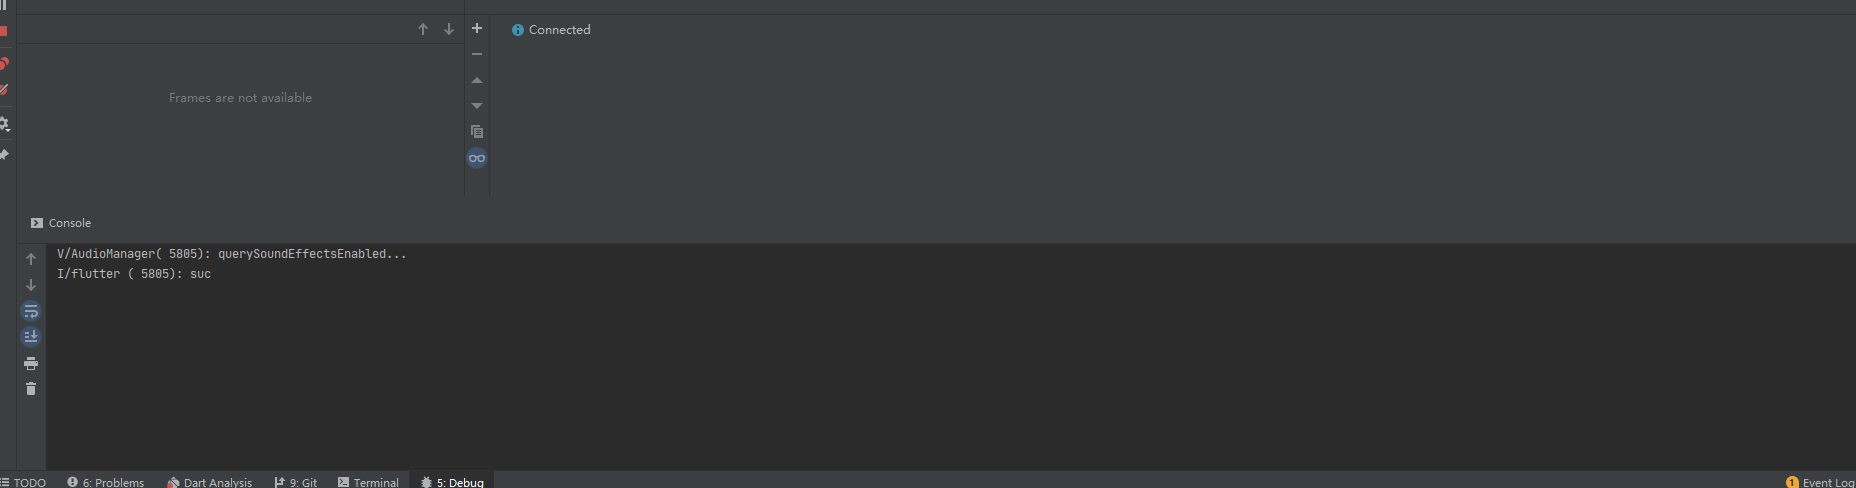
Create a new amapview Java file, through the parameters transmitted from AmapViewFactory by params, to initialize some configuration information of Gaode map and realize the interface with Dart, so as to achieve the purpose of cross platform. The purpose of these codes is to display the individual's position in the middle, and dynamically add marker marker marker points. The parameters (title, latitude and longitude) of adding marker marker marker marker points are passed through the Dart end, and the Native rendering is used. The pipeline name of this method is easy_flutter_amap, so the MethodChannel on the Dart side must also have the connection name easy_flutter_amap, after adding successfully, the Native end will return a string suc to the Dart layer.
package cn.jjvu.xiao.easy_flutter_amap.view;

import android.content.Context;
import android.graphics.BitmapFactory;
import android.graphics.Color;
import android.os.Bundle;
import android.util.Log;
import android.view.View;

import androidx.annotation.NonNull;

import com.amap.api.maps.AMap;
import com.amap.api.maps.CameraUpdateFactory;
import com.amap.api.maps.LocationSource;
import com.amap.api.maps.MapView;
import com.amap.api.maps.model.BitmapDescriptorFactory;
import com.amap.api.maps.model.LatLng;
import com.amap.api.maps.model.MarkerOptions;
import com.amap.api.maps.model.MyLocationStyle;

import java.util.Map;

import cn.jjvu.xiao.easy_flutter_amap.R;
import io.flutter.plugin.common.BinaryMessenger;
import io.flutter.plugin.common.MethodCall;
import io.flutter.plugin.common.MethodChannel;
import io.flutter.plugin.platform.PlatformView;

public class AmapView implements PlatformView, MethodChannel.MethodCallHandler {

    MapView mapView;

    AMap aMap;

    LocationSource.OnLocationChangedListener mListener;

    private MethodChannel methodChannel;

    private Context context;

    private static final String TAG = "AmapView";

    private Map<String, Object> initParams;

    public AmapView(Context context, BinaryMessenger messenger, int id, Map<String, Object> params) {
        Log.d(TAG, params.toString());
        methodChannel = new MethodChannel(messenger, "easy_flutter_amap");
        methodChannel.setMethodCallHandler(this);
        initParams = params;
        createMap(context);
        initMapOptions();
        mapView.onResume();
        this.context = context;
    }

    @Override
    public View getView() {
        return mapView;
    }

    @Override
    public void dispose() {
        mapView.onDestroy();
    }

    private void createMap(Context context) {
        mapView = new MapView(context);
        mapView.onCreate(new Bundle());
        aMap = mapView.getMap();
    }

    private void initMapOptions() {
        Log.d(TAG, initParams.toString());
        aMap.moveCamera(CameraUpdateFactory.zoomTo(Float.parseFloat(initParams.get("zoomLevel").toString())));
        aMap.getUiSettings().setMyLocationButtonEnabled(true);
        MyLocationStyle myLocationStyle = new MyLocationStyle();
        myLocationStyle.interval(Long.parseLong(initParams.get("interval").toString()));
        myLocationStyle.strokeWidth(1f);
        myLocationStyle.strokeColor(Color.parseColor("#8052A3FF"));
        myLocationStyle.radiusFillColor(Color.parseColor("#3052A3FF"));
        myLocationStyle.showMyLocation(true);
        myLocationStyle.myLocationIcon(BitmapDescriptorFactory.fromResource(R.drawable.mime));
        myLocationStyle.myLocationType(MyLocationStyle.LOCATION_TYPE_LOCATION_ROTATE);
        aMap.setMyLocationStyle(myLocationStyle);
        aMap.setMyLocationEnabled(true);
    }

    @Override
    public void onMethodCall(@NonNull MethodCall call, @NonNull MethodChannel.Result result) {
        if (call.method.equals("addMarkers")) {
            if (call.arguments != null) {
                Map<String, Object> datas = (Map<String, Object>) call.arguments;
                showMarker(datas);
                result.success("suc");
            }
        }
    }

    private void showMarker(Map<String, Object> data) {
        MarkerOptions markerOption = new MarkerOptions();
        markerOption.position(new LatLng((double) data.get("latitude"), (double) data.get("longitude")));
        markerOption.title((String) data.get("title"));
        markerOption.draggable(false);
        markerOption.icon(BitmapDescriptorFactory.fromBitmap(BitmapFactory
            .decodeResource(this.context.getResources(), R.drawable.location_marker)));
        markerOption.setFlat(true);
        aMap.addMarker(markerOption);
    }
}
Create a new amapviewfactory Java file, the code is as follows. The parameters obtained from the Flutter end will be transferred here. When the Native View is instantiated, the parameters passed from the Flutter end will be injected.
package cn.jjvu.xiao.easy_flutter_amap.view;

import android.app.Activity;
import android.content.Context;

import java.util.Map;

import io.flutter.plugin.common.BinaryMessenger;
import io.flutter.plugin.common.StandardMessageCodec;
import io.flutter.plugin.platform.PlatformView;
import io.flutter.plugin.platform.PlatformViewFactory;

public class AmapViewFactory extends PlatformViewFactory {

    private BinaryMessenger messenger;

    private Activity activity;

    public AmapViewFactory(BinaryMessenger messenge, Activity activity) {
        super(StandardMessageCodec.INSTANCE);
        this.activity = activity;
        this.messenger = messenge;
    }

    @Override
    public PlatformView create(Context context, int id, Object args) {
        Map<String, Object> params = (Map<String, Object>) args;
        return new AmapView(context, messenger, id, params);
    }
}
In easyflutter amapplugin Register our map plug-in in Java file.
package cn.jjvu.xiao.easy_flutter_amap;

import android.app.Activity;

import androidx.annotation.NonNull;

import cn.jjvu.xiao.easy_flutter_amap.view.AmapViewFactory;
import io.flutter.embedding.engine.plugins.FlutterPlugin;
import io.flutter.embedding.engine.plugins.activity.ActivityAware;
import io.flutter.embedding.engine.plugins.activity.ActivityPluginBinding;
import io.flutter.plugin.common.BinaryMessenger;
import io.flutter.plugin.common.MethodCall;
import io.flutter.plugin.common.MethodChannel;
import io.flutter.plugin.common.MethodChannel.MethodCallHandler;
import io.flutter.plugin.common.MethodChannel.Result;
import io.flutter.plugin.platform.PlatformViewRegistry;

public class EasyFlutterAmapPlugin implements FlutterPlugin, MethodCallHandler, ActivityAware {

  private MethodChannel channel;

  private BinaryMessenger messenger;

  private PlatformViewRegistry platformViewRegistry;

  @Override
  public void onAttachedToEngine(@NonNull FlutterPluginBinding flutterPluginBinding) {
    messenger = flutterPluginBinding.getBinaryMessenger();;
    platformViewRegistry = flutterPluginBinding.getPlatformViewRegistry();
  }

  @Override
  public void onMethodCall(@NonNull MethodCall call, @NonNull Result result) {
    if (call.method.equals("getPlatformVersion")) {
      result.success("Android " + android.os.Build.VERSION.RELEASE);
    } else {
      result.notImplemented();
    }
  }

  @Override
  public void onDetachedFromEngine(@NonNull FlutterPluginBinding binding) {
    channel.setMethodCallHandler(null);
  }

  @Override
  public void onAttachedToActivity(@NonNull ActivityPluginBinding binding) {
    Activity activity = binding.getActivity();
    platformViewRegistry.registerViewFactory("cn.jjvu.xiao.easy_flutter_amap/mapview", new AmapViewFactory(messenger, activity));
  }

  @Override
  public void onDetachedFromActivityForConfigChanges() {

  }

  @Override
  public void onReattachedToActivityForConfigChanges(@NonNull ActivityPluginBinding binding) {

  }

  @Override
  public void onDetachedFromActivity() {

  }
}
In the plug-in's androidmanifest Add some permissions to the XML directory and the necessary configuration of Gaode map. For details, please refer to the official website description of Gaode map, as shown in Figures 8 and 9
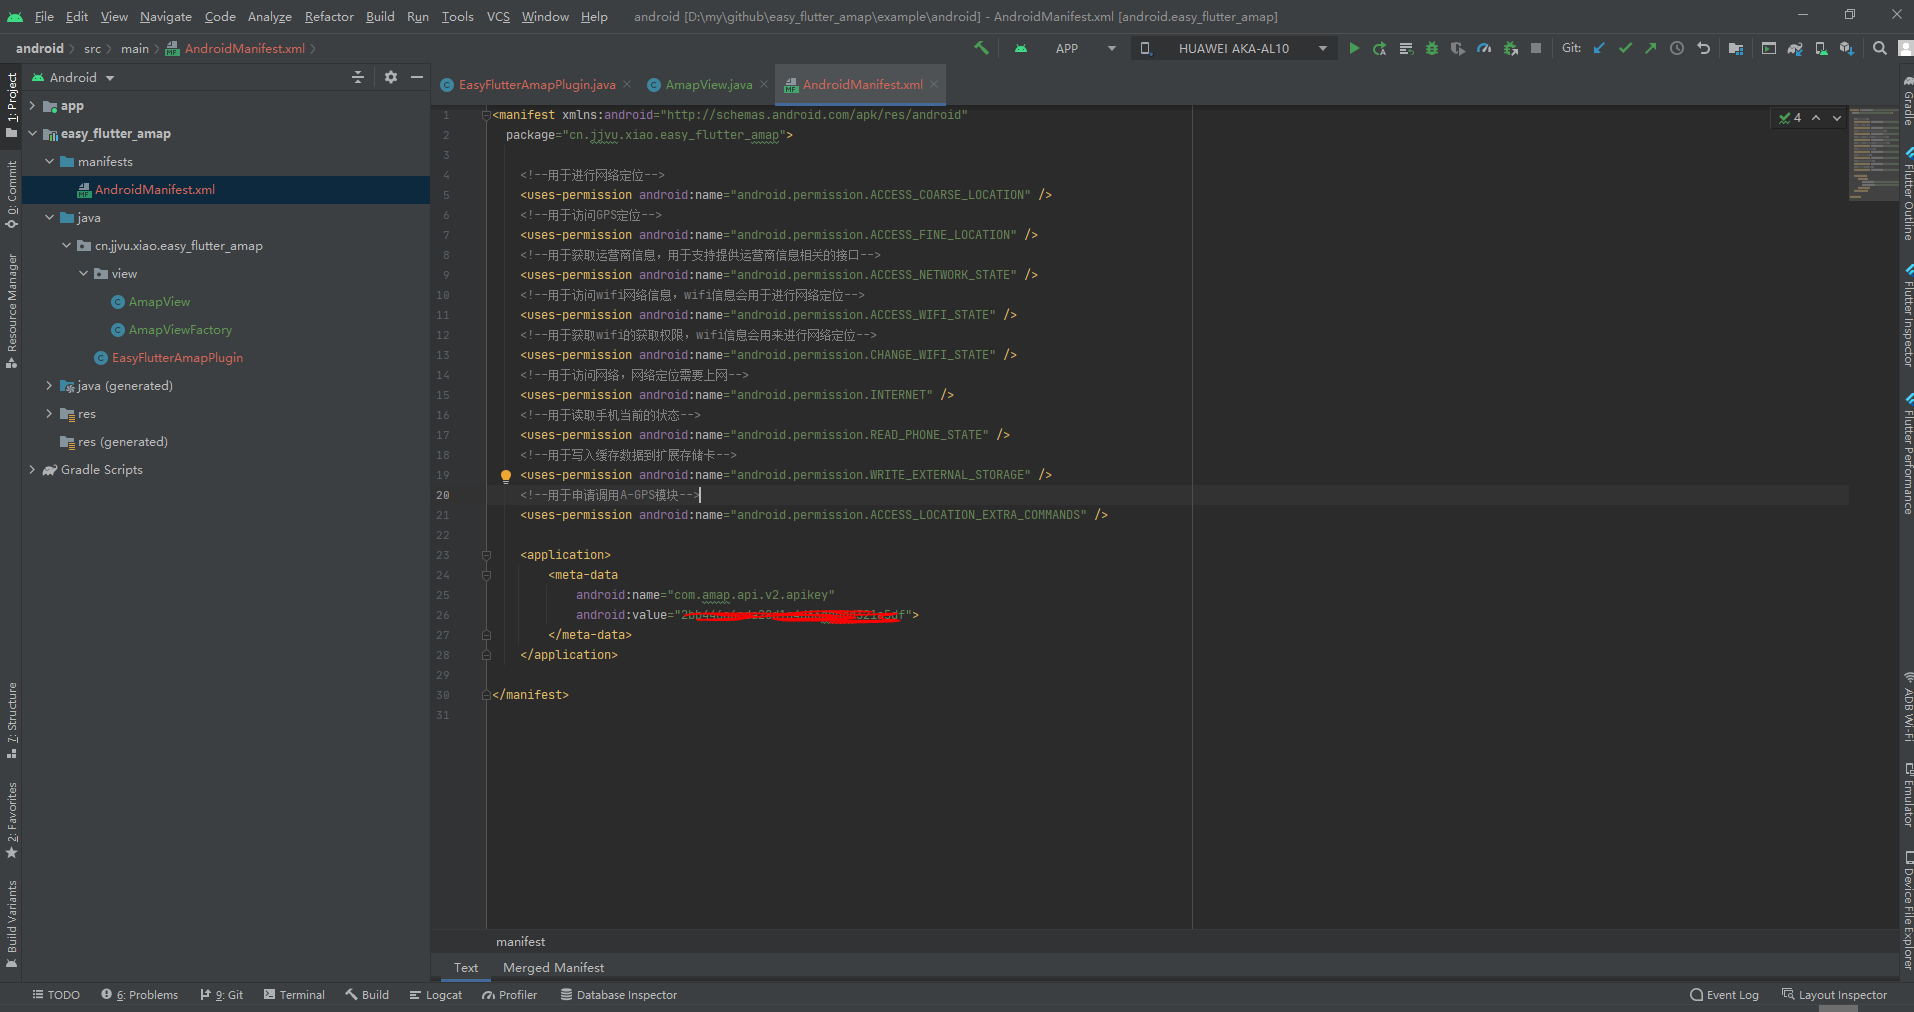
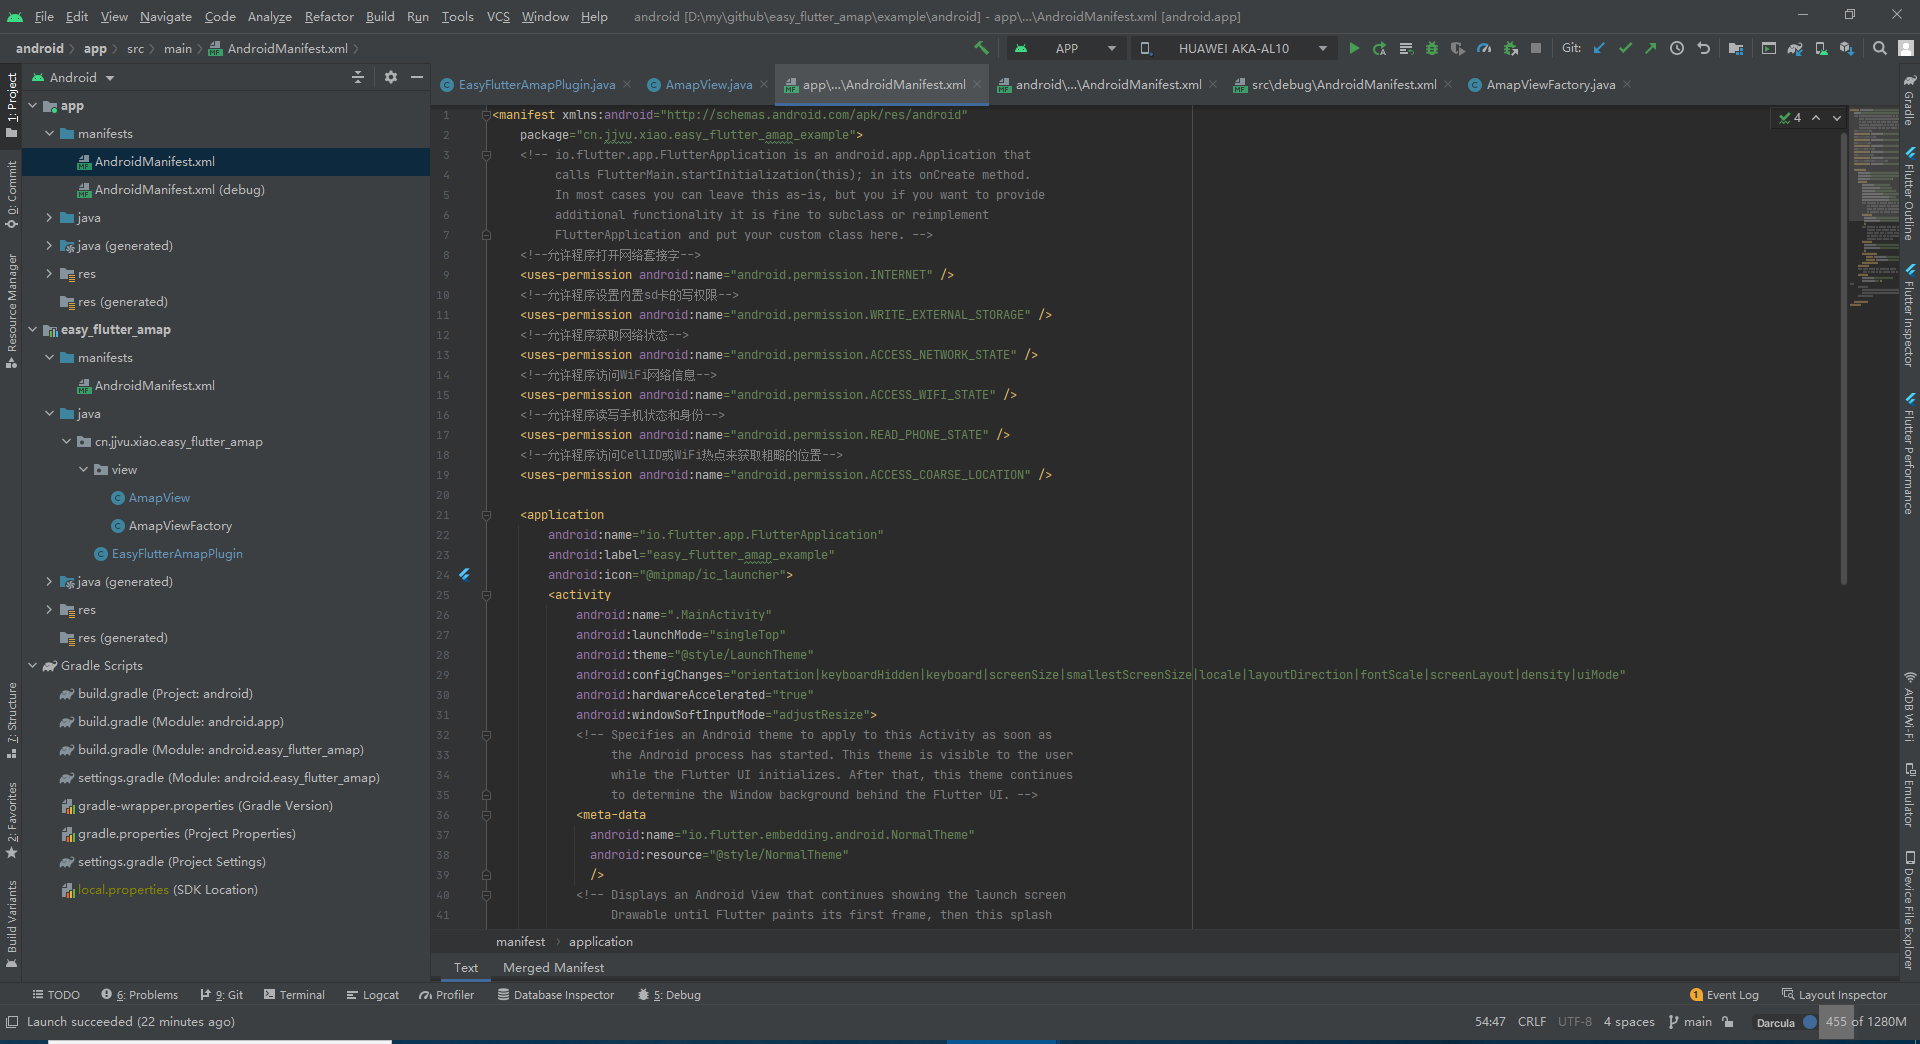
Please refer to this article for a detailed description if there are some problems Flutter Android permission problem , configure Gaode's key in several xml files, so as to complete the preliminary writing of Gaode map native code, and then start writing Dart cross platform code
In eas_ Flutter_ amap. The AndroidView class is written in the dart file, and the AmapConfig class is used to configure some parameters of Gaode map. This example is simple to configure the initial zoom parameters and the refresh position time interval, so that the Fletter end can send data to the Native end when the Android View is instantiated
import 'package:flutter/material.dart';
import 'package:flutter/services.dart';

class AmapView extends StatelessWidget {

  AmapConfig config;

  MethodChannel _channel = MethodChannel('easy_flutter_amap');

  AmapView({this.config}) {
    if (null == this.config)
      this.config = AmapConfig();
  }

  @override
  Widget build(BuildContext context) {
    return Container(
      child: AndroidView(
        viewType:"cn.jjvu.xiao.easy_flutter_amap/mapview",
        creationParamsCodec: StandardMessageCodec(),
        creationParams: config.toMap(),
      ),
    );
  }

  Future<String> addMarker(MarkerOption options) async {
    return _channel.invokeMethod("addMarkers", options.toMap());
  }
}

class AmapConfig {
  int interval;
  double zoomLevel;

  AmapConfig({this.interval: 1000, this.zoomLevel: 28.0});

  Map toMap() {
    Map map = Map();
    map['interval'] = interval;
    map['zoomLevel'] = zoomLevel;
    return map;
  }
}

class MarkerOption {
  double latitude;
  double longitude;
  String title;

  MarkerOption({this.latitude, this.longitude, this.title});

  Map toMap() {
    Map map = Map();
    map['latitude'] = latitude;
    map['longitude'] = longitude;
    map['title'] = title;
    return map;
  }
}
Finally, let's test the plug-in
In example / lib / main Edit the following code in the dart file to test the plug-in and print the parameters of the callback
import 'package:flutter/material.dart';

import 'package:easy_flutter_amap/easy_flutter_amap.dart';

void main() {
  runApp(MyApp());
}

class MyApp extends StatefulWidget {
  @override
  _MyAppState createState() => _MyAppState();
}

class _MyAppState extends State<MyApp> {

  AmapView amapView;

  @override
  void initState() {
    super.initState();
  }

  @override
  Widget build(BuildContext context) {
    amapView =  AmapView(
      config: AmapConfig(zoomLevel: 3),
    );
    return MaterialApp(
      home: Scaffold(
        appBar: AppBar(
          title: const Text('Plugin example app'),
        ),
        body: Center(
          child: amapView
        ),
        floatingActionButton: FloatingActionButton(
          child: Text('add to marker'),
          onPressed: () async {
            String msg = await amapView.addMarker(MarkerOption(latitude: 34.341568, longitude: 108.940174, title: "sign"));
            debugPrint(msg);
          },
        ),
      ),
    );
  }
}
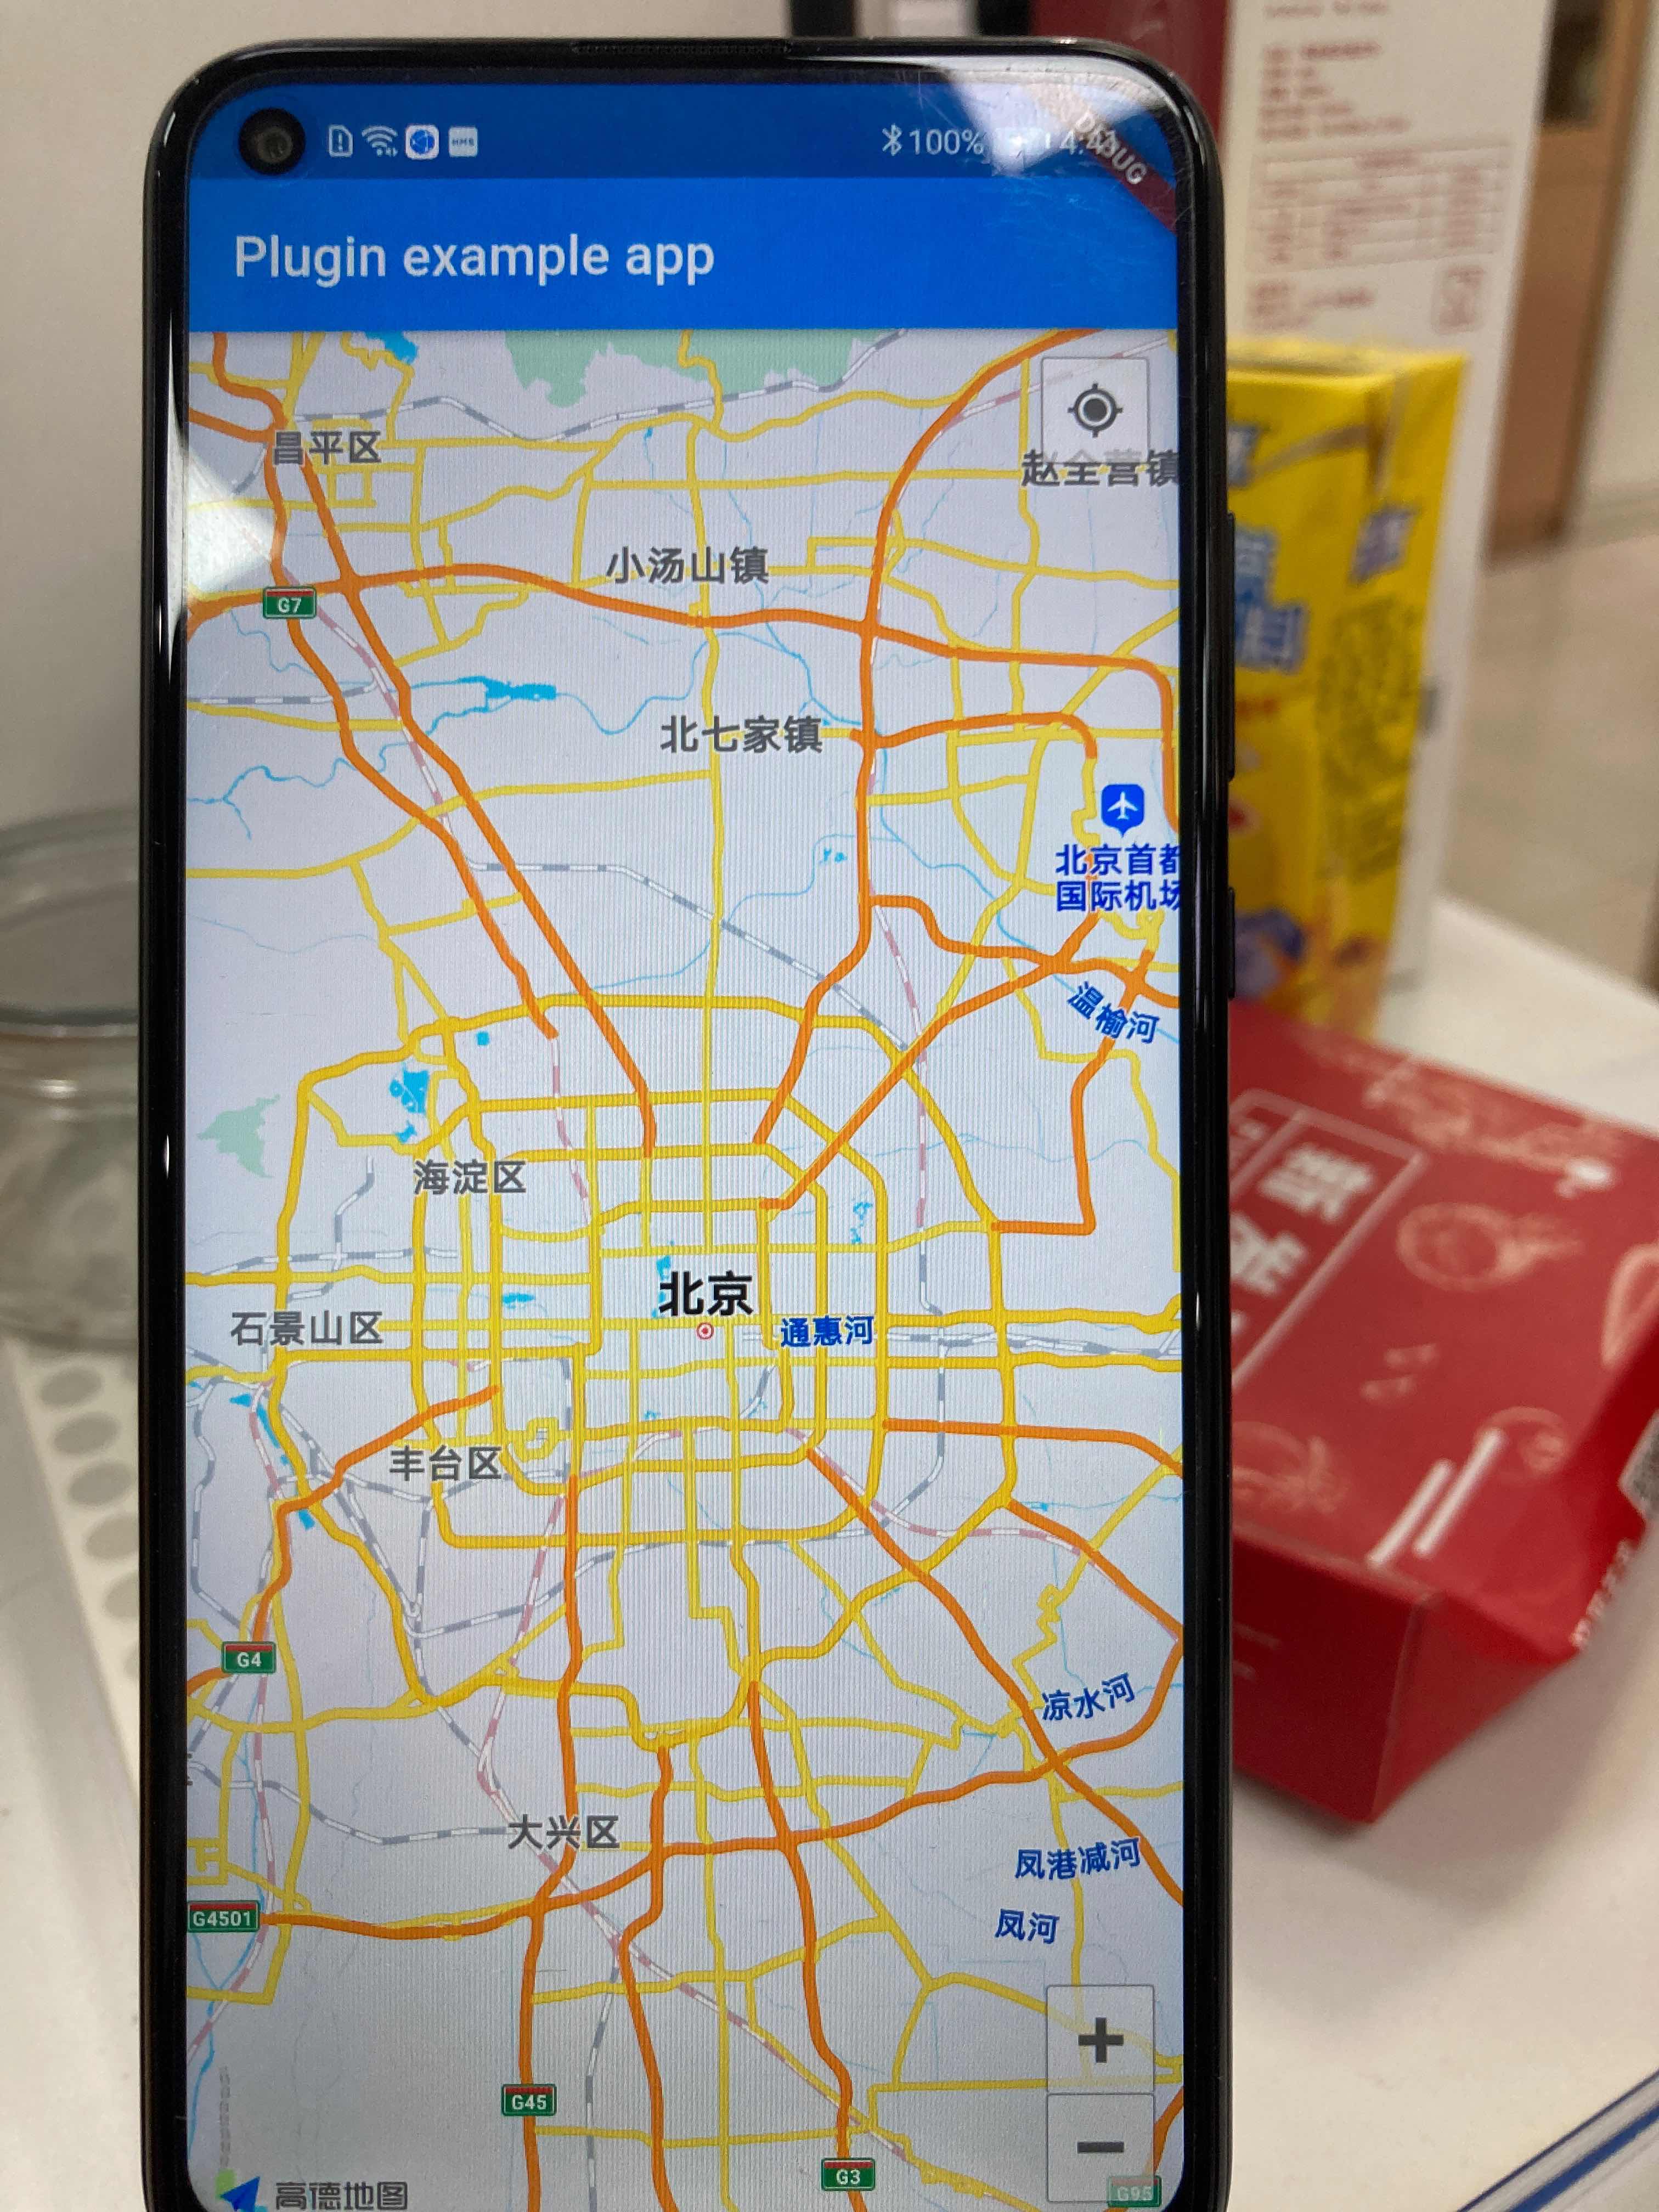
Run main Dart file, the result is a problem: my location is not displayed, and the center point of the map is in Beijing, as shown in Figure 10
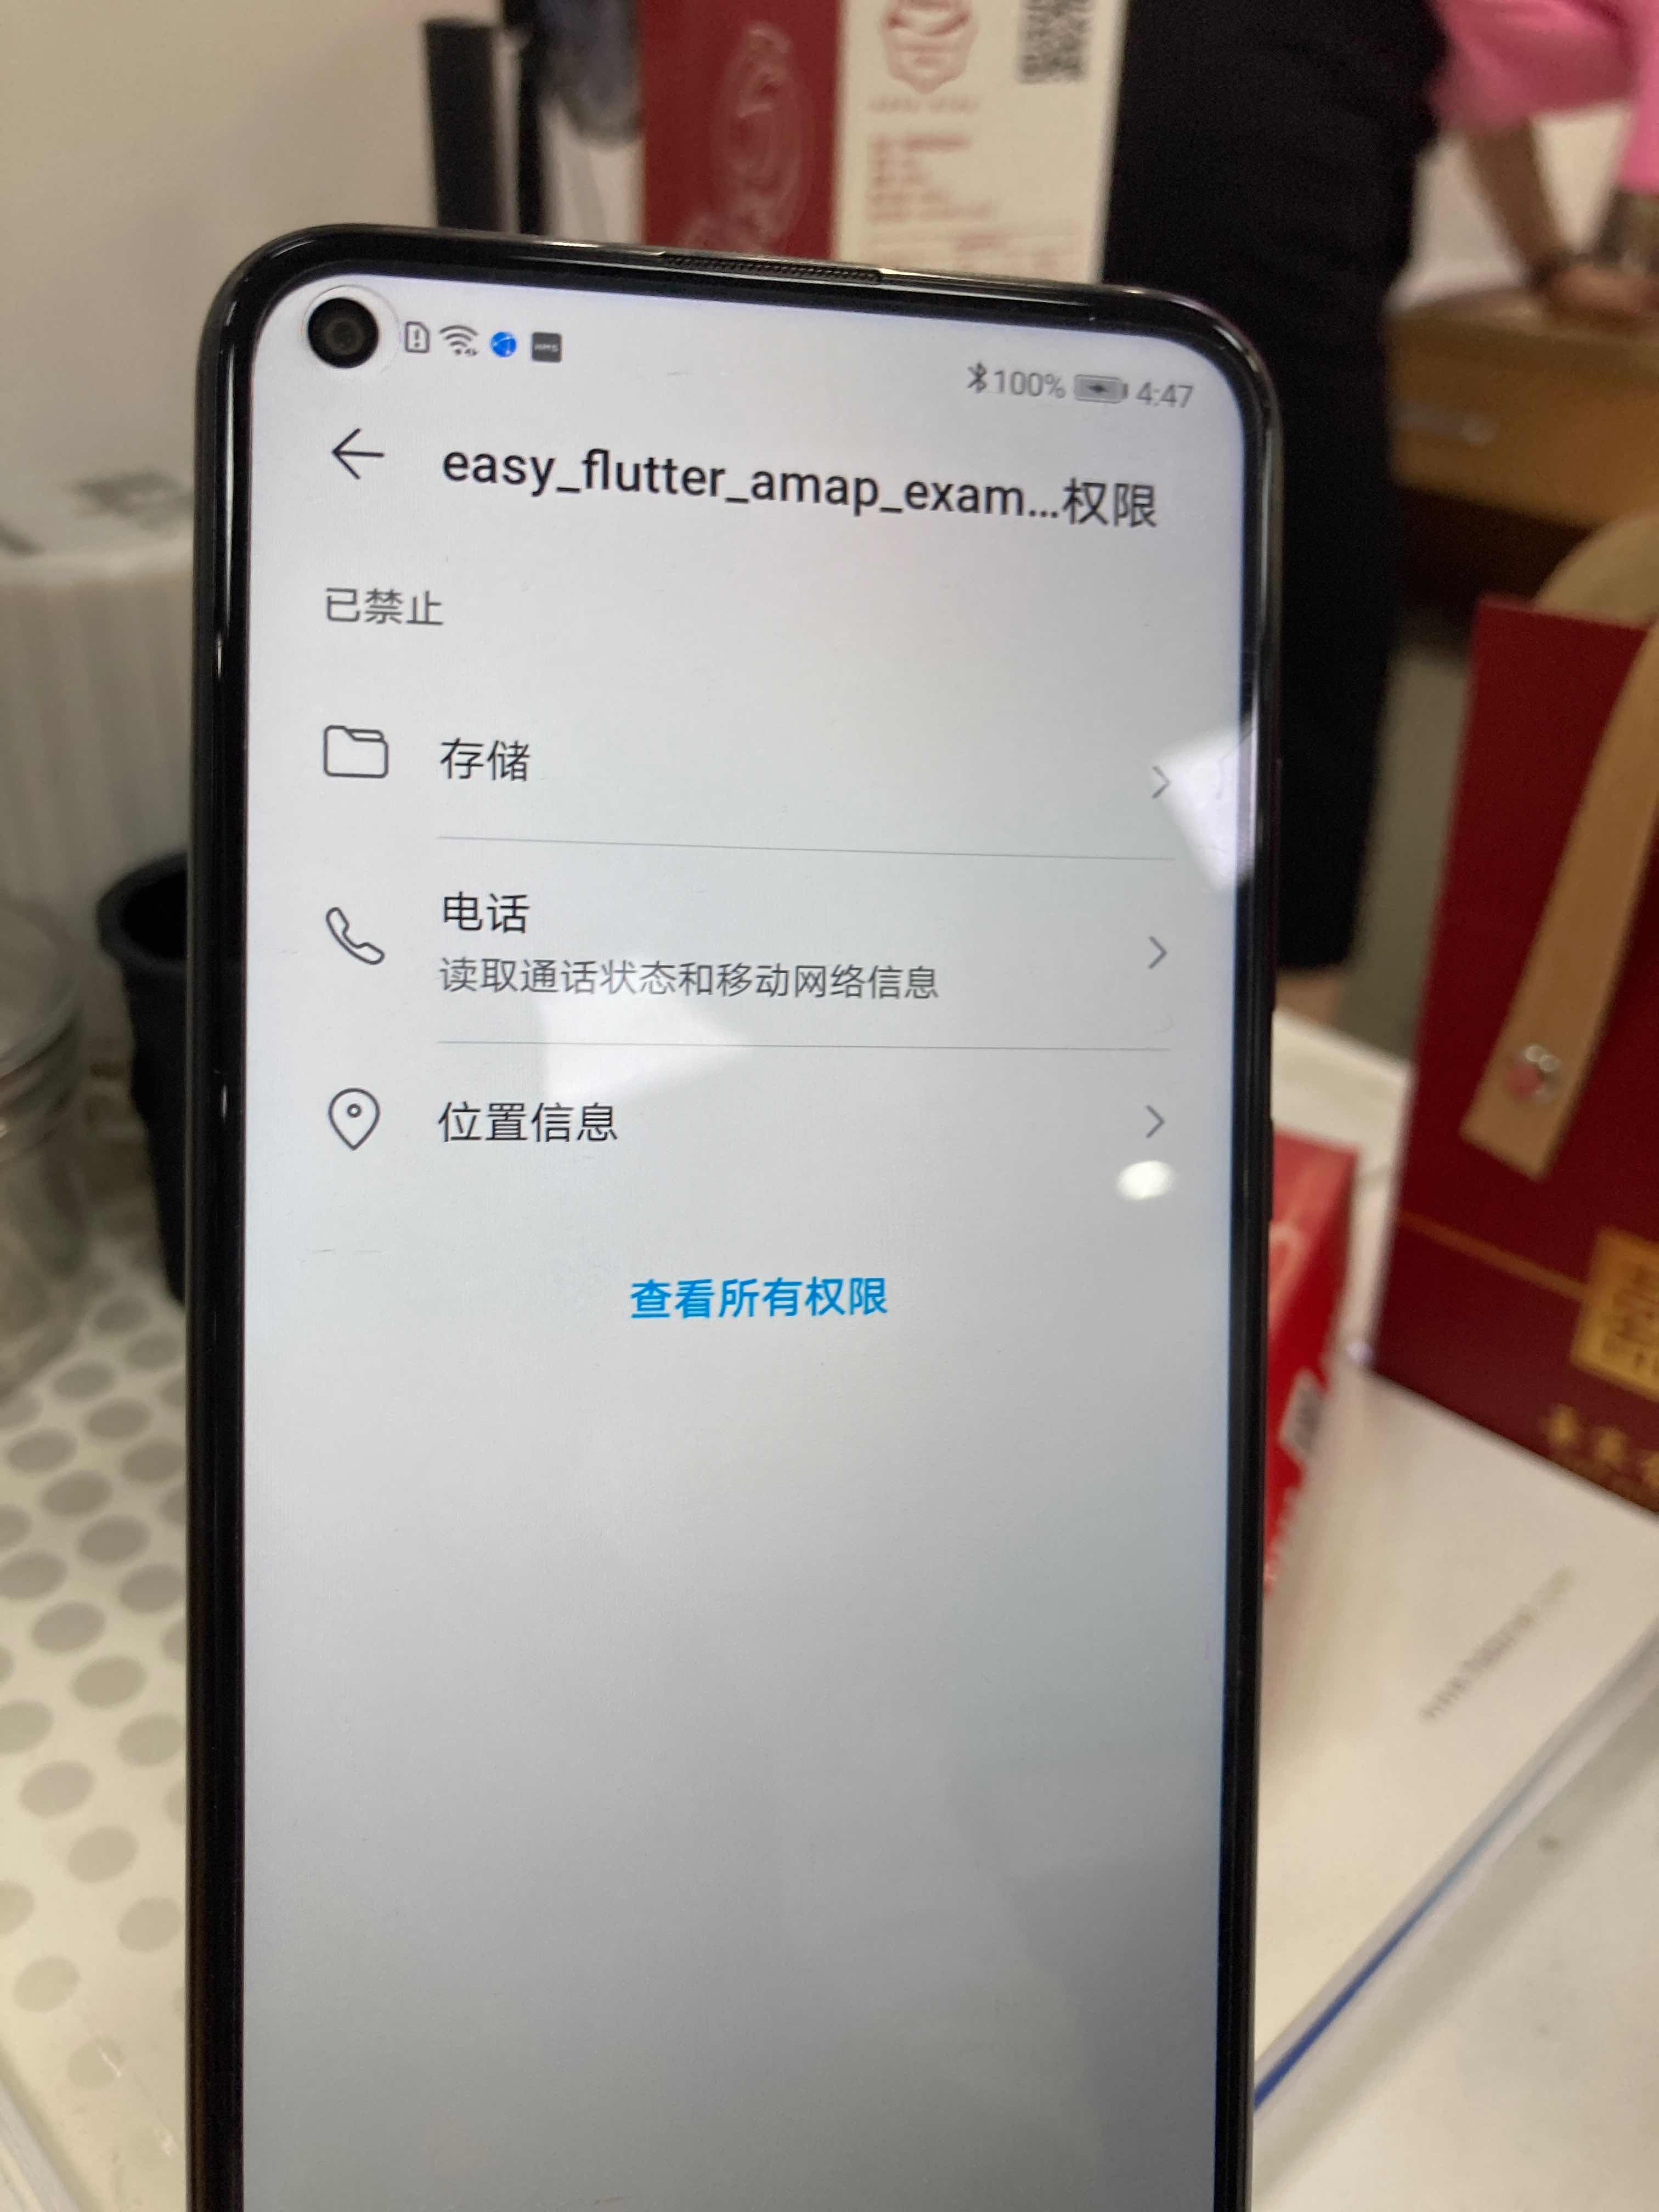
I think the code should be OK. Where will the problem appear? By the way, it may be a permission problem, because our test project has not been integrated yet permission,permission_handler For such a fluent plug-in, you also need to manually set the following permissions, as shown in Figure 11,
The settings of each model may be different. Figure 11 shows the effect of the author's model
Try the effect after granting relevant permissions; In this way, the effect is successfully displayed, as shown in Figure 12
matters needing attention
There are several points to note
- After modifying the native code, it is recommended to recompile and run to see the effect (shift + f9)
- Although in androidmanifest XML has applied for permission, but there may still be an error caused by not granting relevant permission
- The biggest difficulty of hybrid programming is to locate the wrong location. Don't feel that it is an error at one end. It is recommended to eliminate the error at the Dart end before locating the Native end
- Note the correspondence of several strings, such as the correspondence between Dart and Native MethodChannel, and the correspondence between registered view and Dart View
The relevant code is on my github easy_flutter_amap I will continue to maintain this project according to star popularity and personal spare time. I will attend Swift iOS in the later meeting. It would be better if there are leaders willing to join in the writing of iOS plug-ins
summary
Before that, the author used amap_map_fluttify Before the release of this article, I felt that this plug-in was the best one to use (even better than the official plug-in). Unfortunately, the maintenance frequency of the author is very low, and many bugs have not been repaired. If possible, the author may continue to maintain a good library maintenance and development.
Recently, the author has developed an enterprise level Internet of things application by using Flutter technology in the company. If you are interested in the author, you are welcome to pay attention to the author. Readers have good suggestions. Please leave a message below. The code word is not easy, please give it to me 👍