preface
Gradle is an automated build tool that links the steps of software compilation, testing and deployment.
For android developers, you already know build Gradle's android {} and dependencies {}, but what's his compilation process like? What can be done in this process?
This article is a learning note when learning Gradle, so that you can re understand Gradle and make Gradle speed up and improve the construction of your project. At this time, I will share with you and encourage you
The main contents of this note are as follows
- Gradle's most basic project configuration
- Groovy basic syntax and explain the apply plugin: 'xxxx' and dependencies {}
- Gradle Project/Task and customize Task and Plugin
- Customize a plug-in process to rename the APP name
- APT technology - Java AbstractProcessor
- Android bytecode enhancement technology - Transform (bytecode enhancement technology used in Android)
The content of the article is slightly longer. If you have mastered the basic knowledge of Gradle, you can directly view the content you want to see through the directory. It's good to review or study.
Get acquainted with Gradle project construction configuration
Grade project structure
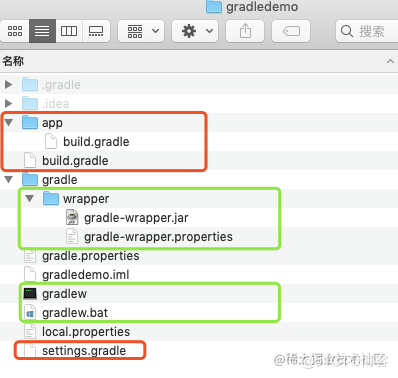
As shown in the figure, it is a relatively small gradle configuration. Here we mainly talk about two parts
- The green part: the version configuration of grade and the scripts required for grade, where gradlew is the script under linux/mac, gradle Bat is the script required under windows
- Red part: settings Gradle is the project configuration of the root project, and the outer layer is build Gradle is the configuration of the root project, and the inner build Gradle is the configuration of subprojects
gradle configuration sequence
The item configuration of grade is to identify settings first Gradle, and then configure each build gradle.
To illustrate the build execution sequence, the corresponding code is set in the most basic gradle project structure above
// settings.gradle
println "settings.gradle start"
include ':app'
println "settings.gradle end"
//root build.gradle
println "project.root start"
buildscript {
    repositories {
    }
    dependencies {
    }
}

allprojects {
}
println "project.root end"
//app build.gradle
println "project.app start"
project.afterEvaluate {
println "project.app.afterEvaluate print"
}
project.beforeEvaluate {
println "project.app.beforeEvaluate print"
}
println "project.app end"If it is mac/linux, execute/ gradlew got the following results:
settings.gradle start
settings.gradle end

> Configure project :
project.root start
project.root end

> Configure project :app
project.app start
project.app end
project.app.afterEvaluate print
Groovy syntax
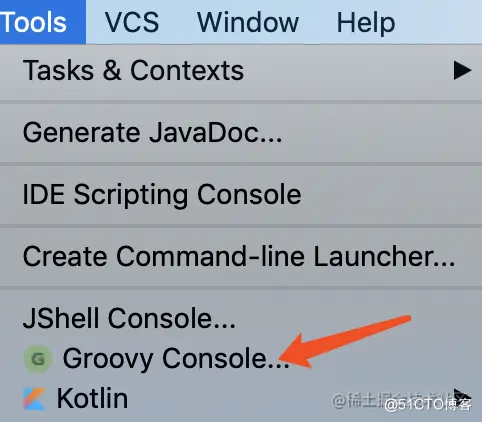
Let's talk about some Groovy syntax. You can open Android studio tools - > Groovy console to practice Groovy syntax, as follows
Optional type definitions. Statement terminator semicolon (;) can be omitted
int vs = 1
def version = 'version1'

println(vs)
println(version)
Parentheses are also optional
println vs
println version
String definition
def s1 = 'aaa'
def s2 = "version is ${version}"
def s3 = ''' str
is
many
'''
println s1
println s2
println s3
aggregate
def list = ['ant','maven']
list << "gradle"
list.add('test')
println list.size()
println list.toString()
//map
def years = ['key1':1000,"key2":2000]
println years.key1
println years.getClass()
Output results
[ant, maven, gradle, test]
1000
class java.util.LinkedHashMap
closure
groovy syntax supports closure syntax. Closure is simply a code block, as follows:
def v = {
    v -> println v
}
static def testMethod(Closure closure){
    closure('closure test')
}
testMethod v
The v defined is closure, testMethod is a method, the incoming parameter is a closure, and then the closure is called.
Explain the apply plugin: 'xxxx' and dependencies {}
Preparatory work, look at the source code of gradle
Let's start with the sub project build Change gradle to the following form
apply plugin: 'java-library'
repositories {
mavenLocal()
}
dependencies {
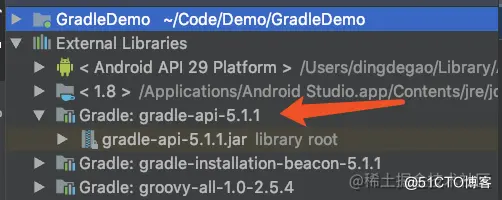
compile gradleApi()
}In this way, we can directly look at the source code of gradle, as follows in External Libraries
explain
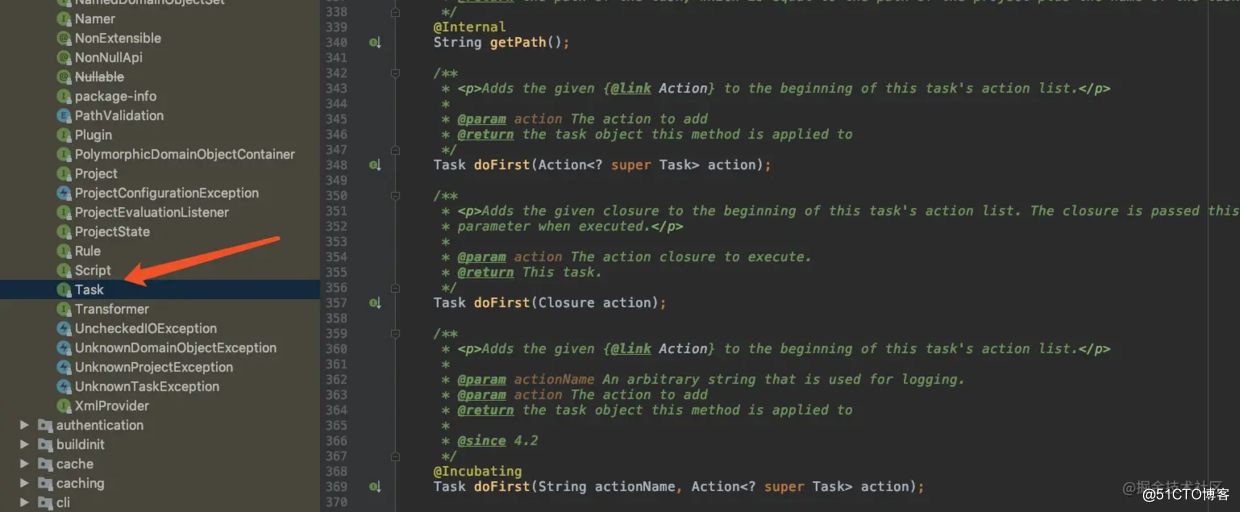
Enter build Gradle click apply to enter the gradle source code, which you can see
//PluginAware
 /**
     * Applies a plugin or script, using the given options provided as a map. Does nothing if the plugin has already been applied.
     * <p>
     * The given map is applied as a series of method calls to a newly created {@link ObjectConfigurationAction}.
     * That is, each key in the map is expected to be the name of a method {@link ObjectConfigurationAction} and the value to be compatible arguments to that method.
     *
     * <p>The following options are available:</p>
     *
     * <ul><li>{@code from}: A script to apply. Accepts any path supported by {@link org.gradle.api.Project#uri(Object)}.</li>
     *
     * <li>{@code plugin}: The id or implementation class of the plugin to apply.</li>
     *
     * <li>{@code to}: The target delegate object or objects. The default is this plugin aware object. Use this to configure objects other than this object.</li></ul>
     *
     * @param options the options to use to configure and {@link ObjectConfigurationAction} before "executing" it
     */
    void apply(Map<String, ?> options);
It is clearly explained in Groovy syntax that apply is actually a method, followed by a map, in which the plugin is the key
So are dependencies {}
//Project
/**
     * <p>Configures the dependencies for this project.
     *
     * <p>This method executes the given closure against the {@link DependencyHandler} for this project. The {@link
     * DependencyHandler} is passed to the closure as the closure's delegate.
     *
     * <h3>Examples:</h3>
     * See docs for {@link DependencyHandler}
     *
     * @param configureClosure the closure to use to configure the dependencies.
     */
    void dependencies(Closure configureClosure);
dependencies is a method, followed by a closure parameter
Question: think about it. Is android {} the same implementation? Explain later
Gradle Project/Task
As mentioned in the previous chapter, the initialization configuration of grade is to parse and execute setting Gradle, and then execute build Gradle, so actually these build Gradle is Project, the outer build Gradle is the root Project, and the inner layer is the child Project. There can only be one root Project and multiple child projects
We know the most basic gradle configuration, so how to use some things in gradle to serve us?
Plugin
As mentioned earlier, apply plugins: 'XXXX'. These plugins are implemented according to the gradle specification, including java and Android. Let's implement our own plugin
Put build Change gradle to the following code
//app build.gradle
class LibPlugin implements Plugin<Project>{
    @Override
    void apply(Project target) {
        println 'this is lib plugin'
    }
}
apply plugin:LibPlugin
Run/ gradlew's results are as follows
> Configure project :app
this is lib plugin
Plugin Extension
To obtain the Project configuration in the customized Plugin, we can obtain some basic configuration information through Project. How can we configure and obtain some properties we want to customize? At this time, we need to create an Extension and change the above code to the following form.
//app build.gradle
class LibExtension{
    String version
    String message
}
class LibPlugin implements Plugin<Project>{
    @Override
    void apply(Project target) {
        println 'this is lib plugin'
        //Create Extension
        target.extensions.create('libConfig',LibExtension)
        //Create a task
        target.tasks.create('libTask',{
           doLast{
               LibExtension config = project.libConfig
               println config.version
               println config.message
           }
        })
    }
}
apply plugin:LibPlugin
//to configure
libConfig {
    version = '1.0'
    message = 'lib message'
}
After configuration, execute/ gradlew libTask gets the following results
> Configure project :app
this is lib plugin
> Task :lib:libTask
1.0
lib message
After reading the above code, we know that Android {} is actually an Extension. It is created by plugin 'com android. Application 'or' com android. Library 'is created.
Task
In the above code, a task named libTask is created. There are many ways to create a task in gradle. The specific creation interface is in the TaskContainer class
//TaskContainer
Task create(Map<String, ?> options) throws InvalidUserDataException;
Task create(Map<String, ?> options, Closure configureClosure) throws InvalidUserDataException;
Task create(String name, Closure configureClosure) throws InvalidUserDataException;
Task create(String name) throws InvalidUserDataException;
<T extends Task> T create(String name, Class<T> type) throws InvalidUserDataException;
<T extends Task> T create(String name, Class<T> type, Action<? super T> configuration) throws InvalidUserDataException;
Project cannot run, so we need to define some tasks to complete our compilation, running, packaging, etc. com. android. The application plug-in defines packaging tasks for us, such as assembly. The plug-in we just defined adds a libTask for us to output.

Task API
We can see that the doLast API can be called directly in the created task because there is a doLast API in the task class. You can view the corresponding code and see the corresponding API
Some tasks of Gradle
gradle defines some common tasks for us, such as clean and copy. These tasks can be directly created by name, as follows:
task clean(type: Delete) {
    delete rootProject.buildDir
}
Dependent task
We know that Android will use assembly related tasks when packaging, but it can't package directly. It will rely on other tasks So how to create a dependent task? The code is as follows
task A{
    println "A task"
}
task B({
    println 'B task'
},dependsOn: A)
Execution/ Gradew B output
A task
B task
Customize a plug-in to rename the APP name
Through the above introductory explanations, we probably know how gradle is built. Now we define a plug-in that renames the APP name in the Android packaging process.
The above is in build It's OK for gradle to write Plugin directly, so how can we take this out in order to make it more reusable?
as follows
Including build Gradle is
apply plugin: 'groovy'
apply plugin: 'maven'
repositories {
mavenLocal()
jcenter()
}
dependencies {
compile gradleApi()
}
def versionName = "0.0.1"
group "com.ding.demo"
version versionName
uploadArchives{ //The current project can be published to a local folder
repositories {
mavenDeployer {
repository(url: uri('../repo')) //Define the address of the local maven warehouse
}
}
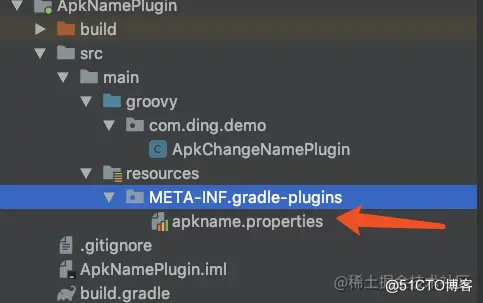
}apkname.properties is
implementation-class=com.ding.demo.ApkChangeNamePlugin
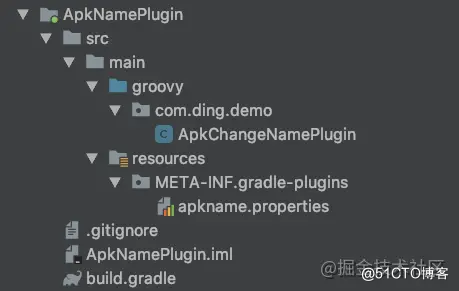
ApkChangeNamePlugin
package com.ding.demo

import org.gradle.api.Project
import org.gradle.api.Plugin

class ApkChangeNamePlugin implements Plugin<Project>{

    static  class ChangeAppNameConfig{
        String prefixName
        String notConfig
    }

    static def buildTime() {
        return new Date().format("yyyy_MM_dd_HH_mm_ss", TimeZone.getTimeZone("GMT+8"))
    }

    @Override
    void apply(Project project) {
        if(!project.android){
            throw new IllegalStateException('Must apply \'com.android.application\' or \'com.android.library\' first!');
        }
        project.getExtensions().create("nameConfig",ChangeAppNameConfig)
        ChangeAppNameConfig config
        project.afterEvaluate {
            config = project.nameConfig
        }
        project.android.applicationVariants.all{
            variant ->
                variant.outputs.all {
                    output ->
                        if (output.outputFile != null && output.outputFile.name.endsWith('.apk')
                                && !output.outputFile.name.contains(config.notConfig)) {
                            def appName = config.prefixName
                            def time = buildTime()
                            String name = output.baseName
                            name = name.replaceAll("-", "_")
                            outputFileName = "${appName}-${variant.versionCode}-${name}-${time}.apk"
                        }
                }
        }
    }
}
When the definition is complete, execute/ gradlew uploadArchives will generate the corresponding plug-ins in this directory
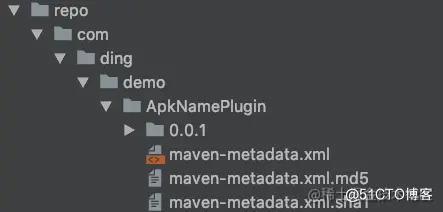
Apply the plug-in in the root build Grade configuration
buildscript {
    repositories {
        maven {url uri('./repo/')}
        google()
        jcenter()
    }
    dependencies {
        classpath 'com.android.tools.build:gradle:3.4.1'
        classpath 'com.ding.demo:apkname:0.0.1'
    }
}
On app Grade settings
apply plugin: 'apkname'
nameConfig{
    prefixName = 'demo'
    notConfig = 'debug'
}
Gradle doc official website
The basic API of Gradle is almost finished.
Official website address: docs.gradle.org/current/use...
You can view the corresponding API or directly through the source code
But the notes are not finished. After learning the basics of Gradle, we want it to serve us. Here are some practical applications
APT Technology
The full name of APT is Annotation Processing Tool, which is a technology for parsing annotations and generating code during compilation. It is the implementation principle of some commonly used IOC frameworks. The famous ButterKnife and Dagger2 are implemented with this technology, and some injections in SpringBoot are also injected with it
Before introducing APT, let's first introduce SPI (Service Provider Interface), which automatically loads the classes defined in the file by searching the file in the META-INF / * * folder under the ClassPath path. The above customized ApkNamePlugin is implemented using this mechanism, as follows
SPI technology has also been used to decouple in the process of componentization.
This technology is also needed to implement an apt, but Google has redefined this using APT Technology and defined an auto service, which can simplify the implementation. Here is a simple Utils document generation tool.
Utils document generation plug-in
We know that there may be many Utils in the project. Whenever new employees or old employees can't complete them, we know that there are those Utils. We may repeatedly add some Utils, such as obtaining the density of the screen and many Utils in the box height We use a small plug-in to generate a document. When using Utils, we can see the document at a glance
Create a new Java Libary named DocAnnotation
Define an annotation
@Retention(RetentionPolicy.CLASS)
public @interface GDoc {
   String name() default "";

   String author() default "";

   String time() default "";
}
Create a new Java Libary named DocComplie
Then introduce Google's auto service and DocAnnotation
apply plugin: 'java-library'
dependencies {
    implementation fileTree(dir: 'libs', include: ['*.jar'])
    implementation 'com.google.auto.service:auto-service:1.0-rc2'
    implementation 'com.alibaba:fastjson:1.2.34'
    implementation project(':DocAnnotation')
}
Define an Entity class
public class Entity {

    public String author;
    public String time;
    public String name;
}
Define annotation processor
@AutoService(Processor.class) //This annotation is the SPI function provided by auto service
public class DocProcessor extends AbstractProcessor{

    Writer docWriter;

    @Override
    public synchronized void init(ProcessingEnvironment processingEnvironment) {
        super.init(processingEnvironment);

    }

    @Override
    public Set<String> getSupportedAnnotationTypes() {
        //A collection of treatable annotations
        HashSet<String> annotations = new HashSet<>();
        String canonicalName = GDoc.class.getCanonicalName();
        annotations.add(canonicalName);
        return annotations;
    }

    @Override
    public SourceVersion getSupportedSourceVersion() {
        return SourceVersion.latestSupported();
    }

    @Override
    public boolean process(Set<? extends TypeElement> annotations, RoundEnvironment env) {
        Messager messager = processingEnv.getMessager();
        Map<String,Entity> map = new HashMap<>();
        StringBuilder stringBuilder = new StringBuilder();
        for (Element e : env.getElementsAnnotatedWith(GDoc.class)) {
            GDoc annotation = e.getAnnotation(GDoc.class);
            Entity entity = new Entity();
            entity.name = annotation.name();
            entity.author = annotation.author();
            entity.time = annotation.time();
            map.put(e.getSimpleName().toString(),entity);

            stringBuilder.append(e.getSimpleName()).append("       ").append(entity.name).append("\n");
        }

        try {
            docWriter = processingEnv.getFiler().createResource(
                    StandardLocation.SOURCE_OUTPUT,
                    "",
                    "DescClassDoc.json"
            ).openWriter();

            //docWriter.append(JSON.toJSONString(map, SerializerFeature.PrettyFormat));
            docWriter.append(stringBuilder.toString());
            docWriter.flush();
            docWriter.close();
        } catch (IOException e) {
            //e.printStackTrace();
            //Write failed
        }
        return true;
    }
}
Reference in project
dependencies {
    implementation project(':DocAnnotation')
    annotationProcessor project(':DocComplie')
}
Apply a Utils
@GDoc(name = "Color tool class",time = "2019 September 18, 2009:58:07",author = "dingxx")
public final class ColorUtils {
}
The final generated documents are as follows:
name              function            author
ColorUtils      Color tool class        dingxx
Of course, the final generated document can be determined by yourself or directly html
Android Transform
Before talking about Android Transform, first introduce the Android packaging process when executing task assembly
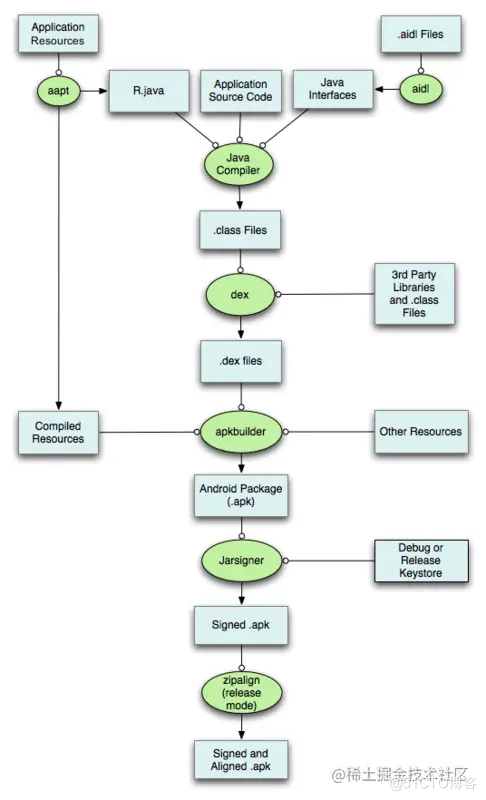
Yes During the compilation of class /jar/resources, apply plugin: 'com android. Application 'this plug-in supports the definition of a callback (com.android.tools.build:gradle:2.xx above), which is similar to an interceptor. You can carry out some definition processing yourself. This is called Android Transform
At this time, we can dynamically modify these class es and complete some things we want to do, such as repairing bug s in third-party libraries, automatically burying points, adding functions to third-party libraries, taking time to execute, completing dynamic AOP, etc
The ARoute we know uses this technology Of course, he first uses APT to generate a routing file, and then loads it through Transform
The following is quoted from ARoute ReadMe
Automatic loading of routing table using Gradle plug-in (optional)
apply plugin: 'com.alibaba.arouter'
buildscript {
    repositories {
       jcenter()
    }

    dependencies {
        classpath "com.alibaba:arouter-register:?"
    }
}
Optional. The routing table is automatically loaded (power by AutoRegister) through the registration plug-in provided by ARouter. By default, it is loaded by scanning dex. Automatic registration through the gradle plug-in can shorten the initialization time and solve the problem that the application reinforcement can not directly access the dex file and the initialization fails. It should be noted that, The plug-in must be combined with API 1.3 Use version above 0!
From the logistics center of ARoute, you can see that if the plugin of trasnform is not used during init, it will traverse all dex and find the relevant classes referenced by ARoute during registration, as shown below
//LogisticsCenter
public synchronized static void init(Context context, ThreadPoolExecutor tpe) throws HandlerException {
  if (registerByPlugin) {
        logger.info(TAG, "Load router map by arouter-auto-register plugin.");
    } else {
        Set<String> routerMap;

        // It will rebuild router map every times when debuggable.
        if (ARouter.debuggable() || PackageUtils.isNewVersion(context)) {
             logger.info(TAG, "Run with debug mode or new install, rebuild router map.");
            // These class was generated by arouter-compiler.
            routerMap = ClassUtils.getFileNameByPackageName(mContext, ROUTE_ROOT_PAKCAGE);
            if (!routerMap.isEmpty()) {
                context.getSharedPreferences(AROUTER_SP_CACHE_KEY, Context.MODE_PRIVATE).edit().putStringSet(AROUTER_SP_KEY_MAP,routerMap).apply();
            }
            PackageUtils.updateVersion(context);    // Save new version name when router map update finishes.
        } else {
            logger.info(TAG, "Load router map from cache.");
            routerMap = new HashSet<>(context.getSharedPreferences(AROUTER_SP_CACHE_KEY, Context.MODE_PRIVATE).getStringSet(AROUTER_SP_KEY_MAP, new HashSet<String>()));
        }
    }
    ....
}
Introduction to the implementation of Android Transform
Through the above, we know that the callback is class file or jar file, then it needs to be processed class files or jar files need tools related to bytecode processing. There are commonly used tools related to bytecode processing
- ASM
- Javassist
- AspectJ
For specific details, you can view meituan's tweets Java bytecode enhanced exploration
How to define a Trasnfrom, review the above gradle plugin implementation and see the following code
public class TransfromPlugin implements Plugin<Project> {

    @Override
    public void apply(Project project) {
        AppExtension appExtension = (AppExtension) project.getProperties().get("android");
        appExtension.registerTransform(new DemoTransform(), Collections.EMPTY_LIST);
    }

    class DemoTransform extends Transform{

        @Override
        public String getName() {
            return null;
        }

        @Override
        public Set<QualifiedContent.ContentType> getInputTypes() {
            return null;
        }

        @Override
        public Set<? super QualifiedContent.Scope> getScopes() {
            return null;
        }

        @Override
        public boolean isIncremental() {
            return false;
        }
    }
}
This article is transferred from https://juejin.cn/post/6844903944439726087 , in case of infringement, please contact to delete.