Article introduction:
GT package that you can't put down in development. Follow the GSLS official website to view more source code (✿ ゚ ▽ ゚) toolkit.
All articles are compiled so that readers can directly read and completely copy and paste. Among them, complex or more source codes will have source codes and paste them on the github website.
The source code in GT class is completely open source, with more Chinese comments, so that more people can read it directly.
Click a point of interest and a praise (″ '▽' ″), and pay attention to the latest release Library of the blogger: https://github.com/1079374315/GT
Meidi framework makes creation so simple!
(Click I know the latest website)
Updated on: January 7, 2020
catalogue
GT # previous remarks: dependency tutorial
GT Chapter 1: Log multi type printing
GT Chapter 3: the story of AlertDialog
GT Chapter 4: Notification notification class (adapted to Android 9.0)
GT Chapter 5: some unknown operations in GT
GT Chapter 6: different SharedPreferences
GT Chapter 7: Mobile SD card IO operation
GT Chapter 9: network request OkGo/OkHttp3 + JSON
GT Chapter 11: loading Google Maps for PC
GT Chapter 13: sharing function and loading pictures
GT Chapter 14: Window operation class
GT Chapter 15: GT_Fragment framework
GT Chapter 16: DeviceListening} device listening class
GT Chapter 17: super simple multimedia
GT Chapter 18: Thread update UI Thread
GT Chapter 19: Inheritance of BaseActivity and AnnotationActivity classes:
GT Chapter 20: GT annotation Calling:
GT Chapter 21: true and false animation
GT Chapter 22: APP update and APP hot repair
GT Chapter 23: remote sensing control
GT section to be updated: GT library being updated
GT # previous remarks: dependency tutorial
The current Android development is almost inseparable from the dependency package. We can directly use the excellent components written by others, and the usage is also simple, which greatly improves the efficiency of our Android development. If some students who are still in school have not contacted the dependency package, I will briefly talk about it here.
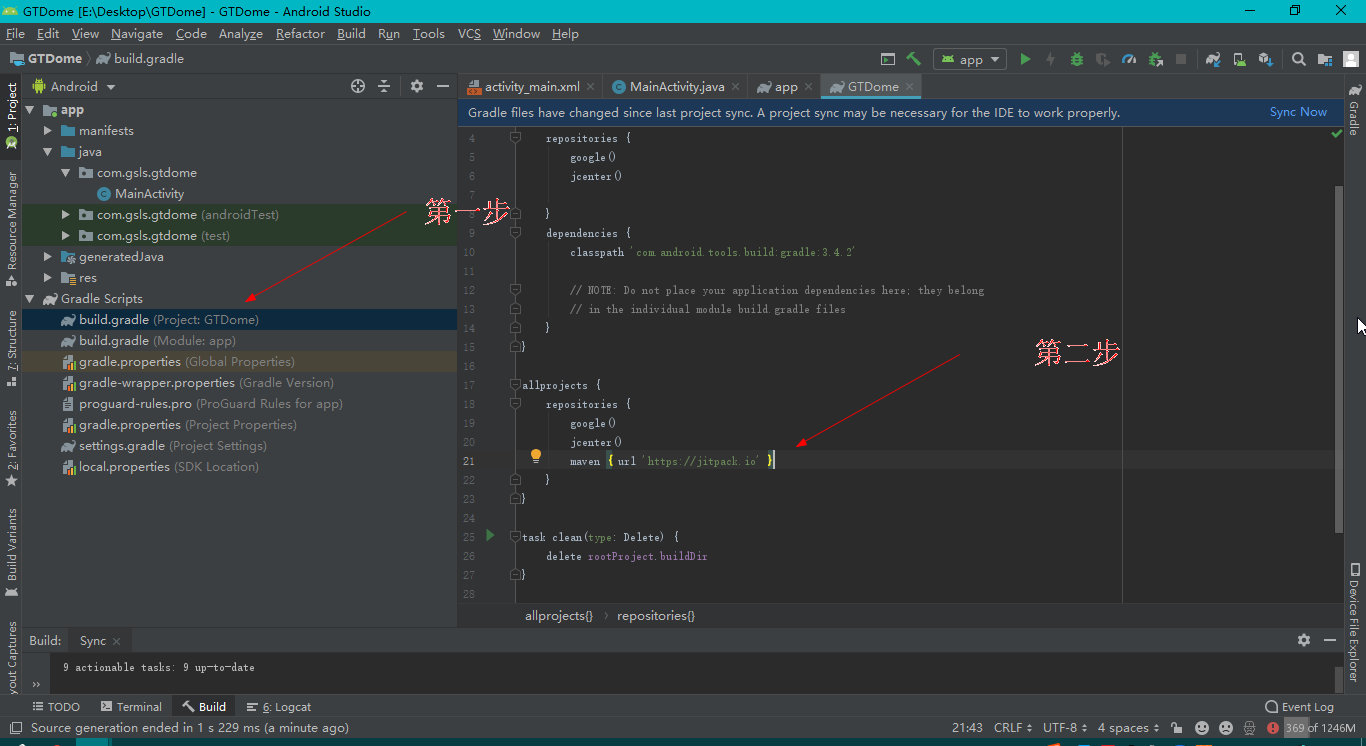
Step 1: add the following repository to the root build. gradle at the end of the repository
allprojects {
	repositories {
		...
		maven { url 'https://jitpack.io' }
	}
}
Step 2: add dependencies
(Note: the version number of the current demo is version 1.0.2, and a new version will be released in the future, Welcome to the latest version)
dependencies {
	implementation 'com.github.1079374315:GT:v1.0.2'
}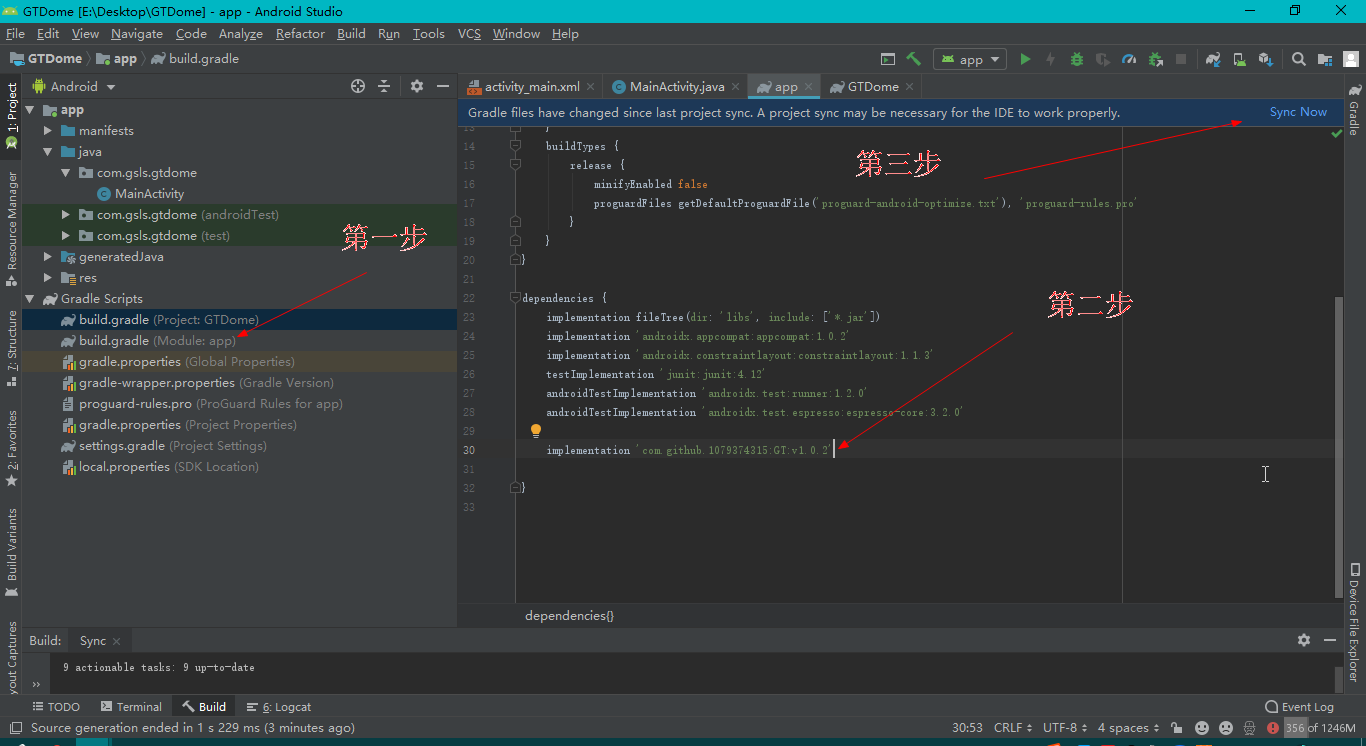
Finally, synchronize Sync New again. During this period, remember to open the network and need to be connected.
GT Chapter 1: Log multi type printing
Create an empty project and add the following code to MainActivity in the project:
[Note: GT library shall reach version 1.0.2]
        /** log Log lifeblood */
        //GT.getGT().setLogTf(true);// The default value is true. If it is set to false, all log s not issued internally by GT will not be printed

        /** Classic log */
        GT.log_d(getClass().getName() + ": classical log");

        /** Print log e int type log */
        GT.log_e(1079);

        /** Print log i boolean type log */
        GT.log_i(true);

        /** Print log with more data */
        GT.log_e("My data log ","Licensed under the Apache License, Version 1.0.2 (the \"License\");\n" +
                "you may not use this file except in compliance with the License.\n" +
                "You may obtain a copy of the License at");

        /** Print an object */
        GT.log_i(new Fragment());
Let's filter the logs in the right window of Verbose and see the print results:
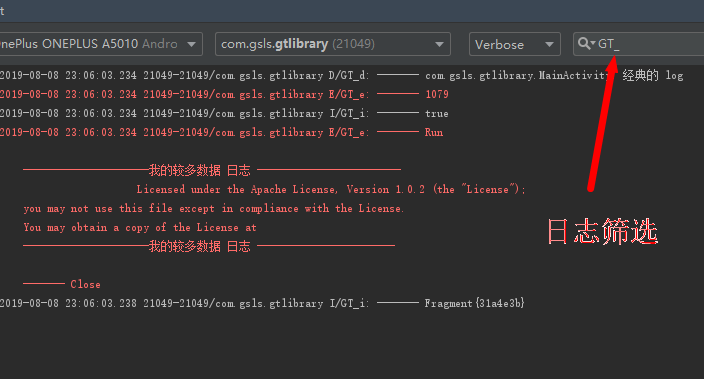
Let's try to adjust the log filter more strictly:
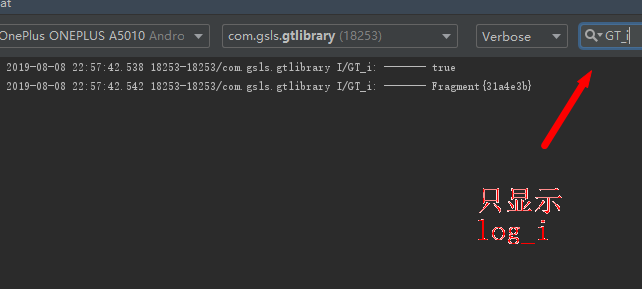
Summary: let your log do whatever you want, write less code and make a cooler log.
GT Chapter 2: Toast family
Create an empty project and add the following code to MainActivity in the project:
[Note: GT library shall reach version 1.0.2]
        // Toast hint lifeline
//        GT. getGT(). set Toast Tf(false);// The default value is true. If it is set to false, all toasts issued outside the GT will not be displayed

        //The least boring Toast
        GT.toast_s(this,"ordinary Toast ");

        //Toast of custom time
        GT.toast_time(this,"Custom time Toast", 4000);
Operation effect diagram:
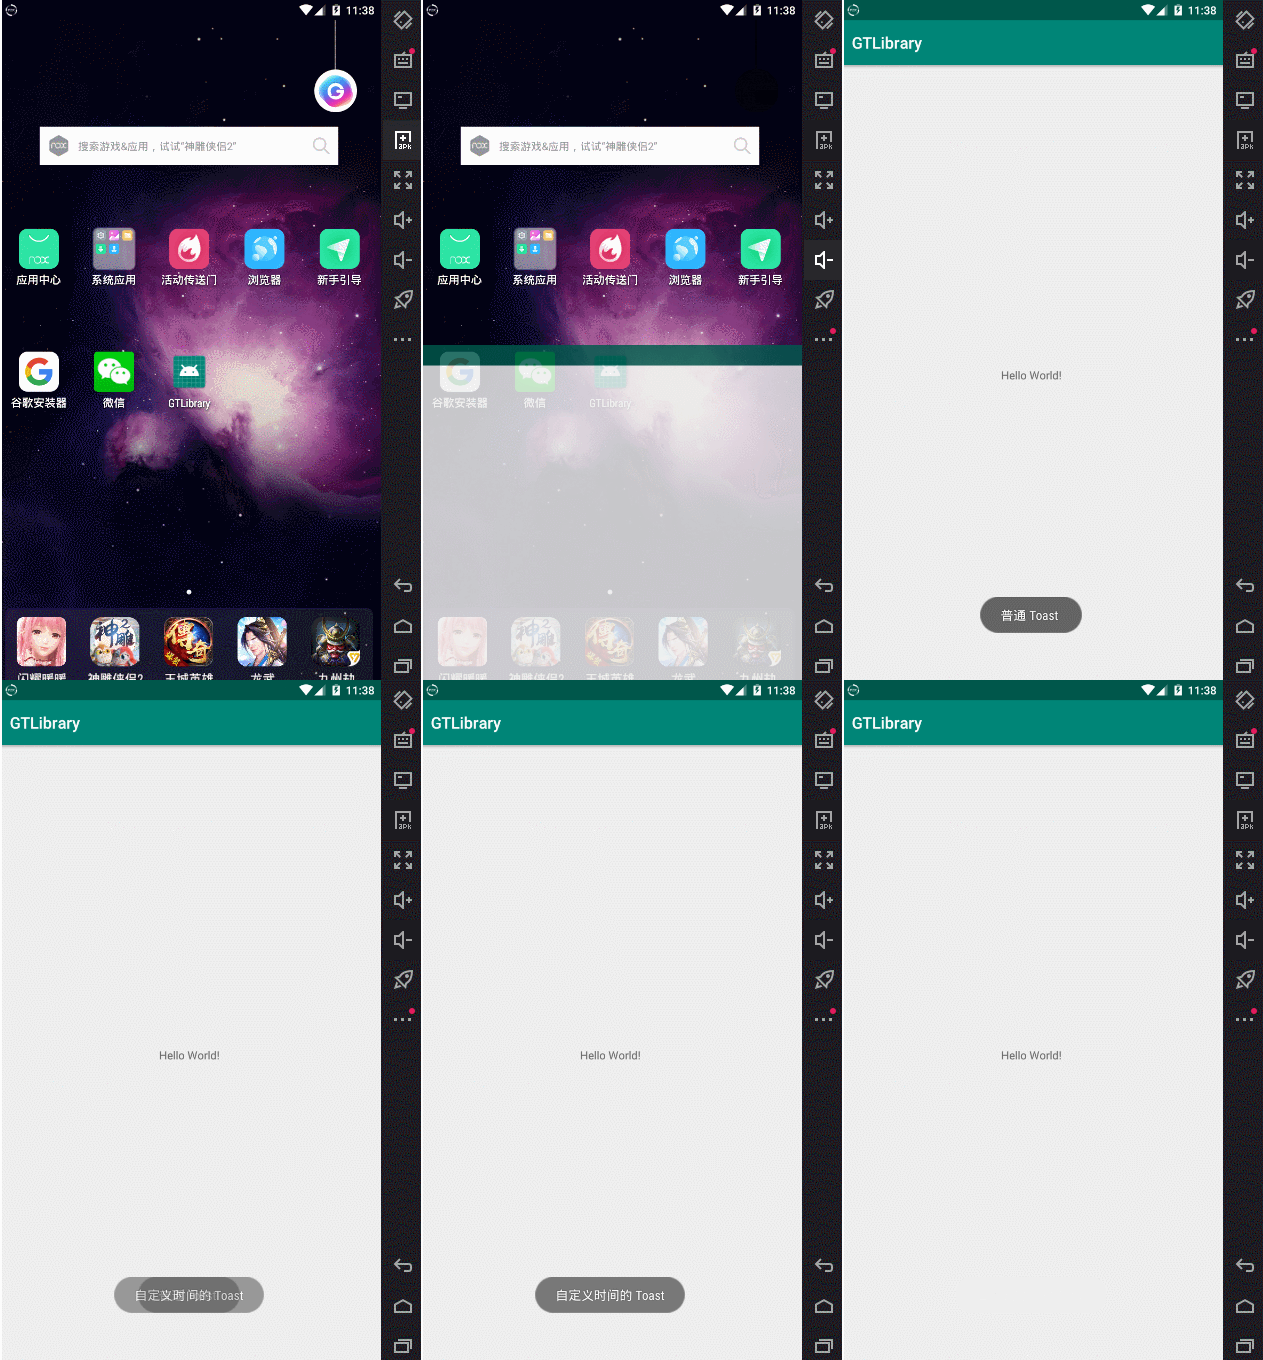
Of course, we also have a simple Toast. Add the following code:
        // Toast hint lifeline
//        GT. getGT(). set Toast Tf(false);// The default value is true. If it is set to false, all toasts issued outside the GT will not be displayed

        //Initialize context
        GT.getGT().setCONTEXT(this);//When you initialize this guy, you can do whatever you want with Toast, so

        GT.toast_s("Simple formula Toast ");

        GT.toast_time("simple and convenient + Custom time",5000);
Let's try to dress Toast:
1: Create toast_view.xml
<?xml version="1.0" encoding="utf-8"?>
<androidx.constraintlayout.widget.ConstraintLayout xmlns:android="http://schemas.android.com/apk/res/android"
    xmlns:app="http://schemas.android.com/apk/res-auto"
    xmlns:tools="http://schemas.android.com/tools"
    android:layout_width="wrap_content"
    android:layout_height="wrap_content">

    <View
        android:id="@+id/view"
        android:layout_width="300dp"
        android:layout_height="200dp"
        android:background="@mipmap/ic_launcher"
        app:layout_constraintStart_toStartOf="parent"
        app:layout_constraintTop_toTopOf="parent" />

    <TextView
        android:id="@+id/tv"
        android:layout_width="wrap_content"
        android:layout_height="wrap_content"
        android:textColor="#000000"
        android:textSize="24sp"
        android:textStyle="bold"
        app:layout_constraintBottom_toBottomOf="parent"
        app:layout_constraintEnd_toEndOf="parent"
        app:layout_constraintStart_toStartOf="parent"
        app:layout_constraintTop_toTopOf="parent"
        app:layout_constraintVertical_bias="0.3" />

</androidx.constraintlayout.widget.ConstraintLayout>
2. Custom Toast Code:
        //Initialize the layout of Toast (R.layout.toast_view) and set the center (Gravity.CENTER)
        GT.ToastView toastView = new GT.ToastView().initLayout(R.layout.toast_view, Gravity.CENTER,this);
        TextView tv = toastView.getView().findViewById(R.id.tv);//Get TextView component
        tv.setText("My customization Toast");
        toastView.getToast().show();//Show Toast
design sketch:
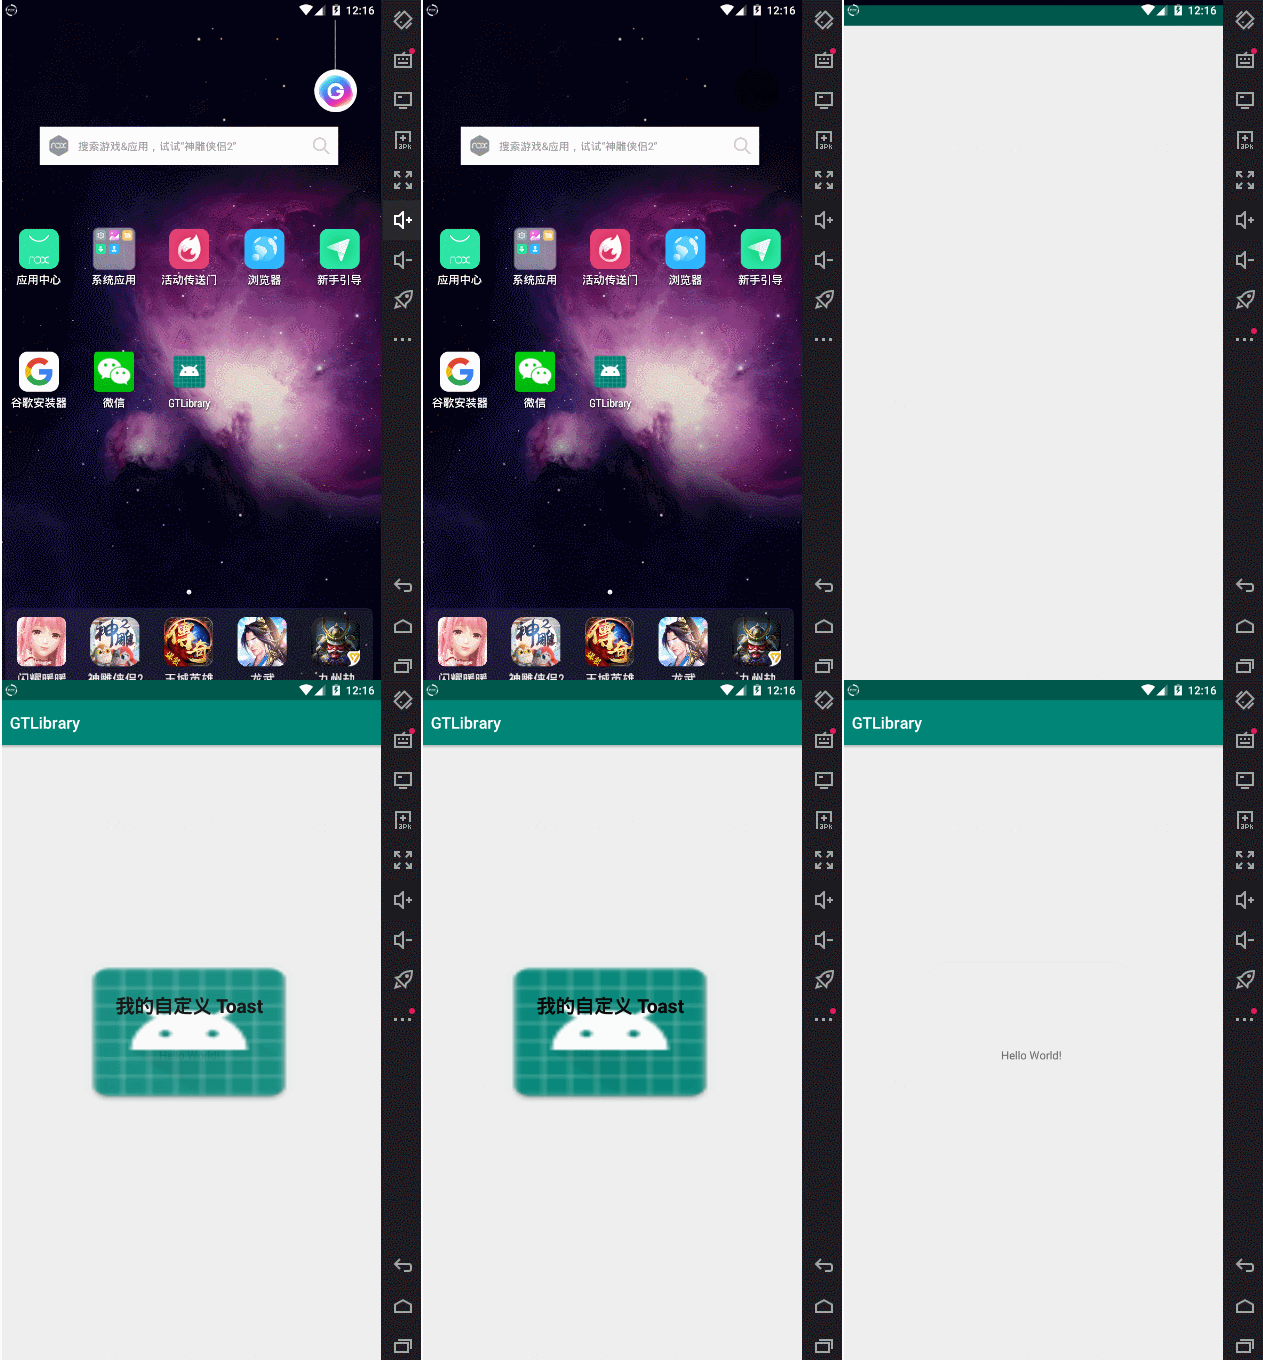
Conclusion: there is a saying that "one initialization, Toast everywhere" you can try.
GT Chapter 3: the story of AlertDialog
Create an empty project and add the following code to MainActivity in the project:
[Note: GT library shall reach version 1.0.2]
        //Dialog box with buttons
        new GT.GT_AlertDialog(this).dialogButton(R.mipmap.ic_launcher, "title", "My content", "well", new DialogInterface.OnClickListener() {
            @Override
            public void onClick(DialogInterface dialogInterface, int i) {
                GT.toast_s(MainActivity.this,"Click OK");
            }
        }).show();
design sketch:
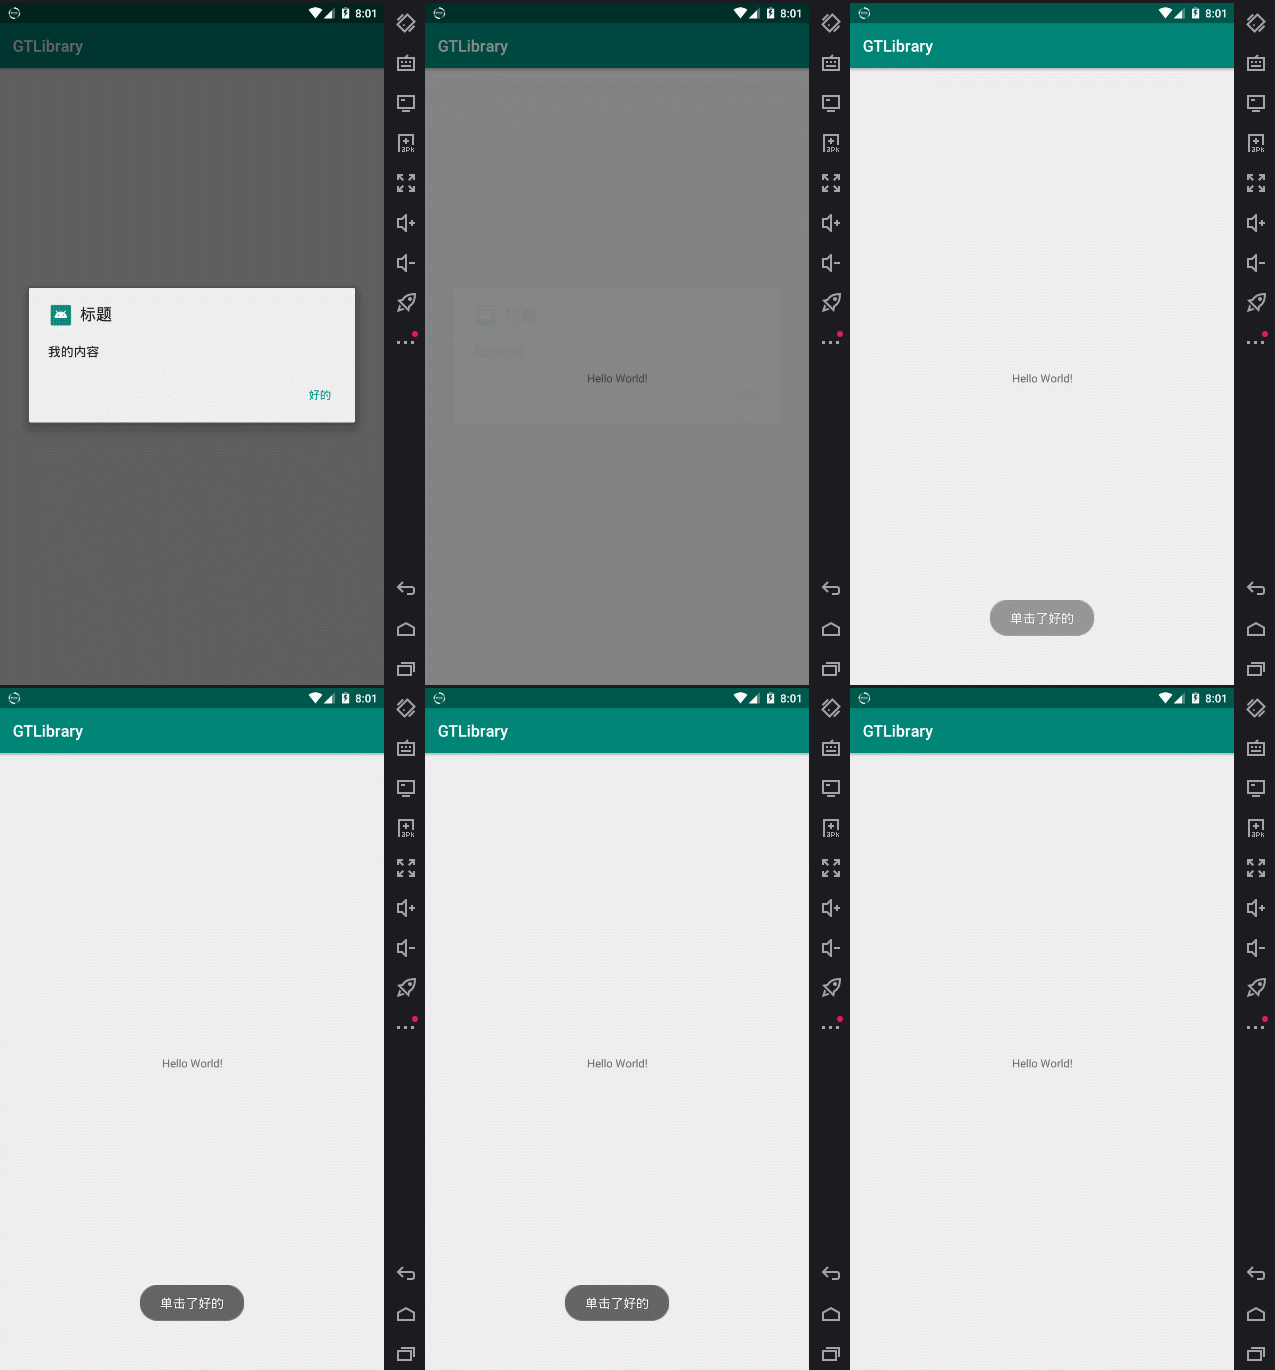
Create an empty project and add the following code to MainActivity in the project:
final String[] items = {"1 number","2 number","3 number","4 number","5 number"};
        //Dialog box with list
        new GT.GT_AlertDialog(this).dialogList(R.mipmap.ic_launcher, "title", items, new DialogInterface.OnClickListener() {
            @Override
            public void onClick(DialogInterface dialogInterface, int i) {
                GT.toast_s(MainActivity.this,"Click " + items[i]);
            }
        }).show();
design sketch:
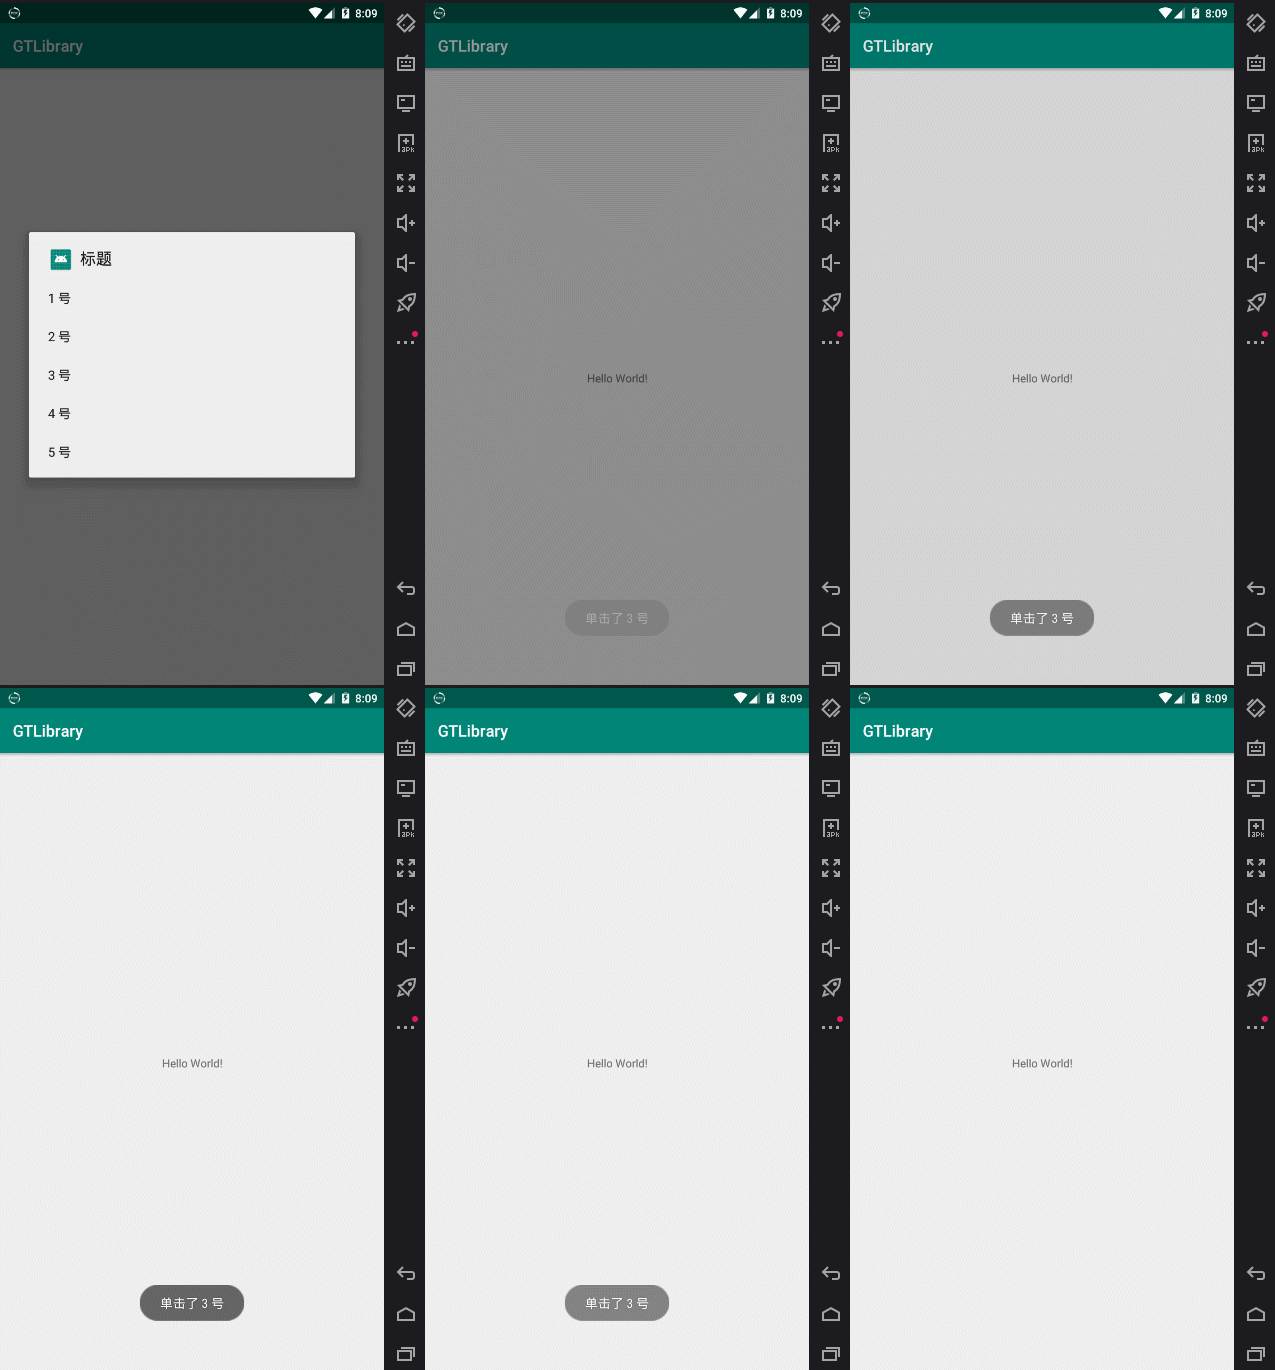
Create an empty project and add the following code to MainActivity in the project:
final String[] items = {"1 number","2 number","3 number","4 number","5 number"};
        //Dialog box with multiple options
        new GT.GT_AlertDialog(this).dialogMultiChoice(R.mipmap.ic_launcher, "title", items, new DialogInterface.OnMultiChoiceClickListener() {
            @Override
            public void onClick(DialogInterface dialogInterface, int i, boolean b) {
                GT.toast_s(MainActivity.this,"You chose " + items[i] + " = " + b);
            }
        }).show();
design sketch:
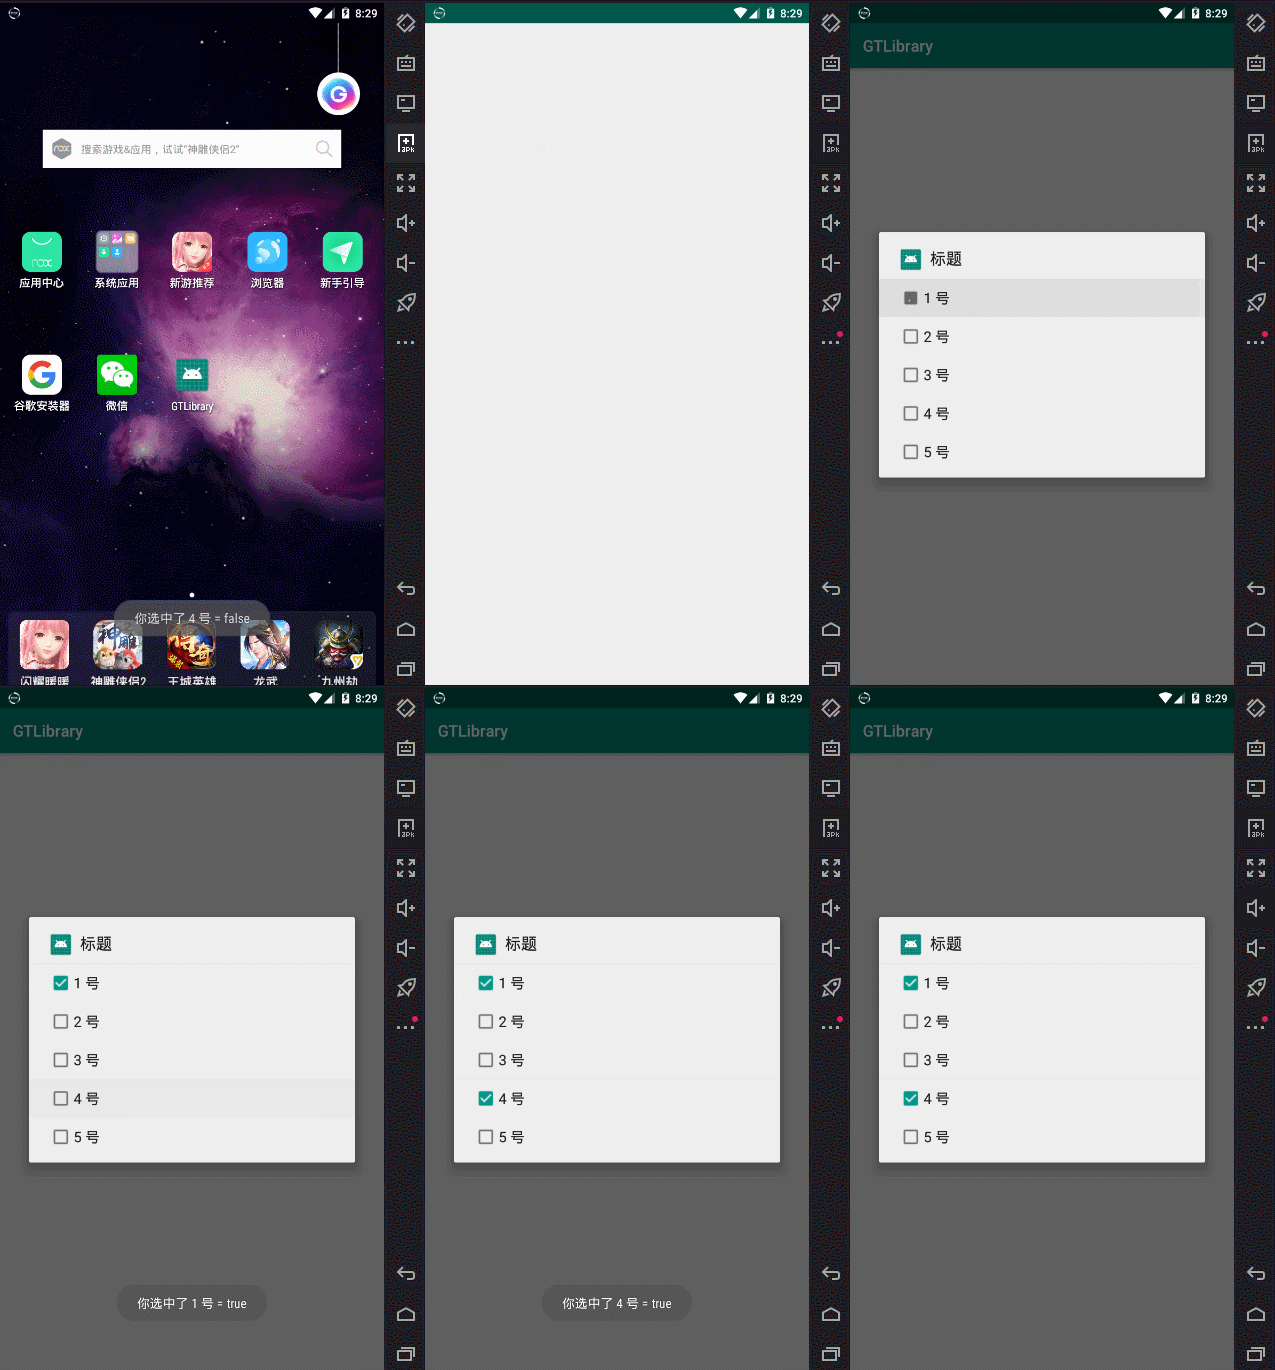
Create an empty project and add the following code to MainActivity in the project:
final String[] items = {"1 number","2 number","3 number","4 number","5 number"};
        //Dialog box with multiple options
        new GT.GT_AlertDialog(this).dialogSingleChoiceList(R.mipmap.ic_launcher, "title", items, new DialogInterface.OnClickListener() {
            @Override
            public void onClick(DialogInterface dialogInterface, int i) {
                GT.toast_s(MainActivity.this,"Yes:" + items[i]);
            }
        }).show();
design sketch:
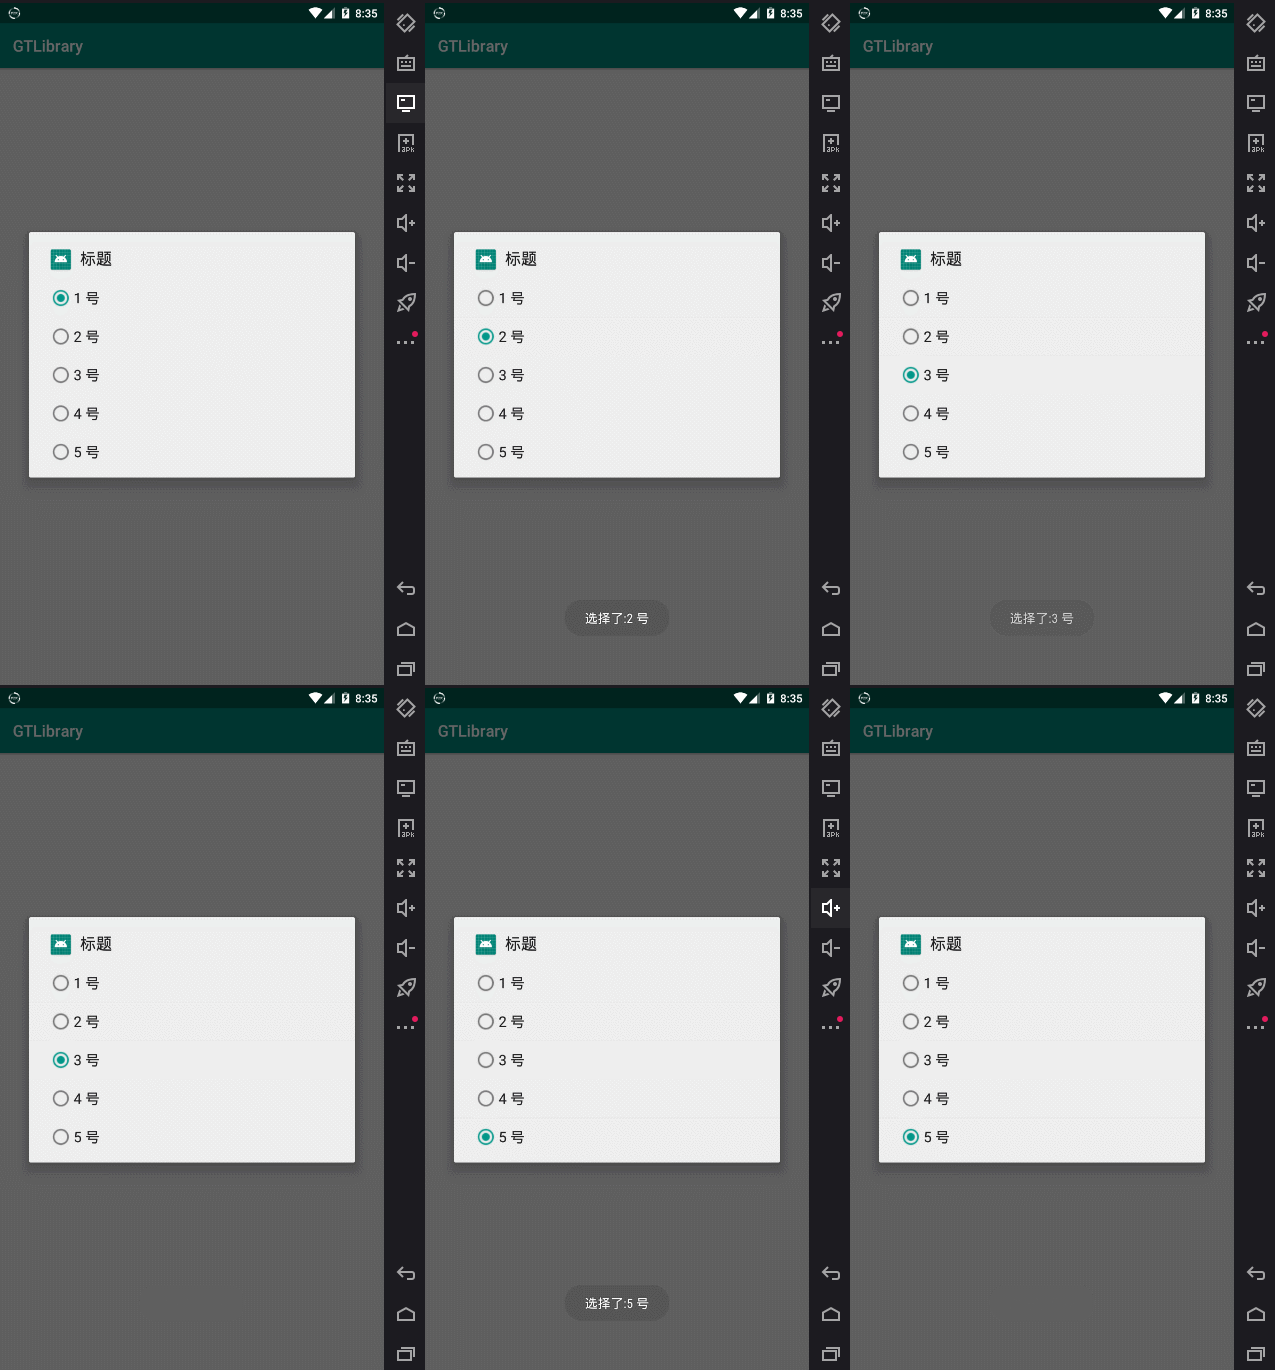
Of course, we also have method support for customizing AlertDialog:
Step 1: add a custom layout file dialog_ view. The XML code is as follows:
<?xml version="1.0" encoding="utf-8"?>
<androidx.constraintlayout.widget.ConstraintLayout xmlns:android="http://schemas.android.com/apk/res/android"
    xmlns:app="http://schemas.android.com/apk/res-auto"
    xmlns:tools="http://schemas.android.com/tools"
    android:layout_width="wrap_content"
    android:layout_height="wrap_content">

    <View
        android:id="@+id/view"
        android:layout_width="300dp"
        android:layout_height="200dp"
        android:background="@mipmap/ic_launcher"
        app:layout_constraintStart_toStartOf="parent"
        app:layout_constraintTop_toTopOf="parent" />

    <TextView
        android:id="@+id/tv"
        android:layout_width="wrap_content"
        android:layout_height="wrap_content"
        android:textColor="#000000"
        android:textSize="24sp"
        android:textStyle="bold"
        app:layout_constraintBottom_toBottomOf="parent"
        app:layout_constraintEnd_toEndOf="parent"
        app:layout_constraintStart_toStartOf="parent"
        app:layout_constraintTop_toTopOf="parent"
        app:layout_constraintVertical_bias="0.3"
        />

    <Button
        android:id="@+id/btn"
        android:layout_width="wrap_content"
        android:layout_height="wrap_content"
        android:layout_marginEnd="8dp"
        android:layout_marginRight="8dp"
        android:text="Button"
        app:layout_constraintBottom_toBottomOf="parent"
        app:layout_constraintEnd_toEndOf="parent"
        app:layout_constraintHorizontal_bias="0.519"
        app:layout_constraintStart_toStartOf="parent"
        app:layout_constraintTop_toTopOf="parent"
        app:layout_constraintVertical_bias="0.671" />

</androidx.constraintlayout.widget.ConstraintLayout>
Then in RES / styles Add code to XML to remove the default background of the dialog box:
<!--dialog Shadow removal-->
    <style name="dialogNoBg">
        <item name="android:background">#00000000</item>
        <item name="android:windowBackground">@android:color/transparent</item>
        <item name="android:windowNoTitle">true</item>
        <item name="android:windowIsFloating">true</item>
    </style>
Finally, implement the custom dialog box in MainActivity:
        //Customize dialog box
        GT.GT_AlertDialog.ViewDialog viewDialog = new GT.GT_AlertDialog.ViewDialog()
                .initLayout(this, R.layout.dialog_view, R.style.dialogNoBg);//Load layout and style

        final TextView tv = viewDialog.getView().findViewById(R.id.tv);
        viewDialog.getView().findViewById(R.id.btn).setOnClickListener(new View.OnClickListener() {
            @Override
            public void onClick(View view) {
                tv.setText("Click the Customize dialog box");
            }
        });
        viewDialog.getDialog().show();
design sketch:
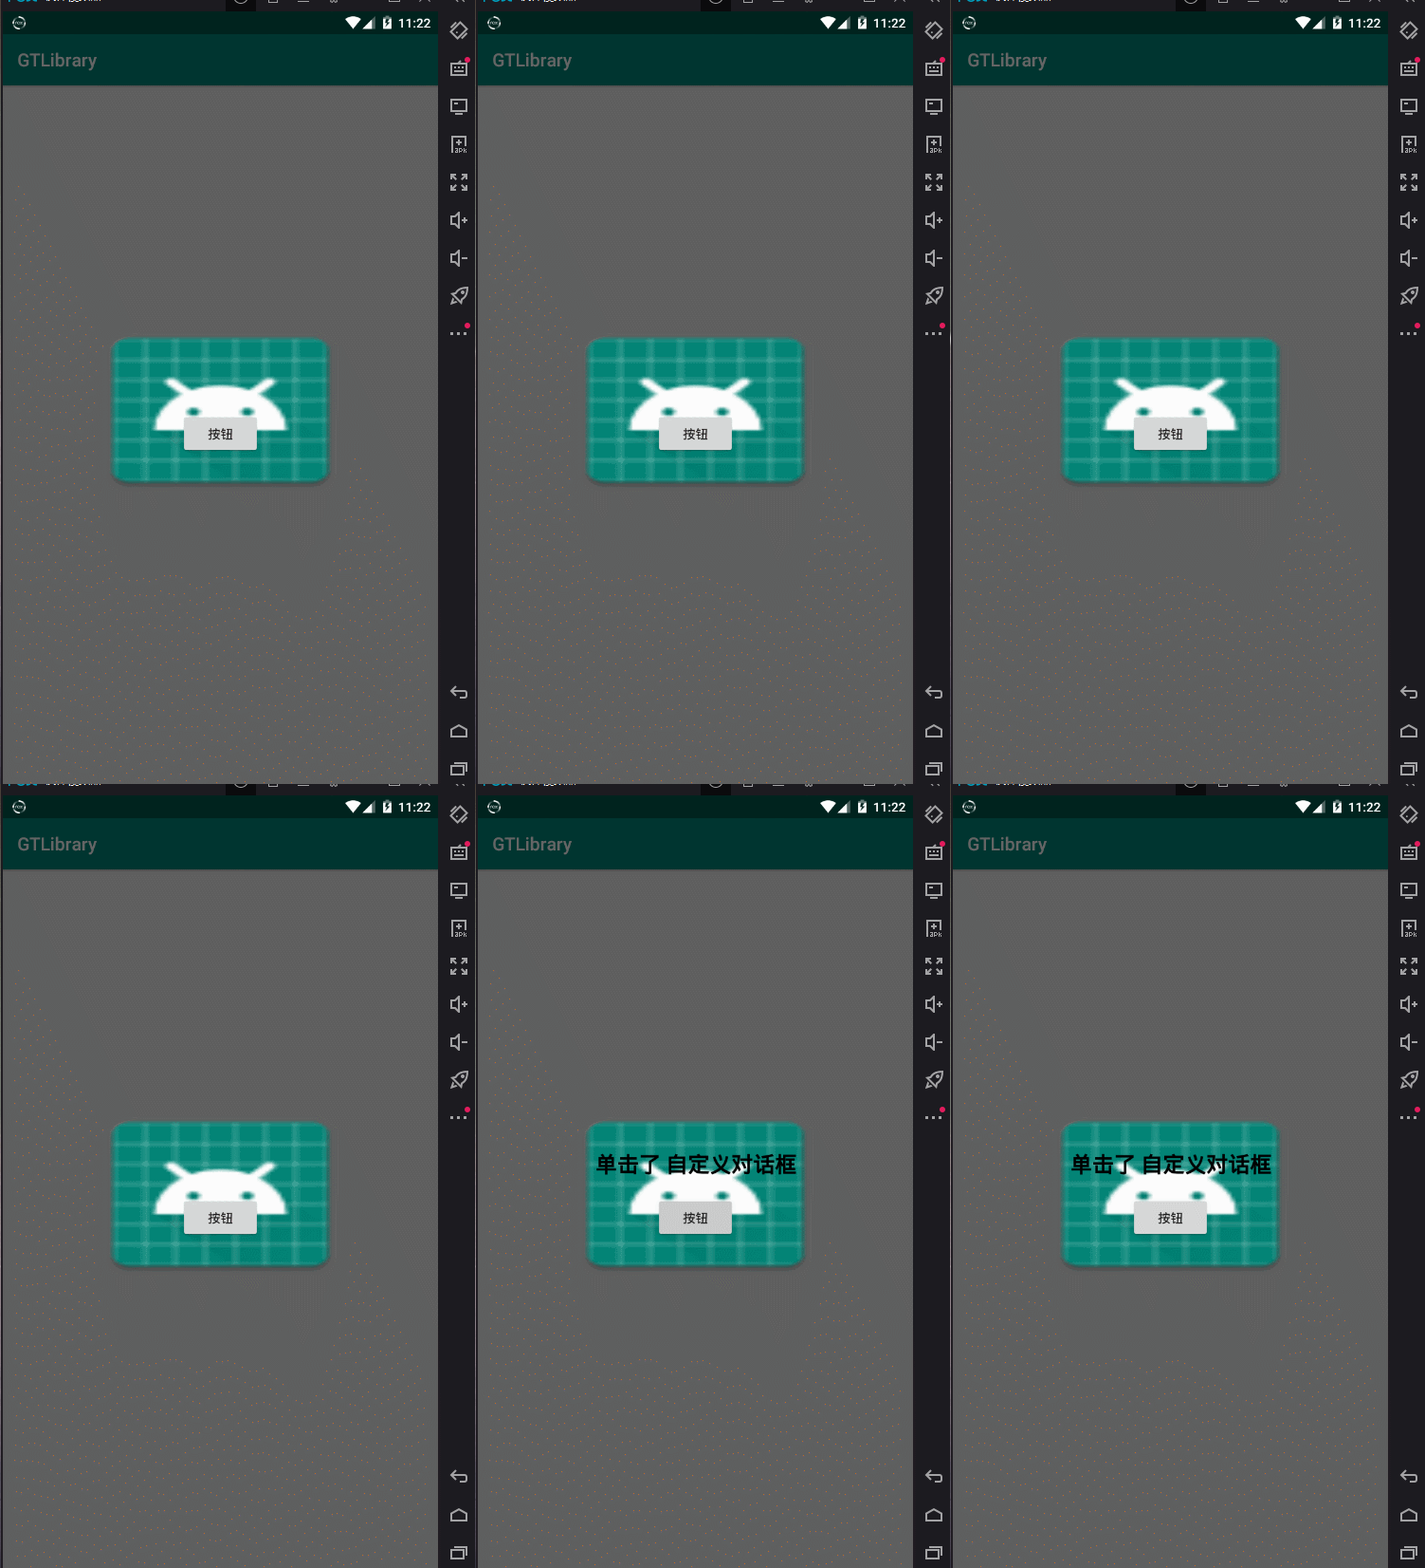
If you are not satisfied, you can try calling this method:
/**
             * @param context       context
             * @param Style         style
             * @param clickExternal External clickable
             * @param layout        layout
             * @param transparency  transparency
             * @param X             Displayed X-axis position
             * @param Y             Displayed Y-axis position
             * @return Object of the current class
             */
            public ViewDialog initLayout(Context context, int layout, int Style, boolean clickExternal, int transparency, int X, int Y)
Not satisfied? Xiaobian thinks you can also save} inheritance or supplement customization yourself.
Inheritance:
private class MyDialog extends GT.GT_AlertDialog.ViewDialog{Supplementary Customization:
Dialog dialog = viewDialog.getDialog();
There is also a class that implements custom Dialog, but it is not recommended in the small series. This class is mainly used to customize the progress bar:
public class MainActivity extends AppCompatActivity {

    @Override
    protected void onCreate(Bundle savedInstanceState) {
        super.onCreate(savedInstanceState);
        setContentView(R.layout.activity_main);

        new Myprogress(this).show();

    }

    // Custom progress bar
    private class Myprogress extends GT.GT_AlertDialog.Loading_view{

        public Myprogress(Context context) {
            super(context);
        }

        @Override
        public int initLayout() {
            return R.layout.dialog_view;//Returns the resolved layout file
        }

        @Override
        protected void loadLayout(final Context context) {
            TextView tv = findViewById(R.id.tv);    //Get tv component
            tv.setText("Progress bar customization");
            findViewById(R.id.btn).setOnClickListener(new View.OnClickListener() {
                @Override
                public void onClick(View view) {
                    GT.toast_s(context,"Clicked the button");
                    dismiss();//close
                }
            });
        }

    }

}
design sketch:
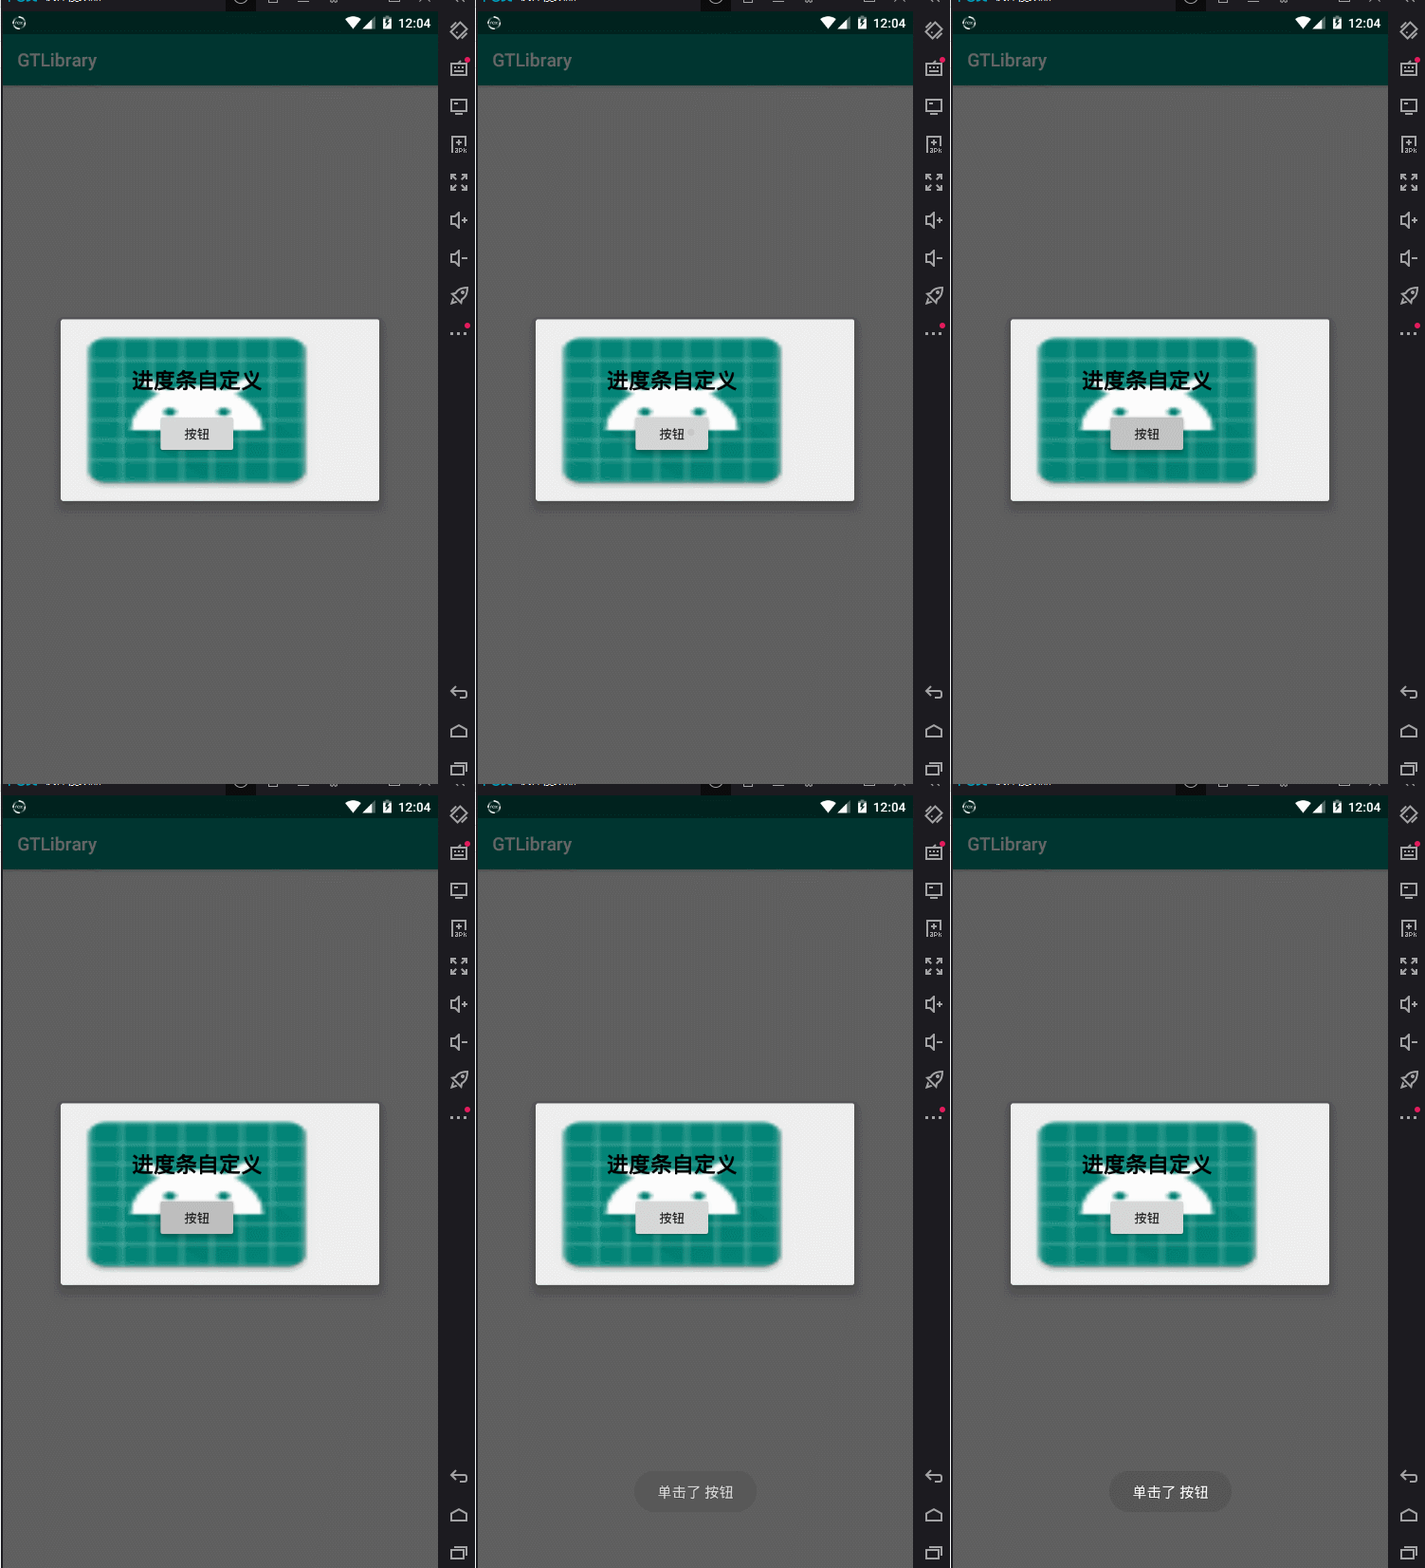
Summary: write less code and do more functions. Handsome man, come and play.
GT Chapter 4: Notification notification class (adapted to Android 9.0)
Create an empty project and add the following code to MainActivity in the project:
[Note: GT library shall reach version 1.0.2]
new GT.GT_Notification(this)
                .setNotifyId(0x1)
                .setChanelId(getClass().getName())
                .setChanelDescription("GT notice")
                .setChanelName("GT name")
                /**
                 * Initialize notification class
                 *
                 * @param icon       Icon
                 * @param title      title
                 * @param text       content
                 * @param time       Set when notifications are sent
                 * @param voiceTF    Is sound vibration set
                 * @param autoCancel Set the notification to disappear automatically after opening
                 * @param cla        Sets the page to jump to when clicked
                 * @return Return notification class
                 */
                .sendingNotice(R.drawable.ic_launcher_background,"title","Content of my notice",0,true,true,MainActivity.class);
design sketch:
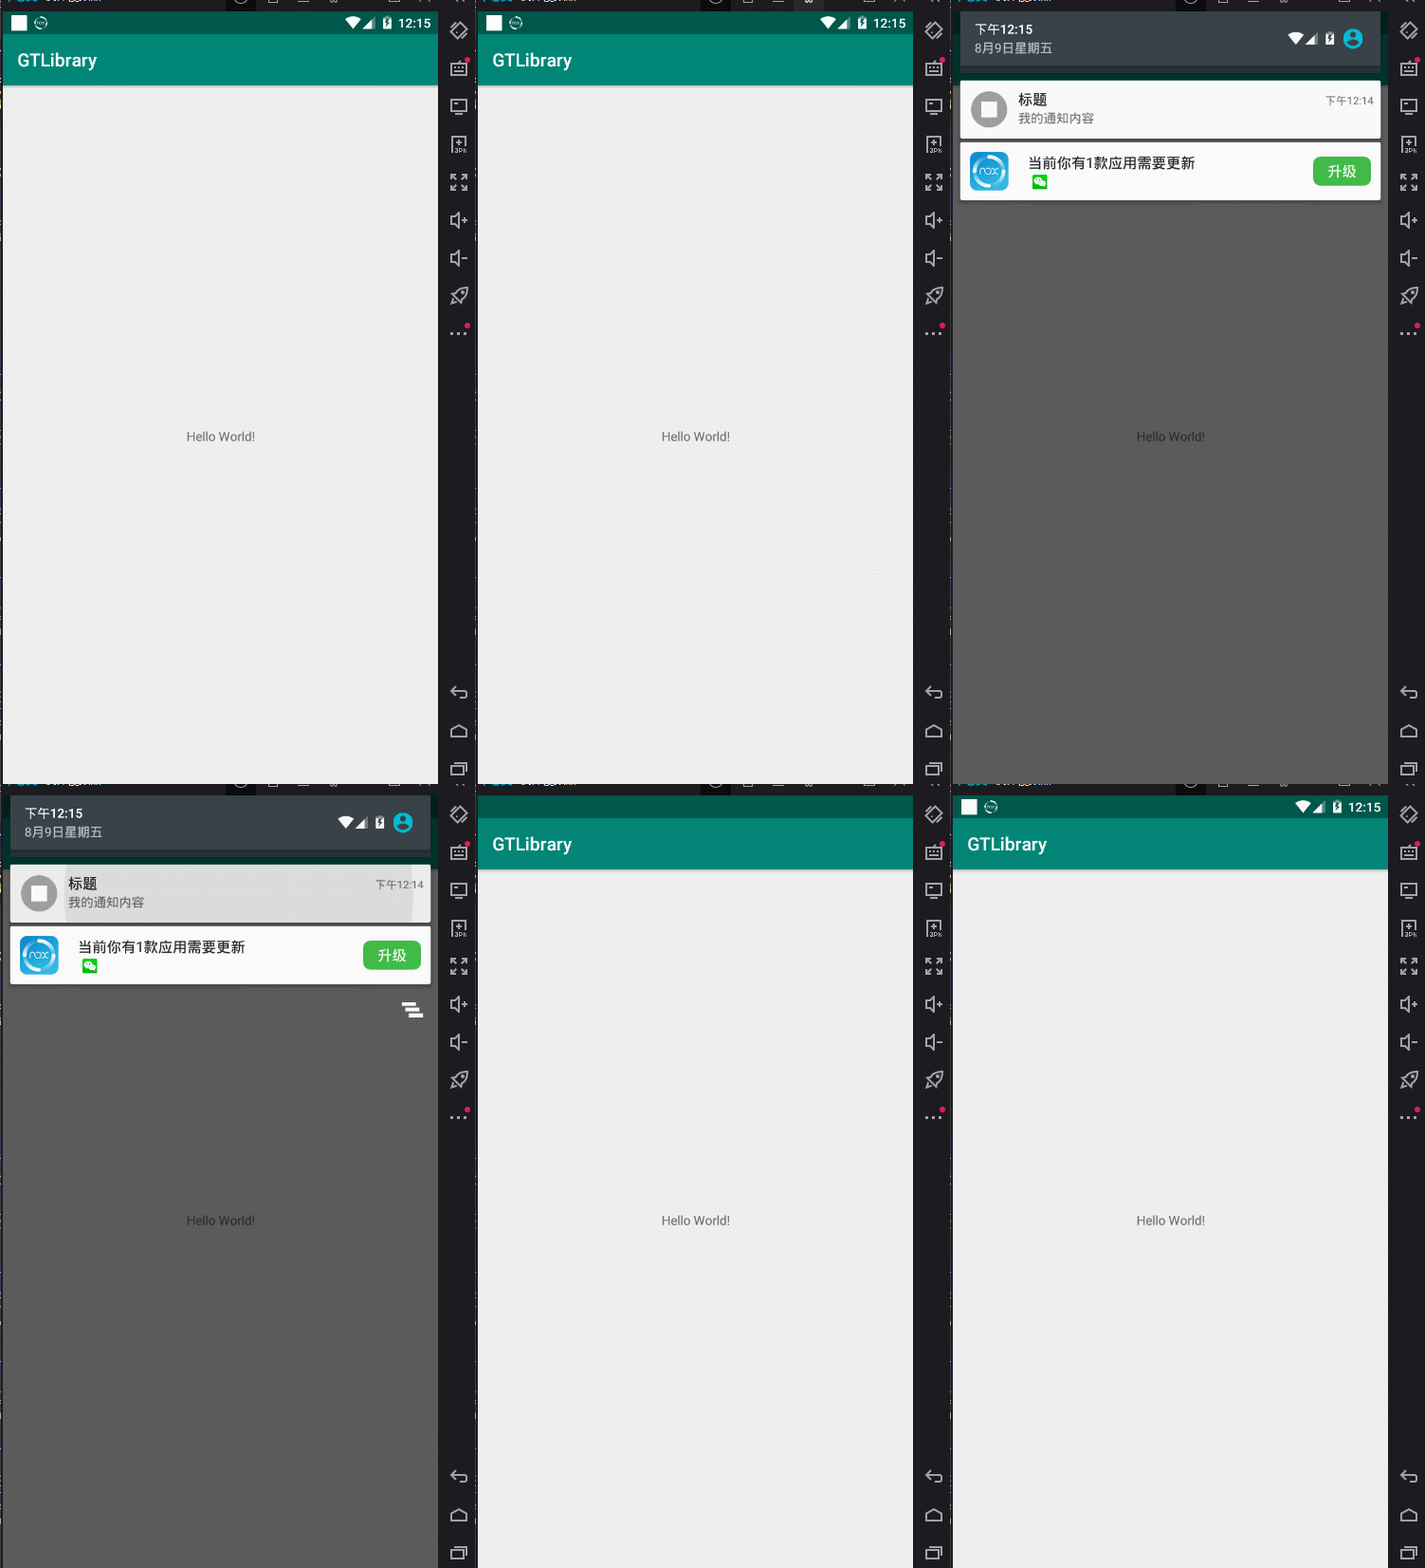
Summary: you asked me about custom notifications? In the next version update, Xiao has written a dome similar to the cool dog music notice bar. If you need the source code, please call me!!! (leave a message in the comments)
GT Chapter 5: some unknown operations in GT
Create two empty projects and add the following code to MainActivity in the project:
[Note: GT library shall reach version 1.0.2]
        //Initialize context
        GT.getGT().setCONTEXT(this);

        findViewById(R.id.btn).setOnClickListener(new View.OnClickListener() {
            @Override
            public void onClick(View view) {

                //The first type of jump page does not need to initialize the context
//                GT.startAct(new Intent(MainActivity.this,Main2Activity.class));

                //The second type of jump page does not need to initialize the context
//                GT.startAct(MainActivity.this,Main2Activity.class);

                //The third type of jump page needs to initialize the context
                GT.startAct(Main2Activity.class);
            }
        });
Corresponding activity_main.xml code:
<?xml version="1.0" encoding="utf-8"?>
<androidx.constraintlayout.widget.ConstraintLayout xmlns:android="http://schemas.android.com/apk/res/android"
    xmlns:app="http://schemas.android.com/apk/res-auto"
    xmlns:tools="http://schemas.android.com/tools"
    android:layout_width="match_parent"
    android:layout_height="match_parent"
    tools:context=".MainActivity">

    <TextView
        android:layout_width="wrap_content"
        android:layout_height="wrap_content"
        android:text="Hello World!"
        app:layout_constraintBottom_toBottomOf="parent"
        app:layout_constraintLeft_toLeftOf="parent"
        app:layout_constraintRight_toRightOf="parent"
        app:layout_constraintTop_toTopOf="parent" />

    <Button
        android:id="@+id/btn"
        android:layout_width="wrap_content"
        android:layout_height="wrap_content"
        android:text="Jump page"
        app:layout_constraintBottom_toBottomOf="parent"
        app:layout_constraintHorizontal_bias="0.498"
        app:layout_constraintLeft_toLeftOf="parent"
        app:layout_constraintRight_toRightOf="parent"
        app:layout_constraintTop_toTopOf="parent"
        app:layout_constraintVertical_bias="0.658" />

</androidx.constraintlayout.widget.ConstraintLayout>
design sketch:
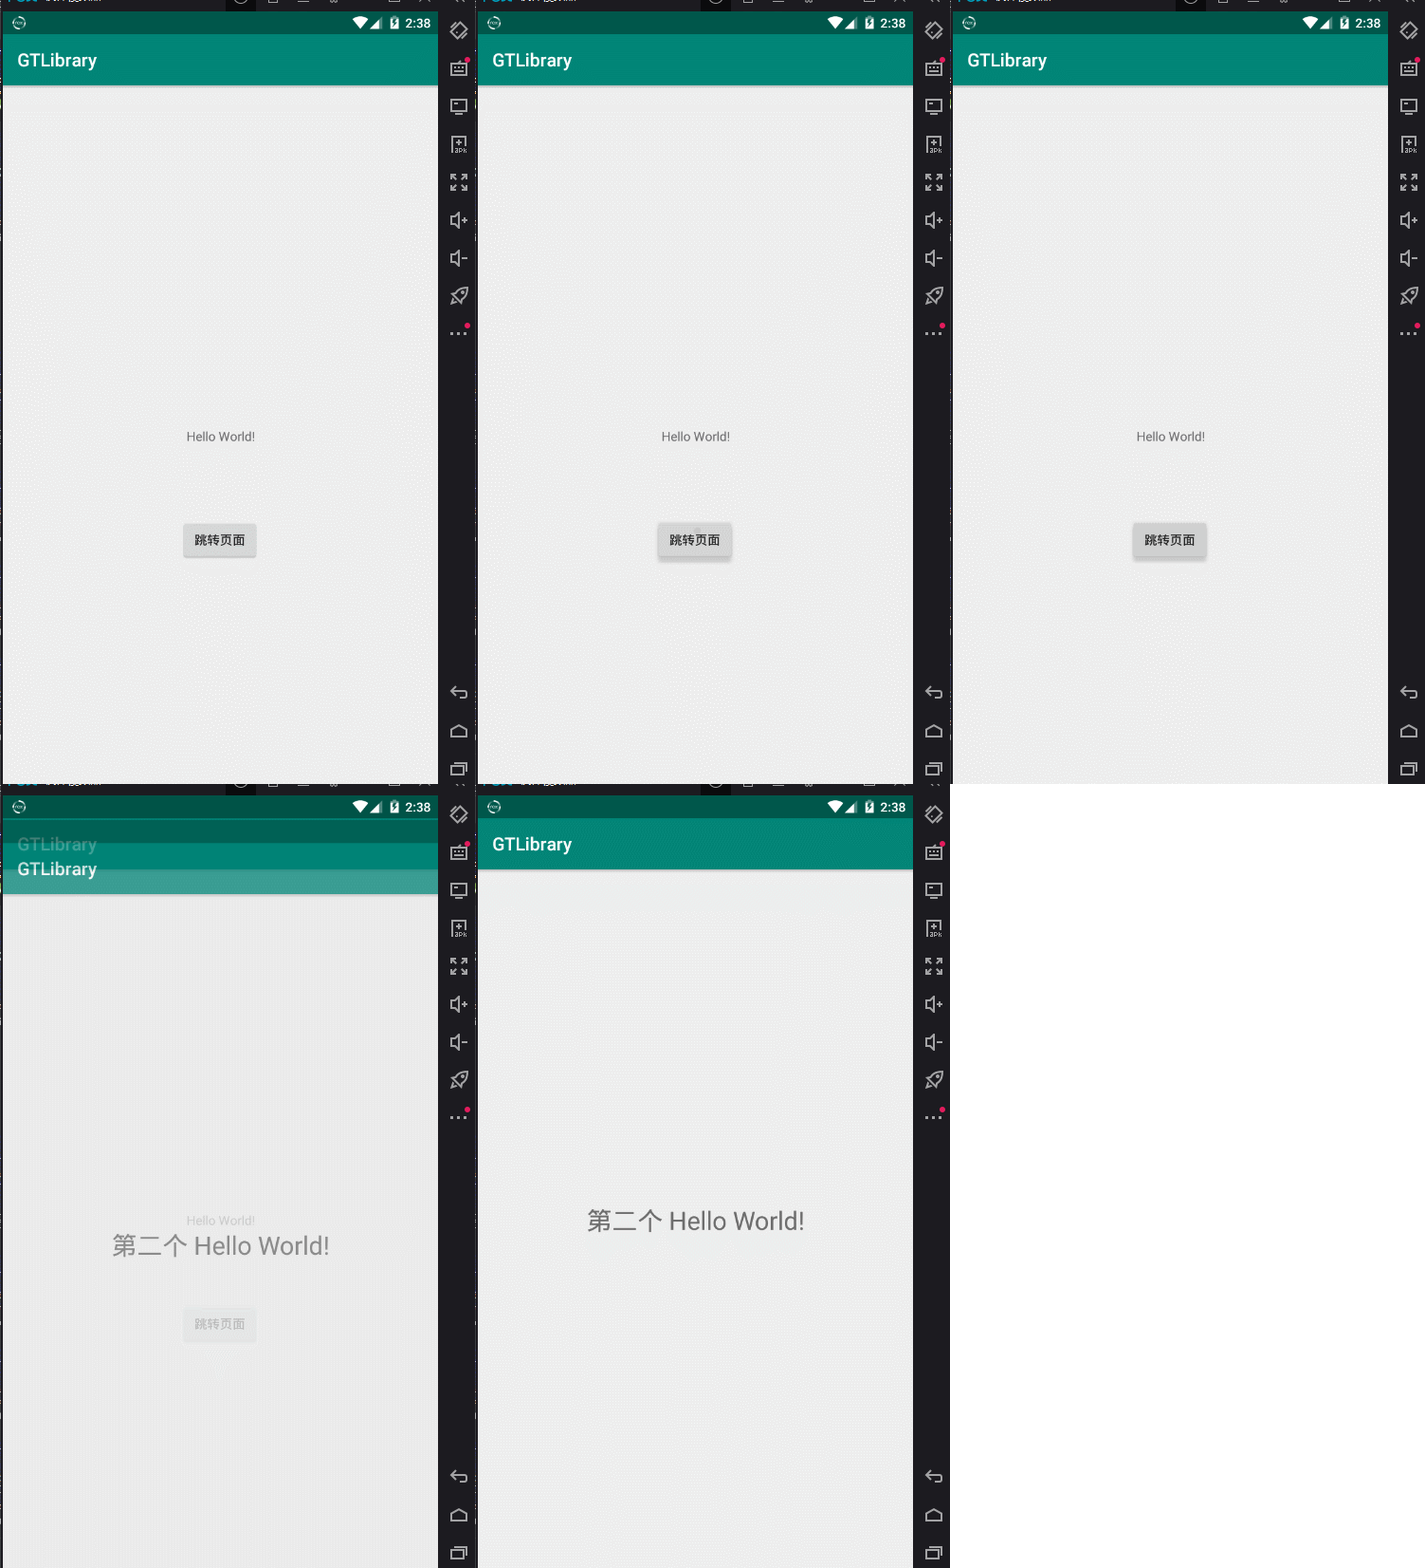
Conclusion: how lazy Xiaobian is
GT Chapter 6: different SharedPreferences
Create a new empty project, the activity in the project_ main. Add the following code to XML:
[Note: GT library shall reach version 1.0.2]
<?xml version="1.0" encoding="utf-8"?>
<androidx.constraintlayout.widget.ConstraintLayout xmlns:android="http://schemas.android.com/apk/res/android"
    xmlns:app="http://schemas.android.com/apk/res-auto"
    xmlns:tools="http://schemas.android.com/tools"
    android:layout_width="match_parent"
    android:layout_height="match_parent"
    tools:context=".MainActivity">

    <TextView
        android:id="@+id/saveData"
        android:layout_width="wrap_content"
        android:layout_height="wrap_content"
        android:text="Save data:"
        android:textSize="24sp"
        app:layout_constraintBottom_toBottomOf="parent"
        app:layout_constraintHorizontal_bias="0.498"
        app:layout_constraintLeft_toLeftOf="parent"
        app:layout_constraintRight_toRightOf="parent"
        app:layout_constraintTop_toTopOf="parent"
        app:layout_constraintVertical_bias="0.2" />


    <TextView
        android:id="@+id/queryData"
        android:layout_width="wrap_content"
        android:layout_height="wrap_content"
        android:text="Fetch data:"
        android:textSize="24sp"
        app:layout_constraintBottom_toBottomOf="parent"
        app:layout_constraintHorizontal_bias="0.552"
        app:layout_constraintLeft_toLeftOf="parent"
        app:layout_constraintRight_toRightOf="parent"
        app:layout_constraintStart_toStartOf="@+id/saveData"
        app:layout_constraintTop_toTopOf="parent"
        app:layout_constraintVertical_bias="0.427" />


</androidx.constraintlayout.widget.ConstraintLayout>
Add the following code to MainActivity in the project:
/**
         * Initialize SP
         * @param context     context
         * @param SPName      Stored name
         * @param permissions Store readable permissions
         * @param commit      Auto submit
         */
        GT.GT_SharedPreferences gt_sp = new GT.GT_SharedPreferences(this,getResources().getString(R.string.app_name),GT.GT_SharedPreferences.PRIVATE,true);

        TextView tv_save = findViewById(R.id.saveData);
        TextView tv_query = findViewById(R.id.queryData);

        //Save data
        gt_sp.save("QQ",1079374315);//Save int type
//        gt_sp.save("QQ","1079374315");// Save String type
//        gt_sp.save("QQ",true);// Save boolean type
//        gt_sp.save("QQ",2019f);// Save float type
        tv_save.setText(tv_save.getText() + "1079374315");

        //Fetch data
        Object qq = gt_sp.query("QQ");
        tv_query.setText(tv_query.getText() + qq.toString());

//        gt_sp.clear();// Clear all currently stored data
design sketch:
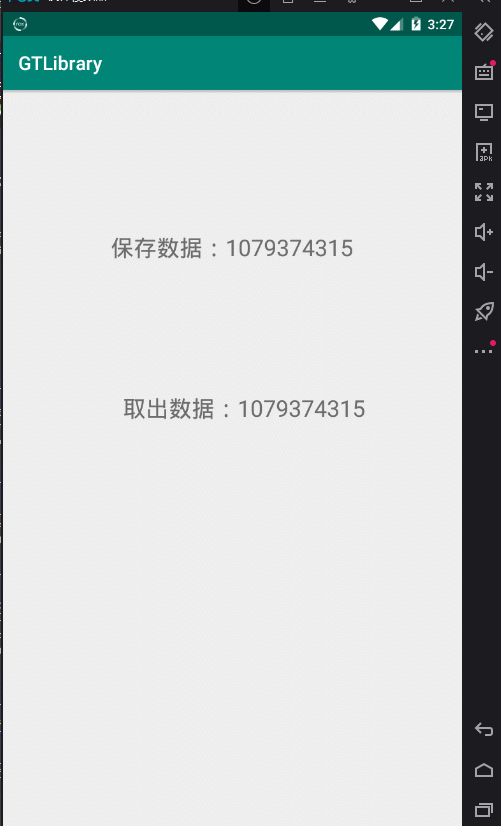
Currently, the supported storage types are: String, Integer, Long, Float, Boolean, Set and Object. Yes, the usage is the same:
Add: save
Delete: delete
Query: query
Modify: updata
 LoginBean loginBean = new LoginBean(user, paw);
 gt_sp.save("LoginBean",loginBean);//Save object
Xiaobian specially wrote a DOM to save objects. Please see the effect picture:
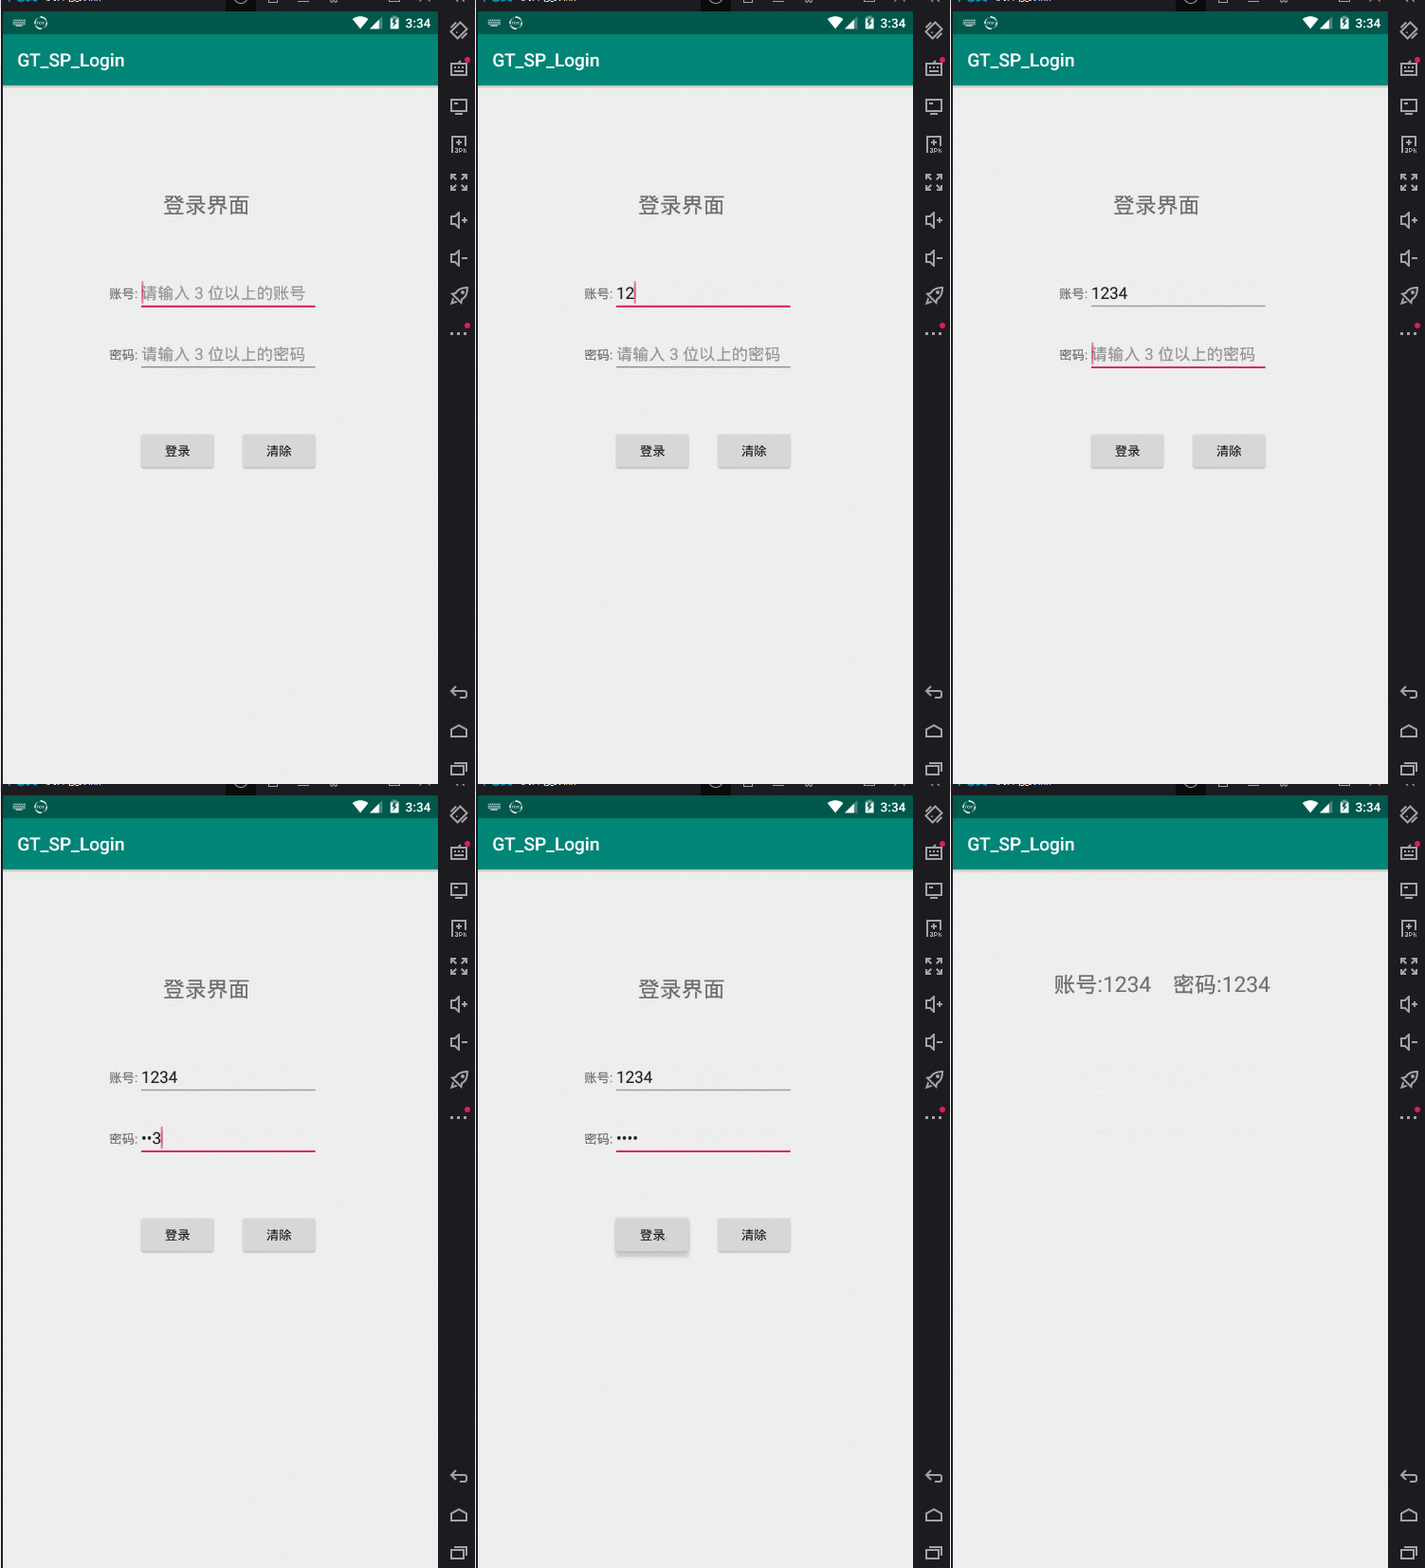
Project source code: https://github.com/1079374315/GT_SP_Login
If the position of the components is not satisfactory, just support them, and Pipi is healthier.
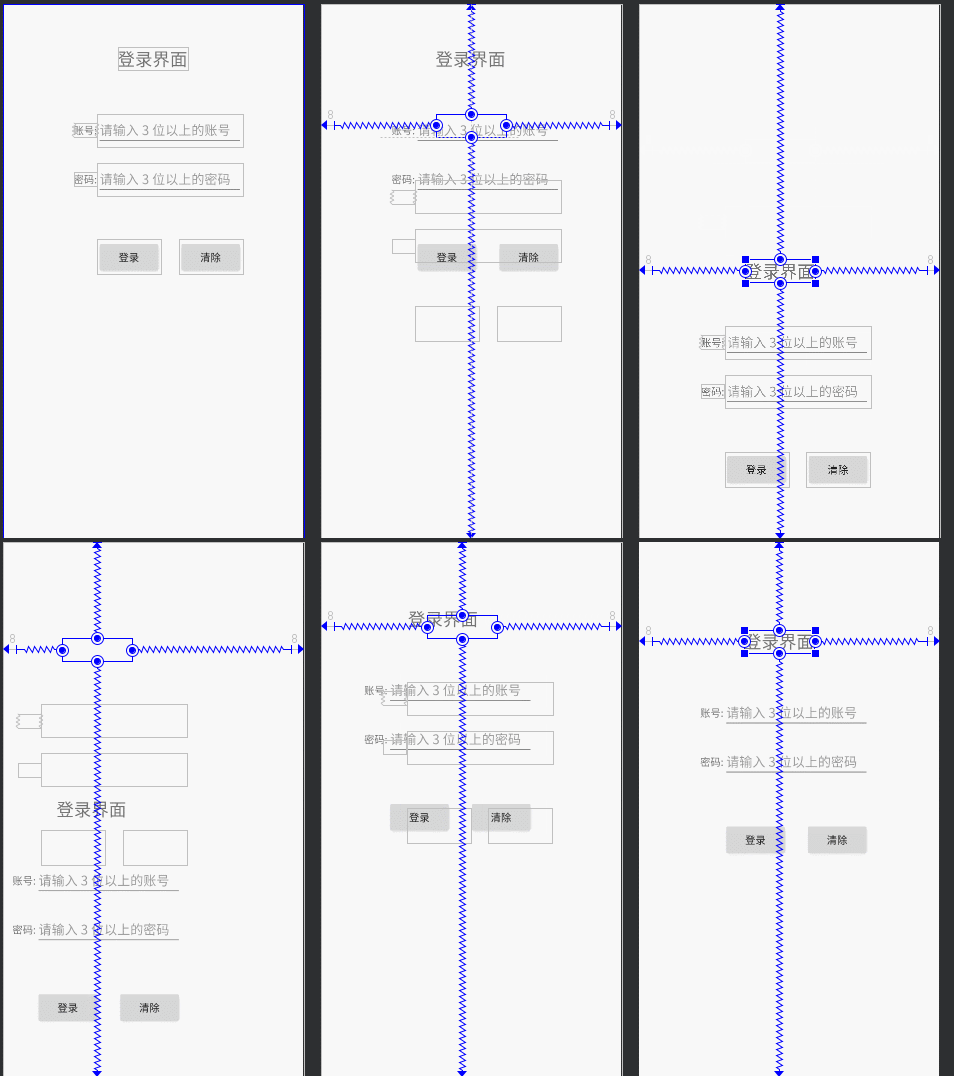
Conclusion: the addition, deletion, check and modification are simple and the function is enhanced. It is a good formula for programming.
GT Chapter 7: Mobile SD card IO operation
Create an empty project and add the following code to MainActivity in the project:
[Note: GT library shall reach version 1.0.2]
//         *Step 1:
         GT.GT_IO io = new GT.GT_IO(this);//Create IO object
//         *Step 2:
         io.save("1079374315","qq");//Save data
//         *Step 3:
         String qq = io.query("qq"); //get data

         GT.log_e("QQ:" + qq);//Print the extracted data
design sketch:

Of course, there is also method support for storing in SD directory. Add the following code to MainActivity in the project:
//         *Step 1:
            GT.GT_File file = new GT.GT_File();//Create File object
//         *Step 2: save the data, save the folder path, and remember to add the extension to the saved file name
            file.save("Chapter I:","/My novel/martial arts novel/","Douluo continent.txt");//Save data
//         *Step 3:
            String query = file.query("/My novel/martial arts novel/", "Douluo continent.txt"); //get data

            GT.log_e("Extracted data:" + query);//Print the extracted data
In Android manifest Add write read permission to XML}:
<uses-permission android:name="android.permission.WRITE_EXTERNAL_STORAGE" />
<uses-permission android:name="android.permission.READ_EXTERNAL_STORAGE" />
design sketch:
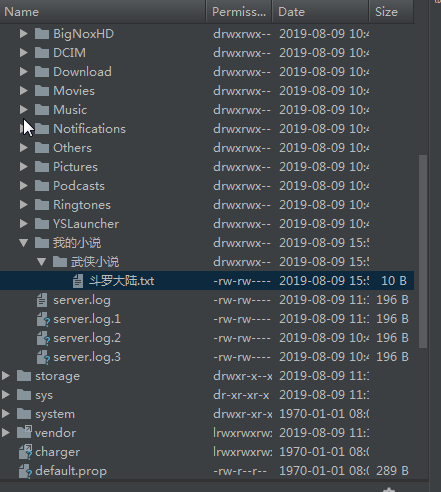

There are also CleanDataUtils class methods for mobile phone cleaning:
Interested students can look at the source code comments. They are all Chinese. Don't say they can't understand Chinese o( ̄▽  ̄) d.
 /**
     * Manage mobile data
     */
    public static class CleanDataUtils {...}
getTotalCacheSize (you need to check the cache size)
clearAllCache (clear cache)
deleteDir (delete file)
cleanInternalCache (clear the internal cache of the application)
cleanDatabases (clear all databases of this application)
cleanSharedPreference (clear SharedPreference of this app)
cleanDatabaseByName (clear the application database by name)
cleanFiles (clear the contents under / data/data/com.xxx.xxx/files)
cleanExternalCache (clear the contents of the external cache (/ mnt/sdcard/android/data/com.xxx.xxx/cache))
cleanCustomCache (clear the files under the custom path. Be careful not to delete them by mistake. It only supports the deletion of files under the directory)
cleanApplicationData (clear all data of this application)
deleteFilesByDirectory (deletion method here only deletes files under a folder. If the incoming directory is a file, it will not be processed)
getFolderSize (get file)
deleteFolderFile (delete files and directories in the specified directory)
getFormatSize (format unit)
GT Chapter 8: network class
Create an empty project and add the following code to MainActivity in the project:
[Note: GT library shall reach version 1.1.3]
boolean internet = GT.Network.isInternet(this);//Whether you can access the Internet at present true: the network is unblocked false: unable to connect to the network
        if(internet){
            String ipAddress = GT.Network.getIPAddress(this);//Get current IP address
            GT.log_i("Internet access: IP:" + ipAddress);
        }else{
            GT.log_i("No internet access");
        }
In Android manifest Add write read permission to XML}:
<uses-permission android:name="android.permission.ACCESS_WIFI_STATE" />
design sketch:

Summary: there are a few network classes, which will be updated slowly later. If you have more good network source code, please participate in the editing - young Lang.
GT Chapter 9: network request OkGo/OkHttp3 + JSON
Create an empty project and add the following code to MainActivity in the project:
[Note: GT library shall reach version 1.1.3]
Request: OkGo Get mode
public class MainActivity extends AppCompatActivity {

    String urlApi = "https://apis.map.qq.com/ws/geocoder/v1/?location=" +
            "22.5948,114.3069163" +
            "&key=J6HBZ-N3K33-D2B3V-YH7I4-37AVE-NJFMT&get_poi=1";

    @Override
    protected void onCreate(Bundle savedInstanceState) {
        super.onCreate(savedInstanceState);
        setContentView(R.layout.activity_main);

        //get request from OkGo
        new GT.OkGo(urlApi).loadDataGet(new StringCallback() {
            @Override
            public void onSuccess(Response<String> response) {

                GT.log_e("I asked for it JSON data:",response.body());

                //Data filtering

                GT.JSON json = new GT.JSON(response.body());//Load data
                json.initBeanData(response.body());
                Object message = json.get("message");
                GT.log_i("message:" + message);

                //Initialization data
                json.initBeanData(json.get("result").toString());

                Object address = json.get("address");
                GT.log_i("address:" + address);

                json.initBeanData(json.get("formatted_addresses").toString());

                Object recommend = json.get("recommend");
                GT.log_i("recommend:" + recommend);

            }
        });


    }

}
Remember to add network permissions:
<uses-permission android:name="android.permission.INTERNET"/>
design sketch:
08-09 16:32:45.790 6090-6090/? E/GT_e: ------- Run

    ---------------------I asked for it JSON data:------------------------
                       {
        "status": 0,
        "message": "query ok",
        "request_id": "462ff366-ba80-11e9-8c6e-5254002f3dc2",
        "result": {
            "location": {
                "lat": 22.5948,
                "lng": 114.306916
            },
            "address": "Song Cai Dao, Yantian District, Shenzhen City, Guangdong Province",
            "formatted_addresses": {
                "recommend": "La Waterfront Hotel",
                "rough": "La Waterfront Hotel"
            },
            "address_component": {
                "nation": "China",
                "province": "Guangdong Province",
                "city": "Shenzhen City",
                "district": "Yantian District",
                "street": "Song Caidao",
                "street_number": "Song Caidao"
        .....
        .....
        .....

08-09 16:32:45.792 6090-6090/? I/GT_i: ------- message:query ok
08-09 16:32:45.793 6090-6090/? I/GT_i: ------- address:Song Cai Dao, Yantian District, Shenzhen City, Guangdong Province
08-09 16:32:45.793 6090-6090/? I/GT_i: ------- recommend:La Waterfront Hotel
Request: OkGo Post request with parameters
public class MainActivity extends AppCompatActivity {

    String Api = "https://apis.map.qq.com/ws/geocoder/v1/?";

    @Override
    protected void onCreate(Bundle savedInstanceState) {
        super.onCreate(savedInstanceState);
        setContentView(R.layout.activity_main);

        //OkGo Post request with parameters
        Map<String,String> map = new HashMap<>();
        map.put("location","22.5948,114.3069163");
        map.put("key","J6HBZ-N3K33-D2B3V-YH7I4-37AVE-NJFMT");
        map.put("get_poi","1");
        new GT.OkGo(Api,map).loadDataPost(new StringCallback() { //Post request method
            @Override
            public void onSuccess(Response<String> response) {
                GT.log_i("Request succeeded!");
                GT.log_e("Requested data:",response.body());
            }

            @Override
            public void onError(Response<String> response) {
                GT.log_e("Request failed!");
            }
        });

    }

}
design sketch:

Request: OkHttp Post request with parameters:
public class MainActivity extends AppCompatActivity {

    String Api = "https://apis.map.qq.com/ws/geocoder/v1/?";

    @Override
    protected void onCreate(Bundle savedInstanceState) {
        super.onCreate(savedInstanceState);
        setContentView(R.layout.activity_main);

        //OkGo Post request with parameters
        Map<String,String> map = new HashMap<>();
        map.put("location","22.5948,114.3069163");
        map.put("key","J6HBZ-N3K33-D2B3V-YH7I4-37AVE-NJFMT");
        map.put("get_poi","1");

        /**
         * OkHttp(String url)  get request is used by default
         * OkHttp(String url, Map<String, String> map) post request is used by default
         */

        new GT.OkHttp(Api,map).loadDAta(new Callback() {
            @Override
            public void onFailure(Call call, IOException e) {

            }

            @Override
            public void onResponse(Call call, Response response) throws IOException {
                GT.log_i("Requested data:" + response.body().string());
            }
        });

    }

}
design sketch:
08-09 16:49:00.956 6443-6460/? I/GT_i: ------- Requested data:{
        "status": 0,
        "message": "query ok",
        "request_id": "8b89cb06-ba82-11e9-8269-6c92bf53528b",
        "result": {
            "location": {
                "lat": 22.5948,
                "lng": 114.306916
            },
            "address": "Song Cai Dao, Yantian District, Shenzhen City, Guangdong Province",
            "formatted_addresses": {
                "recommend": "La Waterfront Hotel",
                "rough": "La Waterfront Hotel"
            },
Original network request:
public class MainActivity extends AppCompatActivity {

    String url = "https://apis.map.qq.com/ws/geocoder/v1/?";

    @Override
    protected void onCreate(Bundle savedInstanceState) {
        super.onCreate(savedInstanceState);
        setContentView(R.layout.activity_main);

        //OkGo Post request with parameters
        Map<String, String> map = new HashMap<>();
        map.put("location", "22.5948,114.3069163");
        map.put("key", "J6HBZ-N3K33-D2B3V-YH7I4-37AVE-NJFMT");
        map.put("get_poi", "1");

        GT.HttpUtil.postRequest(url, map, "utf-8", new GT.HttpUtil.OnLoadData() {
            @Override
            public void onSuccess(String response) {
                GT.log_i("Original network request succeeded:" + response);
            }

            @Override
            public void onError(String error) {
                GT.log_i("request was aborted:" + error);
            }
        });

    }

}
result:
2019-09-27 09:57:04.113 14211-14211/com.gsls.gt_animator I/GT_i: ------- Original network request succeeded:{
        "status": 0,
        "message": "query ok",
        "request_id": "1b1cc4cc-e0ca-11e9-8a7c-7cd30a58fda9",
        "result": {
            "location": {
                "lat": 22.5948,
                "lng": 114.306916
            },
            "address": "Song Cai Dao, Yantian District, Shenzhen City, Guangdong Province",
            "formatted_addresses": {
                "recommend": "La Waterfront Hotel",
                "rough": "La Waterfront Hotel"
            },
Summary: it introduces some methods of network request, and others just read Chinese notes. Readers are also welcome to participate in editing after submitting their contributions.
GT Chapter 10: Web shortcuts
Create an empty project and add the following code to MainActivity in the project:
[Note: GT library shall reach version 1.1.3]
Directly select JSON data on the Web:
public class MainActivity extends AppCompatActivity {

    String urlApi = "https://apis.map.qq.com/ws/geocoder/v1/?location=" +
            "22.5948,114.3069163" +
            "&key=J6HBZ-N3K33-D2B3V-YH7I4-37AVE-NJFMT&get_poi=1";

    @Override
    protected void onCreate(Bundle savedInstanceState) {
        super.onCreate(savedInstanceState);
        setContentView(R.layout.activity_main);

            new Thread(new Runnable() {
                @Override
                public void run() {

                    String htmlData = null;
                    try {
                        htmlData = GT.WebApi.getHtmlData(urlApi);
                    } catch (Exception e) {
                        e.printStackTrace();
                    }
                    GT.log_e("Unplugged htmlData: ",htmlData);

                }
            }).start();

    }

}
design sketch:
08-09 16:56:18.915 6725-6741/? E/GT_e: ------- Run

    ---------------------Unplugged htmlData: ------------------------
                       {
        "status": 0,
        "message": "query ok",
        "request_id": "909ae75a-ba83-11e9-80bb-6c92bf93b501",
        "result": {
            "location": {
                "lat": 22.5948,
                "lng": 114.306916
            },
            "address": "Song Cai Dao, Yantian District, Shenzhen City, Guangdong Province",
            "formatted_addresses": {
                "recommend": "La Waterfront Hotel",
                "rough": "La Waterfront Hotel"
            },
Summary: when unplugging data, it must be executed in the sub thread, because it is a time-consuming operation. Ma Ma is no longer afraid. I can't pull out the data. (ノ´▽`)ノ♪
GT Chapter 11: loading Google Maps for PC
Create an empty project and add the following code to MainActivity in the project:
[Note: GT library shall reach version 1.1.3]
public class MainActivity extends AppCompatActivity {

    private String url = "http://www.google.cn/maps/@17.1669642,109.2817502,14972247m/data=!3m1!1e3";

    @Override
    protected void onCreate(Bundle savedInstanceState) {
        super.onCreate(savedInstanceState);
        setContentView(R.layout.activity_main);

        WebView webView = findViewById(R.id.webView);
        GT.loadPCHtml.setWebViewLoadPC(webView,url);

    }

}
In activity_main.xml added code:
<?xml version="1.0" encoding="utf-8"?>
<androidx.constraintlayout.widget.ConstraintLayout xmlns:android="http://schemas.android.com/apk/res/android"
    xmlns:tools="http://schemas.android.com/tools"
    android:layout_width="match_parent"
    android:layout_height="match_parent"
    tools:context=".MainActivity">

    <WebView
        android:id="@+id/webView"
        android:layout_width="match_parent"
        android:layout_height="match_parent"/>

</androidx.constraintlayout.widget.ConstraintLayout>
Remember to add network permissions:
<uses-permission android:name="android.permission.INTERNET"/>
design sketch:
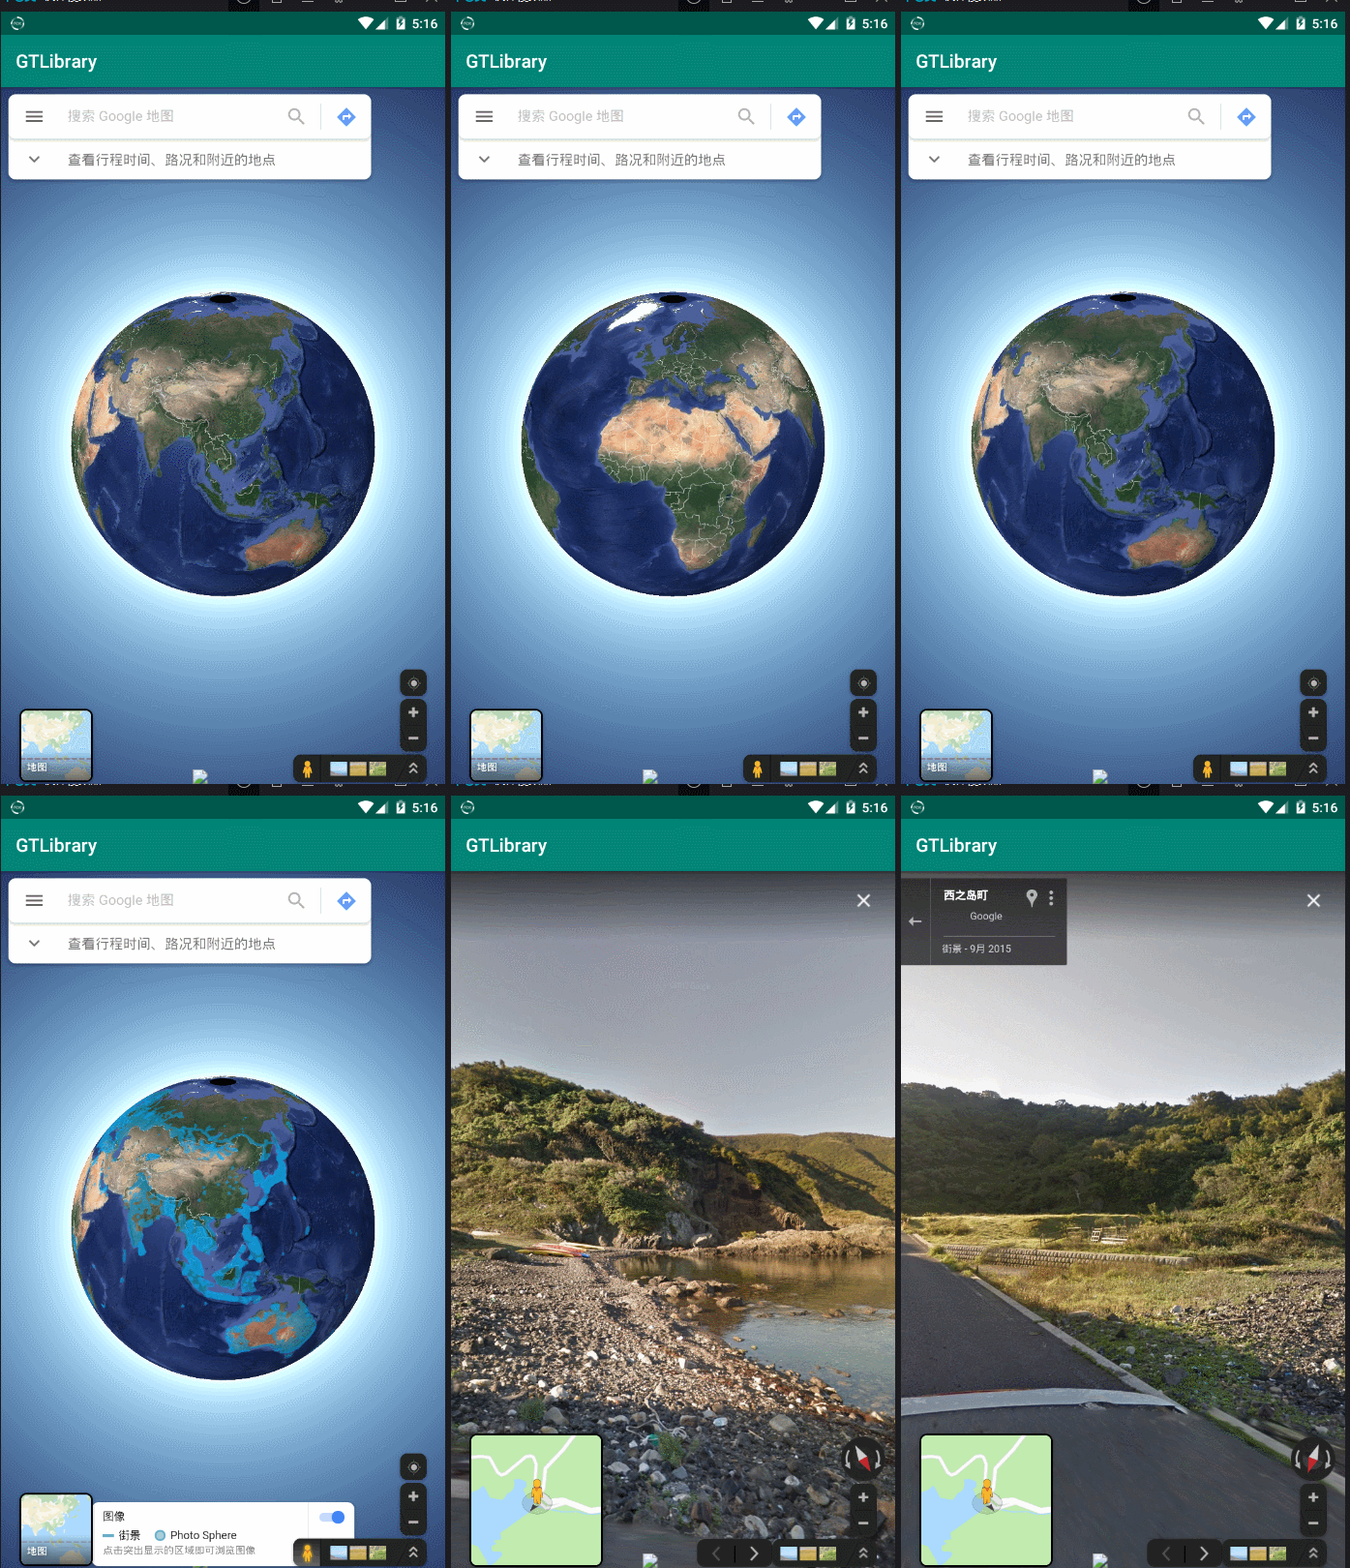
Conclusion: sometimes there are projects that need to force the loading of PC version web pages. Remember to think about me at this time. (◕ᴗ◕✿)
GT Chapter 12: Date category
Create an empty project and add the following code to MainActivity in the project:
[Note: GT library shall reach version 1.1.3]
public class MainActivity extends AppCompatActivity {

    @Override
    protected void onCreate(Bundle savedInstanceState) {
        super.onCreate(savedInstanceState);
        setContentView(R.layout.activity_main);

        GT.GT_Date gt_date = new GT.GT_Date();

        GT.log_i("Time: " + gt_date.getTime());//Get full time

        GT.log_i("WeekOfDate: " + gt_date.getWeekOfDate());//Get week

        GT.log_i("toTime: " + gt_date.toTime("1565343841"));//Timestamp to time

        GT.log_i("toPastTime: " + gt_date.toPastTime("1565221646"));//A few hours from now

    }

}
design sketch:
08-09 17:48:12.534 7756-7756/? I/GT_i: ------- Time: 2019-08-09 17:48:12
08-09 17:48:12.534 7756-7756/? I/GT_i: ------- WeekOfDate: Friday
08-09 17:48:12.534 7756-7756/? I/GT_i: ------- toTime: 2019-08-09 17:44:01
08-09 17:48:12.535 7756-7756/? I/GT_i: ------- toPastTime: 10 Hours ago
Conclusion: there are a lot of fool's methods to use, and I won't write them out, such as:
Get the year separately, get the month separately, get the day of the month, get the hour, get the minute, get the second, and so on
GT Chapter 13: sharing function and loading pictures
Create an empty project and add the following code to MainActivity in the project:
[Note: GT library shall reach version 1.1.3]
public class MainActivity extends AppCompatActivity {

    @Override
    protected void onCreate(Bundle savedInstanceState) {
        super.onCreate(savedInstanceState);
        setContentView(R.layout.activity_main);

        ImageView imageView = findViewById(R.id.image);

        /**
         * Load picture
         *
         * @param context        context
         * @param ImageResources Picture resources to load
         * @param imageView      Load on that component
         */
        GT.ImageOptimize.loadImage(this,R.mipmap.ic_launcher,imageView);//Load picture

    }

}
activity_ main. The XML code is as follows:
<?xml version="1.0" encoding="utf-8"?>
<androidx.constraintlayout.widget.ConstraintLayout xmlns:android="http://schemas.android.com/apk/res/android"
    xmlns:app="http://schemas.android.com/apk/res-auto"
    xmlns:tools="http://schemas.android.com/tools"
    android:layout_width="match_parent"
    android:layout_height="match_parent"
    tools:context=".MainActivity">

    <ImageView
        android:id="@+id/image"
        android:layout_width="200dp"
        android:layout_height="100dp"
        app:layout_constraintBottom_toBottomOf="parent"
        app:layout_constraintEnd_toEndOf="parent"
        app:layout_constraintStart_toStartOf="parent"
        app:layout_constraintTop_toTopOf="parent" />

</androidx.constraintlayout.widget.ConstraintLayout>
design sketch:
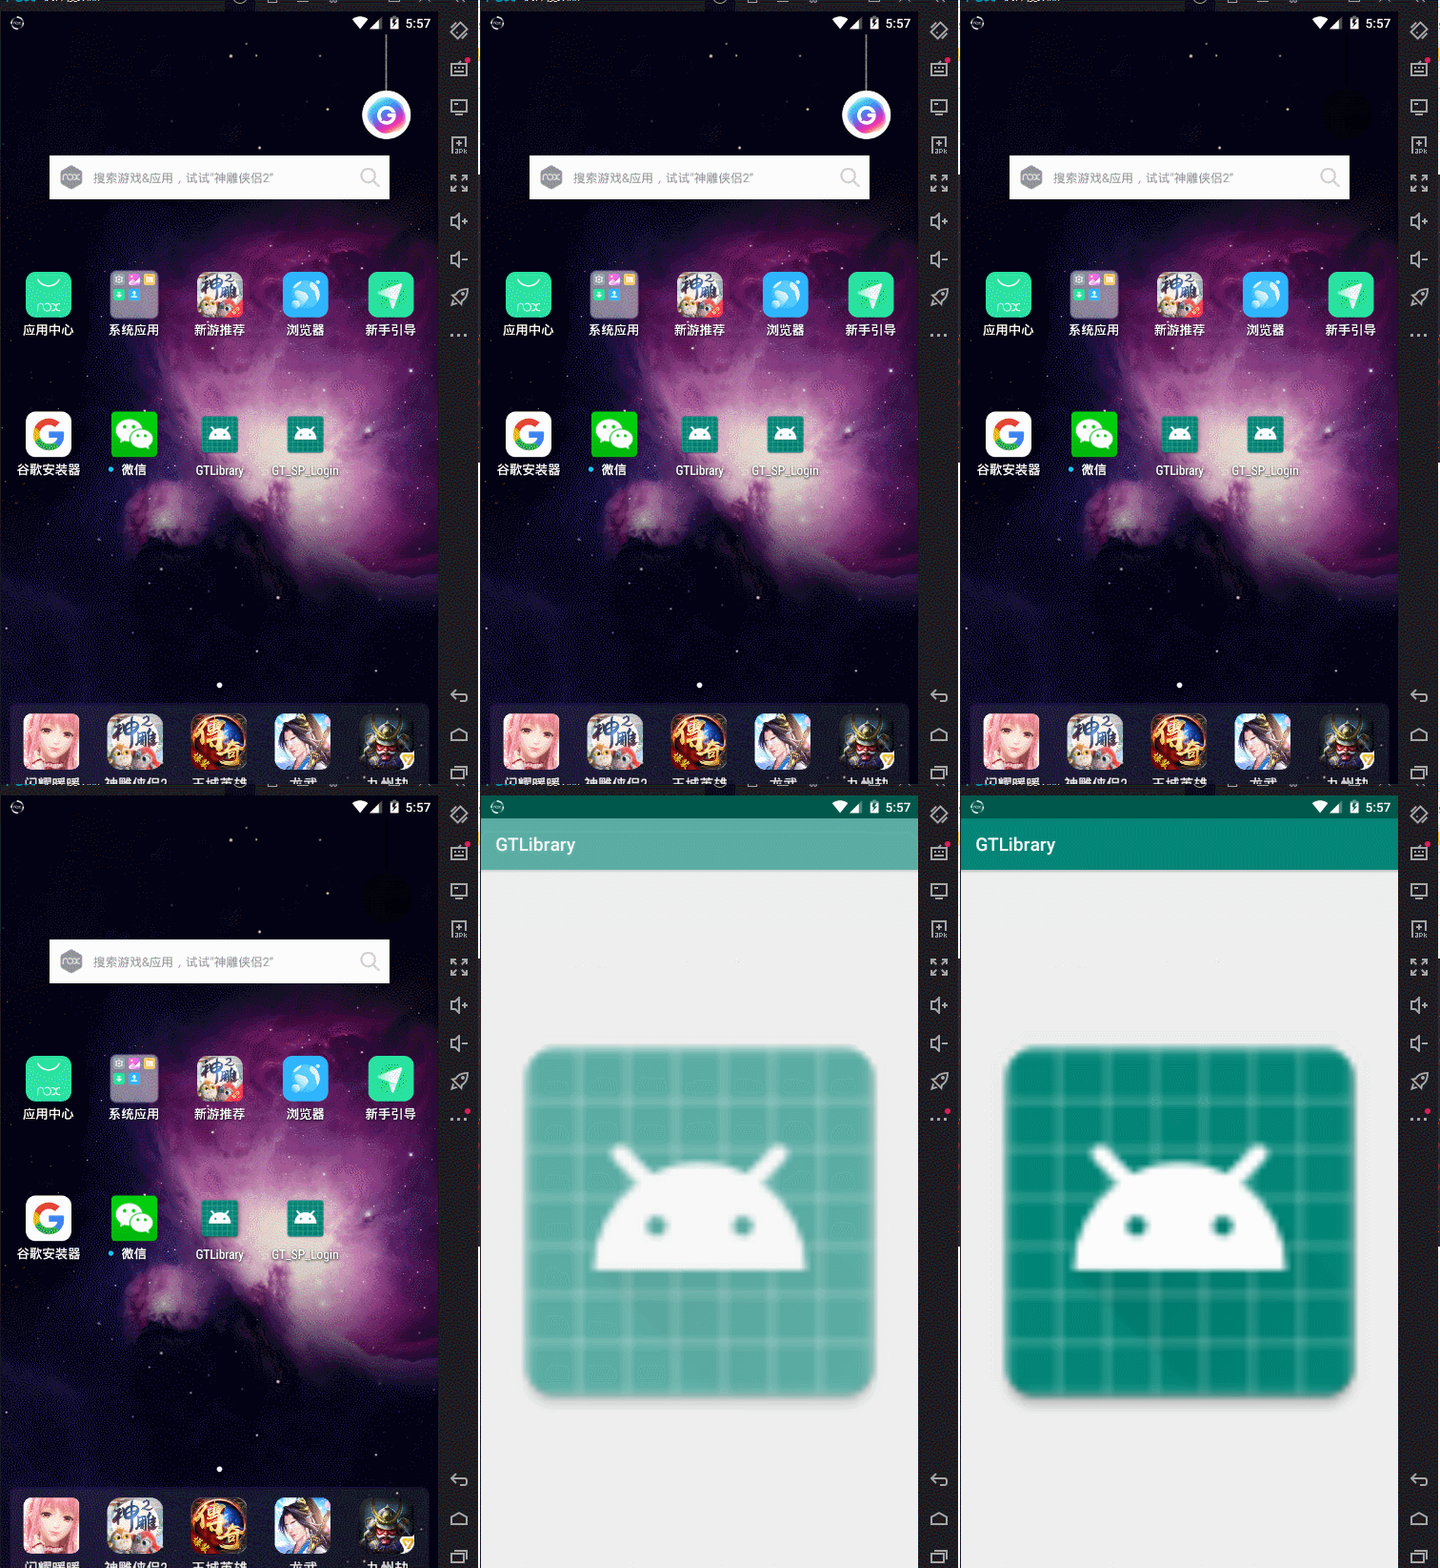
Next, let's look at the sharing function:
Add the following code to MainActivity in the project: Jump directory
public class MainActivity extends AppCompatActivity {

    @Override
    protected void onCreate(Bundle savedInstanceState) {
        super.onCreate(savedInstanceState);
        setContentView(R.layout.activity_main);

        ImageView imageView = findViewById(R.id.image);

        /**
         * Load picture
         *
         * @param context        context
         * @param ImageResources Picture resources to load
         * @param imageView      Load on that component
         */
        GT.ImageOptimize.loadImage(this,R.mipmap.ic_launcher,imageView);//Load picture

        //Click the picture to enter the sharing operation
        imageView.setOnClickListener(new View.OnClickListener() {
            @Override
            public void onClick(View view) {
                new GT.GT_Share(MainActivity.this).senText("title","What I share");
            }
        });

    }

}
design sketch:
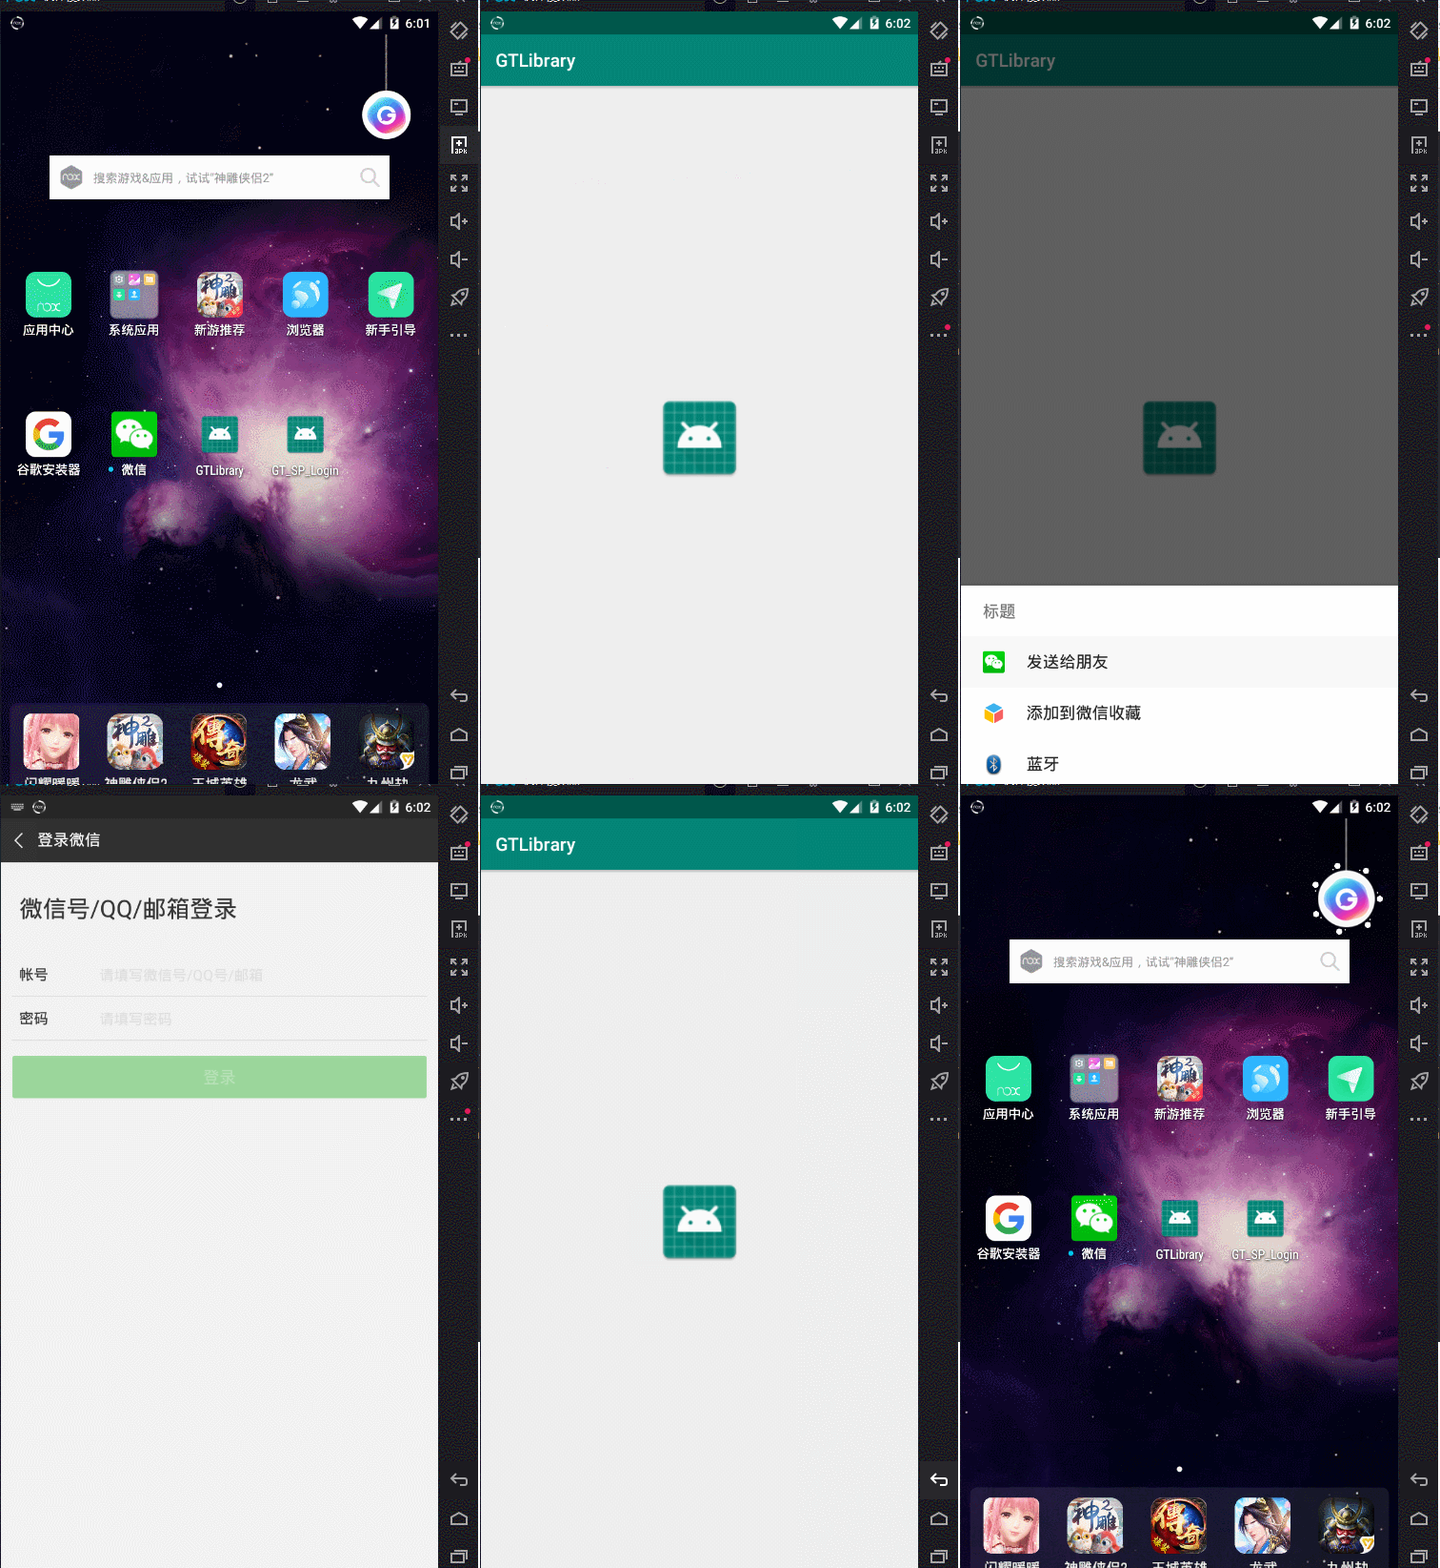
Summary: Q has tried to share news, and the personal test is successful, but wechat has not tried yet. If not, remember to call. ٩ (๑>◡<๑) ۶
GT Chapter 14: Window operation class
Create an empty project and add the following code to MainActivity in the project:
[Note: GT library shall reach version 1.1.3]
public class MainActivity extends AppCompatActivity {

    @RequiresApi(api = Build.VERSION_CODES.JELLY_BEAN_MR2)
    @Override
    protected void onCreate(Bundle savedInstanceState) {
        super.onCreate(savedInstanceState);
//        GT.Window.fullScreen(this);                 // Set full screen mode
        setContentView(R.layout.activity_main);

        GT.log_i("Screen width:" + GT.Window.getWindowWidth(this));
        GT.log_i("Screen height:" + GT.Window.getWindowHeight(this));
        GT.Window.light(this);                      //The setting screen is always on
        GT.Window.Close_virtualButton(this);        //Close virtual button
//        GT.Window.hideStatusBar(this);                     // hide the status bar
        GT.Window.lucencyStatusBar(this);           //Transparent status bar
        GT.Window.hideActionBar(this);              //Hide ActionBar
//        GT.Window.hideNavigationBar(this);          // Hide navigation bar
//        GT.Window.lucencyNavigationBar(this);       // Transparent navigation bar
//        GT.Window.immersionMode(this);              // Immersive mode (hide status bar, remove ActionBar, hide navigation bar)

        /**
         * Returns whether the current screen is horizontal or vertical
         *
         * @param activity
         * @return The horizontal screen returns true and the vertical screen returns false
         */
        GT.log_i("Horizontal and vertical screen detection:" + GT.Window.isLandscapeAndPortrait(this));

        /**
         * one_three:   0-6 For forced horizontal and vertical screen, adaptation, etc
         * Horizontal or vertical screen for enforcement
         *
         * @param activity
         */
        GT.Window.AutoLandscapeAndPortrait(this,5);//It is automatically suitable for positive horizontal screen, negative horizontal screen and positive vertical screen


    }

}
Let's look at activity again_ main. The XML code sets the background color:
<?xml version="1.0" encoding="utf-8"?>
<androidx.constraintlayout.widget.ConstraintLayout xmlns:android="http://schemas.android.com/apk/res/android"
    xmlns:app="http://schemas.android.com/apk/res-auto"
    xmlns:tools="http://schemas.android.com/tools"
    android:layout_width="match_parent"
    android:layout_height="match_parent"
    android:background="#2196F3"
    tools:context=".MainActivity">


</androidx.constraintlayout.widget.ConstraintLayout>
design sketch:
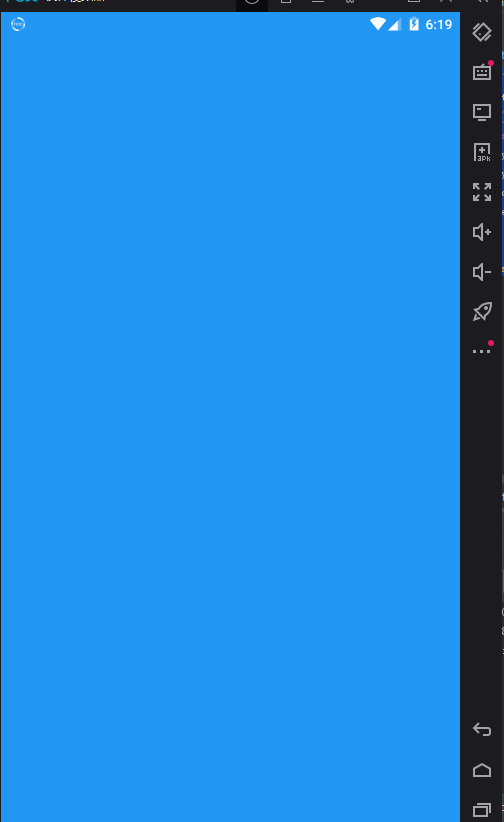

Give me a sugar bean:
public class MainActivity extends AppCompatActivity {

    @RequiresApi(api = Build.VERSION_CODES.JELLY_BEAN_MR2)
    @Override
    protected void onCreate(Bundle savedInstanceState) {
        super.onCreate(savedInstanceState);
        GT.Window.fullScreen(this);                 //Set full screen mode
        setContentView(R.layout.activity_main);

        GT.Game.startGameWindow(this);//Turn on the immersive mode of the game

    }

}
Summary: necessary window knowledge points for developing games. Xiaobian will release his maiden game on tab at the end of December 2019. Remember to enjoy it at that time. (*/ ω\*)
GT Chapter 15: GT_Fragment framework
Meidi framework makes switching so simple!
To create an empty project, let's first look at the file directory structure of DOM:
[Note: GT library shall reach version 1.1.3]
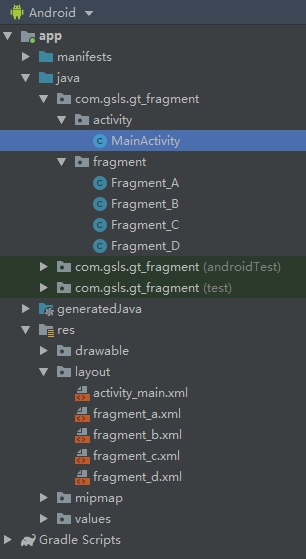
Create a new activity and fragment folder. The directory is simple: one activity, four fragments, and the corresponding layout file.
Step 1: create four new fragments and corresponding xml layout files
fragment_a.xml——fragment_b.xml——fragment_c.xml——fragment_d.xml code:
<?xml version="1.0" encoding="utf-8"?>
<androidx.constraintlayout.widget.ConstraintLayout xmlns:android="http://schemas.android.com/apk/res/android"
    xmlns:app="http://schemas.android.com/apk/res-auto"
    xmlns:tools="http://schemas.android.com/tools"
    android:layout_width="match_parent"
    android:layout_height="match_parent"
    tools:context=".activity.MainActivity"
    >

    <TextView
        android:id="@+id/textView"
        android:layout_width="match_parent"
        android:layout_height="match_parent"
        android:gravity="center"
        android:text="Fragment A"
        android:background="#FFEB3B"
        android:textSize="28sp"
        android:textStyle="bold"
        android:textColor="#000000"
        app:layout_constraintBottom_toBottomOf="parent"
        app:layout_constraintEnd_toEndOf="parent"
        app:layout_constraintStart_toStartOf="parent"
        app:layout_constraintTop_toTopOf="parent" />

</androidx.constraintlayout.widget.ConstraintLayout>
fragment_b.xml is the same as above, only need to modify:
android:text="Fragment B"
android:background="#4CAF50"
fragment_c.xml is the same as above, only need to modify:
android:text="Fragment C"
android:background="#03A9F4"
fragment_d.xml is the same as above, only need to modify
android:text="Fragment D"
android:background="#FF00"
Fragment_A.class——Fragment_C.class——Fragment_C.class——Fragment_D.class code:
Note: you can also not inherit {BaseFragments} app Fragment , is OK.
Fragment_A.xml} Code:
//BaseFragments class inherited from GT
public class Fragment_A extends GT.GT_Fragment.BaseFragments{

    @Override
    protected int loadLayout() {    //Override loadLayout method
        return R.layout.fragment_a; //Returns the resolved layout file
    }

    @Override
    protected void initView(@NonNull View view, @Nullable Bundle savedInstanceState) {  //Override initView method
        // Write Fragment business requirement code
    }

}
Fragment_B.xml is the same as above, only need to modify:
 @Override
    protected int loadLayout() {
        return R.layout.fragment_b;
    }
Fragment_C.xml is the same as above, only need to modify:
@Override
    protected int loadLayout() {
        return R.layout.fragment_c;
    }
Fragment_D.xml is the same as above, only need to modify
@Override
    protected int loadLayout() {
        return R.layout.fragment_d;
    }
Step 2: write MainActivity and activity_main code:
activity_main.xml code:
<?xml version="1.0" encoding="utf-8"?>
<androidx.constraintlayout.widget.ConstraintLayout xmlns:android="http://schemas.android.com/apk/res/android"
    xmlns:app="http://schemas.android.com/apk/res-auto"
    xmlns:tools="http://schemas.android.com/tools"
    android:layout_width="match_parent"
    android:layout_height="match_parent"
    tools:context=".activity.MainActivity">

    <FrameLayout
        android:id="@+id/fLayout"
        android:layout_width="match_parent"
        android:layout_height="0dp"
        app:layout_constraintTop_toTopOf="parent"
        app:layout_constraintBottom_toTopOf="@+id/lLayout"
        />

    <LinearLayout
        android:id="@+id/lLayout"
        android:layout_width="match_parent"
        android:layout_height="wrap_content"
        app:layout_constraintBottom_toBottomOf="parent"
        android:orientation="horizontal"
        android:padding="5dp"
        android:background="#FFFFFF"
        >

        <Button
            android:id="@+id/btn1"
            android:layout_width="0dp"
            android:layout_height="wrap_content"
            android:layout_weight="1"
            android:text="Button 1"
            android:onClick="onClick"
            />

        <Button
            android:id="@+id/btn2"
            android:layout_width="0dp"
            android:layout_height="wrap_content"
            android:layout_weight="1"
            android:text="Button 2"
            android:onClick="onClick"
            />

        <Button
            android:id="@+id/btn3"
            android:layout_width="0dp"
            android:layout_height="wrap_content"
            android:layout_weight="1"
            android:text="Button 3"
            android:onClick="onClick"
            />

        <Button
            android:id="@+id/btn4"
            android:layout_width="0dp"
            android:layout_height="wrap_content"
            android:layout_weight="1"
            android:text="Button 4"
            android:onClick="onClick"
            />

    </LinearLayout>

</androidx.constraintlayout.widget.ConstraintLayout>
MainActivity.class code:
public class MainActivity extends AppCompatActivity {

    private GT.GT_Fragment gt_f;//Define Fragment Manager

    @Override
    protected void onCreate(Bundle savedInstanceState) {
        super.onCreate(savedInstanceState);
        setContentView(R.layout.activity_main);

        //Add fragments to manage
        List<Fragment> list = new ArrayList<>();
        list.add(new Fragment_A());
        list.add(new Fragment_B());
        list.add(new Fragment_C());
        list.add(new Fragment_D());

        //Initialize Fragment Manager
        gt_f = GT.GT_Fragment.getGT_fragment()
                // Initialize GT_Fragment manager parameters
                .initFragment(savedInstanceState,this,getSupportFragmentManager())
                // Parameter 1: id of frame layout parameter 2: list for storing fragments parameter 3: the default page for loading the first page is generally set to 0, just like list get(0);
                .loadFragment(R.id.fLayout,list,0);

    }

    public void onClick(View view) {
        switch (view.getId()){
            case R.id.btn1:
                gt_f.startFragment(Fragment_A.class);//Jump to Fragment_A
                break;
            case R.id.btn2:
                gt_f.startFragment(Fragment_B.class);//Jump to Fragment_B
                break;
            case R.id.btn3:
                gt_f.startFragment(Fragment_C.class);//Jump to Fragment_C
                break;
            case R.id.btn4:
                gt_f.startFragment(Fragment_D.class);//Jump to Fragment_D
                break;
        }
    }
}
Look at the renderings:
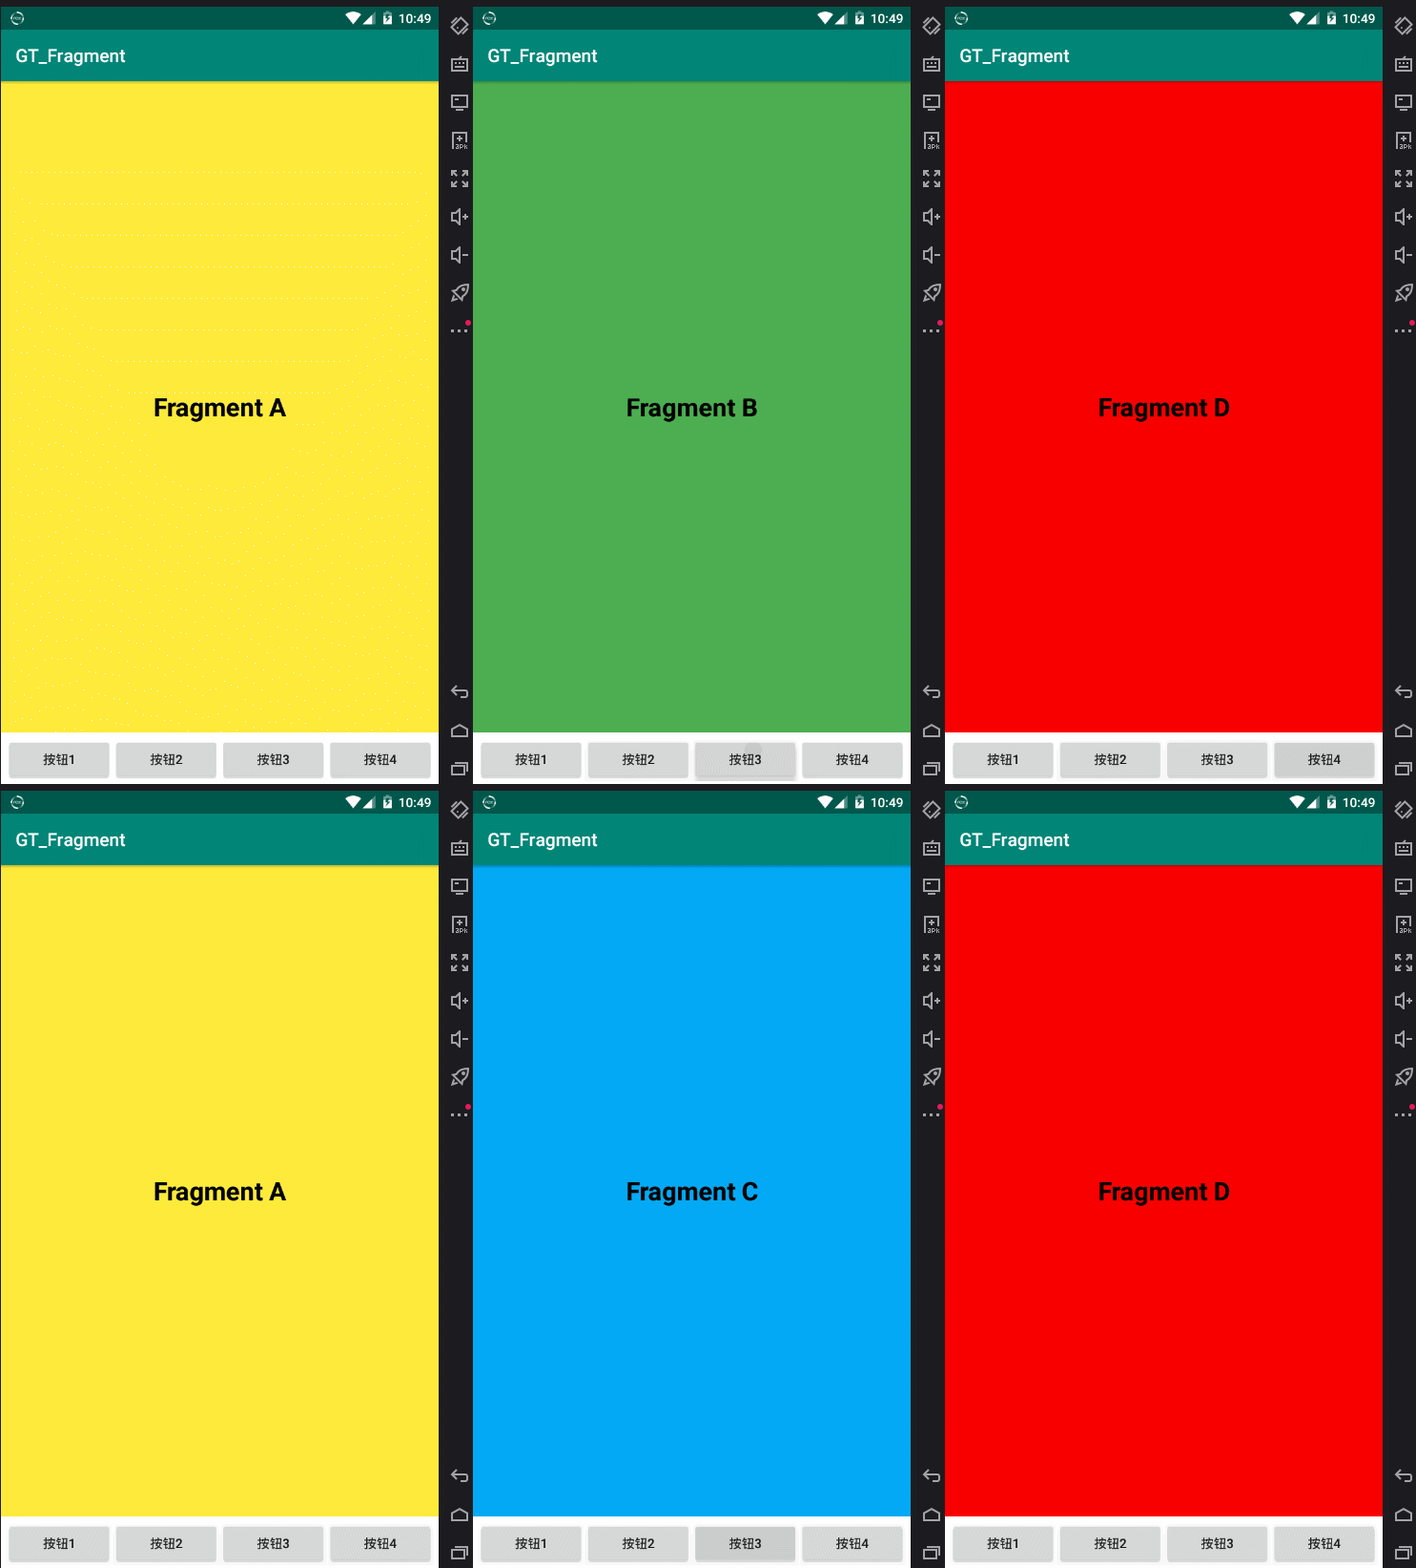
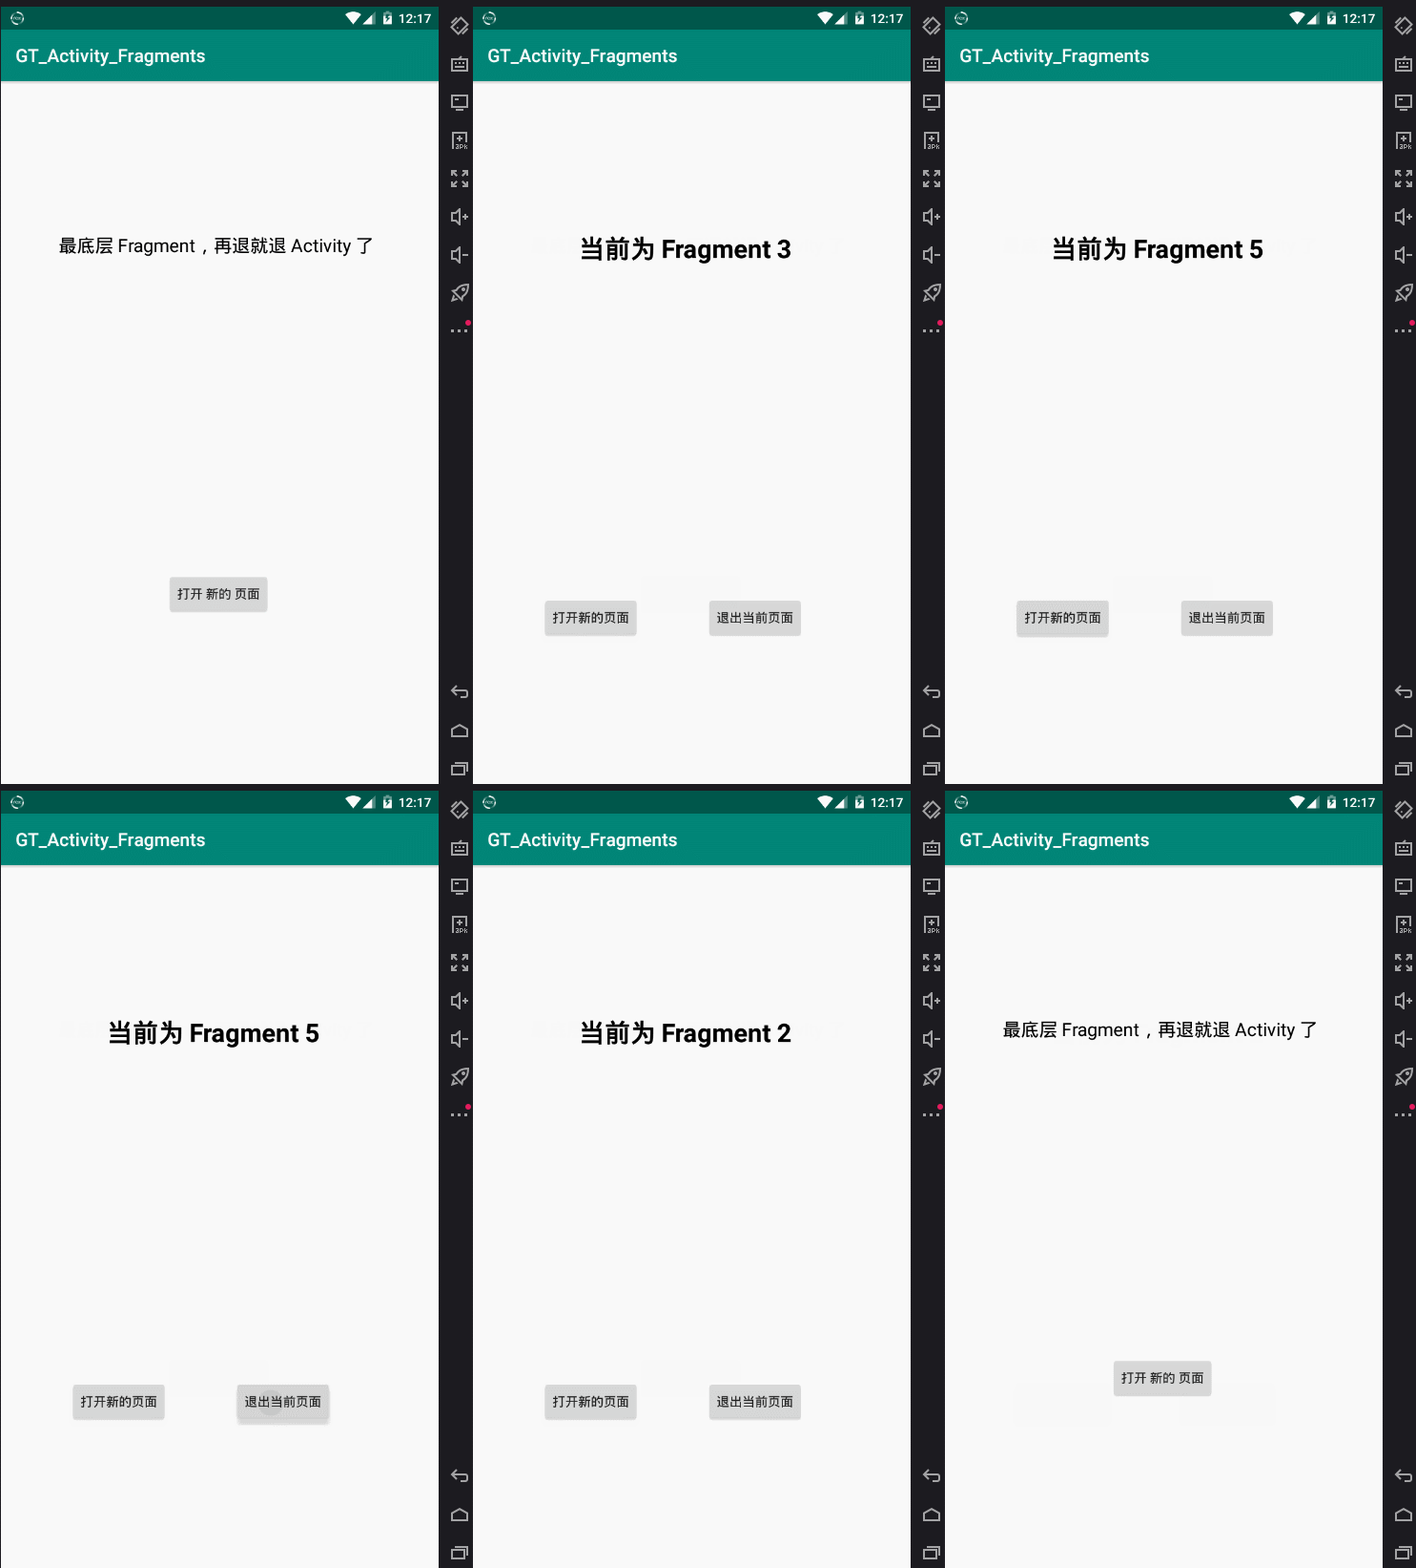
"A few activities correspond to multiple fragemnts" and "a single} Activity corresponds to multiple fragemnts"
Domain website of this chapter: https://github.com/1079374315/GT_Fragment.git
GT_ Advanced version of Fragment (development of single Activity and corresponding multiple fragments): https://github.com/1079374315/GT_Activity_Fragments.git
In the development of single Activity and corresponding multiple fragments, the code of opening a new page and {destroying the current page is optimized:
startFragment(Fragment_n.newInstance());//Open a new Fragment
finish();//Close current Fragment
Including the optimization of listening for physical return buttons or other keys in the state of multi-layer Fragment nesting:
//Monitor physical return key
        getGT_Fragment().onKeyDown(view, new View.OnKeyListener() {
            @Override
            public boolean onKey(View view, int keyCode, KeyEvent keyEvent) {
                if (keyCode == 4 && keyEvent.getAction() == KeyEvent.ACTION_DOWN) {

                    // The activity here can be written directly without writing the code to obtain the activity
                    Toast.makeText(activity, "Listening to you press the physical return button", Toast.LENGTH_SHORT).show();
//                    finish();// Close current Fragment

                    return true;//Only the return key will be used for monitoring
                }
                return false;//The rest, such as low volume, high volume and so on, are not monitored, but are handed over to the Activity management.
            }
        });
Conclusion: Meidi framework makes switching so simple!
GT Chapter 16: DeviceListening} device listening class
Create an empty project and add the following code to MainActivity in the project:
[Note: GT library shall reach version 1.1.3]
public class MainActivity extends AppCompatActivity {

    private GT.DeviceListening.GT_HeadsetPlugReceiver gt_headsetPlugReceiver;

    @Override
    protected void onCreate(Bundle savedInstanceState) {
        super.onCreate(savedInstanceState);
        setContentView(R.layout.activity_main);

        //Get current mobile phone information
        GT.DeviceListening.MobilePhoneAttribute mobilePhoneAttribute = new GT.DeviceListening.MobilePhoneAttribute();
        GT.log_i("Get phone model:" + mobilePhoneAttribute.getModel());
        GT.log_i("Get phone SDK Version number:" + mobilePhoneAttribute.getSDK());
        GT.log_i("Get mobile system version number:" + mobilePhoneAttribute.getRELEASE());

        // Mobile volume class
        GT.DeviceListening.GT_AudioManager gt_audioManager = new GT.DeviceListening.GT_AudioManager(this);
        GT.log_i("Get the maximum value of call sound and the current sound value:" + gt_audioManager.getVoiceCall());
        GT.log_i("Get the sound value of the current mobile phone:" + gt_audioManager.getVoiceSystem());
        GT.log_i("Gets the maximum volume of the system:" + gt_audioManager.getVoiceSystemMax());
        GT.log_i("Gets the value of the currently passed sound:" + gt_audioManager.getVoiceRing());
        GT.log_i("Ringtone volume Max:" + gt_audioManager.getVoiceRingMax());
        GT.log_i("Gets the value of the currently passed sound:" + gt_audioManager.getVoiceMusic());
        GT.log_i("Get music volume(Multi-Media) Maximum:" + gt_audioManager.getVoiceMusicMax());
        GT.log_i("Gets the value of the currently passed sound:" + gt_audioManager.getVoiceAlarm());
        GT.log_i("Gets the maximum volume of the prompt sound:" + gt_audioManager.getVoiceAlarmMax());

        gt_audioManager.gemgMusiceNoSet();//During the game, only the multimedia volume can be adjusted, not the call volume.

        gt_audioManager.setVoiceCallValue(12);//Set the current phone volume
        gt_audioManager.setVoiceSystemValue(12);//Set system volume value
        gt_audioManager.setVoiceRingValue(12);//Set the volume of the ringing tone
        gt_audioManager.setMusicValue(12);//Set multimedia volume
        gt_audioManager.setVoiceAlarmValue(12);//Sets the volume of the prompt sound

        //Monitor whether the headset is plugged in
        gt_headsetPlugReceiver = new GT.DeviceListening.GT_HeadsetPlugReceiver(this);
        gt_headsetPlugReceiver.registerHeadsetPlugReceiver();//Register to listen to headphone broadcasts

        GT.log_i("Monitor headphones:" + gt_headsetPlugReceiver.isHeadset_TF());//It is recommended to add it to the thread to listen all the time

        /**
         *  Spiritleve Screen rotation monitoring
         *  There are implemented classes. See the source code call. If you can't use it, you can call Xiaobian. Xiaobian will write you a detailed dom
         */


        /**
         * ScreenListener Monitor screen status class
         * There are implemented classes. See the source code call. If you can't use it, you can call Xiaobian. Xiaobian will write you a detailed dom
         */


    }

    @Override
    protected void onStop() {
        super.onStop();
        gt_headsetPlugReceiver.unregisterListener();//Log off listening to headphone broadcast
    }
}
design sketch:
08-10 16:35:56.610 5881-5881/? I/GT_i: ------- Get phone model:MI 6
08-10 16:35:56.610 5881-5881/? I/GT_i: ------- Get phone SDK Version number:22
08-10 16:35:56.610 5881-5881/? I/GT_i: ------- Get mobile system version number:5.1.1
08-10 16:35:56.639 5881-5881/? I/GT_i: ------- Get the maximum value of call sound and the current sound value:4
08-10 16:35:56.639 5881-5881/? I/GT_i: ------- Get the sound value of the current mobile phone:5
08-10 16:35:56.639 5881-5881/? I/GT_i: ------- Gets the maximum volume of the system:7
08-10 16:35:56.639 5881-5881/? I/GT_i: ------- Gets the value of the currently passed sound:5
08-10 16:35:56.639 5881-5881/? I/GT_i: ------- Ringtone volume Max:7
08-10 16:35:56.639 5881-5881/? I/GT_i: ------- Gets the value of the currently passed sound:11
08-10 16:35:56.639 5881-5881/? I/GT_i: ------- Get music volume(Multi-Media) Maximum:15
08-10 16:35:56.640 5881-5881/? I/GT_i: ------- Gets the value of the currently passed sound:6
08-10 16:35:56.640 5881-5881/? I/GT_i: ------- Gets the maximum volume of the prompt sound:7
08-10 16:35:56.649 5881-5881/? I/GT_i: ------- Monitor headphones:false
Summary: a series of tools are given for easy access. Welcome Focus on the latest version of GT Library , other contents may have been added.
GT Chapter 17: super simple multimedia
Create an empty project and add the following code to MainActivity in the project:
[Note: GT library shall reach version 1.1.3]
Play music: (long sound)
GT.GT_MediaPlayer mediaPlayer = new GT.GT_MediaPlayer(this);//Instantiate object
        mediaPlayer.loadMusic(R.raw.bg_music);  //Load or update the audio to be played. This method can be used to update the audio to be played next
        mediaPlayer.play_pause();//Pause or play
        mediaPlayer.stop();//stop playing
        mediaPlayer.close();//Release resources
Play audio (short sound)
GT.GT_SoundPool gt_soundPool = new GT.GT_SoundPool(this);

        //Add short audio to play
        Map<String,Integer> map = new HashMap<>();
        map.put("Open the door",R.raw.open_door);
        map.put("shoot",R.raw.shoot);
        map.put("Shoot 2",R.raw.shoot2);

        gt_soundPool.updateMusic("Quick shot",R.raw.shoot2);//Modify audio

        gt_soundPool.initMusic(map);//Initialize audio data
        /**
         * Play audio
         *
         * @param key   Specifies the audio key to play
         * @param loop  Whether to cycle. false means not to cycle, and true means cycle
         * @param rate  The rate is normal rate 1, the minimum is 0.5 and the maximum is 2
         * @return
         */
        gt_soundPool.play("Quick shot",false,1);
Play video:
 /**
   * instructions:
   * Step 1: define the SurfaceView component in xml
   * Step 2: Video = new GT GT_Video(this,R.raw.lmh,surfaceView);// Initialize GT_Video player
   * Step 3: play video play();, Pause video pause();,  Stop video stop();,
   * Free the resource video close();
   */
Conclusion: all are written in native language. Those who can't or don't understand can call or view the source code. The source code is open.
GT Chapter 18: Thread update UI Thread
In Adnroid, it is common to request the network from the background, and all time-consuming operations should be written in the sub threads. Try these thread operations:
[Note: GT library shall reach version 1.1.3]
Normal child thread:
new Thread(new Runnable() {
            @Override
            public void run() {
                try {
                    Thread.sleep(5000);//Delay 5 seconds
                    Log.i("TAG","Request network");//Print
                } catch (InterruptedException e) {
                    e.printStackTrace();
                }
                //... Request network
            }
        }).start();
Sub threads in GT:
GT.Thread.runJava(new Runnable() {
            @Override
            public void run() {
                GT.Thread.sleep(5000);//Delay 5 seconds
                GT.log_i("Request network");//Print
                //... Request network
            }
        });
We know that the Android UI can only be updated in the UI thread. If you update the UI with a sub thread, an exception will occur. If you are still updating the UI with the} handler, you might as well try this method:
Update UI in GT:
GT.Thread.runAndroid(new Runnable() {
            @Override
            public void run() {
                //... Update UI action
            }
        });
There are also some useful methods, such as:
/**
         * Cycle timer
         *
         * @param delay     How many seconds after the start timer
         * @param period    How many milliseconds is the timing
         * @param timerTask Anonymous class new TimerTask, and then write time-consuming operations in the run method
         * @return
         */
        public static Timer Timer(long delay, long period, TimerTask timerTask)
/**
* Simple cycle timer
*
* @param timerTask
* @return
*/
public static Timer Timer(TimerTask timerTask)/**
* Timer Integral packaging
*/
public static class GT_Timer /**
* AsyncTask encapsulation
*
* @param gtAsyncTask
* @return
*/
public static GTAsyncTask asyncTask(GTAsyncTask gtAsyncTask)/**
* Automatically opened AsyncTask encapsulation
*
* @param start
* @param gtAsyncTask
* @return
*/
public static GTAsyncTask asyncTask(boolean start, GTAsyncTask gtAsyncTask)/**
* AsyncTask Integral packaging
*/
public static class AsyncTask /**
* Define the class to be implemented after inheritance
*/
public abstract static class GTAsyncTask extends android.os.AsyncTask<Object, Object, Object>Summary: please see the source code for details. If you can't use it, please call Xiaobian.
GT Chapter 19: Inheritance of BaseActivity and AnnotationActivity classes:
[Note: GT library shall reach version 1.1.3]
Create a new ordinary Activity as follows:
public class MainActivity extends GT.BaseActivity {

    @Override
    protected int initLayout(Bundle savedInstanceState) {
        return R.layout.activity_main;
    }

    @Override
    protected void initView() {
        //Processing related logic
    }
}
Create a new annotation Activity as follows:
@GT.Annotations.GT_Activity(R.layout.activity_main)
public class MainActivity extends GT.AnnotationActivity {

    @Override
    protected void initView() {
        build(this);//Binding activity
        //Processing related logic
    }
}
Summary: it's very simple to use. Just inherit the Activity in GT.
GT Chapter 20: GT annotation Calling:
[Note: GT library shall reach version 1.1.3]
Use GT annotation to develop a small instance of switching between multiple fragments
Renderings: project directory
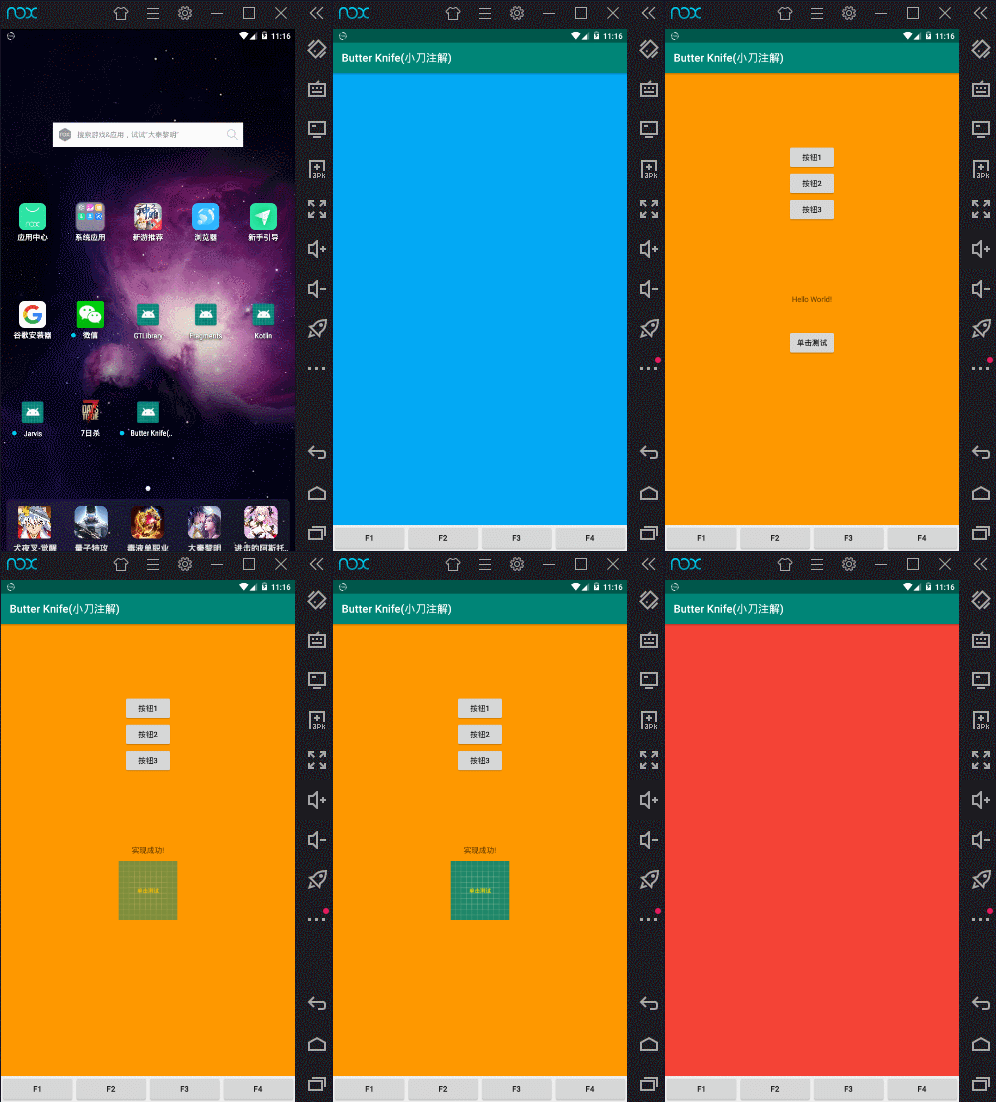
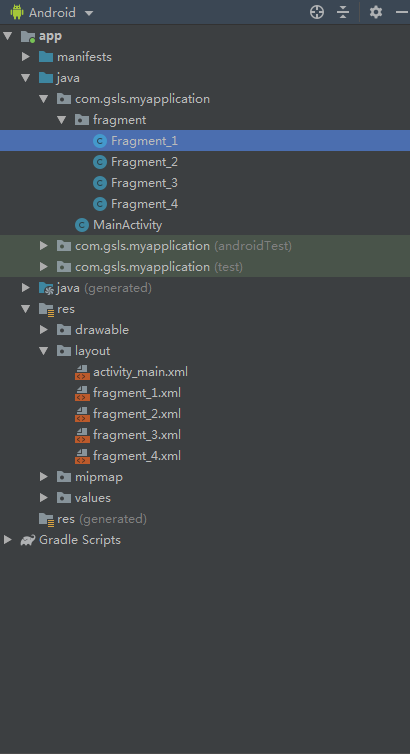
Step 1: add the xml layout and} activity of four fragment s_ Main layout
fragment_1.xml
<?xml version="1.0" encoding="utf-8"?>
<LinearLayout
    xmlns:android="http://schemas.android.com/apk/res/android"
    android:orientation="vertical"
    android:layout_width="match_parent"
    android:layout_height="match_parent"
    android:background="#F44336"
    >

</LinearLayout>
fragment_2.xml
<?xml version="1.0" encoding="utf-8"?>
<LinearLayout
    xmlns:android="http://schemas.android.com/apk/res/android"
    android:orientation="vertical"
    android:layout_width="match_parent"
    android:layout_height="match_parent"
    android:background="#03A9F4"
    >

</LinearLayout>
fragment_3.xml
<?xml version="1.0" encoding="utf-8"?>
<LinearLayout
    xmlns:android="http://schemas.android.com/apk/res/android"
    android:orientation="vertical"
    android:layout_width="match_parent"
    android:layout_height="match_parent"
    android:background="#4CAF50"
    >

</LinearLayout>
fragment_4.xml
<?xml version="1.0" encoding="utf-8"?>
<androidx.constraintlayout.widget.ConstraintLayout
    xmlns:android="http://schemas.android.com/apk/res/android"
    xmlns:app="http://schemas.android.com/apk/res-auto"
    xmlns:tools="http://schemas.android.com/tools"
    android:layout_width="match_parent"
    android:layout_height="match_parent"
    android:background="#FF9800"
    tools:context=".MainActivity">

    <TextView
        android:id="@+id/ioc_tv"
        android:layout_width="wrap_content"
        android:layout_height="wrap_content"
        android:text="Hello World!"
        app:layout_constraintBottom_toBottomOf="parent"
        app:layout_constraintLeft_toLeftOf="parent"
        app:layout_constraintRight_toRightOf="parent"
        app:layout_constraintTop_toTopOf="parent" />

    <Button
        android:id="@+id/ioc_btn"
        android:layout_width="wrap_content"
        android:layout_height="wrap_content"
        android:text="Click test"
        app:layout_constraintBottom_toBottomOf="parent"
        app:layout_constraintEnd_toEndOf="parent"
        app:layout_constraintStart_toStartOf="parent"
        app:layout_constraintTop_toTopOf="parent"
        app:layout_constraintVertical_bias="0.603" />


    <LinearLayout
        android:layout_width="wrap_content"
        android:layout_height="wrap_content"
        android:orientation="vertical"
        app:layout_constraintBottom_toTopOf="@+id/ioc_tv"
        app:layout_constraintEnd_toEndOf="parent"
        app:layout_constraintStart_toStartOf="parent"
        app:layout_constraintTop_toTopOf="parent">

        <Button
            android:id="@+id/ioc_btn01"
            android:layout_width="wrap_content"
            android:layout_height="wrap_content"
            android:text="Button 1" />

        <Button
            android:id="@+id/ioc_btn02"
            android:layout_width="wrap_content"
            android:layout_height="wrap_content"
            android:text="Button 2" />

        <Button
            android:id="@+id/ioc_btn03"
            android:layout_width="wrap_content"
            android:layout_height="wrap_content"
            android:text="Button 3" />

    </LinearLayout>

</androidx.constraintlayout.widget.ConstraintLayout>
activity_main.xml
<?xml version="1.0" encoding="utf-8"?>
<androidx.constraintlayout.widget.ConstraintLayout
    xmlns:android="http://schemas.android.com/apk/res/android"
    xmlns:app="http://schemas.android.com/apk/res-auto"
    xmlns:tools="http://schemas.android.com/tools"
    android:layout_width="match_parent"
    android:layout_height="match_parent"
    tools:context=".MainActivity">

    <FrameLayout
        android:id="@+id/frameLayout"
        android:layout_width="match_parent"
        android:layout_height="0dp"
        app:layout_constraintTop_toTopOf="parent"
        app:layout_constraintBottom_toTopOf="@+id/linearLayout"
        />

    <LinearLayout
        android:id="@+id/linearLayout"
        android:layout_width="match_parent"
        android:layout_height="wrap_content"
        android:orientation="horizontal"
        app:layout_constraintBottom_toBottomOf="parent"
        >
        <Button
            android:id="@+id/btn1"
            android:layout_width="0dp"
            android:layout_weight="1"
            android:layout_height="wrap_content"
            android:text="F1"
            />
        <Button
            android:id="@+id/btn2"
            android:layout_width="0dp"
            android:layout_weight="1"
            android:layout_height="wrap_content"
            android:text="F2"
            />
        <Button
            android:id="@+id/btn3"
            android:layout_width="0dp"
            android:layout_weight="1"
            android:layout_height="wrap_content"
            android:text="F3"
            />
        <Button
            android:id="@+id/btn4"
            android:layout_width="0dp"
            android:layout_weight="1"
            android:layout_height="wrap_content"
            android:text="F4"
            />
    </LinearLayout>

</androidx.constraintlayout.widget.ConstraintLayout>
Step 2: add 4 Fragment} classes and write MainActivity Code:
Fragment_1
public class Fragment_1 extends Fragment {

    @Override
    public View onCreateView(@NonNull LayoutInflater inflater, @Nullable ViewGroup container, @Nullable Bundle savedInstanceState) {
        return inflater.inflate(R.layout.fragment_1,container,false);
    }

}
Fragment_2
public class Fragment_1 extends Fragment {

    @Override
    public View onCreateView(@NonNull LayoutInflater inflater, @Nullable ViewGroup container, @Nullable Bundle savedInstanceState) {
        return inflater.inflate(R.layout.fragment_1,container,false);
    }

}
Fragment_3
public class Fragment_3 extends Fragment {

    @Override
    public View onCreateView(@NonNull LayoutInflater inflater, @Nullable ViewGroup container, @Nullable Bundle savedInstanceState) {
        return inflater.inflate(R.layout.fragment_3,container,false);
    }

}
Fragment_4
public class Fragment_4 extends Fragment {

    @GT.Annotations.GT_View(R.id.ioc_tv)
    private TextView tv;

    @GT.Annotations.GT_View(R.id.ioc_btn)
    private Button btn;

    @GT.Annotations.GT_Object(valueString = "1079", valueInt = 21, types = {GT.Annotations.GT_Object.TYPE.STRING, GT.Annotations.GT_Object.TYPE.INT}, functions = {"setUsername", "setAge"})
    private LoginBean loginBean;

    @GT.Annotations.GT_Res.GT_String(R.string.StringTest)
    private String data;

    @GT.Annotations.GT_Res.GT_Color(R.color.colorTest)
    private int MyColor;

    @GT.Annotations.GT_Res.GT_Drawable(R.drawable.ic_launcher_background)
    private Drawable btnBG;

    @GT.Annotations.GT_Res.GT_Dimen(R.dimen.tv_size)
    private float TextSize;

    @GT.Annotations.GT_Res.GT_Animation(R.anim.alpha)
    private Animation animation;

    @GT.Annotations.GT_Res.GT_StringArray(R.array.ctype)
    private String[] strArray;

    @GT.Annotations.GT_Res.GT_IntArray(R.array.textInt)
    private int[] intArray;

    @GT.Annotations.GT_Res.GT_Layout(R.layout.activity_main)
    private View layout;

    @GT.Annotations.GT_Collection.GT_List(valueString = {"111", "222", "333"})
    private List<String> stringList;

    @GT.Annotations.GT_Collection.GT_Map(valueKey = {"username","password"},valueInt = {4444,5555})
    private Map<String,Integer> userMap;

    @GT.Annotations.GT_Collection.GT_Set(valueInt = {11,22,33,44})
    private Set<Integer> booleanSet;

    private static final String TAG = "GT_";

    @Override
    public View onCreateView(@NonNull LayoutInflater inflater, @Nullable ViewGroup container, @Nullable Bundle savedInstanceState) {
        return inflater.inflate(R.layout.fragment_4, container, false);
    }

    @Override
    public void onViewCreated(@NonNull View view, @Nullable Bundle savedInstanceState) {
        GT.getGT().build(this, view);//Binding Fragment
        btn.setOnClickListener(new View.OnClickListener() {
            @Override
            public void onClick(View view) {

                Log.i(TAG, "loginBean: " + loginBean);
                Log.i(TAG, "data: " + data);
                Log.i(TAG, "color: " + MyColor);
                Log.i(TAG, "Drawable: " + btnBG);
                Log.i(TAG, "TextSize: " + TextSize);
                Log.i(TAG, "animation: " + animation);
                Log.i(TAG, "strArray: " + strArray);
                Log.i(TAG, "intArray: " + intArray);
                Log.i(TAG, "layout: " + layout);
                Log.i(TAG, "stringList: " + stringList);
                Log.i(TAG, "userMap: " + userMap);
                Log.i(TAG, "booleanSet: " + booleanSet);

                tv.setText("Achieve success!");
                btn.setTextColor(MyColor);
                btn.setTextSize(TextSize);
                btn.setBackgroundDrawable(btnBG);
                btn.startAnimation(animation);

            }
        });
    }

    @GT.Annotations.GT_Click({R.id.ioc_btn01, R.id.ioc_btn02, R.id.ioc_btn03})
    public void testBtnOnCLick(View view) {
        switch (view.getId()) {
            case R.id.ioc_btn01:
                Log.i(TAG, "Click number 1");
                break;

            case R.id.ioc_btn02:
                Log.i(TAG, "Click number 2");
                break;

            case R.id.ioc_btn03:
                Log.i(TAG, "Click number 3");
                break;
        }
    }

}
MainActivity
public class MainActivity extends AppCompatActivity {

    //Instantiate four fragments and inject them into the List
    @GT.Annotations.GT_Collection.GT_List({Fragment_1.class, Fragment_2.class, Fragment_3.class, Fragment_4.class})
    private List<Fragment> fragmentList;

    //Define Fragment Manager
    private GT.GT_Fragment gt_fragment;

    @Override
    protected void onCreate(Bundle savedInstanceState) {
        super.onCreate(savedInstanceState);
        setContentView(R.layout.activity_main);
        GT.getGT().build(this);//Bind Activity

        //Instantiate the Fragment manager and initialize the fragments to be managed
        gt_fragment = GT.GT_Fragment.getGT_fragment()
                .initFragment(savedInstanceState, this, getSupportFragmentManager())
                .loadFragment(R.id.frameLayout, fragmentList, 0);

    }

    @GT.Annotations.GT_Click({R.id.btn1,R.id.btn2,R.id.btn3,R.id.btn4})
    public void onBtnClick(View view){
        switch (view.getId()){
            case R.id.btn1:
                gt_fragment.startFragment(Fragment_1.class);//Jump to Fragment_1 page
                break;
            case R.id.btn2:
                gt_fragment.startFragment(Fragment_2.class);//Jump to Fragment_2 pages
                break;
            case R.id.btn3:
                gt_fragment.startFragment(Fragment_3.class);//Jump to Fragment_3 pages
                break;
            case R.id.btn4:
                gt_fragment.startFragment(Fragment_4.class);//Jump to Fragment_4 pages
                break;
        }
    }

}
Effect data:
09-16 11:16:34.657 5823-5823/? I/GT_i: ------- key:username
09-16 11:16:34.657 5823-5823/? I/GT_i: ------- key:password
09-16 11:16:40.378 5823-5823/? I/GT_: Click number 1
09-16 11:16:41.042 5823-5823/? I/GT_: Click number 2
09-16 11:16:41.619 5823-5823/? I/GT_: Click number 3
09-16 11:16:43.061 5823-5823/? I/GT_: loginBean: LoginBean{username='1079', password='null', age=21}
09-16 11:16:43.061 5823-5823/? I/GT_: data: test data
09-16 11:16:43.061 5823-5823/? I/GT_: color: -6400
09-16 11:16:43.061 5823-5823/? I/GT_: Drawable: android.graphics.drawable.VectorDrawable@2747f5a3
09-16 11:16:43.061 5823-5823/? I/GT_: TextSize: 10.0
09-16 11:16:43.061 5823-5823/? I/GT_: animation: android.view.animation.AnimationSet@58d70a0
09-16 11:16:43.061 5823-5823/? I/GT_: strArray: [Ljava.lang.String;@3149e459
09-16 11:16:43.061 5823-5823/? I/GT_: intArray: [I@35df881e
09-16 11:16:43.061 5823-5823/? I/GT_: layout: androidx.constraintlayout.widget.ConstraintLayout{30da48ff V.E..... ......I. 0,0-0,0}
09-16 11:16:43.061 5823-5823/? I/GT_: stringList: [111, 222, 333]
09-16 11:16:43.061 5823-5823/? I/GT_: userMap: {username=4444, password=5555}
09-16 11:16:43.061 5823-5823/? I/GT_: booleanSet: [22, 44, 11, 33]
Conclusion: it's done. If the GT annotation matches the GT annotation base class, your code will get different changes.
Project source code: https://github.com/1079374315/GT_Annotation
GT Chapter 21: true and false animation
[Note: GT library shall reach version 1.1.3]
design sketch:
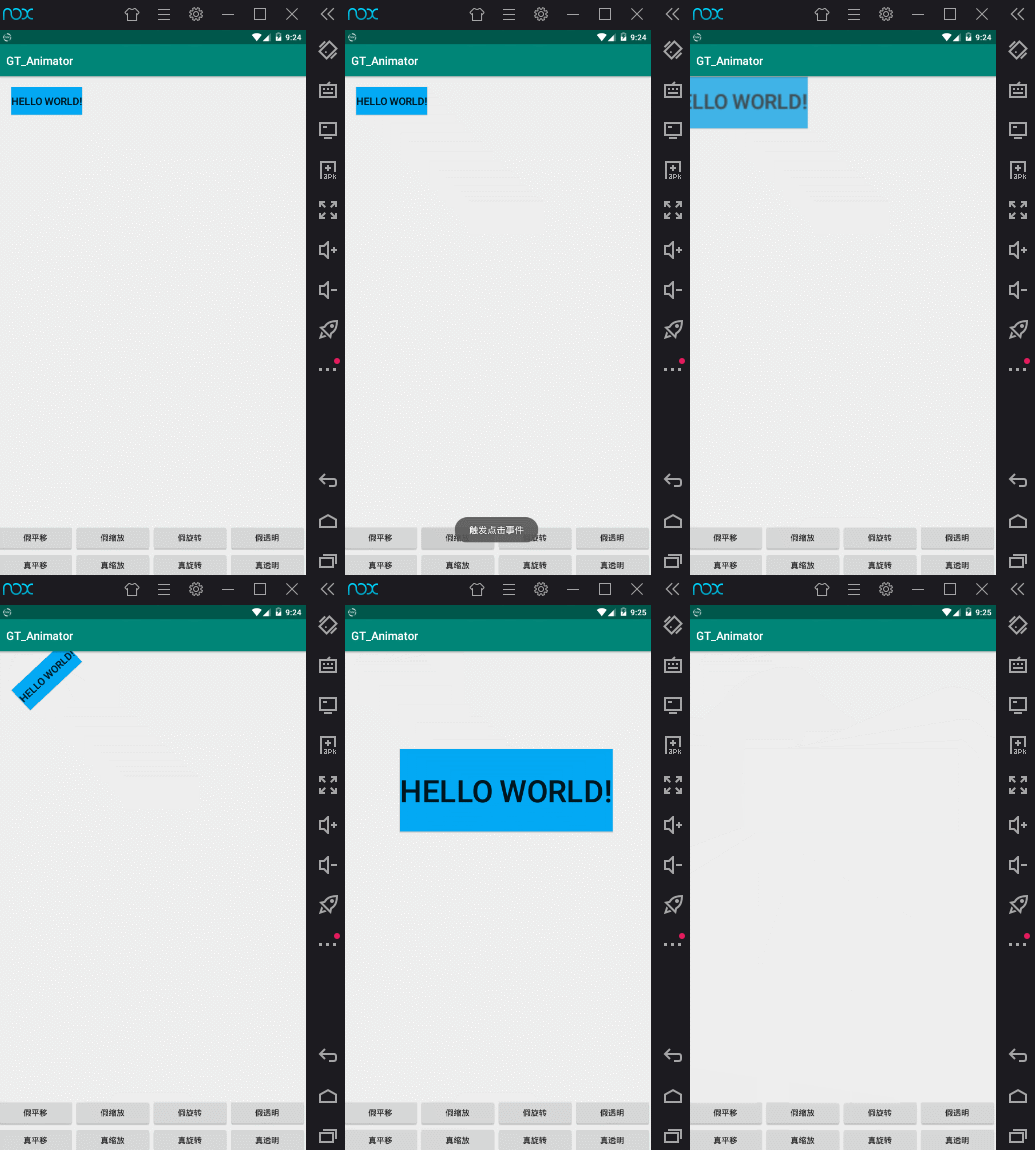
The main codes are as follows:
public class MainActivity extends AppCompatActivity {

    @GT.Annotations.GT_View(R.id.btn_show)
    private Button btn_show;

    @GT.Annotations.GT_Object
    private GT.GT_Animation gt_animation;//This is actually like creating a new GT GT_ Animation();

    @Override
    protected void onCreate(Bundle savedInstanceState) {
        super.onCreate(savedInstanceState);
        setContentView(R.layout.activity_main);
        GT.getGT().build(this);//Bind Activity
    }

    @GT.Annotations.GT_Click({R.id.btnF_translate, R.id.btnF_scales, R.id.btnF_rotate, R.id.btnF_alpha, R.id.btnT_translate, R.id.btnT_scales, R.id.btnT_rotate, R.id.btnT_alpha, R.id.btn_show})
    public void onBtnClick(View view) {
        switch (view.getId()) {

            /**
             * Fake animation
             */

            case R.id.btnF_translate:
                gt_animation.translate_F(0, 200, 0, 200, 2000, true, 0, true, btn_show);
                break;

            case R.id.btnF_scales:
                gt_animation.scale_F(1, 2, 1, 2, 2000, true, 0, true, btn_show);
                break;

            case R.id.btnF_rotate:
                gt_animation.rotate_F(0, 360, 2000, true, 0, true, btn_show);
                break;

            case R.id.btnF_alpha:
                gt_animation.alpha_F(1, 0.3f, 2000, true, 0, true, btn_show);
                break;

            /**
             * True animation
             */

            case R.id.btnT_translate:
                gt_animation.translate_T(0, 200, 0, 200, 2000, 0, true, btn_show);
                break;

            case R.id.btnT_scales:
                gt_animation.scale_T(1, 3, 1, 3, 2000, 0, true, btn_show);
                break;

            case R.id.btnT_rotate:
                gt_animation.rotatesY_T(0, 360, 3000, 0, true, btn_show);
                break;

            case R.id.btnT_alpha:
                gt_animation.alpha_T(1, 0, 2000, 0, true, btn_show);
                break;
            case R.id.btn_show:
                GT.toast_s("Trigger click event");
                break;
        }
    }

}
The XML code is as follows:
<?xml version="1.0" encoding="utf-8"?>
<androidx.constraintlayout.widget.ConstraintLayout xmlns:android="http://schemas.android.com/apk/res/android"
    xmlns:app="http://schemas.android.com/apk/res-auto"
    xmlns:tools="http://schemas.android.com/tools"
    android:layout_width="match_parent"
    android:layout_height="match_parent"
    tools:context=".MainActivity">

    <Button
        android:id="@+id/btn_show"
        android:layout_width="wrap_content"
        android:layout_height="wrap_content"
        android:text="Hello World!"
        android:textSize="18sp"
        android:background="#03A9F4"
        app:layout_constraintBottom_toBottomOf="parent"
        app:layout_constraintHorizontal_bias="0.06"
        app:layout_constraintLeft_toLeftOf="parent"
        app:layout_constraintRight_toRightOf="parent"
        app:layout_constraintTop_toTopOf="parent"
        app:layout_constraintVertical_bias="0.023" />

    <LinearLayout
        android:layout_width="match_parent"
        android:layout_height="wrap_content"
        android:orientation="vertical"
        app:layout_constraintBottom_toBottomOf="parent"
        >

        <LinearLayout
            android:layout_width="match_parent"
            android:layout_height="wrap_content"
            android:orientation="horizontal"
            >
            <Button
                android:id="@+id/btnF_translate"
                android:layout_width="0dp"
                android:layout_weight="1"
                android:layout_height="wrap_content"
                android:text="False translation"
                />

            <Button
                android:id="@+id/btnF_scales"
                android:layout_width="0dp"
                android:layout_weight="1"
                android:layout_height="wrap_content"
                android:text="False scaling"
                />

            <Button
                android:id="@+id/btnF_rotate"
                android:layout_width="0dp"
                android:layout_weight="1"
                android:layout_height="wrap_content"
                android:text="False rotation"
                />
            <Button
                android:id="@+id/btnF_alpha"
                android:layout_width="0dp"
                android:layout_weight="1"
                android:layout_height="wrap_content"
                android:text="False transparency"
                />
        </LinearLayout>

        <LinearLayout
            android:layout_width="match_parent"
            android:layout_height="wrap_content"
            android:orientation="horizontal"
            >
            <Button
                android:id="@+id/btnT_translate"
                android:layout_width="0dp"
                android:layout_weight="1"
                android:layout_height="wrap_content"
                android:text="True translation"
                />

            <Button
                android:id="@+id/btnT_scales"
                android:layout_width="0dp"
                android:layout_weight="1"
                android:layout_height="wrap_content"
                android:text="True scaling"
                />

            <Button
                android:id="@+id/btnT_rotate"
                android:layout_width="0dp"
                android:layout_weight="1"
                android:layout_height="wrap_content"
                android:text="True rotation"
                />
            <Button
                android:id="@+id/btnT_alpha"
                android:layout_width="0dp"
                android:layout_weight="1"
                android:layout_height="wrap_content"
                android:text="Really transparent"
                />
        </LinearLayout>

    </LinearLayout>

</androidx.constraintlayout.widget.ConstraintLayout>
Summary: simple packaging, support single and multiple combined animation playback, and those who do not understand parameters can directly click into the source code to see the Chinese notes.
Source code website of this article: https://github.com/1079374315/GT_Animator
The source code is very easy to understand. If you don't believe it, look:
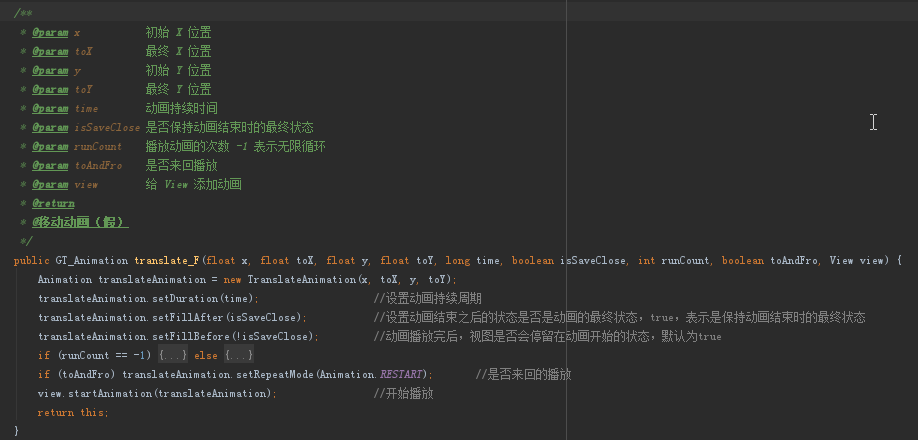
GT Chapter 22: APP update and APP hot repair
[Note: GT library shall reach version 1.1.3]
Simple three lines of code to update the APP
String url = "https://res.wx.qq.com/open/zh_CN/htmledition/res/dev/download/sdk/Gen_Signature_Android3b8804.apk";

//Download the apk on the url and put it in the GT folder in the root directory of the mobile phone
GT.AppIteration.UpdateApp.downloadFile(url,"GT/the latest version APP.apk");

//Install the latest version of APP under the GT folder in the root directory of the mobile phone apk
GT.AppIteration.UpdateApp.installNewApk(this, "GT/the latest version APP.apk");
For APP update, the following configuration parameters should be noted:
Added permissions:
    <uses-permission android:name="android.permission.WRITE_EXTERNAL_STORAGE" /> <!-- Write phone permissions -->
    <uses-permission android:name="android.permission.INTERNET" />  <!-- network right -->
    <uses-permission android:name="android.permission.READ_PHONE_STATE" />  <!-- Read phone permissions -->
Add data share
<application>
...
<!--data sharing-->
        <provider
            android:name="androidx.core.content.FileProvider"
            android:authorities="Own package name.fileprovider"
            android:grantUriPermissions="true"
            android:exported="false">
            <meta-data
                android:name="android.support.FILE_PROVIDER_PATHS"
                android:resource="@xml/file_paths" />
        </provider>
...
</<application>
Create an XML directory and create a file_paths.xml.xml file
<paths>
    <external-path path="." name="external_storage_root" />
</paths>
Summary: concise and practical.
GT Chapter 23: remote sensing control
[Note: GT library shall reach version 1.1.3]
design sketch:
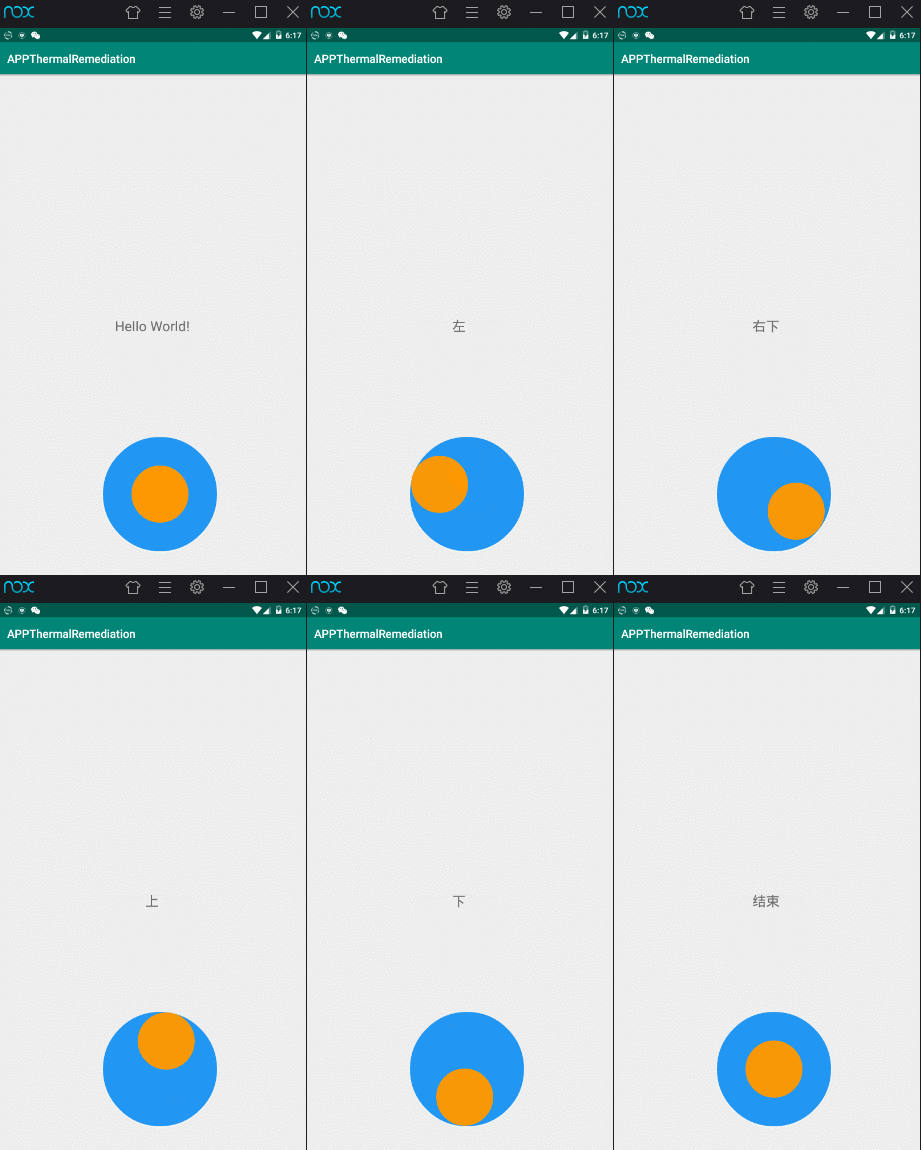
Step 1: write to xml layout
<?xml version="1.0" encoding="utf-8"?>
<androidx.constraintlayout.widget.ConstraintLayout xmlns:android="http://schemas.android.com/apk/res/android"
    xmlns:app="http://schemas.android.com/apk/res-auto"
    xmlns:tools="http://schemas.android.com/tools"
    android:layout_width="match_parent"
    android:layout_height="match_parent"
    tools:context=".MainActivity">

    <TextView
        android:id="@+id/tv"
        android:layout_width="wrap_content"
        android:layout_height="wrap_content"
        android:text="Hello World!"
        android:textSize="24sp"
        app:layout_constraintBottom_toBottomOf="parent"
        app:layout_constraintLeft_toLeftOf="parent"
        app:layout_constraintRight_toRightOf="parent"
        app:layout_constraintTop_toTopOf="parent"
        />

    <view
        android:id="@+id/rv"
        class="com.gsls.gt.GT$Game$RockerView"
        android:layout_width="200dp"
        android:layout_height="200dp"
        app:rockerBackground="#FF9800"
        app:rockerRadius="50dp"
        app:areaBackground="#2196F3"
        app:layout_constraintBottom_toBottomOf="parent"
        app:layout_constraintHorizontal_bias="0.54"
        app:layout_constraintLeft_toLeftOf="parent"
        app:layout_constraintRight_toRightOf="parent"
        app:layout_constraintTop_toTopOf="parent"
        app:layout_constraintVertical_bias="0.934" />

</androidx.constraintlayout.widget.ConstraintLayout>
Step 2: get the component to listen
@GT.Annotations.GT_Activity(R.layout.activity_main)
public class MainActivity extends GT.AnnotationActivity {

    @GT.Annotations.GT_View(R.id.tv)
    private TextView tv;

    @GT.Annotations.GT_View(R.id.rv)
    GT.Game.RockerView rv;

    @Override
    protected void initView(Bundle savedInstanceState) {
        build(this);//Bind Activity

        rv.setCallBackMode(GT.Game.RockerView.CallBackMode.CALL_BACK_MODE_MOVE);//Set the callback method to callback when the status changes
        rv.setOnShakeListener(GT.Game.RockerView.DirectionMode.DIRECTION_8, new GT.Game.RockerView.OnShakeListener() {
            @Override
            public void onStart() {
                tv.setText("start");
            }

            @Override
            public void direction(GT.Game.RockerView.Direction direction) {
                String direction1 = getDirection(direction);//Get direction
                tv.setText(direction1);//Sets the direction of rotation
            }

            @Override
            public void onFinish() {
                tv.setText("end");
            }
        });

    }

    //Returns the string direction
    private String getDirection(GT.Game.RockerView.Direction direction) {
        String message = null;
        switch (direction) {
            case DIRECTION_LEFT:
                message = "Left";
                break;
            case DIRECTION_RIGHT:
                message = "right";
                break;
            case DIRECTION_UP:
                message = "upper";
                break;
            case DIRECTION_DOWN:
                message = "lower";
                break;
            case DIRECTION_UP_LEFT:
                message = "Upper left";
                break;
            case DIRECTION_UP_RIGHT:
                message = "Upper right";
                break;
            case DIRECTION_DOWN_LEFT:
                message = "Lower left";
                break;
            case DIRECTION_DOWN_RIGHT:
                message = "lower right";
                break;
            default:
                break;
        }
        return message;
    }

}
Some common parameters:
app:rockerBackground="#FF9800 "/ / set the color of the center circle
app:rockerRadius="50dp"           //Sets the radius of the center circle
app:areaBackground="#2196F3 "/ / set the color of the background circle
Conclusion: the implementation is very simple, which is the original intention of GT library. Thank you for your attention.
GT Chapter 24: APP data pool
[Note: GT library shall reach version 1.1.5]
Preface: have android friends found that it is very troublesome to transfer data between activities, between fragments, and between activities and fragments. Most activities use Intent and Bundle data to transfer data, while the data between fragments needs to transfer data with the help of parasitic activities as a bridge, When a Class A Activity passes data to the Fragment under a class B Activity, it is even more troublesome. So Xiaobian encapsulated the GT toolkit
App data pool can save data in any class of app by using the save method and query data in any class of app by using the query method. Xiaobian also encapsulates the data transfer between apps. The method used is as simple as two sentences of code.
Let's take a look with Xiaobian.
APP internal data pool:
Save data:
/**
  * @Parameter 1: class of the current class
  * @Parameter 2: key
  * @Parameter 3: stored data
  * @Return: save succeeded: true save failed: false
  */
  boolean domeKey = GT.AppDataPool.Interior.saveDataPool(AndroidActivity.class,"domeKey","Hello,Minecraft");//Store data
Read data:
/**
  * @Parameter 1: get the type of stored data
  * @Parameter 2: stored Key
  * @Return: returns the stored value corresponding to the Key
  */
  Object keyValue = GT.AppDataPool.Interior.queryDataPool(AndroidActivity.class, "domeKey");
Modify data:
/**
  * @Parameter 1: modify the stored data
  * @Parameter 2: stored Key
  * @Parameter 3: modified data
  * @Return: modification succeeded: true modification failed: false
  */
  boolean isDomeKey = GT.AppDataPool.Interior.updateDataPool(AndroidActivity.class,"domeKey","Today is really a happy day");
Delete data:
/**
  * @Parameter 1: delete the stored data
  * @Parameter 2: deleted Key
  * @Return: deletion succeeded: true deletion failed: false
  */
  boolean isDomeKey = GT.AppDataPool.Interior.deleteDataPool(AndroidActivity.class, "domeKey");
The internal APP data pool is easy to add, delete, check and modify.
APP external data pool:
Please refer to the website: https://blog.csdn.net/qq_39799899/article/details/105851165
GT section to be updated: GT library being updated
After reading the source code, you should know the future update route of GT Library:
The declaration changes the name of {Hibernate to} GT_SQL
Update 1: GT_SQL: it has been edited and needs to be optimized finally
Hibernate database will be officially released on May 1, 2020!
Please refer to the official tutorial for specific tutorials.
For the latest updates, please Follow the latest version of GT.