Design sketch
You can see that this custom control combines color gradient, dynamic drawing scale and dynamic water polo effect. Next, let's see how this effect can be achieved step by step.
Start customizing controls
Like many custom controls, you need to base a View or a ViewGroup.
I chose View here, as follows:
public class HuaWeiView extends View {

    /**
     * Used to initialize brushes, etc.
     * @param context
     * @param attrs
     */
    public HuaWeiView(Context context, @Nullable AttributeSet attrs) {
        super(context, attrs);
    }

    /**
     * Used to measure restricted view square
     * @param widthMeasureSpec
     * @param heightMeasureSpec
     */
    @Override
    protected void onMeasure(int widthMeasureSpec, int heightMeasureSpec) {
        super.onMeasure(widthMeasureSpec, heightMeasureSpec);
    }

    /**
     * Realize various rendering functions
     * @param canvas
     */
    @Override
    protected void onDraw(Canvas canvas) {
        super.onDraw(canvas);
    }
}
The construction method is used in the layout.
onMeasure() method is used to measure and limit view size
onDraw() method is used for specific rendering functions
For more information, please click:
Construction method
onMeasure()
MeasureSpec
onDraw()
After understanding the functions of the above methods, let's see how to use them.
1 Restrict View to a square using onMeasure() method
Only when a rectangle is determined can an ellipse be drawn. If the rectangle is a square, the ellipse becomes a circle.
@Override
    protected void onMeasure(int widthMeasureSpec, int heightMeasureSpec) {
        super.onMeasure(widthMeasureSpec, heightMeasureSpec);
        int width=MeasureSpec.getSize(widthMeasureSpec);
        int height = MeasureSpec.getSize(heightMeasureSpec);
        //A rectangle with a minimum value of a square
        len=Math.min(width,height);
        //Set the height and width of the measurement (must be invoked, otherwise no effect)
        setMeasuredDimension(len,len);
    }
MeasureSpec is used to get the width and height of user settings, and then the minimum value is taken out and set to our view, so that we can make a rectangle.
Now use in layout:
<?xml version="1.0" encoding="utf-8"?>
<LinearLayout xmlns:android="http://schemas.android.com/apk/res/android"
    xmlns:app="http://schemas.android.com/apk/res-auto"
    xmlns:tools="http://schemas.android.com/tools"
    android:layout_width="match_parent"
    android:layout_height="match_parent"
    android:orientation="vertical"
    android:background="@color/colorPrimary"
    android:padding="20dp"
    tools:context="com.example.huaweiview.MainActivity">

    <com.example.huaweiview.HuaWeiView
        android:layout_gravity="center"
        android:background="@color/colorAccent"
        android:layout_width="200dp"
        android:layout_height="300dp"
        />

</LinearLayout>

The background of the parent layout is blue, the background of the control is pink, and the width and height of the control are different, but the display effect of the control is still a square, and the value is small. Our onMeasure() came into effect
Next is how to determine a circular area.
2onDraw() Draws a circular region
Before drawing, we need to understand the coordinate system in Android. 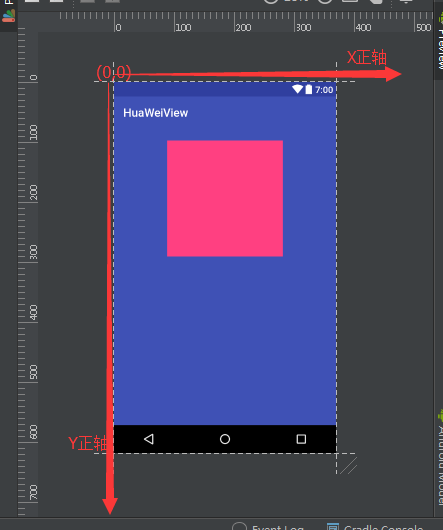
We all know that the top left corner of the screen is the origin of coordinates, the right is the X-axis, and the bottom is the Y-axis. Actually, the mobile page is the display interface of activity and also a View. Can we say that all Views have their own coordinate system when drawing graphics?
That is, each View has its own coordinate system, such as the custom View now: 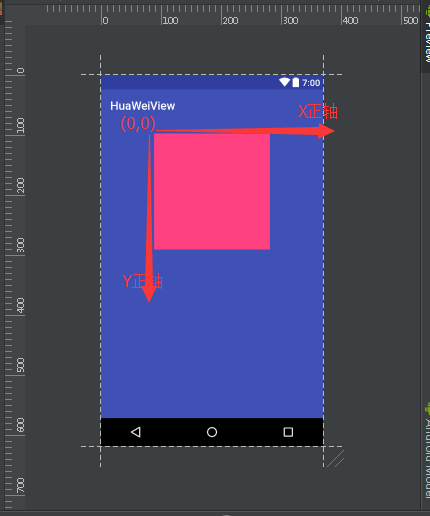
Now we need to draw an arc in our custom view, so the radius of the arc is half the length of our custom view, that is:
radius=len/2;
So the coordinates of the center of the circle are just radius.
Next, start drawing.
 @Override
    protected void onDraw(Canvas canvas) {
        super.onDraw(canvas);
        //The Method of Drawing Arc
        canvas.drawArc(oval, startAngle, sweepAngle, useCenter,paint);
    }
Introduce the method of drawing circular arc.
- The parameter oval is a RectF object as a rectangle.
- The parameter two startAngle is the starting angle of the arc.
- Parametric 3 sweepAngle is the angle of arc (sweep angle)
- The parameter 4 useCenter is a boolean value for a circle, a circle for true and a secant for false.
- Parametric 5 paint is a brush object
That is to say, as long as a rectangle is determined, an arc can be drawn by determining the angle at which it started and went (which you can test with a drawing board).
The next step is to initialize these parameters.
Initialize rectangle
 @Override
    protected void onMeasure(int widthMeasureSpec, int heightMeasureSpec) {
        super.onMeasure(widthMeasureSpec, heightMeasureSpec);
        int width = MeasureSpec.getSize(widthMeasureSpec);
        int height = MeasureSpec.getSize(heightMeasureSpec);
        //A rectangle with a minimum value of a square
        len = Math.min(width, height);
        //Instantiate rectangle
        oval=new RectF(0,0,len,len);
        //Set the height and width of the measurement (must be invoked, otherwise no effect)
        setMeasuredDimension(len, len);
    }
Drawing a rectangle requires determining the coordinates of the upper left corner and the lower right corner (which can be tested by the drawing board). The origin of the analytical coordinates above is the upper left corner of our view, and the coordinates of the lower right corner are of course len.
Next is the initialization start and pass angle.
private float startAngle=120;
private float sweepAngle=300;
It needs to be made clear that the downward axis is the Y axis, which is just the opposite of what you learned in school. That is to say, 90 degrees are below and - 90 degrees are above.
Initialization Brush
 public HuaWeiView(Context context, @Nullable AttributeSet attrs) {
        super(context, attrs);
        paint =new Paint();
        //setpc
        paint.setColor(Color.WHITE);
        //Setting Brush Anti-aliasing
        paint.setAntiAlias(true);
        //Let the drawing be hollow (not filled)
        paint.setStyle(Paint.Style.STROKE);
}useCenter=false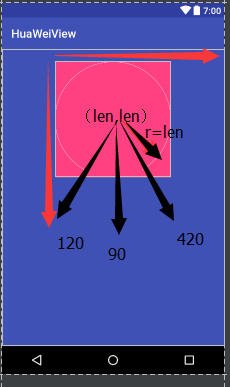
It's not easy to get here, but it's useless to draw only an arc. What I want is a scale line. There's no way to draw a scale line in canvas. At this time, we need to write a scale line by ourselves.
By looking at the pictures, we can see that all the lines draw a straight line from the point on the arc to a certain direction. So how to determine these two points, we need to do two things:
moving coordinate system
 @Override
    protected void onDraw(Canvas canvas) {
        super.onDraw(canvas);
        //The Method of Drawing Arc
        canvas.drawArc(oval, startAngle, sweepAngle, useCenter,paint);
        //The Method of Drawing Scale Line
        drawViewLine(canvas);
    }

    private void drawViewLine(Canvas canvas) {
        //Save the contents of canvas before you save them
        canvas.save();
        //Mobile canvas(X-axis moving distance, Y-axis moving distance)
        canvas.translate(radius,radius);
        //Restore state after completion of operation
        canvas.restore();
    }
We wrote a method of drawing scale lines and called it in onDraw(). Before moving the coordinate system, we need to save the previous canvas state, and then X and Y axes move the distance of the radius of the arc, respectively, as shown in the following figure: 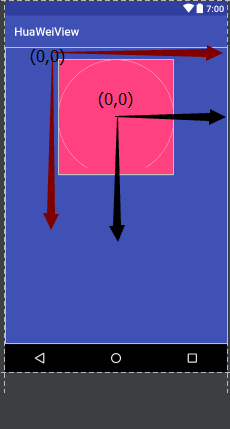
canvas.translate(radius,radius); the method moves the coordinate system (obtained by actual effect and data search)
canvas.save() and canvas.restore() appear in pairs, as if the flow is closed when it is exhausted.
After the first thing is done, start the second thing, rotating the coordinate system.
It is still difficult to determine the coordinates of the arc point and the other point only by moving the coordinate system.
If only these two points were on the coordinate axis, the following realization would be achieved:
 private void drawViewLine(Canvas canvas) {
        //Save the contents of canvas before you save them
        canvas.save();
        //Mobile canvas(X-axis moving distance, Y-axis moving distance)
        canvas.translate(radius,radius);
        //Rotating coordinate system
        canvas.rotate(30);
        //Restore state after completion of operation
        canvas.restore();
    }
The method of drawing the scale line adds a code of 30 degrees rotation. What about the coordinate system after rotation? 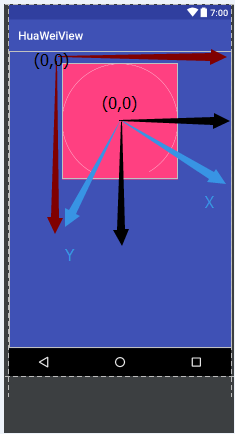
Because the starting point is 30 degrees apart from 90 degrees, after rotation, the starting point just falls on the Y axis, so the coordinates of this point are well determined, that is (0,radius); if we find a point on the Y axis can not draw a scale, then what is its coordinates? Yes, it should be (0,radius-y), because we want to internalize the scale line, so we subtract a value. Let's try it quickly. The code is as follows:
 private void drawViewLine(Canvas canvas) {
        //Save the contents of canvas before you save them
        canvas.save();
        //Mobile canvas(X-axis moving distance, Y-axis moving distance)
        canvas.translate(radius,radius);
        //Rotating coordinate system
        canvas.rotate(30);
        Paint linePatin=new Paint();
        //setpc
        linePatin.setColor(Color.WHITE);
        //line width
        linePatin.setStrokeWidth(2);
        //Setting Brush Anti-aliasing
        linePatin.setAntiAlias(true);
        //Draw a scale line
        canvas.drawLine(0,radius,0,radius-40,linePatin);
        //Restore state after completion of operation
        canvas.restore();
    }
According to the coordinates of the two points, draw a white line, as shown in the figure: 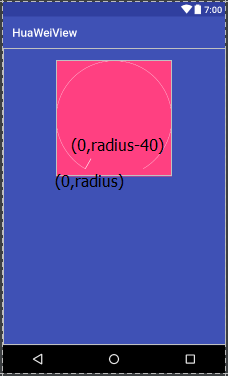
Of course, these points are all obtained by rotating the coordinate system 30 degrees. Here we draw a line. If we draw more than one line, or if we just thought that it would be better to rotate it at a small angle and draw a straight line every time, then how many degrees of rotation, such as here: sweepAngle=300 for the total sweeped angle; For bar scale, rotateAngle=sweepAngle/100 is required to rotate every time. The code is as follows:
 private void drawViewLine(Canvas canvas) {
        //Save the contents of canvas before you save them
        canvas.save();
        //Mobile canvas(X-axis moving distance, Y-axis moving distance)
        canvas.translate(radius,radius);
        //Rotating coordinate system
        canvas.rotate(30);
        Paint linePatin=new Paint();
        //setpc
        linePatin.setColor(Color.WHITE);
        //line width
        linePatin.setStrokeWidth(2);
        //Setting Brush Anti-aliasing
        linePatin.setAntiAlias(true);
        //Determine the angle of each rotation
        float rotateAngle=sweepAngle/99;
        for(int i=0;i<100;i++){
            //Draw a scale line
            canvas.drawLine(0,radius,0,radius-40,linePatin);
            canvas.rotate(rotateAngle);
        }

        //Restore state after completion of operation
        canvas.restore();
    }
For 100 scales, it takes 101 cycles to draw lines (see your watch). After drawing the lines, it rotates. Cycle in turn, as shown in Figure 1 
After such a long time, we have finished the dial. Next, we need to determine what color is displayed from different angles. First, we need to determine the range of targetAngle to draw.
Draw colored parts
private void drawViewLine(Canvas canvas) {
        //Save the contents of canvas before you save them
        canvas.save();
        //Mobile canvas(X-axis moving distance, Y-axis moving distance)
        canvas.translate(radius,radius);
        //Rotating coordinate system
        canvas.rotate(30);
        Paint linePatin=new Paint();
        //setpc
        linePatin.setColor(Color.WHITE);
        //line width
        linePatin.setStrokeWidth(2);
        //Setting Brush Anti-aliasing
        linePatin.setAntiAlias(true);
        //Determine the angle of each rotation
        float rotateAngle=sweepAngle/100;
        //A brush that draws colored parts.
        Paint targetLinePatin=new Paint();
        targetLinePatin.setColor(Color.GREEN);
        targetLinePatin.setStrokeWidth(2);
        targetLinePatin.setAntiAlias(true);
        //Record the range of colored parts that have been drawn
        float hasDraw=0;
        for(int i=0;i<=100;i++){
            if(hasDraw<=targetAngle&&targetAngle!=0){//When the colored part needs to be drawn
                //Draw a scale line
                canvas.drawLine(0,radius,0,radius-40,targetLinePatin);
            }else {//No need to draw colored parts
                //Draw a scale line
                canvas.drawLine(0,radius,0,radius-40,linePatin);
            }
            //Cumulative plotted parts
            hasDraw+=rotateAngle;
            //rotate
            canvas.rotate(rotateAngle);
        }

        //Restore state after completion of operation
        canvas.restore();
    }
We need to keep track of the effective parts we have drawn, and the other parts are painted white. 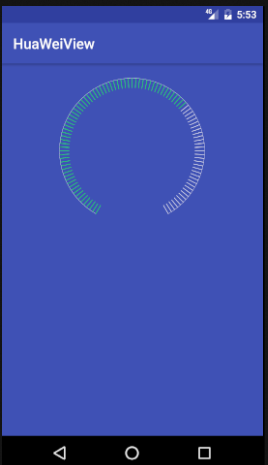
Color gradient according to angle ratio
It is necessary to calculate the proportion of the angle that has been drawn to the total angle (300).
for(int i=0;i<=100;i++){
            if(hasDraw<=targetAngle&&targetAngle!=0){//When the colored part needs to be drawn
                //Calculate the proportion that has been drawn
                float percent=hasDraw/sweepAngle;
                int red= 255-(int) (255*percent);
                int green= (int) (255*percent);
                targetLinePatin.setARGB(255,red,green,0);
                //Draw a scale line
                canvas.drawLine(0,radius,0,radius-40,targetLinePatin);
            }else {//No need to draw colored parts
                //Draw a scale line
                canvas.drawLine(0,radius,0,radius-40,linePatin);
            }
            hasDraw+=rotateAngle;
            canvas.rotate(rotateAngle);
        }
Only when drawing the colored part, use three elements to achieve gradient. The lower the proportion, the bigger the red value, the bigger the green value anyway. 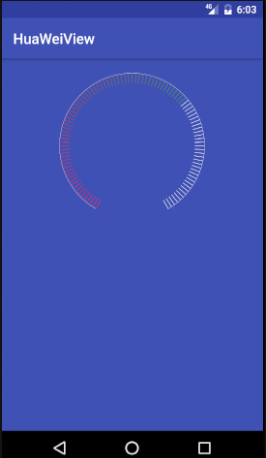
Realizing Dynamic Display
First think about its movement, divided into forward state and backward state, if it is moving (a complete backward and forward useless end), it can not start the next movement, need two parameters, state and is Running.
//Judge whether it's moving or not
    private boolean isRunning;
    //Judging whether it is a backward state or a forward state
    private int state = 1;
    public void changeAngle(final float trueAngle) {
        if (isRunning){//If the action returns directly
            return;
        }
        final Timer timer = new Timer();
        timer.schedule(new TimerTask() {
            @Override
            public void run() {
                switch (state) {
                    case 1://Backward state
                    isRunning=true;
                        targetAngle -= 3;
                        if (targetAngle <= 0) {//If you go back to 0
                            targetAngle = 0;
                            //Change to Progressive State
                            state = 2;
                        }
                        break;
                    case 2://Progressive state
                        targetAngle += 3;
                        if (targetAngle >= trueAngle) {//If increased to a specified angle
                            targetAngle = trueAngle;
                            //Change to a retrogressive state
                            state = 1;
                            isRunning=false;
                            //End the campaign
                            timer.cancel();
                        }
                        break;
                    default:
                        break;
                }
                //Rendering (methods used in sub-threads)
                postInvalidate();
            }
        }, 500, 30);
    }
Take advantage of the time task to execute the run method once every 30 milliseconds, redraw the picture each time, and then call the method in activity.
 HuaWeiView hwv;
    @Override
    protected void onCreate(Bundle savedInstanceState) {
        super.onCreate(savedInstanceState);
        setContentView(R.layout.activity_main);
        hwv= (HuaWeiView) findViewById(R.id.hwv);
        hwv.setOnClickListener(new View.OnClickListener() {
            @Override
            public void onClick(View v) {
                //Click on the event to invoke the active method
                hwv.changeAngle(200);
            }
        });

    }
See here, I believe you have a good understanding of the coordinate system and angle dynamic changes, as well as the drawing of the dial, more verification will help understand.
Next, we need to achieve background dynamic gradient.
Think about where gradients are used in our view. Yes, when drawing the colored part, if only we could transfer the value of the color gradient to the activity continuously. Now we need to use the interface to transfer the value to achieve this function.
- Preferably declare an internal interface in a custom View:
  private OnAngleColorListener onAngleColorListener;

    public void setOnAngleColorListener(OnAngleColorListener onAngleColorListener) {
        this.onAngleColorListener = onAngleColorListener;
    }


    public interface OnAngleColorListener{
       void colorListener(int red,int green);
    }
We declare an internal interface in our custom View and a global interface object to provide a set method
There is a method in the interface to get the color value
The next step is to call this method in the right place, so where is it when we draw the color scale?
for (int i = 0; i <= 100; i++) {
            if (hasDraw <= targetAngle && targetAngle != 0) {//When the colored part needs to be drawn
                //Calculate the proportion that has been drawn
                float percent = hasDraw / sweepAngle;
                int red = 255 - (int) (255 * percent);
                int green = (int) (255 * percent);
                //Implement interface callback and transfer color values
                if (onAngleColorListener!=null){
                    onAngleColorListener.colorListener(red,green);
                }
                targetLinePatin.setARGB(255, red, green, 0);
                //Draw a scale line
                canvas.drawLine(0, radius, 0, radius - 40, targetLinePatin);
            } else {//No need to draw colored parts
                //Draw a scale line
                canvas.drawLine(0, radius, 0, radius - 40, linePatin);
            }
We implemented the interface callback while drawing, and then we implemented the interface in activity.
public class MainActivity extends AppCompatActivity {

    HuaWeiView hwv;
    LinearLayout ll_parent;
    @Override
    protected void onCreate(Bundle savedInstanceState) {
        super.onCreate(savedInstanceState);
        setContentView(R.layout.activity_main);
        hwv= (HuaWeiView) findViewById(R.id.hwv);
        //Instance parent layout
        ll_parent= (LinearLayout) findViewById(R.id.ll_parent);
        hwv.setOnClickListener(new View.OnClickListener() {
            @Override
            public void onClick(View v) {
                //Click on the event to invoke the active method
                hwv.changeAngle(200);
            }
        });
        //Setting Angle Color Change Monitor
        hwv.setOnAngleColorListener(new HuaWeiView.OnAngleColorListener() {
            @Override
            public void colorListener(int red, int green) {
                Color color=new Color();
                //Converting RGB values to int types through Color objects
                int backColor=color.argb(100,red,green,0);
                //Parent Layout Settings Background
                ll_parent.setBackgroundColor(backColor);
            }
        });

    }
}
Layout an id to the parent and instantiate it. Set an angle Color change monitor for our custom control to get the value passed in the callback, then use the Color object to convert the RGB value to int value, and then set it to the parent layout background, where the background is slightly transparent. Design sketch: 
Does it feel cool to be here? In fact, the function has been almost achieved. Next is to draw the contents.
Drawing Text
Of course, it's also possible not to draw text. You can add textview to the layout directly. Well, let's start with the process of drawing. There is a small circle in the inside of the dial, and then these words are in the small circle. To draw a small circle, you just need to make its radius smaller and OK.
/**
     * The method of drawing small circles and text, the color of small circles is also gradient.
     * @param canvas
     */
    private void drawScoreText(Canvas canvas) {
        //Draw a small circle first.
        Paint smallPaint = new Paint();
        smallPaint.setARGB(100,red,green,0);
        // Draw a small circle to specify the coordinates, radius and brush of the center of the circle.
        int smallRadius=radius-60;
        canvas.drawCircle(radius, radius, radius - 60, smallPaint);
        //Drawing text
        Paint textPaint=new Paint();
        //Setting text alignment
        textPaint.setTextAlign(Paint.Align.CENTER);
        textPaint.setColor(Color.WHITE);
        textPaint.setTextSize(smallRadius/2);
        //score needs to be computed
        canvas.drawText(""+score,radius,radius,textPaint);
        //Draw the score, above the right of the score
        textPaint.setTextSize(smallRadius/6);
        canvas.drawText("branch",radius+smallRadius/2,radius-smallRadius/4,textPaint);
        //Draw click optimization below the score
        textPaint.setTextSize(smallRadius/6);
        canvas.drawText("Click optimization",radius,radius+smallRadius/2,textPaint);

    }
In this paper, the previous gradient red and green are taken as global variables. First, a small circle is drawn and the brush color is gradient. Then draw the text score score score that needs to be computed to
//Calculated scores
score=(int)(targetAngle/sweepAngle*100);
//Rendering (methods used in sub-threads)
postInvalidate();
In the time task, the score is calculated before each drawing, then a fixed value score is drawn on the upper right, and then a fixed content click on the optimization below (the coordinates at this time have returned to the original shape). 
So far, the function has been almost written, and there is a water wave acceleration ball effect, write in the next blog.
Finally, for the bottom of the principle, I also need to learn, where there are mistakes, welcome to correct, thank you. The project has been uploaded to github
github Click Download