Preface
When writing Android layouts, you always encounter pain points of one kind or another, such as:
- Some layouts are used in many pages, and the style is the same. Every time they are used, they have to copy and paste a large section. Is there any way to reuse them?
- After solving the problem in 1, it is found that there is always an extra layer of layout outside the reused layout. It is important to know that layout nesting will affect performance.
- Some layouts are displayed only when they are used, but they must be written in advance. Although they are set as invisible or gone, they still take up more or less memory.
To solve these pain points, we can ask Android layout optimization three swordsmen to code, they are include, merge and ViewStub tags, now let's recognize them. Before that, let's take a look at the interface effect of our project:
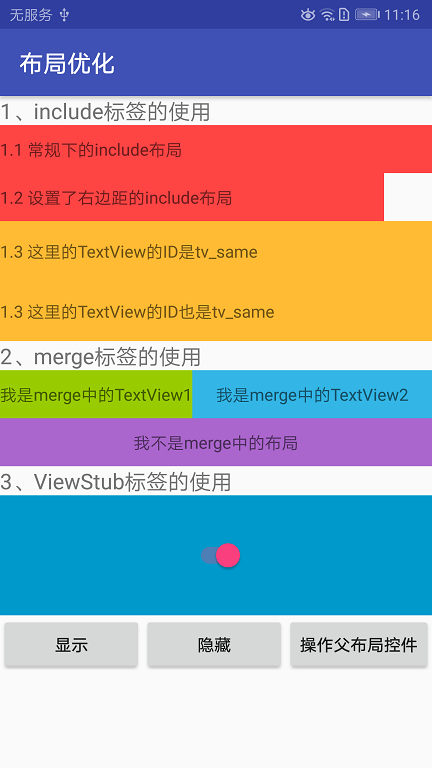
The interface is not complicated. Let's implement it one by one.
1,include
Include means "include" and "include" in Chinese. When you use the include tag in a main page, it means that the current main layout contains the layout in the tag, so that it can play a good role in reusing the layout. It can greatly reduce the amount of code used in common layout such as title bar and splitter. It has two main attributes:
- Layout: The mandatory attribute that you need to insert the layout name of the current main layout is referenced by R.layout.xx.
- id: This property can be used when you want to set an id for the layout added through include, which can override the layout id inserted into the main layout.
Now let's have a real fight.
1.1 Routine use
We first create a ViewOptimization Activity, and then create a layout_include.xml layout file, which is very simple, just a TextView:
<?xml version="1.0" encoding="utf-8"?>
<TextView xmlns:android="http://schemas.android.com/apk/res/android"
    android:layout_width="match_parent"
    android:gravity="center_vertical"
    android:textSize="14sp"
    android:background="@android:color/holo_red_light"
    android:layout_height="40dp">

</TextView>
Now we use the include tag to add it to the layout of ViewOptimization Activity:
<?xml version="1.0" encoding="utf-8"?>
<LinearLayout xmlns:android="http://schemas.android.com/apk/res/android"
    xmlns:app="http://schemas.android.com/apk/res-auto"
    xmlns:tools="http://schemas.android.com/tools"
    android:layout_width="match_parent"
    android:layout_height="match_parent"
    android:orientation="vertical"
    tools:context=".ViewOptimizationActivity">

    <!--include Use of labels-->
    <TextView
        android:textSize="18sp"
        android:text="1,include Use of labels"
        android:layout_width="wrap_content"
        android:layout_height="wrap_content" />

    <include
        android:id="@+id/tv_include1"
        layout="@layout/layout_include"/>

</LinearLayout>
Yes, include is so simple to use, just specify the layout id to be included. In addition, we also set an id for this include tag. To verify that it is the id of the root layout TextView of layout_include.xml, we initialize TextView in ViewOptimization Activity and set text to it:
  TextView tvInclude1 = findViewById(R.id.tv_include1);
        tvInclude1.setText("1.1 Conventional include layout");
After running, you can see the following layout:

It shows that the layout and ID we set up are successful. But you might wonder about the attribute id: ID can be set directly in TextView. Why rewrite it? Don't forget that our goal is reuse. When you add more than two identical layouts in a main layout using include tags, the same ID conflicts, so rewriting it allows us to better call it and its controls. In another case, if your main layout is RelateLayout, you also need to set different IDs for them in order to set relative positions.
1.2 Override the layout attributes of the root layout
In addition to id, we can also override layout attributes such as width, height, margin and visibility. However, it is important to note that single rewriting of android:layout_height or android:layout_width is not feasible, and two rewrites must be simultaneously rewritten to work. The same is true with margins. If we want to add a right margin to an include layout, the complete writing is as follows:
  <include
        android:layout_width="match_parent"
        android:layout_height="40dp"
        android:layout_marginEnd="40dp"
        android:id="@+id/tv_include2"
        layout="@layout/layout_include"/>
Setting up a paragraph of text after initialization can see the following effect:

As you can see, 1.2 obviously has one more right margin than 1.1.
Processing of 1.3 Control ID Same
In 1.1, we know that the id attribute can override the root layout id of the include layout, but there is nothing we can do about the layout and control in the root layout. If this layout is included many times in the main layout, how can we distinguish the control in it?
Let's first create a layout_include2.xml layout, whose root layout is FrameLayout, with a TextView inside, whose id is tv_same:
<?xml version="1.0" encoding="utf-8"?>
<FrameLayout xmlns:android="http://schemas.android.com/apk/res/android"
    android:layout_width="match_parent"
    android:background="@android:color/holo_orange_light"
    android:layout_height="wrap_content">

    <TextView
        android:gravity="center_vertical"
        android:id="@+id/tv_same"
        android:layout_width="match_parent"
        android:layout_height="50dp" />

</FrameLayout>
Add in the main layout:
<?xml version="1.0" encoding="utf-8"?>
<LinearLayout xmlns:android="http://schemas.android.com/apk/res/android"
    xmlns:app="http://schemas.android.com/apk/res-auto"
    xmlns:tools="http://schemas.android.com/tools"
    android:layout_width="match_parent"
    android:layout_height="match_parent"
    android:orientation="vertical"
    tools:context=".ViewOptimizationActivity">

    <!--include Use of labels-->
    ......

    <include layout="@layout/layout_include2"/>

    <include
        android:id="@+id/view_same"
        layout="@layout/layout_include2"/>

</LinearLayout>
To distinguish, the second layout_include2 is set with an id. Maybe you've already reacted. Yes, we're just going to create the object of the root layout, and then initialize the controls in it:
        TextView tvSame = findViewById(R.id.tv_same);
        tvSame.setText("1.3 There TextView Of ID yes tv_same");
        FrameLayout viewSame = findViewById(R.id.view_same);
        TextView tvSame2 = viewSame.findViewById(R.id.tv_same);
        tvSame2.setText("1.3 There TextView Of ID Also tv_same");
You can see this effect after running:

It can be seen that although the id of the control is the same, there is no conflict in its use.
2,merge
Include tags solve the problem of layout reuse, but they also bring another problem: layout nesting. If the root layout of your main layout is the same as the one you need to include (e.g. Linear Layout), then it's equivalent to adding an extra layer of layout in the middle. So is there any way to use include without adding layouts? The answer, of course, is to use the merge tag.
One thing to note about using the merge tag is that it must be a root node in a layout file, which looks like no different from other layouts, but it's special because it won't draw when the page loads. For example, it's like a porter of a layout or control. If you move the "goods" to the main layout, you'll be able to retire without taking up any space, so you won't increase the layout level. This, like its name, only serves as a merger.
2.1 Conventional use of merge
Let's verify that we first create a layout_merge.xml that uses the merge tag at the root node:
<?xml version="1.0" encoding="utf-8"?>
<merge xmlns:android="http://schemas.android.com/apk/res/android"
    android:layout_width="match_parent"
    android:layout_height="wrap_content">

    <TextView
        android:id="@+id/tv_merge1"
        android:text="I am merge Medium TextView1"
        android:background="@android:color/holo_green_light"
        android:gravity="center"
        android:layout_width="wrap_content"
        android:layout_height="40dp" />

    <TextView
        android:layout_toEndOf="@+id/tv_merge1"
        android:id="@+id/tv_merge2"
        android:text="I am merge Medium TextView2"
        android:background="@android:color/holo_blue_light"
        android:gravity="center"
        android:layout_width="match_parent"
        android:layout_height="40dp" />
</merge>
Here I use some attributes of relative layout, as you will see later. We then add Relative Layout to the layout of ViewOptimization Activity, and then add layout_merge.xml using the include tag:
    <RelativeLayout
        android:layout_width="match_parent"
        android:layout_height="wrap_content">

        <include
            android:id="@+id/view_merge"
            layout="@layout/layout_merge"/>
    </RelativeLayout>
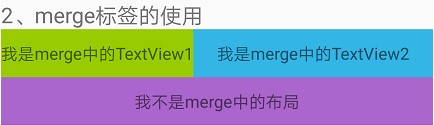
The results of the operation are as follows:

2.2 Effect of Merge Labels on Layout Hierarchy
In layout_merge.xml, we use the relative layout property android: layout_to EndOf to set the blue TextView to the right of the green TextView, while the parent layout of layout_merge.xml is Relative Layout, so this property works. The merge tag does not affect the controls inside, nor does it increase the layout level.
If you're not sure, you can check with Android Studio. The Android Studio I use is version 3.1, and you can view the layout hierarchy through Layout Inspector, but remember to run the project on a real machine or simulator first. Click Tools-Layout Inspector in turn, then select Activeness that you want to view, and you can see the following hierarchy diagram:
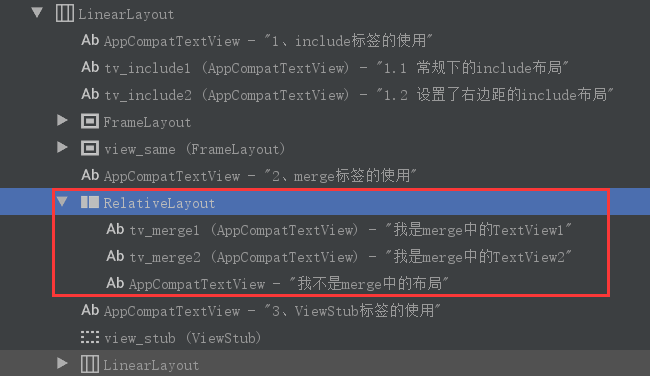
You can see that there are two TextView s directly below Relative Layout, and the merge tag does not add layout hierarchy. The limitation of merge can also be seen here, that is, you need to specify the layout and control include d in merge to what type of layout, in order to set the layout and control position in merge in advance.
2.3 merge ID
When we learn about the include tag, we know that its android:id attribute can override the root layout id of the included tag, but what if the root node is merge? As I said earlier, merge is not drawn as a layout, so it doesn't work to set id here. We can add a TextView to its parent layout Relative Layout and use the android:layout_below attribute to set it under layout_merge:
    <RelativeLayout
        android:layout_width="match_parent"
        android:layout_height="wrap_content">

        <include
            android:id="@+id/view_merge"
            layout="@layout/layout_merge"/>

        <TextView
            android:text="I am not merge Layout in"
            android:layout_below="@+id/view_merge"
            android:background="@android:color/holo_purple"
            android:gravity="center"
            android:layout_width="match_parent"
            android:layout_height="40dp"/>
    </RelativeLayout>
After running, you will find that the new TextView will cover up the merge layout, not below it as expected. If you change the id in android:layout_below to the id of any TextView in layout_merge.xml (such as tv_merge1), you can see the following effect after running:
This also fits in with the situation in 2.2, that is, the parent layout Relative Layout subordinate layout is the TextView include d in.
3,ViewStub
You must encounter the situation that some layouts in the page do not need to be displayed during initialization, but they have to be written in the layout file beforehand. Although they are set to invisible or go, they will be loaded during initialization, which will undoubtedly affect the speed of page loading. In response to this situation, Android provides us with a sharp weapon - ViewStub. This is an invisible, zero-sized view with lazy loading. It exists at the view level, but only setVisibility() and inflate() method calls fill the view, so it does not affect the initial loading speed. It has three important attributes:
- android:layout: The name of the view that ViewStub needs to fill in, in the form of "R.layout.xx";
- android:inflateId: Rewrite the parent layout id of the filled view.
Unlike the include tag, the android:id attribute of ViewStub is to set the view Stub's own id, not to rewrite the layout id, which should not be mistaken. In addition, ViewStub provides an OnInflateListener interface to monitor whether the layout has been loaded.
3.1 The correct way to fill in the layout
Let's first create a layout_view_stub.xml with a Switch switch in it:
<?xml version="1.0" encoding="utf-8"?>
<FrameLayout xmlns:android="http://schemas.android.com/apk/res/android"
    android:layout_width="match_parent"
    android:background="@android:color/holo_blue_dark"
    android:layout_height="100dp">
    <Switch
        android:id="@+id/sw"
        android:layout_gravity="center"
        android:layout_width="wrap_content"
        android:layout_height="wrap_content" />
</FrameLayout>
Then modify the layout of Activity as follows:
<?xml version="1.0" encoding="utf-8"?>
<LinearLayout xmlns:android="http://schemas.android.com/apk/res/android"
    xmlns:app="http://schemas.android.com/apk/res-auto"
    xmlns:tools="http://schemas.android.com/tools"
    android:layout_width="match_parent"
    android:layout_height="match_parent"
    android:orientation="vertical"
    tools:context=".ViewOptimizationActivity">

    <!--ViewStub Use of labels-->
    <TextView
        android:textSize="18sp"
        android:text="3,ViewStub Use of labels"
        android:layout_width="wrap_content"
        android:layout_height="wrap_content" />

    <ViewStub
        android:id="@+id/view_stub"
        android:inflatedId="@+id/view_inflate"
        android:layout="@layout/layout_view_stub"
        android:layout_width="match_parent"
        android:layout_height="100dp" />
    <LinearLayout
        android:orientation="horizontal"
        android:layout_width="match_parent"
        android:layout_height="wrap_content">

        <Button
            android:text="display"
            android:id="@+id/btn_show"
            android:layout_weight="1"
            android:layout_width="0dp"
            android:layout_height="wrap_content" />

        <Button
            android:text="hide"
            android:id="@+id/btn_hide"
            android:layout_weight="1"
            android:layout_width="0dp"
            android:layout_height="wrap_content" />

        <Button
            android:text="Operating parent layout controls"
            android:id="@+id/btn_control"
            android:layout_width="wrap_content"
            android:layout_height="wrap_content" />
    </LinearLayout>
</LinearLayout>
Listen for filling events of ViewStub in ViewOptimization Activity:
        viewStub.setOnInflateListener(new ViewStub.OnInflateListener() {
            @Override
            public void onInflate(ViewStub viewStub, View view) {
                Toast.makeText(ViewOptimizationActivity.this, "ViewStub Loaded", Toast.LENGTH_SHORT).show();
            }
        });
Then the layout_view_stub is filled and displayed by the button event:
    @Override
    public void onClick(View view) {
        switch (view.getId()) {
            case R.id.btn_show:
                viewStub.inflate();
                break;
            case R.id.btn_hide:
                viewStub.setVisibility(View.GONE);
                break;
            default:
                break;
        }
    }
After running, click the "Display" button, layout_view_stub displays, and pops up Toast "ViewStub loaded"; click the "Hide" button, and the layout is hidden, but then click the "Display" button, the page flickers back, looks at the log, and finds that an exception has been thrown:
java.lang.IllegalStateException: ViewStub must have a non-null ViewGroup viewParent
Let's open the source of ViewStub and see where the exception was thrown. Soon we'll be able to locate it in the inflate() method
    public View inflate() {
        final ViewParent viewParent = getParent();

        if (viewParent != null && viewParent instanceof ViewGroup) {
            if (mLayoutResource != 0) {
                final ViewGroup parent = (ViewGroup) viewParent;
                final View view = inflateViewNoAdd(parent);
                replaceSelfWithView(view, parent);

                mInflatedViewRef = new WeakReference<>(view);
                if (mInflateListener != null) {
                    mInflateListener.onInflate(this, view);
                }

                return view;
            } else {
                throw new IllegalArgumentException("ViewStub must have a valid layoutResource");
            }
        } else {
            throw new IllegalStateException("ViewStub must have a non-null ViewGroup viewParent");
        }
    }
Notice that there is a replaceSelfWithView() method in the if statement. Listening to the name gives you an ominous feeling. Click in and see:
    private void replaceSelfWithView(View view, ViewGroup parent) {
        final int index = parent.indexOfChild(this);
        parent.removeViewInLayout(this);

        final ViewGroup.LayoutParams layoutParams = getLayoutParams();
        if (layoutParams != null) {
            parent.addView(view, index, layoutParams);
        } else {
            parent.addView(view, index);
        }
    }
Sure enough, ViewStub calls the removeViewInLayout() method here to remove itself from the layout. Here we see that ViewStub destroys itself after filling in the layout successfully, and that calling the inflate() method again throws an IllegalStateException exception. At this point, if you want to display the layout again, you can call the setVisibility() method.
To avoid multiple invocations of the inflate() method, we can use the following three ways:
3.1.1 Catching Anomalies
We can catch exceptions and call the setVisibility() method to display the layout.
                try {
                    viewStub.inflate();
                } catch (IllegalStateException e) {
                    Log.e("Tag",e.toString());
                    view.setVisibility(View.VISIBLE);
                }
3.1.2 By listening for filling events in ViewStub
Declare a Boolean variable isViewStubShow with a default value of false. After the layout is filled successfully, set it to true in the listen event onInflate method.
                if (isViewStubShow){
                    viewStub.setVisibility(View.VISIBLE);
                }else {
                    viewStub.inflate();
                }
3.1.3 Call setVisibility() method directly
Let me first look at the setVisibility() source code in ViewStub:
    public void setVisibility(int visibility) {
        if (mInflatedViewRef != null) {
            View view = mInflatedViewRef.get();
            if (view != null) {
                view.setVisibility(visibility);
            } else {
                throw new IllegalStateException("setVisibility called on un-referenced view");
            }
        } else {
            super.setVisibility(visibility);
            if (visibility == VISIBLE || visibility == INVISIBLE) {
                inflate();
            }
        }
    }
As you can see, before inflate() initializes mInflatedViewRef, if you set visibility to VISIBLE, the inflate() method will be called, and after mInflatedViewRef is not null, inflate() will not be called again.
3.2 Why is viewStub. getVisibility () always equal to 0?
When displaying the layout in ViewStub, you may write as follows:
                if (viewStub.getVisibility() == View.GONE){
                    viewStub.setVisibility(View.VISIBLE);
                }else {
                    viewStub.setVisibility(View.GONE);
                }
Congratulations on stepping into a big pit. In this way, you will find that the layout in ViewStub will not be displayed after clicking the "Display" button, that is to say, the code in the if statement is not executed. If you print out the value of viewStub.getVisibility(), you will see that it is always zero, which is exactly the value of View.VISIBLE. Strangely, we explicitly wrote viewStub.setVisibility(View.GONE), layout_view_stub is hidden, why is the status of ViewStub still visible?
Go back to 3.1.3 and look at the setVisibility() source code in ViewStub. First, we determine whether the weak reference object mInflatedViewRef is empty or not, then we take out the stored object, that is, View in our ViewStub. Then we call the setVisibility() method of view. When the InflatedViewRef is empty, we judge that the visibility is VIS. When IBLE or IN VISIBLE, the inflate() method is called to fill the layout, but not if it is GONE. Thus, in the case that mInflatedViewRef is not empty, that is, the layout has been filled, the setVisibility() method in ViewStub is actually setting the visibility of the internal view, not the ViewStub itself. Such a design is also in line with the characteristics of ViewStub, that is, it destroys itself after filling the layout, and it is meaningless to set visibility for it.
3.3 Operation Layout Control
Comparing carefully, ViewStub is like a lazy include. We need it to load before it loads. To manipulate the controls in the layout as well as include, you can initialize the controls in the layout in ViewStub before initializing them:
                //1. Initialize the layout of the inflate and then initialize the controls in it.
                FrameLayout frameLayout = findViewById(R.id.view_inflate);//Android: the id set by inflatedId
                Switch sw = frameLayout.findViewById(R.id.sw);
                sw.toggle();
If the id of the control in the main layout does not conflict, the control can be initialized directly to use:
                //2. Direct Initialization Control
                Switch sw = findViewById(R.id.sw);
                sw.toggle();
Well, that's all about ViewStub.
Epilogue
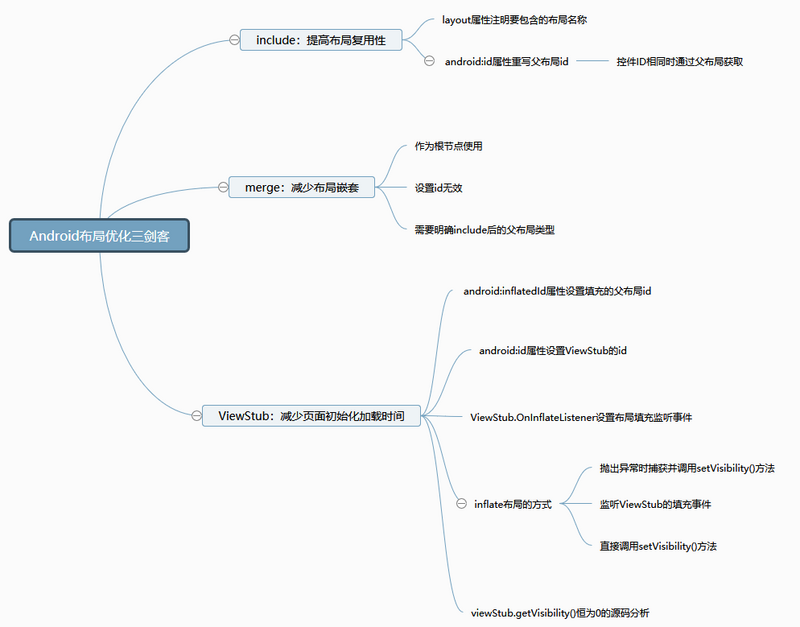
Originally thought that the knowledge point is not difficult, should be able to write faster, unexpectedly or intermittently wrote for four or five days, writing themselves feel a little tired. I hope it will be of some help to all of you, and I hope to correct the shortcomings. Let's sum it up with mind maps and give the source code on GitHub.
Last
Well, this is the end of the article. If you think it's well written, give me a compliment. If you think it's worth improving, please leave me a message. We will inquire carefully and correct the shortcomings. Thank you.

I hope you can forward, share and pay attention to me, and update the technology dry goods in the future. Thank you for your support! ___________
Forwarding + Praise + Concern, First Time to Acquire the Latest Knowledge Points
Android architects have a long way to go. Let's work together.
The following wall cracks recommend reading!!!
- Android Learning Notes Reference!
- "Winter is not over," Ali P9 architecture to share Android essential technical points, so that you get soft offer!
- Three years after graduation, how did I become a 30W senior Android developer from a 10W drag engineer?
- Tencent T3 Taurus gives you an understanding of the development trend of Android in 2019 and the necessary technical points!
- Eight years of Android development, from code farmer to architect to share my technological growth path, to encourage!
Finally, I wish you all a happy life.~