statement
The code part of this time refers to Guo Lin - the first line of code, which was written manually after learning the recyclerview chapter.
. 9 drawing making
. 9 the drawing material is made by myself with the drawing tool in the Windows attachment (i.e. I can't find the resource), and then imported into Android Studio for editing and reference.
- The production process of bubble chat background is introduced in many articles and will not be repeated here. Here's a problem I encountered. After checking the Show Content and Show Bad patches options during editing, an error will be reported in the red area in the picture. At this time, the stretching area on the left side can be limited to the area with a high number of frames. The specific comparison is as follows:
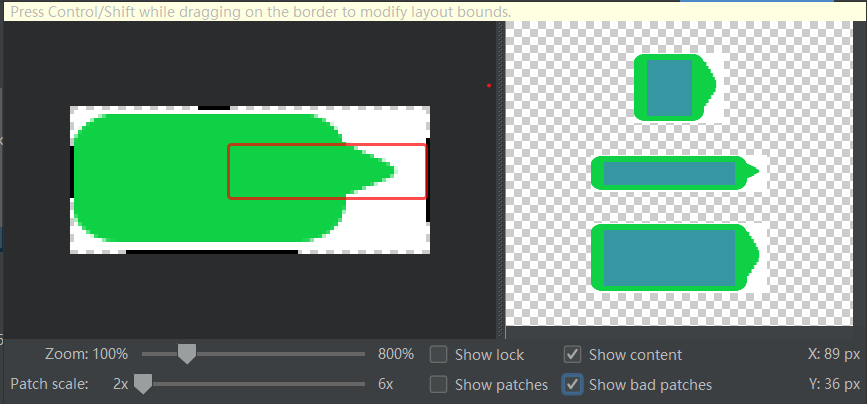 When I was editing, the red box in the picture would not disappear no matter how it was adjusted, and no corresponding solution was found. I accidentally found that it was OK to move the black line area on the left down// Please explain here
Tip: when importing png format pictures into Android Studio, it should be noted that the name of the picture can only be named with characters in the range of a~z and 0-9, otherwise the picture will report an error.
The changed figure is as follows:
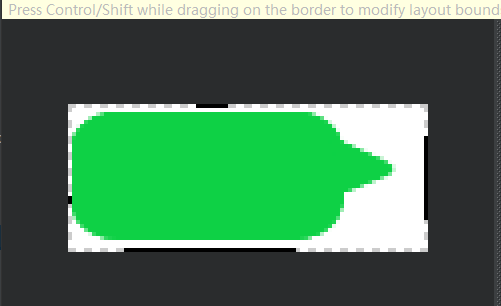 At this point, the. 9 drawing is almost ready for the next operation.
Layout coding
- Start writing layout code. This part of the code is referenced differently because i migrated to Android X. Add RecyclerView;
<LinearLayout
    xmlns:android="http://schemas.android.com/apk/res/android"
    xmlns:app="http://schemas.android.com/apk/res-auto"
    xmlns:tools="http://schemas.android.com/tools"
    android:layout_width="match_parent"
    android:layout_height="match_parent"
    tools:context=".MainActivity"
    android:orientation="vertical">

    <androidx.recyclerview.widget.RecyclerView
        android:id="@+id/msg_view"
        android:layout_width="match_parent"
        android:layout_height="0dp"
        android:layout_weight="1" />

    <LinearLayout
        android:layout_width="match_parent"
        android:layout_height="wrap_content">
        <Button
            android:id="@+id/msg_voice"
            android:layout_width="wrap_content"
            android:layout_height="wrap_content"
            android:text="S"
            android:textSize="20sp"/>
        <EditText
            android:id="@+id/msg_edit"
            android:layout_width="0dp"
            android:layout_height="wrap_content"
            android:layout_weight="1"
            android:hint="Please enter"
            android:maxLines="2"/>
        <Button
            android:id="@+id/msg_send"
            android:layout_width="wrap_content"
            android:layout_height="match_parent"
            android:text="send out"
            android:textSize="20sp"
            android:background="#FF03DAC5"/>
    </LinearLayout>

</LinearLayout>
2. Create another item layout to load messages. Note that I accidentally put the layout of the outermost layer in this step_ The value of height is set to match_parent. Finally, the running program becomes a message and occupies a screen page. The correct value should be set to wrap_content;
<LinearLayout
    xmlns:android="http://schemas.android.com/apk/res/android"
    android:orientation="vertical"
    android:layout_width="match_parent"
    android:layout_height="wrap_content">
    <LinearLayout
        android:id="@+id/layout_left"
        android:layout_width="wrap_content"
        android:layout_height="wrap_content"
        android:layout_gravity="left">
        <ImageView
            android:id="@+id/image_left"
            android:layout_width="wrap_content"
            android:layout_height="wrap_content"
            android:background="@drawable/ai"/>
        <TextView
            android:id="@+id/msg_left"
            android:layout_width="wrap_content"
            android:layout_height="wrap_content"
            android:background="@drawable/msgleft"
            android:padding="10dp"
            android:layout_gravity="center"/>
    </LinearLayout>

    <LinearLayout
        android:id="@+id/layout_right"
        android:layout_width="wrap_content"
        android:layout_height="wrap_content"
        android:layout_gravity="right">

        <TextView
            android:id="@+id/msg_right"
            android:layout_width="wrap_content"
            android:layout_height="wrap_content"
            android:background="@drawable/msgright"
            android:layout_gravity="right"
            android:padding="10dp"/>
        <ImageView
            android:id="@+id/image_right"
            android:layout_width="wrap_content"
            android:layout_height="wrap_content"
            android:background="@drawable/me"/>
    </LinearLayout>

</LinearLayout>
Code part
- Create a new entity class to distinguish message types;
public class Msg {
    public static final int TYPE_RECEIVED = 0;
    public static final int TYPE_SEND = 1;
    private String content;
    private int type;
    public Msg(String content,int type){
        this.content = content;
        this.type = type;
    }
    public String getContent(){
        return content;
    }
    public int getType(){
        return type;
    }
}
- Create an adapter to transfer the data sources to be displayed, and then operate based on these data sources, including setting to hide the message box on the right when the message type is receive, and hide the dialog box on the left when the message is send. In the adapter, you need to override onCreatViewHolder(), onBindViewHolder() and getItemCoun(), The write adapter inherits from recyclerview The system will automatically remind you when the adapter;
public class MsgAdapter extends RecyclerView.Adapter<MsgAdapter.ViewHolder> {
    private List<Msg>mMsgList;
    static class ViewHolder extends RecyclerView.ViewHolder{
        LinearLayout leftLayout;
        LinearLayout rightLayout;
        ImageView leftImage;
        ImageView rightImage;
        TextView leftMsg;
        TextView rightMsg;
        public ViewHolder( View view) {
            super(view);
            leftLayout = view.findViewById(R.id.layout_left);
            rightLayout = view.findViewById(R.id.layout_right);
            leftImage = view.findViewById(R.id.image_left);
            rightImage = view.findViewById(R.id.image_right);
            leftMsg = view.findViewById(R.id.msg_left);
            rightMsg = view.findViewById(R.id.msg_right);
        }
    }
    public MsgAdapter(List<Msg>msgList){
        mMsgList = msgList;
    }

    @Override
    public ViewHolder onCreateViewHolder( ViewGroup parent, int viewType) {
        View view = LayoutInflater.from(parent.getContext()).inflate(R.layout.msg_item,parent,false);
        return new ViewHolder(view);
    }

    @Override
    public void onBindViewHolder( ViewHolder holder, int position) {
        Msg msg = mMsgList.get(position);
        if (msg.getType() == Msg.TYPE_RECEIVED){
            //If the message is received, the layout on the left is displayed and the layout on the right is hidden
            holder.leftLayout.setVisibility(View.VISIBLE);
            holder.rightLayout.setVisibility(View.GONE);
            holder.leftMsg.setText(msg.getContent());
        }else if (msg.getType() == Msg.TYPE_SEND){
            //If it is an outgoing message, the layout on the right is displayed and the layout on the left is hidden
            holder.leftLayout.setVisibility(View.GONE);
            holder.rightLayout.setVisibility(View.VISIBLE);
            holder.rightMsg.setText(msg.getContent());
        }
    }

    @Override
    public int getItemCount() {
        return mMsgList.size();
    }
}
- Write the main code, which calls the notifyItemInserted () method of the adapter to notify the list of new data insertion. In addition, scrollToPosition () is used to locate to the last line, so that the message of the last line can be displayed;
public class MainActivity extends AppCompatActivity {
    private List<Msg>msgList = new ArrayList<>();
    private EditText inputText;
    private Button sendtext;
    private Button sendvoice;
    private RecyclerView msgRecycleView;
    private MsgAdapter adapter;

    @Override
    protected void onCreate(Bundle savedInstanceState) {
        super.onCreate(savedInstanceState);
        setContentView(R.layout.activity_main);
        initMsgs();
        inputText = findViewById(R.id.msg_edit);
        sendtext = findViewById(R.id.msg_send);
        sendvoice = findViewById(R.id.msg_voice);
        msgRecycleView = findViewById(R.id.msg_view);
        LinearLayoutManager layoutManager = new LinearLayoutManager(this);
        msgRecycleView.setLayoutManager(layoutManager);
        adapter = new MsgAdapter(msgList);
        msgRecycleView.setAdapter(adapter);
        sendtext.setOnClickListener(v -> {
            String content = inputText.getText().toString();
            if(!"".equals(content)){
                Msg msg = new Msg(content,Msg.TYPE_SEND);
                msgList.add(msg);
                adapter.notifyItemInserted(msgList.size() - 1);//Refresh the display in RecycleView when there is a message
                msgRecycleView.scrollToPosition(msgList.size() - 1);//Position the RecycleView to the last row
                inputText.setText("");//Finally, clear the contents of the input box
            }
        });
    }
    private void initMsgs(){
        Msg msg1 = new Msg("Hello",Msg.TYPE_RECEIVED);
        msgList.add(msg1);
        Msg msg2 = new Msg("Hello",Msg.TYPE_SEND);
        msgList.add(msg2);
        Msg msg3 = new Msg("nice to meet you",Msg.TYPE_RECEIVED);
        msgList.add(msg3);
    }
}
Finally, there is an important thing. My real machine is MI10. I can't display the reference effect of. 9 figure in drawable and drawable hdpi. Finally, I was inspired by a blogger's solution. I thought that in the case of higher Android version, I need to put the image resources under the resource package with xxxhdpi suffix to be displayed. Similarly, here, at the same time, we can observe the naming rules of mipmap under drawable.
The first time I write an article, if there is any mistake, I hope you can point it out, I will actively correct it.