February 5th
1. target
Master the layout manager of Android UI design
2. Learning notes
2.1 UI components
- TextView
- Botton
- RadioBotton
- EditView
- ImageView
- RecyclerView
2.2 layout manager
2.2.1 linear layout
Most common attributes
| attribute | attribute | attribute |
|---|---|---|
| android:id | android:layout_width | android:layout_height |
| android:background | android:layout_margin | android:layout_padding |
| android:orientation | android:gravity | android:layout_weight |
Machine operation
	<LinearLayout xmlns:android="http://schemas.android.com/apk/res/android"
    xmlns:app="http://schemas.android.com/apk/res-auto"
    xmlns:tools="http://schemas.android.com/tools"
    android:layout_width="match_parent"
    android:layout_height="match_parent"
    android:orientation="vertical"
    android:layout_margin="20dp"
    tools:context=".MainActivity">

    <TextView
        android:layout_width="match_parent"
        android:layout_height="200dp"
        android:text="15521139529"
        android:gravity="center"
        ></TextView>

    <LinearLayout
        android:layout_width="match_parent"
        android:layout_height="50dp"
        android:orientation="horizontal">
        <TextView
            android:layout_width="wrap_content"
            android:layout_height="wrap_content"
            android:text="Password"
            android:layout_marginRight="10dp"
            android:gravity="center"></TextView>
        <EditText
            android:layout_width="match_parent"
            android:layout_height="match_parent"
            android:hint="Please fill in wechat password"
            android:inputType="textPassword"
            android:maxLines="1"
            ></EditText>
    </LinearLayout>

    <TextView
        android:layout_width="wrap_content"
        android:layout_height="wrap_content"
        android:text="Login with SMS verification code"
        android:textColor="	#7D9EC0"></TextView>

    <Button
        android:layout_width="match_parent"
        android:layout_height="60dp"
        android:text="Sign in"
        android:layout_marginTop="20dp"></Button>
	</LinearLayout>
Operation result:
2.2.2 relative layout
Most commonly used attributes
| attribute | Effect |
|---|---|
| android:layout_toLeftOf | Whose left is it |
| android:layout_toRightOf | Whose right is it |
| android:layout_above | On whose side |
| android:layout_below | Under whom |
| android:layout_alignBottom | Align with whose bottom |
| android:layout_alignParentBottom | Align to bottom of parent control |
| android:layout_centerInParent | In the middle of the parent component |
Machine operation
Code:
	<RelativeLayout xmlns:android="http://schemas.android.com/apk/res/android"
    xmlns:app="http://schemas.android.com/apk/res-auto"
    xmlns:tools="http://schemas.android.com/tools"
    android:layout_width="match_parent"
    android:layout_height="match_parent"
    android:layout_margin="20dp"
    android:id="@+id/relative"
    tools:context=".MainActivity">

    <TextView
        android:id="@+id/text1"
        android:layout_width="match_parent"
        android:layout_height="100dp"
        android:text="15521139529"
        android:gravity="center"></TextView>

    <RelativeLayout
        android:id="@+id/relative1"
        android:layout_below="@+id/text1"
        android:layout_width="match_parent"
        android:layout_height="wrap_content">
        <TextView
            android:id="@+id/text2"
            android:layout_width="wrap_content"
            android:layout_height="wrap_content"
            android:text="Password"
            android:layout_centerVertical="true">
        </TextView>
        <EditText
            android:id="@+id/edit_text"
            android:layout_width="match_parent"
            android:layout_height="wrap_content"
            android:hint="Please enter wechat password"
            android:layout_toRightOf="@+id/text2"
            android:gravity="center"
            android:inputType="textPassword"
            ></EditText>
    </RelativeLayout>

    <TextView
        android:id="@+id/text3"
        android:layout_width="match_parent"
        android:layout_height="wrap_content"
        android:text="Login with verification code"
        android:layout_below="@+id/relative1"
        android:layout_alignParentLeft="true"
        android:textColor="	#7D9EC0"
        ></TextView>

    <Button
        android:id="@+id/bottom1"
        android:layout_width="match_parent"
        android:layout_height="wrap_content"
        android:text="Sign in"
        android:layout_marginTop="40dp"
        android:padding="20dp"
        android:layout_below="@id/text3">
    </Button>

    <RelativeLayout
        android:id="@+id/bottom"
        android:layout_width="match_parent"
        android:layout_height="wrap_content"
        android:orientation="horizontal"
        android:layout_alignParentBottom="true"
        android:gravity="center">
        <TextView
            android:id="@+id/text_bottom1"
            android:layout_width="wrap_content"
            android:layout_height="wrap_content"
            android:text="Retrieve password"
            android:textColor="	#7D9EC0"
            android:layout_toLeftOf="@+id/text_bottom2"
            ></TextView>

        <TextView
            android:id="@+id/text_bottom2"
            android:layout_width="wrap_content"
            android:layout_height="wrap_content"
            android:layout_centerInParent="true"
            android:layout_marginLeft="10dp"
            android:layout_marginRight="10dp"
            android:text="Emergency freeze"
            android:textColor="	#7D9EC0"></TextView>

        <TextView
            android:id="@+id/text_bottom3"
            android:layout_width="wrap_content"
            android:layout_height="wrap_content"
            android:text="Wechat Security Center"
            android:textColor="	#7D9EC0"
            android:layout_toRightOf="@id/text_bottom2"></TextView>
    </RelativeLayout>
	</RelativeLayout>
Operation result: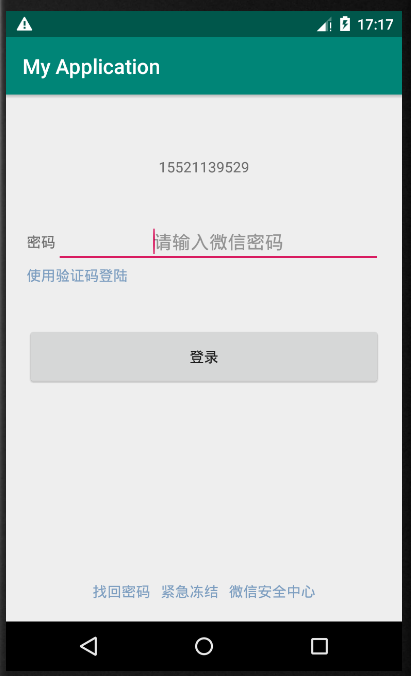
February 6th
1. Learning objectives
Master the common usage of components
- TextView
- Button
- EditView
2. Learning notes
2.1 TextView
2.1.1 key points
- Set size color of text
- Use when text is too long to display
- Text + icon
- Underline with middle dash
- Running lamp effect
2.1.2 solutions
- textColor sets the font color and TextSize sets the font size. Note that the unit used here is sp
- maxLine limits the text to be displayed in one line. Ellipseze sets the default display format, and select end
-
drawableRight can add an image to the right of the text. You need to prepare the image in advance and add another click
Listening to events can realize some functions that you want to filter - Add middle dash and underline in the java file. The code is as follows:
	private TextView mTv4;
	mTv4 = findViewById(R.id.tv_4);
	mTv4.getPaint().setFlags(Paint.STRIKE_THRU_TEXT_FLAG); // Add middle dash
	mTv4.getPaint().setAntiAlias(true); // Remove saw tooth

	private TextView mTv5;
	mTv5 = findViewById(R.id.tv_5);
	mTv5.getPaint().setFlags(Paint.UNDERLINE_TEXT_FLAG); // Underline
	mTv5.getPaint().setAntiAlias(true); // Remove saw tooth
- The implementation of the running lamp depends on the following attributes
	android:singleLine="true"
	android:ellipsize="marquee"
	android:marqueeRepeatLimit="marquee_forever"
	android:focusable="true"
	android:focusableInTouchMode="true"
2.2 Button
2.2.1 points
- Button size color setting
- Custom button background
- Custom press effect
- Click events
2.2.2 solutions
- Same as TextView, because Button inherits from TextView
- The background is defined by creating a new drawable resource file. The common method is to trace the right angle fillet. The code is as follows:
<shape xmlns:android="http://schemas.android.com/apk/res/android"
    android:shape="rectangle">
    <solid
        android:color="#FFCC00"/> // fill color
    <corners
        android:radius="10dp"/> // fillet
</shape>

<shape xmlns:android="http://schemas.android.com/apk/res/android"
    android:shape="rectangle">
    <stroke
        android:width="2dp"
        android:color="#FFCC00"/> // Stroke
    <corners
        android:radius="10dp"/> //fillet
</shape>
- In the same way, customize the pressing effect. The code is as follows:
<selector xmlns:android="http://schemas.android.com/apk/res/android">
    <item android:state_pressed="true"> // press down
        <shape>
            <solid android:color="#00BB25"/> // fill color
            <corners android:radius="10dp"/> // fillet
        </shape>
    </item>

    <item android:state_pressed="false"> // Didn't press
        <shape>
            <solid android:color="#00DD2C"/>
            <corners android:radius="10dp"/>
        </shape>
    </item>
</selector>
- Method 1: add onClick attribute in the layout file, whose value is a user-defined method name, and then define and implement the method in Activity. The code is as follows:
	android:onClick="showToast"

    public void showToast(View view) {
        Toast.makeText(this, "Click button 4", Toast.LENGTH_LONG).show();
    }
Method 2 (recommended): get the control directly in Activity, and create a new listening event to implement it. The code is as follows:
	private Button mBtn3;

	mBtn3 = findViewById(R.id.btn_3);
	mBtn3.setOnClickListener(new View.OnClickListener() {
		@Override
		public void onClick(View v) {
			Toast.makeText(ButtonActivity.this, "Click button 3", Toast.LENGTH_LONG).show();
		}
	});
2.3 EditText
2.3.1 points
- Common attributes
- Monitoring events
2.3.2 solutions
- attribute
| Common attributes | Effect |
|---|---|
| hint | Prompting language |
| inputType | Input type |
- Listening event: before, during, and after the change of listening text value
		mEditText1 = findViewById(R.id.et_1);
        mEditText1.addTextChangedListener(new TextWatcher() {
            @Override
            public void beforeTextChanged(CharSequence s, int start, int count, int after) {

            }

            @Override
            public void onTextChanged(CharSequence s, int start, int before, int count) {
                Log.d("useName", s.toString());

            }

            @Override
            public void afterTextChanged(Editable s) {

            }
        });
February 7th
1. Learning objectives
Master the common usage of the following controls:
- RadioButton
- CheckBox
- ImageView
- ListView
- GridView
- ScrollView
2. Learning notes
2.1 RadioButton and RadioGroup
2.1.1 points
- Common attributes
- custom style
- Monitoring events
2.1.2 solutions
- If it is a group, you need to use radiogoud to include multiple * RadioButton s * to achieve multiple choices. Common properties:
| attribute | Effect |
|---|---|
| checked | Selected by default |
| orientation | Option placement direction, horizontal or vertical |
| button | Set the style of the check button, which can be set to @ null to hide, and then use the custom pattern |
- As with other custom styles, it is better to create a new drawable settlement file and set the background value to the new file name. The code is as follows:
	android:button="@null"
	android:background="@drawable/rb_rb_2"

	<selector xmlns:android="http://schemas.android.com/apk/res/android">
	    <item android:state_checked="true">
	        <shape>
	            <solid android:color="#00BB25"/>
	            <corners android:radius="10dp"/>
	        </shape>
	    </item>

	    <item android:state_checked="false">
	        <shape>
	            <stroke
	                android:width="2dp"
	                android:color="#00BB25"/>
	            <corners android:radius="10dp"/>
	        </shape>
	    </item>
	</selector>
- The code is as follows:
	private RadioGroup mRg1;

        mRg1 = findViewById(R.id.rg_1);
        mRg1.setOnCheckedChangeListener(new RadioGroup.OnCheckedChangeListener() {
            @Override
            public void onCheckedChanged(RadioGroup group, int checkedId) {
                RadioButton radioButton = group.findViewById(checkedId);
                Toast.makeText(RadioButtonActivity.this, radioButton.getText(), Toast.LENGTH_SHORT).show();
            }
        });
2.2 CheckBox
Multiple checkboxes are a group of selected items, i.e. the checked RadioGroup
2.1.1 points
- Common attributes
- custom style
- Monitoring events
2.1.2 solutions
- Same RaidoBox
- The code is the same as that of RaidoBox
	<selector xmlns:android="http://schemas.android.com/apk/res/android">
	    <item android:state_checked="true" android:drawable="@drawable/checkbox_checked"/>
	    <item android:state_checked="false" android:drawable="@drawable/checkmark_unchecked"/>
	</selector>
- The method of listening is similar to that of radio grounp. The code is as follows
    private CheckBox mCb5, mCb6;

        mCb5 = findViewById(R.id.cb_21);
        mCb6 = findViewById(R.id.cb_22);
        mCb5.setOnCheckedChangeListener(new CompoundButton.OnCheckedChangeListener() {
            @Override
            public void onCheckedChanged(CompoundButton buttonView, boolean isChecked) {
                Toast.makeText(CheckBoxActivity.this, isChecked?"checked":"unchecked", Toast.LENGTH_SHORT).show();
            }
        });
        mCb6.setOnCheckedChangeListener(new CompoundButton.OnCheckedChangeListener() {
            @Override
            public void onCheckedChanged(CompoundButton buttonView, boolean isChecked) {
                Toast.makeText(CheckBoxActivity.this, isChecked?"checked":"unchecked", Toast.LENGTH_SHORT).show();
            }
        });
2.3 ImageView
2.3.1 points
- Common attributes
- Load network picture
2.3.2 method
- Common attributes
| attribute | Effect |
|---|---|
| src | Location of picture resources |
| scaleType | Types of picture fit views |
| scaleType value | Effect |
|---|---|
| fitXY | Stretch and width to fill the entire ImageView |
| fitCenter | Proportional scaling is the complete display of the image in ImageView |
| centerCrop | Scale equally to fill the entire ImageView |
- Load the open source package, search the required package directly on GitHub official website, and operate according to the instructions, then you can call the relevant functions. The code is as follows
	// Load the open source package, copy and paste the corresponding content to the corresponding location of * build. Gradle (cloud: app *), and then click synchronize

	repositories {
	    mavenCentral()
	    google()
	}

	dependencies {
	    implementation 'com.github.bumptech.glide:glide:4.11.0'
	    annotationProcessor 'com.github.bumptech.glide:compiler:4.11.0'
	}

	// Use open source package to load network pictures

	private ImageView mIv4;

		mIv4 = findViewById(R.id.iv_4);
		Glide.with(this).load("https://i0.hdslb.com/bfs/archive/058056424b94c3ff8c1facc940f48ce3bfe423a5.jpg@1100w_484h_1c_100q.jpg").into(mIv4);
2.4 ListView
2.4.1 common xml attributes
| attribute | Effect |
|---|---|
| listSelector | Set the selected effect. You can customize the drawable file to achieve the click effect |
| divider | Style split lines between item s |
| dividerHeight | Set the width of the divider |
2.4.2 list generation
- Create a new layout file and design the layout of an item
	<LinearLayout xmlns:android="http://schemas.android.com/apk/res/android"
	    android:orientation="horizontal"
	    android:layout_width="match_parent"
	    android:layout_height="match_parent"
	    android:layout_margin="10dp">

	    <ImageView
	        android:id="@+id/iv"
	        android:layout_width="150dp"
	        android:layout_height="100dp"
	        android:background="@color/colorBlack"
	        android:scaleType="fitXY"/>

	    <LinearLayout
	        android:id="@+id/ll"
	        android:layout_width="match_parent"
	        android:layout_height="100dp"
	        android:orientation="vertical"
	        android:paddingLeft="10dp">

	        <TextView
	            android:id="@+id/tv_tittle"
	            android:layout_width="wrap_content"
	            android:layout_height="wrap_content"
	            android:text="Eraser"
	            android:textSize="20sp"
	            android:textColor="@color/colorBlack"/>
	        <TextView
	            android:id="@+id/tv_date"
	            android:layout_width="wrap_content"
	            android:layout_height="wrap_content"
	            android:text="2020-02-07"
	            android:textSize="18sp"
	            android:textColor="@color/colorGray"
	            android:layout_marginTop="5dp"/>
	        <TextView
	            android:id="@+id/tv_details"
	            android:layout_width="wrap_content"
	            android:layout_height="wrap_content"
	            android:text="This is an introduction., Lead writing with eraser!"
	            android:textSize="19sp"
	            android:layout_marginTop="5dp"
	            android:textColor="@color/colorGray"/>
	    </LinearLayout>

	</LinearLayout>
- The content here needs to know a few knowledge
- Rookie tutorial: Load the system service layoutingger for layout
- Need to implement the getView() method
- setTag() and getTag() methods
public class MyListAdapter extends BaseAdapter {

    private Context mContext;
    private LayoutInflater mLayoutInflater;

    public MyListAdapter(Context context) {
        this.mContext = context;
        mLayoutInflater = LayoutInflater.from(context); // Get layout filler
    }
    @Override
    public int getCount() {
        return 10;
    }

    @Override
    public Object getItem(int position) {
        return null;
    }

    @Override
    public long getItemId(int position) {
        return 0;
    }

    static class ViewHolder {
        public ImageView imageView;
        public TextView tvTittle, tvDate, tvDetails;
    }
    @Override
    // What does each president look like? This method can get
    public View getView(int position, View convertView, ViewGroup parent) {

        ViewHolder viewHolder = null;

        if (convertView == null) { // If the current item is empty, create a new convertView, update the viewHolder and put it in the cache
            // convertView is an item View. Fill r.layout.layout'list'item into a view to get convertView
            convertView = mLayoutInflater.inflate(R.layout.layout_list_item, null);
            // viewHolder is a class object that manages all controls on an item
            viewHolder = new ViewHolder();
            viewHolder.imageView = convertView.findViewById(R.id.iv);
            viewHolder.tvTittle = convertView.findViewById(R.id.tv_tittle);
            viewHolder.tvDate = convertView.findViewById(R.id.tv_date);
            viewHolder.tvDetails = convertView.findViewById(R.id.tv_details);
            // Put viewHolder in cache
            convertView.setTag(viewHolder);
        } else { // If the current item is not empty, just fetch it from the cache
            viewHolder = (ViewHolder)convertView.getTag();
        }
        // Assigning a value to a control overrides the initial value in the xml file
        viewHolder.tvTittle.setText("This is the title.");
        viewHolder.tvDate.setText("2022-02-22");
        viewHolder.tvDetails.setText("This is the content!");
        Glide.with(mContext).load("https://i0.hdslb.com/bfs/archive/058056424b94c3ff8c1facc940f48ce3bfe423a5.jpg@1100w_484h_1c_100q.jpg").into(viewHolder.imageView);

        return convertView;
    }
}


private ListView mLv1;

	mLv1 = findViewById(R.id.lv_1);
	mLv1.setAdapter(new MyListAdapter(ListViewActivity.this));
2.4.3 listening events
- click
        mLv1.setOnItemClickListener(new AdapterView.OnItemClickListener() {
            @Override
            public void onItemClick(AdapterView<?> parent, View view, int position, long id) {
                Toast.makeText(ListViewActivity.this, "position" + position, Toast.LENGTH_SHORT).show();
            }
        });
- Long press
        mLv1.setOnItemLongClickListener(new AdapterView.OnItemLongClickListener() {
            @Override
            public boolean onItemLongClick(AdapterView<?> parent, View view, int position, long id) {
                Toast.makeText(ListViewActivity.this, "position" + position, Toast.LENGTH_SHORT).show();
                return true;
            }
        });
2.5 GridView
2.5.1 common xml attributes
There are also many properties of ListView, including the following:
| attribute | Effect |
|---|---|
| numColumns | How many columns |
| horizontalSpacing | Horizontal spacing |
| verticalSpacing | Vertical spacing |
2.5.2 Adapter
The same as ListView, the code is as follows:
- Create a new layout file and design the layout of an item
<LinearLayout xmlns:android="http://schemas.android.com/apk/res/android"
    android:orientation="vertical" android:layout_width="match_parent"
    android:layout_height="match_parent"
    android:layout_margin="10dp">

    <ImageView
        android:id="@+id/iv_image"
        android:layout_width="match_parent"
        android:layout_height="100dp"
        android:background="@color/colorPink"
        android:scaleType="centerCrop"/>

    <TextView
        android:id="@+id/tv_name"
        android:layout_width="match_parent"
        android:layout_height="wrap_content"
        android:text="name"
        android:gravity="center"/>

</LinearLayout>
- Custom MyGridViewAdapter class
public class MyGridViewAdapter extends BaseAdapter {

    private Context mContext;
    private LayoutInflater mLayoutInflater;

    public MyGridViewAdapter(Context context){
        this.mContext = context;
        mLayoutInflater = LayoutInflater.from(context);
    }

    static class ViewHolder{
        public ImageView mImageView;
        public TextView mTextView;
    }

    @Override
    public int getCount() {
        return 10;
    }

    @Override
    public Object getItem(int position) {
        return null;
    }

    @Override
    public long getItemId(int position) {
        return 0;
    }

    @Override
    public View getView(int position, View convertView, ViewGroup parent) {
        ViewHolder viewHolder = null;
        if (convertView == null) {
            convertView = mLayoutInflater.inflate(R.layout.layout_grid_item, null);
            viewHolder = new ViewHolder();
            viewHolder.mImageView = convertView.findViewById(R.id.iv_image);
            viewHolder.mTextView = convertView.findViewById(R.id.tv_name);
            convertView.setTag(viewHolder);
            convertView.setTag(viewHolder);
        } else {
            viewHolder = (ViewHolder) convertView.getTag();
        }
        viewHolder.mTextView.setText("JoJo");
        Glide.with(mContext).load("https://timgsa.baidu.com/timg?image&quality=80&size=b9999_10000&sec=1581092772754&di=252dc3a97008701c0c654df1cb070f42&imgtype=0&src=http%3A%2F%2Fi2.hdslb.com%2Fbfs%2Farchive%2F23cd383165745a6fdc4ddc06ecc31e5cee91f91c.jpg").into(viewHolder.mImageView);
        return convertView;
    }
}

	private GridView mGv1
        mGv1 = findViewById(R.id.gv);
        mGv1.setAdapter(new MyGridViewAdapter(GridViewActivity.this));
- Monitoring events
Same ListView
	    // Single click
    mGv1.setOnItemClickListener(new AdapterView.OnItemClickListener() {
        @Override
        public void onItemClick(AdapterView<?> parent, View view, int position, long id) {
            Toast.makeText(GridViewActivity.this, "Click on the picture" + position, Toast.LENGTH_SHORT).show();
        }
    });

    // Long press
    mGv1.setOnItemLongClickListener(new AdapterView.OnItemLongClickListener() {
        @Override
        public boolean onItemLongClick(AdapterView<?> parent, View view, int position, long id) {
            Toast.makeText(GridViewActivity.this, "Long press picture" + position, Toast.LENGTH_SHORT).show();
            return true;
        }
  	});
2.6 ScrollView
When there are too many controls and the mobile screen can't be put down, ScrollView can be used to realize the scrolling function
2.6.1 use
Just put the layout that needs to be scrolled in ScrollView. Note that only one element can be placed in it. Scroll vertically with ScrollView, and scroll horizontally with HorizontalScrollView
<ScrollView xmlns:android="http://schemas.android.com/apk/res/android"
  xmlns:app="http://schemas.android.com/apk/res-auto"
  xmlns:tools="http://schemas.android.com/tools"
  android:layout_width="match_parent"
  android:layout_height="match_parent"
  tools:context=".ScrollViewActivity">
  <LinearLayout
      android:id="@+id/sv_ll_1"
      android:layout_width="match_parent"
      android:layout_height="match_parent"
      android:orientation="vertical"
      android:layout_margin="5dp">
      <TextView
          android:layout_width="match_parent"
          android:layout_height="150dp"
          android:text="\(@^0^@)/"
          android:textSize="30sp"
          android:gravity="center"
          android:background="@color/colorPink"/>
      <TextView
          android:layout_width="match_parent"
          android:layout_height="150dp"
          android:text="\(@^0^@)/"
          android:textSize="30sp"
          android:gravity="center"
          android:background="@color/colorPink"
          android:layout_marginTop="10dp"/>
      <TextView
          android:layout_width="match_parent"
          android:layout_height="150dp"
          android:text="\(@^0^@)/"
          android:textSize="30sp"
          android:gravity="center"
          android:background="@color/colorPink"
          android:layout_marginTop="10dp"/>
      <TextView
          android:layout_width="match_parent"
          android:layout_height="150dp"
          android:text="\(@^0^@)/"
          android:textSize="30sp"
          android:gravity="center"
          android:background="@color/colorPink"
          android:layout_marginTop="10dp"/>
      <HorizontalScrollView
          android:layout_width="match_parent"
          android:layout_height="match_parent">
          <LinearLayout
              android:layout_width="match_parent"
              android:layout_height="match_parent"
              android:orientation="horizontal">
              <TextView
                  android:layout_width="200dp"
                  android:layout_height="150dp"
                  android:text="\(@^0^@)/"
                  android:textSize="30sp"
                  android:gravity="center"
                  android:background="@color/colorPink"
                  android:layout_marginTop="10dp"/>

              <TextView
                  android:layout_width="200dp"
                  android:layout_height="150dp"
                  android:layout_marginTop="10dp"
                  android:background="@color/colorPink"
                  android:gravity="center"
                  android:text="\(@^0^@)/"
                  android:textSize="30sp"
                  android:layout_marginLeft="10dp"/>

              <TextView
                  android:layout_width="200dp"
                  android:layout_height="150dp"
                  android:text="\(@^0^@)/"
                  android:textSize="30sp"
                  android:gravity="center"
                  android:background="@color/colorPink"
                  android:layout_marginTop="10dp"
                  android:layout_marginLeft="10dp"/>
          </LinearLayout>
      </HorizontalScrollView>

  </LinearLayout>

</ScrollView>
February 8th
1. Learning objectives
RecycleView
2. Learning notes
2.1 RecyclerView
2.1.1 brief introduction to RecyclerView
- It can be used to replace ListView and GridView to flexibly display large data sets.
- There are lists, grids and waterfall flows.
- Viewholder can realize multiple items, for example, wechat chat interface has multiple items such as text, picture and address information.
2.1.2 dependence on importing Recyclerview Library
2.1.3 realize vertical list function
- Set up the layout manager: there are three types of layout managers. Here, use the LinearLayoutManager
LinearLayoutManager linearLayoutManager = new LinearLayoutManager(HorRecyclerViewActivity.this); // Create layout manager objects
mRv.setLayoutManager(linearLayoutManager); // Set up layout manager for RecyclerView control
- Set adapter
mRvHor.setAdapter(new HorAdapter(HorRecyclerViewActivity.this, new HorAdapter.OnItemClickListener() {
            @Override
            public void onClick(int pos) {
                Toast.makeText(HorRecyclerViewActivity.this, "Click." + pos, Toast.LENGTH_SHORT).show();
            }
        }));
2.1.3.1 specific implementation
- Layout file preparation: an activity layout file and an item layout file
// Layout file for activity
<LinearLayout xmlns:android="http://schemas.android.com/apk/res/android"
    xmlns:app="http://schemas.android.com/apk/res-auto"
    xmlns:tools="http://schemas.android.com/tools"
    android:layout_width="match_parent"
    android:layout_height="match_parent"
    tools:context=".recyclerview.RecyclerViewActivity"
    android:layout_margin="10dp">

    <Button
        android:id="@+id/btn_linear"
        android:layout_width="match_parent"
        android:layout_height="wrap_content"
        android:text="List view"/>

</LinearLayout>

// item layout file
<LinearLayout xmlns:android="http://schemas.android.com/apk/res/android"
    android:orientation="vertical"
    android:layout_width="match_parent"
    android:layout_height="wrap_content">

    <TextView
        android:id="@+id/tv_tittle"
        android:layout_width="match_parent"
        android:layout_height="50dp"
        android:textSize="20sp"
        android:textColor="@color/colorBlack"
        android:gravity="center"
        android:background="@color/colorWhite"/>

</LinearLayout>
- Implementation adapter
public class LinearAdapter extends RecyclerView.Adapter<LinearAdapter.LinearViewHolder> {

    private Context mContext;

    public LinearAdapter(Context context) {
        this.mContext = context;
    }

    @NonNull
    @Override
    /**
     * The ViewHolder is created to realize the reuse function
     */
    public LinearAdapter.LinearViewHolder onCreateViewHolder(@NonNull ViewGroup parent, int viewType) {
        return new LinearViewHolder(LayoutInflater.from(mContext).inflate(R.layout.layout_linear_item, parent, false));
    }

    @Override
    /**
     * It is used to set the data. When the item is pulled into the screen, this method will be called to change the data
     */
    public void onBindViewHolder(@NonNull LinearAdapter.LinearViewHolder holder, final int position) {

        holder.mTv.setText("Set up holder Value");
    }

    @Override
    /**
     * It is used to get the number of item s. The actual development is to get the length of the List
     */
    public int getItemCount() {
        return 30;
    }

    /**
     * Customize the type of ViewHolder and replace all generics with this type
     */
    class LinearViewHolder extends RecyclerView.ViewHolder {

        private TextView mTv;

        public LinearViewHolder(@NonNull View itemView) {
            super(itemView);
            mTv = itemView.findViewById(R.id.tv_tittle);
        }
    }

}
- Use adapter
public class LinearRecyclerViewActivity extends AppCompatActivity {

    private RecyclerView mRvMain;

    @Override
    protected void onCreate(Bundle savedInstanceState) {
        super.onCreate(savedInstanceState);
        setContentView(R.layout.activity_linear_recycler_view);
        mRvMain = findViewById(R.id.rv_main);
        mRvMain.setLayoutManager(new LinearLayoutManager(LinearRecyclerViewActivity.this)); // Set up the layout manager with three linear, tabular, and waterfall flows
        mRvMain.setAdapter(new LinearAdapter(LinearRecyclerViewActivity.this);
    }

}
2.1.3.2 realize split line
Using addItemDecoration to implement the split line
public class LinearRecyclerViewActivity extends AppCompatActivity {

    private RecyclerView mRvMain;

    @Override
    protected void onCreate(Bundle savedInstanceState) {
        super.onCreate(savedInstanceState);
        setContentView(R.layout.activity_linear_recycler_view);
        mRvMain = findViewById(R.id.rv_main);
        mRvMain.setLayoutManager(new LinearLayoutManager(LinearRecyclerViewActivity.this)); // Set up the layout manager with three linear, tabular, and waterfall flows
        mRvMain.setAdapter(new LinearAdapter(LinearRecyclerViewActivity.thi);
        mRvMain.addItemDecoration(new MyDecoration());
    }

    /**
     * Realize the function of dividing line
     */
    class MyDecoration extends RecyclerView.ItemDecoration {
        @Override
        public void getItemOffsets(@NonNull Rect outRect, @NonNull View view, @NonNull RecyclerView parent, @NonNull RecyclerView.State state) {
            super.getItemOffsets(outRect, view, parent, state);
            outRect.set(0, 0, 0, getResources().getDimensionPixelOffset(R.dimen.dividerHeight));
        }
    }
}
2.1.3.3 listening events
- Method 1: directly create a new listening event in the onBindViewHolder() method.
    @Override
    /**
     * It is used to set data. When an item is pulled into the screen, this method will be called to change data or set listening (the first method)
     */
    public void onBindViewHolder(@NonNull LinearAdapter.LinearViewHolder holder, final int position) {

        holder.mTv.setText("Set up holder Value");
        holder.mTv.setOnClickListener(new View.OnClickListener() {
            @Override
            public void onClick(View v) {
                Toast.makeText(mContext, "Click." + position, Toast.LENGTH_SHORT).show();
            }
        });
    }
- Method 2: use the interface to define the interface for listening events in the user-defined adapter. When instantiating the adapter, rewrite the click method of the interface to realize listening events.
// Adapter code
public class LinearAdapter extends RecyclerView.Adapter<LinearAdapter.LinearViewHolder> {

    private Context mContext;
    private OnItemClickListener mOnItemClickListener; // Declarative interface

    public LinearAdapter(Context context, OnItemClickListener onItemClickListener) {
        this.mContext = context;
        this.mOnItemClickListener = onItemClickListener; // Initialize interface
    }

    @NonNull
    @Override
    /**
     * The ViewHolder is created for reuse
     */
    public LinearAdapter.LinearViewHolder onCreateViewHolder(@NonNull ViewGroup parent, int viewType) {
        return new LinearViewHolder(LayoutInflater.from(mContext).inflate(R.layout.layout_linear_item, parent, false));
    }

    @Override
    /**
     * It is used to set data. When an item is pulled into the screen, this method will be called to change data or set listening (the first method)
     */
    public void onBindViewHolder(@NonNull LinearAdapter.LinearViewHolder holder, final int position) {

        holder.mTv.setText("Set up holder Value");
        holder.mTv.setOnClickListener(new View.OnClickListener() {
            @Override
            public void onClick(View v) {
            // Call of interface method. Rewrite the method after instantiation, i.e. call the final rewritten method here
                mOnItemClickListener.onClick(position);
            }
        });
    }

    @Override
    /**
     * It is used to get the number of item s. The actual development is to get the length of the List
     */
    public int getItemCount() {
        return 30;
    }

    /**
     * Customize the type of ViewHolder and replace all generics with this type
     */
    class LinearViewHolder extends RecyclerView.ViewHolder {

        private TextView mTv;

        public LinearViewHolder(@NonNull View itemView) {
            super(itemView);
            mTv = itemView.findViewById(R.id.tv_tittle);
        }
    }

    /**
     * Write an interface to realize the second method of setting listening
     * That is to instantiate this class, you must implement this interface and rewrite the method, which is invoked in the onBindViewHolder() method.
     * In this way, as long as you add a listening event to the override method, you can add a listening event for the item when it appears on the screen.
     */
    public interface OnItemClickListener {
        void onClick(int pos);
    }
}

// activity code
public class LinearRecyclerViewActivity extends AppCompatActivity {

    private RecyclerView mRvMain;

    @Override
    protected void onCreate(Bundle savedInstanceState) {
        super.onCreate(savedInstanceState);
        setContentView(R.layout.activity_linear_recycler_view);
        mRvMain = findViewById(R.id.rv_main);
        mRvMain.setLayoutManager(new LinearLayoutManager(LinearRecyclerViewActivity.this)); // Set up the layout manager with three linear, tabular, and waterfall flows
        mRvMain.setAdapter(new LinearAdapter(LinearRecyclerViewActivity.this, new LinearAdapter.OnItemClickListener() {
            @Override
            public void onClick(int pos) {
                Toast.makeText(LinearRecyclerViewActivity.this, "Click." + pos, Toast.LENGTH_SHORT).show();
            }
        }));
    }
}
2.1.4 horizontal rolling
Just set the direction of the linear layout
LinearLayoutManager linearLayoutManager = new LinearLayoutManager(HorRecyclerViewActivity.this);
linearLayoutManager.setOrientation(LinearLayoutManager.HORIZONTAL); // Set scrolling direction
mRvHor.setLayoutManager(linearLayoutManager);
mRvHor.setAdapter(new HorAdapter(HorRecyclerViewActivity.this, new HorAdapter.OnItemClickListener() {
    @Override
    public void onClick(int pos) {
        Toast.makeText(HorRecyclerViewActivity.this, "Click." + pos, Toast.LENGTH_SHORT).show();
    }
}));
2.1.5 grid layout
You have to use GridLayoutManager
new GridLayoutManager(GridRecyclerViewActivity.this, 3);
public class GridRecyclerViewActivity extends AppCompatActivity {

    private RecyclerView mRvGrid;
    @Override
    protected void onCreate(Bundle savedInstanceState) {
        super.onCreate(savedInstanceState);
        setContentView(R.layout.activity_grid_recycler_view);
        mRvGrid = findViewById(R.id.rv_grid);
        GridLayoutManager gridLayoutManager = new GridLayoutManager(GridRecyclerViewActivity.this, 3); // The 3 column
        mRvGrid.setLayoutManager(gridLayoutManager);
        mRvGrid.setAdapter(new GridAdapter(GridRecyclerViewActivity.this, new GridAdapter.OnItemClickListener() {
            @Override
            public void onClick(int pos) {
                Toast.makeText(GridRecyclerViewActivity.this, "Click." + pos, Toast.LENGTH_SHORT).show();
            }
        }));

    }
}
Waterfall flow
You need to use the table layout manager
new StaggeredGridLayoutManager(2,StaggeredGridLayoutManager.VERTICAL);
public class StaggeredRecyclerViewActivity extends AppCompatActivity {

    private RecyclerView mRvSta;

    @Override
    protected void onCreate(Bundle savedInstanceState) {
        super.onCreate(savedInstanceState);
        setContentView(R.layout.activity_staggered_recycler_view);
        mRvSta = findViewById(R.id.rv_staggered);
        StaggeredGridLayoutManager staggeredGridLayoutManager = new StaggeredGridLayoutManager(2,StaggeredGridLayoutManager.VERTICAL);
        mRvSta.setLayoutManager(staggeredGridLayoutManager);
        mRvSta.setAdapter(new StaggeredAdapter(StaggeredRecyclerViewActivity.this, new StaggeredAdapter.OnItemClickListener() {
            @Override
            public void onClick(int pos) {
                Toast.makeText(StaggeredRecyclerViewActivity.this, "Click." + pos, Toast.LENGTH_SHORT).show();
            }
        }));
        mRvSta.addItemDecoration(new MyItemDecoration());
    }
}
2.1.6 implement multiple item display
The ViewHolder of the custom Adapter requires multiple types. You can override the getItemViewType(int position) method to return different item types according to different information. Next, the creation of ViewHolder and the specific operations in the onBindViewHolder method are based on the item type.
public class MulVHAdapter extends RecyclerView.Adapter<RecyclerView.ViewHolder> {

    private Context mContext;
    private OnItemClickListener mOnItemClickListener;

    public MulVHAdapter(Context context, OnItemClickListener onItemClickListener) {
        this.mContext = context;
        this.mOnItemClickListener = onItemClickListener;
    }

    @Override
    /**
     * Judge the type of item according to its location
     * return 0: Odd, item is Text type
     * return 1: Even, item is of type Iamge
     */
    public int getItemViewType(int position) {
        int flag;
        if(position % 2 == 0){
            flag = 1;
        } else {
            flag = 0;
        }
        return flag;
    }

    @NonNull
    @Override
    /**
     * Create the corresponding ViewHolder according to the type of item
     */
    public RecyclerView.ViewHolder onCreateViewHolder(@NonNull ViewGroup parent, int viewType) {
        RecyclerView.ViewHolder viewHolder = null;
        if(viewType == 0) { // Text type
            viewHolder = new MyViewHolderText(LayoutInflater.from(mContext).inflate(R.layout.layout_mvh_text_item, parent, false));
        } else { // Image type
            viewHolder = new MyViewHolderImage(LayoutInflater.from(mContext).inflate(R.layout.layout_mvh_image_item, parent, false));
        }
        return viewHolder;
    }

    @Override
    /**
     * Perform different operations according to the type of item
     */
    public void onBindViewHolder(@NonNull RecyclerView.ViewHolder holder, final int position) {
        if(getItemViewType(position) == 0) {
            ((MyViewHolderText)holder).mTv.setText("I am the text.");
            ((MyViewHolderText)holder).mTv.setOnClickListener(new View.OnClickListener() {
                @Override
                public void onClick(View v) {
                    mOnItemClickListener.onClick(position);
                }
            });
        } else {
            ((MyViewHolderImage)holder).mIv.setImageResource(R.drawable.pikaqiu);
            ((MyViewHolderImage)holder).mIv.setOnClickListener(new View.OnClickListener() {
                @Override
                public void onClick(View v) {
                    mOnItemClickListener.onClick(position);
                }
            });
        }
    }

    @Override
    /**
     * It is used to get the number of item s. The actual development is to get the length of the List
     */
    public int getItemCount() {
        return 30;
    }

    /**
     * Custom ViewHolder type 1, Text type
     */
    class MyViewHolderText extends RecyclerView.ViewHolder {

        private TextView mTv;

        public MyViewHolderText(@NonNull View itemView) {
            super(itemView);
            mTv = itemView.findViewById(R.id.tv_mvh);
        }
    }

    /**
     * Custom ViewHolder type 2, Image type
     */
    class MyViewHolderImage extends RecyclerView.ViewHolder {

        private ImageView mIv;

        public MyViewHolderImage(@NonNull View itemView) {
            super(itemView);
            mIv = itemView.findViewById(R.id.iv_mvh);
        }
    }

    /**
     * Write an interface to realize the second method of setting listening
     * That is, to instantiate this class, you need to implement this interface. In this way, you can
     */
    public interface OnItemClickListener {
        void onClick(int pos);
    }
}
February 9th
1. Learning objectives
- WebView
- Toast
- AlertDialog
2. Learning notes
2.1 WebView
Loading webpage
- Load URL (html file under network or local assets folder)
- Load HTML code
- Mutual call between Native and JavaScript
2.1.1 loading local html file
You need to create an asset folder in the main folder, put the html file in this folder, and load it with the following code.
mWvMain.loadUrl("file:///android_asset/test.html");
2.1.2 loading web pages
There are two steps:
- Set JavaScript support: mWvMain.getSettings().setJavaScriptEnabled(true);
- Call the load method: mWvMain.loadUrl("https://m.baidu.com");
2.1.3 WebViewClient
It is used to handle various notification and request events. Set WebViewClient mWvMain.setWebViewClient(new MyWebViewClient()) for a webView, where MyWebViewClient() is a custom class inherited from WebViewClient, overriding the following methods:
- Keep the loaded URL interface in the current WebView
	@Override
    public boolean shouldOverrideUrlLoading(WebView view, WebResourceRequest request) {
        return false;
    }
- At the beginning of loading the monitoring interface
	@Override
	public void onPageStarted(WebView view, String url, Bitmap favicon) {
	    super.onPageStarted(view, url, favicon);
	    Log.d("WebView", "Page Started");
	}
- At the end of loading the monitoring interface
    @Override
    public void onPageFinished(WebView view, String url) {
        super.onPageFinished(view, url);
        Log.d("WebView", "Page Finished");
    }
2.1.4 WebChromClient
The same as WebView client, except that WebChromClient is used to process dialog box, website icon, website title, loading progress, etc.
Set a WebChromClient for a WebView: mWvMain.setWebChromeClient(new MyWebChromeClient());
    public class MyWebChromeClient extends WebChromeClient {
        @Override
        public void onProgressChanged(WebView view, int newProgress) {
            super.onProgressChanged(view, newProgress);
        }

        @Override
        public void onReceivedTitle(WebView view, String title) {
            super.onReceivedTitle(view, title);
            setTitle(title);
        }
    }
2.1.4 return key in browsing
When entering the URL interface, if the return key is not set, the return key will directly exit the URL interface. To return to the previous URL interface, rewrite the listening method onKeyDown(int keyCode, KeyEvent event) in order. The code is as follows:
    @Override
    public boolean onKeyDown(int keyCode, KeyEvent event) {
        if(keyCode == KeyEvent.KEYCODE_BACK && mWvMain.canGoBack()) {
            mWvMain.goBack();
            return true;
        }
        return super.onKeyDown(keyCode, event);
    }
2.1.5 comprehensive code
public class WebViewActivity extends AppCompatActivity {

    private WebView mWvMain;
    @Override
    protected void onCreate(Bundle savedInstanceState) {
        super.onCreate(savedInstanceState);
        setContentView(R.layout.activity_web_view);
        mWvMain = findViewById(R.id.wv);
        // Load local html file
//        mWvMain.loadUrl("file:///android_asset/test.html");
        // Load network URL
        mWvMain.getSettings().setJavaScriptEnabled(true); // Setting support
        mWvMain.setWebViewClient(new MyWebViewClient()); // Handle various notification and request events
        mWvMain.setWebChromeClient(new MyWebChromeClient()); // Processing dialog box, site icon, site title, loading progress, etc
        mWvMain.loadUrl("https://m.baidu.com"); //
    }

    public class MyWebViewClient extends WebViewClient {
        @RequiresApi(api = Build.VERSION_CODES.LOLLIPOP)
        /**
         * Return true to terminate loading URL, return false to load URL in WebView
         */
        @Override
        public boolean shouldOverrideUrlLoading(WebView view, WebResourceRequest request) {
            return false;
        }

        @Override
        public void onPageStarted(WebView view, String url, Bitmap favicon) {
            super.onPageStarted(view, url, favicon);
            Log.d("WebView", "Page Started");
        }

        @Override
        public void onPageFinished(WebView view, String url) {
            super.onPageFinished(view, url);
            Log.d("WebView", "Page Finished");
        }
    }

    public class MyWebChromeClient extends WebChromeClient {
        @Override
        public void onProgressChanged(WebView view, int newProgress) {
            super.onProgressChanged(view, newProgress);
        }

        @Override
        public void onReceivedTitle(WebView view, String title) {
            super.onReceivedTitle(view, title);
            setTitle(title);
        }
    }

    @Override
    public boolean onKeyDown(int keyCode, KeyEvent event) {
        if(keyCode == KeyEvent.KEYCODE_BACK && mWvMain.canGoBack()) {
            mWvMain.goBack();
            return true;
        }
        return super.onKeyDown(keyCode, event);
    }
}
2.2 Toast
Is a message pop-up prompt component
- Default call: Toast.makeText(getApplicationContext(), "Toast", Toast.LENGTH_SHORT).show();
- Adjust location: toastCenter.setGravity(Gravity.CENTER, 0, 0);
- Custom pattern: toastCustom.setView(view);
switch (v.getId()){
    case R.id.btn_toast_1: // Default condition
        Toast.makeText(getApplicationContext(), "Toast", Toast.LENGTH_SHORT).show();
        break;
    case R.id.btn_toast_2: // Adjusting position
        Toast toastCenter = Toast.makeText(getApplicationContext(), "Toast", Toast.LENGTH_SHORT);
        toastCenter.setGravity(Gravity.CENTER, 0, 0);
        toastCenter.show(); ;
    case R.id.btn_toast_3: // Custom pattern
        Toast toastCustom = new Toast(ToastActivity.this);
        View view = LayoutInflater.from(ToastActivity.this).inflate(R.layout.layout_toast_item, null);
        ImageView imageView = view.findViewById(R.id.iv_toast);
        TextView textView = view.findViewById(R.id.tv_toast);
        imageView.setImageResource(R.drawable.icon_smile);
        textView.setText("I am a Toast");
        toastCustom.setView(view);
        toastCustom.setDuration(Toast.LENGTH_SHORT);
        toastCustom.show();
        break;
}
2.3 AlertDialog
A message dialog box will pop up. Use the builder to manage. For specific methods, see the method introduction in the builder. New Builder: AlertDialog.Builder builder5 = new AlertDialog.Builder(DialogActivity.this);
Realize 5 kinds of dialog boxes
switch (v.getId()) {
    case R.id.btn_dialog_1:
        AlertDialog.Builder builder1 = new AlertDialog.Builder(DialogActivity.this);
        builder1.setTitle("Please answer the questions").setMessage("I am not handsome.?").setIcon(R.drawable.icon_smile)
                .setPositiveButton("Handsome", new DialogInterface.OnClickListener() {
                    @Override
                    public void onClick(DialogInterface dialog, int which) {
                        Toast.makeText(DialogActivity.this, "Have vision", Toast.LENGTH_SHORT).show();
                    }
                }).setNegativeButton("commonly", new DialogInterface.OnClickListener() {
            @Override
            public void onClick(DialogInterface dialog, int which) {
                Toast.makeText(DialogActivity.this, "Fuck", Toast.LENGTH_SHORT).show();
            }
        }).setNeutralButton("It's not bad", new DialogInterface.OnClickListener() {
            @Override
            public void onClick(DialogInterface dialog, int which) {
                Toast.makeText(DialogActivity.this, "Think again.", Toast.LENGTH_SHORT).show();
            }
        }).show();
        break;
    case R.id.btn_dialog_2:
        final String[] array2 = new String[]{"boy", "girl"};
        AlertDialog.Builder builder2 = new AlertDialog.Builder(DialogActivity.this);
        builder2.setTitle("What's your sex?").setItems(array2, new DialogInterface.OnClickListener() {
            @Override
            public void onClick(DialogInterface dialog, int which) {
                Toast.makeText(DialogActivity.this, array2[which], Toast.LENGTH_SHORT).show();
            }
        }).show();
        break;
    case R.id.btn_dialog_3: // Single election
        final String[] array3 = new String[]{"boy", "girl"};
        AlertDialog.Builder builder3 = new AlertDialog.Builder(DialogActivity.this);
        builder3.setTitle("What's your sex?").setSingleChoiceItems(array3, 1, new DialogInterface.OnClickListener() {
            @Override
            public void onClick(DialogInterface dialog, int which) {
                Toast.makeText(DialogActivity.this, array3[which], Toast.LENGTH_SHORT).show();
            }
        }).show();
        break;
    case R.id.btn_dialog_4: // Multiple selection
        final String[] array4 = new String[]{"boy", "girl", "I don't know!"};
        boolean[] isSelected = new boolean[]{false, false, true};
        AlertDialog.Builder builder4 = new AlertDialog.Builder(DialogActivity.this);
        builder4.setTitle("What's your sex?").setMultiChoiceItems(array4, isSelected, new DialogInterface.OnMultiChoiceClickListener() {
            @Override
            public void onClick(DialogInterface dialog, int which, boolean isChecked) {
                Toast.makeText(DialogActivity.this, array4[which], Toast.LENGTH_SHORT).show();
            }
        }).setPositiveButton("Determine", new DialogInterface.OnClickListener() {
            @Override
            public void onClick(DialogInterface dialog, int which) {
                Toast.makeText(DialogActivity.this, "Determine", Toast.LENGTH_SHORT).show();
            }
        }).setNegativeButton("cancel", new DialogInterface.OnClickListener() {
            @Override
            public void onClick(DialogInterface dialog, int which) {
                Toast.makeText(DialogActivity.this, "cancel", Toast.LENGTH_SHORT).show();
            }
        }).show();
        break;
    case R.id.btn_dialog_5: // Custom View
        AlertDialog.Builder builder5 = new AlertDialog.Builder(DialogActivity.this);
        View view = LayoutInflater.from(DialogActivity.this).inflate(R.layout.layout_dialog, null);
        builder5.setView(view).setTitle("Please login first.").show();
        break;
}
February 10th
1. Learning tasks
- ProgressBar and ProgressDialog
- Custom Dialog
- PopupWindow
2. Learning notes
2.1 PressingDialog and PressingBar
The former is the progress bar, the latter is the progress dialog box, which has been abandoned in API26. I will not learn it here. It's quite simple
Here are a few styles of progress bars. You can also custom style , not to mention custom style here, just search again when necessary
<LinearLayout xmlns:android="http://schemas.android.com/apk/res/android"
    android:layout_width="match_parent"
    android:layout_height="match_parent"
    android:orientation="vertical"
    android:layout_margin="10dp">

    <ProgressBar
        android:id="@+id/rb_def"
        android:layout_width="wrap_content"
        android:layout_height="wrap_content"
        android:layout_gravity="center"
        android:visibility="visible"/>
    <ProgressBar
        android:id="@+id/rb_style_1"
        android:layout_width="wrap_content"
        android:layout_height="wrap_content"
        android:layout_gravity="center"
        style="@android:style/Widget.ProgressBar"
        android:layout_marginTop="10dp"/>
    <ProgressBar
        android:id="@+id/rb_style_2"
        android:layout_width="match_parent"
        android:layout_height="wrap_content"
        style="@android:style/Widget.ProgressBar.Horizontal"
        android:progress="10"
        android:secondaryProgress="30"
        android:layout_marginTop="10dp"/>
    <ProgressBar
        android:id="@+id/rb_style_3"
        android:layout_width="match_parent"
        android:layout_height="wrap_content"
        style="@android:style/Widget.Holo.ProgressBar.Horizontal"
        android:progress="20"
        android:secondaryProgress="30"
        android:layout_marginTop="10dp"/>
    <ProgressBar
        android:id="@+id/rb_style_4"
        android:layout_width="match_parent"
        android:layout_height="wrap_content"
        style="@android:style/Widget.DeviceDefault.ProgressBar.Horizontal"
        android:progress="20"
        android:secondaryProgress="30"
        android:layout_marginTop="10dp"/>

</LinearLayout>
It's all written, so attach the code
mBtnProgressDialog1.setOnClickListener(new View.OnClickListener() {
    @Override
    public void onClick(View v) {
        ProgressDialog progressDialog = new ProgressDialog(ProgressActivity.this);
        progressDialog.setTitle("One moment please");
        progressDialog.setMessage("Loading");
        progressDialog.setOnCancelListener(new DialogInterface.OnCancelListener() {
            @Override
            public void onCancel(DialogInterface dialog) {
                Toast.makeText(ProgressActivity.this, "Load complete", Toast.LENGTH_SHORT).show();
            }
        });
        progressDialog.setCancelable(false); // Return is not allowed. Only when the load is completed can progressDialog.setCancelable(true) be called to cancel the load
        progressDialog.setCancelable(true);
        progressDialog.show();
    }
});
2.2 custom Dialog
- Custom Dialog class inherits from Dialog
- Rewrite onCreate() method, corresponding to the last CustomDialog layout file, get the controls on the layout file, set the variables for each control to store data, and write out their setter() and getter() methods
- Let this custom class CustomDialog implement the interface View.OnClickListener, set the click event listener for the relevant controls, rewrite the onClick() method, and invoke the method of customizing the interface in CustomDialog in the onClick() method, so that you can use the instance of CustomDialog to import the custom interface and rewrite the custom interface.
The custom class CustomDialog code is as follows:
public class CustomDialog extends Dialog implements View.OnClickListener{

    private TextView mTvTittle, mTvMassage, mTvPositive, mTvNegative;
    private String tittle, massage, positive, negative;
    private IOnNegativeListener negativeListener;
    private IOnPositiveListener positiveListener;

    public CustomDialog(@NonNull Context context) {
        super(context);
    }

    public CustomDialog(@NonNull Context context, int themeResId) {
        super(context, themeResId);
    }

    @Override
    protected void onCreate(Bundle savedInstanceState) {
        super.onCreate(savedInstanceState);
        setContentView(R.layout.layout_custom_dialog);
        mTvTittle = findViewById(R.id.tv_tittle);
        mTvMassage = findViewById(R.id.tv_massage);
        mTvPositive = findViewById(R.id.tv_positive);
        mTvNegative = findViewById(R.id.tv_negative);
        if (!TextUtils.isEmpty(tittle)) {
            mTvTittle.setText(tittle);
        }
        if (!TextUtils.isEmpty(massage)) {
            mTvMassage.setText(massage);
        }
        if (!TextUtils.isEmpty(positive)) {
            mTvPositive.setText(positive);
        }
        if (!TextUtils.isEmpty(negative)) {
            mTvNegative.setText(negative);
        }
        mTvPositive.setOnClickListener(this);
        mTvNegative.setOnClickListener(this);
    }


    public String getTittle() {
        return tittle;
    }


    public CustomDialog setTittle(String tittle) {
        this.tittle = tittle;
        return this;
    }

    public String getMassage() {
        return massage;
    }

    public CustomDialog setMassage(String massage) {
        this.massage = massage;
        return this;
    }

    public String getPositive() {
        return positive;
    }

    public CustomDialog setPositive(String positive, IOnPositiveListener positiveListener) {
        this.positive = positive;
        this.positiveListener = positiveListener;
        return this;
    }

    public String getNegative() {
        return negative;
    }

    public CustomDialog setNegative(String negative, IOnNegativeListener negativeListener) {
        this.negative = negative;
        this.negativeListener = negativeListener;
        return this;
    }

    @Override
    public void onClick(View v) {
        switch (v.getId()){
            case R.id.tv_positive:
                positiveListener.positive(this);
                break;
            case R.id.tv_negative:
                negativeListener.negative(this);
                break;
        }
    }

    public interface IOnPositiveListener {
        void positive(CustomDialog customDialog);
    }

    public  interface IOnNegativeListener {
        void negative(CustomDialog customDialog);
    }
}
Code of layout file
<LinearLayout xmlns:android="http://schemas.android.com/apk/res/android"
    android:layout_width="match_parent"
    android:layout_height="wrap_content"
    android:orientation="vertical"
    android:background="@drawable/layout_dialog">

    <TextView
        android:id="@+id/tv_tittle"
        android:layout_width="match_parent"
        android:layout_height="wrap_content"
        android:text="Tips"
        android:textSize="20sp"
        android:gravity="center"
        android:textColor="@color/colorGray"
        android:layout_margin="20dp"/>

    <TextView
        android:id="@+id/tv_massage"
        android:layout_width="match_parent"
        android:layout_height="wrap_content"
        android:text="Confirm deletion?"
        android:textSize="20sp"
        android:gravity="center"
        android:textColor="@color/colorBlack"
        android:layout_margin="20dp"/>

    <View
        android:layout_width="match_parent"
        android:layout_height="1dp"
        android:background="@color/colorLightGray"
        android:layout_marginTop="20dp"/>

    <LinearLayout
        android:layout_width="match_parent"
        android:layout_height="50dp"
        android:orientation="horizontal">

        <TextView
            android:id="@+id/tv_positive"
            android:layout_width="match_parent"
            android:layout_height="match_parent"
            android:text="Determine"
            android:textSize="20sp"
            android:textColor="@color/colorLightGrayishBlue"
            android:gravity="center"
            android:layout_weight="1"/>
        <View
            android:layout_width="1dp"
            android:layout_height="match_parent"
            android:background="@color/colorLightGray"/>
        <TextView
            android:id="@+id/tv_negative"
            android:layout_width="match_parent"
            android:layout_height="match_parent"
            android:text="cancel"
            android:textSize="20dp"
            android:textColor="@color/colorLightGrayishBlue"
            android:gravity="center"
            android:layout_weight="1"/>
    </LinearLayout>

</LinearLayout>
Use custom class CustomDialog
protected void onCreate(Bundle savedInstanceState) {
    super.onCreate(savedInstanceState);
    setContentView(R.layout.activity_custom_dialog);
    mBtnCustomDialog1 = findViewById(R.id.btn_custom_dialog_1);
    mBtnCustomDialog1.setOnClickListener(new View.OnClickListener() {
        @Override
        public void onClick(View v) {
            CustomDialog customDialog = new CustomDialog(CustomDialogActivity.this);
            customDialog.setTittle("Tips").setMassage("Are you sure to delete?").setPositive("Determine", new CustomDialog.IOnPositiveListener() {
                @Override
                public void positive(CustomDialog customDialog) {

                }
            }).setNegative("cancel", new CustomDialog.IOnNegativeListener() {
                @Override
                public void negative(CustomDialog customDialog) {

                }
            }).show();
        }
    });
}
2.3 PopupWindow
It is a container. You can put the View in it. By designing a monitor, you can click the pop-up View
    protected void onCreate(Bundle savedInstanceState) {
        super.onCreate(savedInstanceState);
        setContentView(R.layout.activity_popup_window);
        mBtnPop = findViewById(R.id.btn_pop);
        mBtnPop.setOnClickListener(new View.OnClickListener() {
            @Override
            public void onClick(View v) {
                View view = getLayoutInflater().inflate(R.layout.layout_pop, null);
                mPop = new PopupWindow(view, mBtnPop.getWidth(), ViewGroup.LayoutParams.WRAP_CONTENT);
                mPop.setOutsideTouchable(true);
                mPop.setFocusable(true);
//                mPop.setAnimationStyle();
                mPop.showAsDropDown(mBtnPop);
                final TextView textView = view.findViewById(R.id.tv_1);
                textView.setOnClickListener(new View.OnClickListener() {
                    @Override
                    public void onClick(View v) {
                        Toast.makeText(PopupWindowActivity.this, textView.getText(), Toast.LENGTH_SHORT).show();
                        mPop.dismiss();
                        //do something
                    }
                });

            }
        });
    }
Layout file
// R. Layout.layout ABCD pop layout file
<LinearLayout xmlns:android="http://schemas.android.com/apk/res/android"
    android:orientation="vertical" android:layout_width="match_parent"
    android:layout_height="match_parent" android:layout_margin="5dp">

    <TextView
        android:id="@+id/tv_1"
        android:layout_width="match_parent"
        android:layout_height="wrap_content"
        android:text="Apple"
        android:gravity="center"
        android:padding="5dp"/>
    <View
        android:layout_width="match_parent"
        android:layout_height="1dp"
        android:background="@color/colorGray"/>
    <TextView
        android:id="@+id/tv_2"
        android:layout_width="match_parent"
        android:layout_height="wrap_content"
        android:text="Snow pear"
        android:gravity="center"
        android:padding="5dp"/>
    <View
        android:layout_width="match_parent"
        android:layout_height="1dp"
        android:background="@color/colorGray"/>
    <TextView
        android:id="@+id/tv_3"
        android:layout_width="match_parent"
        android:layout_height="wrap_content"
        android:text="Banana"
        android:gravity="center"
        android:padding="5dp"/>

</LinearLayout>
February 11th
1. Learning objectives
- Activity
- Fragmen
2. Learning notes
2.1 Activity
2.1.1 what is Activity?
Activity is mainly used for control. It can select the View to display, or get data from the View, then transfer the data to the Model layer for processing, and finally display the processing results.
2.1.2 there are three steps to create a new avitivity
- The creation class inherits from the Activity class or its subclass, such as: public class UIActivity extends AppCompatActivity {
- Declare in the Android manifest file, for example: < activity Android: name = ". Uiactivity" / >
- Create a layout file and set it in the overridden onCreate() method, such as: setcontentview (r.layout. Activity? UI); (this step is usually required, but not required)
2.1.3 set relevant attributes of avitivity in Android manifest
| attribute | Effect |
|---|---|
| label | Set the text content of the top column, action bar |
| theme | Set the theme, which can be set in the application tab, so that it can be used in all activities |
| screenOrientation | Direction, vertical or horizontal screen, or full screen |
| intent-filter | This label can set the startup item |
2.1.4 life cycle of activity
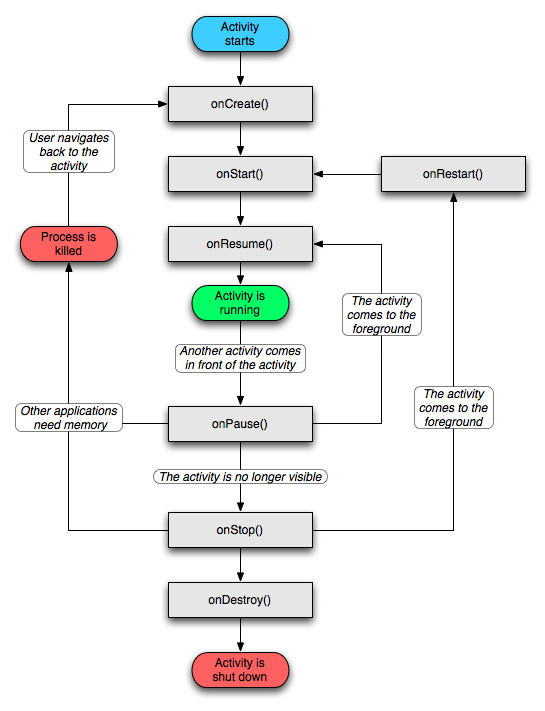
Print logs to see how the lifecycle works
public class LifeCycleActivity extends AppCompatActivity {

    private String eTag = "LifeCycle";
    @Override
    protected void onCreate(@Nullable Bundle savedInstanceState) {
        super.onCreate(savedInstanceState);
        setContentView(R.layout.activity_life_cycle);
        Log.e(eTag, "onCreate");
    }

    @Override
    protected void onStart() {
        super.onStart();
        Log.e(eTag, "onStart");
    }

    @Override
    protected void onResume() {
        super.onResume();
        Log.e(eTag, "onResume");
    }

    @Override
    protected void onPause() {
        super.onPause();
        Log.e(eTag, "onPause");
    }

    @Override
    protected void onStop() {
        super.onStop();
        Log.e(eTag, "onStop");
    }

    @Override
    protected void onDestroy() {
        super.onDestroy();
        Log.e(eTag, "onDestroy");
    }
}
2.1.5 jump of activity
Generally, it's better to use explicit 1. Others should be understood
- There are four ways to jump to Activity explicitly: 2
// One way
// First parameter: current Activity. Second parameter: target Activity
Intent intent = new Intent(JumpActivity.this, TargetActivity.class);
startActivity(intent);

// Mode two
Intent intent = new Intent();
intent.setClass(JumpActivity.this, TargetActivity.class);
startActivity(intent);

// Mode three
Intent intent = new Intent();
intent.setClassName(JumpActivity.this, "com.example.learningandroid.activity.jump.TargetActivity");
startActivity(intent);

// Mode four
Intent intent = new Intent();
intent.setComponent(new ComponentName(JumpActivity.this, "com.example.learningandroid.activity.jump.TargetActivity"));
startActivity(intent);
- Implicit jump Activity
You need to add a label in the target Activity of the Android manifest file, as follows:
// The first string starts at will, and the corresponding one is OK. The second string must be DEFAULT
<intent-filter>
    <action android:name="android.intent.action.jumpto" />

    <category android:name="android.intent.category.DEFAULT" />
</intent-filter>
And then you can use explicit jumps
Intent intent = new Intent();
intent.setAction("android.intent.action.jumpto");
startActivity(intent);
2.1.6 data transfer of activity
- Put: uses the key value to Bundle, enters the value put to be passed in, and then calls the putExtras() method of intent to transmit Bundle.
Intent intent = new Intent(JumpActivity.this, TargetActivity.class);
Bundle bundle = new Bundle();
bundle.putString("name", "A smile");
bundle.putInt("old", 18);
intent.putExtras(bundle);
- Get, call getIntent() method to get the Intent object, and then call getExtras(); method to get the Bundle object and then call get method to get the data
Bundle bundle = getIntent().getExtras();
mTv.setText(bundle.getString("name") + bundle.getInt("old"));
-
startActivityForResult() and setResult
In order to meet this requirement: jump to another Activity, return to the original Activity after processing the data, and return the data at the same time. These two methods are needed
// In the current Activity:
// This is the way to jump to * Activity *
startActivityForResult(intent, 0);
// At the same time, the onActivityResult() method should be rewritten to obtain the data returned. The data is in the data type
@Override
protected void onActivityResult(int requestCode, int resultCode, @Nullable Intent data) {
    super.onActivityResult(requestCode, resultCode, data);
    Toast.makeText(JumpActivity.this, data.getExtras().getString("content"), Toast.LENGTH_LONG).show();
}
// In the target Activity:
// Set the button, click to return to the original * Activity *, and call the * setResult() * method to return data, and the * finish() * method to close the current * Activity*
mBtnBack.setOnClickListener(new View.OnClickListener() {
    @Override
    public void onClick(View v) {
        Intent intent = new Intent();
        Bundle bundle1 = new Bundle();
        bundle1.putString("content", "I'm back!");
        intent.putExtras(bundle1);
        setResult(Activity.RESULT_OK, intent);
        finish();
    }
});
2.1.7 four startup modes of activity
Android's Activity is managed by the stack. Every time an Activity is started, it will be put into the stack. Press the return key to remove an Activity from the top of the stack
In the Android manifest file, you can set the startup mode: android:launchMode, and the task stack Name: android:taskAffinity. This is equivalent to a new task stack, and all the rest are put here
There are four startup modes: you can refer to Figure 4 startup modes
- Standard: standar d mode, default. Every time an Activity is started, a new instance will be created (heap up)
- Singletop: task stack top reuse mode. When the Activity to be started is at the top of the stack, the instance will not be created, but the Activity at the top of the stack will be reused, and its onNewIntent() method will be called. If the target Activity is not at the top of the stack, it is the same as the standard mode (reuse it if the top is repeated)
- Single task: task stack reuse mode. When the Activity to be started is in the stack, the instance will not be created, but the Activity at the top of the stack will be reused, and its onNewIntent() method will be called. At the same time, all the activities above the Activity will be cleared. If the target Activity is not in the stack, it is the same as the standard mode (reuse it if it is repeated in the stack, and make it clear by clearing Become the top)
- Single instance: global single instance mode. There is only one Activity in a task stack, and global reuse
2.2 Fragment
2.2.1 what is Fragment
Fragment is a kind of UI fragment that can be embedded in activities. It can make the program more reasonable and make full use of the space of large screen, so it is widely used in tablet. Although debris should be a new concept for you, I believe it should be effortless for you to learn, because it is so similar to activities, it can also contain layout and have its own life cycle. You can even think of fragments as a mini activity, although this mini activity may be the same size as a normal activity.
emmm... If I don't think it's useful, I won't learn

