For reprinting, please indicate the source: http://www.cnblogs.com/cnwutianhao/p/6640649.html
Reference: https://github.com/ljgsonx/adaptiveStatusBar
Google added a translucent interface style to Android 4.4 and introduced the concept of Material Design in Android 5.0.
The addition of these styles makes the original rigid, ugly, and App color inconsistent notice boards more friendly, pleasant and user-friendly.
The author has been working on Japanese projects all the year round. Japanese projects are famous for their simple interface and powerful functions. Recently, customers have asked for some UI changes to make App look and feel more user-friendly. So I mentioned the notification bar after Android 4.4.
Online articles about notice boards are overwhelming, what is immersive, what is translucent... Very good at dragging words. There are many Android gods who have written similar articles, but can you read them? Long story, the programmer is tired enough, where have those time to see you there wheeled chat flying in the sky, said a lot of expression do not understand, waste time, write a pile of garbage articles.
This article eliminates redundancy and achieves the simplest and most practical. It is not the amount of code that is used to compare Japanese projects, but the smallest amount of code to write the most beautiful program.
The corresponding project has been uploaded to Github. Welcome Star and Fork. Address: https://github.com/cnwutianhao/ImmersiveDemo
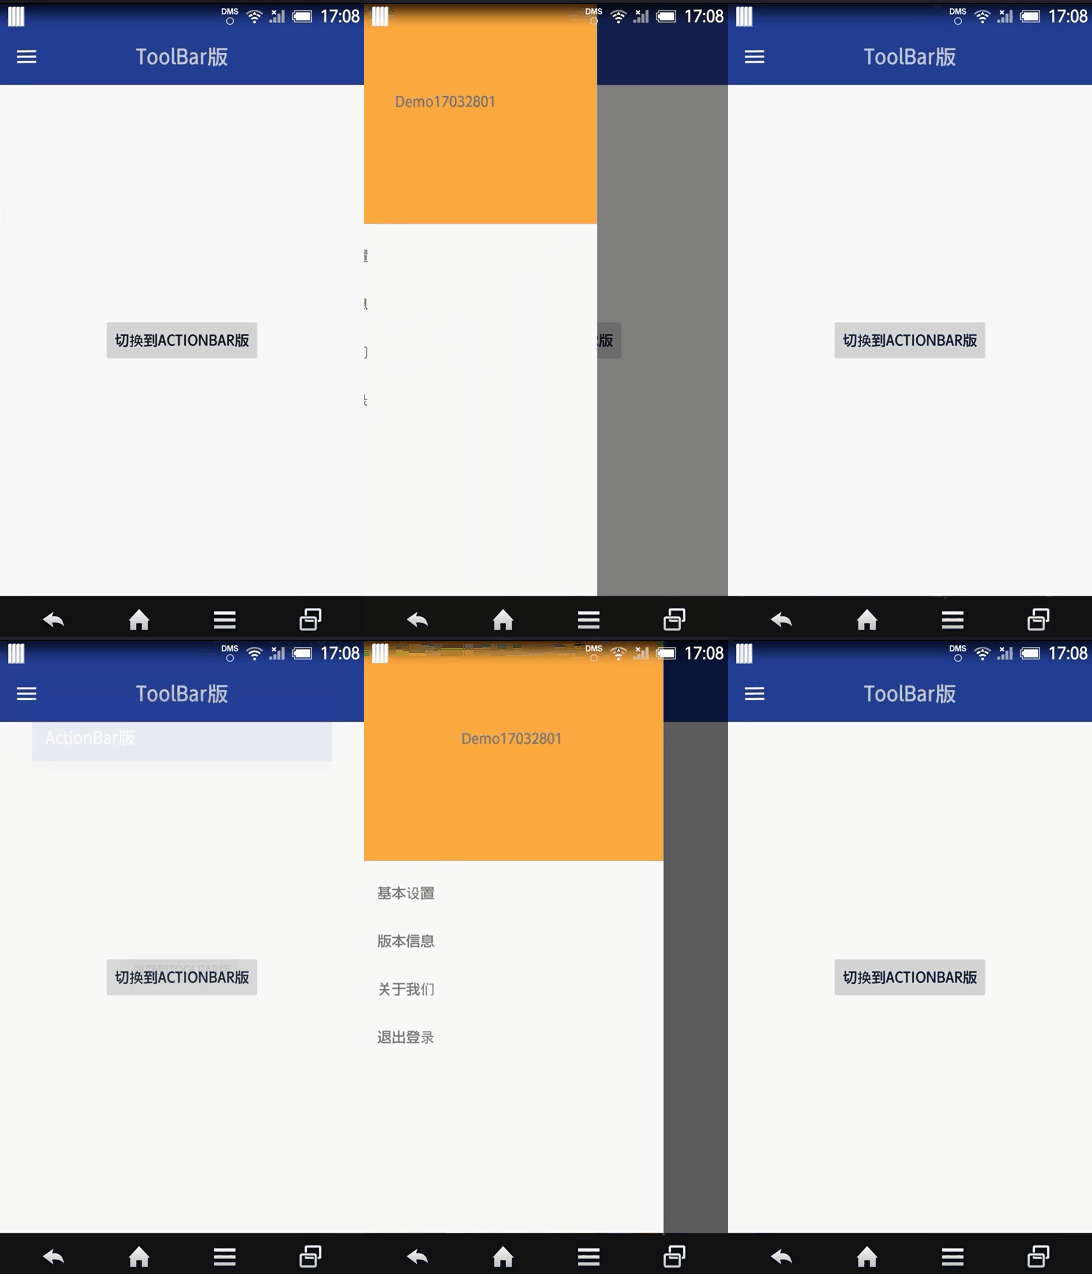
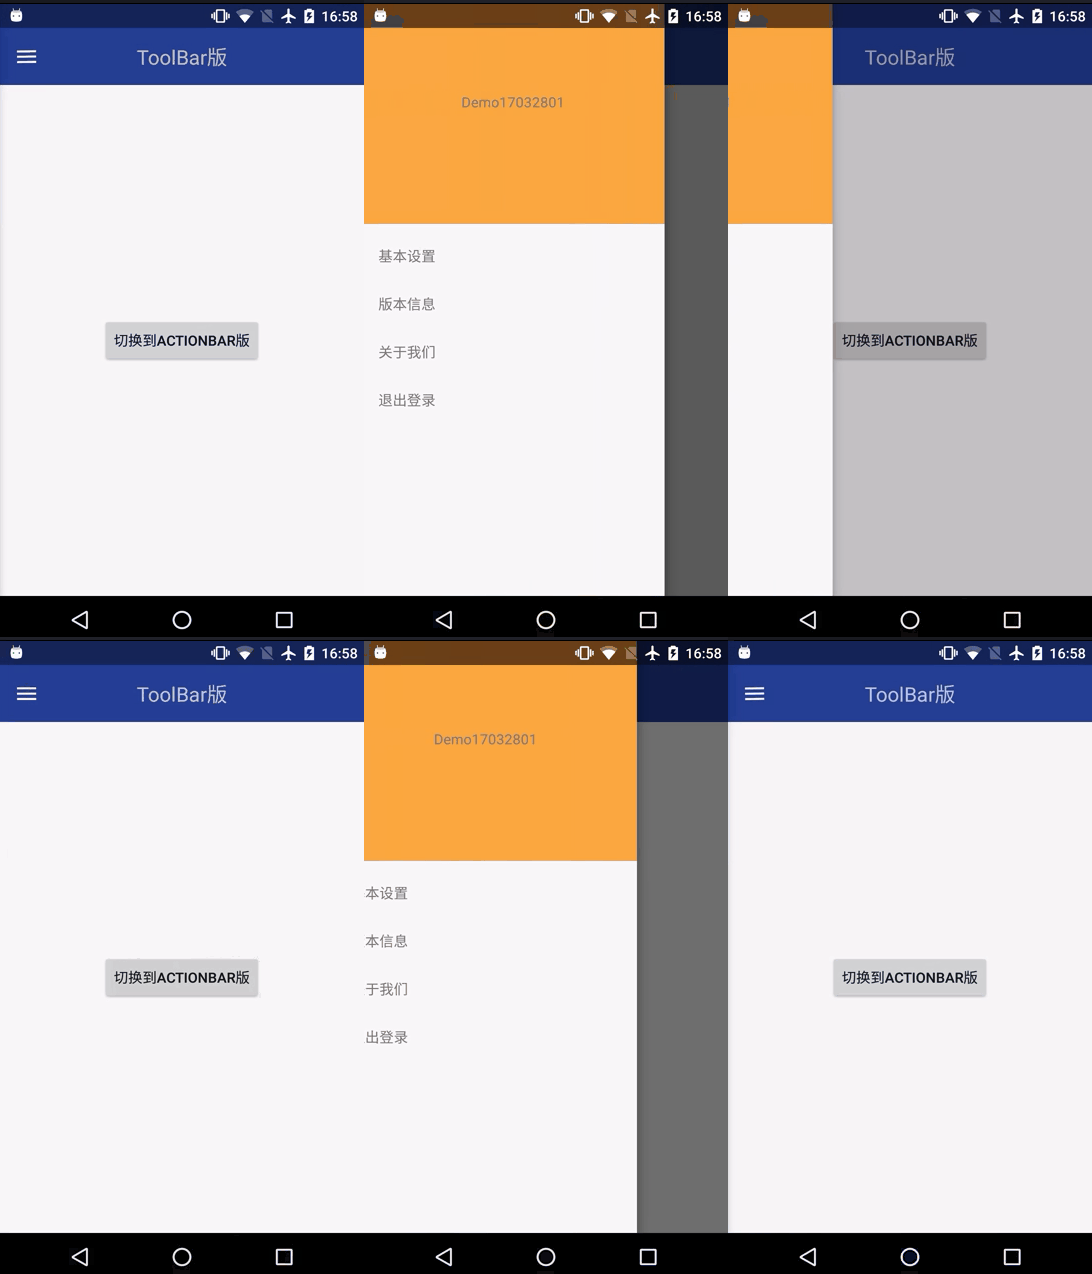
First, the Gif chart, Android 4.4 and Android 6.0 are used to compare the style effects.
Android 4.4 Android 6.0


There are two ways to achieve style effects
①DrawerLayout+Toolbar
②ActionBar
Now we'll implement it one by one.
①DrawerLayout+Toolbar
Adding dependency libraries (provided by Google)
compile 'com.android.support:design:25.3.1'
Layout Code 1: Drawer Layout is used as the outermost layer and Navigation View side drawer control is introduced.
<?xml version="1.0" encoding="utf-8"?>
<android.support.v4.widget.DrawerLayout xmlns:android="http://schemas.android.com/apk/res/android"
    xmlns:app="http://schemas.android.com/apk/res-auto"
    xmlns:tools="http://schemas.android.com/tools"
    android:id="@+id/id_drawerlayout"
    android:layout_width="match_parent"
    android:layout_height="match_parent"
    tools:context="com.tnnowu.android.demo17032801.MainActivity">

    <include layout="@layout/content_layout" />

    <android.support.design.widget.NavigationView
        android:id="@+id/id_navigationview"
        android:layout_width="match_parent"
        android:layout_height="match_parent"
        android:layout_gravity="left"
        app:itemTextColor="@color/c_light_gray3" />

</android.support.v4.widget.DrawerLayout>
Layout code 2: Inside nested Toolbar
<?xml version="1.0" encoding="utf-8"?>
<LinearLayout xmlns:android="http://schemas.android.com/apk/res/android"
    xmlns:app="http://schemas.android.com/apk/res-auto"
    android:layout_width="match_parent"
    android:layout_height="match_parent"
    android:orientation="vertical">

    <android.support.v7.widget.Toolbar
        android:id="@+id/toolbar"
        android:layout_width="match_parent"
        android:layout_height="wrap_content"
        android:background="#30469b"
        android:paddingTop="@dimen/toolbar_padding_top"
        app:popupTheme="@style/ThemeOverlay.AppCompat.Light"
        app:theme="@style/ThemeOverlay.AppCompat.Dark.ActionBar">

        <TextView
            android:layout_width="wrap_content"
            android:layout_height="wrap_content"
            android:layout_gravity="center"
            android:text="ToolBar edition"
            android:textSize="20sp" />

    </android.support.v7.widget.Toolbar>

    <!--Content Display Layout-->
    <RelativeLayout
        android:layout_width="match_parent"
        android:layout_height="match_parent">

        <Button
            android:id="@+id/goToActionBar"
            android:layout_width="wrap_content"
            android:layout_height="wrap_content"
            android:layout_centerInParent="true"
            android:text="switch to ActionBar edition" />
    </RelativeLayout>

</LinearLayout>
Style Style: No ActionBar
<style name="AppThemeNoActionBar" parent="Theme.AppCompat.Light.NoActionBar">
    <!-- Customize your theme here. -->
    <item name="colorPrimary">@color/colorPrimary</item>
    <item name="colorPrimaryDark">@color/colorPrimaryDark</item>
    <item name="colorAccent">@color/colorAccent</item>
</style>
Main program code: In addition to initializing DrawerLayout, Navigation View, Toolbar control, i.e. initViews() in onCreate(), add mobile phone system version judgment and corresponding style adaptation initImmersive() in onCreate().
private void initViews() {
        mDrawerLayout = (DrawerLayout) findViewById(R.id.id_drawerlayout);
        mNagigationView = (NavigationView) findViewById(R.id.id_navigationview);
        mNagigationView.inflateHeaderView(R.layout.header_nav);
        mNagigationView.inflateMenu(R.menu.menu_nav);
        mToolbar = (Toolbar) findViewById(R.id.toolbar);
        mBtn = (Button) findViewById(R.id.goToActionBar);
        mToolbar.setTitle("");
        if (mToolbar != null) {
            setSupportActionBar(mToolbar);
        }
        ActionBarDrawerToggle mActionBarDrawerToggle = new ActionBarDrawerToggle(this, mDrawerLayout, mToolbar, R.string.open, R.string.close);
        mActionBarDrawerToggle.syncState();
        mDrawerLayout.setDrawerListener(mActionBarDrawerToggle);
        mBtn.setOnClickListener(new View.OnClickListener() {
            @Override
            public void onClick(View v) {
                startActivity(new Intent(MainActivity.this, DemoActionBarActivity.class));
            }
        });
    }
private void initImmersive() {
        if (Build.VERSION.SDK_INT >= Build.VERSION_CODES.KITKAT) {
            WindowManager.LayoutParams localLayoutParams = getWindow().getAttributes();
            localLayoutParams.flags = (WindowManager.LayoutParams.FLAG_TRANSLUCENT_STATUS | localLayoutParams.flags);
            if (Build.VERSION.SDK_INT < Build.VERSION_CODES.LOLLIPOP) {
                //Extend the top of the sidebar to status bar
                mDrawerLayout.setFitsSystemWindows(true);
                //Extend the top of the main page to status bar;Although the default is false,But it has been tested.,DrawerLayout Need to display settings
                mDrawerLayout.setClipToPadding(false);
            }
        }
    }
In this way, Drawlayout + Toolbar implements style changes.
②ActionBar
Layout code
<?xml version="1.0" encoding="utf-8"?>
<LinearLayout xmlns:android="http://schemas.android.com/apk/res/android"
    android:layout_width="match_parent"
    android:layout_height="match_parent"
    android:background="@color/colorPrimary"
    android:fitsSystemWindows="true"
    android:orientation="vertical">

    <!--Content Display Layout-->
    <RelativeLayout
        android:layout_width="match_parent"
        android:layout_height="match_parent"
        android:background="@color/c_light_white">

        <Button
            android:id="@+id/goBack"
            android:layout_width="wrap_content"
            android:layout_height="wrap_content"
            android:layout_centerInParent="true"
            android:text="Back to ToolBar edition" />
    </RelativeLayout>

</LinearLayout>
Style Style: ActionBar
<style name="AppThemeActionBar" parent="Theme.AppCompat.Light.DarkActionBar">
    <!-- Customize your theme here. -->
    <item name="colorPrimary">@color/colorPrimary</item>
    <item name="colorPrimaryDark">@color/colorPrimaryDark</item>
    <item name="colorAccent">@color/colorAccent</item>
</style>
Main program code:
public class DemoActionBarActivity extends AppCompatActivity {

    private Button mBtn;

    @Override
    protected void onCreate(Bundle savedInstanceState) {
        super.onCreate(savedInstanceState);
        setContentView(R.layout.activity_main_actionbar);

        if (Build.VERSION.SDK_INT >= Build.VERSION_CODES.KITKAT) {
            WindowManager.LayoutParams localLayoutParams = getWindow().getAttributes();
            localLayoutParams.flags = (WindowManager.LayoutParams.FLAG_TRANSLUCENT_STATUS | localLayoutParams.flags);

        }

        initView();
    }

    private void initView() {
        mBtn = (Button) findViewById(R.id.goBack);
        mBtn.setOnClickListener(new View.OnClickListener() {
            @Override
            public void onClick(View v) {
                finish();
            }
        });
    }

}
In this way, ActionBar implements style changes.
No redundant code. Why don't you try to use the code that is used by all Japanese projects?
follow My Sina Weibo Get more information about Android development!
follow Science and Technology Critics Understand technology, innovation, education and maximize human wisdom and imagination!