##The focus is face detection, detection, detection.
Is to detect the face, not recognition, not recognition. The meaning of recognition is to detect the face, and obtain the face recognition degree through data comparison and algorithm analysis. And detection is just detection.
For the whole network about Android OpenCV recognition XXX and other titles, but actually only the relevant articles that have been tested, ha ha
####Back to the point
How to preview the video and perform face detection?
###(1) Preview video
You can directly use the JavaCameraView control in the OpenCV library to preview the video.
####1. Declare the object in the layout:
<?xml version="1.0" encoding="utf-8"?>
<RelativeLayout xmlns:android="http://schemas.android.com/apk/res/android"
    android:layout_width="match_parent"
    android:layout_height="match_parent">

    <org.opencv.android.JavaCameraView
        android:id="@+id/activity_main_camera_view"
        android:layout_width="match_parent"
        android:layout_height="match_parent" />

</RelativeLayout>
####2. In the layout, directly call the enableView() method of the object to preview.
Note: permission application is a clich é. I won't be wordy here.
###(2) Construction of detection classifier
In OpenCV, cascade classifier is used for classifier data processing. First of all, building a classifier requires a data source, and OpenCV official has a classifier data source for face detection that can be used directly. Here you can take it directly. The path of the file is in the OpenCV Android SDK \ SDK \ etc \ lbpcascades directory in the downloaded resource file. If you don't understand the process of building the project, you can read my last article
OpenCV import
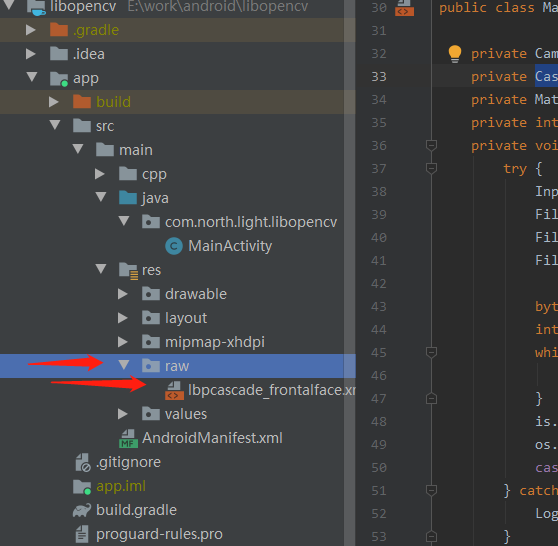
Copy the classifier data to the res raw directory of the main project, and create a new one without this directory. After copying, see the following figure:

Then, before application detection, copy the classifier data to the local and initialize the classifier. The code is as follows:
try {
            InputStream is = getResources().openRawResource(R.raw.lbpcascade_frontalface);
            File cascadeDir = getDir("cascade", Context.MODE_PRIVATE);
            File mCascadeFile = new File(cascadeDir, "lbpcascade_frontalface.xml");
            FileOutputStream os = new FileOutputStream(mCascadeFile);

            byte[] buffer = new byte[4096];
            int bytesRead;
            while ((bytesRead = is.read(buffer)) != -1) {
                os.write(buffer, 0, bytesRead);
            }
            is.close();
            os.close();
            cascadeClassifier = new CascadeClassifier(mCascadeFile.getAbsolutePath());
        } catch (Exception e) {
            Log.e("OpenCVActivity", "Error loading cascade", e);
        }
This completes the construction of the classifier.
###(3) Monitor video data
Set camerabridgeviewbase. On JavaCameraView Cvcameraviewlistener can monitor video data
###(4) Face detection, based on the third part, monitors the callback video data in the monitoring callback method onCameraFragment(), and the implementation code is as follows:
   @Override
    public Mat onCameraFrame(Mat aInputFrame) {
        Imgproc.cvtColor(aInputFrame, grayscaleImage, Imgproc.COLOR_RGBA2RGB);
        MatOfRect faces = new MatOfRect();
        if (cascadeClassifier != null) {
            cascadeClassifier.detectMultiScale(grayscaleImage, faces, 1.1, 3, 2,
                    new Size(absoluteFaceSize, absoluteFaceSize), new Size());
        }
        Rect[] facesArray = faces.toArray();
        for (int i = 0; i <facesArray.length; i++){
            Imgproc.rectangle(aInputFrame, facesArray[i].tl(), facesArray[i].br(), new Scalar(0, 255, 0, 255), 3);
        }
        return aInputFrame;
    }
Firstly, the incoming picture frame is transformed by color value, then the face is detected by the detectMultiScale method of the classifier, and finally by imgproc Rectangle () method to draw face.
The passed in parameters of the detectMultiScale method are analyzed as follows:
1.image indicates the input image to be detected
2.objects represents the detected face target sequence
3.scaleFactor represents the proportion of each image size reduction
4.minNeighbors means that each target must be detected at least three times before it is considered a real target (because the surrounding pixels and different window sizes can detect faces)
5.minSize is the minimum size of the target
6.minSize is the maximum size of the target
Finally, attach the complete code:
package com.north.light.libopencv;

import android.Manifest;
import android.content.Context;
import android.os.Build;
import android.os.Bundle;
import android.util.Log;
import android.view.WindowManager;

import androidx.appcompat.app.AppCompatActivity;


import org.opencv.android.CameraBridgeViewBase;
import org.opencv.android.JavaCameraView;
import org.opencv.android.OpenCVLoader;
import org.opencv.core.Core;
import org.opencv.core.CvType;
import org.opencv.core.Mat;
import org.opencv.core.MatOfRect;
import org.opencv.core.Rect;
import org.opencv.core.Scalar;
import org.opencv.core.Size;
import org.opencv.imgproc.Imgproc;
import org.opencv.objdetect.CascadeClassifier;

import java.io.File;
import java.io.FileOutputStream;
import java.io.InputStream;

public class MainActivity extends AppCompatActivity implements CameraBridgeViewBase.CvCameraViewListener{

    private CameraBridgeViewBase openCvCameraView;
    private CascadeClassifier cascadeClassifier;
    private Mat grayscaleImage;
    private int absoluteFaceSize;
    private void initializeOpenCVDependencies() {
        try {
            InputStream is = getResources().openRawResource(R.raw.lbpcascade_frontalface);
            File cascadeDir = getDir("cascade", Context.MODE_PRIVATE);
            File mCascadeFile = new File(cascadeDir, "lbpcascade_frontalface.xml");
            FileOutputStream os = new FileOutputStream(mCascadeFile);

            byte[] buffer = new byte[4096];
            int bytesRead;
            while ((bytesRead = is.read(buffer)) != -1) {
                os.write(buffer, 0, bytesRead);
            }
            is.close();
            os.close();
            cascadeClassifier = new CascadeClassifier(mCascadeFile.getAbsolutePath());
        } catch (Exception e) {
            Log.e("OpenCVActivity", "Error loading cascade", e);
        }
        openCvCameraView.enableView();
    }

    @Override
    protected void onCreate(Bundle savedInstanceState) {
        super.onCreate(savedInstanceState);
        getWindow().addFlags(WindowManager.LayoutParams.FLAG_KEEP_SCREEN_ON);

        setContentView(R.layout.activity_main);   // Set the layout for this activity
        openCvCameraView = findViewById(R.id.activity_main_camera_view);
        openCvCameraView.setCvCameraViewListener(this);

    }
    @Override
    public void onCameraViewStarted(int width, int height) {
        grayscaleImage = new Mat(height, width, CvType.CV_8UC4);
        absoluteFaceSize = (int) (height * 0.2);
    }

    @Override
    public void onCameraViewStopped() {
    }

    @Override
    public Mat onCameraFrame(Mat aInputFrame) {
        Imgproc.cvtColor(aInputFrame, grayscaleImage, Imgproc.COLOR_RGBA2RGB);
        MatOfRect faces = new MatOfRect();
        if (cascadeClassifier != null) {
            cascadeClassifier.detectMultiScale(grayscaleImage, faces, 1.1, 3, 2,
                    new Size(absoluteFaceSize, absoluteFaceSize), new Size());
        }
        Rect[] facesArray = faces.toArray();
        for (int i = 0; i <facesArray.length; i++){
            Imgproc.rectangle(aInputFrame, facesArray[i].tl(), facesArray[i].br(), new Scalar(0, 255, 0, 255), 3);
        }
        return aInputFrame;
    }
    @Override
    public void onResume() {
        super.onResume();

        if (!OpenCVLoader.initDebug()) {
        }
        initializeOpenCVDependencies();
        final String[] permissions = {
                Manifest.permission.CAMERA
        };
        if (Build.VERSION.SDK_INT >= Build.VERSION_CODES.M) {
            requestPermissions(permissions,0);
        }
    }

    @Override
    public void onBackPressed() {
        super.onBackPressed();
        Log.d("Return key","back back back");
    }
}
So far, face detection has been completed. However, the preview display of face detection is still horizontal, and the official demo is also horizontal. For vertical display, please see my next article.
that's all---------------------------------------------------------------------------------