Preparatory knowledge
- Basic knowledge of android Development
- Understanding the basic use of Android Studio
How far can I go after reading this article
- Master the basic use of gradle
- Understanding gradle and android gradle plugin
- Understanding the gradle build phase and life cycle callbacks
- Master Task, Transform and other concepts
- Learn to customize task s, customize gradle plug-ins
If you have reached the above level, you can stop reading the following and just look at the final summary.
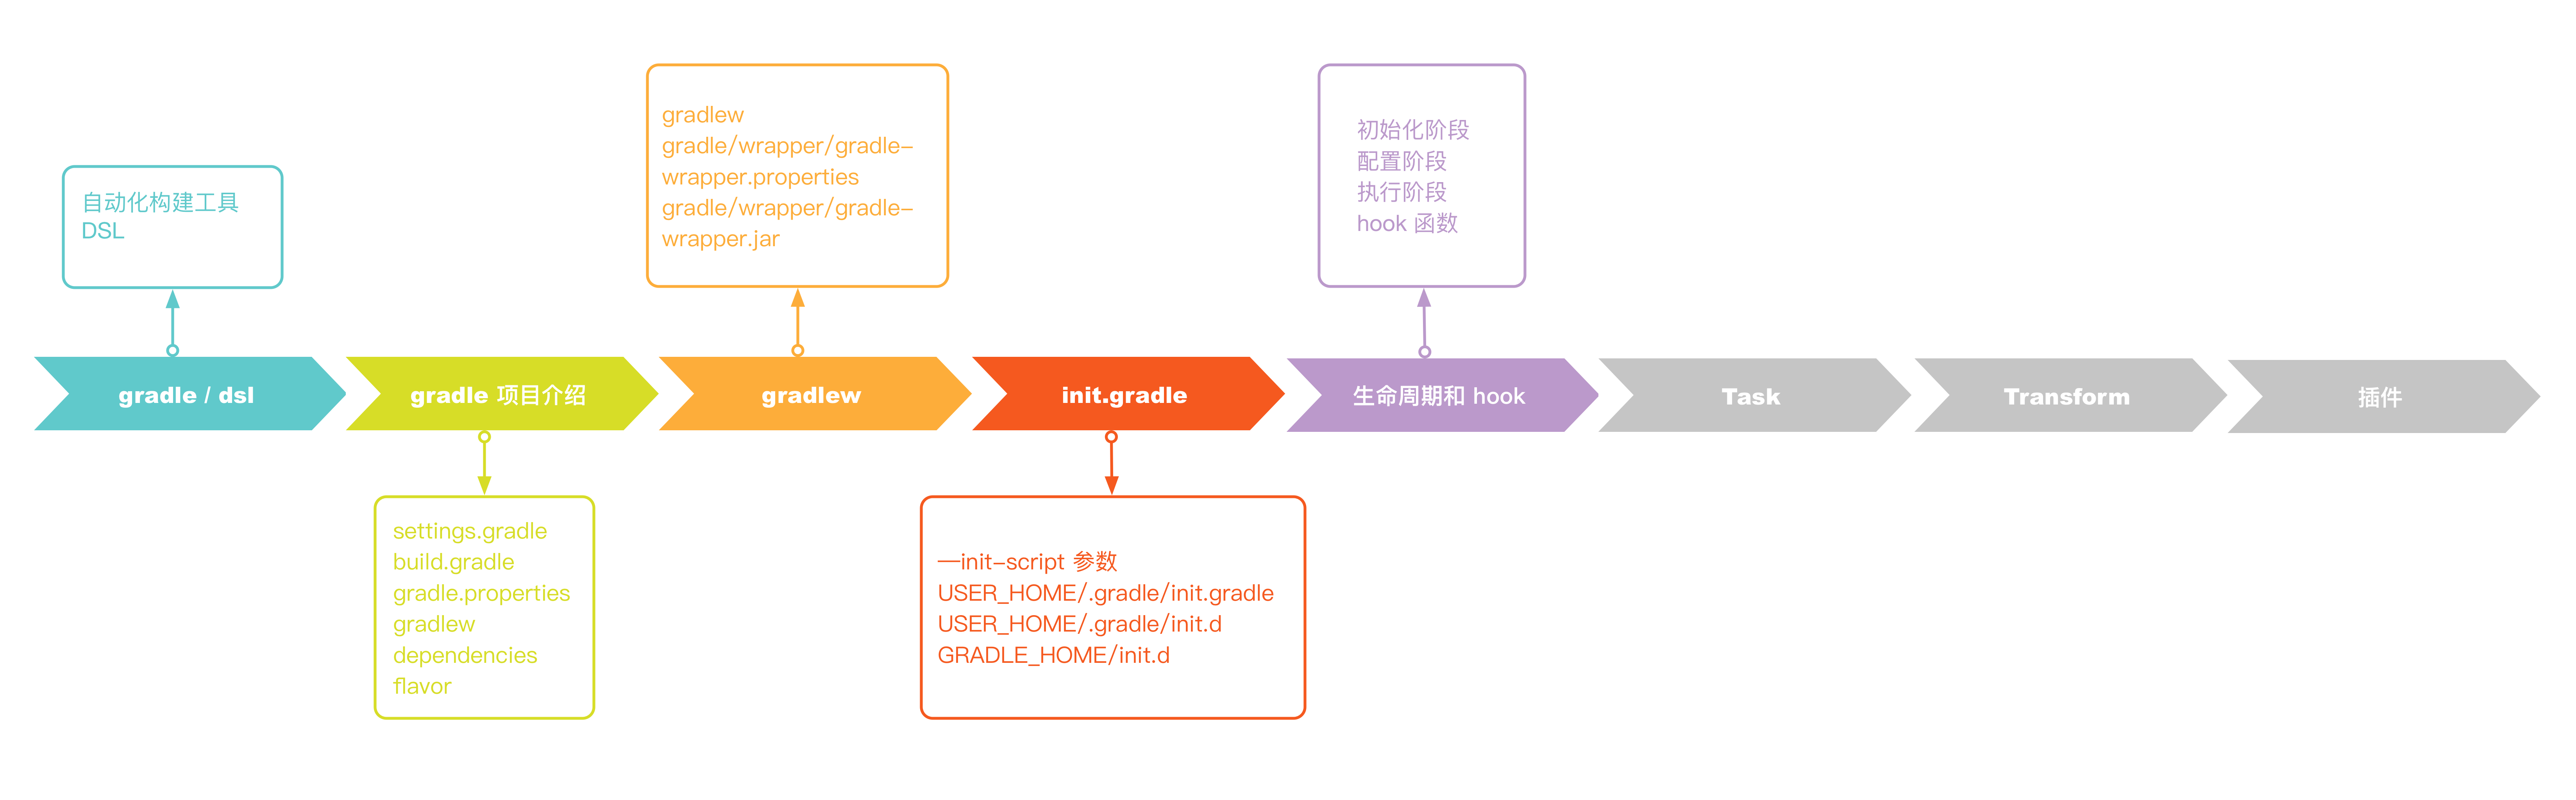
This article will be explained in the following sections: 
1. What is gradle

The official explanation is:
Gradle is an open-source build automation tool focused on flexibility and performance. Gradle build scripts are written using a Groovy or Kotlin DSL.
You can understand it from three perspectives
1. gradle is an automated build tool
Gradle is built automatically by organizing a series of tasks, so task is the most important concept in gradle
Let's take the generation of an available APK as an example. The whole process goes through the steps of resource processing, javac compilation, dex packaging, apk packaging, signature, etc. Each step corresponds to a task in gradle
gradle can be analogous to a pipeline, task can be analogous to a pipeline of robots, each of which is responsible for different things and ultimately generates a complete build product
2. The gradle script uses groovy or kotlin DSL
gradle was written using groovy or kotlin, but currently groovy is the majority
So what is DSL?DSL, short for Domain Specific Language, is a specially designed computer language for a specific type of task
DSL corresponds to GPL (General-Purpose Language), such as java
Compared with GPL, DSL is simple to use, simple to define, and can implement language logic compared to configuration files.
For gradle scripts, he implements a concise definition with sufficient linguistic logic. For example, android {}, which is itself a function call and a parameter is a closure, but this definition is much more concise
3. gradle is based on groovy, while groovy is based on the jvm language
Gradle is written using groovy, groovy is based on the jvm language, so it is object-oriented in nature. Object-oriented language is characterized by that everything is object, so in gradle,.Gradle script is essentially the definition of classes, some configuration items are method calls, and parameters are the {} closures that follow
For example, build.gradle corresponds to the Projectclass, and buildScript corresponds to the Project.buildScript method
2. gradle Project Analysis

For the project hierarchy of gradle, let's create a new project and look at the project address at EasyGradle 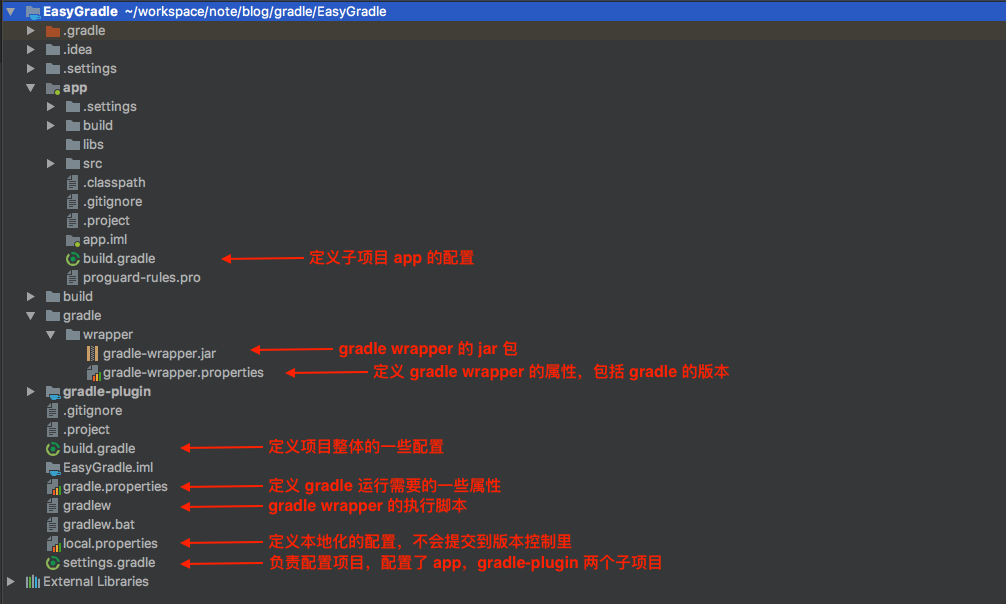
2.1 settings.gradle
settings.gradle is the script responsible for configuring the project
Corresponding Settings Class, during gradle building, objects for Settings are generated from settings.gradle
The corresponding callable method is File Find in
There are several main methods:
- include(projectPaths)
- includeFlat(projectNames)
- project(projectDir)
The general way to refer to a submodule in a project is to use include, which refers to the submodule at the next level of the root project
include ':app'
If you want to specify the location of a submodule, you can use the project method to get the ProjectObject and set its projectDir parameter
include ':app'
project(':app').projectDir = new File('./app')
2.2 rootproject/build.gradle
build.gradle is responsible for some of the overall project configurations, corresponding to Project class
When gradle is built, the Project object is generated from build.gradle, so the dsl written in build.gradle is actually some of the methods of the Project interface. Projects are actually an interface. The real implementation class is DefaultProject
The methods that can be called in build.gradle are Project Can be found
Several of the main methods are:
- buildscript //classpath of configuration script
- allprojects //Configuration project and its subprojects
- respositories //Configure the warehouse address, where subsequent dependencies will go to find the configured address
- Dependencies //configure project dependencies
Looking at the EasyGradle project
buildscript { // Configuration project classpath
    repositories {  // The warehouse address of the project, which is found in sequence
        google()
        jcenter()
        mavenLocal()
    }
    dependencies { // Project Dependency
        classpath 'com.android.tools.build:gradle:3.0.1'
        classpath 'com.zy.plugin:myplugin:0.0.1'
    }
}

allprojects { // Configuration of subprojects
    repositories {
        google()
        jcenter()
        mavenLocal()
    }
}
2.3 module/build.gradle
build.gradle is the configuration of the subproject and corresponds to the Project class
The configuration of the subproject is similar to that of the root project, but there is a clear difference in the subproject that refers to a plugin application plugin "com.android.application". The following android dsl is the extension of the application plugin, and you can see about the android plugin dsl android-gradle-dsl
Several of the main methods are:
- compileSdkVersion //Specify the sdk version required for compilation
- defaultConfig //Specifies the default attribute, which will be applied to all variants
- buildTypes //Some compilation properties can be configured here, and all configurable properties are Here
- productFlavor //Configure the flavor of the project
From the build.gradle perspective of the app module
apply plugin: 'com.android.application' // Introducing the android gradle plug-in

android { // Configure what android gradle plugin requires
    compileSdkVersion 26
    defaultConfig { // Version, applicationId, etc.
        applicationId "com.zy.easygradle"
        minSdkVersion 19
        targetSdkVersion 26
        versionCode 1
        versionName "1.0"
    }
    buildTypes {
        release {
            minifyEnabled false
            proguardFiles getDefaultProguardFile('proguard-android.txt'), 'proguard-rules.pro'
        }
    }
    compileOptions { // Specify the java version
        sourceCompatibility 1.8
        targetCompatibility 1.8
    }

    // flavor-related configuration
    flavorDimensions "size", "color"
    productFlavors {
        big {
            dimension "size"
        }
        small {
            dimension "size"
        }
        blue {
            dimension "color"
        }
        red {
            dimension "color"
        }
    }
}

// Project Requirements Dependency
dependencies {
    implementation fileTree(dir: 'libs', include: ['*.jar']) // jar package dependency
    implementation 'com.android.support:appcompat-v7:26.1.0' // Remote warehouse dependency
    implementation 'com.android.support.constraint:constraint-layout:1.1.3'
    implementation project(':module1') // Project Dependency
}
2.4 Dependency
New dependency configurations were introduced in gradle 3.4 as follows:
| New Configuration | Deprecated Configuration | behavior | Effect |
|---|---|---|---|
| implementation | compile | Dependencies are available to modules at compile time and only to consumers of modules at run time.For large multi-project builds, using implementation s instead of api/compile s can significantly reduce build time because it reduces the number of projects that need to be recompiled to build the system.This configuration should be used by most application and test modules. | Impementation only exposes directly dependent modules. With this configuration, only directly dependent modules will be recompiled after module modification, and indirectly dependent modules will not need to be modified |
| api | compile | Dependencies are available to modules at compile time and to consumers of modules at compile and run time.This configuration behaves like a compile (now deprecated), and you should normally only use it in Library modules.Application modules should use implementation unless you want to expose their API s to separate test modules. | api exposes indirectly dependent modules, and with this configuration, both directly and indirectly dependent modules of a module need to be recompiled after the module is modified |
| compileOnly | provided | Dependencies are only available to modules at compile time and are not available to their consumers at compile or run time.This configuration behaves like provided (now deprecated). | Dependent only on modules during compilation and not at runtime after packaging can be used to resolve some library conflicts |
| runtimeOnly | apk | Dependencies are available to modules and their consumers only at runtime.This configuration behaves like an apk (now deprecated). | Dependent on modules only at run time, not at compile time |
Or take EasyGradle as an example to see how the dependencies differ:
There are three modules in the project: app, module 1, module 2
There is a class ModuleApi in the module app
module1 has a class Module1Api
There is a class Module2Api in module module 2
The dependencies are as follows: 
implementation dependency
The Module2Api class cannot be referenced in an app module when module 1 relies on module 2 with implementation 
api dependency
When module 1 relies on module 2 with an api, the Module2Api class can be normally referenced in the app module, as shown below
compileOnly Dependency
When module1 uses compileOnly dependent module2, the app module cannot reference the Module2Api class at compile time. It is normally referenced in module1, but errors will occur at runtime
Decompilate the packaged apk, and you can see that Module2Api is not packaged in the APK
runtimeOnly Dependency
When module 1 relies on module 2 using runtimeOnly, module 1 also cannot reference Module2Api during compilation
2.5 flavor
Before introducing the following process, clarify several concepts, flavor, dimension, variant
After android gradle plugin 3.x, each flavor must correspond to a dimension, which can be interpreted as a grouping of flavors, and then two groups of flavors in different dimensions form a variant
For instance
The following configuration:
flavorDimensions "size", "color"

productFlavors {
    big {
        dimension "size"
    }
    small {
        dimension "size"
    }
    blue {
        dimension "color"
    }
    red {
        dimension "color"
    }
}
The resulting variant corresponds to bigBlue, bigRed, smallBlue, smallRed
Each variant can use variant Implementation to introduce specific dependencies, such as bigBlueImplementation, which is only introduced when compiling a bigBlue variant
3. gradle wrapper

The file gradlew / gradlew.bat is used to download a specific version of gradle and execute it without requiring the developer to install gradle locally.What are the benefits of this?Developers installing gradles locally have a problem with how different versions of gradles are handled for different projects. Wapper is a good solution to this problem. You can use different versions of gradles for different projects.gradle wrapper is normally downloaded in the GRADLE_CACHE/wrapper/dists directory
gradle/wrapper/gradle-wrapper.properties are some gradle wrapper configurations that use distributionUrl more often and can perform download addresses and versions of gradle
gradle/wrapper/gradle-wrapper.jar is a dependency package required for gradle wrapper to run
4. gradle init.gradle

In gradle, there is a special init.gradle script that is called before each project build, where you can do some overall initialization, such as configuring log output, and so on.
Using the init.gradle method:
- Specify the init.gradle location through --init-script
eg: gradlew --init-script initdir/init.gradle - The init.gradle file is placed in the USER_HOME/.gradle/directory
- The.Gradle script is placed in the USER_HOME/.gradle/init.d/directory
- The.gradle script is placed in the GRDALE_HOME/init.d/directory
5. gradle life cycle and callbacks
gradle construction is divided into three phases
Initialization phase
The main thing to do in the initialization phase is what projects need to be built, and then create a Project Object object for the corresponding projects
Configuration phase
The main thing to do in the configuration phase is configure the project you created in the previous step, which executes the build.gradle script and generates the task to execute
Execution phase
The main thing to do in the execution phase is to execute the task and do the main construction work
gradle provides some column callback interfaces during the build process to help you do something at different stages. The main interfaces are the following
gradle.addBuildListener(new BuildListener() {
    @Override
    void buildStarted(Gradle gradle) {
        println('Build Start')
        // This callback will not normally be invoked because we registered too late and the build started when we registered, which is used internally by gradle
    }

    @Override
    void settingsEvaluated(Settings settings) {
        println('settings File Parsing Complete')
    }

    @Override
    void projectsLoaded(Gradle gradle) {
        println('Project Loading Completed')
        gradle.rootProject.subprojects.each { pro ->
            pro.beforeEvaluate {
                println("${pro.name} Called before project configuration")
            }
            pro.afterEvaluate{
                println("${pro.name} Called after project configuration")
            }
        }
    }

    @Override
    void projectsEvaluated(Gradle gradle) {
        println('Project resolution complete')
    }

    @Override
    void buildFinished(BuildResult result) {
        println('Build complete')
    }
})

gradle.taskGraph.whenReady {
    println("task Graph building complete")
}
gradle.taskGraph.beforeTask {
    println("each task Tune this interface before execution")
}
gradle.taskGraph.afterTask {
    println("each task Execute Complete Mediation for this interface")
}
6. Custom task

The task created by default inherits from DefaultTask
How to declare a task
task myTask {
    println 'myTask in configuration'
    doLast {
        println 'myTask in run'
    }
}

class MyTask extends DefaultTask {
    @Input Boolean myInputs
    @Output
    @TaskAction
    void start() {
    }
}

tasks.create("mytask").doLast {
}
Some of Task's important methods are categorized as follows:
- Task Behavior
Task.doFirst
Task.doLast
- Task Dependent Order
Task.dependsOn
Task.mustRunAfter
Task.shouldRunAfter
Task.finalizedBy
- Task's grouping description
Task.group
Task.description
- Is Task Available
Task.enabled
- Task Input and Output
gradle compares task's inputs and outputs to determine if task is up-to-date. If inputs and outputs do not change, task is considered up-to-date and task skips execution
Task.inputs
Task.outputs
- Is Task Executed
You can force task execution by specifying Task.upToDateWhen = false
Task.upToDateWhen
For example, to specify the order of dependencies between Task s, write as follows:
task task1 {
    doLast {
        println('task2')
    }
}
task task2 {
    doLast {
        println('task2')
    }
}
task1.finalizedBy(task2)
task1.dependsOn(task2)
task1.mustRunAfter(task2)
task1.shouldRunAfter(task2)
task1.finalizedBy(task2)
7. Android transform
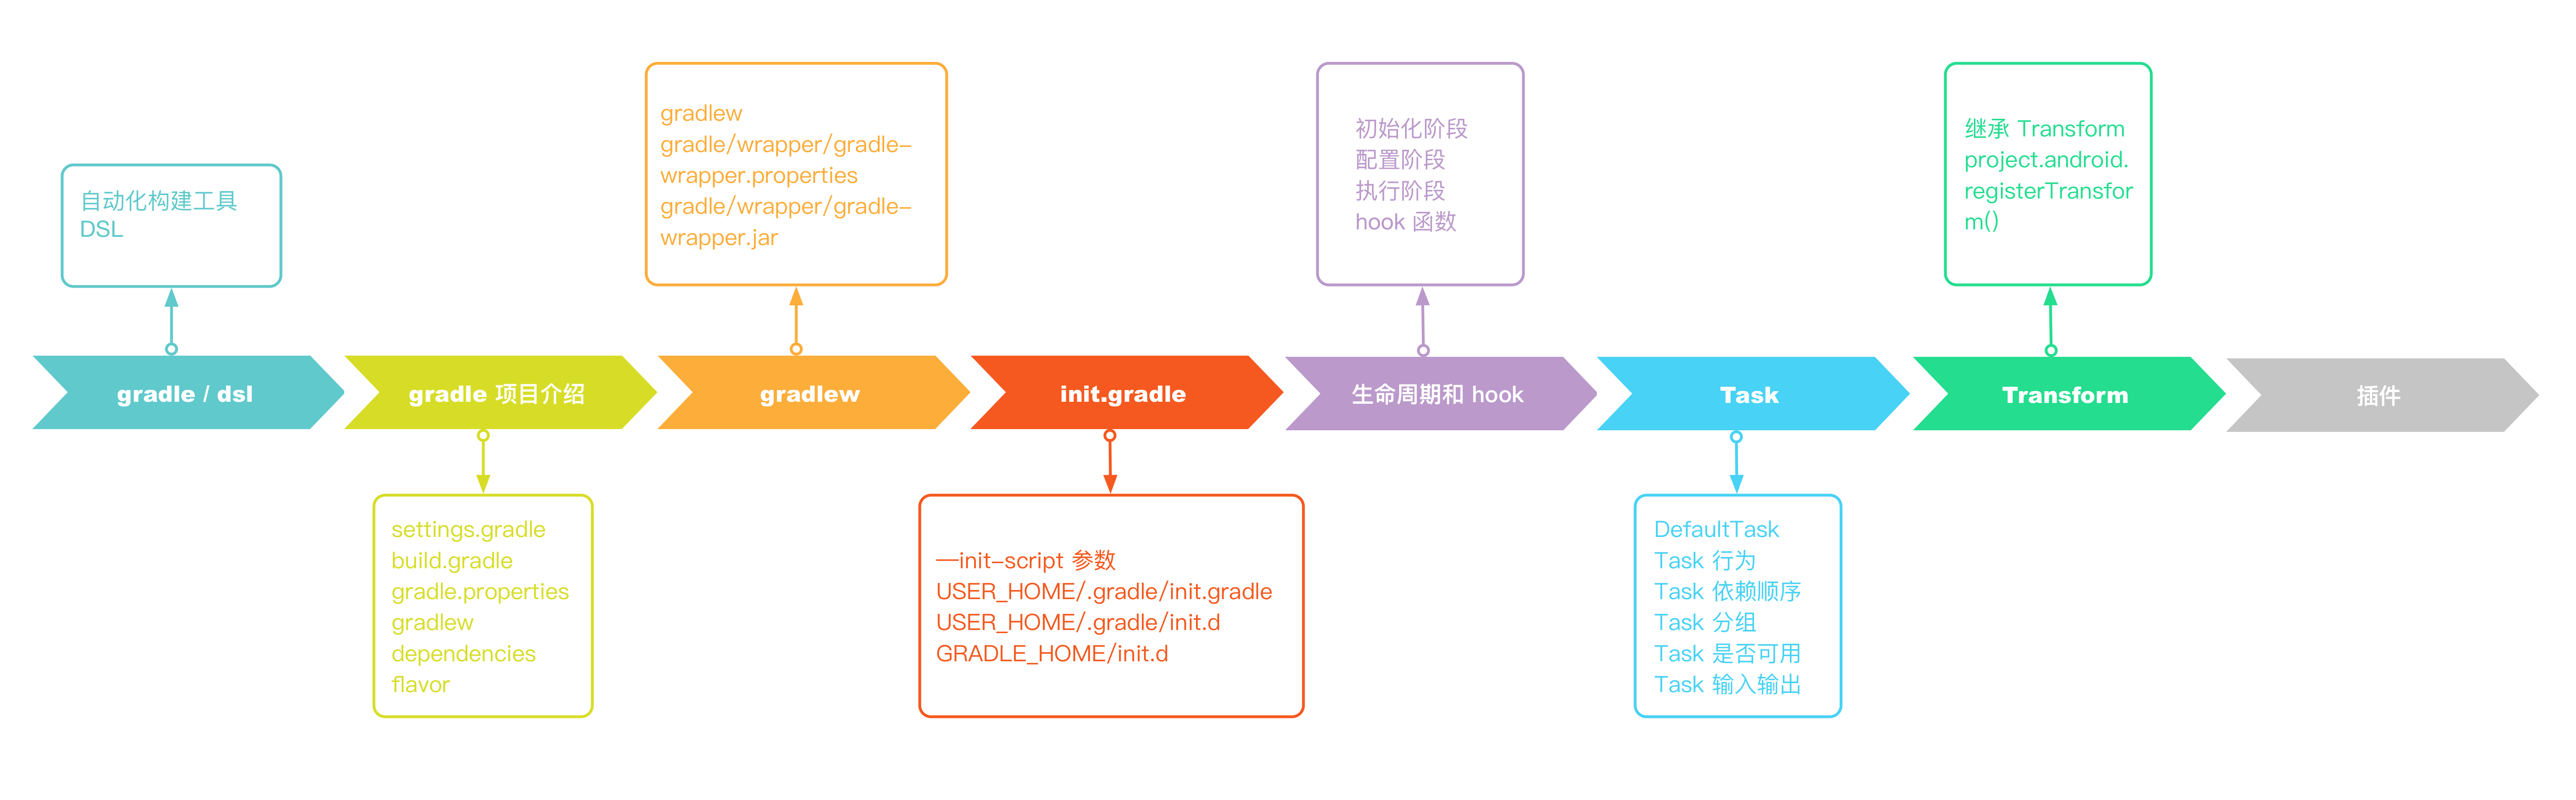
The android gradle plugin provides a transform api to process classes in the.class to dex process, which can be understood as a special Task, because transforms are ultimately converted into Tasks to execute
To implement transformation, you need to inherit com.android.build.api.transform.Transform and implement its methods. After you implement the Transform, to apply it, you call project.android.registerTransform()
public class MyTransform extends Transform {
    @Override
    public String getName() {
        // Returns the name of the transform, and the final name will be in the form of transformClassesWithMyTransformForDebug
        return "MyTransform";
    }

    @Override
    public Set<QualifiedContent.ContentType> getInputTypes() {
        /**
        There are several types of data that can be returned for processing.
        public static final Set<ContentType> CONTENT_CLASS = ImmutableSet.of(CLASSES);
        public static final Set<ContentType> CONTENT_JARS = ImmutableSet.of(CLASSES, RESOURCES);
        public static final Set<ContentType> CONTENT_RESOURCES = ImmutableSet.of(RESOURCES);
        public static final Set<ContentType> CONTENT_NATIVE_LIBS = ImmutableSet.of(NATIVE_LIBS);
        public static final Set<ContentType> CONTENT_DEX = ImmutableSet.of(ExtendedContentType.DEX);
        public static final Set<ContentType> DATA_BINDING_ARTIFACT = ImmutableSet.of(ExtendedContentType.DATA_BINDING);
        */
        return TransformManager.CONTENT_CLASS;
    }

    @Override
    public Set<? super QualifiedContent.Scope> getScopes() {
        /**
        Returns the range of content to be processed, with the following types
        PROJECT(1), Processing project content only
        SUB_PROJECTS(4), Processing subprojects only
        EXTERNAL_LIBRARIES(16), Processing external libraries only
        TESTED_CODE(32), Only process test code corresponding to the current variant
        PROVIDED_ONLY(64), Processing Dependencies
        @Deprecated
        PROJECT_LOCAL_DEPS(2),
        @Deprecated
        SUB_PROJECTS_LOCAL_DEPS(8);
        */
        return Sets.immutableEnumSet(QualifiedContent.Scope.PROJECT);
    }

    @Override
    public boolean isIncremental() {
        // Incremental, if true, TransformInput includes a modified list of files, returns false, compiles in full, and deletes the last output
        return false;
    }

    @Override
    void transform(TransformInvocation transformInvocation) throws TransformException, InterruptedException, IOException {
        // Processing class here
        super.transform(transformInvocation)
        // In transform, if there are no modifications, also output the contents of the input to output, otherwise error will occur
        for (TransformInput input : transformInvocation.inputs) {
            input.directoryInputs.each { dir ->
                // Get the corresponding output directory
                File output = transformInvocation.outputProvider.getContentLocation(dir.name, dir.contentTypes, dir.scopes, Format.DIRECTORY)
                dir.changedFiles // Files modified in incremental mode
                dir.file // Get the input directory
                FileUtils.copyDirectory(dir.file, output) // input content output to output
            }
            input.jarInputs.each { jar ->
                // Get the corresponding output jar
                File output = transformInvocation.outputProvider.getContentLocation(jar.name, jar.contentTypes, jar.scopes, Format.JAR)
                jar.file // Get input jar file
                FileUtils.copyFile(jar.file, output) // input content output to output
            }
        }
    }
}

// Register transform
android.registerTransform(new MyTransform())
Processing in transform generally involves modifying class files. The tools to manipulate byte codes are usually javasist and asm, which are not described here.You'll have a chance to expand later
8. Write your own plugin

The gradle plug-in can be thought of as a collection of task s
In the build.gradle script for the Android project, the first line is apply plugin:'com.android.application', which introduces the android gradle plugin, which contains task s related to Android packaging
Source analysis for android gradle plugin, which you'll see later, is now how to implement a plugin of your own
8.1 Initialization Project
- Create a java module in android studio
- Create a groovy directory in the src/main directory, then create your own package names and plug-in classes
- Create resources/META-INFO/gradle-plugins directory in src/main directory, create, myplugin.properties file, the contents of the file are
implementation-class=com.zy.plugin.MyPlugin // Here is your own plug-in class
- Modify build.gradle file
// Introducing groovy and java plug-ins
apply plugin: 'groovy'
apply plugin: 'java'

buildscript {
    repositories {
        mavenLocal()
        maven { url 'http://depot.sankuai.com/nexus/content/groups/public/' }
        maven { url 'https://maven.google.com' }
        jcenter()
    }
}

repositories {
    mavenLocal()
    maven {
        url "http://mvn.dianpingoa.com/android-nova"
    }
    maven {
        url 'http://depot.sankuai.com/nexus/content/groups/public/'
    }
    maven { url 'https://maven.google.com' }
}

dependencies {
    compile gradleApi()
    compile localGroovy()
    compile 'com.android.tools.build:gradle:3.0.1'
}
So far, the project structure looks like this 
8.2 Create Plugin
In the plug-in class you just created, you can write the code for the plug-in.Plugin class inherits Plugin and implements the apply interface, which is the interface to call when applying plugin'xxx'in build.gradle
Plug-in development can use groovy and java. Groovy makes it easier to develop with more grammatical sugar
package com.zy.plugin

import org.gradle.api.Plugin
import org.gradle.api.Project

class MyPlugin implements Plugin<Project> {

    @Override
    void apply(Project project) {
        println("apply my plugin")
    }
}
8.3 task for creating plug-ins
Let's define a task class, MyTask, that inherits from DefaultTask and simply outputs some information
package com.zy.plugin

import org.gradle.api.DefaultTask
import org.gradle.api.tasks.TaskAction

class MyTask extends DefaultTask {

    @TaskAction
    void action() {
        println('my task run')
    }
}
Then register the task in the plugin
class MyPlugin implements Plugin<Project> {

    @Override
    void apply(Project project) {
        println("apply my plugin")
        project.tasks.create("mytask", MyTask.class)
    }
}
8.4 Local Installation Plugins
Such a simple plug-in will be developed, how to use it?
We first need to introduce the maven plug-in in build.gradle and configure the install-related properties
apply plugin: 'maven'

install {
    repositories.mavenInstaller {
        pom.version = '0.0.1' // Configure Plugin Version Number
        pom.artifactId = 'myplugin' // Configure plug-in identity
        pom.groupId = 'com.zy.plugin' // Configure Plug-in Organization
    }
}
Executing. /gradlew install will install the plug-in in the local maven repository
We then introduced our plug-in's classpath where it was used
classpath 'com.zy.plugin:myplugin:0.0.1'
Then load the plug-in
apply plugin; 'myplugin' // Here myplugin is the name of myplugin.properties
Then run. /gradlew tasks --all | grep mytask to see the new task we added in the plugin
. /gradlew mytasks to execute task
8.5 Packaged Release
The new upload configuration in the plugin build.gradle is as follows
uploadArchives {
    repositories {
        mavenDeployer {
            repository(url: "mavenUrl")
            pom.version = '0.0.1'
            pom.artifactId = 'myplugin'
        }
    }
}
Run. /gradlew uploadArchives
8.6 Debugging Plugin
So how do you debug when developing plug-ins?
1. First add a new remote configuration in as 

2. Add the following parameters when task is executed
./gradlew app:mytask -Dorg.gradle.debug=true
You can see that gradle is waiting for the debug process to connect 
3. After breaking points in the plug-in code, click the debug button in as to debug the plug-in code. 
9. Key Summary
The main points are as follows: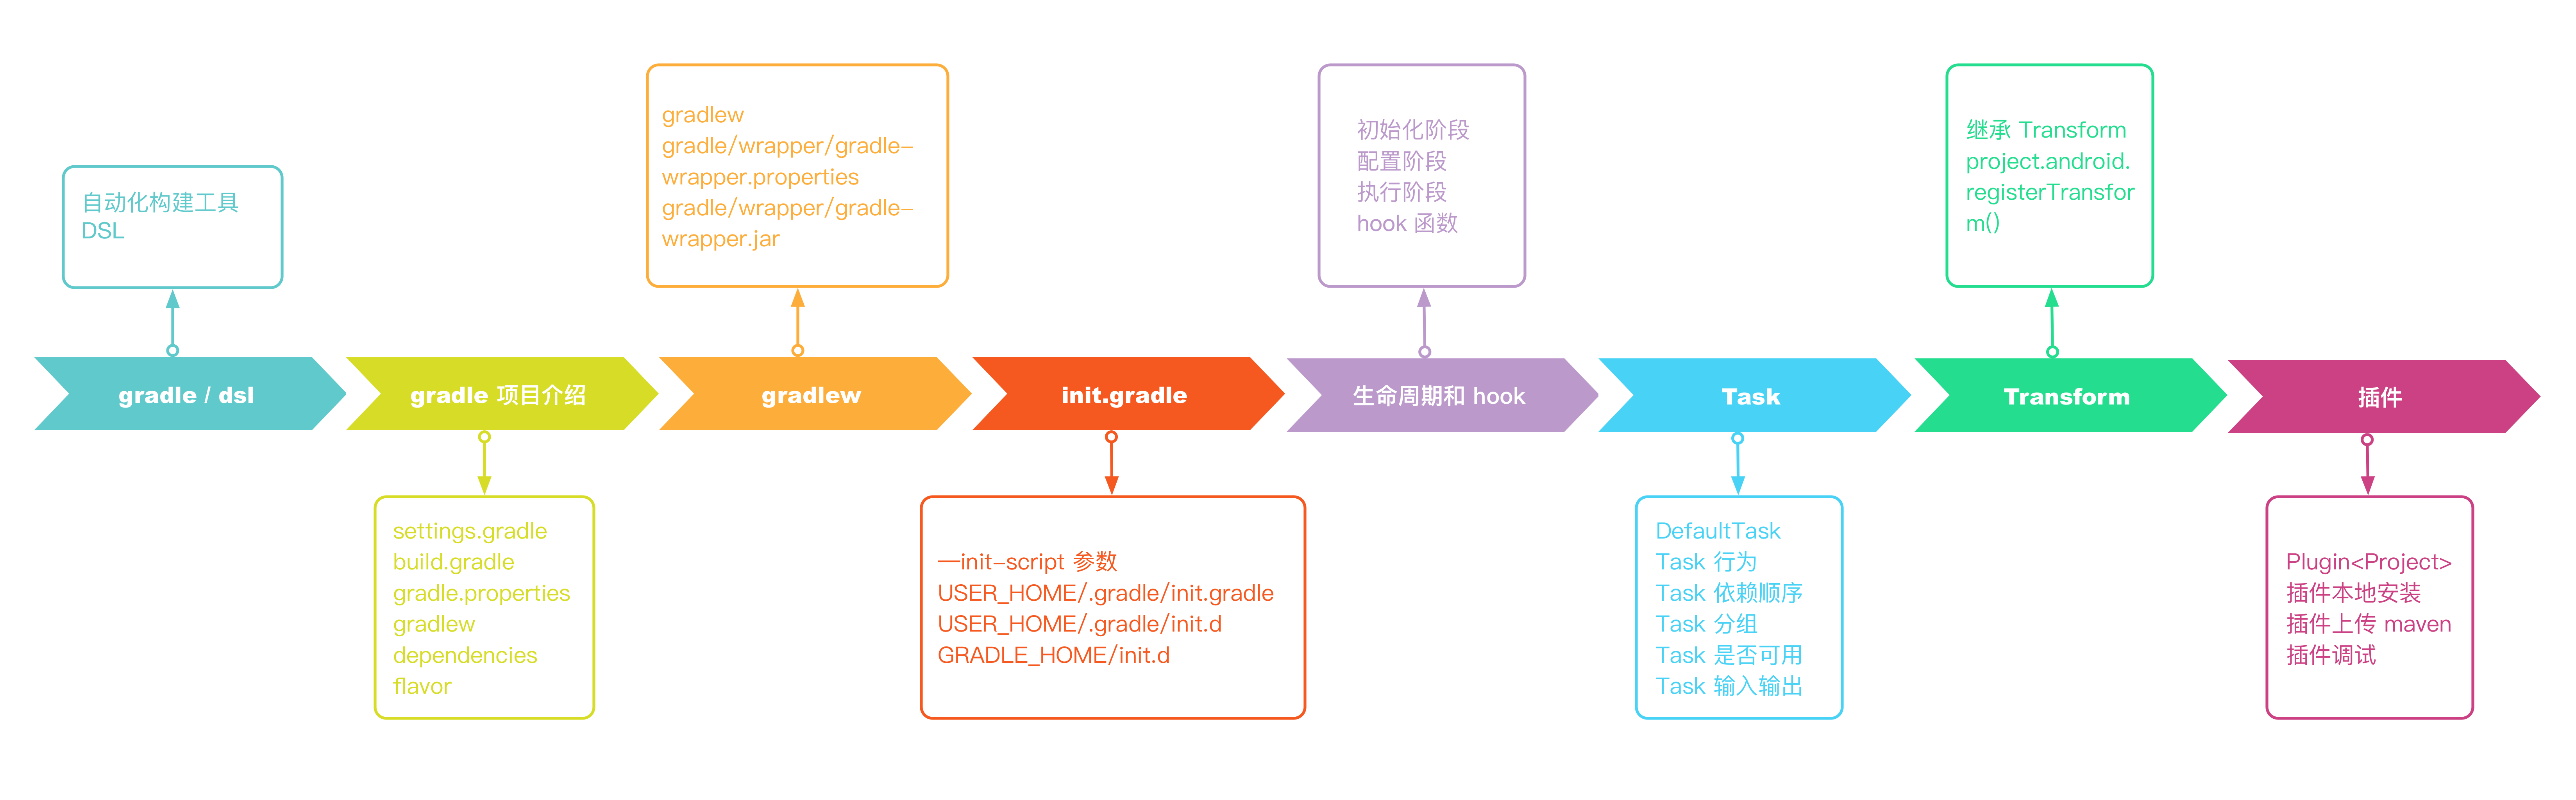
The following must be mastered:
- gradle dsl query address https://docs.gradle.org/curre...
- android gradle plugin dsl query address http://google.github.io/andro...
- gradle build lifecycle and callbacks
- implementation / api
- flavor
- Customize Task
- Custom Transform s and custom plug-ins can be used as extensions