Article directory
- I. concept
- 2, Database operations
- 1. Create database
- 2. Data operation (add, delete, modify and query)
- 3. Import of mobile database file
- ==Question: what's the difference between mnt/adcard and storage/sdcard? = =
- 3, Using SQLite in Android
- 4, Operation of SqLite database through Android API
- 5, SQLite summary
- 6, Encapsulation of database operations
I. concept
1, understand

2. Application scenario
Now the mainstream mobile devices such as Android and iPhone use SQLite as the storage engine of complex data. When we develop applications for mobile devices, we may use SQLite to store a large amount of data, so we need to master the SQLite development skills on mobile devices. For Android platform, the system has built-in rich API for developers to operate SQLite, so we can easily access data
2, Database operations
1. Create database
create table info_tab(
	/*primary key Primary key - > unique identifier auto increment*/
	_id int primary key auto_increment,
    name varchar(30) not null,
    /*Allow age to be blank (female age cannot be disclosed at will*/
    age int,
    gender varchar(2) not null
)

2. Data operation (add, delete, modify and query)
DML (database operation statement)
2.1 add statement
Method 1:

Insert into info tab (ID, name, age, gender) values (1, 'Zhang three', 23, 'men')
Error Code: 1366. Incorrect string value: 'xE5\xBC\xA0\xE4\xB8\x89' for column 'name' at row 1
Solve:
Add the following code to input Chinese characters
alter table info_tab convert to character set utf8 ;
Be careful:
① Data type should correspond to
② The number of data should correspond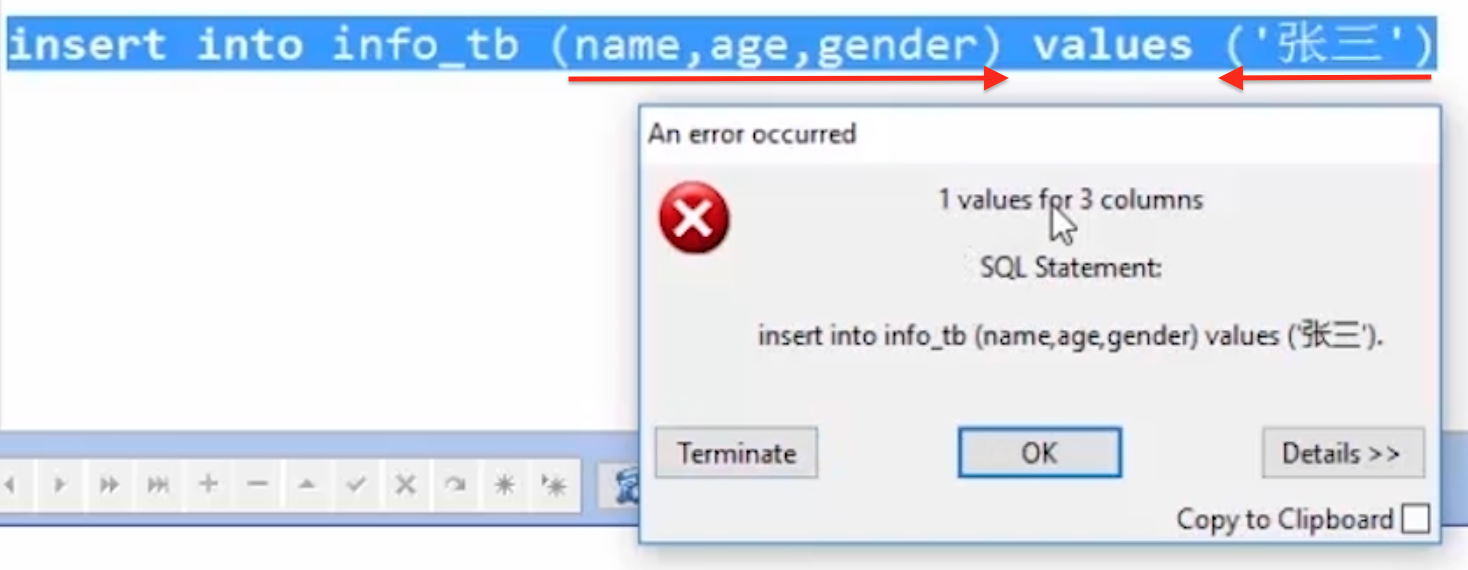
③ Data order should correspond
Age column insert age, name column insert name
④ Be sure to include all non empty columns
NN: not null non empty column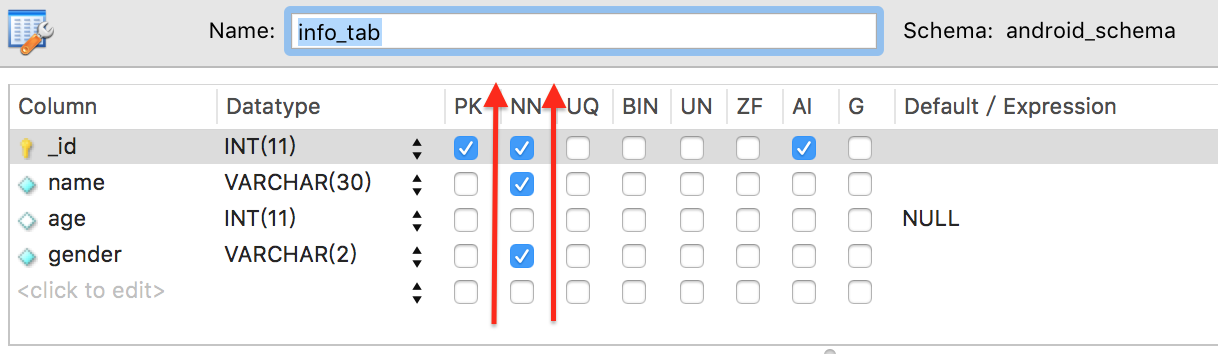
⑤ Auto grow columns
It can be ignored by default and configured automatically
To be sure to add manually:
a. Give a nonexistent data
b.null (will grow automatically)
Method 2:

By default, all columns are inserted with data (be sure to insert them in the order of columns in the table structure)
Insert into info tab values (3, 'Zhang Si', 34, 'female')
2.2 delete statement

If there is no condition, all contents in the table will be deleted
Delete from info \ tab where gender = 'female'
Error code: 1175. You are using safe update mode and you tried to update a table without a where that uses a key column to disable safe mode, toggle the option in preferences - > sql editor and reconnect
Reason: MySQL runs in safe updates mode, which will result in failure to execute update or delete commands under non primary key conditions
Solution: execute the command set SQL? Safe? Updates = 0; modify the database mode
Delete is for records (it is not possible to delete a column)
2.3 UPDATE statement

update info_tab set name = 'Tom', gender = 'female' where age=23
If the data does not exist in the table
update info_tab set age=100 where _id=3
Result: 0 row (s) affected rows matched: 0 changed: 0 warnings: 0
2.4 query statement
The result of query is actually a virtual result set, not to take out the real data and pass it to the client
select * from table name to query all records in a table
select column name 1, column name 2 from table name; query partial columns
select * from table name where < query criteria >; query partial columns
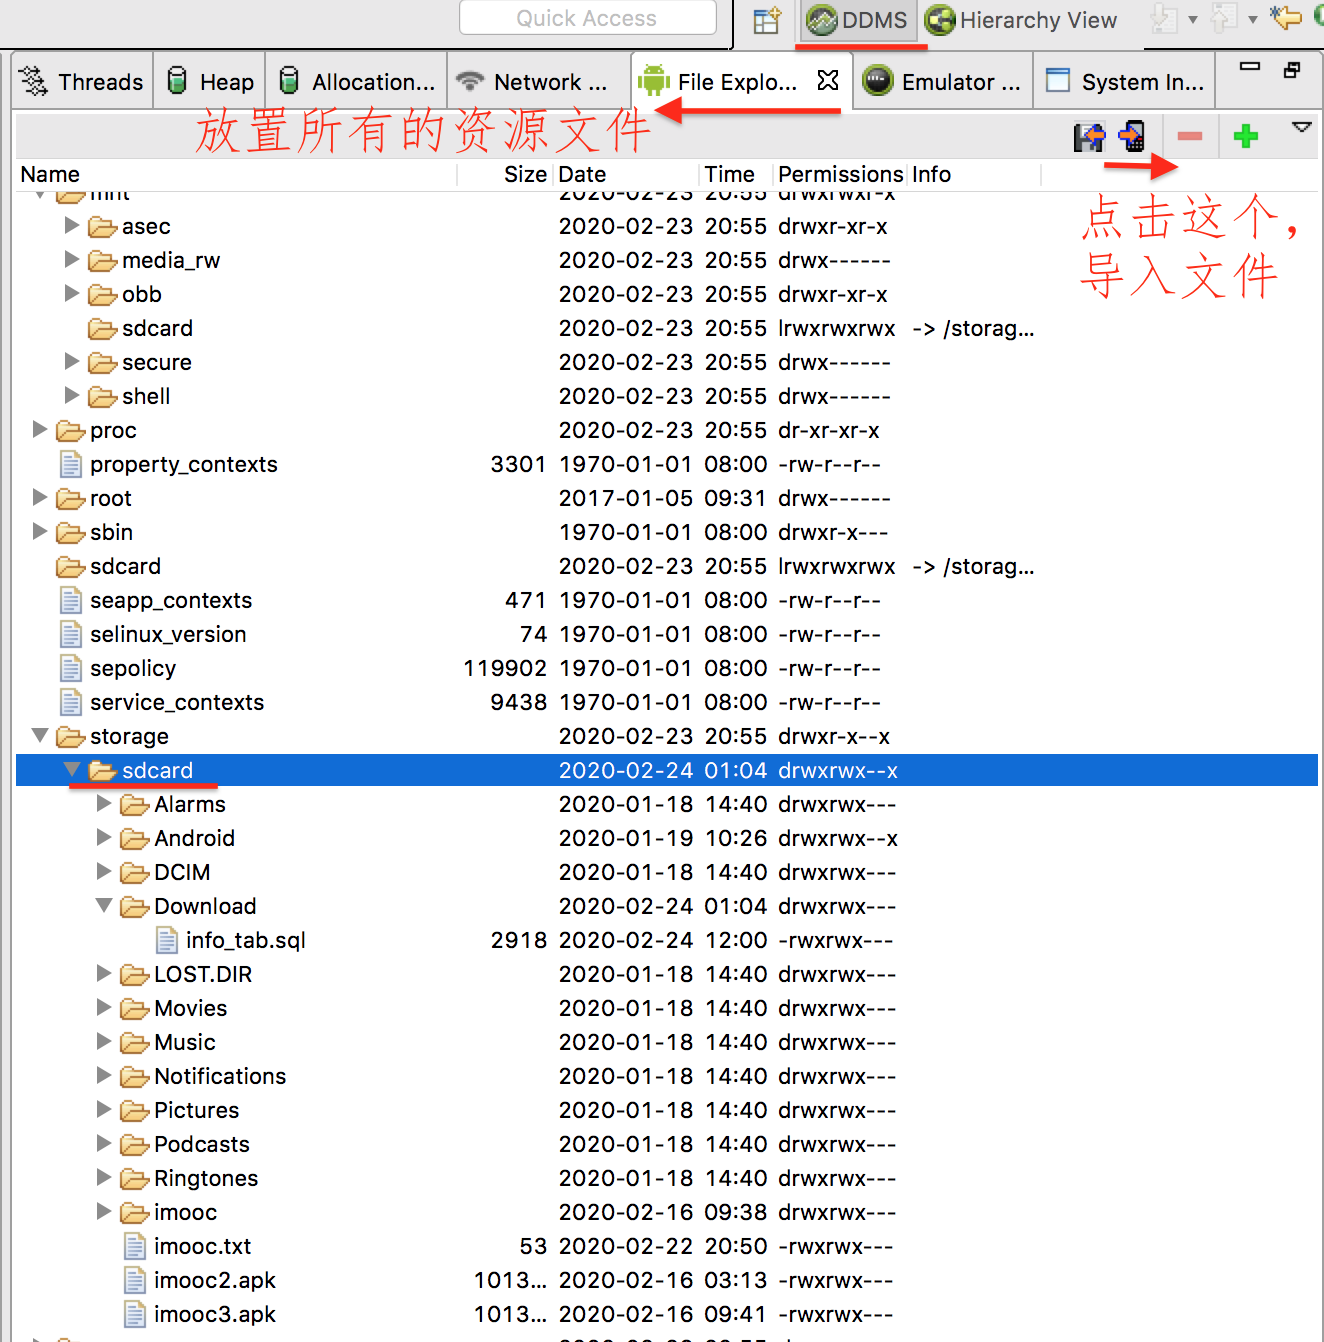
3. Import of mobile database file
① On the simulator
reference material: How to use MysqlWorkbench to export an entire sql file
Save the above database file as info? Tab.sql, and then drag it directly into the simulator. (it can't be operated on the real machine)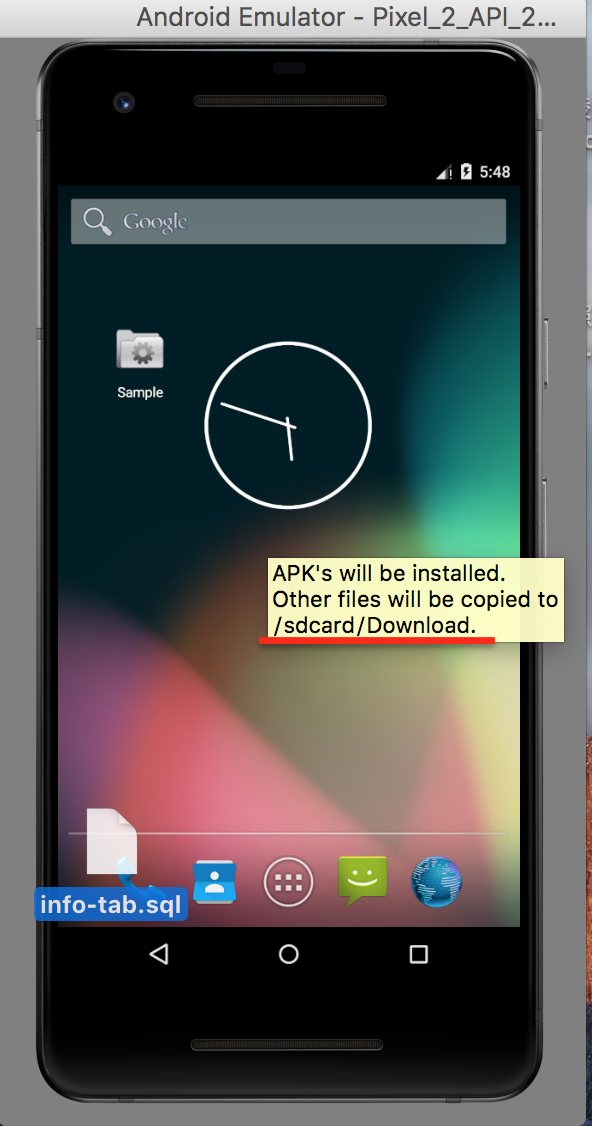
You can see the info tab.sql file under the virtual machine sdcard/Download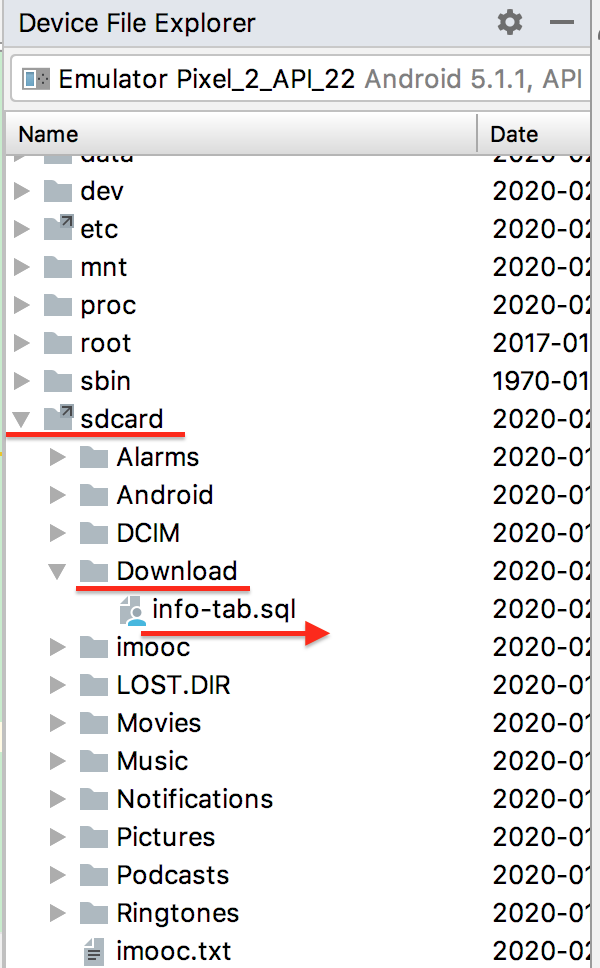
② On the real plane
reference material: How to open DDMS in Android Studio

Copy SDK path open in folder
After entering the folder, tools - > monitor, double-click to open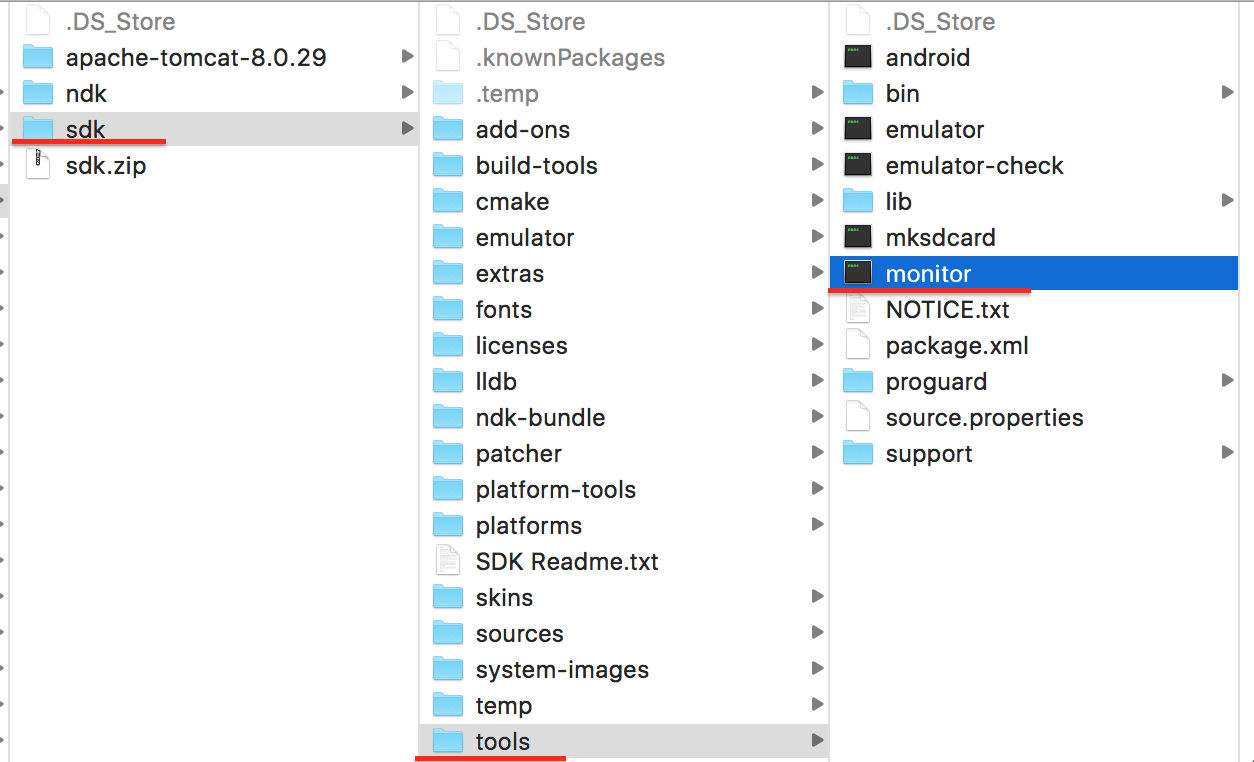
At this point, DDMS is turned on
Report errors:
Could not open Selected VM debug port (8700). Make sure you do not have another instance of DDMS or of the eclipse plugin running. If it's being used by something else, choose a new port number in the preferences."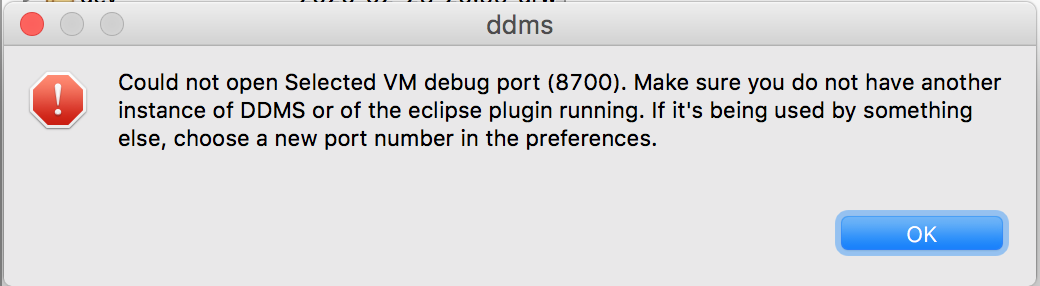
Solve:
Close Android studio and then open DDMS without error
reference material: See which app uses port 8700
Doubt:
reference material: mnt/sdcard cannot load directory tree after DDMS is enabled in Android Studio built-in simulator
Solve:
Simulator version problem, switch to lower version (not 7.0)
The simulator is more than 7.0, and 6.0 has not been tested yet. After changing to 5.0, the problem is solved smoothly. Besides, there is no need to operate the sdcard under mnt, only the sdcard under storage. Print the absolute path of sd, and the storage/sdcard will also come out.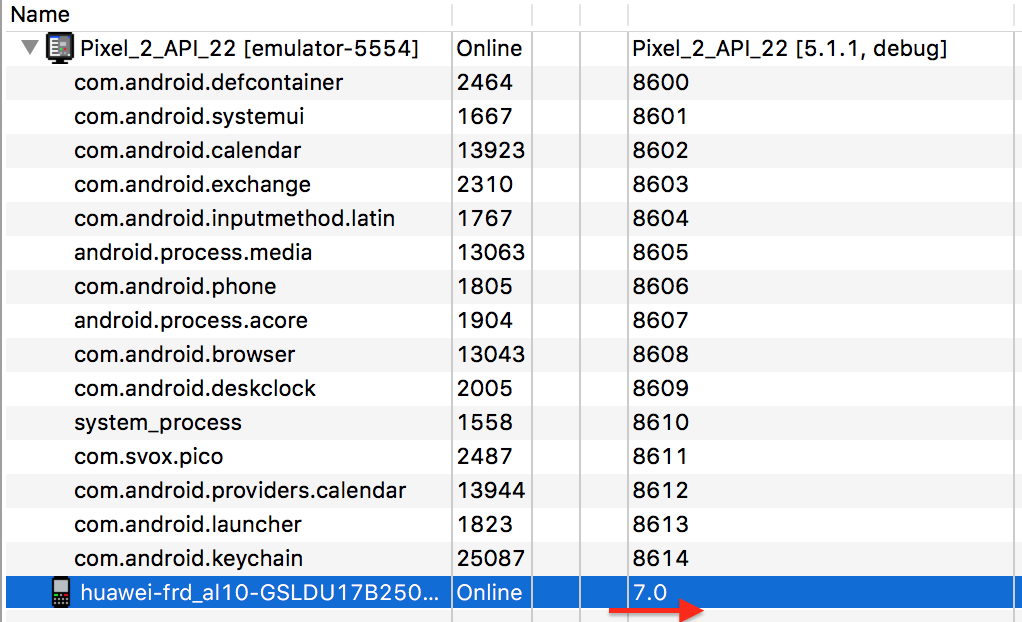
Question: what's the difference between mnt/adcard and storage/sdcard?
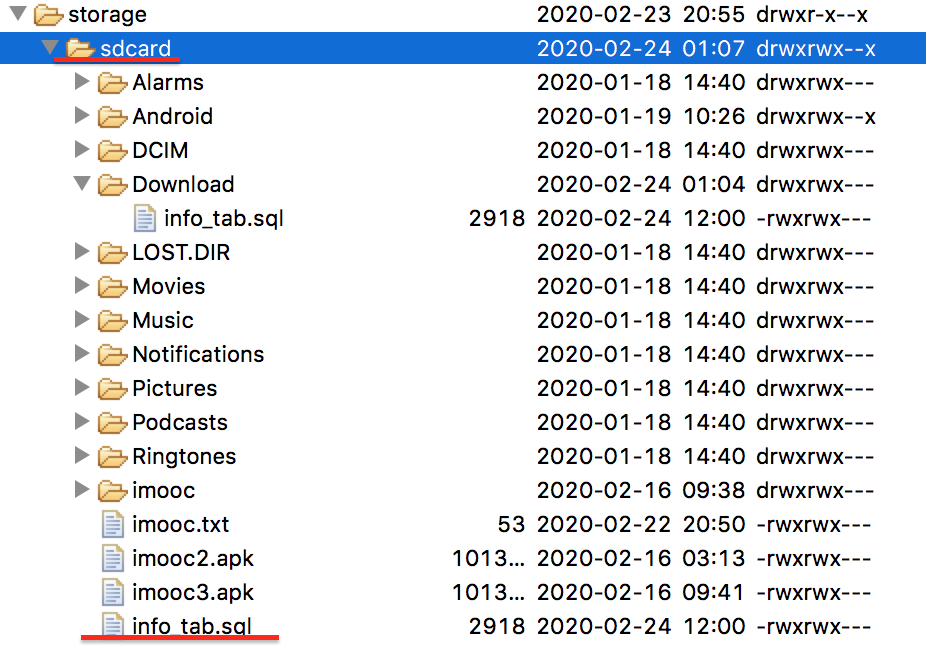
Switch to the simulator, and you can see the info tab.sql file we imported earlier in the storage/sdcard/Download directory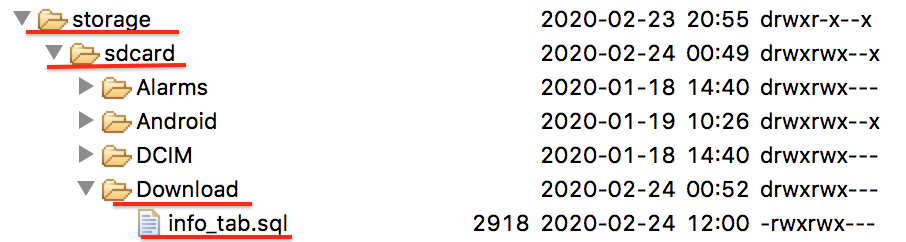
Import the database file in the root directory of the sdcard:
Import results:
3, Using SQLite in Android
1. Interface layout
Corresponding to database file info tab.sql
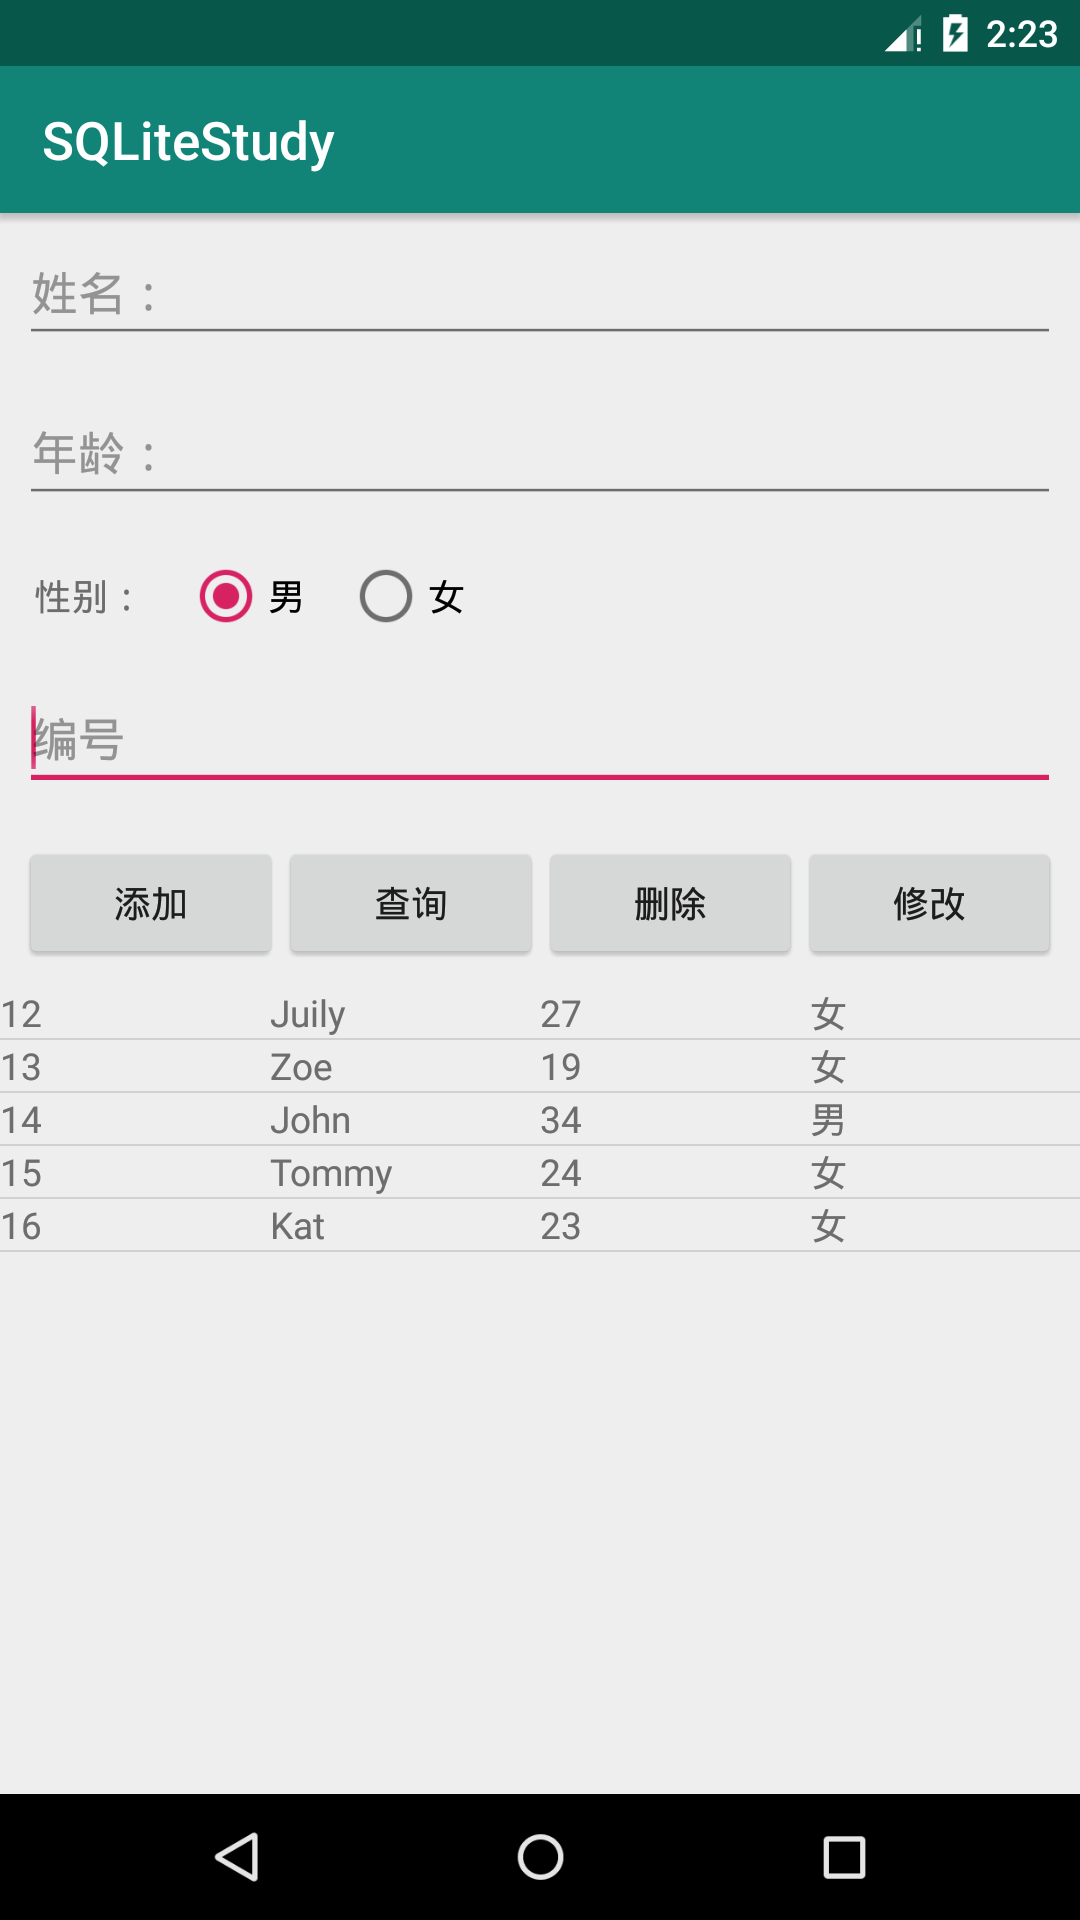
<?xml version="1.0" encoding="utf-8"?>
<LinearLayout xmlns:android="http://schemas.android.com/apk/res/android"
    xmlns:tools="http://schemas.android.com/tools"
    android:layout_width="match_parent"
    android:layout_height="match_parent"
    android:orientation="vertical"
    tools:context=".MainActivity">


    <EditText
        android:id="@+id/name_edt"
        android:layout_width="match_parent"
        android:layout_height="wrap_content"
        android:layout_margin="8dp"
        android:hint="Full name:" />

    <EditText
        android:id="@+id/age_edt"
        android:layout_width="match_parent"
        android:layout_height="wrap_content"
        android:layout_margin="8dp"
        android:hint="Age:"
        android:numeric="integer" />
    <!--     android:numeric="integer" Limit input data to integers only-->

    <!--    Radio button box-->
    <RadioGroup
        android:id="@+id/gender_group"
        android:layout_width="match_parent"
        android:layout_height="wrap_content"
        android:layout_margin="8dp"
        android:orientation="horizontal">

        <TextView
            android:layout_width="wrap_content"
            android:layout_height="wrap_content"
            android:layout_marginLeft="5dp"
            android:text="Gender:" />

        <RadioButton
            android:id="@+id/male"
            android:layout_width="wrap_content"
            android:layout_height="wrap_content"
            android:layout_marginLeft="15dp"
            android:checked="true"
            android:text="male" />
        <!--android:checked="true" Set this button as the default option-->

        <RadioButton
            android:id="@+id/female"
            android:layout_width="wrap_content"
            android:layout_height="wrap_content"
            android:layout_marginLeft="15dp"
            android:text="female" />

    </RadioGroup>

    <EditText
        android:id="@+id/id_edt"
        android:layout_width="match_parent"
        android:layout_height="wrap_content"
        android:layout_margin="8dp"
        android:hint="number" />

    <LinearLayout
        android:layout_width="match_parent"
        android:layout_height="wrap_content"
        android:layout_margin="8dp"
        android:orientation="horizontal">

        <Button
            android:id="@+id/insert_btn"
            android:layout_width="match_parent"
            android:layout_height="wrap_content"
            android:layout_weight="1"
            android:onClick="operate"
            android:text="Add to" />
        <!--        stay xml Add click event attribute to layout file-->

        <Button
            android:id="@+id/select_btn"
            android:layout_width="match_parent"
            android:layout_height="wrap_content"
            android:layout_weight="1"
            android:onClick="operate"
            android:text="query" />

        <Button
            android:id="@+id/delete_btn"
            android:layout_width="match_parent"
            android:layout_height="wrap_content"
            android:layout_weight="1"
            android:onClick="operate"
            android:text="delete" />

        <Button
            android:id="@+id/update_btn"
            android:layout_width="match_parent"
            android:layout_height="wrap_content"
            android:layout_weight="1"
            android:onClick="operate"
            android:text="modify" />

    </LinearLayout>

</LinearLayout>
MainActivity
public class MainActivity extends AppCompatActivity {

    @Override
    protected void onCreate(Bundle savedInstanceState) {
        super.onCreate(savedInstanceState);
        setContentView(R.layout.activity_main);
    }

}
Design sketch: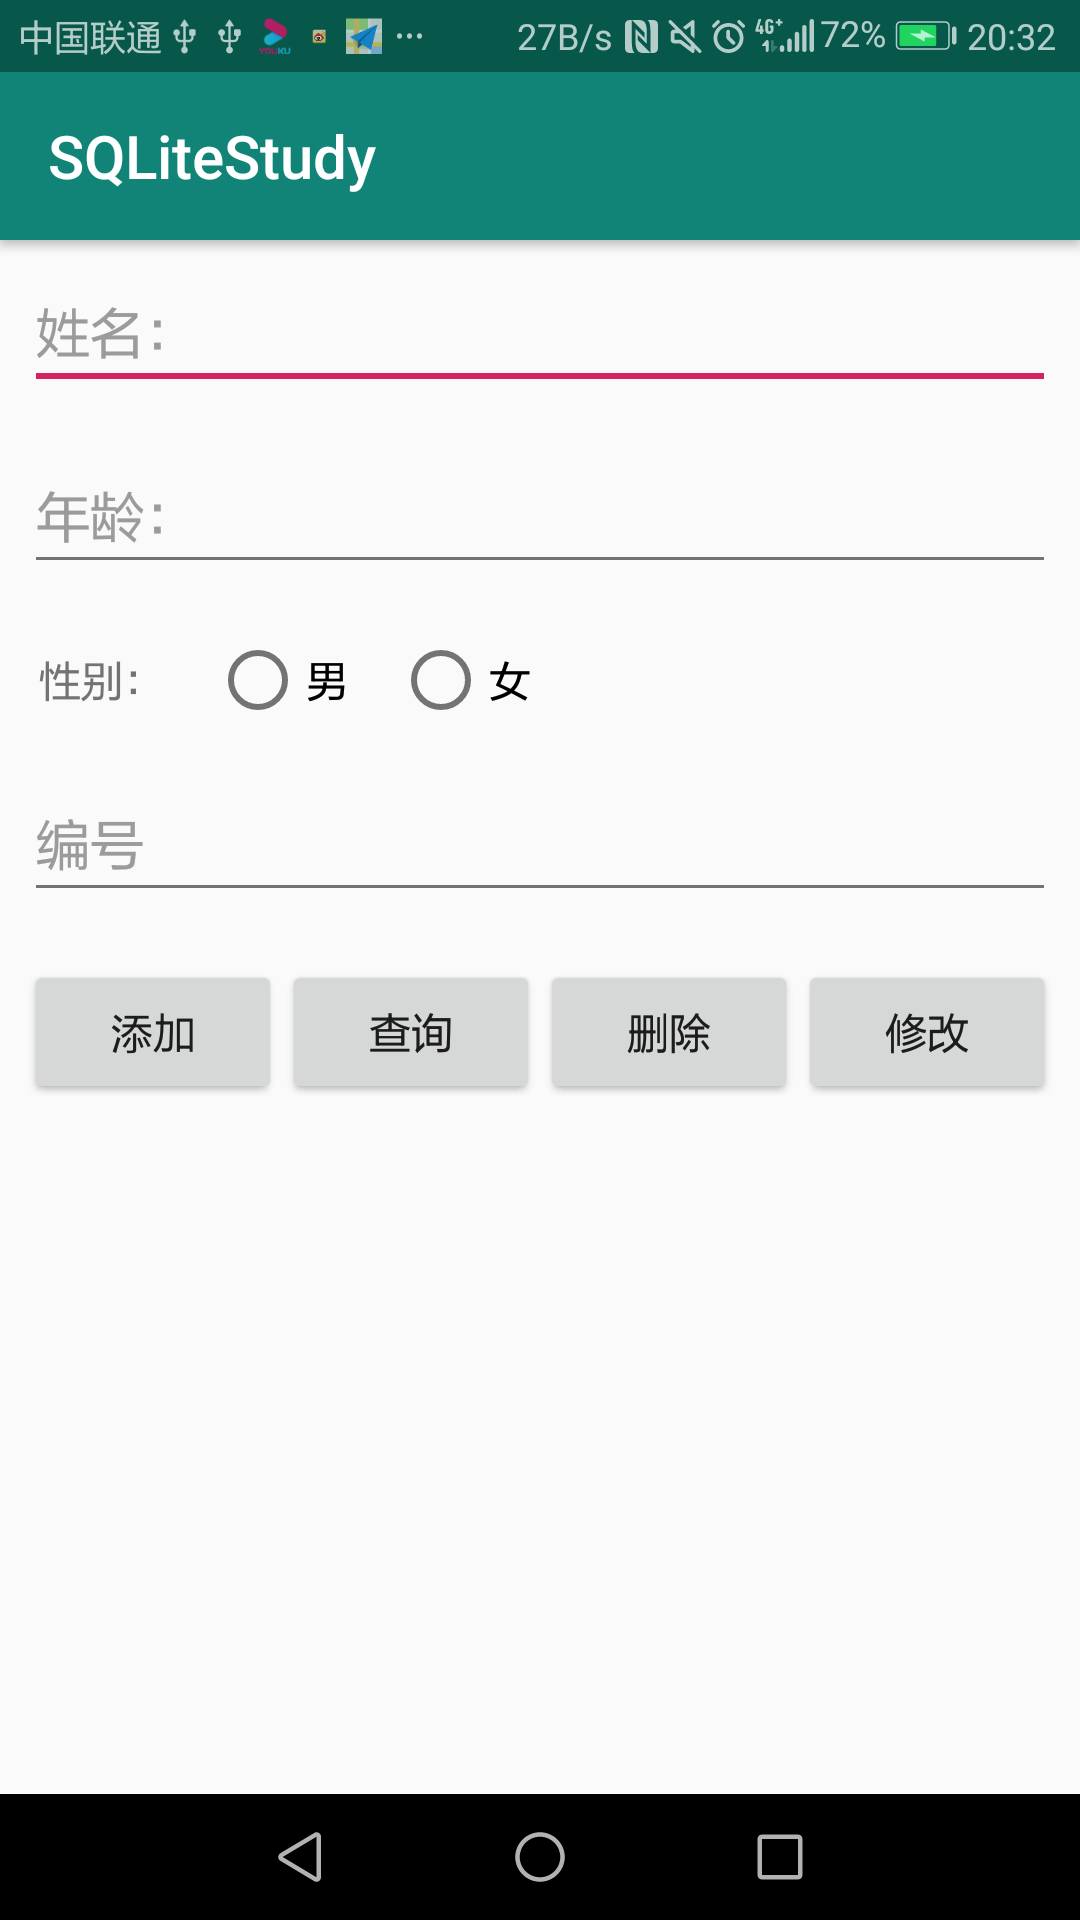
2. SQLiteOpenHelper class
reference material: SQLiteOpenHelper for Android
MainActivity
package com.example.sqlitestudy;

import androidx.appcompat.app.AppCompatActivity;

import android.database.sqlite.SQLiteDatabase;
import android.database.sqlite.SQLiteOpenHelper;
import android.os.Bundle;
import android.os.Environment;
import android.view.View;
import android.widget.Toast;

public class MainActivity extends AppCompatActivity {

    @Override
    protected void onCreate(Bundle savedInstanceState) {
        super.onCreate(savedInstanceState);
        setContentView(R.layout.activity_main);
    }

    //SQLiteOpenHelper
    public void operate(View view) {

        switch (view.getId()){

            case R.id.insert_btn:

                /**
                 * Add operation
                 */
                //Parameter 1: Context
                // Parameter 2: database name (if there is only one database name, the location of this database will be in the private directory;
                //                  If there is an SD card path, the database location is under the specified path.)
                String path= Environment.getExternalStorageDirectory()+"/test.sql";
                SQLiteOpenHelper helper=new SQLiteOpenHelper(this,path,null,1) {
                    @Override
                    public void onCreate(SQLiteDatabase db) {
                        /**
                         * Establish
                         */
                        Toast.makeText(MainActivity.this,"Database creation",Toast.LENGTH_SHORT).show();
                    }

                    @Override
                    public void onUpgrade(SQLiteDatabase db, int oldVersion, int newVersion) {
                        /**
                         * upgrade
                         */
                        Toast.makeText(MainActivity.this,"Database upgrade",Toast.LENGTH_SHORT).show();

                    }
                };
                //For getting database objects
                helper.getReadableDatabase();
                break;

            case R.id.select_btn:
                break;
            case R.id.delete_btn:
                break;
            case R.id.update_btn:
                break;
        }
    }
}
helper.getReadableDatabase(); used to get database objects
There are three possibilities:
1. If the database exists, open the database directly
2. If the database does not exist, call the database creation method, and then open the database
3. If the database exists but the version number increases, the database upgrade method is called
Corresponding renderings:
If the database does not exist: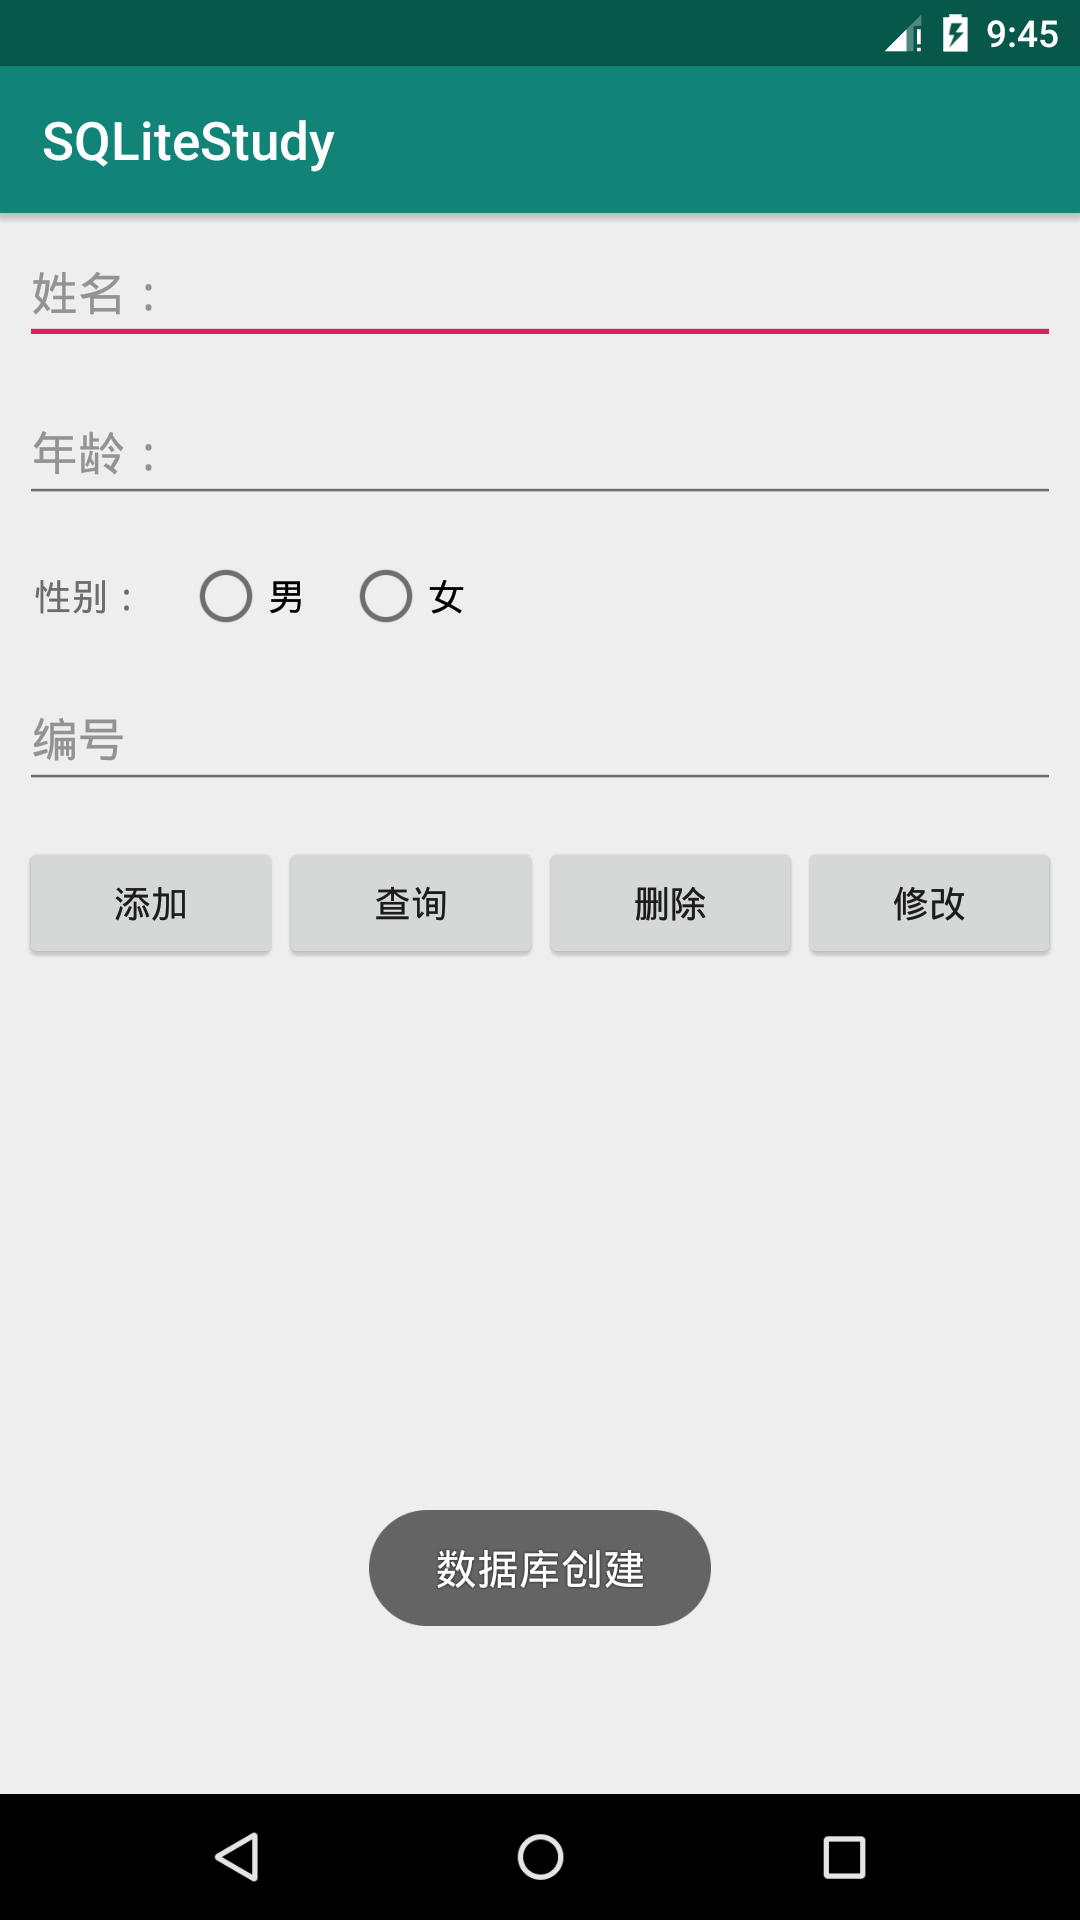
① If there is only one database name
SQLiteOpenHelper helper=new SQLiteOpenHelper(this,"try8888.sql",null,1) {
	...
}
The location of this database will be in the private directory: data/data / package name com.example.sqlitestudy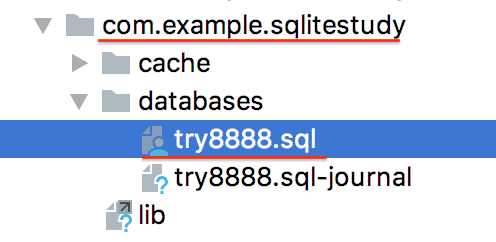
② If with SD card path
String path= Environment.getExternalStorageDirectory()+"/info_tab.sql";
SQLiteOpenHelper helper=new SQLiteOpenHelper(this,path,null,1) {
	... ...
}
Then the database location is under the specified path storage/sdcard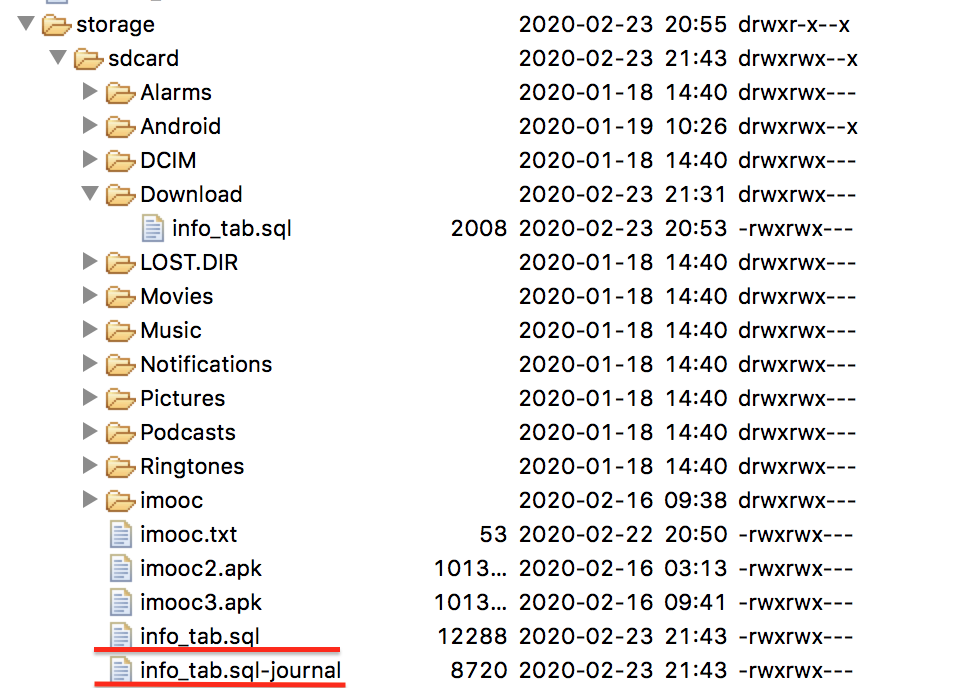
When the version number increases:
SQLiteOpenHelper helper=new SQLiteOpenHelper(this,path,null,2){
	... ...
}

3. SQLiteDatabase class
reference material: SQLiteDatabase for Android
Use to rawQuery(), execSQL()
3.1 create table
SQL statement:
String sql= "create table test_tab(_id integer primary key autoincrement,name varchar(20),age integer,gender varchar)";
Execute SQL statement:
db.execSQL(sql);
Specific code: MainActivity
public class MainActivity extends AppCompatActivity {

    ... ...

    //SQLiteOpenHelper
    public void operate(View view) {

        switch (view.getId()){

            case R.id.insert_btn:

                /**
                 * Add operation
                 */
                //Parameter 1: context environment; parameter 2: database name
                String path= Environment.getExternalStorageDirectory()+"/test.sql";
                //storage/sdcard/test.sql
                Log.d("MainActivity", path);

                SQLiteOpenHelper helper=new SQLiteOpenHelper(this,path,null,1) {
                    @Override
                    /**
                     * onCreate Is a callback method, which is executed when the database does not exist and helper.getReadableDatabase() has been used
                     * The onCreate method will be called, and the SQLiteDatabase object returned will be passed back to onCreate
                     */
                    public void onCreate(SQLiteDatabase db) {

                        // Establish
                        Toast.makeText(MainActivity.this,"Database creation",Toast.LENGTH_SHORT).show();

                        /**
                         * If the database does not exist, the onCreate method will be called. Then we can finish the creation of the table here
                         */
                        //SQL statement
                        String sql= "create table test_tab(_id integer primary key autoincrement,name varchar(20),age integer,gender varchar)";
                        db.execSQL(sql);

                    }

                    @Override
                    public void onUpgrade(SQLiteDatabase db, int oldVersion, int newVersion) {

                        // upgrade
Toast.makeText(MainActivity.this,"Database upgrade",Toast.LENGTH_SHORT).show();

                    }
                };

                SQLiteDatabase db=helper.getReadableDatabase();

                /**
                 * db.rawQuery() query
                 * db.execSQL()  Add, delete, modify, and create tables (execute SQL statement by execute)
                 */

                break;

            ... ...
        }
    }
}
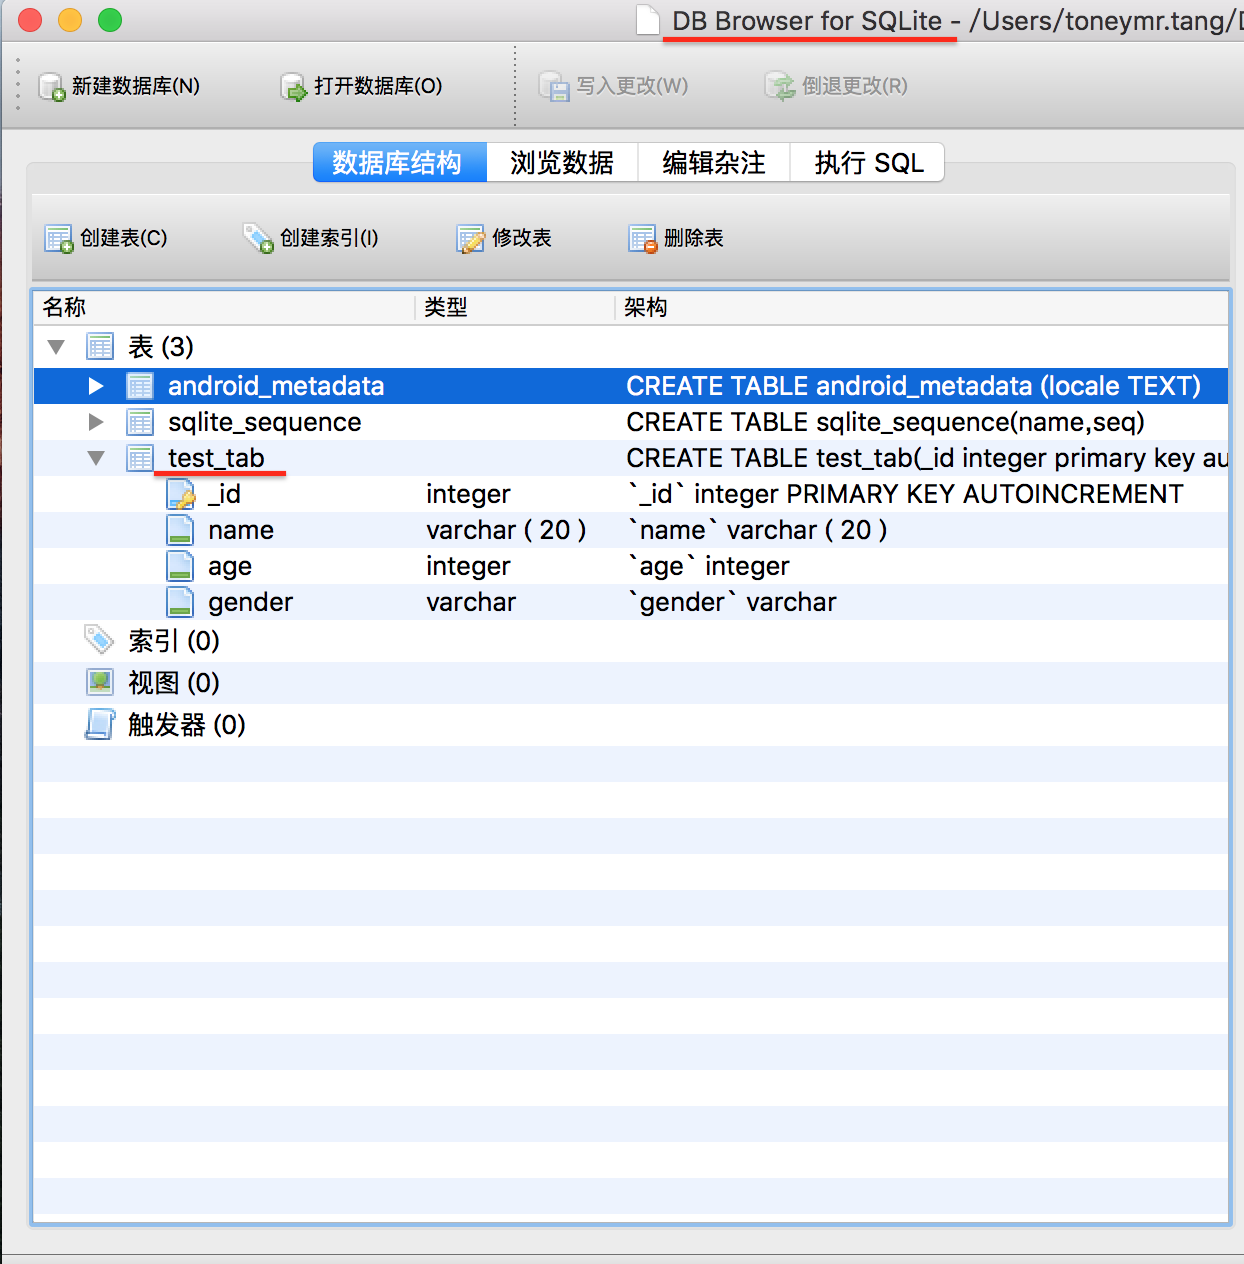
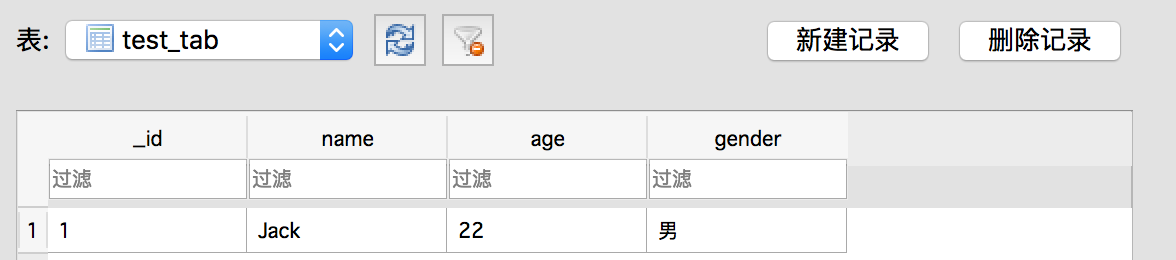
Export the generated test.sql file to the desktop: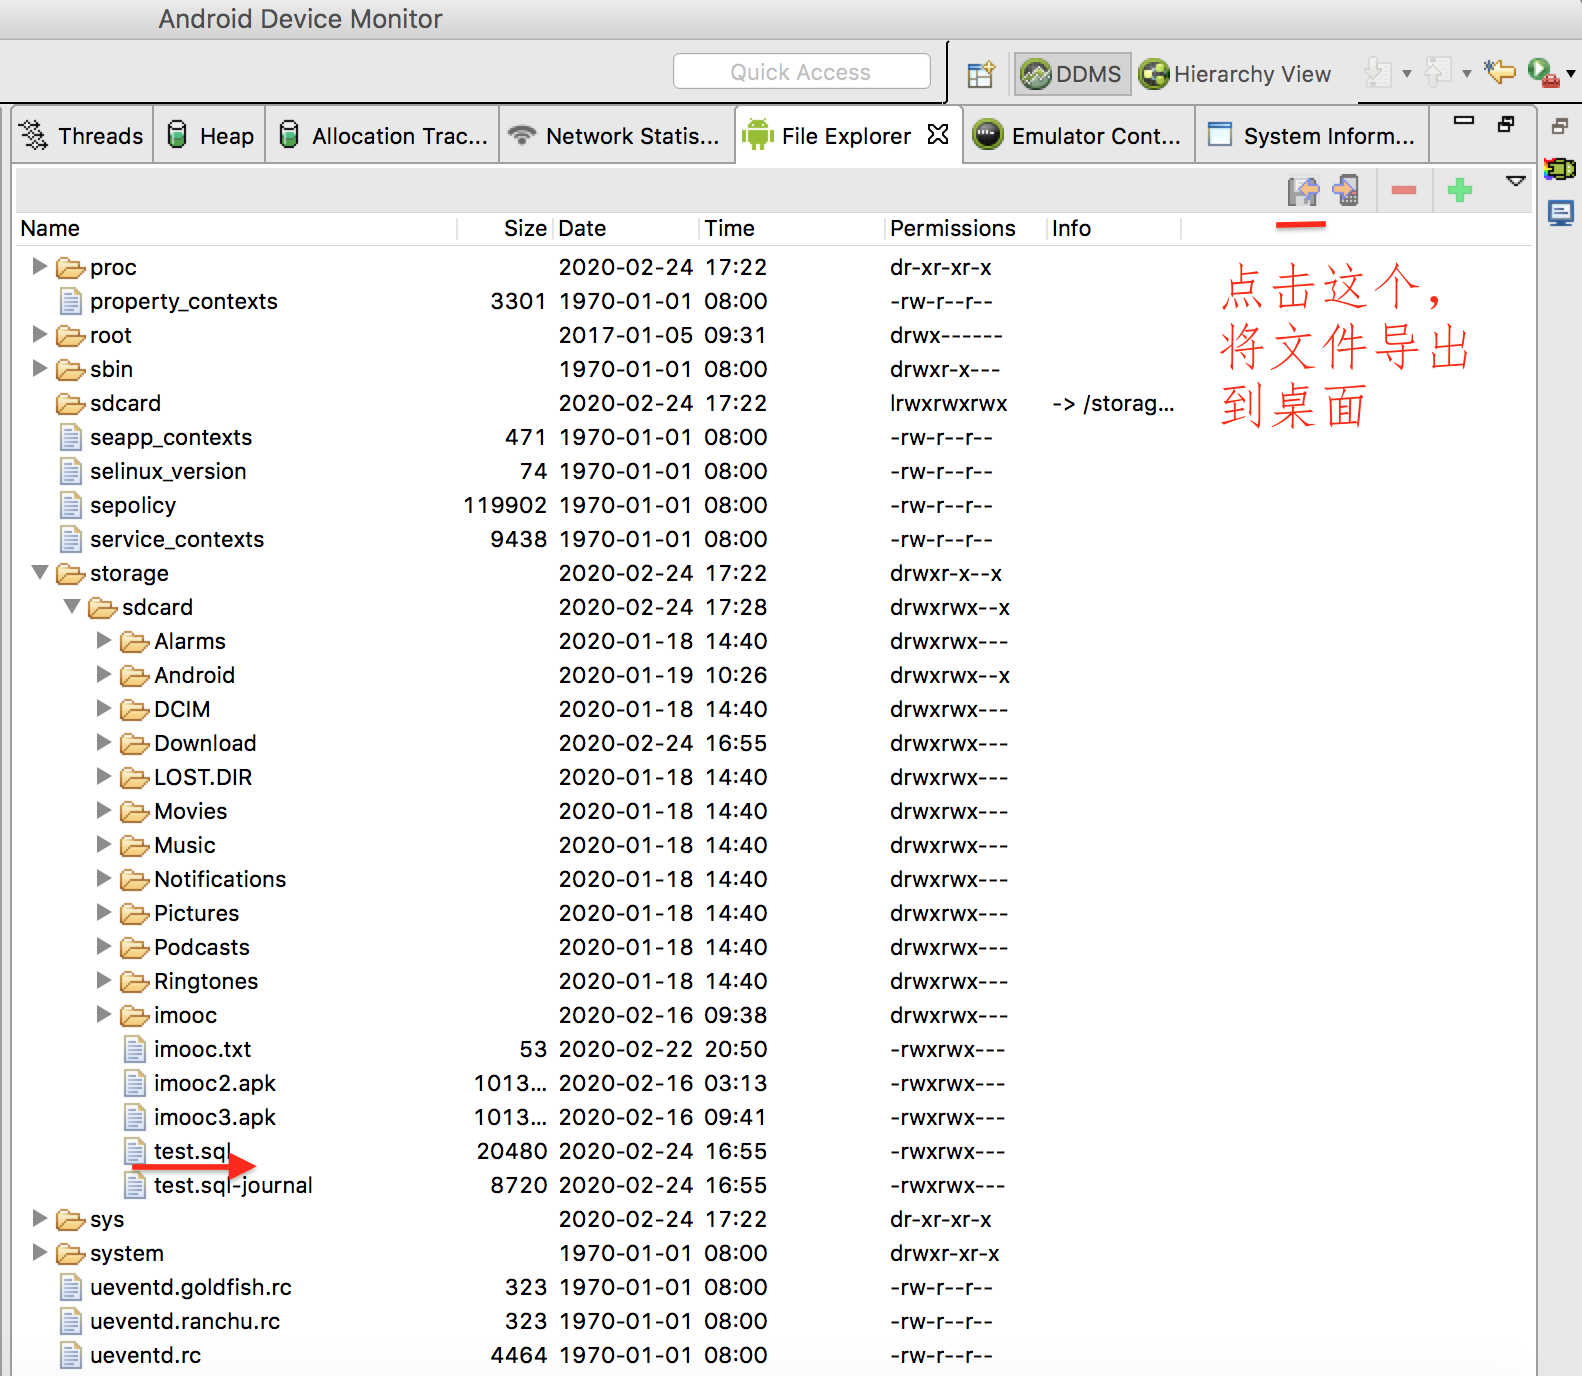
Import to MySQL workbench to see if the test tab table has been generated:
This step has a lot of problems and takes a lot of time. Later, we found that although the SQL statements are the same, MySQL workbench is more suitable for MySQL. Finally, we download DB Browser for SQLite, and successfully complete the work of importing database.

3.2 add data
Method 1:
String sql="insert into test_tab (name,age,gender) values ('"+nameStr+"',"+ageStr+",'"+genderStr+"')";
db.execSQL(sql);
Mode two:
String sql = "insert into test_tab (name,age,gender) values (?,?,?)";
db.execSQL(sql,new String[]{nameStr,ageStr,genderStr});
Specific code: MainActivity
public class MainActivity extends AppCompatActivity {

    private EditText nameEdt,ageEdt;
    private RadioGroup genderGp;
    private String genderStr="male";//In case nothing is selected, set the default option to male
    @Override
    protected void onCreate(Bundle savedInstanceState) {
        super.onCreate(savedInstanceState);
        setContentView(R.layout.activity_main);

        //Initialize control
        nameEdt=(EditText)findViewById(R.id.name_edt);
        ageEdt=(EditText)findViewById(R.id.age_edt);

        //Read radio button to monitor the event of option switching
        genderGp=(RadioGroup)findViewById(R.id.gender_group);
        genderGp.setOnCheckedChangeListener(new RadioGroup.OnCheckedChangeListener() {
            @Override
            public void onCheckedChanged(RadioGroup group, int checkedId) {
                if(checkedId==R.id.male){
                    //male
                    genderStr="male";
                }
                else{
                    //female
                    genderStr="female";
                }
            }
        });
    }

    //SQLiteOpenHelper
    //SQLiteDatabase
    public void operate(View view) {

        switch (view.getId()){

            case R.id.insert_btn:

                ... ...

                SQLiteDatabase db=helper.getReadableDatabase();

                //Get the contents of the input box
                String nameStr=nameEdt.getText().toString();
                String ageStr=ageEdt.getText().toString();
                //The inserted data is the content of the input box
                String sql="insert into test_tab (name,age,gender) values ('"+nameStr+"',"+ageStr+",'"+genderStr+"')";
                db.execSQL(sql);
                //Suggestive statement
				Toast.makeText(MainActivity.this,"Add success",Toast.LENGTH_SHORT).show();


                break;

            ... ...
        }
    }
}
Design sketch:
3.2 query data
activity_main.xml
To display the queried data on the interface, add a ListView control
  <ListView
        android:layout_width="match_parent"
        android:layout_height="match_parent"
        android:id="@+id/stu_list"></ListView>
item.xml
Children of query results
<?xml version="1.0" encoding="utf-8"?><!--ListView Layout of sub items, including4Text-->
<LinearLayout xmlns:android="http://schemas.android.com/apk/res/android"
    android:layout_width="match_parent"
    android:layout_height="match_parent"
    android:orientation="horizontal">

    <TextView
        android:id="@+id/id_item"
        android:layout_width="match_parent"
        android:layout_height="wrap_content"
        android:layout_weight="1" />

    <TextView
        android:id="@+id/name_item"
        android:layout_width="match_parent"
        android:layout_height="wrap_content"
        android:layout_weight="1" />

    <TextView
        android:id="@+id/age_item"
        android:layout_width="match_parent"
        android:layout_height="wrap_content"
        android:layout_weight="1" />

    <TextView
        android:id="@+id/gender_item"
        android:layout_width="match_parent"
        android:layout_height="wrap_content"
        android:layout_weight="1" />

</LinearLayout>
MainActivity
Because SQLiteOpenHelper and SQLiteDatabase are also needed to query data. In order to avoid code duplication (also because SQLiteDatabase object can execute rawQuery() and execSQL() methods repeatedly), the new SQLiteOpenHelper and the related code house onCreate() method of getting SQLiteDatabase object (db) are used, and db is extracted as a global variable.
reference material: SimpleCursorAdapter for Android
1. All queries:
String sql2="select * from test_tab";
Query results
Cursor c=db.rawQuery(sql2,null);
2. Partial query:
String sql2="select * from test_tab";
query criteria
String idStr=idEdt.getText().toString();
if(!idStr.equals("")){
	 sql2+=" where _id="+idStr;
}
Query results
Cursor c=db.rawQuery(sql2,null);
Specific code:
public class MainActivity extends AppCompatActivity {

    private EditText nameEdt,ageEdt,idEdt;
    private RadioGroup genderGp;
    private ListView  listView;
    private String genderStr="male";//In case nothing is selected, set the default option to male (add the corresponding xml settings)
    private SQLiteDatabase db;

    @Override
    protected void onCreate(Bundle savedInstanceState) {
        super.onCreate(savedInstanceState);
        setContentView(R.layout.activity_main);

        //Parameter 1: Context
        //Parameter 2: database name (if there is only one database name, the location of this database will be in the private directory;
        //If there is an SD card path, the database location is under the specified path.)
        String path= Environment.getExternalStorageDirectory()+"/test.sql";
        //storage/sdcard/test.sql
        Log.d("MainActivity", path);
        SQLiteOpenHelper helper=new SQLiteOpenHelper(this,path,null,1) {
            @Override
            /**
             * onCreate Is a callback method, which is executed when the database does not exist and helper.getReadableDatabase() has been used
             * The onCreate method will be called, and the SQLiteDatabase object returned will be passed back to onCreate
             */
            public void onCreate(SQLiteDatabase db) {

                // Establish
                Toast.makeText(MainActivity.this, "Database creation", Toast.LENGTH_SHORT).show();

                /**
                 * If the database does not exist, the onCreate method will be called. Then we can finish the creation of the table here
                 */
                String sql = "create table test_tab(_id integer primary key autoincrement,name varchar(20),age integer,gender varchar)";
                db.execSQL(sql);

            }

            @Override
            public void onUpgrade(SQLiteDatabase db, int oldVersion, int newVersion) {
                // upgrade
                Toast.makeText(MainActivity.this,"Database upgrade",Toast.LENGTH_SHORT).show();

            }
        };

        //For getting database objects
        //1. If the database exists, open the database directly
        //2. If the database does not exist, create the database and open it again
        //3. If the database exists but the version number increases, the database upgrade method is called
        db = helper.getReadableDatabase();

        ... ...

        idEdt=(EditText)findViewById(R.id.id_edt);

		... ...

        //Set the data displayed on the interface in listview (Adapter is required for listview)
        listView=(ListView)findViewById(R.id.listView);
    }

    //SQLiteOpenHelper
    //SQLiteDatabase
    public void operate(View view) {

        switch (view.getId()){

                ... ...

            case R.id.select_btn:

                //select * from table name where [id =?
                String sql2="select * from test_tab";
                //Query results
                Cursor c=db.rawQuery(sql2,null);
//                db.rawQuery(sql,new String[]{})
                /**
                 * Next, we need to process the query results and display the data in the interface
                 */
                /*
                SimpleCursorAdapter:Parameter 1 context environment; parameter 2 layout resource; parameter 3 data source;
                 */
                SimpleCursorAdapter adapter=new SimpleCursorAdapter(
                        this,
                        R.layout.item,
                        c,
                        new String[]{"_id","name","age","gender"},
                        new int[]{R.id.id_item,R.id.name_item,R.id.age_item,R.id.gender_item},
                        CursorAdapter.FLAG_REGISTER_CONTENT_OBSERVER
                        );
                listView.setAdapter(adapter);

                break;

            ... ...

        }
    }
}
Design sketch: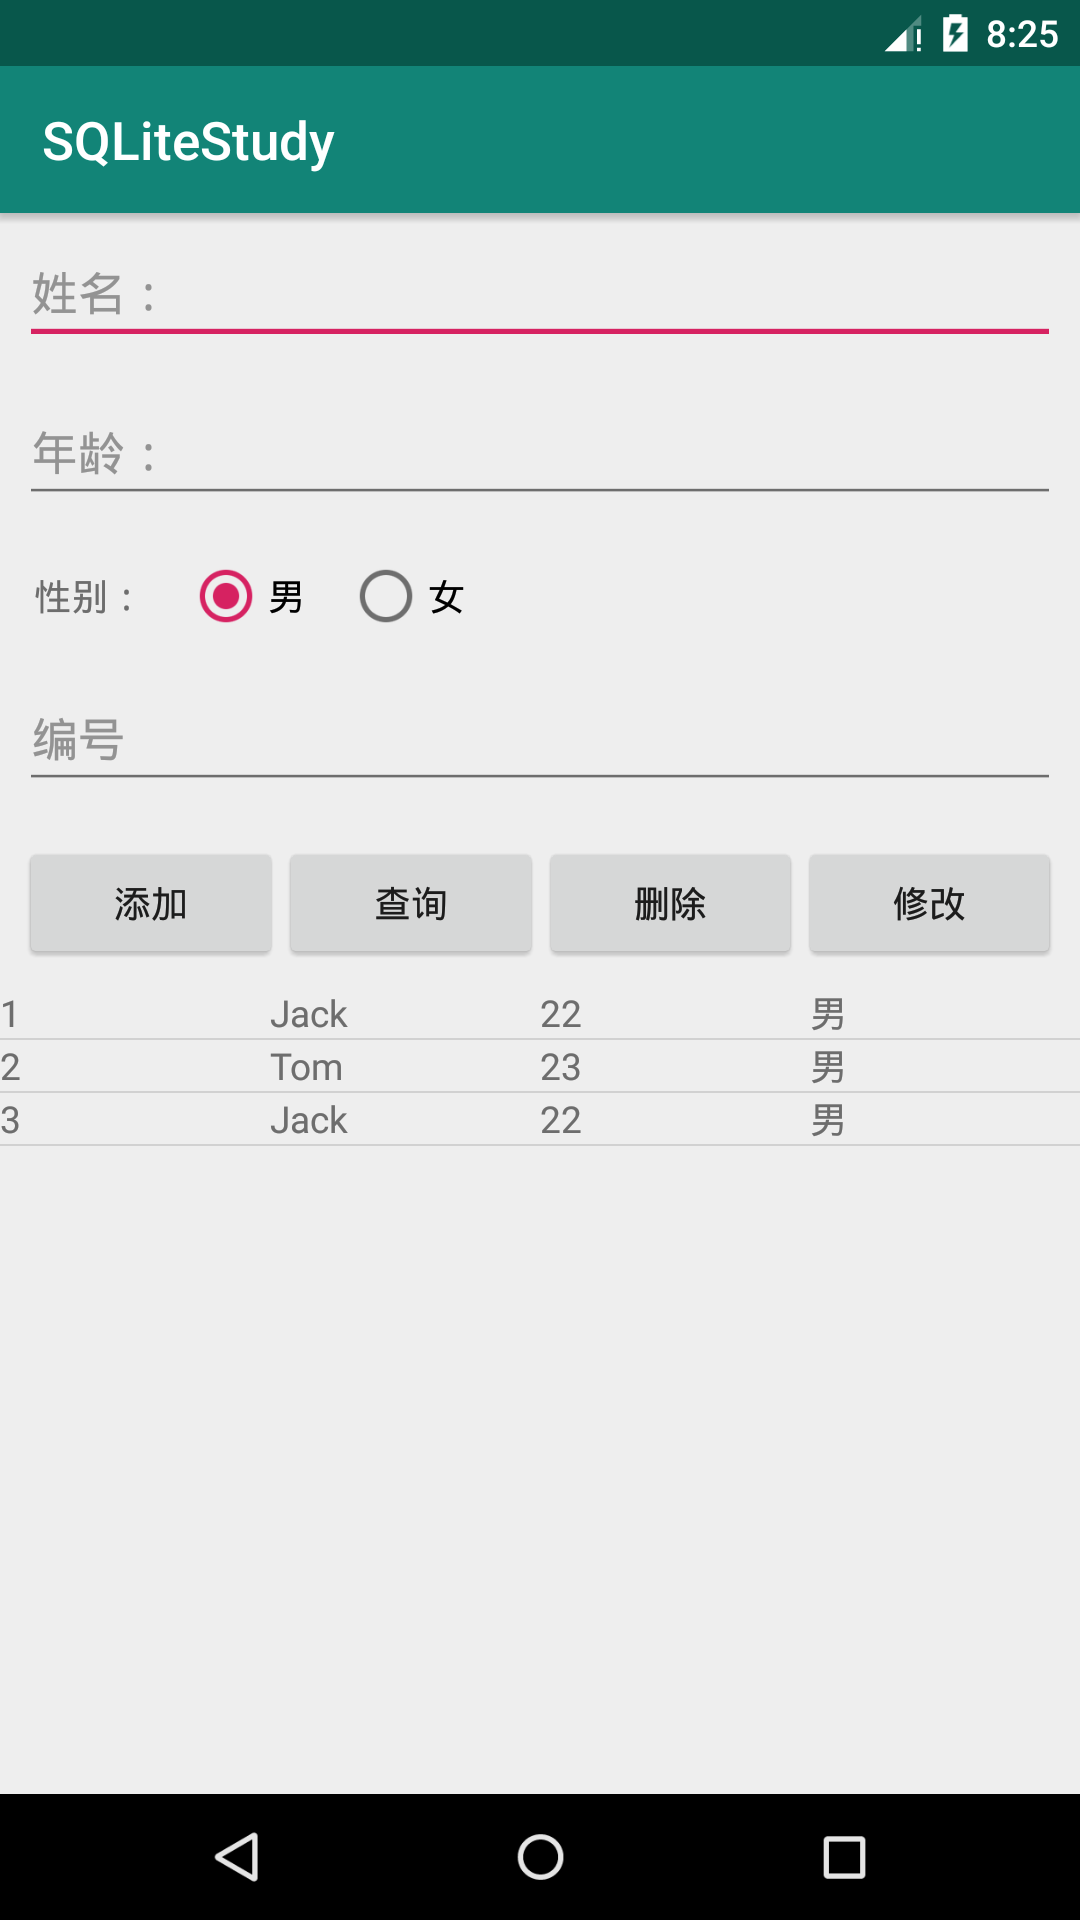
Question: why set the student id attribute name to "id"?
Answer: because when the new SimpleCursorAdapter recognizes that the data source Cursor c does not have an [id] - > the requirement of simplecursoradapter for this class at the beginning of the definition is that the data source must have an [id] column - > if not, it will not be recognized and an exception will occur - > this is why the student id attribute name should be set to [id] at the beginning
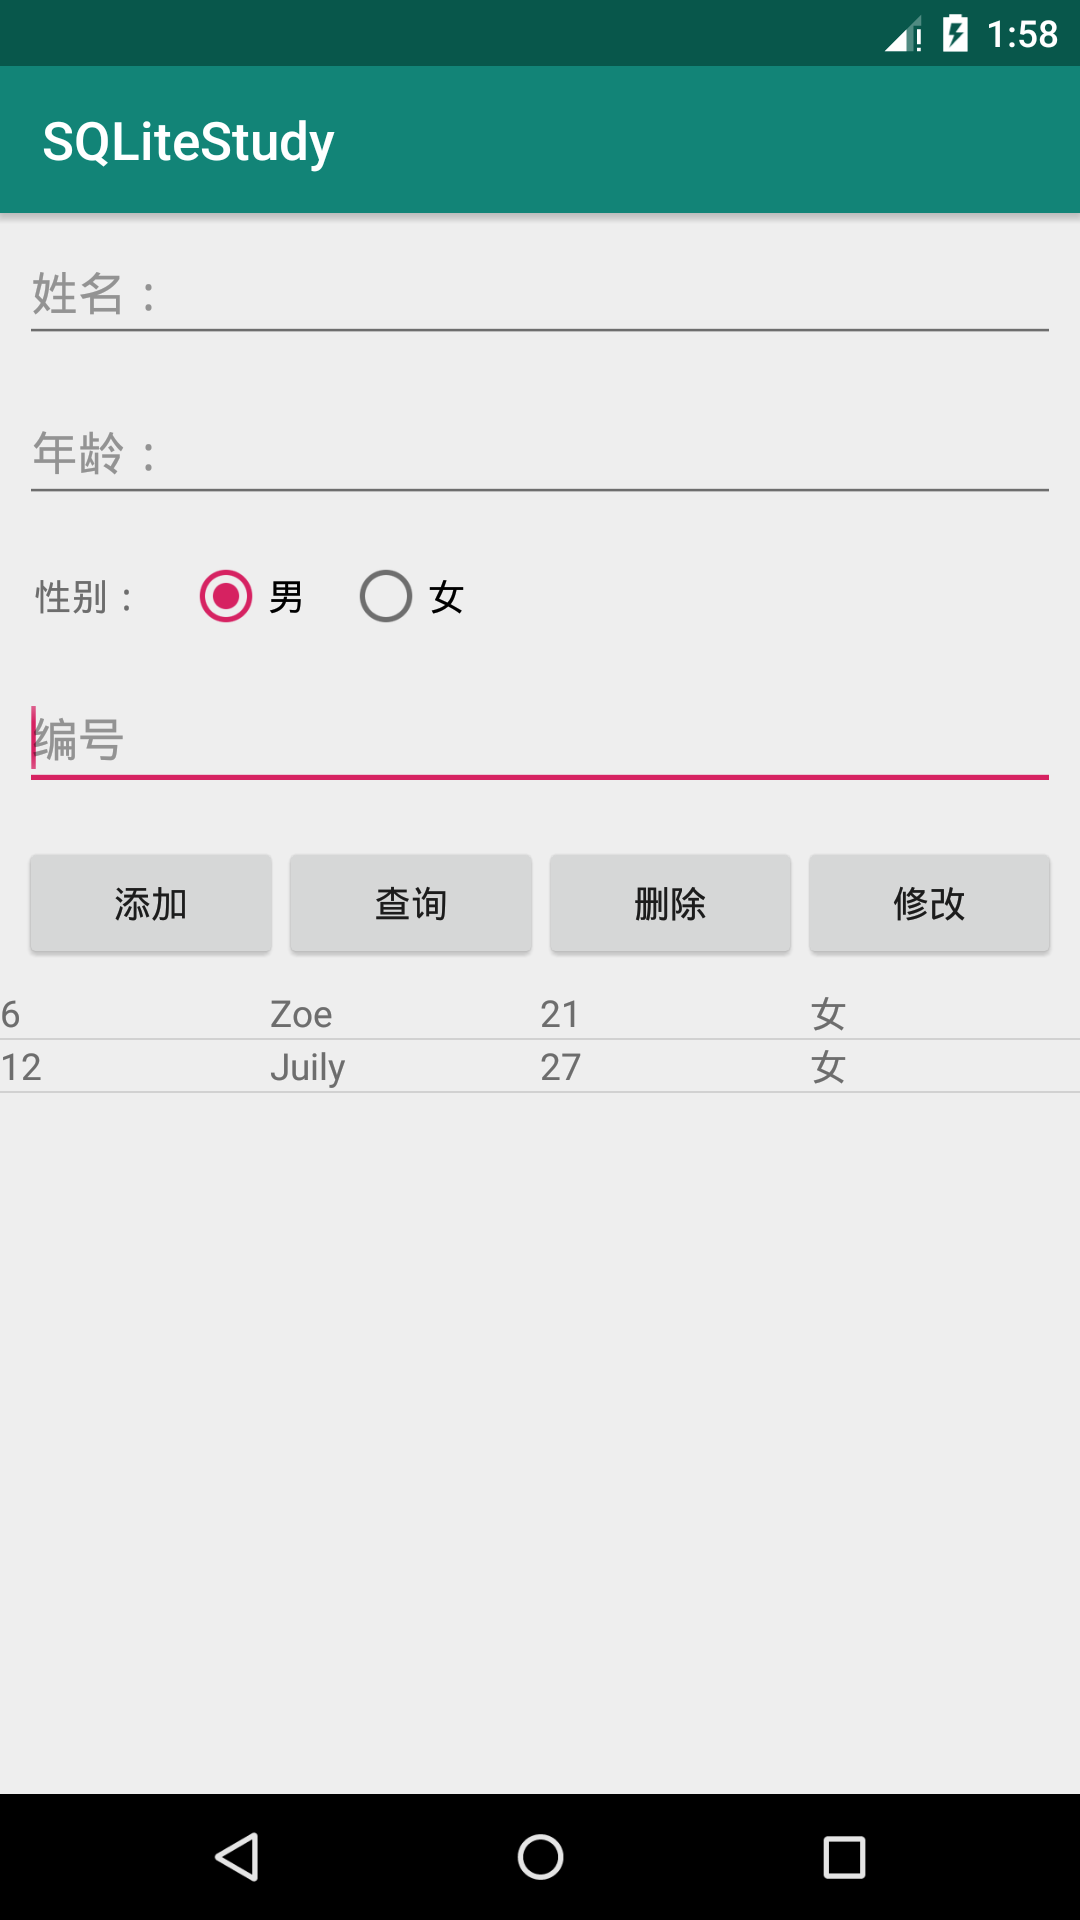
3.3 delete data
public class MainActivity extends AppCompatActivity {

 	public void operate(View view) {

		... ...

	 	//Get the contents of the input box
        String nameStr=nameEdt.getText().toString();
        String ageStr=ageEdt.getText().toString();
        //Conditions of condition query
        String idStr = idEdt.getText().toString();

		... ...

		switch (view.getId()){

			... ...

			case R.id.delete_btn:

	    		String sql3="delete from test_tab where _id=?";
	    		db.execSQL(sql3,new String[]{idStr});

    		break;

			... ...
		}
	}
}
Design sketch: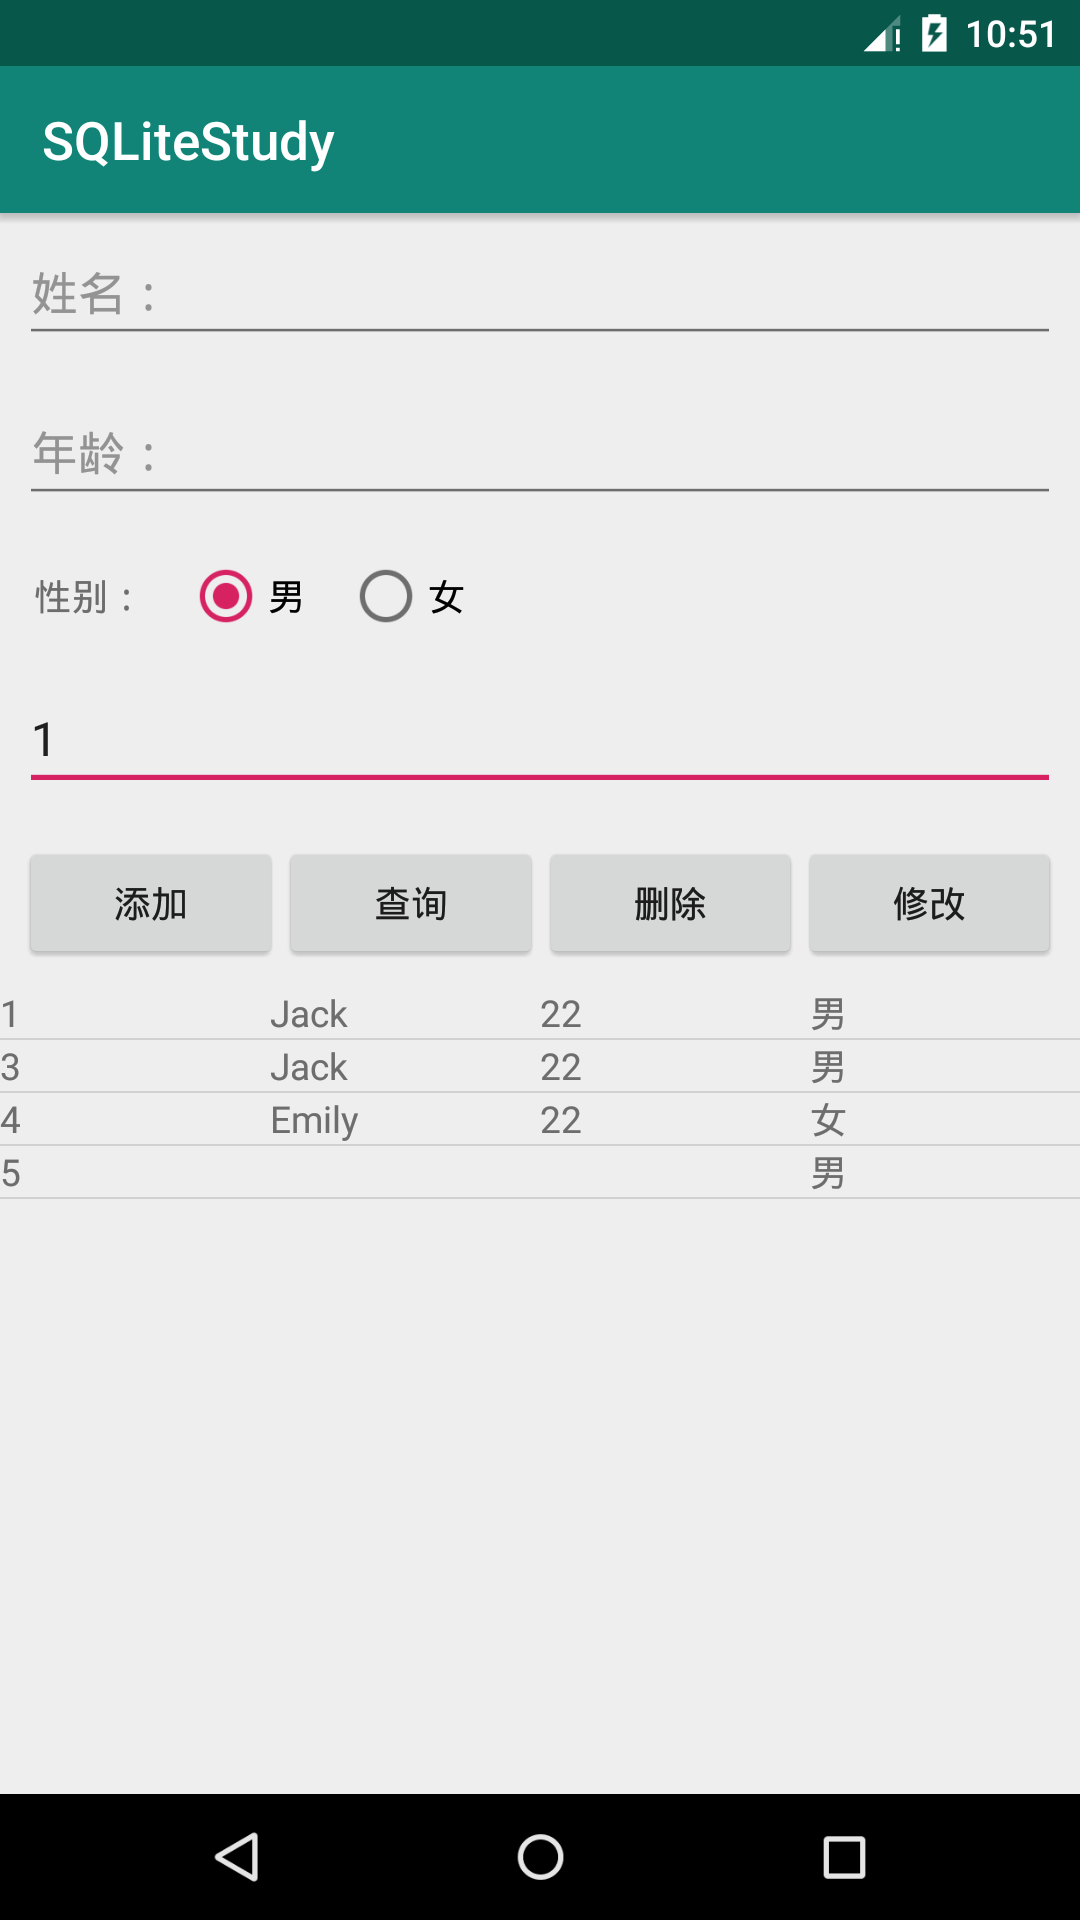
3.4 modify data
public class MainActivity extends AppCompatActivity {

 	public void operate(View view) {

		... ...

	 	//Get the contents of the input box
        String nameStr=nameEdt.getText().toString();
        String ageStr=ageEdt.getText().toString();
        //Conditions of condition query
        String idStr = idEdt.getText().toString();

		... ...

		switch (view.getId()){

			... ...

			case R.id.update_btn:

                String sql4="update test_tab set name=?,age=?,gender=? where _id=?";
                db.execSQL(sql4,new String[]{nameStr,ageStr,genderStr,idStr});

                break;

			... ...
		}
	}
}
Design sketch:
3.5 improvement
1. Input information in the input box, clear the input box after operation (avoid manual clearing every time) (radio button returns to the initial setting "male")
private String genderStr = "male";
malerb = (RadioButton) findViewById(R.id.male);
malerb.setChecked(true);

nameEdt.setText("");
ageEdt.setText("");
idEdt.setText("");
2. When the operation is successful, prompt
Toast.makeText(this,"Add success",Toast.LENGTH_SHORT).show();
Toast.makeText(this,"Delete successful",Toast.LENGTH_SHORT).show();
Toast.makeText(this,"Modified success",Toast.LENGTH_SHORT).show();
3.6 complete code
MainActivity
public class MainActivity extends AppCompatActivity {

    private EditText nameEdt,ageEdt,idEdt;
    private RadioGroup genderGp;
    private ListView  listView;
    private String genderStr="male";//In case nothing is selected, set the default option to male (add the corresponding xml settings)
    private SQLiteDatabase db;
    private RadioButton malerb;//Let the radio button return to the initial state "male" after each operation

    @Override
    protected void onCreate(Bundle savedInstanceState) {
        super.onCreate(savedInstanceState);
        setContentView(R.layout.activity_main);

        //Parameter 1: Context
        // Parameter 2: database name (if there is only one database name, the location of this database will be in the private directory;
        //                  If there is an SD card path, the database location is under the specified path.)
        String path= Environment.getExternalStorageDirectory()+"/test.sql";
        //storage/sdcard/test.sql
        Log.d("MainActivity", path);
        SQLiteOpenHelper helper=new SQLiteOpenHelper(this,path,null,1) {
            @Override
            /**
             * onCreate Is a callback method, which is executed when the database does not exist and helper.getReadableDatabase() has been used
             * The onCreate method will be called, and the SQLiteDatabase object returned will be passed back to onCreate
             */
            public void onCreate(SQLiteDatabase db) {

                // Establish
                Toast.makeText(MainActivity.this, "Database creation", Toast.LENGTH_SHORT).show();

                /**
                 * If the database does not exist, the onCreate method will be called. Then we can finish the creation of the table here
                 */
                //SQL statement
                String sql = "create table test_tab(_id integer primary key autoincrement,name varchar(20),age integer,gender varchar)";
                db.execSQL(sql);

            }

            @Override
            public void onUpgrade(SQLiteDatabase db, int oldVersion, int newVersion) {
                // upgrade
                Toast.makeText(MainActivity.this,"Database upgrade",Toast.LENGTH_SHORT).show();

            }
        };


        //For getting database objects
        //1. If the database exists, open the database directly
        //2. If the database does not exist, create the database and open it again
        //3. If the database exists but the version number increases, the database upgrade method is called
        db = helper.getReadableDatabase();

        //Initialize control
        nameEdt=(EditText)findViewById(R.id.name_edt);
        ageEdt=(EditText)findViewById(R.id.age_edt);
        idEdt=(EditText)findViewById(R.id.id_edt);
        malerb=(RadioButton)findViewById(R.id.male);

        //Read radio button to monitor the event of option switching
        genderGp=(RadioGroup)findViewById(R.id.gender_group);
        genderGp.setOnCheckedChangeListener(new RadioGroup.OnCheckedChangeListener() {
            @Override
            public void onCheckedChanged(RadioGroup group, int checkedId) {
                if(checkedId==R.id.male){
                    //male
                    genderStr="male";
                }
                else{
                    //female
                    genderStr="female";
                }
            }
        });

        //Set the data displayed on the interface in listview (Adapter is required for listview)
        listView=(ListView)findViewById(R.id.listView);


    }

    //SQLiteOpenHelper
    //SQLiteDatabase
    public void operate(View view) {

        //Get the contents of the input box
        String nameStr=nameEdt.getText().toString();
        String ageStr=ageEdt.getText().toString();
        //Conditions of condition query
        String idStr = idEdt.getText().toString();

        switch (view.getId()){

            case R.id.insert_btn:

                /**
                 * db.rawQuery() query
                 * db.execSQL()  Add, delete, modify, and create tables (execute SQL statement by execute)
                 */


                //The inserted data is the content of the input box
//                String sql="insert into test_tab (name,age,gender) values ('"+nameStr+"',"+ageStr+",'"+genderStr+"')";
                String sql = "insert into test_tab (name,age,gender) values (?,?,?)";
                db.execSQL(sql,new String[]{nameStr,ageStr,genderStr});
                Toast.makeText(MainActivity.this,"Add success",Toast.LENGTH_SHORT).show();

                break;

            case R.id.select_btn:

                //select * from table name where [id =?
                String sql2="select * from test_tab";

                if(!idStr.equals("")){
                    sql2+=" where _id="+ idStr;
                }
                //Query results
                Cursor c=db.rawQuery(sql2,null);
//                db.rawQuery(sql,new String[]{})
                /**
                 * Next, we need to process the query results and display the data in the interface
                 */
                /*
                SimpleCursorAdapter:Parameter 1 context environment; parameter 2 layout resource; parameter 3 data source;
                 */
                SimpleCursorAdapter adapter=new SimpleCursorAdapter(
                        this,
                        R.layout.item,
                        c,
                        new String[]{"_id","name","age","gender"},
                        new int[]{R.id.id_item,R.id.name_item,R.id.age_item,R.id.gender_item},
                        CursorAdapter.FLAG_REGISTER_CONTENT_OBSERVER
                        );
                listView.setAdapter(adapter);

                break;

            case R.id.delete_btn:

                String sql3="delete from test_tab where _id=?";
                db.execSQL(sql3,new String[]{idStr});
                Toast.makeText(this,"Delete successful",Toast.LENGTH_SHORT).show();

                break;

            case R.id.update_btn:

                String sql4="update test_tab set name=?,age=?,gender=? where _id=?";
                db.execSQL(sql4,new String[]{nameStr,ageStr,genderStr,idStr});
                Toast.makeText(this,"Modified success",Toast.LENGTH_SHORT).show();

                break;
        }

        nameEdt.setText("");
        ageEdt.setText("");
        idEdt.setText("");
        malerb.setChecked(true);
    }
}
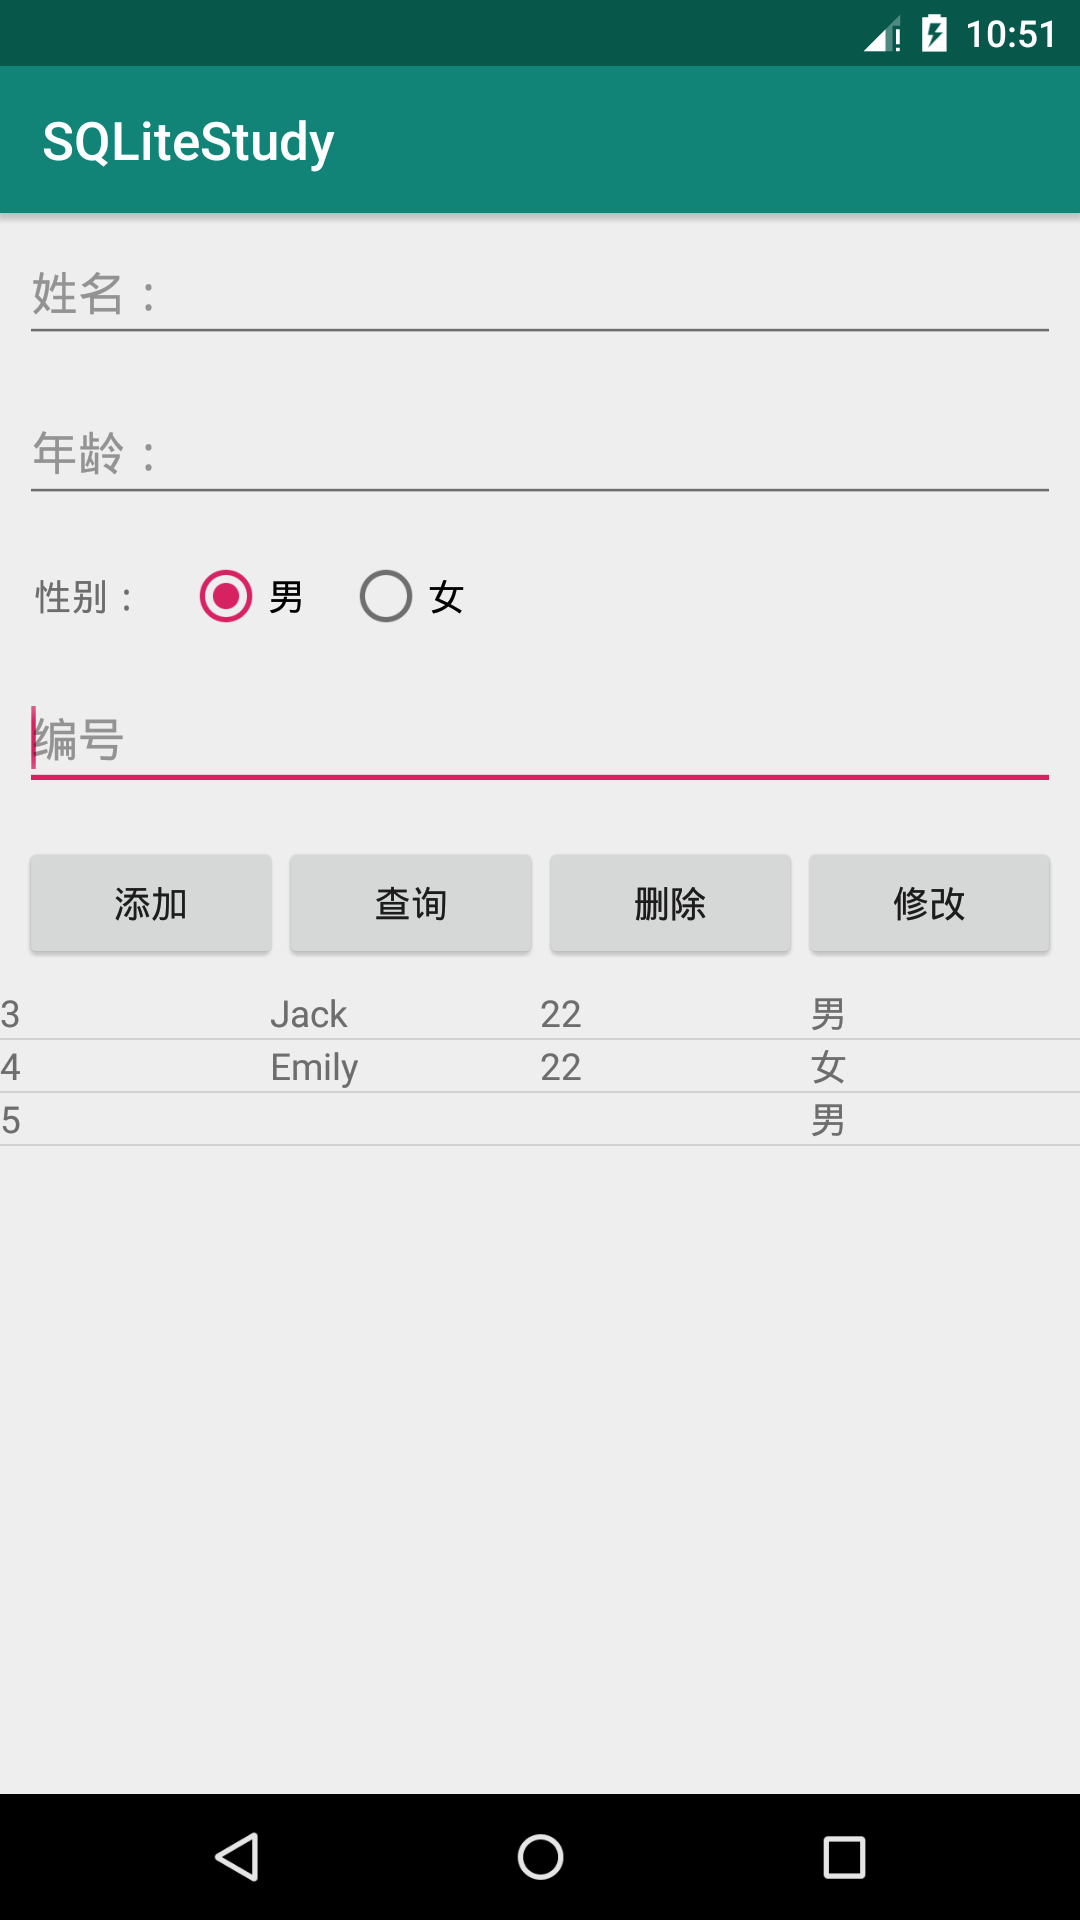
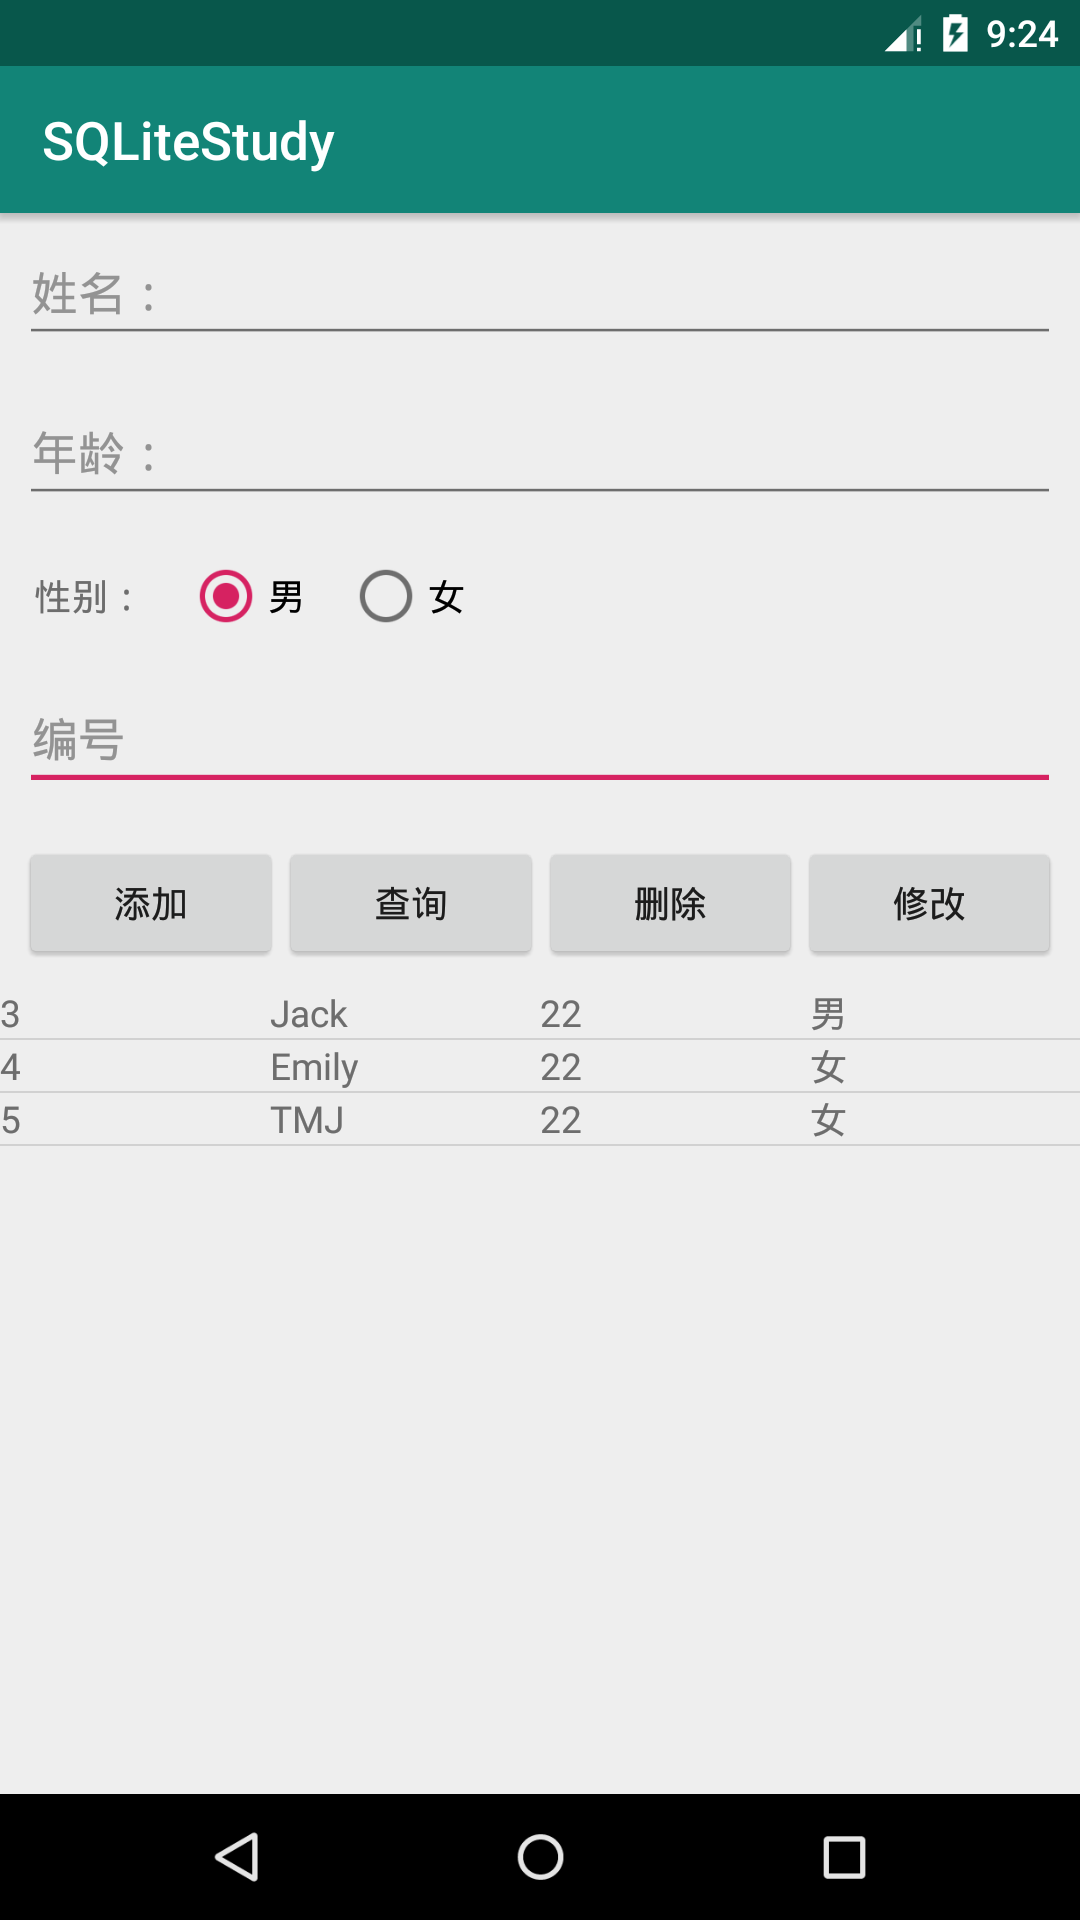
Design sketch:
As shown in the figure, after pressing the "modify" button, all the contents of the input box will be cleared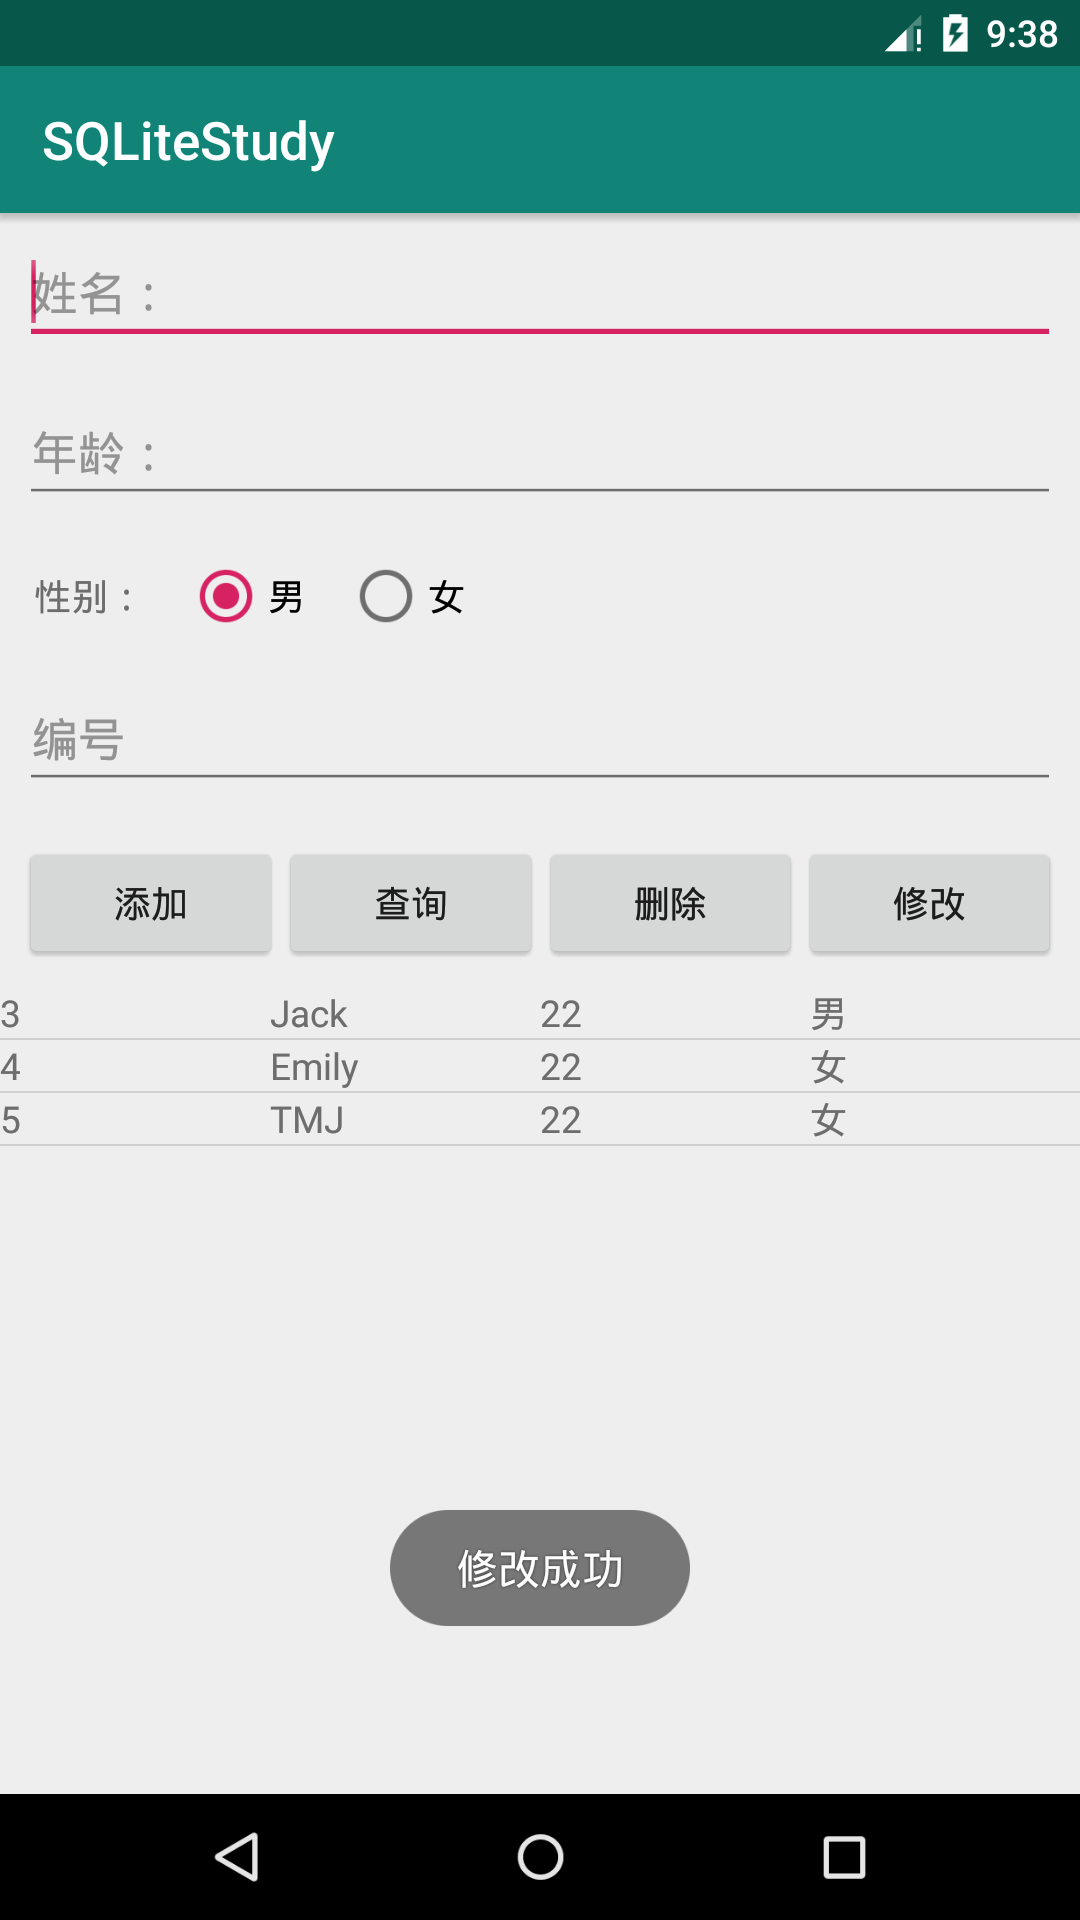
4, Operation of SqLite database through Android API
reference material: Four methods of SQLiteDatabase
1. Add insert
case R.id.insert_btn:

   ContentValues values = new ContentValues();
   //insert into table name (column 1, column 2) values (value 1, value 2)
   //The values (value 1, value 2) part is handed over to the ContentValues operation
   values.put("name",nameStr);
   values.put("age",ageStr);
   values.put("gender",genderStr);

   long id = db.insert("test_tab",null,values);
   Toast.makeText(this,"The new student ID is:" + id,Toast.LENGTH_SHORT).show();

   break;
Design sketch: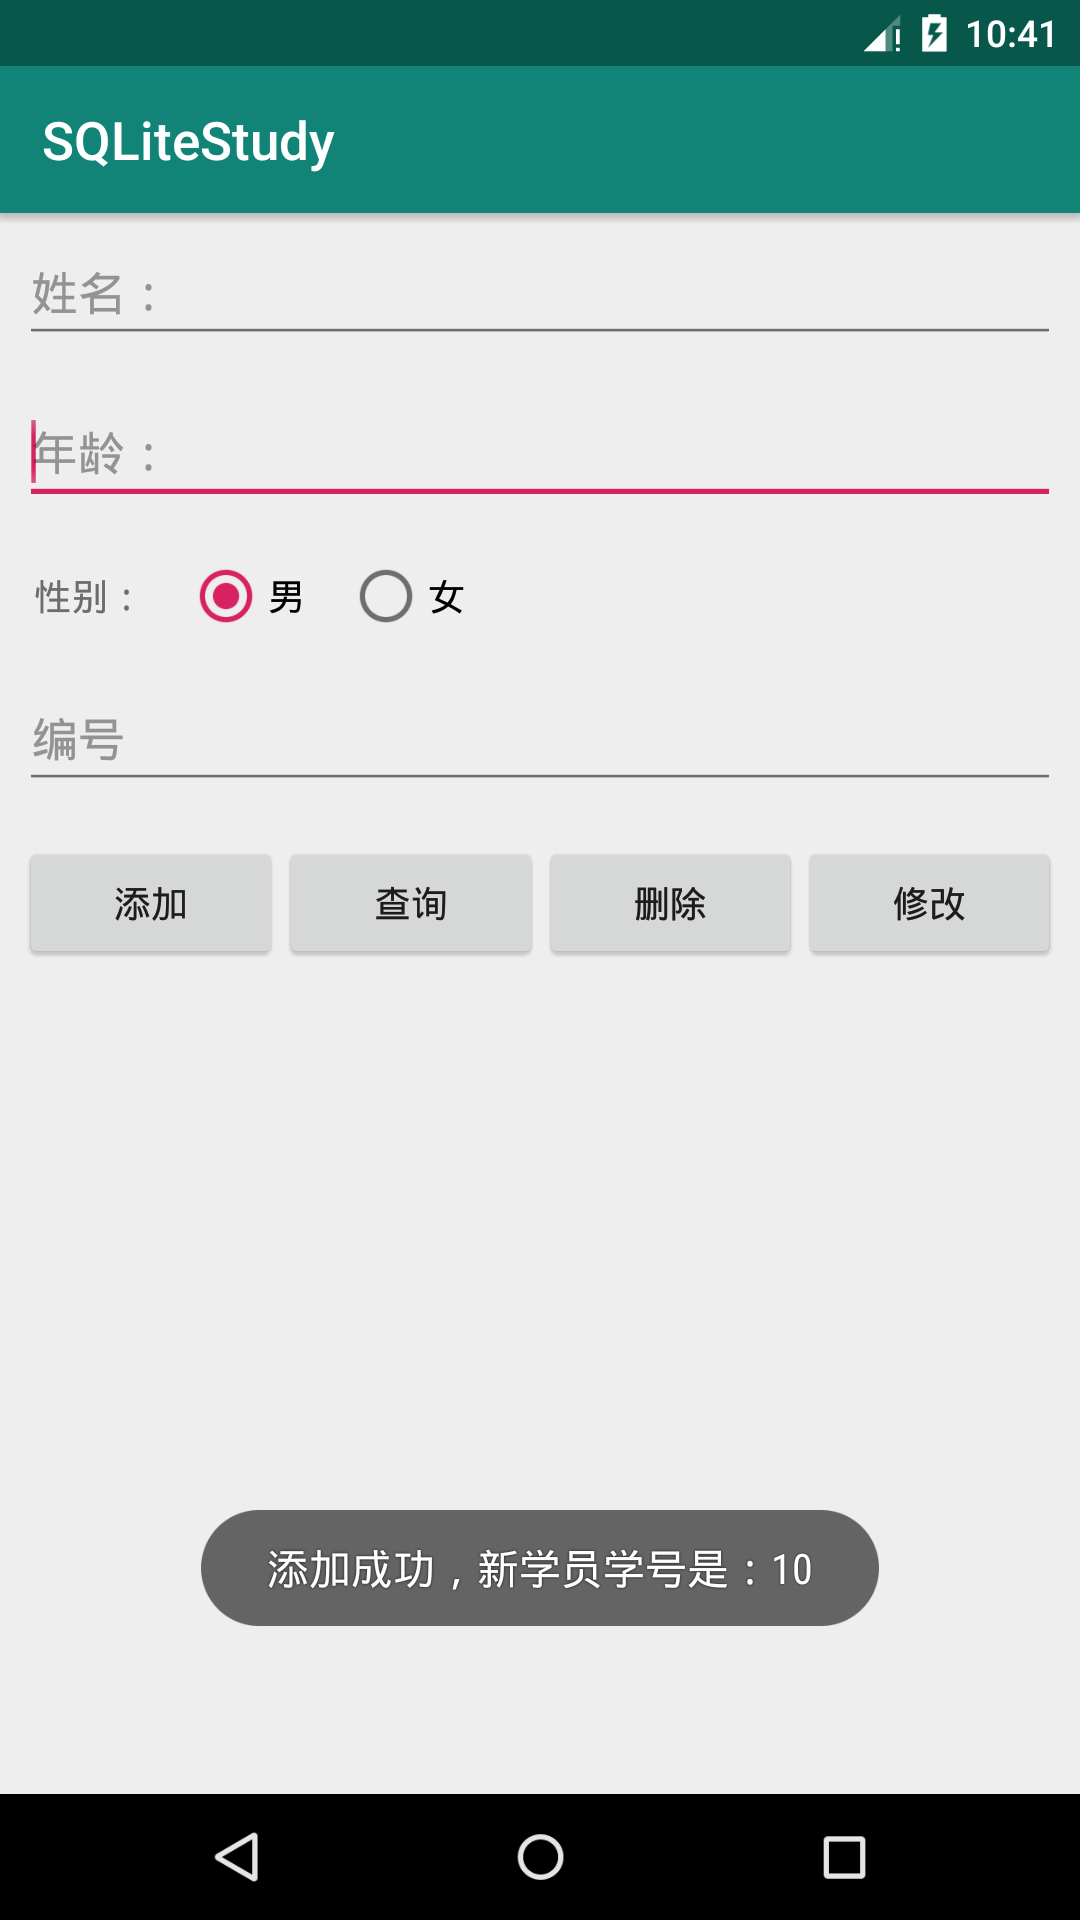
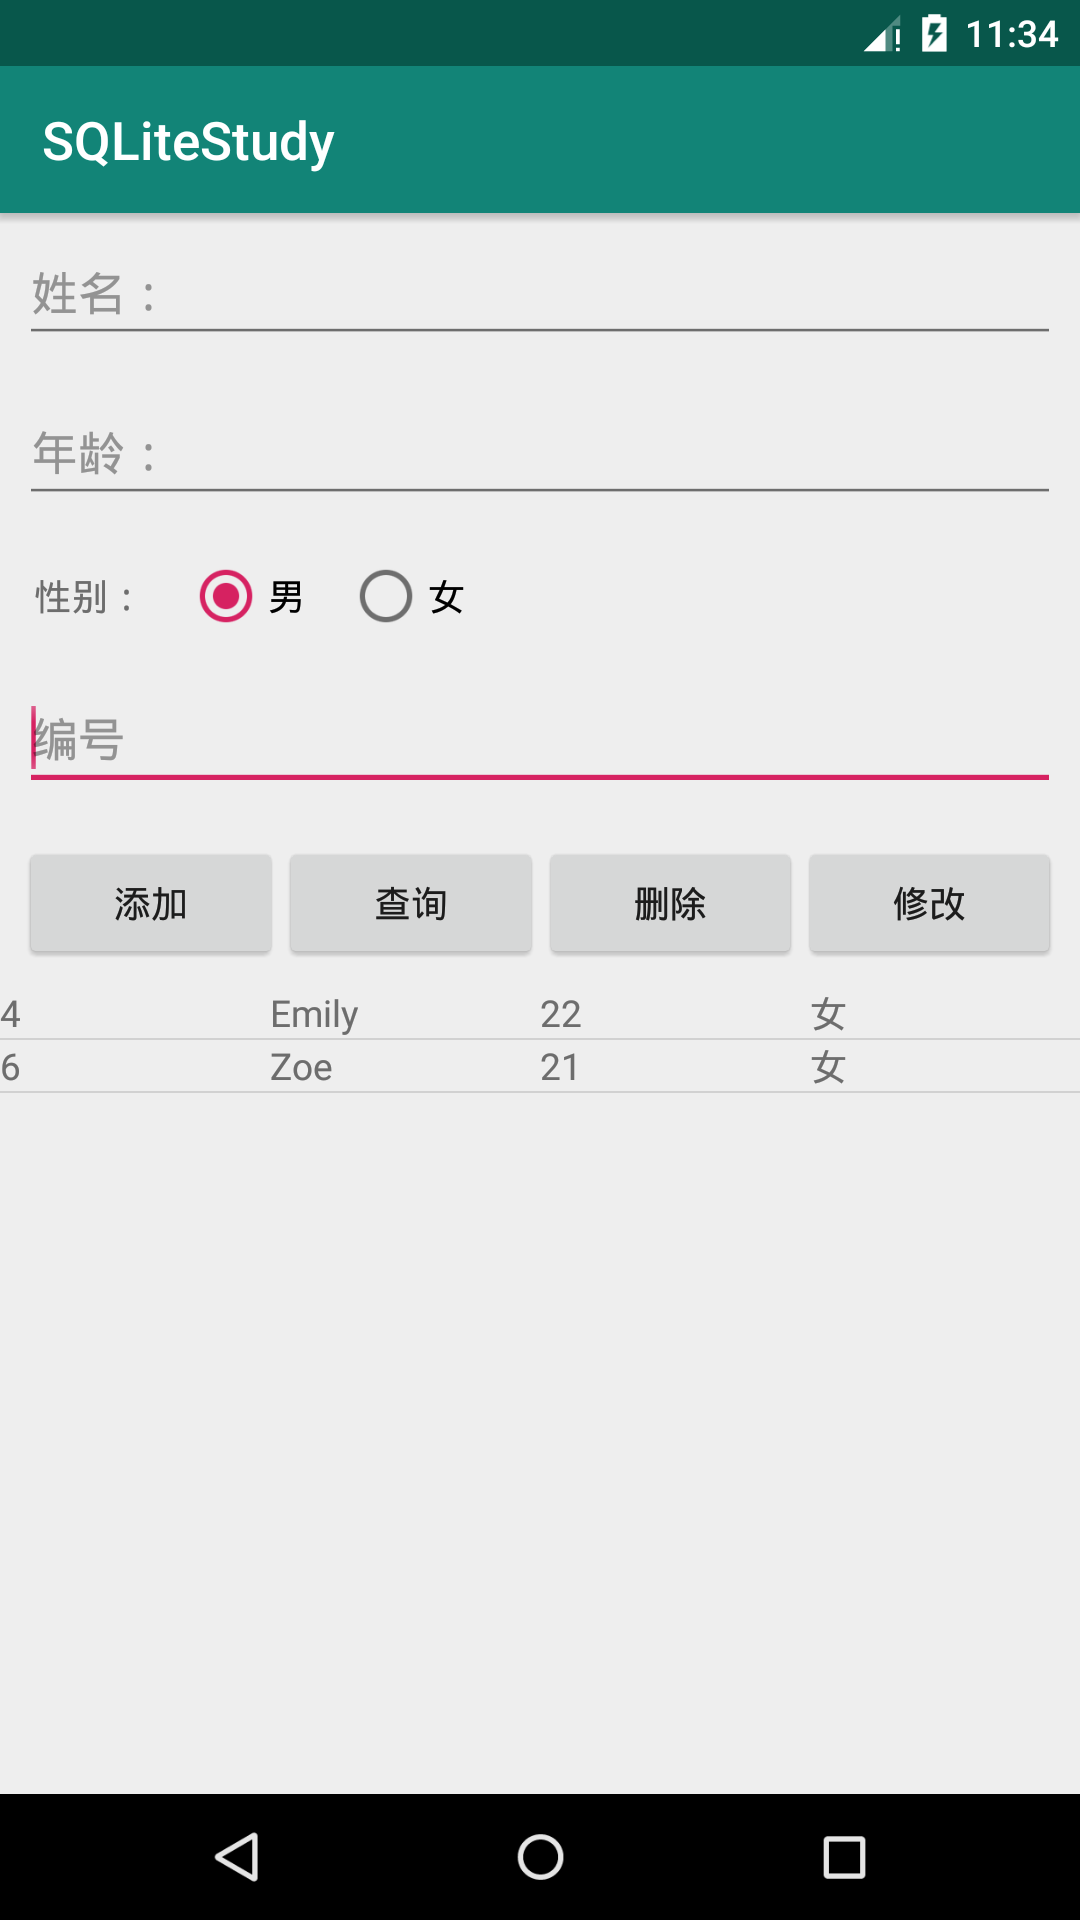
2. query
 case R.id.select_btn:

     Cursor c=db.query("test_tab",null,null,null,null,null,null);

     //Parameter 3: data source
     SimpleCursorAdapter adapter = new SimpleCursorAdapter(
             this, R.layout.item,c,
             new String[]{"_id","name","age","gender"},
             new int[]{R.id.id_item,R.id.name_item,R.id.age_item,R.id.gender_item});
     listView.setAdapter(adapter);
     break;
Design sketch: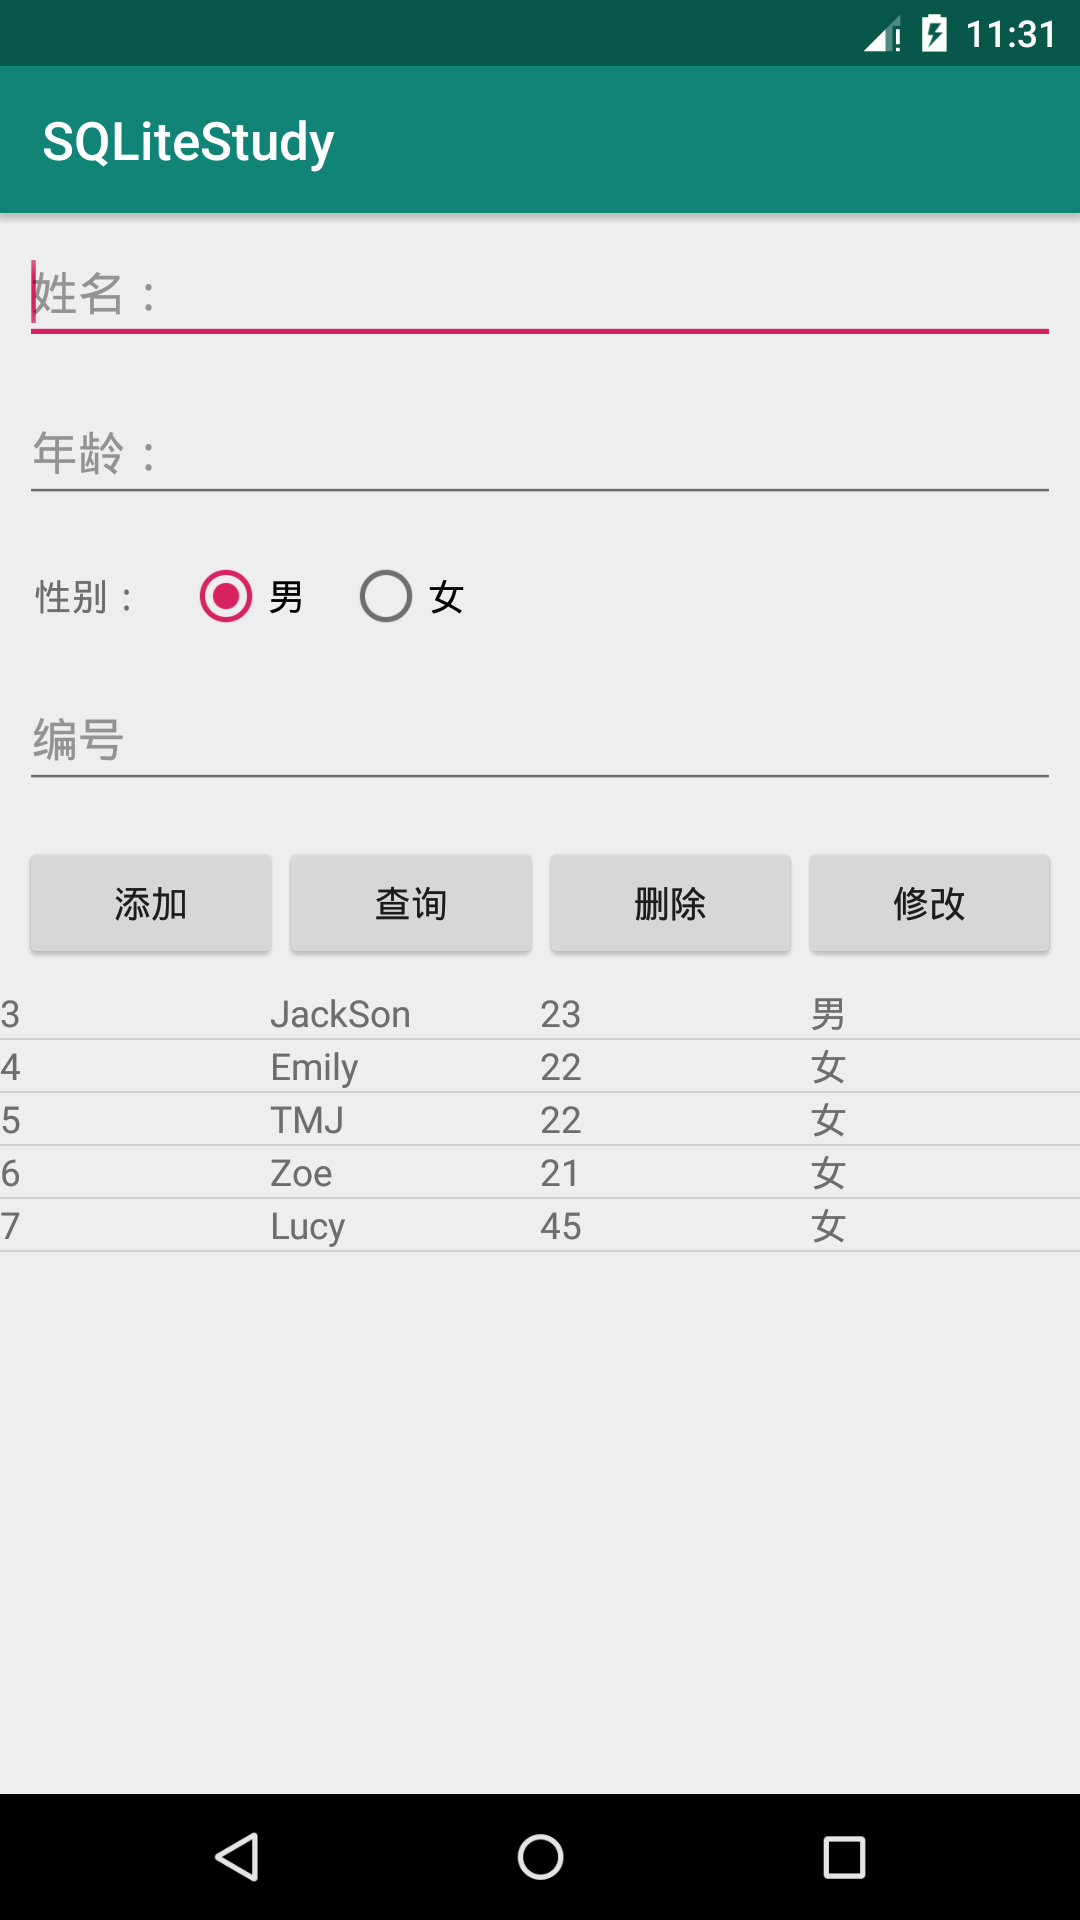
3. delete
case R.id.delete_btn:

    int count = db.delete("test_tab","_id=?",new String[]{idStr});
    if(count > 0) {
        Toast.makeText(this, "Delete successful", Toast.LENGTH_SHORT).show();
    }

    break;
Design sketch: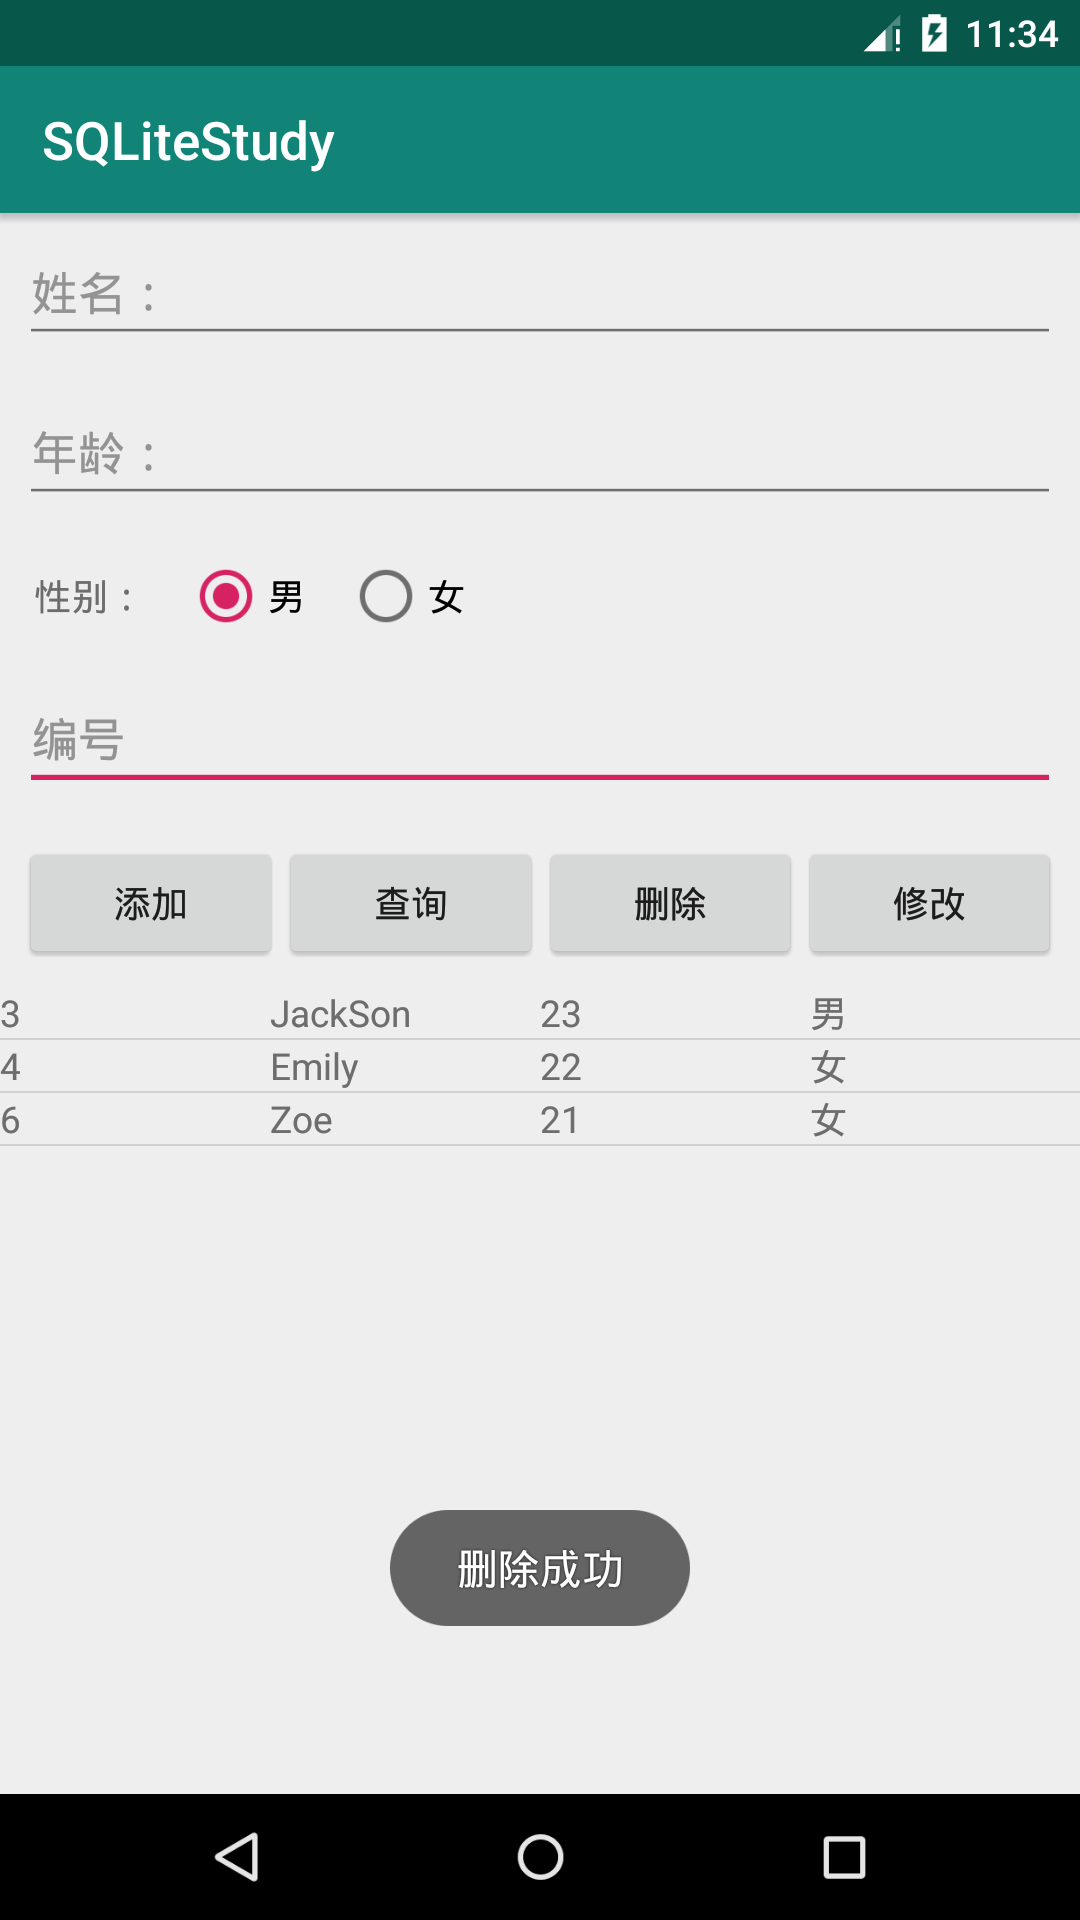
4. Modify update
case R.id.update_btn:

   ContentValues values2 = new ContentValues();
    //Update info? TB set column 1=xx, column 2=xxx where column name = value
    values2.put("name",nameStr);
    values2.put("age",ageStr);
    values2.put("gender",genderStr);
    int count2 = db.update("test_tb",values2,"_id=?",new String[]{idStr});
    if(count2 > 0) {
        Toast.makeText(this, "Modified success", Toast.LENGTH_SHORT).show();
    }

    break;
Design sketch: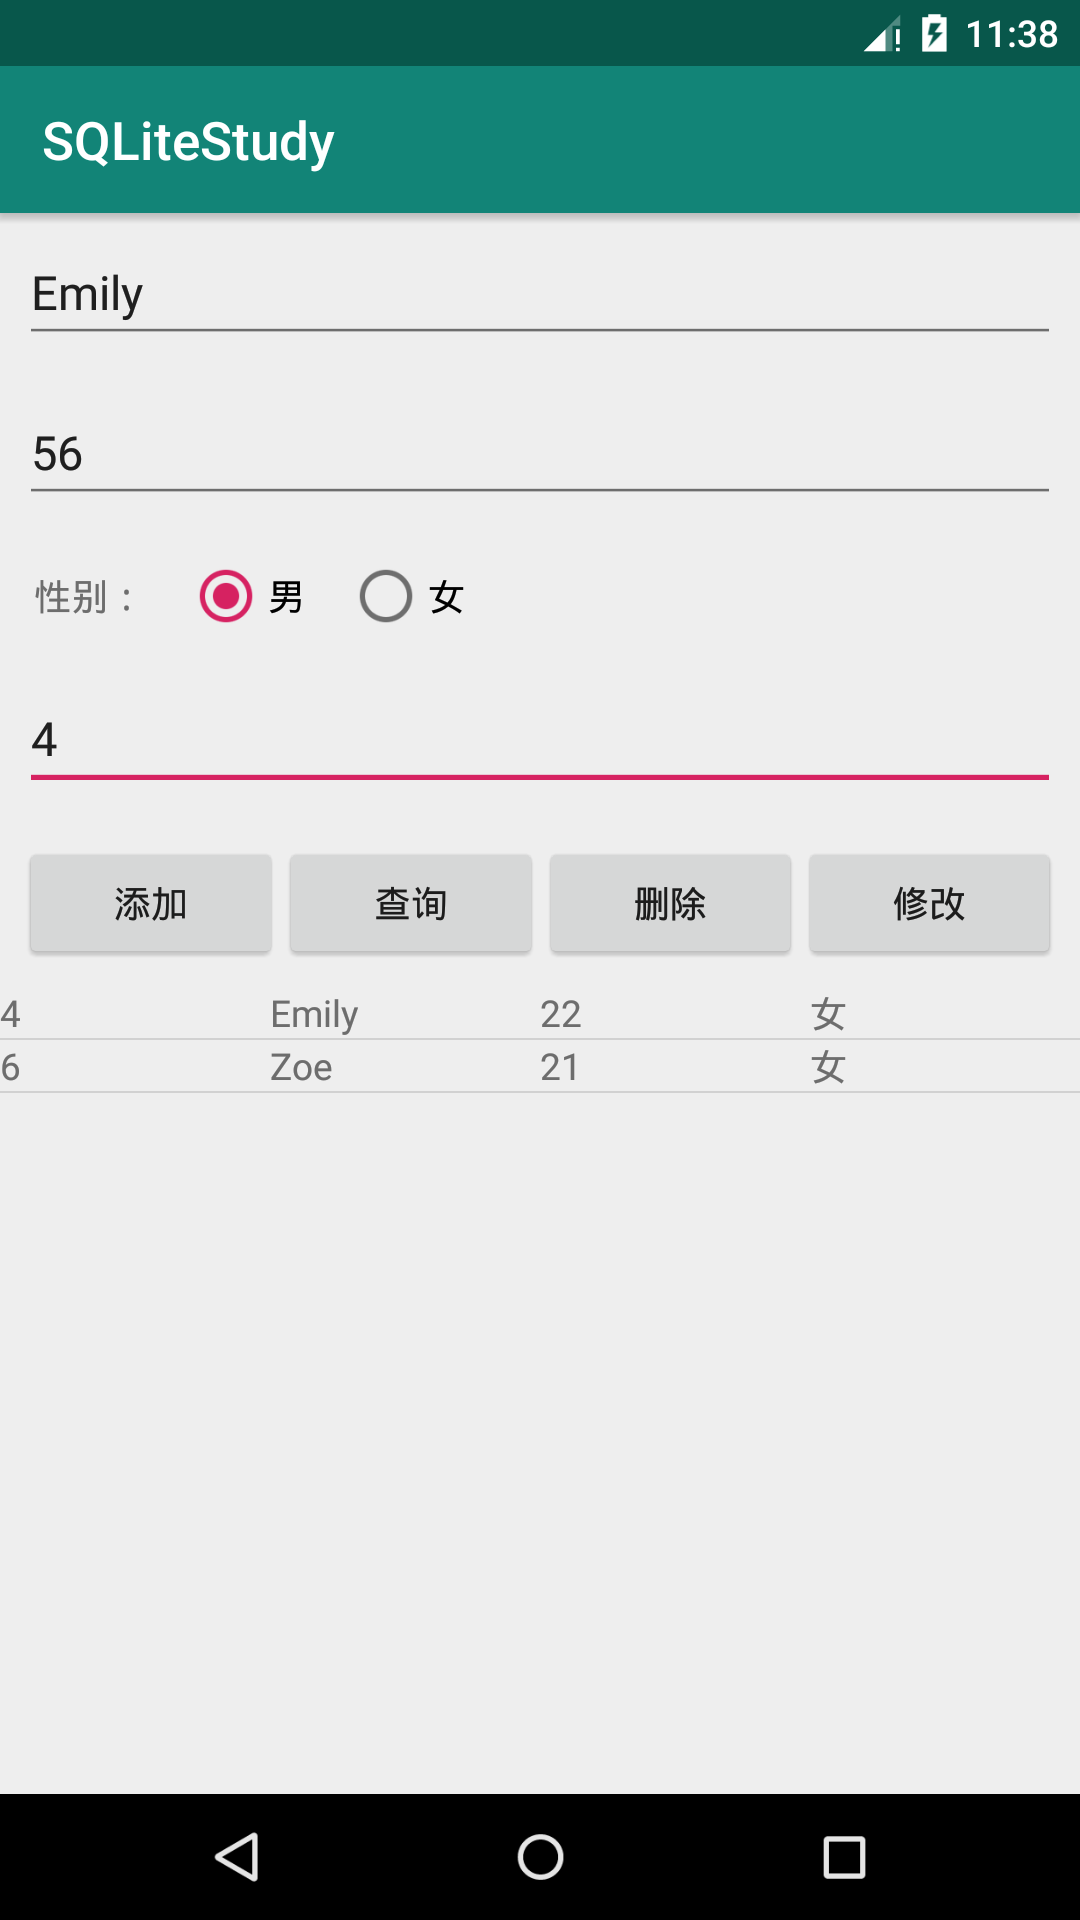

5. Full code
MAinActivity2
//Operation of SqLite database through Android API
public class MainActivity2 extends AppCompatActivity {

    private EditText nameEdt,ageEdt,idEdt;
    private RadioGroup genderGp;
    private ListView listView;
    private String genderStr="male";//In case nothing is selected, set the default option to male (add the corresponding xml settings)
    private SQLiteDatabase db;
    private RadioButton malerb;//Let the radio button return to the initial state "male" after each operation

    @Override
    protected void onCreate(Bundle savedInstanceState) {
        super.onCreate(savedInstanceState);
        setContentView(R.layout.activity_main);

        //Parameter 1: Context
        // Parameter 2: database name (if there is only one database name, the location of this database will be in the private directory;
        //                  If there is an SD card path, the database location is under the specified path.)
        String path= Environment.getExternalStorageDirectory()+"/test.sql";
        //storage/sdcard/test.sql
        Log.d("MainActivity", path);
        SQLiteOpenHelper helper=new SQLiteOpenHelper(this,path,null,2) {
            @Override
            /**
             * onCreate Is a callback method, which is executed when the database does not exist and helper.getReadableDatabase() has been used
             * The onCreate method will be called, and the SQLiteDatabase object returned will be passed back to onCreate
             */
            public void onCreate(SQLiteDatabase db) {

                // Establish
                Toast.makeText(MainActivity2.this, "Database creation", Toast.LENGTH_SHORT).show();

                /**
                 * If the database does not exist, the onCreate method will be called. Then we can finish the creation of the table here
                 */
                //SQL statement
//                String sql = "create table test_tab(_id integer primary key autoincrement,name varchar(20),age integer,gender varchar)";
//                db.execSQL(sql);

            }

            @Override
            public void onUpgrade(SQLiteDatabase db, int oldVersion, int newVersion) {
                // upgrade
                Toast.makeText(MainActivity2.this,"Database upgrade",Toast.LENGTH_SHORT).show();

            }
        };


        //For getting database objects
        //1. If the database exists, open the database directly
        //2. If the database does not exist, create the database and open it again
        //3. If the database exists but the version number increases, the database upgrade method is called
        db = helper.getReadableDatabase();

        //Initialize control
        nameEdt=(EditText)findViewById(R.id.name_edt);
        ageEdt=(EditText)findViewById(R.id.age_edt);
        idEdt=(EditText)findViewById(R.id.id_edt);
        malerb=(RadioButton)findViewById(R.id.male);

        //Read radio button to monitor the event of option switching
        genderGp=(RadioGroup)findViewById(R.id.gender_group);
        genderGp.setOnCheckedChangeListener(new RadioGroup.OnCheckedChangeListener() {
            @Override
            public void onCheckedChanged(RadioGroup group, int checkedId) {
                if(checkedId==R.id.male){
                    //male
                    genderStr="male";
                }
                else{
                    //female
                    genderStr="female";
                }
            }
        });

        //Set the data displayed on the interface in listview (Adapter is required for listview)
        listView=(ListView)findViewById(R.id.listView);


    }

    //SQLiteOpenHelper
    //SQLiteDatabase
    public void operate(View view) {

        //Get the contents of the input box
        String nameStr=nameEdt.getText().toString();
        String ageStr=ageEdt.getText().toString();
        //Conditions of condition query
        String idStr = idEdt.getText().toString();

        switch (view.getId()){

            case R.id.insert_btn:

                /**Under the SqliteDatabase class, four methods are provided
                 * insert(Add, delete, update, query
                 * No need to write sql statement
                 * Parameter 1: the name of the database table you want to operate on
                 * Parameter 2: can be an empty column if the third parameter is null or there is no data in it
                 * Then our sql statement will change to insert into info_tb() values(), which is syntactically incorrect
                 * In this case, you can specify a column that can be empty through parameter 3, and the statement becomes insert into info? TB (nullable column) values (null)
                 */
                ContentValues values = new ContentValues();
                //insert into table name (column 1, column 2) values (value 1, value 2)
                //The values (value 1, value 2) part is handed over to the ContentValues operation
                values.put("name",nameStr);
                values.put("age",ageStr);
                values.put("gender",genderStr);
                long id = db.insert("test_tab",null,values);
                Toast.makeText(this,"The new student ID is:" + id,Toast.LENGTH_SHORT).show();

                break;

            case R.id.select_btn:

                /**
                 * Parameter 1: table name
                 * Parameter 2: if you want to query all the columns {"name","age","gender"}, enter null or {*}
                 * Parameter 3: condition (for column)
                 * Parameter 5: Group
                 * Parameter 6: after group by groups the data, you can remove the unqualified groups by having
                 * Parameter 7: sort
                 */
                Cursor c=db.query("test_tab",null,null,null,null,null,null);

                //Parameter 3: data source
                SimpleCursorAdapter adapter = new SimpleCursorAdapter(
                        this, R.layout.item,c,
                        new String[]{"_id","name","age","gender"},
                        new int[]{R.id.id_item,R.id.name_item,R.id.age_item,R.id.gender_item});
                listView.setAdapter(adapter);
                break;

            case R.id.delete_btn:

                int count = db.delete("test_tab","_id=?",new String[]{idStr});
                if(count > 0) {
                    Toast.makeText(this, "Delete successful", Toast.LENGTH_SHORT).show();
                }

                break;

            case R.id.update_btn:

                ContentValues values2 = new ContentValues();
                //Update info? TB set column 1=xx, column 2=xxx where column name = value
                values2.put("name",nameStr);
                values2.put("age",ageStr);
                values2.put("gender",genderStr);
                int count2 = db.update("test_tab",values2,"_id=?",new String[]{idStr});
                if(count2 > 0) {
                    Toast.makeText(this, "Modified success", Toast.LENGTH_SHORT).show();
                }

                break;
        }

        nameEdt.setText("");
        ageEdt.setText("");
        idEdt.setText("");
        malerb.setChecked(true);
    }
}
5, SQLite summary
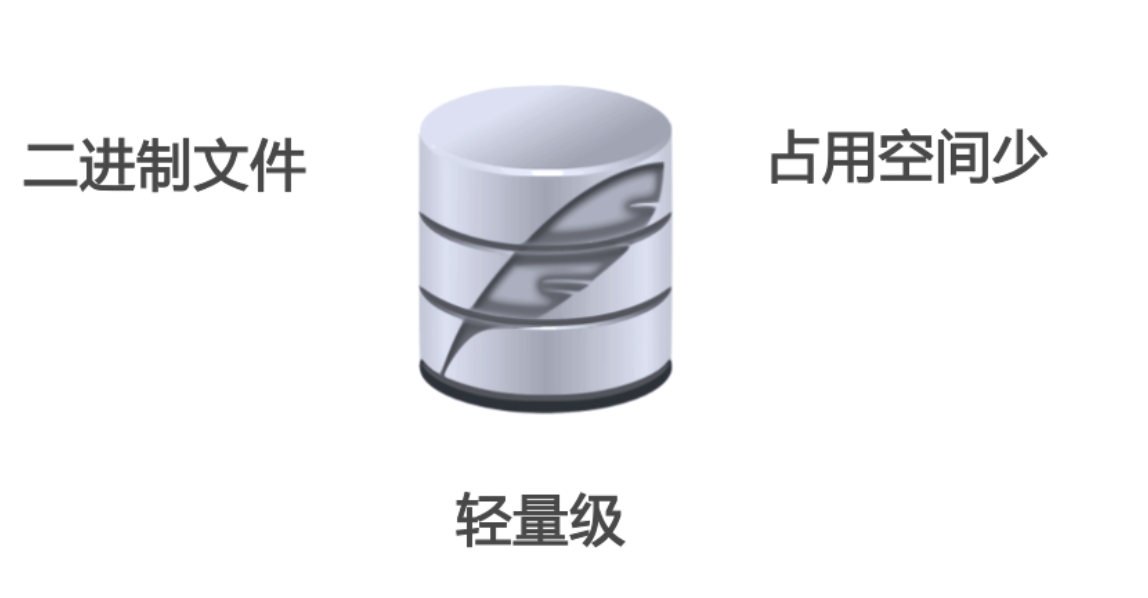
SQLite database is a lightweight database, which is essentially a binary file.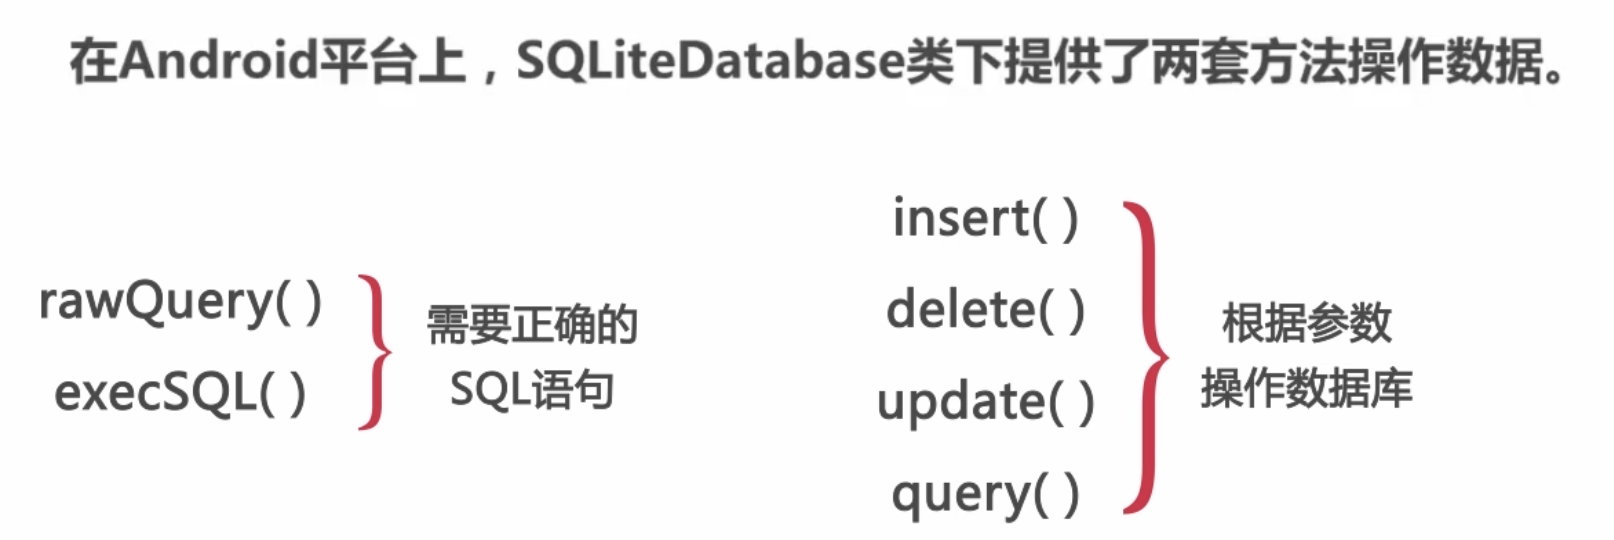
6, Encapsulation of database operations
Student
public class Student{

    //Private attributes
    private int id;
    private String name;
    private int age;
    private String gender;

    //Non parametric structure
    public Student(){

    }

    //Parametric construction (3 parameters)
    public Student(String name, int age, String gender) {
        this.name = name;
        this.age = age;
        this.gender = gender;
    }

    //Parametric construction (4 parameters)
    public Student(int id, String name, int age, String gender) {
        super();
        this.id = id;
        this.name = name;
        this.age = age;
        this.gender = gender;
    }

    //setter and getter methods created
    public int getId() {
        return id;
    }
    public void setId(int id) {
        this.id = id;
    }
    public String getName() {
        return name;
    }
    public void setName(String name) {
        this.name = name;
    }
    public int getAge() {
        return age;
    }
    public void setAge(int age) {
        this.age = age;
    }
    public String getGender() {
        return gender;
    }
    public void setGender(String gender) {
        this.gender = gender;
    }
}
StudentDao
//Dao (data access object) data access object
public class StudentDao {

    //SQLiteDatabase is required for subsequent database operations
    private SQLiteDatabase db;

    //First instantiate StudentDao class, then instantiate the object and click the db method. Therefore, during the instantiation process of this class, get the db object to the
    public StudentDao(final Context context){

        String path= Environment.getExternalStorageDirectory()+"/test.sql";

        SQLiteOpenHelper helper=new SQLiteOpenHelper(context,path,null,2) {
            @Override
            public void onCreate(SQLiteDatabase db) {
                // Establish
            }
            @Override
            public void onUpgrade(SQLiteDatabase db, int oldVersion, int newVersion) {
                // upgrade
            }
        };

        //Get objects
        db=helper.getReadableDatabase();

    }

	 /**
     * Add operation
     */
    public void addStudent(){

    }

    /**
     * Query operation
     */
    public void getStudent(){

    }

    /**
     * Delete operation
     */
    public void deleteStudent(){

    }

    /**
     * Modify operation
     */
    public void uodatae(){

    }
}
MainActivity3
public class MainActivity3 extends AppCompatActivity {

    private EditText nameEdt, ageEdt, idEdt;
    private RadioGroup genderGp;
    private ListView listView;
    private String genderStr = "male";//In case nothing is selected, set the default option to male (add the corresponding xml settings)
    private RadioButton malerb;//Let the radio button return to the initial state "male" after each operation

    private StudentDao dao;

    @Override
    protected void onCreate(Bundle savedInstanceState) {
        super.onCreate(savedInstanceState);
        setContentView(R.layout.activity_main);

        //instantiation
        dao = new StudentDao(this);

        //Initialize control
        nameEdt = (EditText) findViewById(R.id.name_edt);
        ageEdt = (EditText) findViewById(R.id.age_edt);
        idEdt = (EditText) findViewById(R.id.id_edt);
        malerb = (RadioButton) findViewById(R.id.male);

        //Read radio button to monitor the event of option switching
        genderGp = (RadioGroup) findViewById(R.id.gender_group);
        genderGp.setOnCheckedChangeListener(new RadioGroup.OnCheckedChangeListener() {
            @Override
            public void onCheckedChanged(RadioGroup group, int checkedId) {
                if (checkedId == R.id.male) {
                    //male
                    genderStr = "male";
                } else {
                    //female
                    genderStr = "female";
                }
            }
        });

		listView=(ListView)findViewById(R.id.listView);

    }

    public void updataeStudent(View view) {

        //Get the contents of the input box
        String nameStr = nameEdt.getText().toString();
        String ageStr = ageEdt.getText().toString();
        //Conditions of condition query
        String idStr = idEdt.getText().toString();

        switch (view.getId()) {

            case R.id.insert_btn:


                Student stu = new Student(nameStr, Integer.parseInt(ageStr), genderStr);
                dao.addStudent(stu);
                Toast.makeText(this, "Add success", Toast.LENGTH_SHORT).show();


                break;

            case R.id.select_btn:


                break;

            case R.id.delete_btn:


                break;

            case R.id.update_btn:


                break;
        }

        nameEdt.setText("");
        ageEdt.setText("");
        idEdt.setText("");
        malerb.setChecked(true);
    }
}
1. Add action
StudentDao
public void addStudent(Student stu){

   String sql="insert into test_tab (name,age,gender) values (?,?,?)";
   db.execSQL(sql,new String[]{stu.getName(),stu.getAge()+"",stu.getGender()});

}
MainActivity3
case R.id.insert_btn:
	  Student stu = new Student(nameStr, Integer.parseInt(ageStr), genderStr);
	  dao.addStudent(stu);
	  Toast.makeText(this, "Add success", Toast.LENGTH_SHORT).show();
	  break;
Design sketch: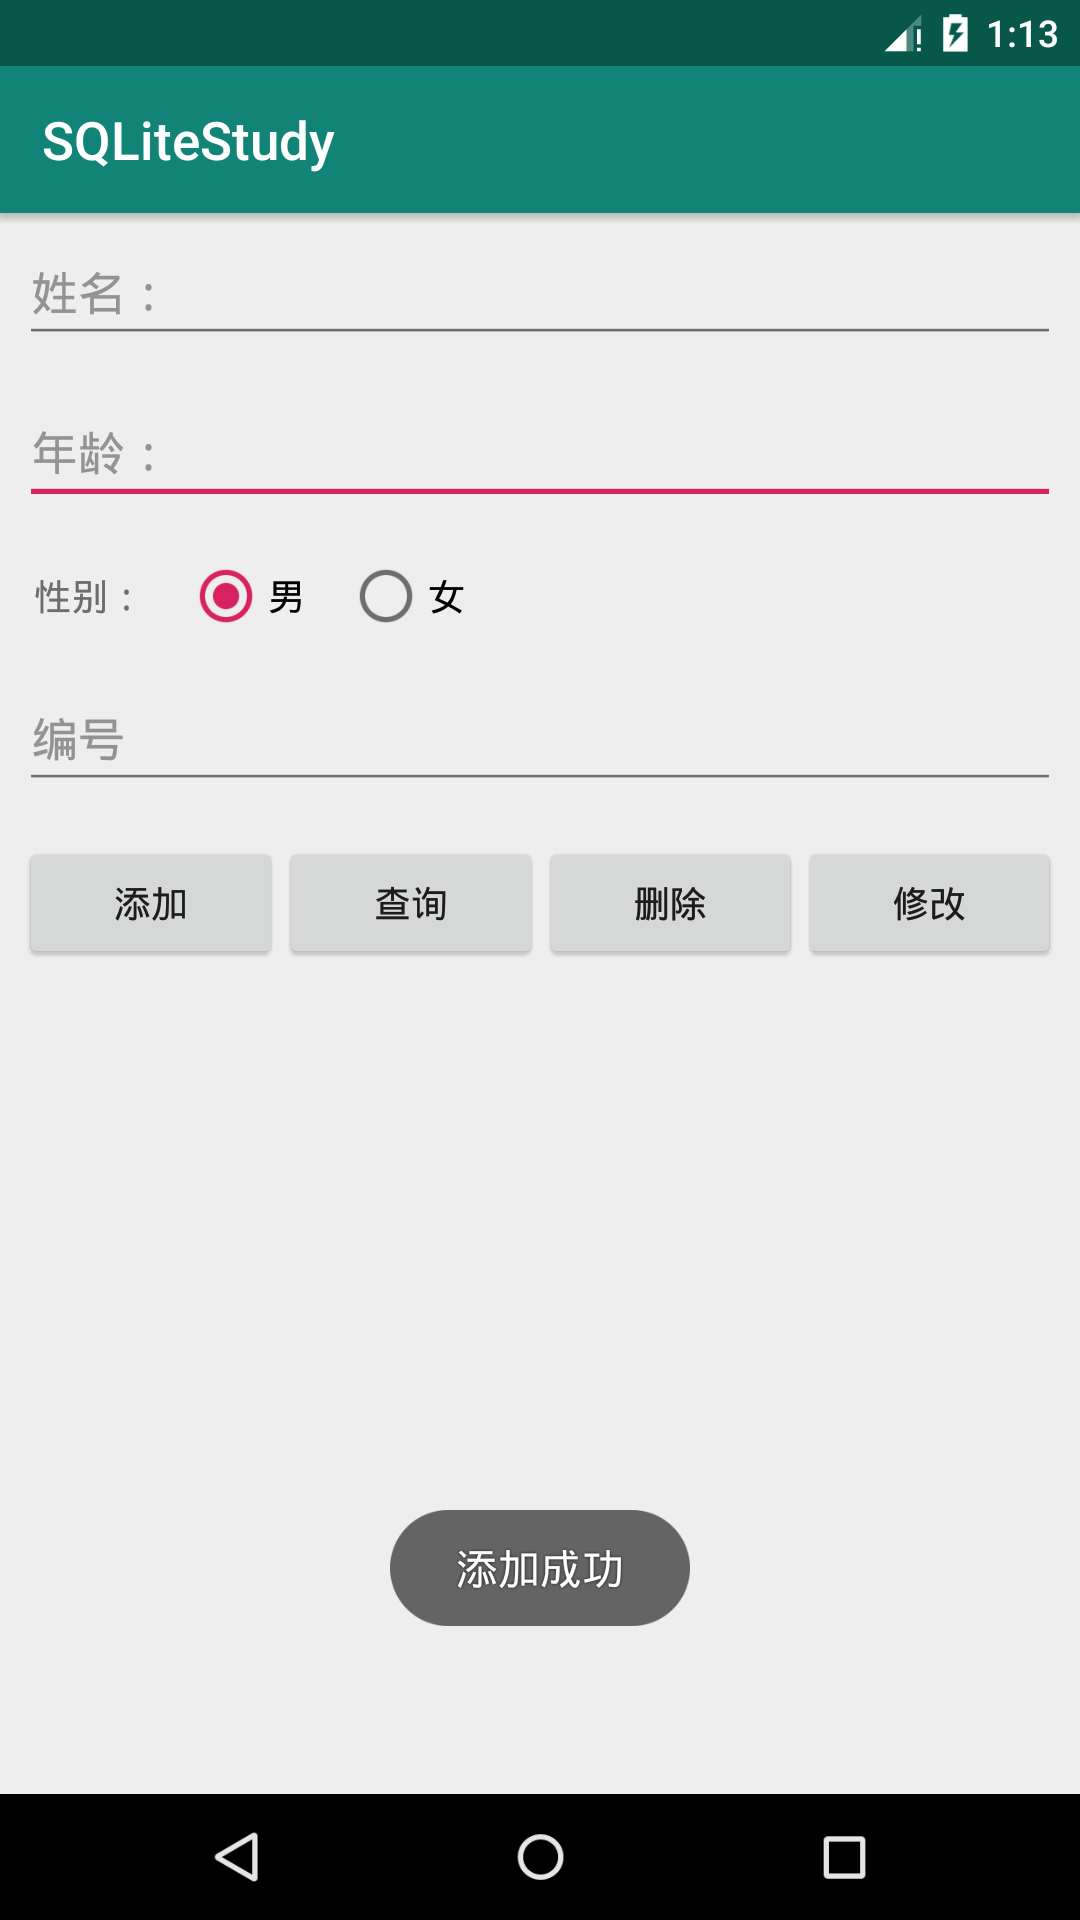
2. Query operation
StudentDao
public Cursor getStudent(String...strings){

     //1. Query all (no parameters)
     String sql="select * from test_tab";
     //2. Query with condition (name, age, number) (parameter form: the first parameter indicates the condition, and the second parameter indicates the condition value)
     if(strings.length!=0){
         sql+=" where "+strings[0]+"='"+strings[2]+"'";//When querying, it doesn't matter that age is decorated with ''
     }
     Cursor c=db.rawQuery(sql,null);
     return c;

}
MainActivity3
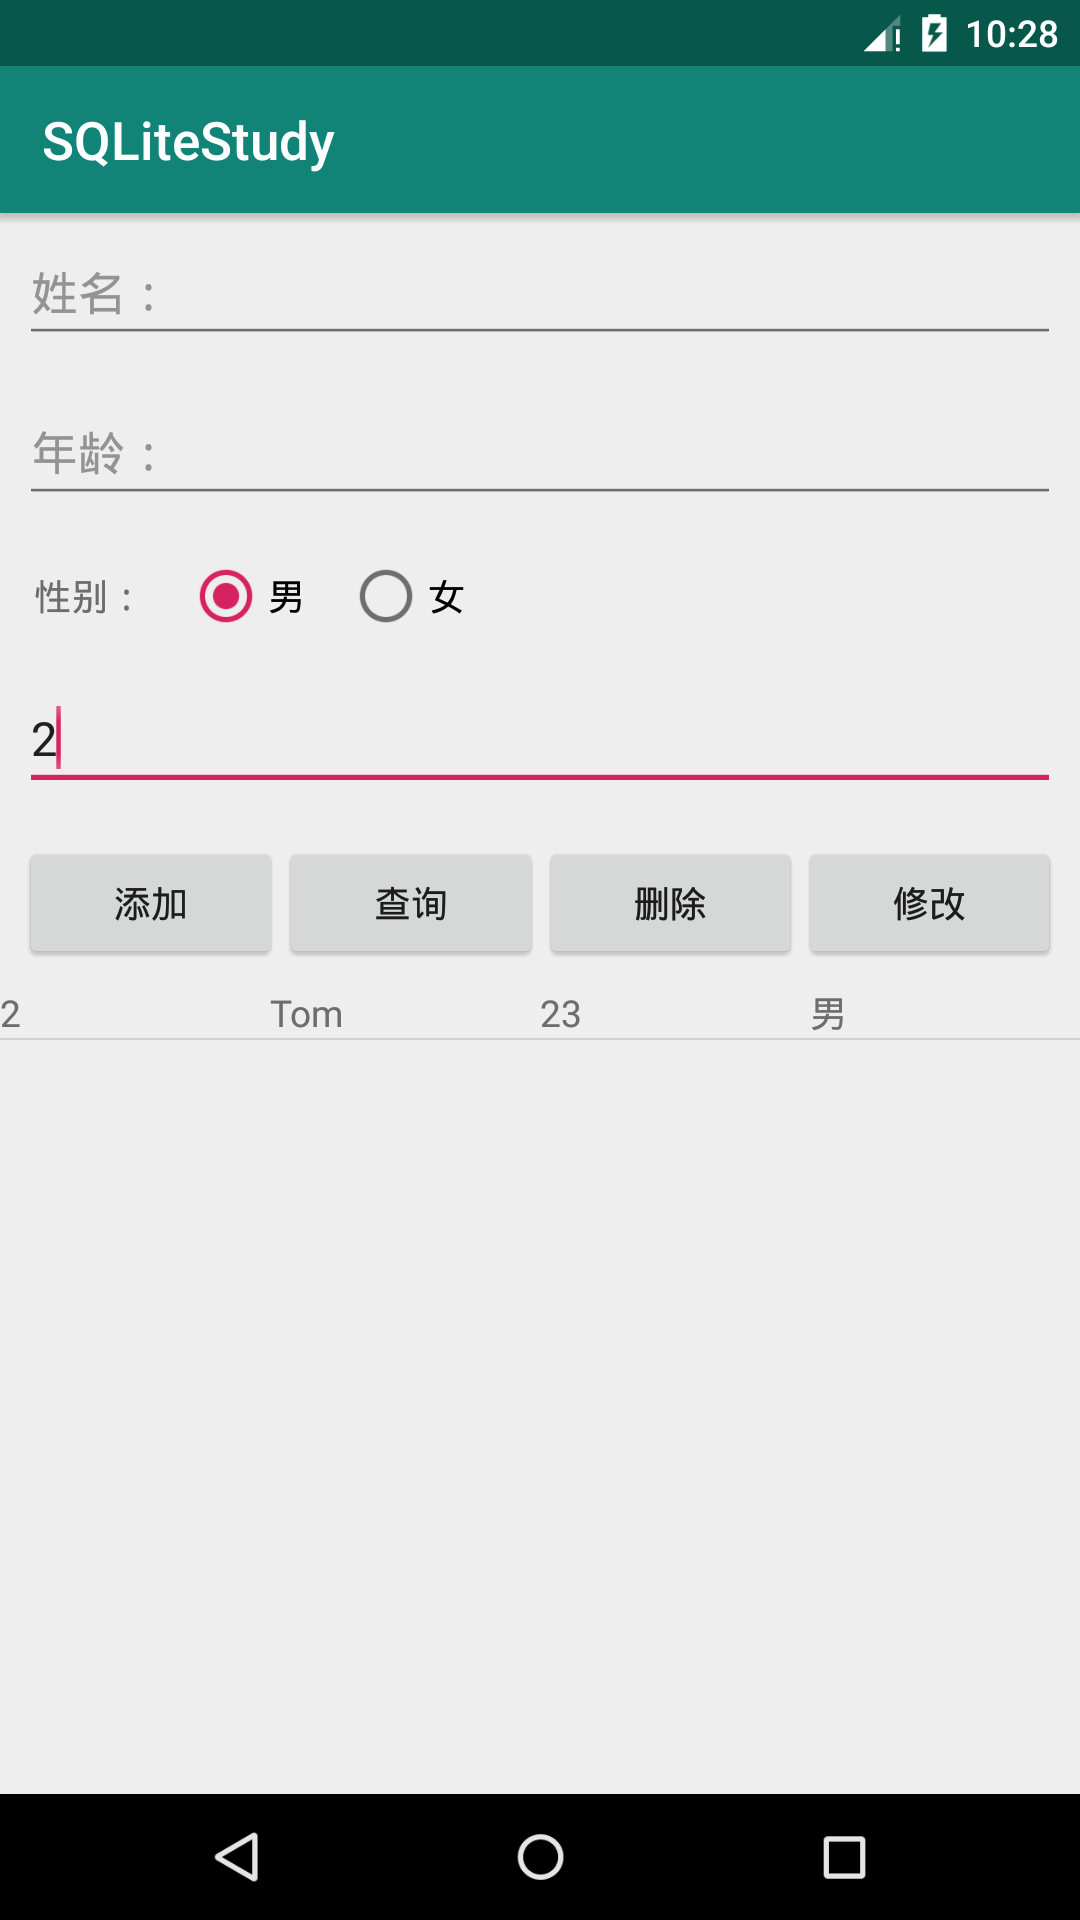
case R.id.select_btn:

    String key = "", value = "";
    //It is necessary to determine which nameEdt ageEdt idEdt is not empty. If it is not empty, it is the parameter that getStudent() needs to pass in
    if (!nameStr.equals("")) {
        key = "name";
        value = nameStr;
    } else if (!ageStr.equals("")) {
        key = "age";
        value = ageStr;
    } else if (!idStr.equals("")) {
        key = "_id";
        value = idStr;
    }

    Cursor c;
    if (key.equals("")) {
        c = dao.getStudent();
    } else {
        c = dao.getStudent(key, value);
    }

    SimpleCursorAdapter adapter = new SimpleCursorAdapter(
            this, R.layout.item, c,
            new String[]{"_id", "name", "age", "gender"},
            new int[]{R.id.id_item, R.id.name_item, R.id.age_item, R.id.gender_item});
    listView.setAdapter(adapter);
    break;
Design sketch: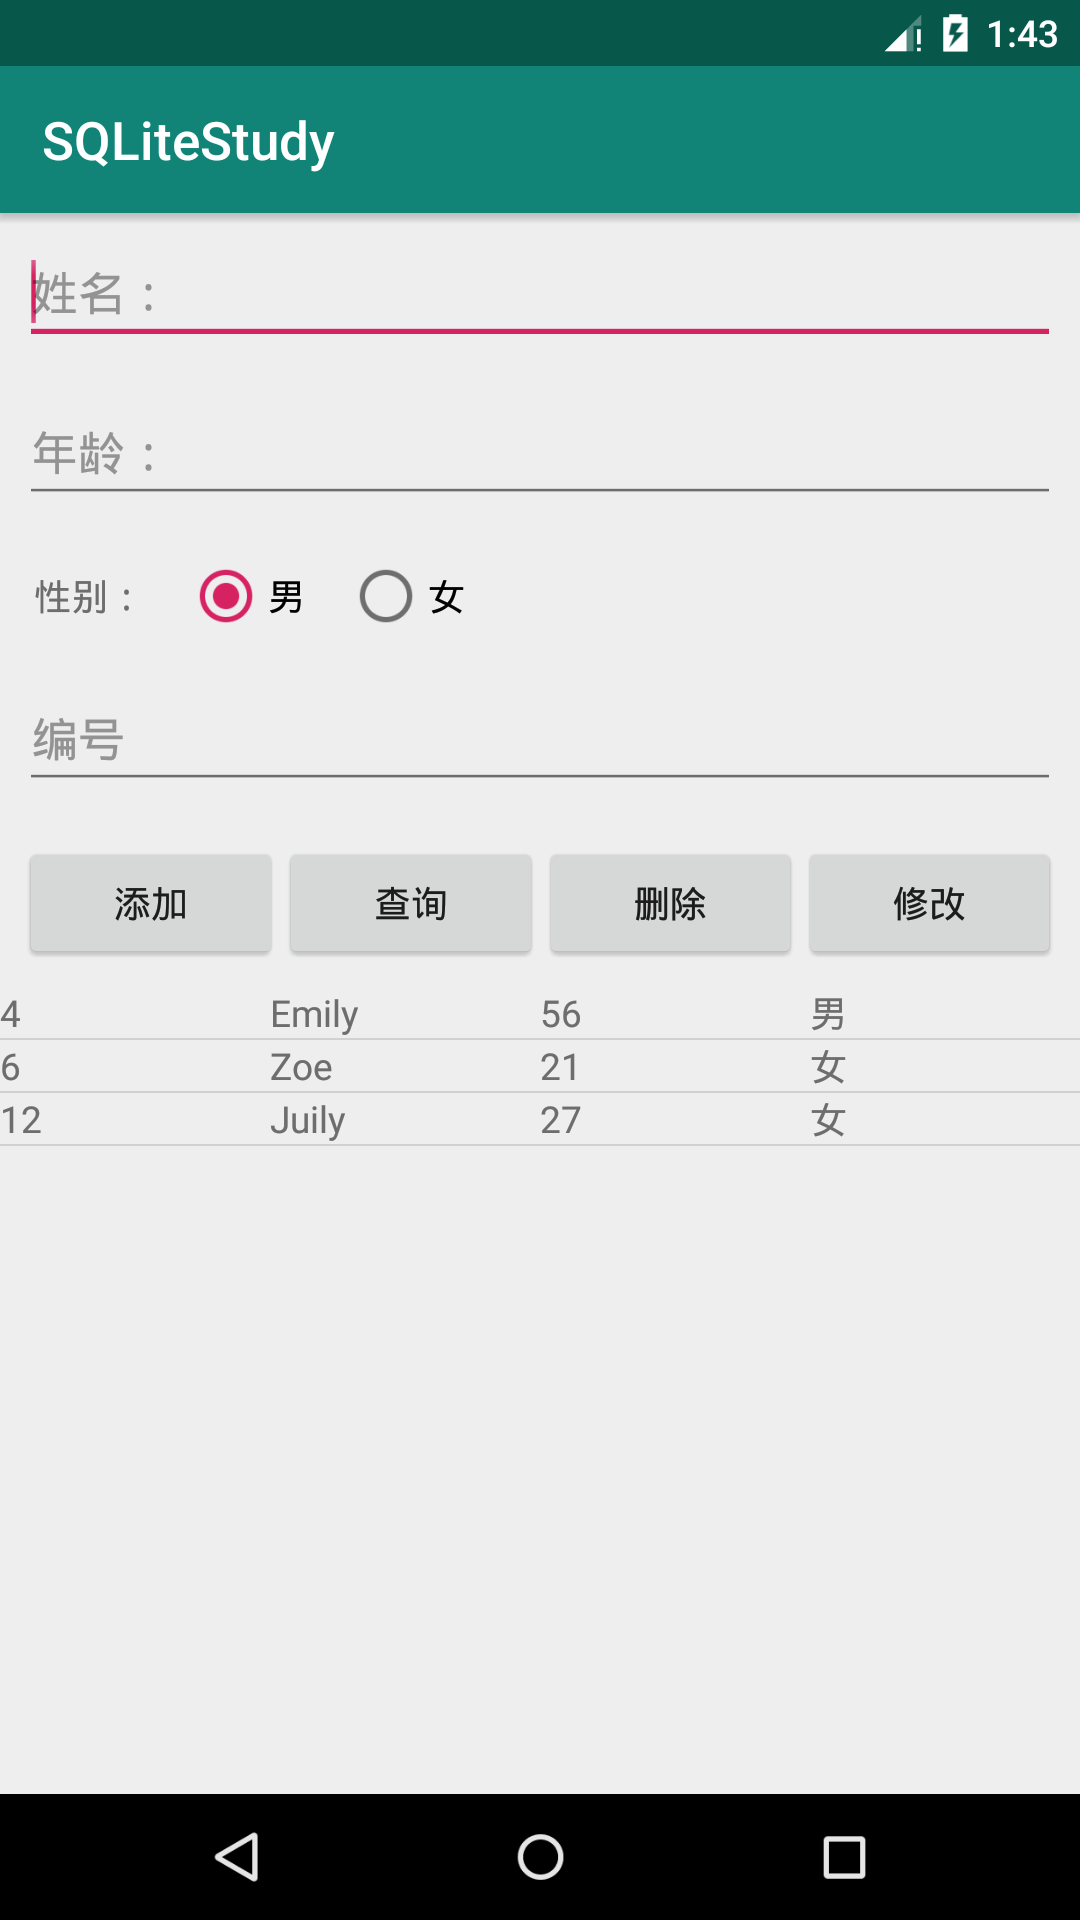
3. Delete operation
StudentDao
public void deleteStudent(String...strings){

       String sql="delete from test_tab where "+strings[0]+"='"+strings[1]+"'";
       db.execSQL(sql);

}
MainActivity3
Because "judge whether the content of input box is empty" is also needed in delete, this part is extracted as a getParams() method
case R.id.delete_btn:

    String[] params = getParams(nameStr, ageStr, idStr);
    dao.deleteStudent(params[0],params[1]);
    Toast.makeText(this, "Delete successful", Toast.LENGTH_SHORT).show();
    break;
public String[] getParams(String nameStr, String ageStr, String idStr) {
    String[] params = new String[2];
    if (!nameStr.equals("")) {
        params[0] = "name";
        params[1] = nameStr;
    } else if (!ageStr.equals("")) {
        params[0] = "age";
        params[1] = ageStr;
    } else if (!idStr.equals("")) {
        params[0] = "_id";
        params[1] = idStr;
    }
    return params;
}
Design sketch: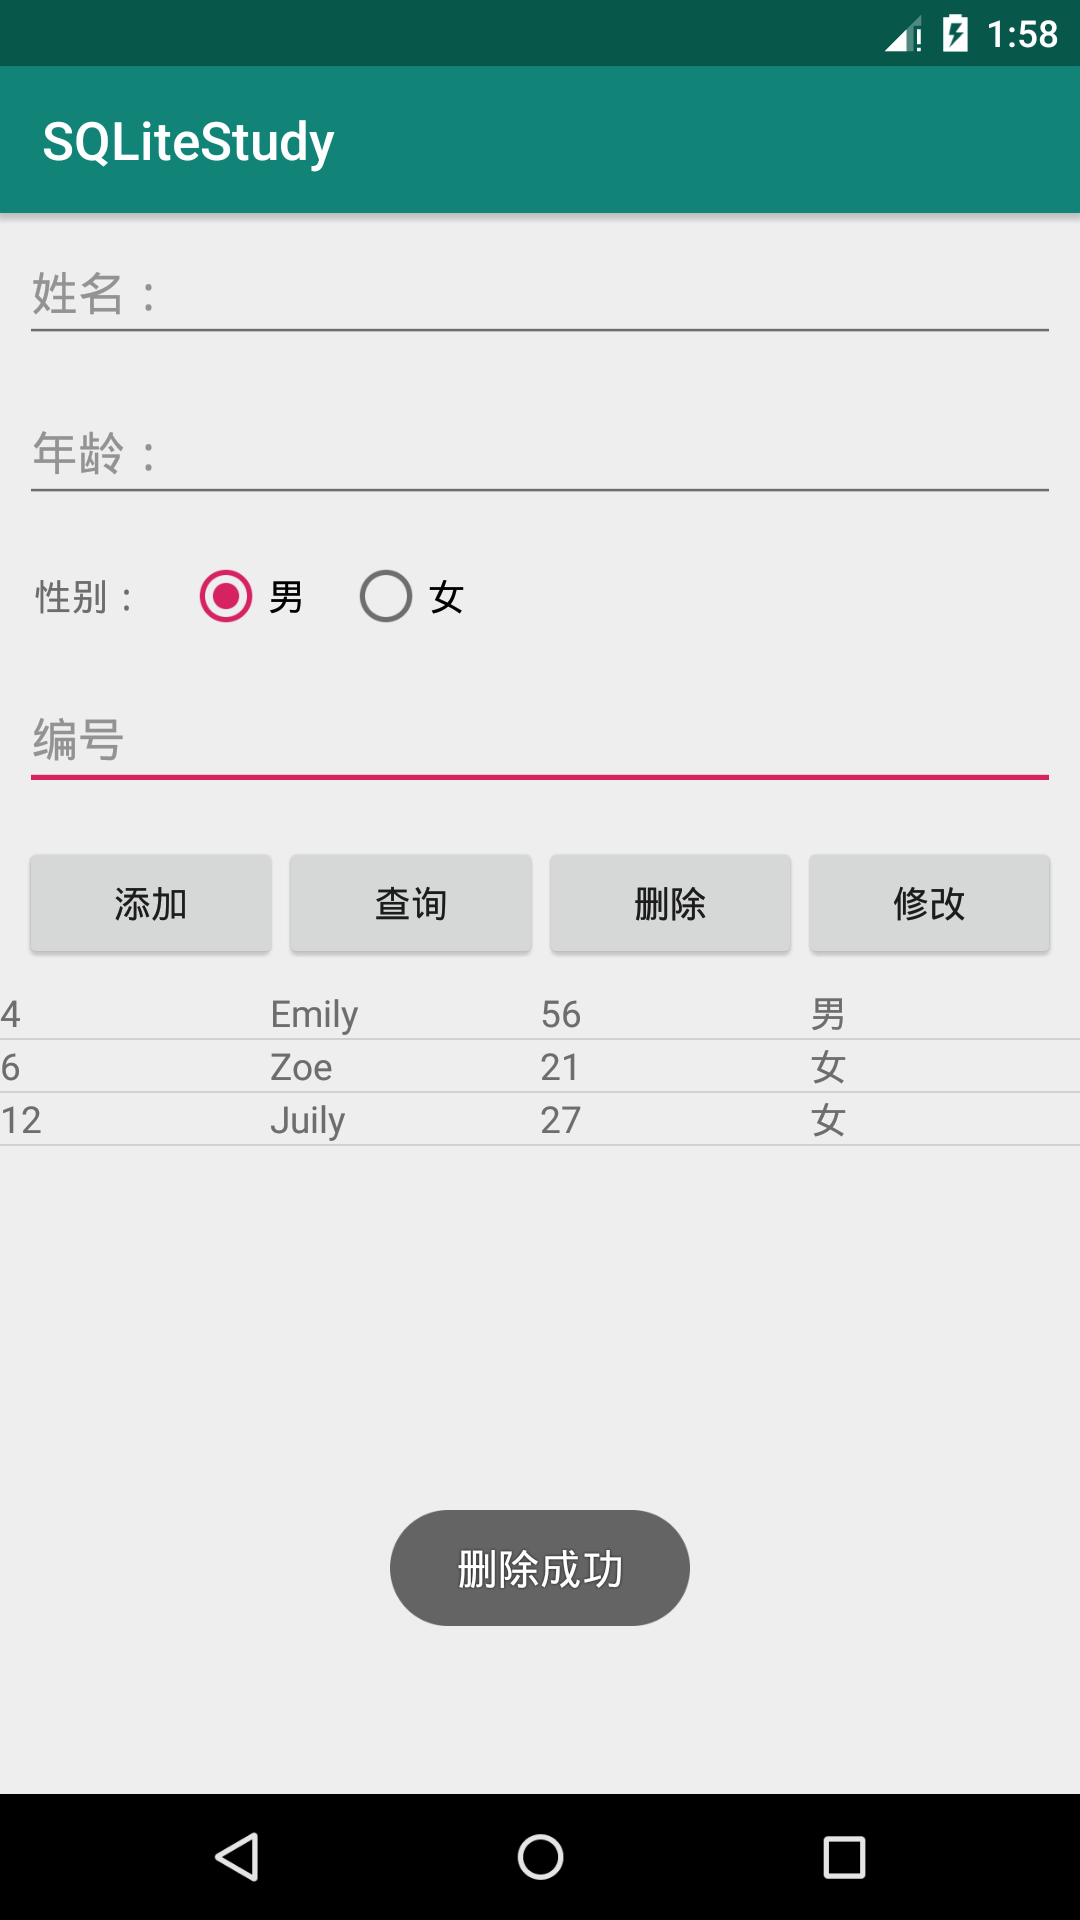
4. Modify operation
StudentDao
public void updateStudent(Student stu){

	   String sql = "update test_tab set name=?,age=?,gender=? where _id=?";
	   db.execSQL(sql,new Object[]{stu.getName(),stu.getAge(),stu.getGender(),stu.getId()});
}
MainActivity3
case R.id.update_btn:

     Student stu2=new Student(Integer.parseInt(idStr),nameStr,Integer.parseInt(ageStr),genderStr);
     dao.updateStudent(stu2);
     Toast.makeText(this,"Modified success",Toast.LENGTH_SHORT).show();
     break;
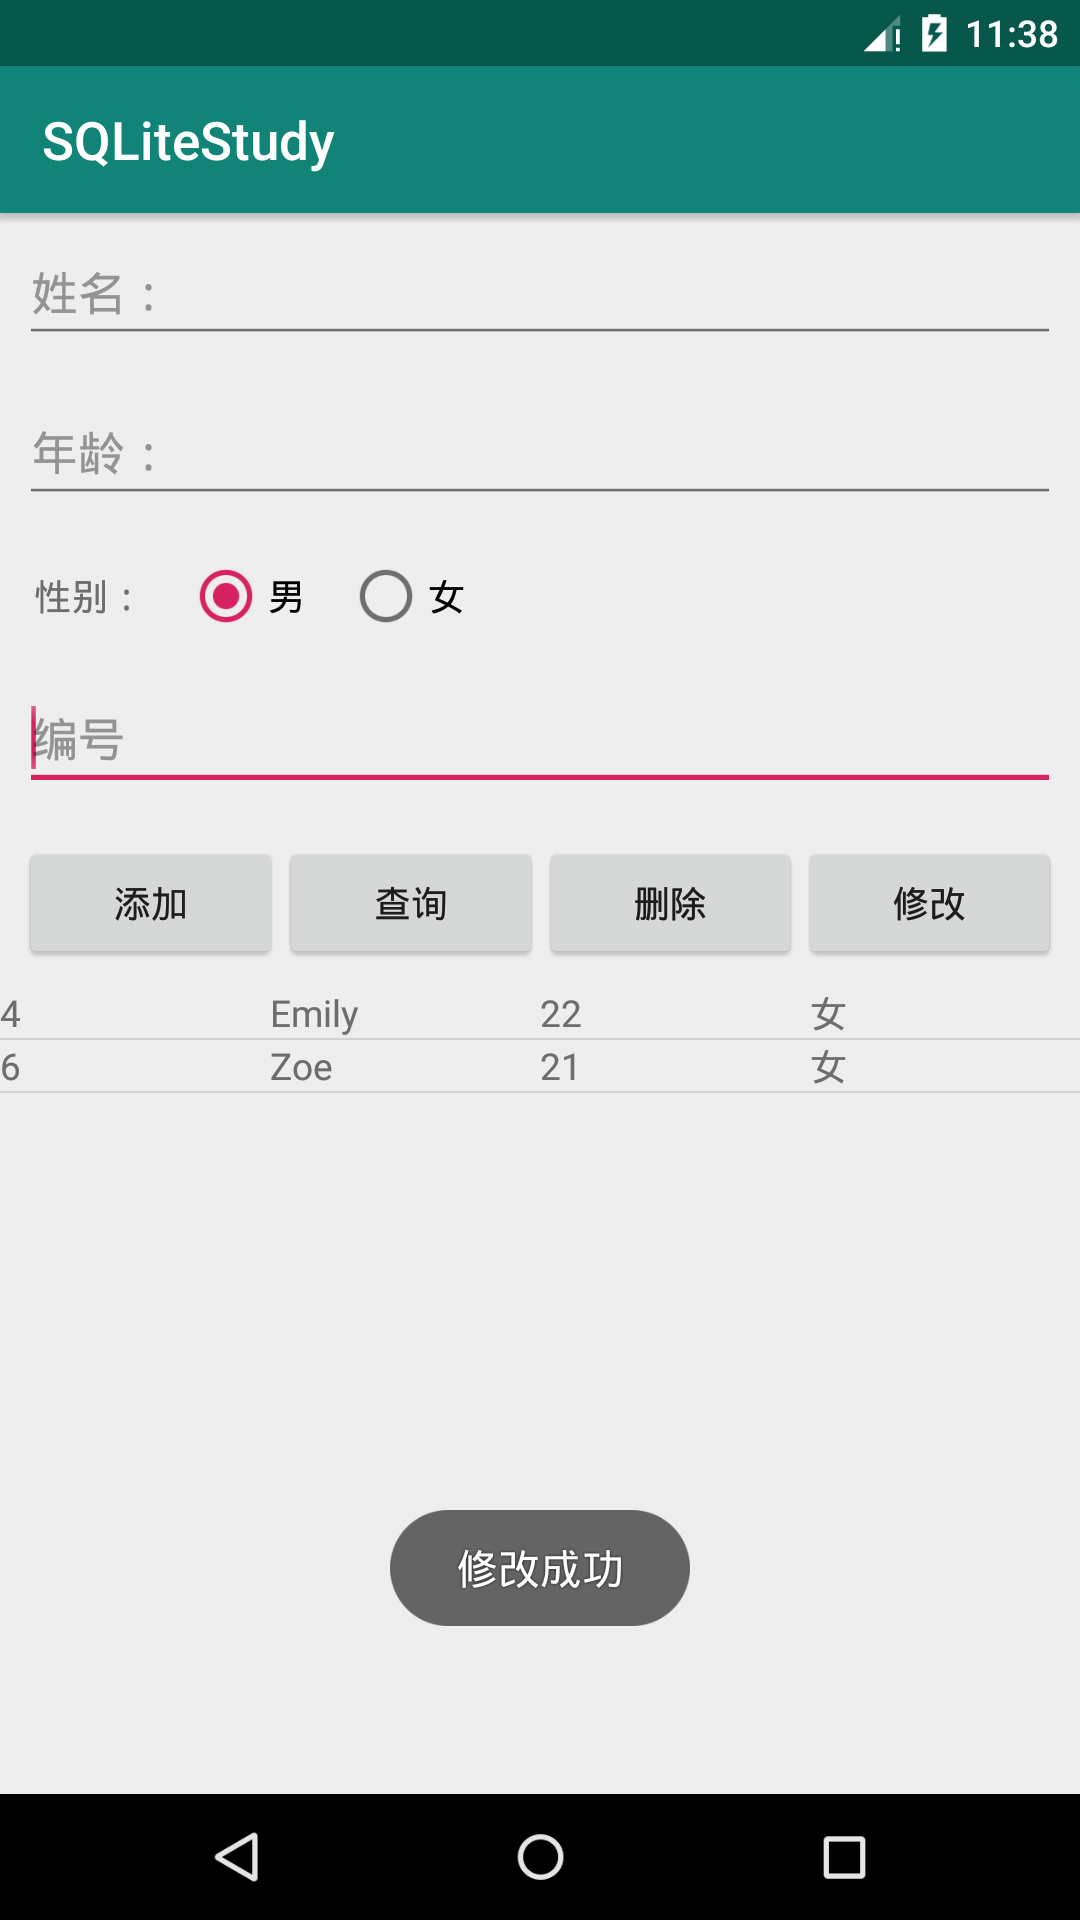
Design sketch: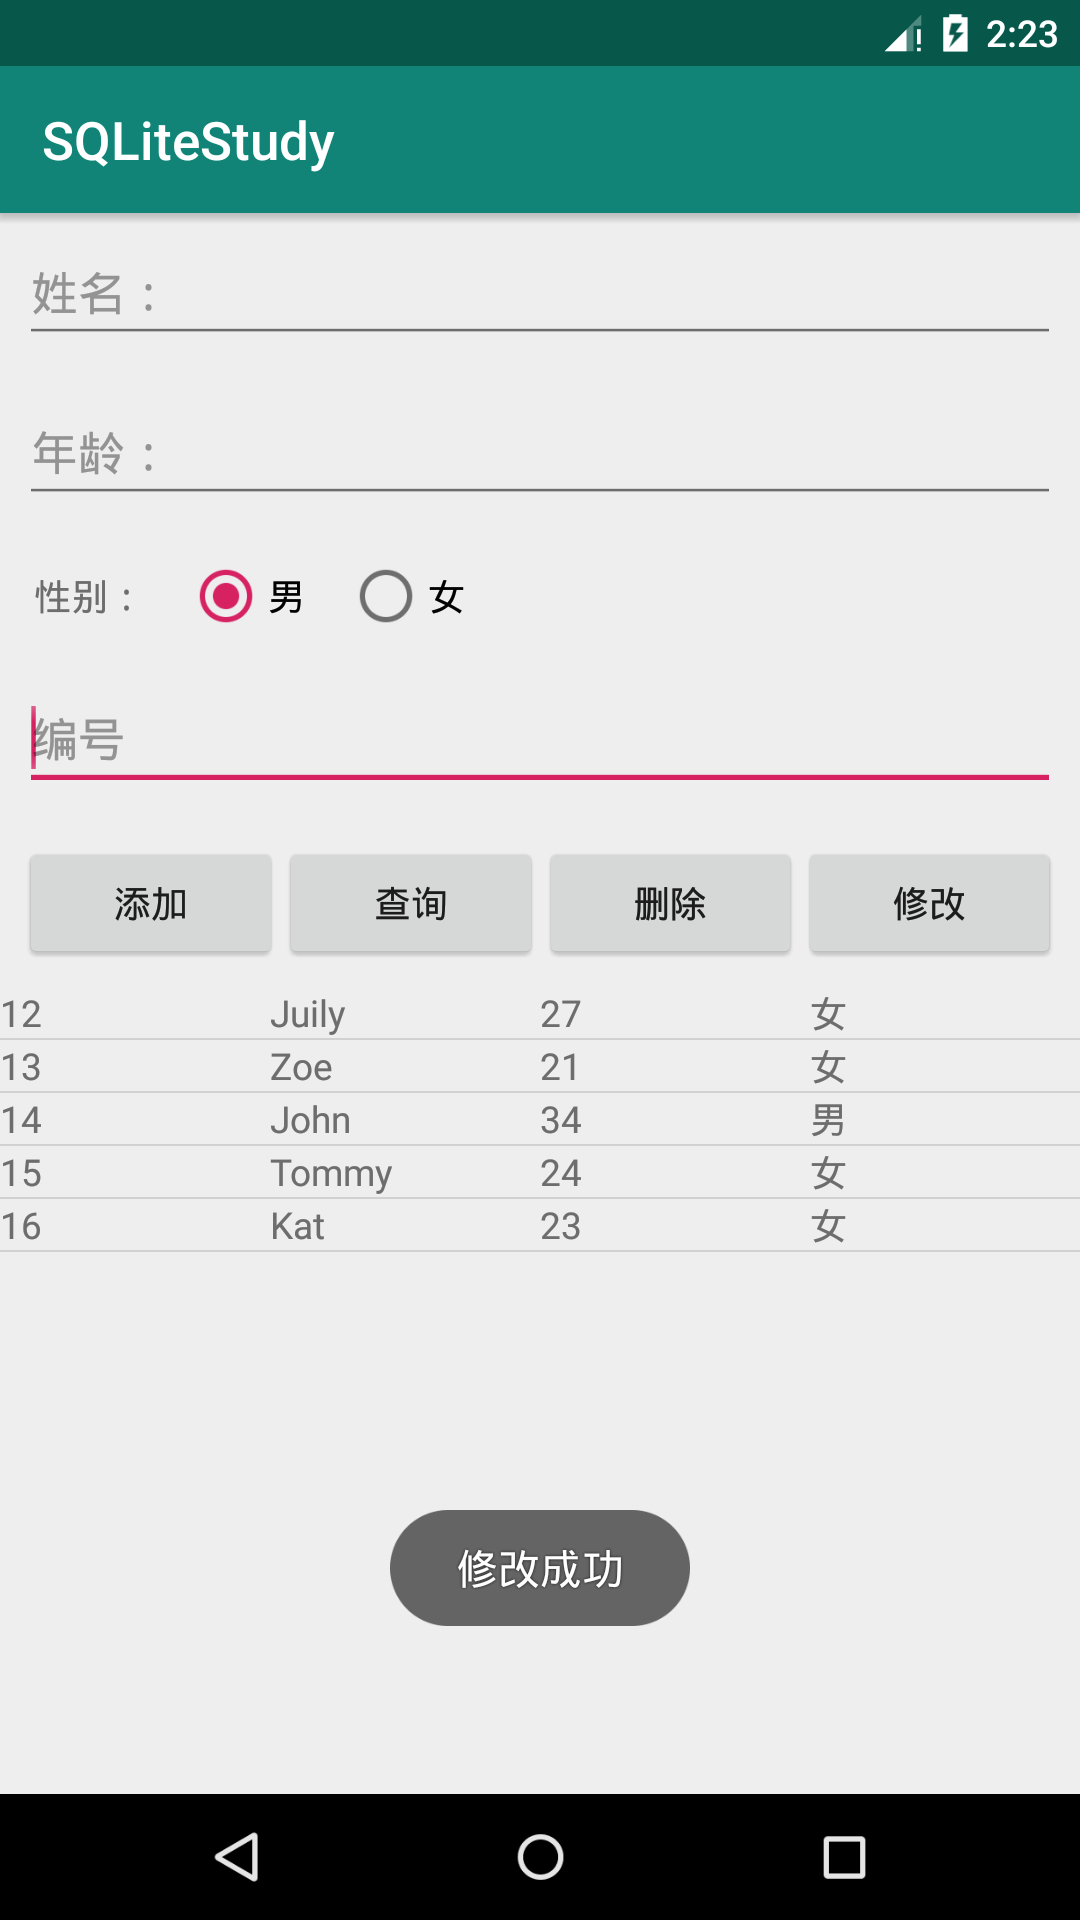
5, summary
StudentDao
Another query method
moveToNext() can move cursor to the next record
public ArrayList<Student> getStudentInList(String...strings){
    ArrayList<Student> list=new ArrayList<>();
    Cursor c=getStudent(strings);
    while (c.moveToNext()){
        int id=c.getInt(0);
        String name=c.getString(1);
        int age=c.getInt(2);
        String gender=c.getString(3);
        Student s=new Student(id,name,age,gender);
        list.add(s);
    }
    return list;
}

