This article blog address: http://blog.csdn.net/qq1084283172/article/details/70339471
I. Environmental Configuration
1.ubuntu 14.04.5 x64bit
2.jdk-6u45-linux-x64.bin
3.Android Studio 2.3
4.Android 4.4.4r1
Configuration of JDK
According to official google documents https://source.android.com/source/requirements#jdk The hint is that the source code of Android 4.4.4r1 needs JDK 1.6 version. Here, take jdk-6u45-linux-x64 as an example to compile Android source code. Oracle The official download address for all versions of JDK is: http://www.oracle.com/technetwork/java/javase/archive-139210.html.

Unzip the downloaded jdk-6u45-linux-x64.bin:
Configure jdk environment variables:$ chmod a+x jdk-6u45-linux-x64.bin $ ./jdk-6u45-linux-x64.bin
# Open the environment variable configuration file
$ sudo gedit /etc/profile

# Configuring jdk environment variables
export JAVA_HOME=/opt/jdk1.6.0_45
export JRE_HOME=${JAVA_HOME}/jre
export PATH=$PATH:${JAVA_HOME}/bin
export CLASSPATH=.:${JAVA_HOME}/lib:${JRE_HOME}/lib

# Save, close / etc/profile file, update to make environment variables valid
$ source /etc/profile

# View version information for jdk
$ java -version
java version "1.6.0_45"
Java(TM) SE Runtime Environment (build 1.6.0_45-b06)
Java HotSpot(TM) 64-Bit Server VM (build 20.45-b01, mixed mode)
Installation of Dependent Library Files
According to official google documents https://source.android.com/source/initializing#for-ubuntu-14-04 Know: Compiling Android source code on ubuntu 14.04 requires installing the following dependency library files.
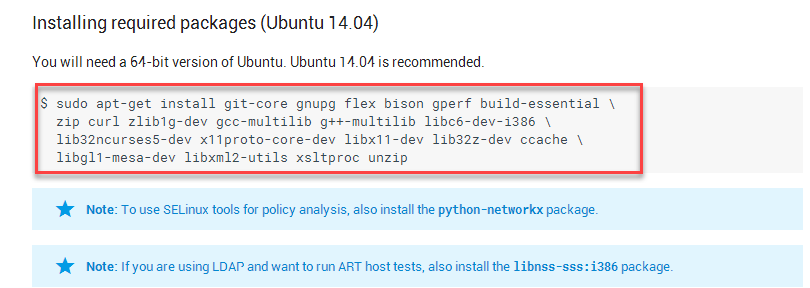
Dependency library files needed to be installed to compile Android system source code on ubuntu 14.04 system:
$ sudo apt-get install git-core gnupg flex bison gperf build-essential \
  zip curl zlib1g-dev gcc-multilib g++-multilib libc6-dev-i386 \
  lib32ncurses5-dev x11proto-core-dev libx11-dev lib32z-dev ccache \
  libgl1-mesa-dev libxml2-utils xsltproc unzip
Compiling Android Source Code
# Clean up
$ make clobber
# Set up environment
$ . build/envsetup.sh
# or
$ source build/envsetup.sh
# Choose a target
$ lunch
You're building on Linux
Lunch menu... pick a combo:
1. aosp_arm-eng
2. aosp_x86-eng
3. aosp_mips-eng
4. vbox_x86-eng
5. aosp_grouper-userdebug
6. aosp_flo-userdebug
7. aosp_deb-userdebug
8. aosp_tilapia-userdebug
9. aosp_mako-userdebug
10. aosp_hammerhead-userdebug
11. aosp_manta-userdebug
12. mini_armv7a_neon-userdebug
13. mini_x86-userdebug
14. mini_mips-userdebug
Which would you like? [aosp_arm-eng] 1
# Build the code
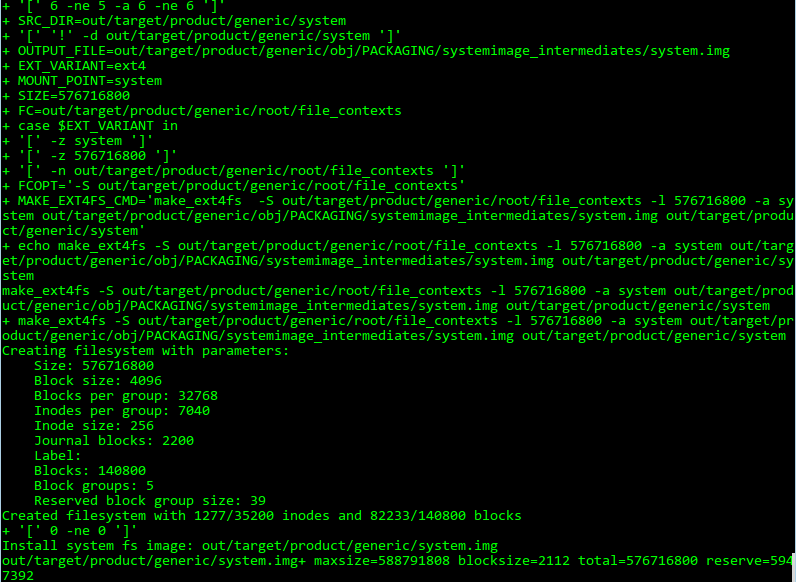
$ make -j16 Screenshot of the successful source code compilation of Android 4.4.4r1:
According to the official documents of google, the download address of each version of Android Studio is: https://developer.android.com/studio/index.html#tos-header . Choose the target version of Android according to your actual needs Studio downloads the Linux version of Android Studio, and the specific address of Android Studio downloads is: https://dl.google.com/dl/android/studio/ide-zips/2.3.1.0/android-studio-ide-162.3871768-linux.zip . google also officially offers versions of Android. The instructions of the Studio Installation Tutorial illustrate in detail the details that should be paid attention to in each version of Android Studio installation. The reference address is: https://developer.android.com/studio/install.html.
An example of the Android Studio installation command is as follows:
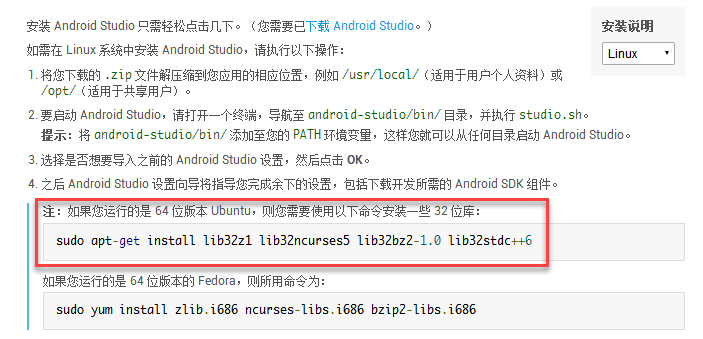
Once Android Studio is installed and started successfully, follow the instructions of Android Studio to configure it accordingly. In the process of configuration, Android Studio will prompt you to download the required sdk, emulator and other files to keep the network open and wait for Android Studio to download. To start Android Studio easily, you need to add android-studio/bin/to the PATH environment variable so that we can start from any directory. Android Studio program.# Ubuntu 64 bit requires 32 bit dependency library files to be installed $ sudo apt-get install lib32z1 lib32ncurses5 lib32bz2-1.0 lib32stdc++6 # Unzip the downloaded android-studio package $ unzip android-studio-ide-162.3871768-linux.zip $ ls -l # Copy android-studio to / opt directory $ sudo mv android-studio /opt/ $ cd /opt/android-studio/bin/ $ ls -l # Give executable privileges (optional) $ sudo chmod +x ./studio.sh # Start Android Studio $ ./studio.sh
# Open the environment variable configuration file
$ sudo gedit /etc/profile

# Add Android Studio to environment variables
export ANDROID_STUDIO_HOME=/opt/android-studio
export PATH=$PATH:${ANDROID_STUDIO_HOME}/bin

# Save, close / etc/profile file, update to make environment variables valid
$ source /etc/profile

# Start the Android Studio test in any directory
$ studio.sh
6. Android Studio Import Android Source
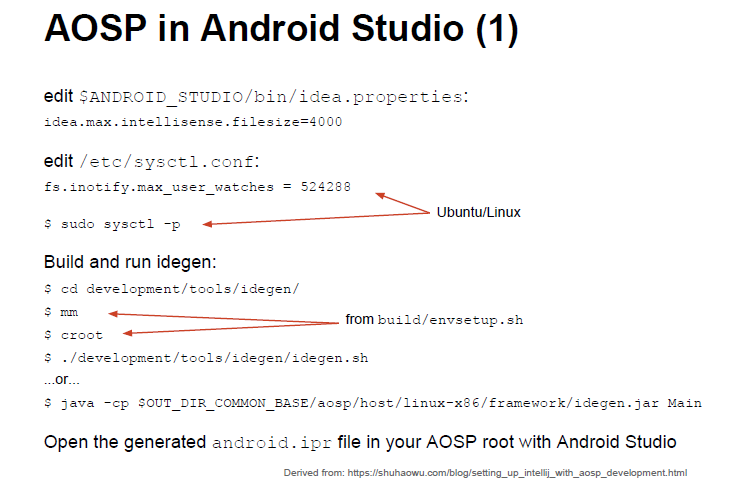
Under the file path / development/tools/idegen of Android source code, the instructions on how to import Android source code into Android Studio or Eclipse are specifically / development/tools/idegen/README files. Import Android source code to Android The instructions in Studio are as follows:
The complete/development/tools/idegen/README file is described as follows:
IDEGen automatically generates Android IDE configurations for IntelliJ IDEA
and Eclipse. Your IDE should be able to compile everything in a reasonable
amount of time with no errors.
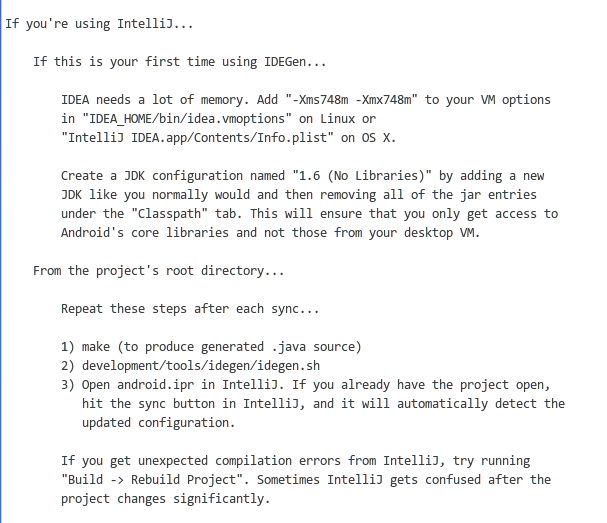
If you're using IntelliJ...
If this is your first time using IDEGen...
IDEA needs a lot of memory. Add "-Xms748m -Xmx748m" to your VM options
in "IDEA_HOME/bin/idea.vmoptions" on Linux or
"IntelliJ IDEA.app/Contents/Info.plist" on OS X.
Create a JDK configuration named "1.6 (No Libraries)" by adding a new
JDK like you normally would and then removing all of the jar entries
under the "Classpath" tab. This will ensure that you only get access to
Android's core libraries and not those from your desktop VM.
From the project's root directory...
Repeat these steps after each sync...
1) make (to produce generated .java source)
2) development/tools/idegen/idegen.sh
3) Open android.ipr in IntelliJ. If you already have the project open,
hit the sync button in IntelliJ, and it will automatically detect the
updated configuration.
If you get unexpected compilation errors from IntelliJ, try running
"Build -> Rebuild Project". Sometimes IntelliJ gets confused after the
project changes significantly.
If you're using Eclipse...
If this is your first time using IDEGen...
Edit eclipse.ini ("Eclipse.app/Contents/MacOS/eclipse.ini" on OS X) and
add "-Xms748m -Xmx748m" to your VM options.
Configure a JRE named "1.5 (No Libraries)" under "Preferences -> Java ->
Installed JREs". Remove all of the jar entries underneath "JRE system
libraries". Eclipse will not let you save your configuration unless at
least one jar is present, so include a random jar that won't get in the
way.
From the project's root directory...
Repeat these steps after each sync...
1) make (to produce generated .java source)
2) development/tools/idegen/idegen.sh
3) Import the project root directory into your Eclipse workspace. If you
already have the project open, simply refresh it (F5).
Excluding source roots and jars
IDEGen keeps an exclusion list in the "excluded-paths" file. This file
has one regular expression per line that matches paths (relative to the
project root) that should be excluded from the IDE configuration. We
use Java's regular expression parser (see java.util.regex.Parser).
You can create your own additional exclusion list by creating an
"excluded-paths" file in the project's root directory. For example, you
might exclude all apps except the Browser in your IDE configuration with
this regular expression: "^packages/apps/(?!Browser)".
Controlling source root ordering (Eclipse)
You may want some source roots to come before others in Eclipse. Simply
create a file named "path-precedence" in your project's root directory.
Each line in the file is a regular expression that matches a source root
path (relative to the project's root directory). If a given source root's
path matches a regular expression that comes earlier in the file, that
source root will come earlier in the generated configuration. If a source
root doesn't match any of the expressions in the file, it will come last,
so you effectively have an implicit ".*" rule at the end of the file.
For example, if you want your applications's source root to come first,
you might add an expression like "^packages/apps/MyApp/src$" to the top
of the "path-precedence" file. To make source roots under ./out come last,
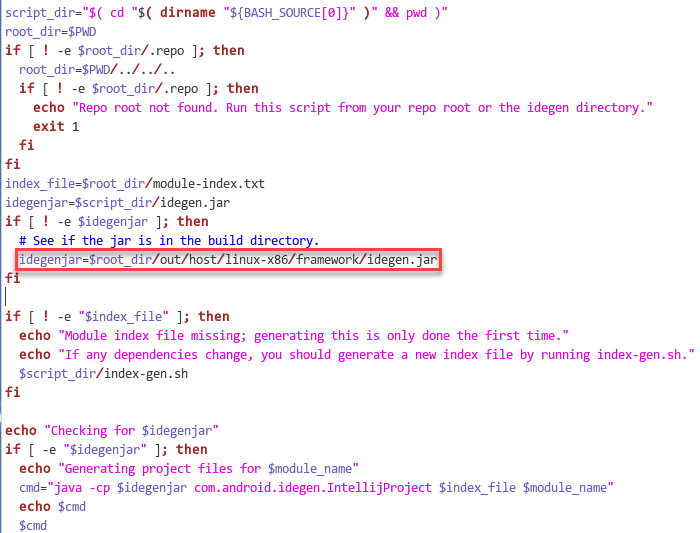
add "^(?!out/)" (which matches all paths that don't start with "out/").1. Make sure that Android source code has been successfully compiled before importing it into Android Studio. Since the / out/host/linux-x86/framework/idegen.jar tool is used when executing the / development/tools/idegen/idegen.sh script (as shown in the figure below), you need to ensure idegen.jar before executing the / development/tools/idegen/idegen.sh script. Tools already exist.
2. If idegen.jar does not exist in the / out/host/linux-x86/framework/directory, it can be compiled and generated according to / development/tools/idegen/Android.mk.
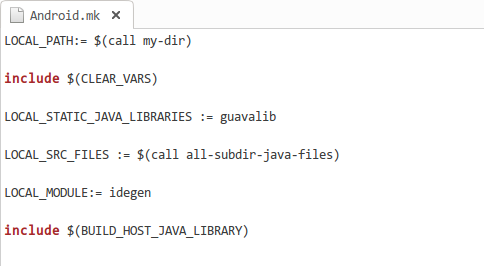
3. In the root directory of the Android source code, execute the following command to create the idegen.jar file, and then generate the configuration file importing the Android source code into Android Studio.
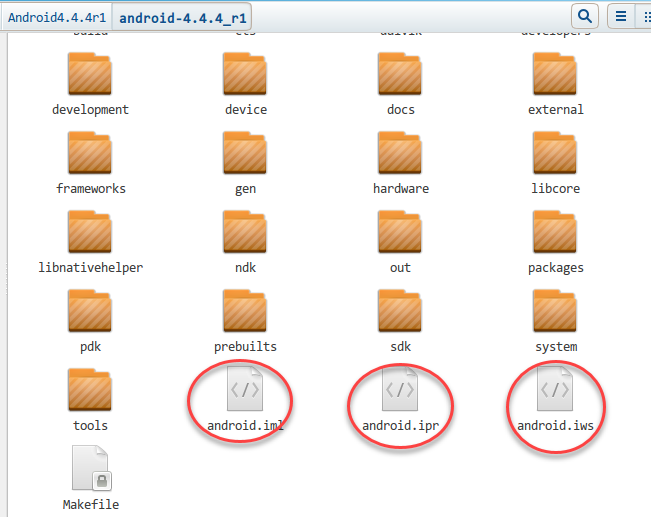
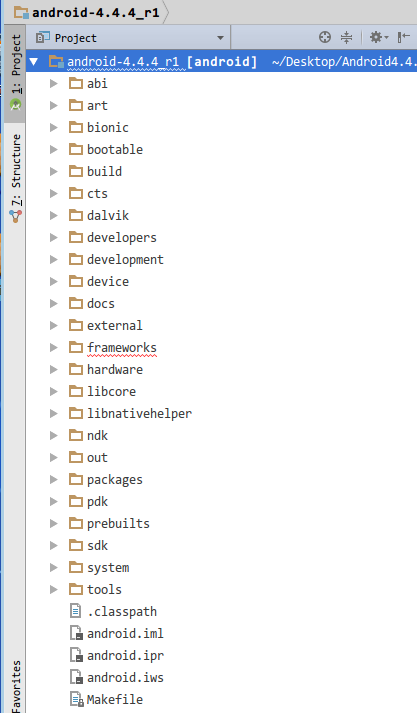
When the above command is executed successfully, the android.iml and android.ipr will be generated in the root directory of the Android source code. And the android.iws file, the results are as follows:# Import default scripts $ source build/envsetup.sh # Compile and generate idegen.jar tool $ mmm ./development/tools/idegen/ # Generate configuration files for importing Android source code into Android Studio $ ./development/tools/idegen/idegen.sh
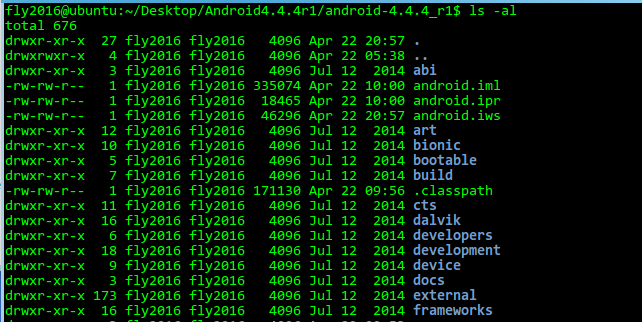
In fact, under the root directory of Android source code, the configuration file. classpath for importing Android source code from Eclipse is also generated. The result is as follows:
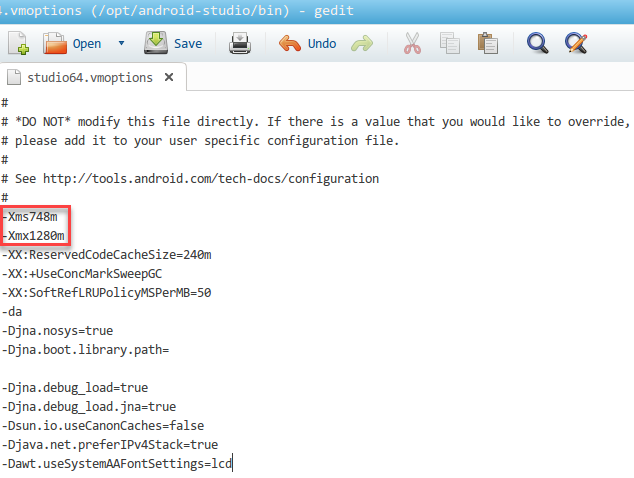
4. It takes a lot of memory to import Android source code into Android Studio, so we need to modify the configuration file of Android Studio and make the allocated memory space larger. Modify android-studio/bin/studio.vmoptions under 32-bit Linux system and Android-studio/bin/studio 64.vmoptions under 64-bit Linux system to adjust the parameters of-Xms and-Xmx, recommending at least 748m. Here is The modified android-studio/bin/studio64.vmoptions file is as follows:
5. Start Android Studio by executing studio.sh, click File - > Open, select the android.ipr file just generated under the Android source root directory, and then wait for Android Studio to import Android source code. Here is a screenshot of the results of Android Studio importing Android source code:
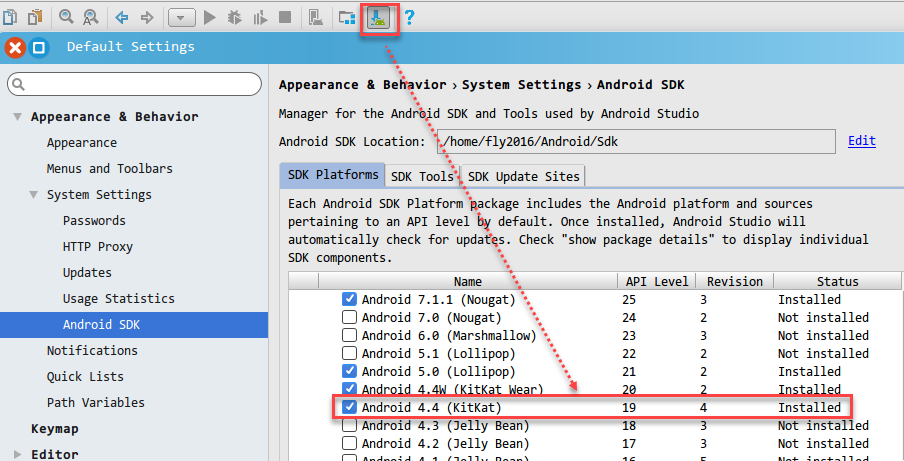
6. In Android Studio, according to the current version of Android source code, Android 4.4.4r1, keep the network free to download Android SDK version Android API 19 corresponding to Android 4.4.4r1, as shown below:
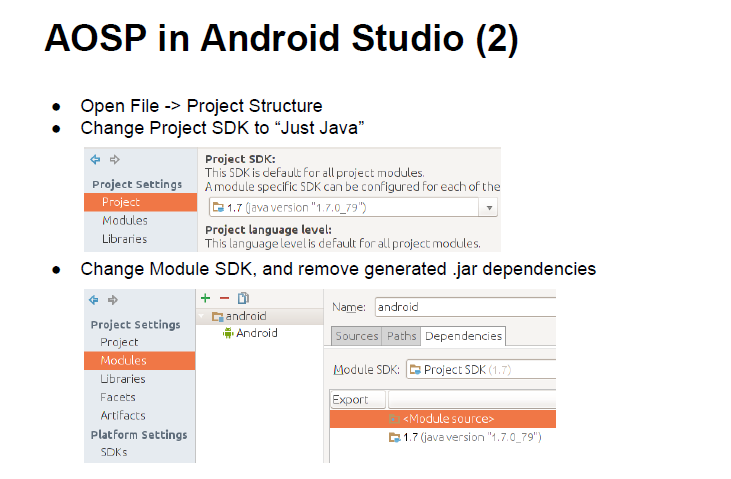
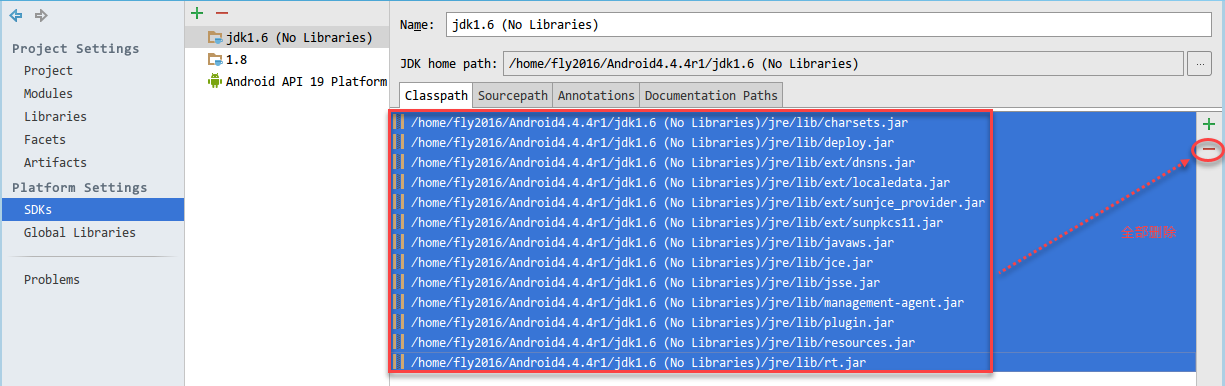
Click File - > Project Structure - > SDKs - > "+" to create a new JDK named jdk1.6 (No Libraries), and then delete all the jar files under the classpath tab (that is, all the jar packages under the Classpath tab need to be deleted). This ensures that the library files in the Android source code are used, even if the Android source code does not use the jar package of the locally installed JDK but uses the core jar library files of the Android source code.
And jdk1.6 (No Libraries) is used as the jar package for Android SDK (Android API 19) version. The settings are as follows:
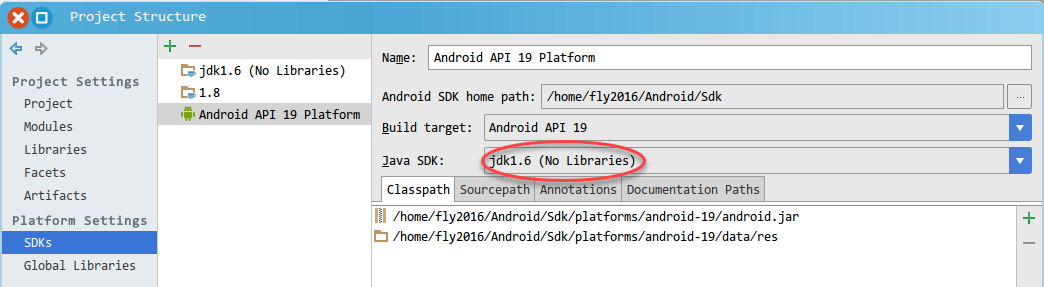
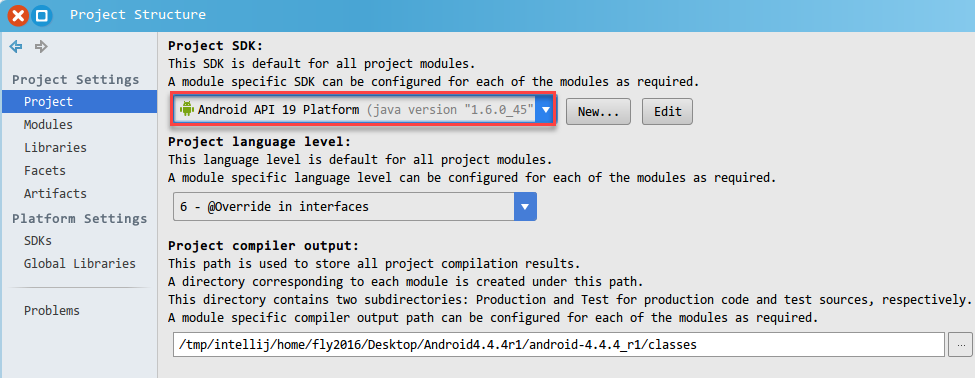
Then select the corresponding Android SDK (Android API 19) version from the Project SDK in the Project tag, as shown in the following figure:
7. Make sure that the Android SDK and JDK are set correctly for the current Android source code project in the above steps. Then open Projects Stucture and select Modules to delete all default dependent jar library files (for convenience, if you lack any jar library files, you can add them yourself).
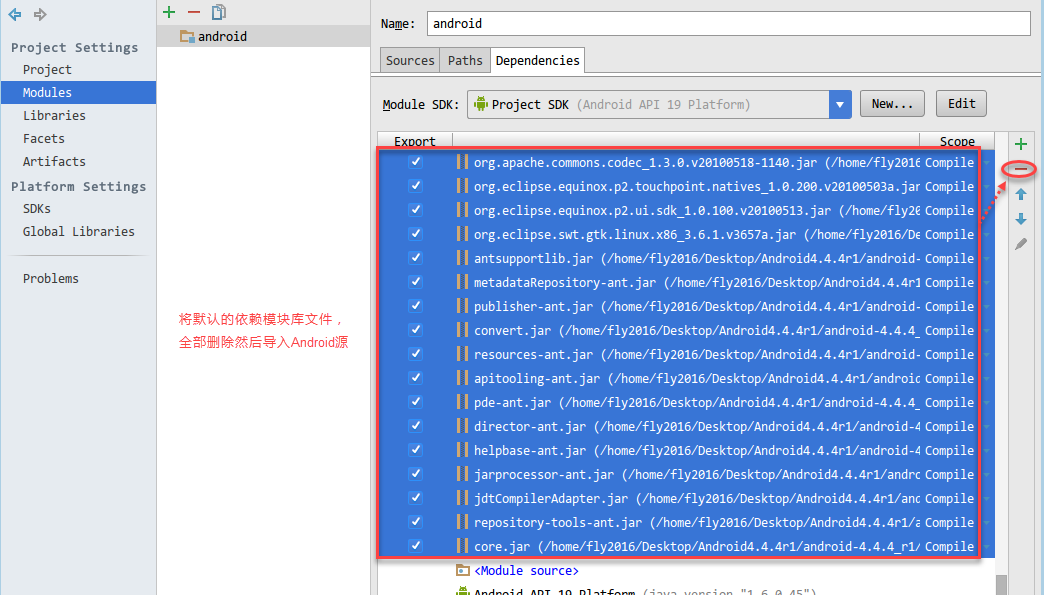
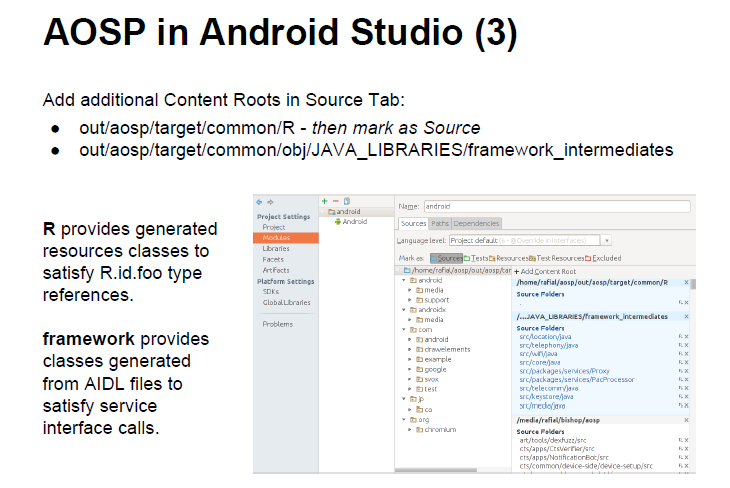
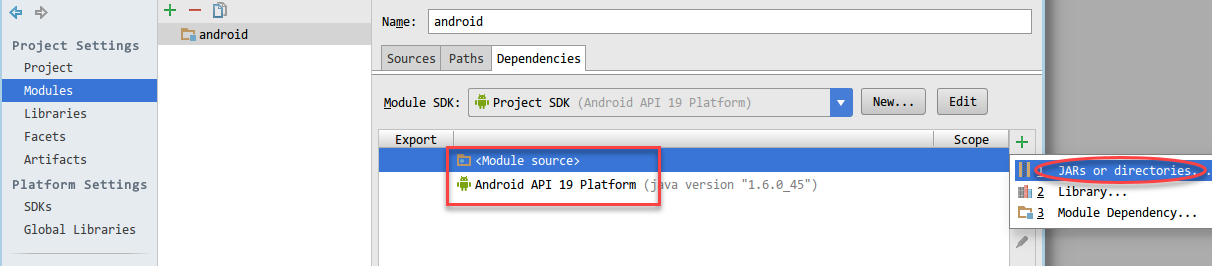
After the default dependency jar files are deleted, retain the two items shown in the following figure, and then click on the "+" on the right to add the Android source frameworks and the jar package files in the external directory, as shown in the following figure:
Add the jar package files in Android source frameworks and external directories to a successful screenshot, as follows:

In the process of reading Android source code later, if there is a code jump error, please follow the steps above to add the path or jar file of the corresponding code to the Moduled Dependencies tab.
VII. Summary
About importing Android source code into Android Studio, I refer to some blogs, but many of them are not very clear. This is also a muddled practice. Maybe it is because I chose a lower version of Android source code and a higher version of Android Studio, which led to the results of practice and other bloggers. The results are different. " Android Studio imports Android source code > This blog post is well written, and some of the details are referenced by this blog post.
Reference article link:
<Android Studio imports Android source code>
<Manual debugging of Android source code (super simple)>
<idegen: a magic instrument in a corner>
<Macbook Pro downloads and compiles Android source code and imports Android Studio>
VIII. Other References
<Introduction to AOSP > This article also has some introductions, but after some practice, some steps are out of date. Details of the specific steps are as follows, for reference only: