I have just contacted FFmpeg, and I have searched and sorted out some specific methods of using ffmpeg on android mobile phones for this purpose. As a personal knowledge point, I have arranged the following records. Of course, if I am lucky to help some people, it is naturally better. There are some wrong places to be pointed out.
Share the relevant information or good articles in front of you.
Lei Xiaohua Blog: http://blog.csdn.net/leixiaohua1020/article/details/15811977
https://stackoverflow.com/questions/4725773/ffmpeg-on-android
FFmpeg Download Address: https://ffmpeg.org/releases/
(When I heard about Lei Xiaohua's death in the news before, I also passed through the Media University every day... Alas)
First, necessary preparations
In general, FFmpeg is required to be used on android phones. First, FFmpeg needs to be compiled into. so files (dynamic libraries) that android can use. So we first need to prepare:
1. Compiler environment - Windows,Mac OS,Linux... Different systems may operate differently. Taking this article as an example, the compilation environment for locks is to build Ubuntu(Linux system) on Aliyun service, which is roughly configured as follows (for learning only):

2, FFmpeg source code.
Source Download Address
This article takes ffmpeg-3.2.1.tar.gz Version for example.
(Take this article as an example, after login to the Ali server) locate in the corresponding file directory and use the command:
wget https://ffmpeg.org/releases/ffmpeg-3.2.1.tar.gz
Download the source code and use the decompression to the current directory. The decompression command is as follows:
unzip ffmpeg-3.2.1.tar.gz
3,NDK
The NDK version used in this article is: android-ndk-r13b-linux-x86_64.zip . You can also download and decompress it into the corresponding directory by using the wget and unzip commands (without configuring environment variables).
Note: If you want to use this article as a practical reference, be sure to keep your prepared FFmpeg source code and downloaded ndk version consistent with this article, consistent and consistent. Because the changes of ffmpeg versions and ndk versions will lead to different configuration parameters for subsequent compilation of dynamic libraries, and because the Chinese learning materials of FFmpeg are limited (English is not comprehensible), it is likely that other versions of FFmpeg will not be compiled, at least I have tried to compile with the updated version... but eventually abandoned. ...
II. Configuration files
_Before compiling the dynamic library, you need to set up the corresponding compilation rules. Specifically as follows:
1. Modify. so file naming rules
The default compiled. so file format is as follows: +. so + three-paragraph version number format, such as libavformat.so.57.0.101. Such a file format does not meet our requirements, and even if the name of such a file is simply and roughly deleted. so later version number, it can not be compiled in actual use. So amend it as follows:
Locate in the ffmpeg root directory to download and unzip and open the configuration file
vim configure
Around 3247 lines
Replacement:
SLIBNAME_WITH_MAJOR='$(SLIBNAME).$(LIBMAJOR)'
LIB_INSTALL_EXTRA_CMD='$$(RANLIB) "$(LIBDIR)/$(LIBNAME)"'
SLIB_INSTALL_NAME='$(SLIBNAME_WITH_VERSION)'
SLIB_INSTALL_LINKS='$(SLIBNAME_WITH_MAJOR) $(SLIBNAME)'
For:
SLIBNAME_WITH_MAJOR='$(SLIBPREF)$(FULLNAME)-$(LIBMAJOR)$(SLIBSUF)'
LIB_INSTALL_EXTRA_CMD='$$(RANLIB)"$(LIBDIR)/$(LIBNAME)"'
SLIB_INSTALL_NAME='$(SLIBNAME_WITH_MAJOR)'
SLIB_INSTALL_LINKS='$(SLIBNAME)'
Save and exit.
Note: Due to the different versions of FFmpeg, the modified line number and are mentioned here.
Naming rules may be the same.
2. Write compiler (. sh) script
First create build_android.sh under ffmpeg and directory (name is optional):
vim build_android.sh
In editing state, the following contents are included:
#!/bin/bash
make clean
#Fill in your specific ndk unzipped directory
export NDK=/android/ndk/android-ndk-r13b
export SYSROOT=$NDK/platforms/android-9/arch-arm/
export TOOLCHAIN=$NDK/toolchains/arm-linux-androideabi-4.9/prebuilt/linux-x86_64
export CPU=arm
#The compiled file will be placed under android/arm / in the current path
export PREFIX=$(pwd)/android/$CPU
export ADDI_CFLAGS="-marm"


#. / configure is the executable file configure in the ffmpeg root directory
#You can use. / configure --hellp to view. / configure to fill in the parameters in the ffmpeg root directory.

./configure --target-os=linux \
        --prefix=$PREFIX --arch=arm \
        --disable-doc \
        --enable-shared \
        --disable-static \
        --disable-yasm \
        --disable-symver \
        --enable-gpl \
        --disable-ffmpeg \
        --disable-ffplay \
        --disable-ffprobe \
        --disable-ffserver \
        --disable-doc \
        --disable-symver \
        --cross-prefix=$TOOLCHAIN/bin/arm-linux-androideabi- \
        --enable-cross-compile \
        --sysroot=$SYSROOT \
        --extra-cflags="-Os -fpic $ADDI_CFLAGS" \
        --extra-ldflags="$ADDI_CFLAGS" \
        $ADDITIONAL_CONFIGURE_FLAG
make clean
make
make install
Save and exit
Be careful:
–disable-yasm
1. You may be prompted to install yasm in the actual compilation below (there is no such prompt in earlier versions). It is said that yasm can improve the compilation speed of ffmpeg, but I actually feel like it is not very fast. I guess I opened it in the wrong way.
2. Do not leave any blanks after the coding of each line above.
3. Make sure that the relevant variables, such as NDK, SYSROOT, TOOLCHAIN, are stored in the real directory of NDK that you download and decompress by yourself. Make sure your system is 32-bit or 64-bit -- it must be consistent with the NDK version.
3. Compile and generate. so files
Executable permissions need to be added to the build_android.sh file before executing a specific compilation. The operation commands are as follows:
chmod +x build_android.sh
Execute the compilation command:
./build_android.sh
Actual compilation may take several minutes.
After compilation, there will be two folders, inclue and lib, under android/arm / in the current directory
Include stores. h files for related modules: 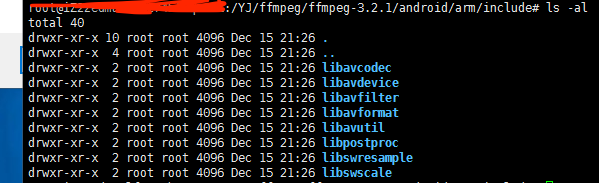
lib stores. so files 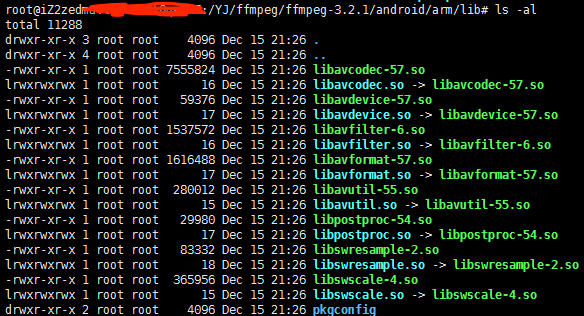
Four, verify
1. Create a new Android project.
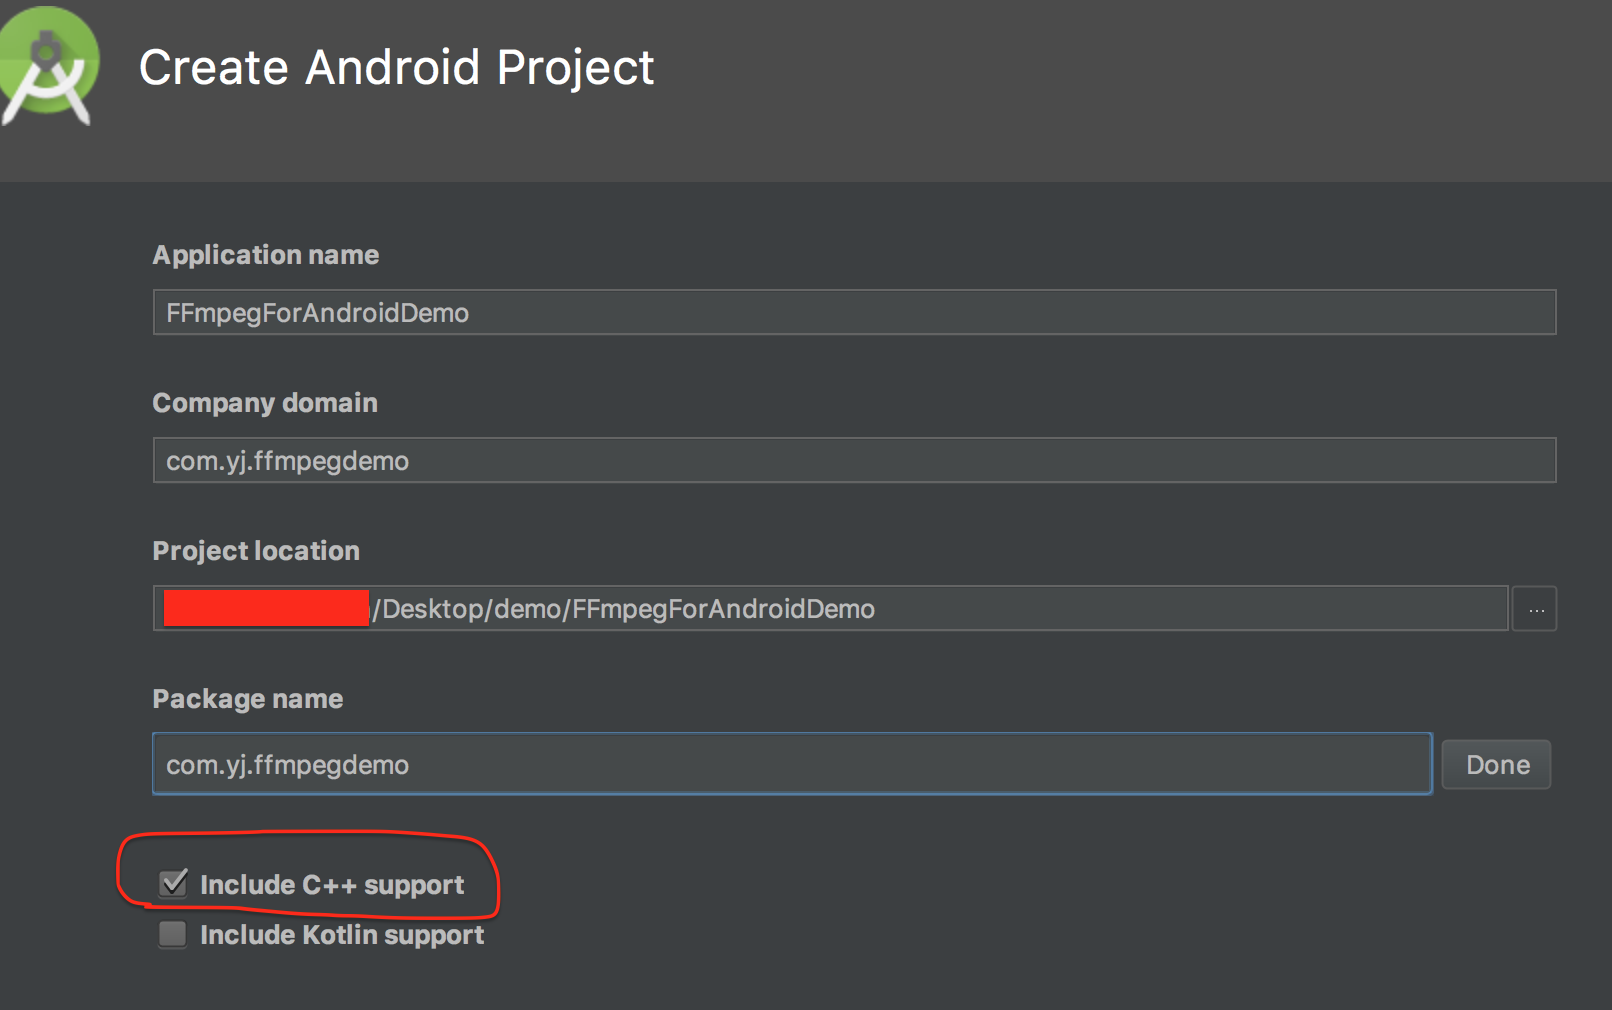
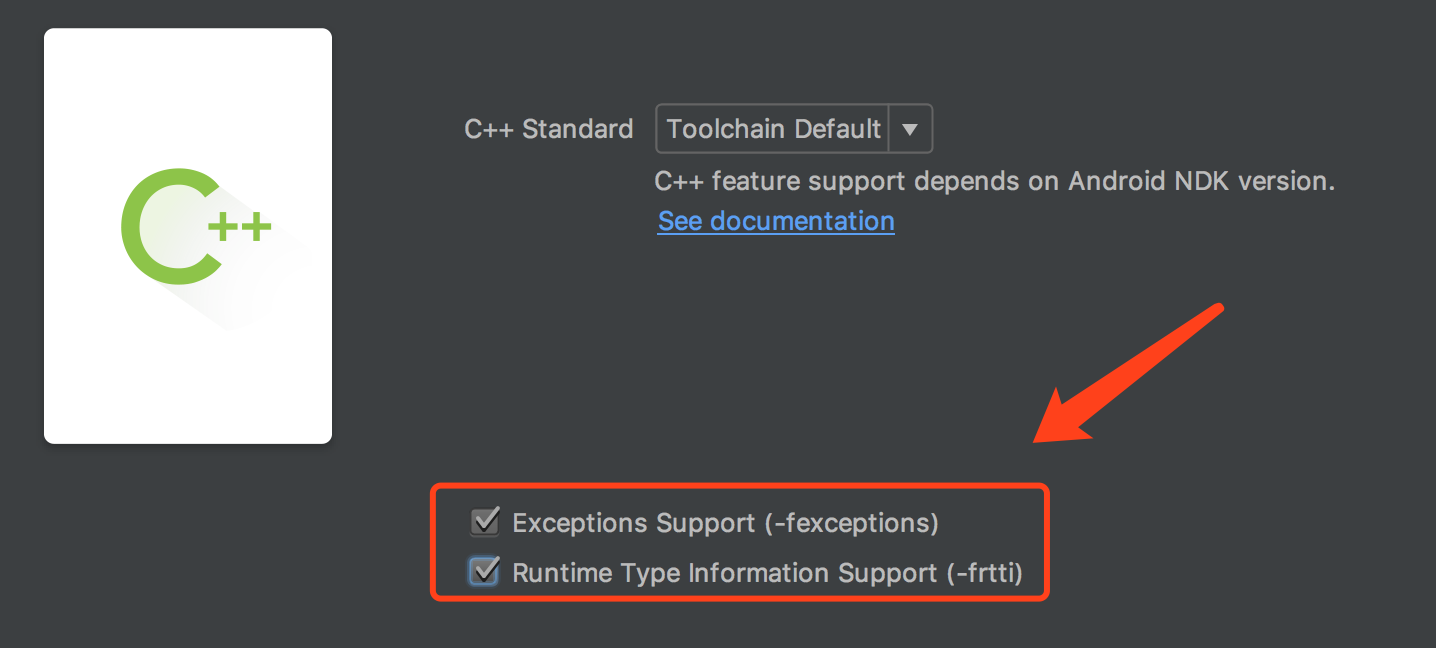
Check: Include C++ support
(Note labeling)
2. Copy the previously generated. so file and header /. h file to the specified directory as shown below.
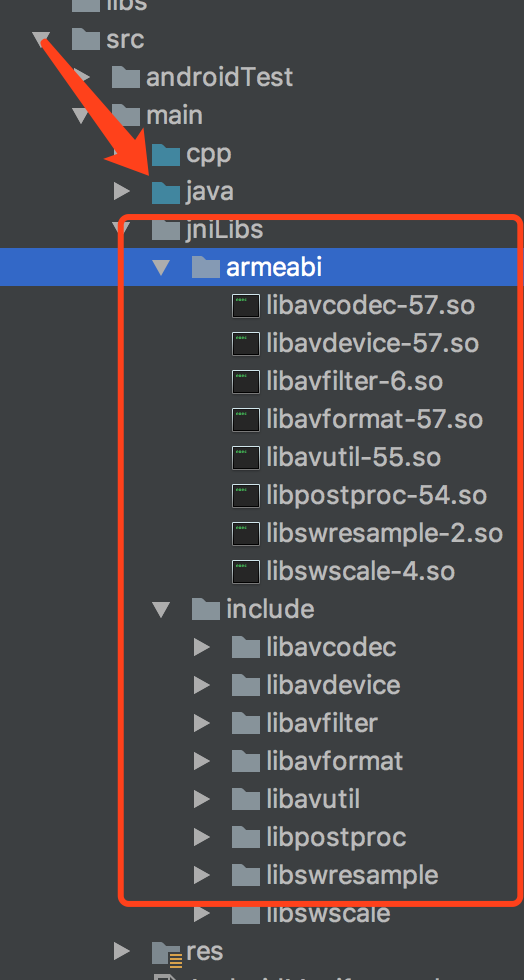
    Note: The. so file copied here must be version-numbered, otherwise it will cause an error when it is actually running.
    (In addition, this is just a simple and rough copy of all modules into the project, the actual project may not be required, here only for learning to use.)
3, build.gradle configuration
Add the supporting cpu architecture pattern to build.gradle in the app directory as shown below 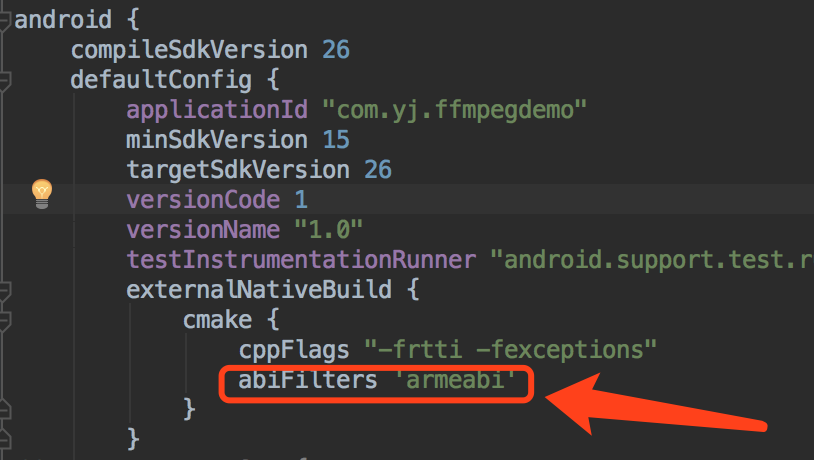
(For the time being, only the CPU in this section is considered)
Then sync
3. CMakeList.txt configuration
a, import the header file in the default CMakeList.txt file content.
#Import header file
include_directories(src/main/jniLibs/include)
b, add dynamic (. so) library.
#Declare the import file to change the directory variable ARM_DIR, which uses the relative directory with the system, because using the relative path does not seem to work
set(ARM_DIR /Users/Fill in the absolute path of your own actual system/demo/FFmpegForAndroidDemo/app/src/main/jniLibs)

#Add an example of so library.
add_library(avdevice-57
            SHARED
            IMPORTED)
set_target_properties(avdevice-57
                      PROPERTIES IMPORTED_LOCATION
                      ${ARM_DIR}/armeabi/libavdevice-57.so)

#Adding other so libraries in the same format as above
#Link library
target_link_libraries(
                       native-lib
                       avcodec-57
                       avdevice-57
                       avformat-57
                       avfilter-6
                       avutil-55
                       postproc-54
                       swresample-2
                       swscale-4
                       ${log-lib} )
Then sync
Be careful:
For reasons unknown, set_target_properties appears to set relative paths and
It doesn't work. So here you need to note that you need to assign project sources when declaring ARM_DIR variables
The absolute path of the file.
Considering that the full cmakelist configuration is not pasted here, please check the project code in detail.
c, load static library.
(This article is loaded in MainActivity created by default)
static {
        System.loadLibrary("avcodec-57");
        System.loadLibrary("avdevice-57");
        System.loadLibrary("avfilter-6");
        System.loadLibrary("avformat-57");
        System.loadLibrary("avutil-55");
        System.loadLibrary("postproc-54");
        System.loadLibrary("swresample-2");
        System.loadLibrary("swscale-4");
        System.loadLibrary("native-lib");
    }
d, call method, compile and run project.
We only do simple tests here, so we don't use FFmpeg in detail.
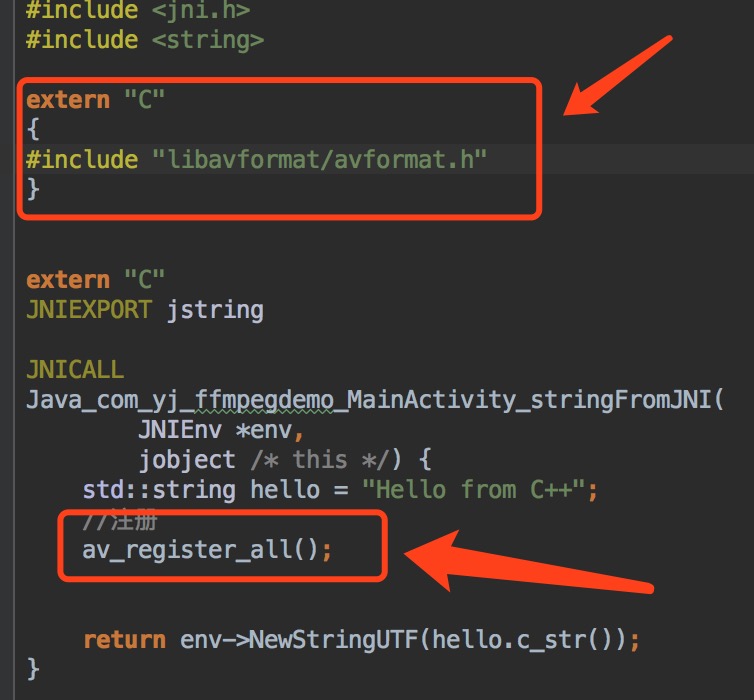
Be careful:
1. Introduce ffmpeg header file in the figure above to ensure that it is written in
extern "C"
{

}
Otherwise, the compiler will report an error - the header file cannot be found.
2,
av_register_all()For FFmpeg Library in the more common and important registration methods, specific use does not fall within the scope of this film.
Finally, compile and use the real machine to run the project... Here's a screenshot.
The project code is as follows:
CSDN upload must set download resource points, I really want not to download points...
Baidu Disk: Links: https://pan.baidu.com/s/1i5OVOcH Password: dzw7