-
In our daily life, we often see some html webpages to express our girlfriend, but the Android side of the presentation software can be said to be basically no, the author searched the whole network, there is no one available, so it is recommended that the editor put my blog on the home page. Android can give people a sense of customization and beauty, which is beyond the reach of web pages, Web links disappear. Therefore, the Android software production process and code written by myself are all open source. The technology of web and Android native hybrid development is adopted here, and Tencent X5 kernel is introduced to replace WebView, which can increase the loading speed of software by 30%. In github, I also imported several different background dynamic templates for you to choose, but also imported different background music to choose from. The specific replacement method will be explained in detail in the following blog (if you don't want to tap code yourself). The trouble of downloading directly is to give a star in Github. My younger brother will be very grateful! I will not pack and generate the installation package apk. I can directly install the APK file and upload it to github! Zero Foundation can also play! After reading the blog, you can change it by yourself!
- Github link: https://github.com/Geeksongs/ExpressLove
- Installation package APK file links (debug version, available directly): https://github.com/Geeksongs/ExpressLove/tree/master/app/debug
Software presentation process:
1. Page opening pause for three seconds, fixed background image
2. Enter the presentation interface
3. If you want to leave, click the return button on your mobile phone, but you can't get out anyway.
4. Begin to confess
5. After the success of the presentation, there is a fireworks scene, and then jump to Wechat, and chat with the younger brother automatically (or jump to any software such as QQ, just need to change a string)
The following is a software demonstration:
First, our Mainactivity.java
This activity (Java file) is in the folder: ExpressLove app src main java com example lenovo express love. We write in a hander in this activity, enter the delay, then jump to the second activity. This activity lets our homepage open and pause for three seconds to fix the background image. If you want to change the background image, you can download the folder: ExpressLove app src main res drawing image to replace itself, but later change the timg. drawing image in ExpressLove\ app\ src main\ res\ table. Keep the names consistent. If you want to change the latency, you can make changes in the following code with more detailed comments.
The code for Mainactivity.java is as follows:
package com.example.lenovo.expresslove;

import android.app.Activity;
import android.content.Intent;
import android.os.Bundle;

import android.os.Handler;
import android.support.v7.app.ActionBar;
import android.support.v7.app.AppCompatActivity;
import android.view.WindowManager;
import android.webkit.WebViewClient;

import com.tencent.smtt.sdk.WebView;


public class MainActivity extends AppCompatActivity {


    @Override
    protected void onCreate(Bundle savedInstanceState) {
        super.onCreate(savedInstanceState);
        setContentView(R.layout.activity_main);

        ActionBar actionBar=getSupportActionBar();//The next few lines are used to hide the title bar
        if(actionBar !=null)
        {
            actionBar.hide();
        }
        getWindow().setFlags(WindowManager.LayoutParams.FLAG_FULLSCREEN, WindowManager.LayoutParams.FLAG_FULLSCREEN);
        getSupportActionBar().hide();
new Handler().postDelayed(new Runnable(){ // To reduce code anonymity Handler Create a delayed call
            public void run() {
                Intent i = new Intent(MainActivity.this,Main2Activity.class);//After the delay, jump to activity 2, main2activity.java
                MainActivity.this.startActivity(i);
                MainActivity.this.finish();
            } }, 3000);//3000 represents a delay of 3 seconds
    }


        }
2. Home page layout code: activity_main.xml (no need to change)
In the folder: activity_main.xml under ExpressLove app src main res layout
<?xml version="1.0" encoding="utf-8"?>
<LinearLayout xmlns:android="http://schemas.android.com/apk/res/android"
    xmlns:tools="http://schemas.android.com/tools"
    android:layout_width="match_parent"
    android:layout_height="match_parent"
    android:orientation="vertical"
    android:background="@drawable/timg">
</LinearLayout>
Enter the second activity: (Android programmers can access Tencent X5 kernel here)
Mai2activity. java, in the same folder as Mainactivity.java, this activity introduces our heart-shaped dynamic graph interface:
This part of the code consists of several parts:
1. Android programmers can join the Tencent X5 kernel. Because the background dynamic behind our activity is loaded through Webview, the first time we open the software will be slower. If we delete the call to delete the WebView control, using X5 will increase the loading speed. The following comments are also more detailed.
2. Because the dynamic behind is html5 file, which is placed under the asset folder that I have created. If you want to change the background dynamic behind, you can go directly to ExpressLove app src main assets folder to see the html5 background dynamic we have given. If you are not satisfied with it, you can replace it by yourself. I have injected index.html. index 2. HTM into it. index3.html and index4.html are four background dynamics. The effect can be viewed in the computer browser by itself, and can be changed at the webview code implementation. If you want a dynamic background text, I'll explain it in detail later.
3. Introduce text animation again, but animation needs us to create a new xml file to complete the animation. In this activity, only Java code calls xml animation to achieve the gradual change of the top title bar text. The code starts from animation, using the knowledge of complementary animation. Later, we will show the code of the new xml file.
4. The rogue presentation process mainly uses the dialog technology. If the user clicks the button "click me" on the software first, he will jump to a dialog box, and the dialog box has only one button. The code uses the nesting of dialog boxes to realize the clicking of the buttons in the dialog box, and then a new dialog box will appear. Until the dialog box is clicked.
5. Can't return to the desktop of the beautiful dialog production: If the user clicked the return button on the mobile phone, it will appear: "Miss Sister, please don't leave me, okay?" Whether clicking to confirm or returning will return to the second activity, and will not exit the software.
ackage com.example.lenovo.expresslove;

import android.app.Dialog;
import android.content.DialogInterface;
import android.content.Intent;
import android.os.Build;
import android.os.Handler;
import android.support.v7.app.ActionBar;
import android.support.v7.app.AlertDialog;
import android.support.v7.app.AppCompatActivity;
import android.os.Bundle;
import android.view.KeyEvent;
import android.view.View;
import android.view.Window;
import android.view.WindowManager;
import android.view.animation.Animation;
import android.view.animation.AnimationUtils;
import android.webkit.WebViewClient;
import android.widget.Button;
import android.widget.TextView;
import android.widget.Toast;
import android.net.http.SslError;
import android.os.Bundle;
import android.support.v7.app.AppCompatActivity;
import android.webkit.SslErrorHandler;
import android.webkit.WebSettings;
import android.webkit.WebView;
import android.webkit.WebViewClient;
/*import com.tencent.smtt.sdk.WebSettings;
import com.tencent.smtt.sdk.WebView;*/

public class Main2Activity extends AppCompatActivity {
  //  private WebView mWebView;
  private WebView webView;
    AlertDialog builder=null;//Enter rogue Confessions
    @Override
    protected void onCreate(Bundle savedInstanceState) {
        super.onCreate(savedInstanceState);

        setContentView(R.layout.activity_main2);
//The following lines of code that have been commented out depend entirely on the programmer's personal wishes. If you want to use the Tencent X5 kernel, you can delete the following comment symbols. At the same time, you need to correlate our webview control.
      /*  mWebView = (com.tencent.smtt.sdk.WebView) findViewById(R.id.webView2);
        mWebView.loadUrl("file:///android_asset/index3.html");
        if (Build.VERSION.SDK_INT >= 21) {//Set the top status bar to translucent
            getWindow().setFlags(
                    WindowManager.LayoutParams.FLAG_TRANSLUCENT_STATUS,
                    WindowManager.LayoutParams.FLAG_TRANSLUCENT_STATUS);
        }*/
        final TextView  textView=(TextView)findViewById(R.id.textview);


//The following is the use of webview to load our h5 animation, if you want to use x5, you can delete the following, and then use the code that has been annotated above.

        webView = (WebView) findViewById(R.id.webView);
        //Pages that need to be loaded url
        webView.loadUrl("file:///android_asset/index3.html");//Here's what it says. assets Under folder html The name of the file should be suffixed with the suffix name. The path ahead is prescribed by Android itself. android_asset It is expressed in assets Change the meaning of the folder if you want other dynamic backgrounds index File name is OK.
        webView.getSettings().setLayoutAlgorithm(WebSettings.LayoutAlgorithm.SINGLE_COLUMN);//Adaptive Screen
        webView.getSettings().setLoadWithOverviewMode(true);//Adaptive Screen
        webView.getSettings().setSupportZoom(true);
        webView.getSettings().setUseWideViewPort(true);//Scale-up of Scale-up
       // webView.getSettings().setBuiltInZoomControls(true);//Set whether the zoom tool appears,I don't think there's any effect here.
        WebSettings settings = webView.getSettings();
        // If you want to access the page with the ____________ Javascript Interaction, then webview Support must be set up Javascript
        settings.setJavaScriptEnabled(true);
        webView.setWebViewClient(new WebViewClient(){
            public boolean shouldOverrideUrlLoading(WebView view, String url){
                view.loadUrl(url);
                return true;
            }
        });
//Here is the introduction of animation, in the title bar above the text gradient effect, from "in the process of loading" to "still stunned why?"
        Animation scaleAnimation = AnimationUtils.loadAnimation(this, R.animator.anim);
        textView.startAnimation(scaleAnimation);
//Here is the title bar that hides Android itself.
        ActionBar actionBar=getSupportActionBar();
        if(actionBar!=null)
        {
            actionBar.hide();
        }
//Here is to set the top status bar of Android to be translucent, which corresponds to the color of our top title bar. Otherwise, the status bar that shows the time is dark blue, and it will look annoying.
        if (Build.VERSION.SDK_INT >= 21) {//Set the top status bar to translucent
            getWindow().setFlags(
                    WindowManager.LayoutParams.FLAG_TRANSLUCENT_STATUS,
                    WindowManager.LayoutParams.FLAG_TRANSLUCENT_STATUS);}

        getWindow().setFlags(WindowManager.LayoutParams.FLAG_FULLSCREEN, WindowManager.LayoutParams.FLAG_FULLSCREEN);
        getSupportActionBar().hide();
new Handler().postDelayed(new Runnable(){ // To reduce code anonymity Handler Create a delayed call
            public void run() {
                textView.setText("<----What are you still stunned about?");
            } }, 4500);//Text gradient time is 4500ms

        Button button=(Button)findViewById(R.id.button);
        button.setOnClickListener(new View.OnClickListener() {
            @Override
            public void onClick(View view) {
                AlertDialog.Builder b = new AlertDialog.Builder(Main2Activity.this);
//2.set a property
                b.setTitle("Cook for you every day?");


                b.setPositiveButton("Okay", new DialogInterface.OnClickListener() {
                    @Override
                    public void onClick(DialogInterface dialogInterface, int i) {
                        AlertDialog.Builder c = new AlertDialog.Builder(Main2Activity.this);
                        c.setTitle("Cute girl:");
                        c.setMessage("Every month's living expenses are all for you.");
                        c.setPositiveButton("Good duck", new DialogInterface.OnClickListener() {
                            @Override
                            public void onClick(DialogInterface dialogInterface, int i) {
                                AlertDialog.Builder d = new AlertDialog.Builder(Main2Activity.this);
                                d.setTitle("Cute girl:");
                                d.setMessage("Write your name on the property certificate");
                                d.setNegativeButton("Good duck", new DialogInterface.OnClickListener() {
                                    @Override
                                    public void onClick(DialogInterface dialogInterface, int i) {
                                        AlertDialog.Builder y = new AlertDialog.Builder(Main2Activity.this);
                                        y.setTitle("Cute girl");
                                        y.setMessage("Shopping with you every day");
                                        y.setNegativeButton("Okay", new DialogInterface.OnClickListener() {
                                            @Override
                                            public void onClick(DialogInterface dialogInterface, int i) {
                                                Intent intent=new Intent(Main2Activity.this,Main3Activity.class);
                                                startActivity(intent);
                                            }
                                        });
                                        y.create();
                                        y.show();
                                    }
                                });
                                d.create();
                                d.show();
                            }
                        });
                        c.create();//Establish
                        c.show();//show
                    }
                });
                b.create();//Establish
                b.show();//show

            }

        });
        //Here are the brackets outside.


    }


//Here is the button to click back and jump out of the beautiful dialog box. It will not exit the software whether it is confirmed or cancelled.


    public boolean onKeyUp(int keyCode, KeyEvent event) {
        if(keyCode == KeyEvent.KEYCODE_BACK){
            new CommomDialog(this, R.style.dialog, "Please don't leave me, will you?", new CommomDialog.OnCloseListener() {
                @Override
                public void onClick(Dialog dialog, boolean confirm) {
                    if(confirm){

                        dialog.dismiss();
                    }

                }
            })
                    .setTitle("Cute girl:").show();

    }
    return true;
    }}
IV. index3.html
If you want to modify the text behind the background dynamic: "Dear love" for the person you want Dear, you can modify it in this web page file:
If you don't know how to create asset catalog by yourself, you can refer to my previous blog posts, portal: https://www.cnblogs.com/geeksongs/p/10673133.html Here is the file directory: ExpressLove app src main assets
The code is as follows:
<!DOCTYPE html>
<html lang="en" >
<head>
<meta charset="UTF-8">
<title>love you</title>

<link rel="stylesheet" href="css/style.css">

</head>
<body>

<link href='https://fonts.googleapis.com/css?family=Lato:100' rel='stylesheet' type='text/css'>

<canvas id="canvas" width="800" height="500"></canvas>

<div class="title"><b>Dear Love</b></div><!--Modify the text in the background here-->

<script src='js/FastBlur.js'></script>
<script src='js/jquery.min.js'></script>
<script src="js/index.js"></script>

</body>
</html>
From the code, we can see that many js files are referenced here. The relevant js folder has been placed under the asset folder, so we can make the correct call. If you want to introduce a programmer with a new HTML 5 animation background, please be careful not to duplicate the folder names of the javascript files and css files corresponding to your HTML 5 pages, or it will cause some unnecessary trouble.
Five.anim.xml
This file is the xml file used in our interpolation animation. The scale attribute in front of it was commented out by me. It represents the zoom of text or picture. But the effect of running in android software is not very good. We just use alpha's gradient attribute to make the gradient of text. Creating anim.xml requires a specific way to create it, not directly under our layout folder. Students can go to Baidu/Google by themselves.
<?xml version="1.0" encoding="utf-8"?>
<set xmlns:android="http://schemas.android.com/apk/res/android">
    <!--<scale
        android:duration="1000"
        android:startOffset ="0"
        android:fillBefore = "true"
        android:fillAfter = "false"
        android:fillEnabled= "true"
        android:repeatMode= "restart"
        android:repeatCount = "0"
        android:fromXScale="0.0"
        android:toXScale="2"
        android:fromYScale="0.0"
        android:toYScale="2"
        android:pivotX="50%"
        android:pivotY="50%" />-->
    <alpha


    android:duration="2000"
    android:startOffset ="0"
    android:fillBefore = "true"
    android:fillEnabled= "true"
    android:repeatMode= "restart"
    android:repeatCount = "0"
        android:fromAlpha="0.0"
    android:toAlpha="1.0"

    />

</set>
VI. Layout of the second activity activity activity_main2.xml
This layout is a bit complicated, but it's not too difficult to look at it carefully. Mainly at the top of the overall layout, we introduced a nested relative layout, which can replace the title bar that Android has. If you want to use the X5 kernel, just delete the staple food of the X5 control that I have commented out, and then delete the layout of WEBVIEW, but no matter how its id must be right, because we will introduce its id in the second activity!!
<?xml version="1.0" encoding="utf-8"?>
<LinearLayout xmlns:android="http://schemas.android.com/apk/res/android"
    xmlns:app="http://schemas.android.com/apk/res-auto"
    xmlns:tools="http://schemas.android.com/tools"
    android:layout_width="match_parent"
    android:layout_height="match_parent"
    android:orientation="vertical"
    tools:context=".Main2Activity">
    <RelativeLayout
        android:background="@color/mainColor"
        android:layout_width="match_parent"
        android:layout_height="17dp">


    </RelativeLayout>
<RelativeLayout
    android:background="@color/mainColor"
    android:layout_width="match_parent"
    android:layout_height="42dp">
    <Button
        android:id="@+id/button"
        android:layout_width="wrap_content"
        android:layout_height="match_parent"
        android:text="Point me."/>
<TextView
    android:id="@+id/textview"
    android:textSize="23dp"
    android:layout_alignParentRight="true"
    android:textColor="@color/white"
    android:layout_width="250dp"
    android:layout_height="match_parent"
    android:text="While loading, wait a minute....."/>
</RelativeLayout>
   <!-- <com.tencent.smtt.sdk.WebView
        android:id="@+id/webView2"
        android:layout_width="match_parent"
        android:layout_height="match_parent"/>-->
    <WebView
        android:id="@+id/webView"
        android:layout_width="match_parent"
        android:layout_height="match_parent"></WebView>
</LinearLayout>
The effect of the final layout is as follows: (the effect of the real machine running), you can see that the status bar above is not blue, the blue title bar is also hidden by us, because we have hidden these in the second activity. Just be careful to change the status bar to translucent. It is necessary to upgrade the API of Android software to more than 21. No more than 21 can be modified directly in the gradle file. After the modification, click syic now at the top right of android studio, and then wait for the computer to run for a period of time.

In addition, when we click the return button, we will jump out of a fake Wechat dialog box, as follows: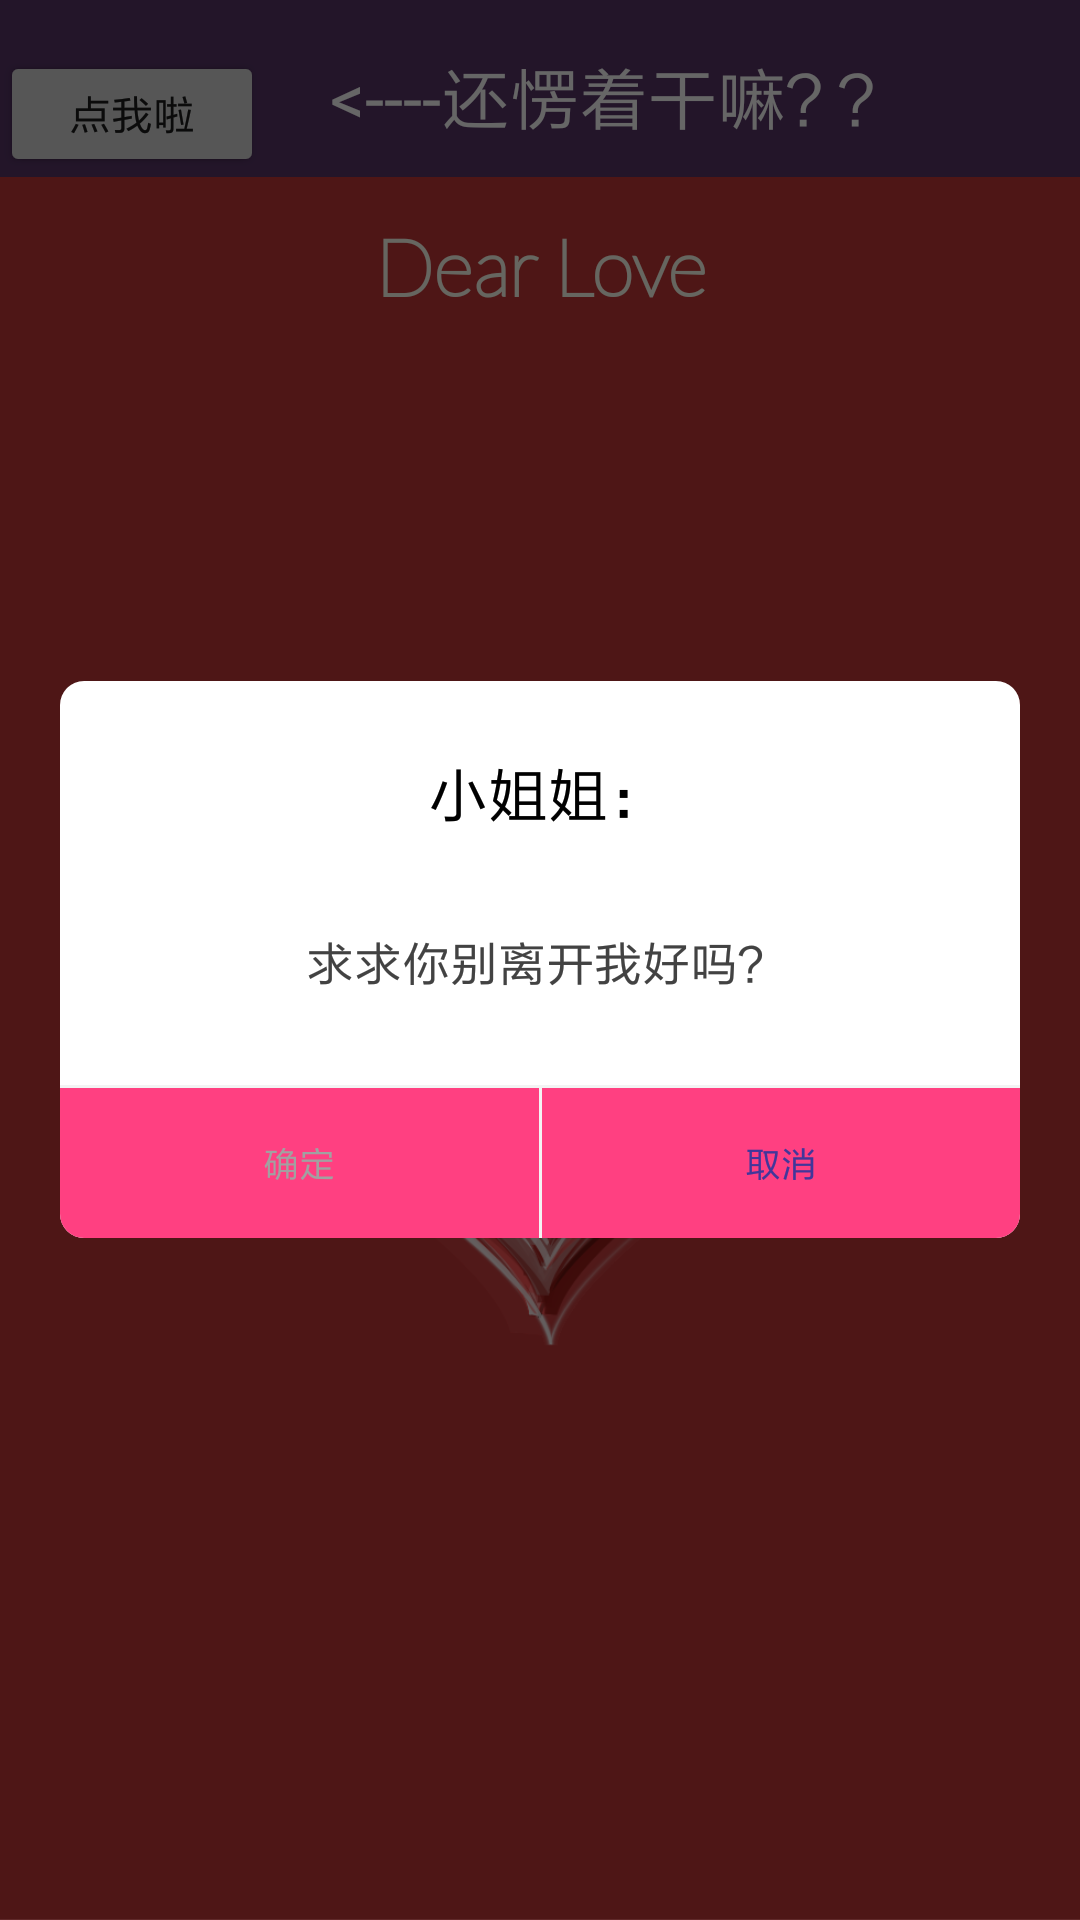
This event has been triggered in the second activity, so we need to do some artwork in the xml file. Here is the first xml file we need to edit:
VII. Diaog_commom.xml
This layout can be created directly under our layout folder.
The code is as follows:
<?xml version="1.0" encoding="utf-8"?>
<LinearLayout xmlns:android="http://schemas.android.com/apk/res/android"
    android:layout_width="match_parent"
    android:layout_height="match_parent"
    android:background="@drawable/bg_round_white"
    android:orientation="vertical" >

    <TextView
        android:id="@+id/title"
        android:layout_width="match_parent"
        android:layout_height="wrap_content"
        android:gravity="center_horizontal"
        android:padding="12dp"
        android:layout_marginTop="12dp"
        android:text="Tips"
        android:textSize="20sp"
        android:textColor="@color/black"/>

    <TextView
        android:id="@+id/content"
        android:layout_width="match_parent"
        android:layout_height="wrap_content"
        android:gravity="center"
        android:layout_gravity="center_horizontal"
        android:lineSpacingExtra="3dp"
        android:layout_marginLeft="40dp"
        android:layout_marginTop="20dp"
        android:layout_marginRight="40dp"
        android:layout_marginBottom="30dp"
        android:text="Check in successfully and get 200 points"
        android:textSize="16sp"
        android:textColor="@color/font_common_1"/>
    <View
        android:layout_width="match_parent"
        android:layout_height="1dp"
        android:background="@color/commom_background"/>

    <LinearLayout
        android:layout_width="match_parent"
        android:layout_height="50dp"
        android:orientation="horizontal">

        <TextView
            android:id="@+id/cancel"
            android:layout_width="match_parent"
            android:layout_height="match_parent"
            android:background="@drawable/bg_dialog_left_white"
            android:layout_weight="1.0"
            android:gravity="center"
            android:text="Determine"
            android:textSize="12sp"
            android:textColor="@color/font_common_2"/>

        <View
            android:layout_width="1dp"
            android:layout_height="match_parent"
            android:background="@color/commom_background"/>

        <TextView
            android:id="@+id/submit"
            android:layout_width="match_parent"
            android:layout_height="match_parent"
            android:background="@drawable/bg_dialog_right_white"
            android:gravity="center"
            android:layout_weight="1.0"
            android:text="cancel"
            android:textSize="12sp"
            android:textColor="@color/font_blue"/>

    </LinearLayout>

</LinearLayout>
VIII. colors.xml
Files under values, required
<?xml version="1.0" encoding="utf-8"?>
<resources>
    <color name="colorPrimary">#3F51B5</color>
    <color name="colorPrimaryDark">#303F9F</color>
    <color name="colorAccent">#FF4081</color>
    <color name="mainColor">#573567</color>

    <color name="white">#FFFFFF</color>
    <color name="black">#000000</color>

    <color name="font_gray_b">#d4d4d3</color>

    <color name="font_tab_1">#42369a</color>
    <color name="font_tab_0">#b1b1b1</color>


    <color name="font_common_1">#424242</color>
    <color name="font_common_2">#a1a1a1</color>
    <color name="font_blue">#42369a</color>

    <color name="font_green">#00cccc</color>

    <color name="commom_background">#f3f3f3</color>

</resources>
9. styles.xml
<resources>

    <!-- Base application theme. -->
    <style name="AppTheme" parent="Theme.AppCompat.Light.DarkActionBar">
        <!-- Customize your theme here. -->
        <item name="colorPrimary">@color/colorPrimary</item>
        <item name="colorPrimaryDark">@color/colorPrimaryDark</item>
        <item name="colorAccent">@color/colorAccent</item>
    </style>


    <style name="dialog" parent="@android:style/Theme.Dialog">
        <item name="android:windowFrame">@null</item>
        <!--Frame-->
        <item name="android:windowIsFloating">true</item>
        <!--Does it float now? activity Above-->
        <item name="android:windowIsTranslucent">false</item>
        <!--translucent-->
        <item name="android:windowNoTitle">true</item>
        <!--No title-->
        <item name="android:windowBackground">@android:color/transparent</item>
        <!--Background transparency-->
        <item name="android:backgroundDimEnabled">true</item>
        <!--vague-->

    </style>


    <style name="AppTheme.NoActionBar">
        <item name="windowActionBar">false</item>
        <item name="windowNoTitle">true</item>
    </style>

    <style name="AppTheme.AppBarOverlay" parent="ThemeOverlay.AppCompat.Dark.ActionBar" />

    <style name="AppTheme.PopupOverlay" parent="ThemeOverlay.AppCompat.Light" />


</resources>
In order to jump out of the box when clicking, we also need to write new Java classes:
9. CommomDialog.java
package com.example.lenovo.expresslove;

import android.app.Dialog;
import android.content.Context;
import android.os.Bundle;
import android.text.TextUtils;
import android.view.View;
import android.widget.TextView;

public class CommomDialog extends Dialog implements View.OnClickListener {

    private TextView contentTxt;
    private TextView titleTxt;
    private TextView submitTxt;
    private TextView cancelTxt;

    private Context mContext;
    private String content;
    private OnCloseListener listener;
    private String positiveName;
    private String negativeName;
    private String title;

    public CommomDialog(Context context) {
        super(context);
        this.mContext = context;
    }

    public CommomDialog(Context context, int themeResId, String content) {
        super(context, themeResId);
        this.mContext = context;
        this.content = content;
    }

    public CommomDialog(Context context, int themeResId, String content, OnCloseListener listener) {
        super(context, themeResId);
        this.mContext = context;
        this.content = content;
        this.listener = listener;
    }

    protected CommomDialog(Context context, boolean cancelable, OnCancelListener cancelListener) {
        super(context, cancelable, cancelListener);
        this.mContext = context;
    }

    public CommomDialog setTitle(String title){
        this.title = title;
        return this;
    }

    public CommomDialog setPositiveButton(String name){
        this.positiveName = name;
        return this;
    }

    public CommomDialog setNegativeButton(String name){
        this.negativeName = name;
        return this;
    }

    @Override
    protected void onCreate(Bundle savedInstanceState) {
        super.onCreate(savedInstanceState);
        setContentView(R.layout.dialog_commom);
        setCanceledOnTouchOutside(false);
        initView();
    }

    private void initView(){
        contentTxt = (TextView)findViewById(R.id.content);
        titleTxt = (TextView)findViewById(R.id.title);
        submitTxt = (TextView)findViewById(R.id.submit);
        submitTxt.setOnClickListener(this);
        cancelTxt = (TextView)findViewById(R.id.cancel);
        cancelTxt.setOnClickListener(this);

        contentTxt.setText(content);
        if(!TextUtils.isEmpty(positiveName)){
            submitTxt.setText(positiveName);
        }

        if(!TextUtils.isEmpty(negativeName)){
            cancelTxt.setText(negativeName);
        }

        if(!TextUtils.isEmpty(title)){
            titleTxt.setText(title);
        }

    }

    @Override
    public void onClick(View v) {
        switch (v.getId()){
            case R.id.cancel:
                if(listener != null){
                    listener.onClick(this, false);
                }
                this.dismiss();
                break;
            case R.id.submit:
                if(listener != null){
                    listener.onClick(this, true);
                }
                break;
        }
    }

    public interface OnCloseListener{
        void onClick(Dialog dialog, boolean confirm);
    }
}
If you want the X5 kernel to run well, you need to create a new MyApplication.java class:
10. MyApplication.java
If this class does not use the X5 kernel, it does not matter if it is written. If it is to be used, it must be written.
package com.example.lenovo.expresslove;

import android.app.Application;
import android.util.Log;

import com.tencent.smtt.sdk.QbSdk;

public class MyApplication extends Application {
    public void onCreate() {
        // TODO Auto-generated method stub
        super.onCreate();
        initX5();
    }

    /**
     * Initialize X5
     */
    private void initX5() {
        //x5 Kernel Initialization Callback
        QbSdk.PreInitCallback cb = new QbSdk.PreInitCallback() {
            @Override
            public void onViewInitFinished(boolean arg0) {
                //x5 The callback for the completion of kernel initialization is true Express x5 The kernel loads successfully, otherwise it means x5 If the kernel fails to load, it will automatically switch to the system kernel.
                Log.d("app", " onViewInitFinished is " + arg0);
            }

            @Override
            public void onCoreInitFinished() {
            }
        };
        //x5 Kernel Initialization Interface
        QbSdk.initX5Environment(getApplicationContext(), cb);

    }
}
Now the first two main activities have been compiled. Now we come to our third activity, fireworks scene. After playing, we jump directly to Wechat.
11. Main3Activity.java
package com.example.lenovo.expresslove;

import android.content.ComponentName;
import android.content.Context;
import android.content.Intent;
import android.content.pm.PackageInfo;
import android.content.pm.PackageManager;
import android.net.Uri;
import android.os.Build;
import android.os.Handler;
import android.support.v7.app.ActionBar;
import android.support.v7.app.AppCompatActivity;
import android.os.Bundle;
import android.view.WindowManager;
import android.webkit.WebSettings;
import android.webkit.WebView;
import android.webkit.WebViewClient;

import java.util.List;

public class Main3Activity extends AppCompatActivity {


    private WebView webView;
    @Override
    protected void onCreate(Bundle savedInstanceState) {
        super.onCreate(savedInstanceState);
        setContentView(R.layout.activity_main3);
        getWindow().setFlags(WindowManager.LayoutParams.FLAG_FULLSCREEN, WindowManager.LayoutParams.FLAG_FULLSCREEN);
        getSupportActionBar().hide();
        new Handler().postDelayed(new Runnable(){ // To reduce code anonymity Handler Create a delayed call
            public void run() {
                String url="weixin://";
                startActivity(new Intent(Intent.ACTION_VIEW, Uri.parse(url)));


            } }, 5000);
        webView = (WebView) findViewById(R.id.webView2);
        //Pages that need to be loaded url
        webView.loadUrl("file:///android_asset/index4.html");//Here's what it says. assets Under folder html The name of the file should be suffixed with the suffix name. The path ahead is prescribed by Android itself. android_asset It is expressed in assets The meaning under the folder.
        webView.getSettings().setLayoutAlgorithm(WebSettings.LayoutAlgorithm.SINGLE_COLUMN);//Adaptive Screen
        webView.getSettings().setLoadWithOverviewMode(true);//Adaptive Screen
        webView.getSettings().setSupportZoom(true);
        webView.getSettings().setUseWideViewPort(true);//Scale-up of Scale-up
        // webView.getSettings().setBuiltInZoomControls(true);//Set whether the zoom tool appears,I don't think there's any effect here.
        WebSettings settings = webView.getSettings();
        // If you want to access the page with the ____________ Javascript Interaction, then webview Support must be set up Javascript
        settings.setJavaScriptEnabled(true);
        webView.setWebViewClient(new WebViewClient(){
            public boolean shouldOverrideUrlLoading(WebView view, String url){
                view.loadUrl(url);
                return true;
            }
        });
        if (Build.VERSION.SDK_INT >= 21) {//Set the top status bar to translucent
            getWindow().setFlags(
                    WindowManager.LayoutParams.FLAG_TRANSLUCENT_STATUS,
                    WindowManager.LayoutParams.FLAG_TRANSLUCENT_STATUS);}

        ActionBar actionBar=getSupportActionBar();
        if(actionBar!=null)
        {
            actionBar.hide();
        }
    }
}
The following is the third activity layout:
activity_main3.xml
<?xml version="1.0" encoding="utf-8"?>
<LinearLayout xmlns:android="http://schemas.android.com/apk/res/android"
    xmlns:app="http://schemas.android.com/apk/res-auto"
    xmlns:tools="http://schemas.android.com/tools"
    android:layout_width="match_parent"
    android:layout_height="match_parent"
    tools:context=".Main3Activity">
<WebView
    android:id="@+id/webView2"
    android:layout_width="match_parent"
    android:layout_height="match_parent">

</WebView>

</LinearLayout>
The final animation scenario is as follows: (Here's just a screenshot)

Waiting for a few seconds will automatically jump the tweet, waiting for us to also use anonymous handler to complete. Okay, that's about it. So we've finished making a complete software. If there's any problem, go to the source code and see Hey Hey.
- Github link: https://github.com/Geeksongs/ExpressLove