Reprinted from: https://cloud.tencent.com/developer/article/1772873
1, Paging introduction
In Android application development, we often need to display a large amount of data in the form of list. These data may come from the network or local database . In order to avoid loading a large amount of data at one time, it is necessary to page the data. Paging loading can load data as needed, and improve the performance of the application without affecting the user experience.
In order to facilitate developers' Paging processing, Google provides developers with Paging component. With the help of Paging component, developers can easily load and present large data sets, and scroll quickly and infinitely in RecyclerView. In addition, it can load Paging data from local storage and / or network, and allows developers to define the loading method of content. At the same time, it also supports the combination with Room, LiveData and RxJava.
1.1 supported architecture types
At present, Paging can support three types of architectures: network, data, network and database. The schematic diagram of the architecture is shown below.
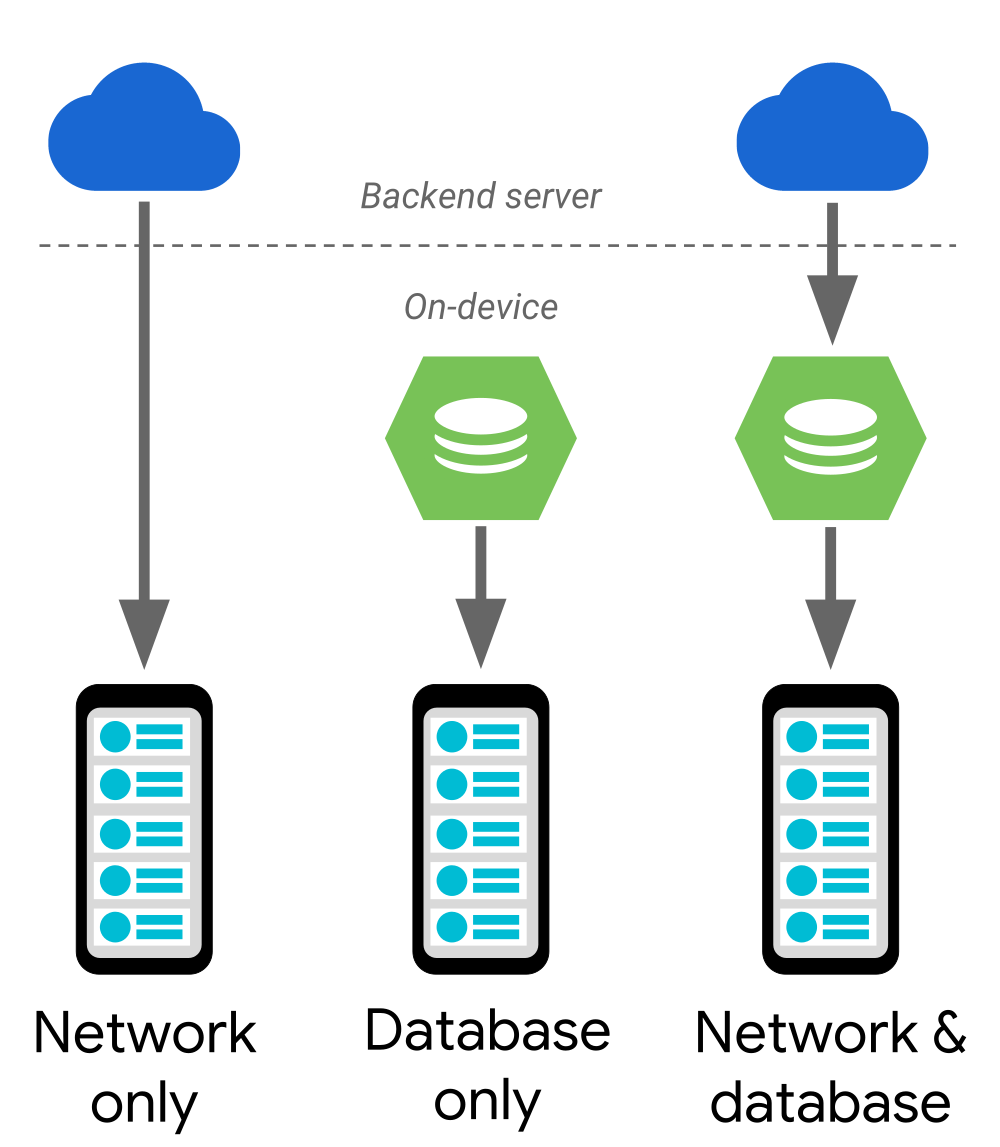
network
In Android application development, Paging loading of network data is a common scenario, and it is also the most frequently encountered in our usual development. Different companies usually have different API interfaces involved in Paging mechanism, but generally speaking, they can be divided into three. For these different classifications, Paging provides PageKeyedDataSource, PositionalDataSource, and ItemKeyedDataSource.
- PageKeyedDataSource: get the data of a page according to the incoming page num, such as the data of page 2.
- PositionalDataSource: the page number displayed by default when paging.
- ItemKeyedDataSource: the keyword that requests the next page.
database
In addition to the network, there are many scenarios where data sources come from the database. If you have mastered the paging of network data, it is naturally very simple to page the data in the database, but the reading methods of data sources are different.
Network + Database
In this scenario, we will cache the network data, and the database is a data persistence method for comparison scenarios, such as chat applications. First, we will use the database to cache network data, but in this scenario, we need to process both database and network data sources at the same time, so we need to agree on the data processing logic of the network and database.
1.2 workflow
Before using Paging formally, we need to have a general understanding of Paging's workflow. As shown in the figure below, there are several steps to go through to use Paging.
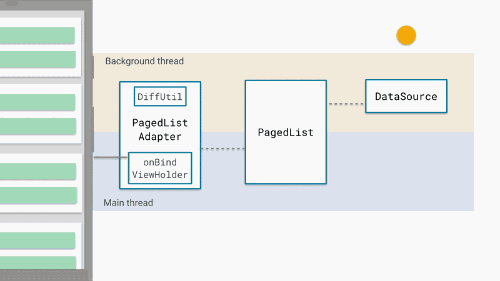
As shown in the figure above, the main steps are as follows:
- Use DataSource to get data from the server or from the local database.
- Save the data to the PageList.
- Give the data of the PageList to the PageListAdapter.
- The PageListAdapter compares the original PageList with the new PageList in the background thread to generate a new PageList.
- PageListAdapter notifies RecyclerView to update data.
1.3 core concepts
When using the Paging library for Paging loading, several core classes need to be used, namely PagedListAdapter, PageList and DataSource.
PagedListAdapter
As we all know, RecyclerView needs to be used in Android list development, and it needs to cooperate with custom adapters. PagedListAdapter inherits from RecyclerView.Adapter, which indicates that it is also a RecyclerView.Adapter and extends the asynchronous differential update function of RecyclerView.Adapter.
PageList
PageList is used to inform DataSource when to get data and how to get data. For example, when to get the first page of data and when to start loading data waiting. In addition, DataSource and data sources will be set to PagedListAdapter through PageList.
DataSource
DataSource is mainly used to load data, and the loading of data needs to be carried out in the child thread, otherwise the main thread will be blocked. The data source can be a network or a local database, such as Room. According to different paging mechanisms, DataSource can have three sources: PageKeyedDataSource, PositionalDataSource and ItemKeyedDataSource.
- PageKeyedDataSource: get the data of a page according to the incoming page num, such as the data of page 2.
- PositionalDataSource: the page number displayed by default when paging.
- ItemKeyedDataSource: the keyword that requests the next page.
2, Basic use
2.1 adding dependencies
First, add the dependency of Paging component library in the build.gradle file of app, as shown below.
dependencies {
   //Network request Library
   implementation 'com.squareup.retrofit2:retrofit:2.9.0'
   implementation 'com.squareup.retrofit2:converter-gson:2.9.0'
   implementation 'com.squareup.retrofit2:adapter-rxjava2:2.7.1'
   implementation 'com.google.code.gson:gson:2.8.6'
   implementation 'com.squareup.okhttp3:okhttp:4.8.0'
   implementation 'com.squareup.okio:okio:2.7.0'
   //Paging
   def paging_version = "2.1.0"
   implementation "androidx.paging:paging-runtime:$paging_version"
 }
2.2 defining network requests
In Android development, data usually comes from the network. We can use retrofit to complete the request for network data. Before obtaining data, we need to create a new data entity class, which is mainly used to store the obtained data. As shown below, it is an entity class that uses the data of the open source Api of the dry goods concentration camp.
public class DataBean {

    private int count;
    private boolean error;
    private List<ResultsBean> results;

    ...//Omit get and set

    public static class ResultsBean {
        private String desc;
        private String ganhuo_id;
        private String publishedAt;
        private String readability;
        private String type;
        private String url;
        private String who;

        ... //Omit get and set
    }
}
Then, in order to complete the network request, we need to create an Api according to the use mode of Retrofit to uniformly manage the request interface, as shown below.
public interface Api {

    //Open source API:http://gank.io/api/search/query/listview/category/Android/count/10/page/1
    @GET("api/search/query/listview/category/Android/count/10/page/{page}")
    Call<List<DataBean.ResultsBean>> getArticleList1(@Path("page") int page);

}
Then, we simply encapsulate Retrofit and use it to complete the network request, as shown below.
public class RetrofitClient {

    private static RetrofitClient instance;
    private Retrofit mRetrofit;
    private OkHttpClient getClient(){
        OkHttpClient.Builder builder = new OkHttpClient().newBuilder()
                .connectTimeout(30, TimeUnit.SECONDS)//Set timeout
                .readTimeout(10, TimeUnit.SECONDS)//Set read timeout
                .writeTimeout(10, TimeUnit.SECONDS);//Set write timeout
        return builder.build();
    }

    public RetrofitClient() {
        mRetrofit=new Retrofit.Builder()
                .addConverterFactory(GsonConverterFactory.create())
                .client(getClient())
                .build();

    }

    public static RetrofitClient getInstance() {
        if (instance==null){
            instance=new RetrofitClient();
        }
        return instance;
    }

    public <T> T createApi(Class<T> cls){
        T t=mRetrofit.create(cls);
        return t;
    }
}
2.3 creating data sources
If you are using network data, you need to customize the DataSource when using Paging to load pages. As mentioned earlier, DataSource has three abstract classes, namely PageKeyedDataSource, PositionalDataSource and ItemKeyedDataSource. Therefore, they need to be inherited in actual use.
Because the network data is loaded here, it is more appropriate to use PageKeyedDataSource. We create a new custom DataSource inherited from PageKeyedDataSource, as shown below.
public class PagingDataSource extends PageKeyedDataSource<String, DataBean.ResultsBean> {

    private static final String TAG = PagingDataSource.class.getSimpleName();
    private int mPage = 1;

    @Override
    public void loadInitial(@NonNull LoadInitialParams<String> params, @NonNull final LoadInitialCallback<String, DataBean.ResultsBean> callback) {
        Api api = RetrofitClient.getInstance().createApi(Api.class);
        Call<List<DataBean.ResultsBean>> call = api.getArticleList1(mPage);
        call.enqueue(new Callback<List<DataBean.ResultsBean>>() {
            @Override
            public void onResponse(Call<List<DataBean.ResultsBean>> call, Response<List<DataBean.ResultsBean>> response) {
                if (response.isSuccessful() && response.code() == 200) {
                    List<DataBean.ResultsBean> data  = response.body();
                    callback.onResult(data, "before", "after");
                }

            }

            @Override
            public void onFailure(Call<List<DataBean.ResultsBean>> call, Throwable t) {
                Log.e(TAG, "--onFailure-->" + t.getMessage());
            }
        });
    }

    //Load previous page
    @Override
    public void loadBefore(@NonNull LoadParams<String> params, @NonNull LoadCallback<String, DataBean.ResultsBean> callback) {
        Log.i(TAG, "--loadBefore-->" + params.key);
    }

    //Load next page
    @Override
    public void loadAfter(@NonNull final LoadParams<String> params, @NonNull final LoadCallback<String, DataBean.ResultsBean> callback) {
        mPage++;
        Api api = RetrofitClient.getInstance().createApi(Api.class);
        Call<List<DataBean.ResultsBean>> call = api.getArticleList1(mPage);
        call.enqueue(new Callback<List<DataBean.ResultsBean>>() {
            @Override
            public void onResponse(Call<List<DataBean.ResultsBean>> call, Response<List<DataBean.ResultsBean>> response) {
                if (response.isSuccessful() && response.code() == 200) {
                    List<DataBean.ResultsBean> data  = response.body();
                    callback.onResult(data, params.key);
                }
            }

            @Override
            public void onFailure(Call<List<DataBean.ResultsBean>> call, Throwable t) {
                Log.i(TAG, "--onFailure-->" + t.getMessage());
            }
        });
    }
}
In the above code, PageKeyedDataSource needs to override three methods.
- loadInitial(): data is requested for the first time, that is, in the initialization state.
- Loadcore(): request the data of the previous page, which is basically useless.
- loadAfter(): request the next page of data.
Once the DataSource is created, create a DataSource.Factory and return the corresponding DataSource instance, as shown below.
public class PagingDataSourceFactory extends DataSource.Factory<String, DataBean.ResultsBean> {

    @NonNull
    @Override
    public DataSource<String, DataBean.ResultsBean> create() {
        PagingDataSource dataSource = new PagingDataSource();
        return dataSource;
    }
}
2.4 configuring paging parameters
In Jetpack's architecture, it is officially recommended that each page hold a ViewModel object to ensure the correctness of data and avoid other problems.
Create PagedList.Config in ViewModel, configure paging parameters, create DataSource factory object, and finally generate LiveData data supporting paging. To create LiveData, you need to create a livepagedlistbuilder. Livepagedlistbuilder has two methods: setting the number of pages and configuring parameters, as shown below.
public class PagingViewModel extends ViewModel {

    private int pageSize = 20;
    //PagedList configuration
    private PagedList.Config config = new PagedList.Config.Builder()
            .setInitialLoadSizeHint(pageSize)//Sets the number of first loads
            .setPageSize(pageSize)//Sets the number of loads per page
            .setPrefetchDistance(2)//Set the distance from the last data item of each page to preload the data of the next page
            .setEnablePlaceholders(false)//Sets whether UI occupiers are enabled
            .build();

    //DataSource.Factory
    private DataSource.Factory<String,DataBean.ResultsBean> factory = new PagingDataSourceFactory();

    //LiveData
    private LiveData<PagedList<DataBean.ResultsBean>> mPagedList = new LivePagedListBuilder<>(factory, config)
            .build();

    public LiveData<PagedList<DataBean.ResultsBean>> getPagedList() {
        return mPagedList;
    }

}
In the above code, we mentioned placeholders, which are used to display the default view effect to the user before the data is rendered. Placeholders have the following advantages:
- Support scroll bar: PagedList can provide the number of list items to PagedListAdapter. This information allows the adapter to draw a scroll bar to convey the entire list size. When a new page is loaded, the scroll bar will not jump to the specified position because the list will not change size.
- No need to load rotation icons: since the list size is known, there is no need to remind the user that more items are being loaded.
However, before adding support for placeholders, note the following prerequisites:
- A countable dataset is required: the DataSource instance in the Room persistence library can effectively count the number of items. However, if you are using a custom local storage solution or a network specific data architecture, determining how many items a dataset contains can be costly or even impossible to determine at all.
- The adapter must consider unloaded items: the adapter or rendering mechanism used to prepare the list for growth needs to handle Null list items. For example, when binding data to the ViewHolder, you need to provide a default value to indicate that the data is not loaded.
- Item views of the same size are required: if the size of list items changes with content (such as social network updates), the cross gradient effect between items is not ideal. In this case, we strongly recommend deactivating placeholders.
2.5 create PagedListAdapter
PagedListAdapter is a special RecyclerAdapter of RecyclerView, and its use method is similar to that of RecyclerAdapter, as shown below.
public class PagingAdapter extends PagedListAdapter<DataBean.ResultsBean, PagingAdapter.ViewHolder> {

    public PagingAdapter() {
        super(itemCallback);
    }

    @NonNull
    @Override
    public PagingAdapter.ViewHolder onCreateViewHolder(@NonNull ViewGroup parent, int viewType) {
        View view = LayoutInflater.from(parent.getContext()).inflate(R.layout.item_recycleview, parent, false);
        return new ViewHolder(view);
    }

    @Override
    public void onBindViewHolder(@NonNull PagingAdapter.ViewHolder holder, int position) {
        DataBean.ResultsBean bean = getItem(position);
        if (bean != null) {
            holder.desc.setText(bean.getDesc());
            holder.time.setText(bean.getPublishedAt());
            holder.type.setText(bean.getType());
            holder.auth.setText(bean.getWho());
        }
    }

    public class ViewHolder extends RecyclerView.ViewHolder{
        TextView desc;
        TextView time;
        TextView type;
        TextView auth;

        public ViewHolder(View itemView) {
            super(itemView);
            desc = itemView.findViewById(R.id.desc);
            time = itemView.findViewById(R.id.time);
            type = itemView.findViewById(R.id.type);
            auth = itemView.findViewById(R.id.auth);
        }
    }

    private static DiffUtil.ItemCallback<DataBean.ResultsBean> itemCallback = new DiffUtil.ItemCallback<DataBean.ResultsBean>() {
        @Override
        public boolean areItemsTheSame(@NonNull DataBean.ResultsBean oldItem, @NonNull DataBean.ResultsBean newItem) {
            return oldItem.getGanhuo_id().equals(newItem.getGanhuo_id());
        }

        @SuppressLint("DiffUtilEquals")
        @Override
        public boolean areContentsTheSame(@NonNull DataBean.ResultsBean oldItem, @NonNull DataBean.ResultsBean newItem) {
            return oldItem.equals(newItem);
        }
    };

}
When using PagedListAdapter, the PagedListAdapter internally implements DiffUtil by default to calculate the difference of data, so we pass a DiffUtil.ItemCallback in the construction method.
2.6 loading paging data
After the above processing, you only need to request and bind data in the Activity, as shown below.
public class MainActivity extends AppCompatActivity {

    private final String TAG = "MainActivity";
    private ActivityMainBinding activityMainBinding;
    private PagingViewModel mViewModel;
    private PagingAdapter adapter;

    @Override
    protected void onCreate(Bundle savedInstanceState) {
        super.onCreate(savedInstanceState);
        activityMainBinding = DataBindingUtil.setContentView(this, R.layout.activity_main);
        initRecyclerView();
//        getData();
    }

    private void initRecyclerView() {
        adapter = new PagingAdapter();

        LinearLayoutManager layoutManager = new LinearLayoutManager(this);
        layoutManager.setOrientation(LinearLayoutManager.VERTICAL);
        activityMainBinding.recycle.setLayoutManager(layoutManager);
        activityMainBinding.recycle.addItemDecoration(new DividerItemDecoration(this,DividerItemDecoration.VERTICAL));
        activityMainBinding.recycle.setAdapter(adapter);

        ViewModelProvider mViewModelProvider = new ViewModelProvider(this,
                new ViewModelProvider.AndroidViewModelFactory(getApplication()));
        mViewModel = mViewModelProvider.get(PagingViewModel.class);

    }

    public void getData() {
        mViewModel.getPagedList().observe(this, new Observer<PagedList<DataBean.ResultsBean>>() {
            @Override
            public void onChanged(PagedList<DataBean.ResultsBean> dataBeans) {
                adapter.submitList(dataBeans);
            }
        });
    }
}
We use LiveData to listen to the loaded data, and then use sumbitList to submit the data to the PagedListAdapter. The PagedListAdapter will compare the differences between the old and new data in the background thread, and finally update the RecyclerView.
3, Paging3
3.1 general
Paging is a paging library provided by the JetPack framework. It can help developers load display data from local storage or through the network. However, due to historical reasons, the early paging had various problems in use. Therefore, Android provided Paging3 to replace the early Paging2. Compared with Paging2, Paging3 has the following advantages.
- Cache paging data in memory to ensure that App uses system resources effectively when using paging data.
- The built-in request to delete duplicate data ensures that App effectively uses network bandwidth and system resources.
- The RecyclerView Adapters can be configured to automatically request data when the user scrolls to the end of the loaded data.
- Support Kotlin collaboration and Flow, as well as LiveData and RxJava.
- Built in error handling support, including refresh and retry functions.
3.1.1 main changes
Before Paging3, Paging provided ItemKeyedDataSource, PageKeyedDataSource and PositionalDataSource to obtain data.
- PositionalDataSource: used to load data with limited data, such as local database.
- PageKeyedDataSource: used to request network data. It is applicable to requesting data through page number paging.
- ItemKeyedDataSource: used to request network data. It is applicable to the scenario where the id of the last data on the current page is used as the starting position of the data on the next page.
After Paging3, ItemKeyedDataSource, PageKeyedDataSource and PositionalDataSource are merged into one PagingSource, and all old API loading methods are merged into a single load() method in PagingSource, as shown below.
abstract suspend fun load(params: LoadParams): LoadResult<Key, Value>
In addition, the changes include:
- LivePagedListBuilder and RxPagedListBuilder are merged into Pager.
- Replace PagingConfig with PagedList.Config.
- PagedList.BoundaryCallback is replaced by RemoteMediator to load the data of network and local database.
3.1.2 important concepts
Before formally learning Paging3, we need to clarify several important concepts:
- PagingSource: a single data source, which can represent the data requested by the database or the data requested by the network.
- RemoteMediator: a single data source. It will use the data provided by RemoteMediator when there is no data in PagingSource. If there are both database requests and network requests, PagingSource is usually used for database requests and RemoteMediator for network requests.
- PagingData: container for single paging data.
- Pager: used to build the class of flow < pagingdata > and implement the callback after data loading.
- PagingDataAdapter: the adapter of RecyclerView that loads data in pages.
Generally speaking, the process of loading network data using Paging3 is: PagingSource and RemoteMediator act as data sources. ViewModel uses flow < pagingdata > provided in Pager to monitor data refresh. Whenever RecyclerView is about to scroll to the bottom, it will load new data, and finally use PagingAdapter to display data.
3.1.3 Paging3 application architecture
The following is the application architecture diagram for accessing Paging3 officially recommended by Android.
Insert picture description here
It can be found that Paging3 mainly contains three objects:
Data warehouse layer Repository
The Repository layer mainly uses PagingSource, a paging component. Each PagingSource object corresponds to a data source and how to find data from the data source. PagingSource can find data from any single data source, such as the network or database.
Another paging component in the Repository layer can use RemoteMediator, which is a hierarchical data source, such as a network data source with local database cache.
ViewModel layer
The Repository finally returns pagingdataflow < PagingData < value > > of an asynchronous Flow package. PagingData stores the data results and can be used to associate the data with the UI interface. ViewModel generally uses LiveData to interact with UI layer, and the extension function of Flow can be directly converted into a LiveData observable object.
UI layer
The UI layer is actually a view layer such as Activity/Fragment. Its main function is to set the Adapter and data for the RecycleView.
3.2 basic use
3.2.1, add dependency
First, add the dependency of Paging3 component library in the build.gradle file of app, as shown below.
dependencies {
   ...
   //Paging3
   def paging_version = "3.0.0-alpha11"
   implementation "androidx.paging:paging-runtime:$paging_version"
 }
3.2.2 defining data sources
Paging 2 provides three types of pagesources, which developers need to choose according to the use scenario. Paging 3 handles the data source in a unified way. During development, you only need to inherit PagingSource.
The data source of Paging 3 can be PagingSource or RemoteMediator. Their differences are as follows.
- PagingSource: a single data source and how to find data from the data source. Changes in the data source will be directly mapped to the UI.
- RemoteMediator: load the network paging data and update it to the database, but the changes of the data source cannot be directly mapped to the UI.
How to choose in actual use? PagingSource is mainly used to load limited data sets, while RemoteMediator is mainly used to load network paging data. In actual use, it needs to be combined with PagingSource to save more data and map it to the UI.
Take the WanAndroid interface as an example, and the interface address is: https://www.wanandroid.com/article/list/1/json , the data source code is as follows.
public class Paging3DataSource extends PagingSource<Integer, ArticleBean.DataBean.DatasBean>  {

    @Nullable
    @Override
    public Object load(@NotNull LoadParams<Integer> params, @NotNull Continuation<? super LoadResult<Integer, ArticleBean.DataBean.DatasBean>> continuation) {
        int page = 0;
        if(params.getKey()!=null){
            page=params.getKey();
        }
        //Get network data
        ArticleBean result = (ArticleBean) RetrofitClient.getInstance().getApi().getArticleList(page);
        //Data to load
        List<ArticleBean.DataBean.DatasBean> datas= result.getData().getDatas();
        //If more can be loaded up, set this parameter; otherwise, do not set it
        String prevKey=null;
        //Load the key of the next page. If null is passed, it means the end
        String nextKey=null;
        if(result.getData().getCurPage() == result.getData().getPageCount()){
            nextKey=null;
        }else {
            nextKey=String.valueOf(page+1);
        }
        return new LoadResult.Page<>(datas,prevKey,nextKey);
    }

}
In the above code, the custom PagingSource needs to inherit from PagingSource, and two generics need to be passed in. The first represents the loading method of the data of the next page, and the other is the entity class that returns the data. At the same time, the user-defined PagingSource also needs to rewrite the load method to trigger asynchronous loading. You can see that it is a suspend function decorated with suspend, which can be easily used to load asynchronously.
The parameter LoadParams of the load method has a key value, which can be used when loading the data of the next page. The return value is a LoadResult. If an exception occurs, call LoadResult.Error(e). Under normal forced open conditions, call LoadResult.Page method to set the data obtained from the network or database.
3.2.3 network request
In practical application development, we need to obtain data from the network, and then carry out other business operations. Network requests are generally implemented with the help of Retrofit. The following is a simple encapsulation of WanAndroid interface requests using Retrofit. The code is as follows.
public class RetrofitClient {

    private static String BASE_URL="https://www.wanandroid.com/";
    private static RetrofitClient instance;
    private Retrofit mRetrofit;

    private OkHttpClient getClient(){
        HttpLoggingInterceptor interceptor = new HttpLoggingInterceptor(new HttpLoggingInterceptor.Logger() {
            @Override
            public void log(String message) {
                Log.i("RetrofitClient: ", message);
            }
        });
        interceptor.setLevel(HttpLoggingInterceptor.Level.BODY);

        OkHttpClient client = new OkHttpClient.Builder()
                .addInterceptor(interceptor)
                .connectTimeout(60, TimeUnit.SECONDS)
                .build();
        return client;
    }

    public RetrofitClient() {
        mRetrofit=new Retrofit.Builder()
                .baseUrl(BASE_URL)
                .addConverterFactory(GsonConverterFactory.create())
                .client(getClient())
                .build();
    }

    public static RetrofitClient getInstance() {
        if (instance==null){
            instance=new RetrofitClient();
        }
        return instance;
    }

    public <T> T createApi(Class<T> cls){
        T t=mRetrofit.create(cls);
        return t;
    }

}
Then, create a WAN Android Api to manage all Api interfaces, as shown below.
public interface WanAndroidApi {

    @GET("article/list/{pageNum}/json")
    Call<ArticleBean> getArticleList(@Path("page") int page);
}
3.2.4 building ViewModel
The container for paging data is called PagingData. Each time the data is refreshed, an instance of PagingData will be created. If you want to create PagingData data stream, you need to create a Pager instance, provide a PagingConfig configuration object and a function that can tell Pager how to obtain the instance of PagerSource you implemented for Pager to use.
In actual development, the Repository returns pagingdataflow < PagingData < value > > of an asynchronous Flow package, and PagingData stores the data results. In MVVM, we need to build ViewModel to realize the interaction between LiveData and UI layer, and the Flow extension function of ViewModel can directly convert PagingSource into a LiveData observable object. The code is as follows.
public class Paging3ViewModel extends ViewModel {

    PagingConfig pagingConfig = new PagingConfig(20, 3);

    public LiveData<PagingData<ArticleBean.DataBean.DatasBean>> getArticleData() {
        CoroutineScope viewModelScope = ViewModelKt.getViewModelScope(this);
        Pager<Integer, ArticleBean.DataBean.DatasBean> pager = new Pager<>(pagingConfig, () -> new Paging3DataSource());
        LiveData<PagingData<ArticleBean.DataBean.DatasBean>> cachedResult=PagingLiveData.cachedIn(PagingLiveData.getLiveData(pager), viewModelScope);
        return cachedResult;
    }

}
3.2.5 creating an Adapter
Similar to the application steps of Paging2's Adapter, creating an Adapter in Paging3 needs to inherit PagingDataAdapter, and then provide diffutil. Itemcallback < T >, as shown below.
public class Paging3Adapter extends PagingDataAdapter<ArticleBean.DataBean.DatasBean, Paging3Adapter.ViewHolder> {

    public Paging3Adapter(@NotNull DiffUtil.ItemCallback<ArticleBean.DataBean.DatasBean> diffCallback) {
        super(itemCallback);
    }

    @NonNull
    @Override
    public ViewHolder onCreateViewHolder(@NonNull ViewGroup parent, int viewType) {
        View view = LayoutInflater.from(parent.getContext()).inflate(R.layout.item_recycleview, parent, false);
        return new Paging3Adapter.ViewHolder(view);
    }

    @Override
    public void onBindViewHolder(@NonNull ViewHolder holder, int position) {
        ArticleBean.DataBean.DatasBean bean = getItem(position);
        if (bean != null) {
            holder.desc.setText(bean.getDesc());
            holder.time.setText(String.valueOf(bean.getPublishTime()));
            holder.type.setText(bean.getType());
            holder.auth.setText(bean.getAuthor());
        }
    }

    public static class ViewHolder extends RecyclerView.ViewHolder{
        TextView desc;
        TextView time;
        TextView type;
        TextView auth;

        public ViewHolder(View itemView) {
            super(itemView);
            desc = itemView.findViewById(R.id.desc);
            time = itemView.findViewById(R.id.time);
            type = itemView.findViewById(R.id.type);
            auth = itemView.findViewById(R.id.auth);
        }
    }

    public static DiffUtil.ItemCallback<ArticleBean.DataBean.DatasBean> itemCallback = new DiffUtil.ItemCallback<ArticleBean.DataBean.DatasBean>() {
        @Override
        public boolean areItemsTheSame(@NonNull ArticleBean.DataBean.DatasBean oldItem, @NonNull ArticleBean.DataBean.DatasBean newItem) {
            return oldItem.getId()==newItem.getId();
        }

        @SuppressLint("DiffUtilEquals")
        @Override
        public boolean areContentsTheSame(@NonNull ArticleBean.DataBean.DatasBean oldItem, @NonNull ArticleBean.DataBean.DatasBean newItem) {
            return oldItem.equals(newItem);
        }
    };
}
It can be found that the code of Paging3Adapter is similar to that of an ordinary Adapter, and the onCreateViewHolder and onBindViewHolder methods need to be rewritten.
3.2.6 display data in UI
Finally, we can use RecyclerView in Activity to display the obtained data, as shown below.
public class MainActivity extends AppCompatActivity {

    private final String TAG = "MainActivity";
    private Paging3Adapter adapter;

    @Override
    protected void onCreate(Bundle savedInstanceState) {
        super.onCreate(savedInstanceState);
        setContentView( R.layout.activity_main);
        initRecyclerView();
    }

    private void initRecyclerView() {
        adapter = new Paging3Adapter();
        RecyclerView  recyclerView = findViewById(R.id.recycle);
        recyclerView.addItemDecoration(new DividerItemDecoration(this,DividerItemDecoration.VERTICAL));
        recyclerView.setAdapter(adapter);

        Paging3ViewModel viewModel=new ViewModelProvider(this).get(Paging3ViewModel.class);

        viewModel.getArticleData().observe(this, pagingData -> adapter.submitData(getLifecycle(),pagingData));
    }
}
In addition, Paging3 also supports adding headers and footers to realize more functions of pull-up refresh and pull-down loading.