Angular life cycle practice
The meaning of life cycle hooks
In Angular, the method of realizing the life cycle hook interface of components is to use the Angular framework to realize the time point of inserting business.
What is the life cycle in official documents
There is a chapter in the official document of Angular Lifecycle hooks To explain the mechanism of life cycle and how to observe the component life cycle.
From the official chapter, we can understand all aspects of the life cycle hook method, and there is basically no difference.
Let me list some official gains:
- How to write in components ; To implement the OnInit method, add the ngonit method to the component. Note that there are two more letters. This is true for each hook method.
- Lifecycle event sequence;
- How to observe life cycle events;
- Use ngOnInit as the business insertion point instead of putting business code in the constructor;
- Execution timing of ngOnDestroy
- Trigger sequence of all lifecycle events
- Implementation mechanism of ngOnChanges
- ... wait
This basically covers all aspects of the component life cycle;
Key content of this paper
The content of the official chapter is based on the life cycle itself, while the actual use process, the execution process of the life cycle will be combined with many features, such as dependency injection timing, data flow transmission, change detection, parent-child component data change, component inheritance and so on. After the combination, the execution sequence is a little difficult for us to understand, Only through a lot of thinking and practice can we know and summarize its laws.
Different from the official entry point, this paper hopes to summarize the law from practice.
This paper selects the following scenarios for practical demonstration, and tries to get the law:
- Basic life cycle introduction
- The timing of data flow transmission is in which specific event.
- How the life cycle of parent-child components in parent-child components is executed.
- How to execute the life cycle in the inherited component.
- Are the variables bound in the template related to these life cycles when obtaining values?
I hope that through reading this article, I can help you remove some veils, so that you can further master the characteristics of Angular with me, think about the life cycle setting in Angular, and peep into the operating mechanism of Angular; Understand the ideas and thoughts of Angular and the thinking mode it shapes for developers.
Only we can think in the way of Angular. When we encounter complex businesses and participate in complex data flow, complex component relationships and complex class relationships, we can quickly understand the knowledge blind spot through thinking and quickly organize the keywords of relevant knowledge. In this way, you will become like a fish in the vast ocean of Angular concepts and new knowledge, It will also become the sharpest spear when we develop business code, optimize refactoring and solve problems.
lifecycle-hook-basic
Since the order of life cycle has been introduced and demonstrated in the official documents, we will make a simple verification and summary here as a review.
First, let's take a look at an actual execution effect diagram
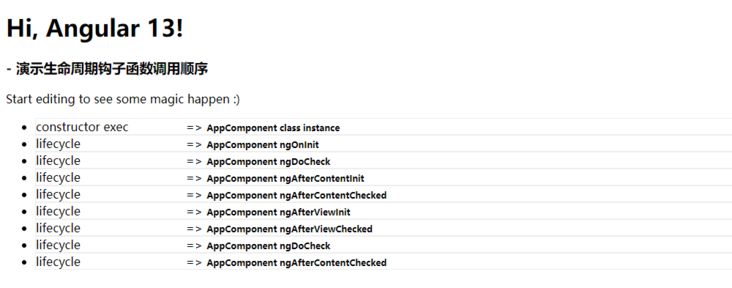
Note: careful partners may notice that the ngOnChanges event is not seen in this figure. Don't forget that the root component will not trigger the ngOnChanges event, because there is no @ Input variable with the component;
The source code is as follows
@Component({
  selector: 'my-app',
  templateUrl: './app.component.html',
  styleUrls: ['./app.component.css'],
})
export class AppComponent implements OnChanges, OnInit, DoCheck, AfterContentInit, AfterContentChecked,
    AfterViewInit, AfterViewChecked, OnDestroy {
  name = 'Angular ' + VERSION.major;
  messages = [];
  subject = window['subject'];
  constructor() {
    this.subject.subscribe((item) => {
      this.messages.push(item);
    });
    this.subject.next({ type: 'constructor exec', content: 'AppComponent class instance' });
  }
  ngOnChanges() {
    this.subject.next({ type: 'lifecycle', content: 'AppComponent ngOnChanges' });
  }
  ngOnInit() {
    this.subject.next({ type: 'lifecycle', content: 'AppComponent ngOnInit' });
  }
  ngDoCheck() {
    this.subject.next({ type: 'lifecycle', content: 'AppComponent ngDoCheck' });
  }
  ngAfterContentInit() {
    this.subject.next({ type: 'lifecycle', content: 'AppComponent ngAfterContentInit' });
  }
  ngAfterContentChecked() {
    this.subject.next({ type: 'lifecycle', content: 'AppComponent ngAfterContentChecked' });
  }
  ngAfterViewInit() {
    this.subject.next({ type: 'lifecycle', content: 'AppComponent ngAfterViewInit' });
  }
  ngAfterViewChecked() {
    this.subject.next({ type: 'lifecycle', content: 'AppComponent ngAfterViewChecked' });
  }
  ngOnDestroy() {
    this.subject.next({ type: 'lifecycle', content: 'AppComponent ngOnDestroy' });
  }
}
The following figure shows a normal component with @ Input attribute
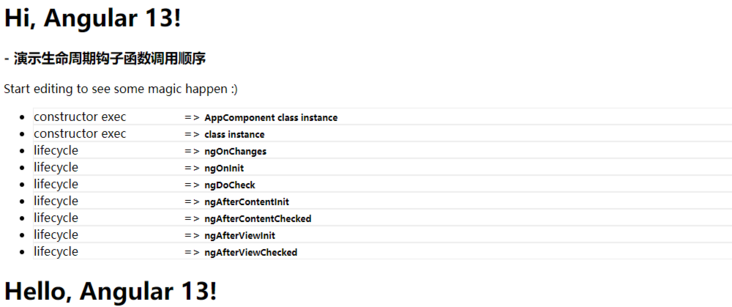
The source code is as follows
@Component({
  selector: 'my-app',
  templateUrl: './app.component.html',
  styleUrls: ['./app.component.css'],
})
export class AppComponent implements OnChanges, OnInit, DoCheck, AfterContentInit, AfterContentChecked,
    AfterViewInit, AfterViewChecked, OnDestroy {
  name = 'Angular ' + VERSION.major;
  messages = [];
  subject = window['subject'];
  constructor() {
    this.subject.subscribe((item) => {
      this.messages.push(item);
    });
    this.subject.next({ type: 'constructor exec', content: 'AppComponent class instance' });
  }
}
// HelloComponent is a child view component of AppComponent
...
@Component({
  selector: 'hello',
  template: `<h1>Hi, {{name}}!</h1>`,
  styles: [`h1 { font-family: Lato; }`],
})
export class HelloComponent implements OnChanges, OnInit, DoCheck, AfterContentInit, AfterContentChecked,
    AfterViewInit, AfterViewChecked, OnDestroy {

  _name: string = '';
  subject = window['subject'];
  @Input() set name(n: string) {
    this.subject.next({ type: '@input', content: 'set name update' });
    this._name = n;
  }
  get name() {
    // this.subject.next({ type: 'template binding variable get', content: 'get name update' });  Demo call only
    return this._name;
  }
  messages = [];
  constructor() {
    this.subject.next({ type: 'constructor exec', content: 'class instance, visit@input attribute name=' + this.name });
  }
  ngOnChanges() {
    this.subject.next({ type: 'lifecycle', content: 'ngOnChanges, visit@input attribute name=' + this.name });
  }
  ngOnInit() {
    this.subject.next({ type: 'lifecycle', content: 'ngOnInit, visit@input attribute name=' + this.name });
  }
  ngDoCheck() {
    this.subject.next({ type: 'lifecycle', content: 'ngDoCheck, visit@input attribute name=' + this.name });
  }
  ngAfterContentInit() {
    this.subject.next({ type: 'lifecycle', content: 'ngAfterContentInit, visit@input attribute name=' + this.name });
  }
  ngAfterContentChecked() {
    this.subject.next({ type: 'lifecycle', content: 'ngAfterContentChecked, visit@input attribute name=' + this.name });
  }
  ngAfterViewInit() {
    this.subject.next({ type: 'lifecycle', content: 'ngAfterViewInit, visit@input attribute name=' + this.name });
  }
  ngAfterViewChecked() {
    this.subject.next({ ype: 'lifecycle', content: 'ngAfterViewChecked, visit@input attribute name=' + this.name });
  }
  ngOnDestroy() {
    this.subject.next({ type: 'lifecycle', content: 'ngOnDestroy, visit@input attribute name=' + this.name });
  }
}
Explain and summarize
In combination with the above sequence, we can draw a rough figure first as follows:
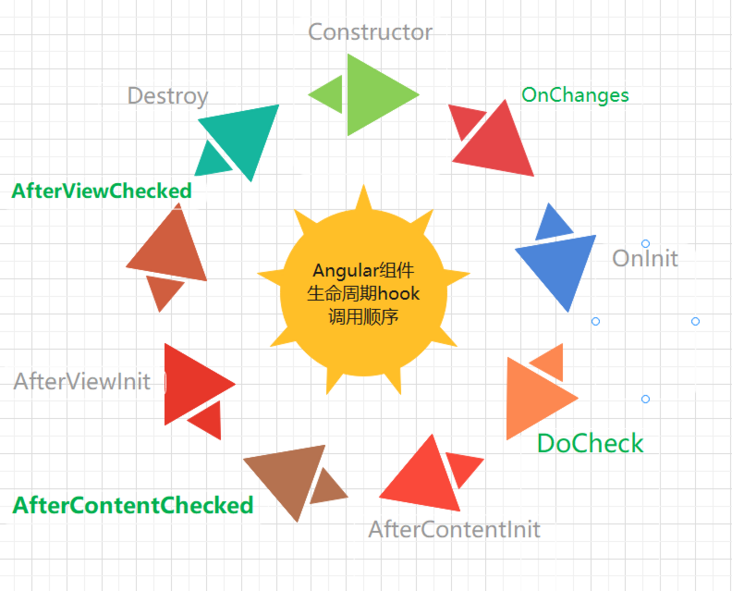
Explain the meaning of each hook in the figure below:
be careful:
- Events with light gray names will only be triggered once in the life cycle of the component, while those with green names will be triggered multiple times with the corresponding logic changes.
- Here, I also add the execution of the component constructor to the observation sequence, because in business, small partners often insert business code into the constructor.
The execution sequence of all methods is as follows:
Construction, OnChanges, OnInit, DoCheck, AfterContentInit, AfterContentChecked, AfterViewInit, AfterViewChecked, OnDestroy
Construction
When the constructor is executed, it is executed once.
OnChanges
Called when any one of the bindable properties of an instruction (the implementation of the component inherits the instruction) changes.
main points:
- From the execution effect of the root component above, this hook is not necessarily called, and only the change of @ Input attribute will trigger it;
- @There is no requirement for the number of changes to the Input property, so there is no limit on the number of callbacks.
- Special attention should be paid to the case that the parent changes the passed value, which will cause ngOnChange to be called again at any time in the life cycle.
- Parameter is a change processor of input attributes, which will contain the old and new values of all changed input attributes;
- If at least one change occurs, the callback method will be called before the default change detector checks the binding property, the view child node and the content sub node are checked.
- The setter of property can replace the logic executed in this hook.
OnInit
After Angular initializes all the data binding properties of the instruction, it calls.
main points:
- After the default change detector first checks all the data binding properties of the instruction, and before any subview or projection content is checked.
- It will and will only be called once when the instruction is initialized
- Define the ngOnInit() method to handle all additional initialization tasks.
DoCheck
During change detection, the default change detection algorithm compares bindable attributes based on references to find differences. You can use this hook to check and respond to changes in other ways.
main points:
- In addition to using the default change checker to perform checks, custom change detection functions are also performed for instructions
- When the default change detector checks for changes, it triggers the execution of OnChanges() if any, regardless of whether you have performed additional change detection.
- You should not use both DoCheck and OnChanges to respond to changes that occur on the same input.
- The default change detector is called after the execution of the detector, and the change detection is performed.
- See keyvaluedifferences and iteratabledifferences to implement custom change detection logic for collection objects.
- In DoCheck, you can monitor the changes that OnChanges cannot capture, and the detection logic needs to be implemented by yourself.
- Because DoCheck can monitor when a specific variable has changed, it is very expensive. Angular rendering irrelevant data in other parts of the page will also trigger this hook, so your implementation must ensure the user experience by itself.
AfterContentInit
It will be called immediately after Angular initializes all the contents of the instruction.
main points:
- After the instruction is initialized, it will only be called once.
- It can be used to handle some initialization tasks
AfterContentChecked
Called immediately after the default change detector has completed the change detection of all contents under the instruction.
AfterViewInit
- After Angular completely initializes the view of the component, it calls. Define an ngAfterViewInit() method to handle some additional initialization tasks.
AfterViewChecked
Called immediately after the default change detector completes a change detection cycle on the component view.
OnDestroy
Called when an instruction, pipe, or service is destroyed. Used to execute some custom cleanup code when the instance is destroyed.
Further description:
Because we are concerned about when to use these hooks, let's go back to the above callback hook definitions and carefully observe the hook contents with Init. We can see that OnInit, AfterContentInit and AfterViewInit are only executed once and can do some initialization tasks. The differences between these three hooks are just like the descriptions in the definitions.
If necessary, you can leave a message at the bottom of the article to see if the actual situation needs to be explained carefully. The differentiation scenarios applicable to these three hooks.
I haven't carefully studied the three different partners. I'm often confused about which hook I should put the asynchronous initialization business I want to implement, so I choose one at random, either on init or after viewinit. If I find it impossible to put it in one, I'll change the other, Until the problem is solved or the problem cannot be solved for a long time, or occasional bugs are left (because asynchronous sequential execution is not technically guaranteed), it is also very difficult to check again.
Therefore, these three inits deserve the attention of small partners who write more asynchronous services.
From the first scenario, we reviewed the contents of each life cycle hook.
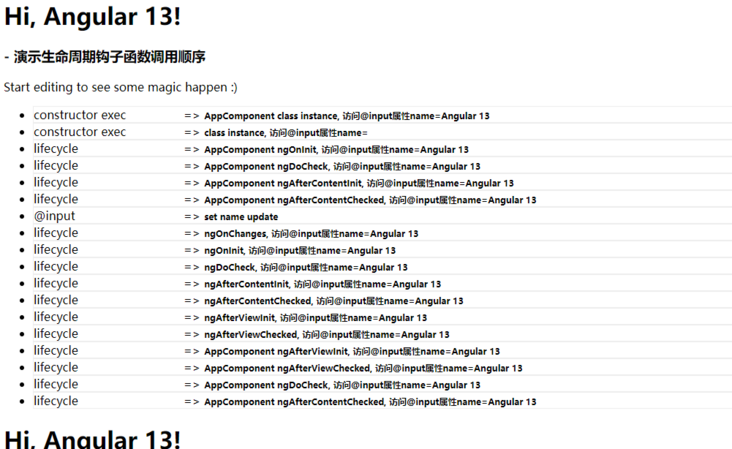
Next, let's take a look at the scenario with @ Input:
lifecycle-hook&Input
The source code is as follows
//AppComponent html
<h1>Hi, Angular 13!</h1>
<h3>- Demonstrates the life cycle hook function call sequence<br /></h3>
<p>Start editing to see some magic happen :)</p>
<ul>
  <li *ngFor="let message of messages">
    <span class="message-type">{{ message.type }}</span>
    =>
    <span class="message-content">{{ message.content }}</span>
  </li>
</ul>
<hello [name]="name"></hello>
// AppComponent
@Component({
selector: 'my-app',
templateUrl: './app.component.html',
styleUrls: ['./app.component.css'],
})
export class AppComponent{
name = 'Angular ' + VERSION.major;
messages = [];
subject = window['subject'];
constructor() {
this.subject.subscribe((item) => { this.messages.push(item); });
this.subject.next({ type: 'constructor exec', content: 'AppComponent class instance, visit@input attribute name=' + this.name });
}
}
// HelloComponent is a child view component of AppComponent
...
@Component({
selector: 'hello',
template: `<h1>Hi, {{name}}!</h1>`,
styles: [`h1 { font-family: Lato; }`],
})
export class HelloComponent implements OnChanges, OnInit, DoCheck, AfterContentInit, AfterContentChecked,
AfterViewInit, AfterViewChecked, OnDestroy {
_name: string = '';
subject = window['subject'];
@Input() set name(n: string) {
this.subject.next({ type: '@input', content: 'set name update' });
this._name = n;
}
get name() {
// this.subject.next({ type: 'template binding variable get', content: 'get name update' }); Demo call only
return this._name;
}
messages = [];
constructor() {
this.subject.next({ type: 'constructor exec', content: 'class instance, visit@input attribute name=' + this.name });
}
ngOnChanges() {
this.subject.next({ type: 'lifecycle', content: 'ngOnChanges, visit@input attribute name=' + this.name });
}
ngOnInit() {
this.subject.next({ type: 'lifecycle', content: 'ngOnInit, visit@input attribute name=' + this.name });
}
ngDoCheck() {
this.subject.next({ type: 'lifecycle', content: 'ngDoCheck, visit@input attribute name=' + this.name });
}
ngAfterContentInit() {
this.subject.next({ type: 'lifecycle', content: 'ngAfterContentInit, visit@input attribute name=' + this.name });
}
ngAfterContentChecked() {
this.subject.next({ type: 'lifecycle', content: 'ngAfterContentChecked, visit@input attribute name=' + this.name });
}
ngAfterViewInit() {
this.subject.next({ type: 'lifecycle', content: 'ngAfterViewInit, visit@input attribute name=' + this.name });
}
ngAfterViewChecked() {
this.subject.next({ ype: 'lifecycle', content: 'ngAfterViewChecked, visit@input attribute name=' + this.name });
}
ngOnDestroy() {
this.subject.next({ type: 'lifecycle', content: 'ngOnDestroy, visit@input attribute name=' + this.name });
}
}
results of enforcement
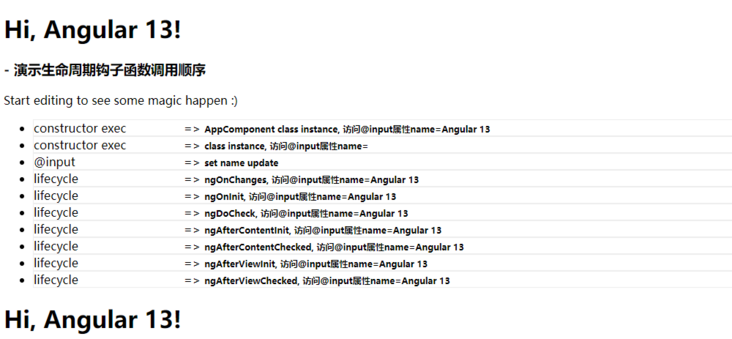
Explain and summarize
We added an input attribute to the Hello component. The parent component AppComponent assigns an initial value to the name during initialization. Only under the processing of angular, the binding of the input attribute occurs before the initialization of the Hello component (of course, the parent component may change the name at any time during the call of the hello component life cycle).
- Note that after the first OnChanges trigger, that is, the initial value of the passed variables is given. In some cases, we will adjust the value of the passed variables through the logic in the parent component, which will trigger the callback of OnChanges again, and the callback of the callback will be called in chronological order with the callbacks of OnInit and AfterContentInit of the HelloComponent component. That is, the trigger of onchanges has nothing to do with whether aftercontentinit and AfterViewInit have completed an execution.
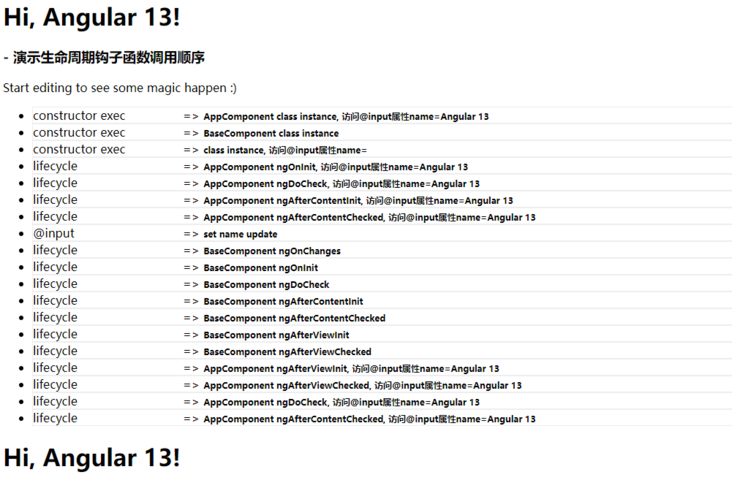
We also added the execution of life cycle in the AppComponent component just now. What will be the result?
lifecycle-hook&child&parent&Input
Change the source code as follows
export class AppComponent implements OnChanges, OnInit, DoCheck, AfterContentInit, AfterContentChecked,
    AfterViewInit, AfterViewChecked, OnDestroy {
  name = 'Angular ' + VERSION.major;
  messages = [];
  subject = window['subject'];
  constructor() {
    this.subject.subscribe((item) => { this.messages.push(item); });
    this.subject.next({ type: 'constructor exec', content: 'AppComponent class instance, visit@input attribute name=' + this.name });
  }
  ngOnChanges() {
    this.subject.next({ type: 'lifecycle', content: 'AppComponent ngOnChanges' });
  }
  ngOnInit() {
    this.subject.next({ type: 'lifecycle', content: 'AppComponent ngOnInit' });
  }
  ngDoCheck() {
    this.subject.next({ type: 'lifecycle', content: 'AppComponent ngDoCheck' });
  }
  ngAfterContentInit() {
    this.subject.next({ type: 'lifecycle', content: 'AppComponent ngAfterContentInit' });
  }
  ngAfterContentChecked() {
    this.subject.next({ type: 'lifecycle', content: 'AppComponent ngAfterContentChecked' });
  }
  ngAfterViewInit() {
    this.subject.next({ type: 'lifecycle', content: 'AppComponent ngAfterViewInit' });
  }
  ngAfterViewChecked() {
    this.subject.next({ type: 'lifecycle', content: 'AppComponent ngAfterViewChecked' });
  }
  ngOnDestroy() {
    this.subject.next({ type: 'lifecycle', content: 'AppComponent ngOnDestroy' });
  }
}
results of enforcement
Explain and summarize
Phenomenon:
- The lifecycle callback of the parent component AppComponent is divided into two parts by the child component.
- constuctor is executed in the order of parent component, child component and other function callbacks in the life cycle.
- ngOnChanges (if any, for the first time), ngOnInit, ngDoCheck, ngAfterContentInit and ngAfterContentChecked of the parent component will be executed earlier.
- The name value of the parent component is passed to the child component to trigger OnChanges of the child component.
- The life cycle of the child component is executed, and then the ngAfterViewInit and ngAfterViewChecked of the parent component are executed.
main points:
It is important that the parent component passes the binding value to the child component when the parent component's life cycle is executed to ngAfterContentChecked
- This means that if there is logic to handle dependent transfer variables in the life cycle of sub components (such as OnInit), the latest transfer value may not be obtained. (because of this, little partners often get confused, which is also related to not knowing the applicable scenario of Init hook)
- In parent-child components, AfterViewInit will not be executed until the life cycle of all child components is completed (this feature should be brought into full play and utilized).
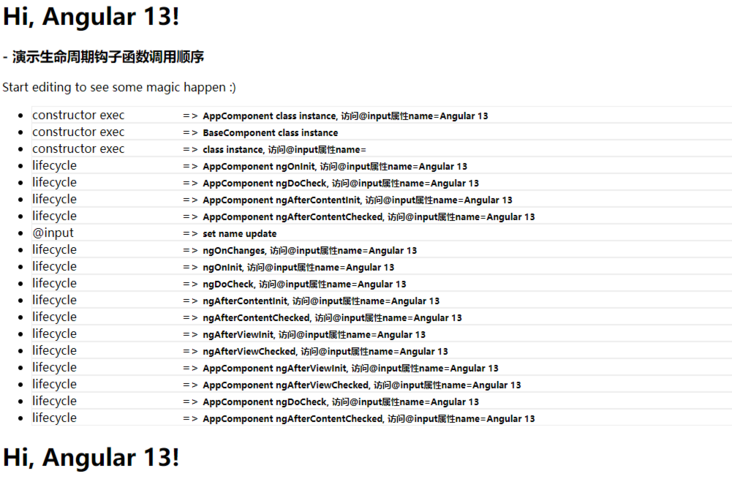
Next, let's look at how Angular handles lifecycle callbacks when there are inherited components.
life-hook&child&parent&inheritComponent&input
The source code of the change is as follows:
...
// This time, we added a BaseComponent as the base class of Hello component, which is decorated with Directive in Angular
// Benefits of using Directive
// Angular component inheritance will not inherit metadata. You can use the directive decorator to configure empty metadata to avoid configuring redundant metadata
// Directive is the base class of Component decorator, which is basically replaced seamlessly
@Directive()
export class BaseComponent implements OnChanges, OnInit, DoCheck, AfterContentInit, AfterContentChecked,
    AfterViewInit, AfterViewChecked, OnDestroy {
  subject = window['subject'];
  constructor() {
    this.subject.next({ type: 'constructor exec', content: 'BaseComponent class instance' });
  }
  _name: string = '';
  @Input() set name(n: string) {
    this.subject.next({ type: '@input', content: 'set base name update' });
    this._name = n;
  }
  get name() {
    // If it's not necessary, you don't define getter s or put logic in place. There are a lot of accesses
    // this.subject.next({ type: 'tpl binding variable get', content: 'get name update' });
    return this._name;
  }
  ngOnChanges() {
    this.subject.next({ type: 'lifecycle', content: 'BaseComponent ngOnChanges' });
  }
  ngOnInit() {
    this.subject.next({ type: 'lifecycle', content: 'BaseComponent ngOnInit' });
  }
  ngDoCheck() {
    this.subject.next({ type: 'lifecycle', content: 'BaseComponent ngDoCheck' });
  }
  ngAfterContentInit() {
    this.subject.next({ type: 'lifecycle', content: 'BaseComponent ngAfterContentInit' });
  }
  ngAfterContentChecked() {
    this.subject.next({ type: 'lifecycle', content: 'BaseComponent ngAfterContentChecked' });
  }
  ngAfterViewInit() {
    this.subject.next({ type: 'lifecycle', content: 'BaseComponent ngAfterViewInit' });
  }
  ngAfterViewChecked() {
    this.subject.next({ type: 'lifecycle', content: 'BaseComponent ngAfterViewChecked' });
  }
  ngOnDestroy() {
    this.subject.next({ type: 'lifecycle', content: 'BaseComponent ngOnDestroy' });
  }
}

// HelloComponent is a child view component of AppComponent and a subclass of BaseComponent
...
@Component({
  selector: 'hello',
  template: `<h1>Hi, {{name}}!</h1>`,
  styles: [`h1 { font-family: Lato; }`],
})
export class HelloComponent extends BaseComponent {
  _name: string = '';
  subject = window['subject'];
  @Input() set name(n: string) {
    this.subject.next({ type: '@input', content: 'set name update' });
    this._name = n;
  }
  get name() {
    // this.subject.next({ type: 'template binding variable get', content: 'get name update' });  Demo call only
    return this._name;
  }
  messages = [];
  constructor() {
    super();
    this.subject.next({ type: 'constructor exec', content: 'class instance, visit@input attribute name=' + this.name });
  }
}
results of enforcement
Explanation and induction
Phenomenon and Realization
- The life cycle removes the implementation in the HelloComponent of the inheritance system and implements it in the base class BaseComponent
- In any case, the constructor is executed at the earliest and depends on the order of execution
- All life cycles in BaseComponent are executed (we know that after inheritance, these life cycle methods can also be called in Hello component. Is Angular calling subclasses or base classes? Please continue to read)
Continue to modify the source code:
// HelloComponent is a child view component of AppComponent and a subclass of BaseComponent
...
@Component({
  selector: 'hello',
  template: `<h1>Hi, {{name}}!</h1>`,
  styles: [`h1 { font-family: Lato; }`],
})
export class HelloComponent extends BaseComponent implements OnChanges, OnInit, DoCheck, AfterContentInit, AfterContentChecked, AfterViewInit, AfterViewChecked, OnDestroy{
  _name: string = '';
  subject = window['subject'];
  @Input() set name(n: string) {
    this.subject.next({ type: '@input', content: 'set name update' });
    this._name = n;
  }
  get name() {
    // this.subject.next({ type: 'template binding variable get', content: 'get name update' });  Demo call only
    return this._name;
  }
  messages = [];
  constructor() {
    super();
    this.subject.next({ type: 'constructor exec', content: 'class instance, visit@input attribute name=' + this.name });
  }
  ngOnChanges() {
    this.subject.next({ type: 'lifecycle', content: 'ngOnChanges, visit@input attribute name=' + this.name });
  }
  ngOnInit() {
    this.subject.next({ type: 'lifecycle', content: 'ngOnInit, visit@input attribute name=' + this.name });
  }
  ngDoCheck() {
    this.subject.next({ type: 'lifecycle', content: 'ngDoCheck, visit@input attribute name=' + this.name });
  }
  ngAfterContentInit() {
    this.subject.next({ type: 'lifecycle', content: 'ngAfterContentInit, visit@input attribute name=' + this.name });
  }
  ngAfterContentChecked() {
    this.subject.next({ type: 'lifecycle', content: 'ngAfterContentChecked, visit@input attribute name=' + this.name });
  }
  ngAfterViewInit() {
    this.subject.next({ type: 'lifecycle', content: 'ngAfterViewInit, visit@input attribute name=' + this.name });
  }
  ngAfterViewChecked() {
    this.subject.next({ ype: 'lifecycle', content: 'ngAfterViewChecked, visit@input attribute name=' + this.name });
  }
  ngOnDestroy() {
    this.subject.next({ type: 'lifecycle', content: 'ngOnDestroy, visit@input attribute name=' + this.name });
  }
}
We also implement these life cycles for subclasses to see whether Angualr executes subclasses or parent classes, or both. What is the order of execution?
results of enforcement
Summary:
The phenomenon is that the subclass is executed and the parent class is not executed
- Explain the life cycle method. The life cycle method between subclass and parent class also conforms to the inheritance principle. In case of rewriting, the life cycle method in subclass
Template binding variable acquisition
Finally, take a look at the acquisition of the template bound variable Angular, as shown in the following figure
  get name() { // Just remove the comments in the getter of name
    this.subject.next({ type: 'template binding variable get', content: 'get name update' }); Demo call only
    return this._name;
  }
  // On the other hand, we need to remove the reading of the printed name field in the life cycle hook, so that we can know how many times the name has been read by Angular and when. (sometimes, we will write some simple logic in the getter and take the variable as the calculation attribute. Understanding this is very useful for us to know the number of names read.)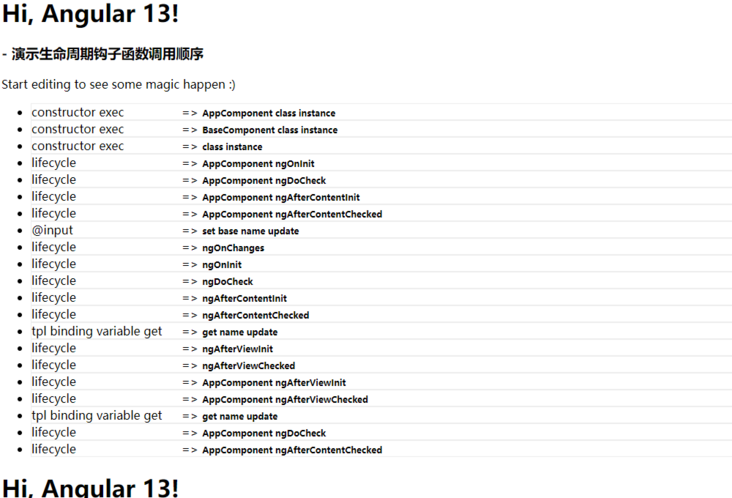
Explain and summarize
- After the parent component passes the name attribute to the Hello component (@ input execution), the Hello component obtains the name after its own content ngAfterContentChecked, and reads the value of name after the App component ngAfterViewChecked. The whole process is read twice.
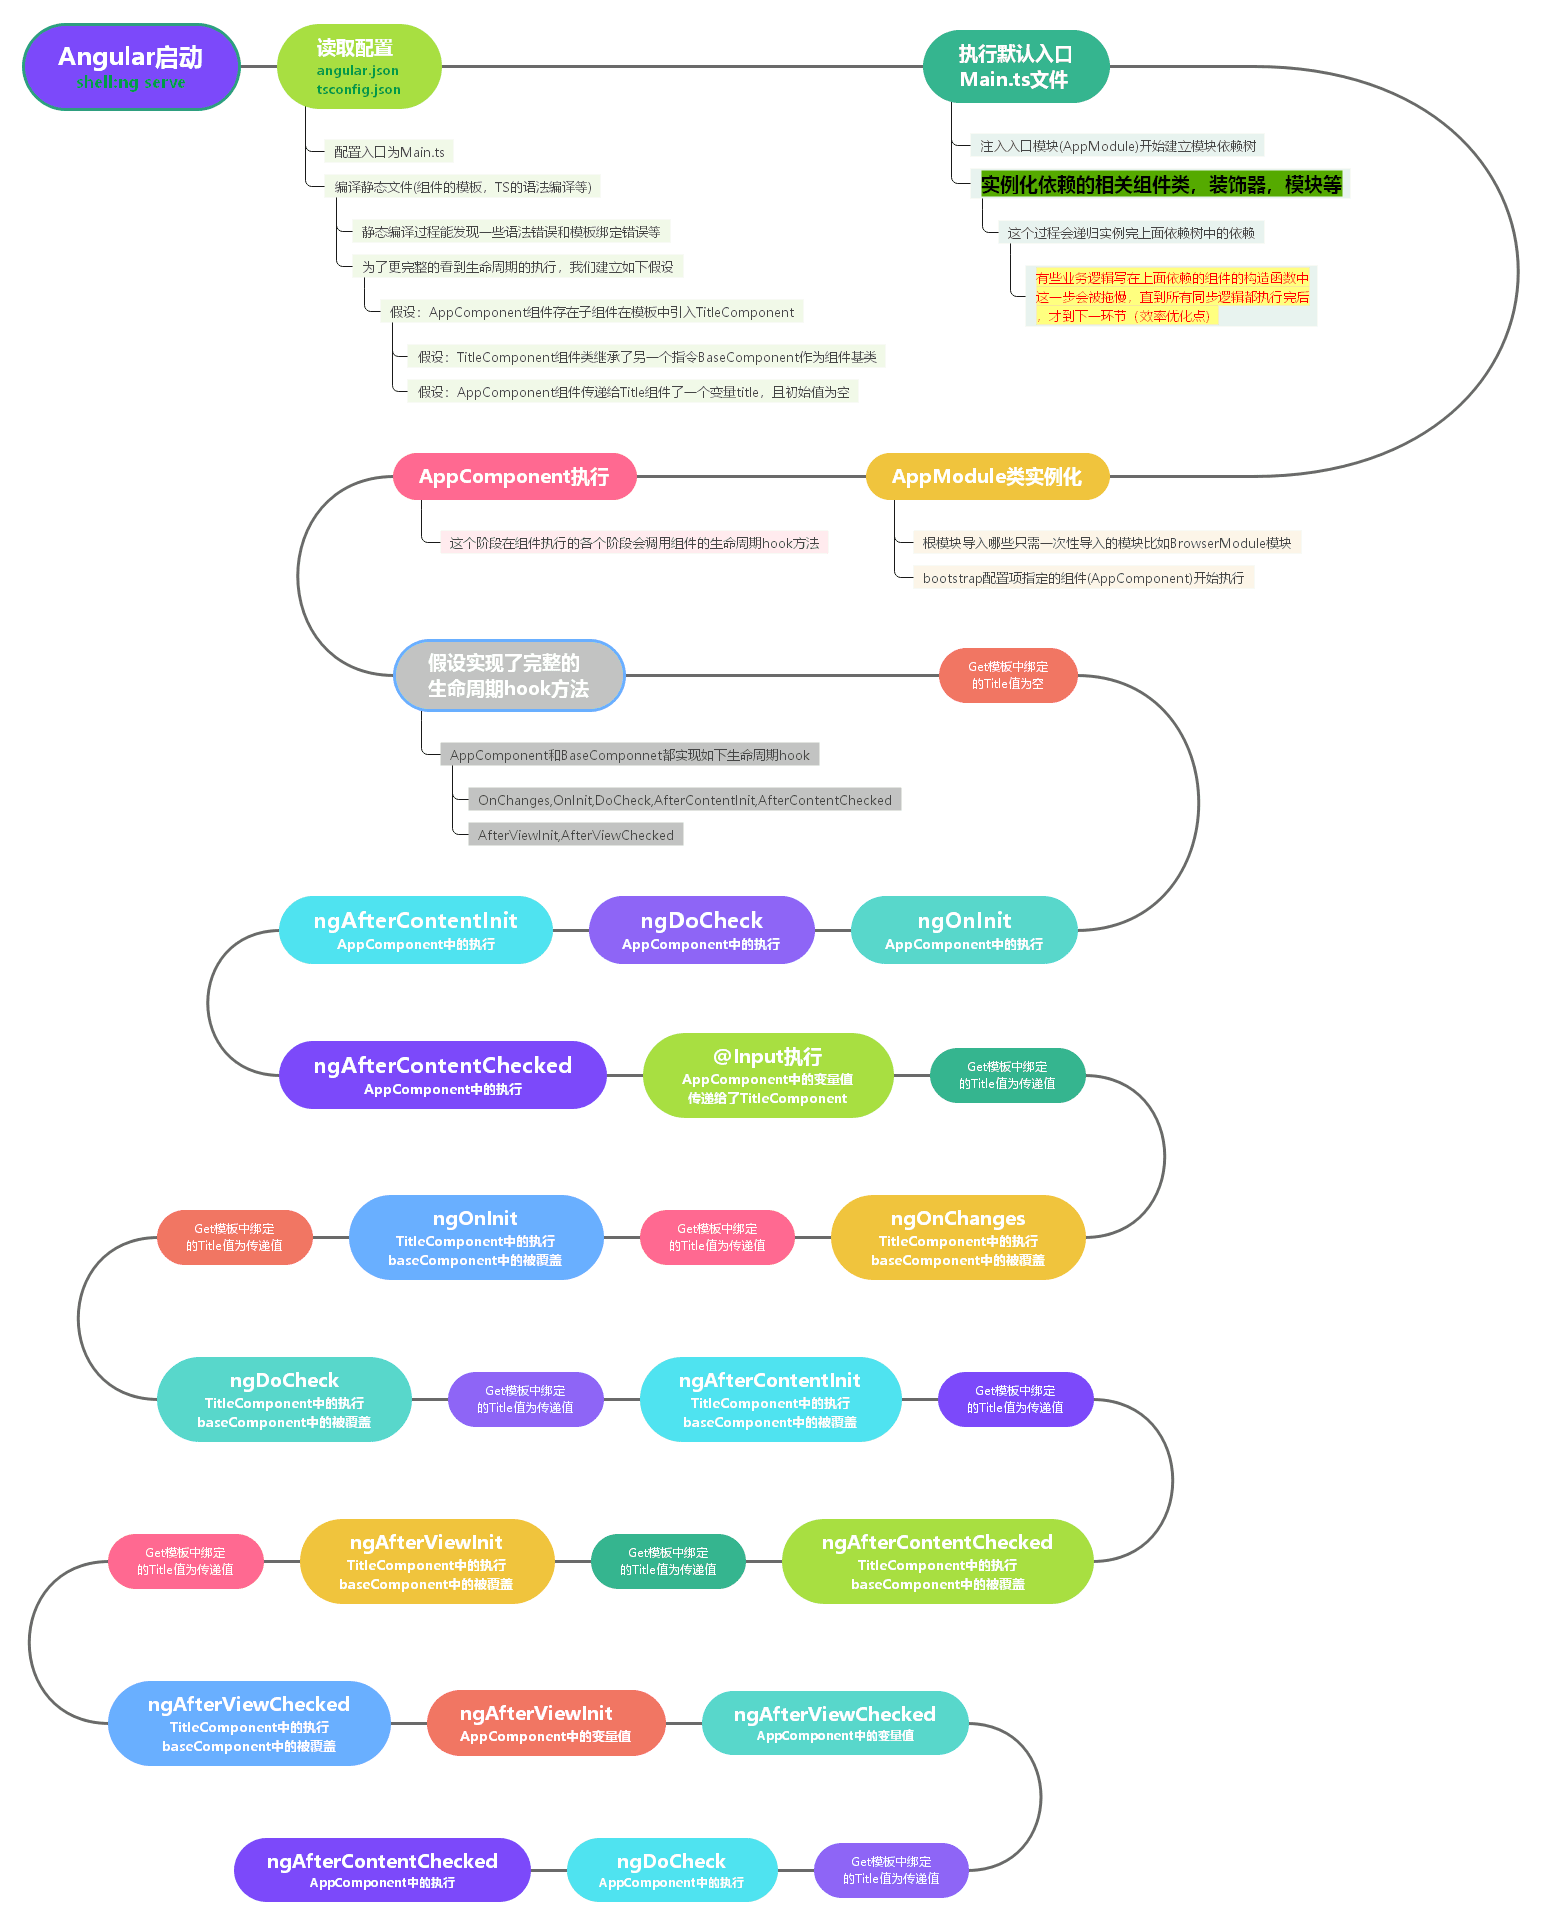
Finally, a diagram of the operation and life cycle execution of the Angular project combined with the above three components is attached
Finally, if you have doubts or puzzles about the above statements or conclusions, you can leave a message below.