Reference article: apache Impala detailed installation (lying in the most complete pit)
Apache impala detailed installation
impala is an efficient sql query tool provided by cloudera, which provides real-time query results. The official test performance is 10 to 100 times faster than hive, and its sql query is even faster than spark sql. impala is known as the fastest query sql tool in the field of big data,
Installation and deployment:
1. Installation premise
- Install hadoop and hive in advance.
- hadoop framework needs to support C program provider
2. Download installation package and dependency package
- Since impala does not provide tar package for installation, only rpm package is provided. Therefore, when installing impala, you need to use rpm package to install it. Only cloudera company provides rpm package, so go to cloudera company website to download rpm package.
- But there is another problem. impala's rpm package relies on many other rpm packages. You can find the dependencies one by one, or download all the rpm packages and make them into our local yum source for installation. Here, choose to make a local yum source for installation.
So you need to download all the rpm packages first. The download address is as follows
http://archive.cloudera.com/cdh5/repo-as-tarball/5.14.0/cdh5.14.0-centos6.tar.gz
3. Configure local yum source
- Use sftp to upload the large files of the installation package to the server * * / cloudera_data * * directory
cd /cloudera_data
tar -zxvf cdh5.14.0-centos6.tar.gz
- Install Apache Server server
yum -y install httpd
service httpd start
chkconfig httpd on
- Configure files for local yum source
cd /etc/yum.repos.d
vim localimp.repo
[localimp]
name=localimp
baseurl=http://node-3/cdh5.14.0/
gpgcheck=0
enabled=1
Create a read link for apache httpd
ln -s /cloudera_data/cdh/5.14.0 /var/www/html/cdh5.14.0
Ensure Selinux of linux is turned off
Temporarily Closed:
[root@localhost ~]# getenforce
Enforcing
[root@localhost ~]# setenforce 0
[root@localhost ~]# getenforce

Permissive
 Permanent closure:
[root@localhost ~]# vim /etc/sysconfig/selinux
 SELinux = forcing changed to SELINUX=disabled
 Restart service reboot
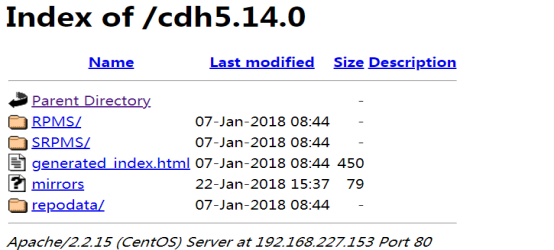
Access the local yum source through the browser. If the following page appears, it is successful.
http://192.168.227.153/cdh5.14.0/
4. Distribute the local yum source configuration file localimp.repo to all nodes that need to install impala.
cd /etc/yum.repos.d/
scp localimp.repo  node-2:$PWD
scp localimp.repo  node-3:$PWD
| Service name | Slave node | Slave node | Master node |
|---|---|---|---|
| impala-catalog | Node-3 | ||
| impala-state-store | Node-3 | ||
| impala-server(impalad) | Node-1 | Node-2 | Node-3 |
On the planned primary node node-3, execute the following command to install:
yum install -y impala impala-server impala-state-store impala-catalog impala-shell
Execute the following commands in the planned slave nodes node-1 and node-2 for installation:
yum install -y impala-server
5: Modify Hadoop and Hive configurations
It needs to operate on the whole cluster of three machines, and all of them need to be modified. Whether hadoop and hive are in normal service and well configured is the premise to determine whether impala is successfully started and used.
Modify hive configuration
It can be configured on the node-1 machine, and then scp can be provided to the other 2 machines.
vim /export/servers/hive/conf/hive-site.xml
<configuration>
  <property>
    <name>javax.jdo.option.ConnectionURL</name>
    <value>jdbc:mysql://node-1:3306/hive?createDatabaseIfNotExist=true</value>
  </property>
  <property>
    <name>javax.jdo.option.ConnectionDriverName</name>
    <value>com.mysql.jdbc.Driver</value>
  </property>
  <property>
    <name>javax.jdo.option.ConnectionUserName</name>
    <value>root</value>
  </property>
  <property>
    <name>javax.jdo.option.ConnectionPassword</name>
    <value>hadoop</value>
  </property>
  <property>
    <name>hive.cli.print.current.db</name>
    <value>true</value>
  </property>
  <property>
    <name>hive.cli.print.header</name>
    <value>true</value>
  </property>
  <!-- Bind run hiveServer2 Of hosts host,default localhost -->
  <property>
    <name>hive.server2.thrift.bind.host</name>
    <value>node-1</value>
  </property>
  <!-- Appoint hive metastore Service requested uri address -->
  <property>
    <name>hive.metastore.uris</name>
    <value>thrift://node-1:9083</value>
  </property>
  <property>
    <name>hive.metastore.client.socket.timeout</name>
    <value>3600</value>
  </property>
</configuration>
Give the hive installation package cp to the other two machines.
cd /export/servers/
scp -r hive/ node-2:$PWD
scp -r hive/ node-3:$PWD
Modify hadoop configuration
All nodes create the following folders
mkdir -p /var/run/hdfs-sockets
Modify the hdfs-site.xml of all nodes to add the following configuration. After modification, restart the HDFS cluster to take effect
vim etc/hadoop/hdfs-site.xml
<property>
    <name>dfs.client.read.shortcircuit</name>
    <value>true</value>
</property>
<property>
    <name>dfs.domain.socket.path</name>
    <value>/var/run/hdfs-sockets/dn</value>
</property>
<property>
    <name>dfs.client.file-block-storage-locations.timeout.millis</name>
    <value>10000</value>
</property>
<property>
    <name>dfs.datanode.hdfs-blocks-metadata.enabled</name>
    <value>true</value>
</property>
- dfs.client.read.shortcircuit enables DFSClient to read data locally,
- dfs.domain.socket.path is the local path of the Socket between Datanode and DFSClient.
Update the hadoop configuration file, scp to other machines.
cd /export/servers/hadoop-2.7.5/etc/hadoop
scp -r hdfs-site.xml node-2:$PWD
scp -r hdfs-site.xml node-3:$PWD
Note: the root user does not need the following operations. Ordinary users need this step.
Give permissions to this folder. If you use hadoop, you can directly give permissions to ordinary users. For example:
chown -R hadoop:hadoop /var/run/hdfs-sockets/
Because the root user is used directly here, there is no need to assign permissions.
Copy hadoop and hive configuration files
impala The configuration directory of is/etc/impala/conf,Under this path, you need to core-site.xml,hdfs-site.xml as well as hive-site.xml.
//All nodes execute the following command
cp -r /export/servers/hadoop-2.7.5/etc/hadoop/core-site.xml /etc/impala/conf/core-site.xml
cp -r /export/servers/hadoop-2.7.5/etc/hadoop/hdfs-site.xml /etc/impala/conf/hdfs-site.xml
cp -r /export/servers/hive/conf/hive-site.xml /etc/impala/conf/hive-site.xml
6. Modify impala configuration
Modify impala default configuration
All nodes change impala default profile
vim /etc/default/impala
IMPALA_CATALOG_SERVICE_HOST=node-3
IMPALA_STATE_STORE_HOST=node-3
Add mysql driver
By configuring / etc/default/impala, you can find that the location name of mysql driver has been specified.
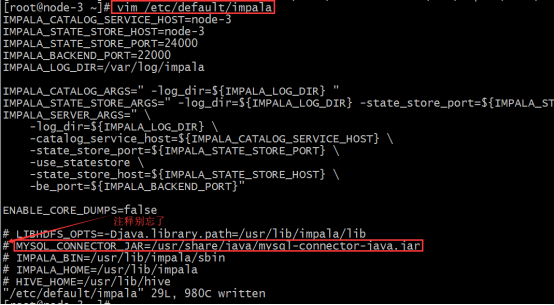
Use the soft link to point to the path (all three machines need to execute)
ln -s /export/servers/hive/lib/mysql-connector-java-5.1.32.jar /usr/share/java/mysql-connector-java.jar
Modify bigtop configuration
#Modify the Java home path of bigtop (3 machines)
vim /etc/default/bigtop-utils
export JAVA_HOME=/export/servers/jdk1.8.0_65
7. Start and shut down impala service
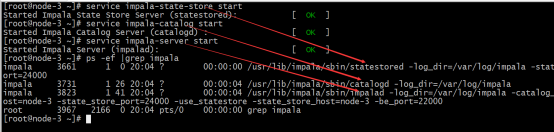
The primary node node-3 starts the following three service processes
service impala-state-store start
service impala-catalog start
service impala-server start
Starting impala server from node-1 and node-2
service impala-server start
Check if impala process exists
ps -ef | grep impala
Shut down service
If you need to shut down the impala service, you can change the start in the command to stop. Note that if the process still resides after shutdown, you can delete it as follows. Normally it disappears with the shutdown.
impala web ui
- Visit the management interface of impalad http://node-3:25000/
- Visit the management interface of statestore http://node-3:25010/
Finally (permission issue):

1: Granting permissions to HDFS specified folders
hadoop fs -chmod -R 777 hdfs://Host name: Port No. / user/hive
2: Set the permission to false in hdfs-site.xml in the haoop configuration file
Either way is OK.