preface
The laboratory has recently assigned a task to set up an information sharing system on the laboratory server to facilitate the information introduction of senior students after graduation, but the following requirements are met:
- Use as convenient as possible
- As the system is oriented to the research room, privacy needs to be guaranteed
For the first point, I think about two solutions. The first is to continue the solution of previous years: using open source software GROWI Directly rebuild a lightweight intelligence sharing system, but when I read the document to install docker to build the project, I heard that the server configuration provided by the professor was CPU:2 cores, Memory:1G. The server was directly down when it was started for the first time. For a careful server running other services at the same time, it was far fetched to use docker, so I gave up this scheme (later, it was found that the official GROWI provided an installation guide based on NodeJS); the second is to use Gitbook When building a static document site, I first thought that Gitbook was mainly due to its popularity. When I actually went to the original repo to check the deployment scheme, I found that the maintenance of the project had almost stopped. It seems that the Gitbook team has focused on the commercialization of Gitbook. If you want to have a better use experience, you can only register an account on the official website to use cloud services, which is related to the privacy and security of this task The customization requirement was obviously contrary, so I chose to find an alternative to Gitbook. Finally, I found it Docsify.
This paper mainly further explains the realization of requirement 2 in the preface.
The implementation idea is to use the front-end server (i.e. intermediate server) to reverse proxy the application request of the client and forward the request to the back-end application server where the application is actually deployed. For the same machine (assuming that the application is actually deployed on port 2367), by default, the front-end is equivalent to a virtual server listening on port 80 of the machine (Apache is used in this paper) , the back end is equivalent to a virtual server listening on port 2367 (Nginx is used in this article)
For the difference between Nginx and Apache:
- Nginx has highly modular design, simple writing and configuration, faster processing of static files than Apache, less memory consumption, and good concurrency (asynchronous and non blocking), which is suitable for front-end servers
- Apache is very stable, with high dynamic page processing capability, rich modules and powerful rewrite performance
Therefore, when choosing one of the web servers to build the project, if you want to pursue project performance, you can use Nginx; on the contrary, if you want stability and more configuration options, you are recommended to use Apache. For the combination of the two, Nginx is more suitable as the front-end to act as load balancing and reverse proxy, and Apache is used as the back-end server to process dynamic requests This article is based on the existing configuration (APACHE listens to port 80) and it is inconvenient to modify the configuration. Using Apache as the front-end reverse agent is not blindly recommended to imitate this practice, which should be adjusted according to the actual situation.
Construction process
The specific construction process is shown in the figure below: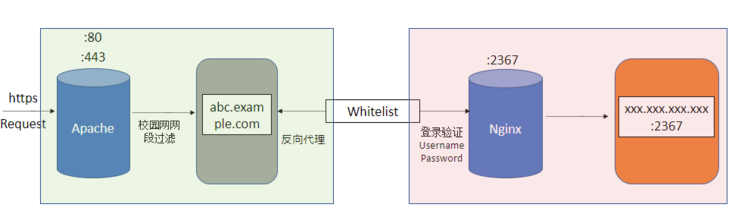
The green box on the left represents the reverse proxy server built based on Apache, and the pink box on the right represents the application server built based on Nginx. In addition to the basic reverse proxy configuration, the reverse proxy server also adds a layer of ip filtering to prevent ip outside the campus network (because for my needs, the respondents of the application are school research laboratories) In addition to configuring the application, a login authentication link (user name and password) is added to the application server to filter access other than the members of the research room. A white list is added between Apache and Nginx, so that the application server can only accept requests from the reverse proxy server (so that even if the external application address is detected, it can not be accessed directly).
Reverse proxy
Apache is configured as follows:
# Include module configuration:
IncludeOptional mods-enabled/*.load
IncludeOptional mods-enabled/*.conf

# Include list of ports to listen on
Include ports.conf

#NameVirtualHost *:443
<VirtualHost *:443>
        ServerName abc.example.com
        ServerAlias abc.example.com
        ProxyRequests Off
        <Proxy "*">
                Require ip yyy.yyy.yyy.yyy/zz
        </Proxy>
        ProxyPass / http://xxx.xxx.xxx.xxx:2367/
        ProxyPassReverse / http://xxx.xxx.xxx.xxx:2367
        SSLCertificateFile "/path/to/your/sslcert/fullchain.pem"
        SSLCertificateKeyFile "/path/to/your/sslcert/privkey.pem"
</VirtualHost>
It should be noted that the reverse proxy function of Apache needs to be started manually. First, you need to import the three modules mod_proxy, mod_proxy_http.so, mod_proxy_connect.so into apache.conf. if you are FreeBSD, you only need to cancel the comments on httpd.conf and restart the service; but if you are using Ubuntu, it is different from sites available and sites en The use method of enabled is the same. Mods available is the storage directory of all modules, but the modules loaded by the service are stored in MODS enabled.
This can be confirmed by the following lines of apache.conf:
# Include module configuration:
IncludeOptional mods-enabled/*.load
IncludeOptional mods-enabled/*.conf
When apache service is running, only the modules in MODS enabled will be loaded, and some modules will not be loaded by default during installation. (that is, the module will not appear in MODS enabled)
Apache provides us with the a2enmod command to help us quickly add modules. For the deactivated modules, use the a2dismod command:
admin@ubuntu:~$ sudo a2enmod proxy proxy_http proxy_connect # Enable module
admin@ubuntu:~$ sudo a2dismod proxy proxy_http proxy_connect # Disable module
After enabling, the specified module will be put into mods enabled in the form of soft link, and the service restart will take effect.
After adding a module, you need to add a downlink in apache.conf to enable the reverse proxy function.
ProxyRequests Off
Add such as setting your proxy target
ProxyPass / http://xxx.xxx.xxx.xxx:2367/
ProxyPassReverse / http://xxx.xxx.xxx.xxx:2367
Add ip white list. You can specify specific ip or limit a network segment like me.
<Proxy "*">
    Require ip yyy.yyy.yyy.yyy/zz
</Proxy>
Add https certificate. You can refer to whether https is required for proxy server and application server Reverse proxy server proxy HTTPS.
SSLCertificateFile "/path/to/your/sslcert/fullchain.pem"
SSLCertificateKeyFile "/path/to/your/sslcert/privkey.pem"
At this point, the configuration of the reverse proxy server ends.
application server
The configuration of Nginx is as follows. The author configures static pages, php and other dynamic applications. Please adjust yourself according to the Nginx documents:
server {
        listen 2367;
        listen [::]:2367;

        root /path/to/app;

        # Add index.php to the list if you are using PHP
        index index.html index.htm;

        server_name _;

        auth_basic "Please enter your username and password.";
        auth_basic_user_file /path/to/your/htpasswd;

        location / {
                # First attempt to serve request as file, then
                # as directory, then fall back to displaying a 404.
                try_files $uri $uri/ =404;
                alias /path/of/your/app/;
                index index.html;
        }
}
Start with the following description. Create a new configuration file with the default template under / etc / nginx / sites available / and soft link it to / etc / nginx / sites enabled /:
sudo touch /etc/nginx/sites-available/mysite.conf
sudo ln -s /etc/nginx/sites-available/mysite.conf /etc/nginx/sites-enabled/mysite.conf.enable
Use the absolute path, otherwise an error will be reported.
The deployment configuration of the application is written according to your actual situation.
Login verification is realized through nginx configuration and htpasswd tool. Htpasswd is a built-in user name and password generation tool in Apache. The usage method is as follows:
$ htpasswd -c /usr/local/nginx/password username
# Suppose we want to store the validation file in / usr/local/nginx /
# The file name is password and the login user name is username
# Enter the password after entering
# -c create encrypted files
At this point, the login information is created, and the authentication information is written into the website configuration file:
auth_basic "Please enter your username and password.";
auth_basic_user_file /usr/local/nginx/password;
The implementation effect is shown in the figure: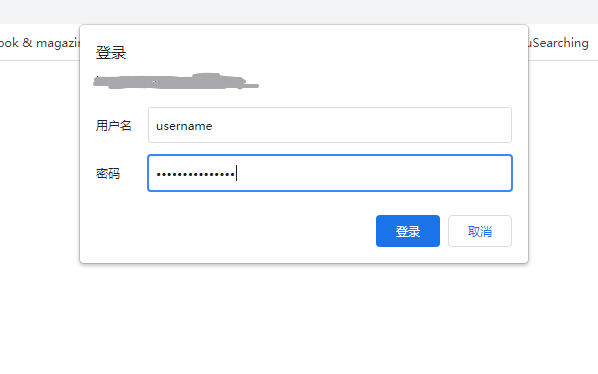
This implementation is the most basic authentication function. It has a defect that you cannot set the login expiration time, that is, after a device successfully logs in once, it will remain in the login success state until the website cache is manually cleared by the user.
After the configuration is completed, restart the nginx server to take effect.
Add white list between proxy server and application server
The implementation of this part is very simple. You can filter all requests except the proxy server directly on the application server (Nginx). Add the following configuration.
# Whitelist
allow zzz.zzz.zzz.zzz; # Address of the reverse proxy server
deny all;
All requests other than the ip followed by the allow keyword will be denied.
Epilogue
So far, the introduction of all implementations is completed.
reference resources:
https://caloskao.org/ubuntu-a...
https://www.cnblogs.com/kevin...
https://segmentfault.com/a/11...