
Identity authentication is a very common function in daily life, and you will basically come into contact with it at ordinary times. As an API gateway, Apache apifix has opened the adaptation cooperation with various plug-in functions, and the plug-in library is also relatively rich. At present, it can be matched with a large number of plug-ins related to identity authentication, as shown in the figure below.
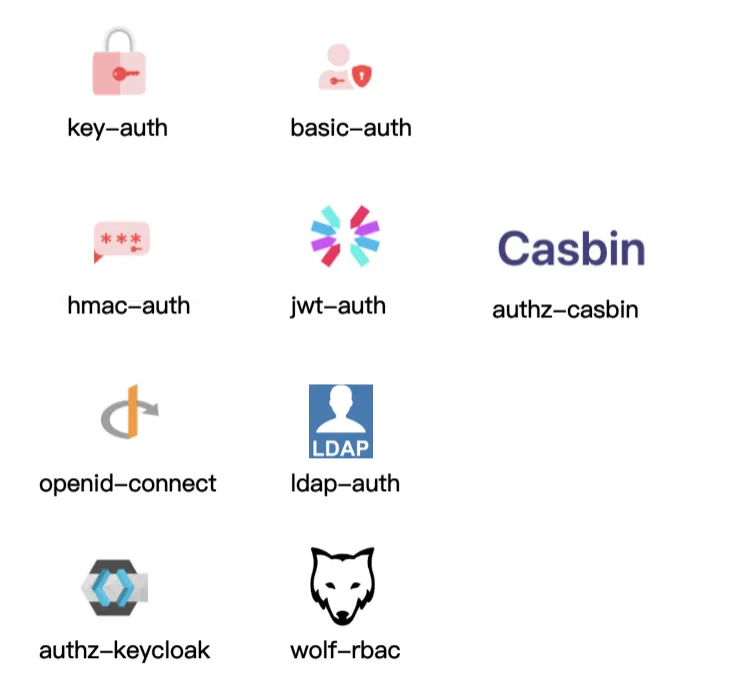
For example, auth basic authentication is the basis of their account authentication. Complex authentication plug-ins such as HMAC auth and JWT auth, such as HMAC auth, generate a signature by encrypting the request information. When the API caller carries the signature to APISIX, APISIX will calculate the signature with the same algorithm. It will pass only when the signer and the application caller have the same authentication. Others are some general authentication protocols and authentication protocols that cooperate with third-party components, such as openid connect identity authentication mechanism, LDAP authentication and so on.
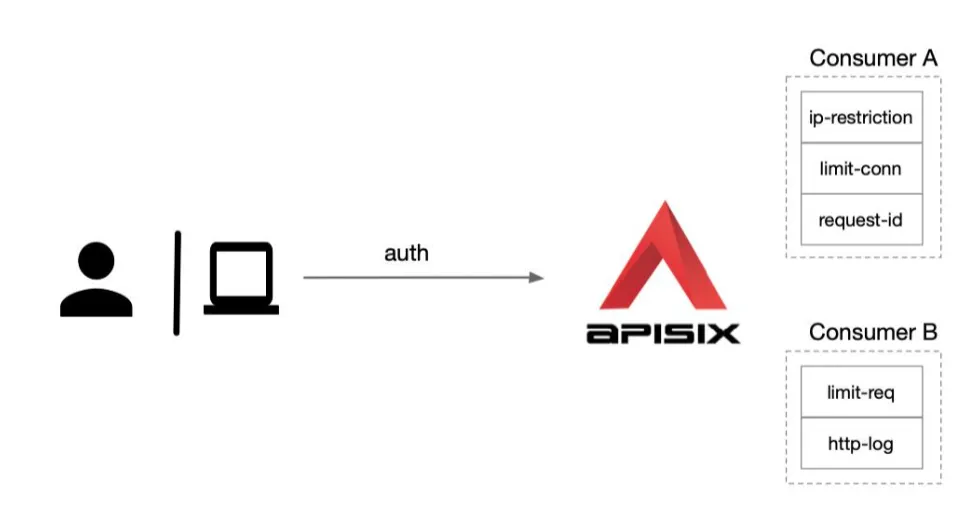
APISIX can also do different levels of plug-in configuration for each Consumer (i.e. caller application). As shown in the figure below, we have created two consumers, Consumer A and Consumer B. if we apply Consumer A to application 1, the access of subsequent application 1 will open these plug-ins of Consumer A, such as IP black-and-white list, limiting the number of concurrent applications, etc. Apply Consumer B to application 2. Since the HTTP log plug-in is enabled, the access log of application 2 will be sent to the log system through HTTP for collection.
basic-auth
First, let's learn how the simplest basic authentication is used in apisik. Basic Auth is an authentication plug-in. It needs to work with Consumer. Add Basic Auth to a Service or Route, and then the Consumer adds its user name and password to the request header to verify its request.
First of all, we need to add basic auth authentication configuration to ApisixConsumer consumer, and specify user name and password for it. Here, we can configure it through ApisixConsumer resource object in apisixprogress. For example, here, we add a basic authentication for the previous nexus instance application, as shown below:
# nexus-basic-auth.yaml
apiVersion: apisix.apache.org/v2alpha1
kind: ApisixConsumer
metadata:
  name: nexusBauth
spec:
  authParameter:
    basicAuth:
      value:
        username: admin
        password: admin321
The ApisixConsumer resource object only needs to configure the authParameter authentication parameter. At present, only two authentication types, basicauth and KeyAuth, are supported. Under basicauth, you can directly configure the relevant username and password through value, or you can directly use the Secret resource object for configuration, which is safer than plaintext configuration.
Then add authentication in ApisixRoute, turn it on and specify the authentication type, and then use Consumer to complete the relevant configuration authentication, as shown below:
apiVersion: apisix.apache.org/v2beta2
kind: ApisixRoute
metadata:
  name: nexus
  namespace: default
spec:
  http:
    - name: root
      match:
        hosts:
          - ops.qikqiak.com
        paths:
          - "/nexus*"
          - "/static/*"
          - "/service/*"
      plugins:
      - name: proxy-rewrite
        enable: true
        config:
          regex_uri: ["^/nexus(/|$)(.*)", "/$2"]
      - name: redirect
        enable: true
        config:
          regex_uri: ["^(/nexus)$", "$1/"]
      - name: redirect
        enable: true
        config:
          http_to_https: true
      backends:
      - serviceName: nexus
        servicePort: 8081
      authentication:  # Open basic auth authentication
        enable: true
        type: basicAuth
The basic auth authentication can be started by directly updating the above resources. You can also see the creation of a Consumer on the Dashboard:

Then we can conduct the following tests to verify:
# Authorization header is missing
➜ curl -i http://ops.qikqiak.com/nexus/
HTTP/1.1 401 Unauthorized
Date: Tue, 11 Jan 2022 07:44:49 GMT
Content-Type: text/plain; charset=utf-8
Transfer-Encoding: chunked
Connection: keep-alive
WWW-Authenticate: Basic realm='.'
Server: APISIX/2.10.0

{"message":"Missing authorization in request"}
# user name does not exist
➜ curl -i -ubar:bar http://ops.qikqiak.com/nexus/
HTTP/1.1 401 Unauthorized
Date: Tue, 11 Jan 2022 07:45:07 GMT
Content-Type: text/plain; charset=utf-8
Transfer-Encoding: chunked
Connection: keep-alive
Server: APISIX/2.10.0

{"message":"Invalid user key in authorization"}
# Successful request
➜ curl -uadmin:admin321 http://ops.qikqiak.com/nexus/
<html>
<head><title>301 Moved Permanently</title></head>
<body>
<center><h1>301 Moved Permanently</h1></center>
<hr><center>openresty</center>
</body>
</html>
consumer-restriction
However, you may have a question here. We didn't specify a specific Consumer on the Route, and then we can carry out Basic Auth authentication. If we have multiple consumers defined, won't Basic Auth take effect? That's true. This is the implementation method of apisik. All consumers will take effect on the Route with the corresponding plug-in enabled. What if we only want Consumer A to be applied to Route A and Consumer B to be applied to Route B? To achieve this function, you need to use another plug-in: Consumer restriction.
The consumer restriction plug-in can make corresponding access restrictions according to different objects selected. The configurable properties of the plug-in are shown in the following table:
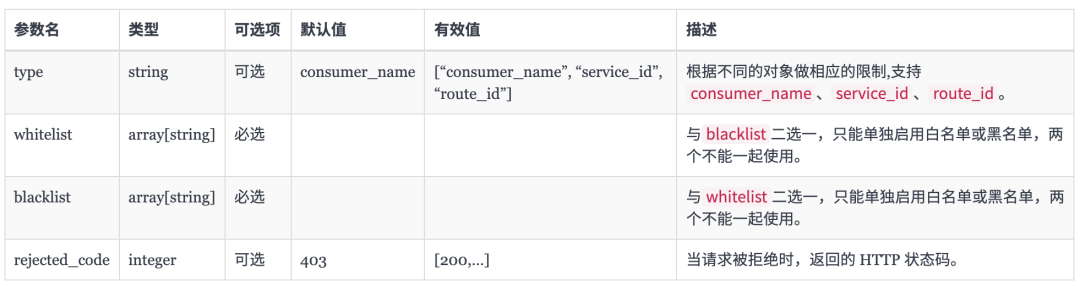
The type field is an enumeration type, which can be consumer_name or service_id stands for the following meanings:
- consumer_name: whitelist or blacklist the user name of the consumer (support single or multiple consumers) to restrict access to services or routes.
- service_id: the id of the service is listed in the white list or blacklist (one or more services are supported) to restrict the access of the service. It needs to be used in combination with the authorization plug-in.
For example, we now have two consumers: jack1 and jack2. Both consumers are configured with Basic Auth authentication, as shown below:
Authentication configuration of Conumer jack1:
➜ curl http://192.168.31.46/apisix/admin/consumers -H 'X-API-KEY: edd1c9f034335f136f87ad84b625c8f1' -X PUT -i -d '
{
    "username": "jack1",
    "plugins": {
        "basic-auth": {
            "username":"jack2019",
            "password": "123456"
        }
    }
}'
Authentication configuration of Conumer jack2:
➜ curl http://192.168.31.46/apisix/admin/consumers -H 'X-API-KEY: edd1c9f034335f136f87ad84b625c8f1' -X PUT -i -d '
{
    "username": "jack2",
    "plugins": {
        "basic-auth": {
            "username":"jack2020",
            "password": "123456"
        }
    }
}'
Now we only want to enable the authentication configuration of the Consumer jack1 for a Route object. In addition to enabling the basic auth plug-in, we also need to configure a whitelist whitelist in the Consumer restriction plug-in (of course, it is also possible to configure a blacklist), as shown below:
➜ curl http://192.168.31.46/apisix/admin/routes/1 -H 'X-API-KEY: edd1c9f034335f136f87ad84b625c8f1' -X PUT -d '
{
    "uri": "/index.html",
    "upstream": {
        "type": "roundrobin",
        "nodes": {
            "127.0.0.1:1980": 1
        }
    },
    "plugins": {
        "basic-auth": {},
        "consumer-restriction": {
            "whitelist": [
                "jack1"
            ]
        }
    }
}'
Then we use jack1 to access our route for verification:
➜ curl -u jack2019:123456 http://127.0.0.1:9080/index.html -i
HTTP/1.1 200 OK
...
If you use jack2 normally, the authentication will fail:
➜ curl -u jack2020:123456 http://127.0.0.1:9080/index.html -i
HTTP/1.1 403 Forbidden
...
{"message":"The consumer_name is forbidden."}
So when you only want a Route object to be associated with the specified Consumer, remember to use the Consumer restriction plug-in.
jwt-auth
jwt authentication is most likely to be used in ordinary applications. Similarly, there is a plug-in providing JWT Auth in APISIX. It also needs to work together with the Consumer. We only need to add JWT Auth to a Service or Route, and then the Consumer adds its key to the query string parameter, request header or cookie to verify its request.
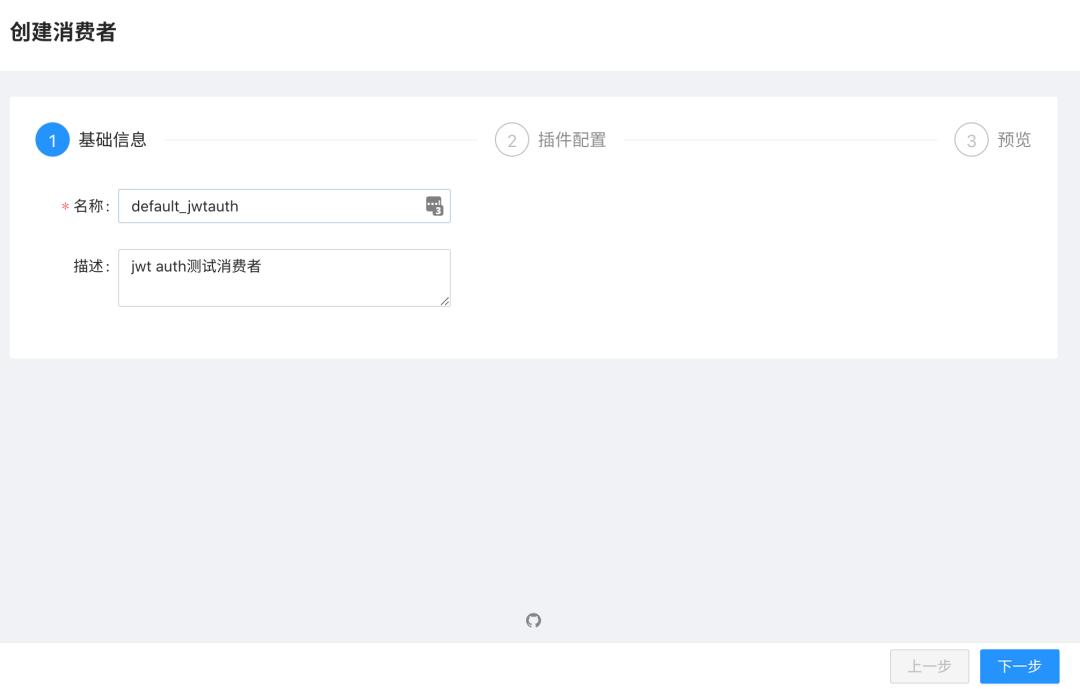
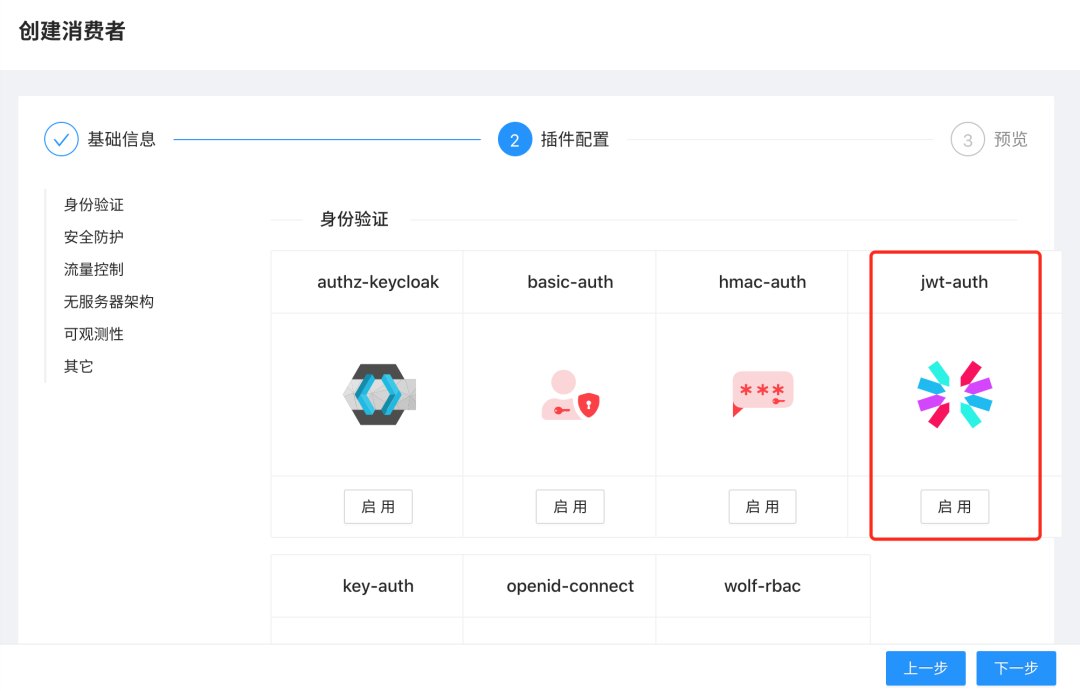
At present, ApisixConsumer does not support JWT auth configuration, so we need to manually create a Consumer in APISIX, which can be created through API of APISIX or directly through Dashboard page. On the Dashboard Consumer page, click create Consumer:
Click next to enter the plug-in configuration page, where we need to enable JWT auth plug-in:
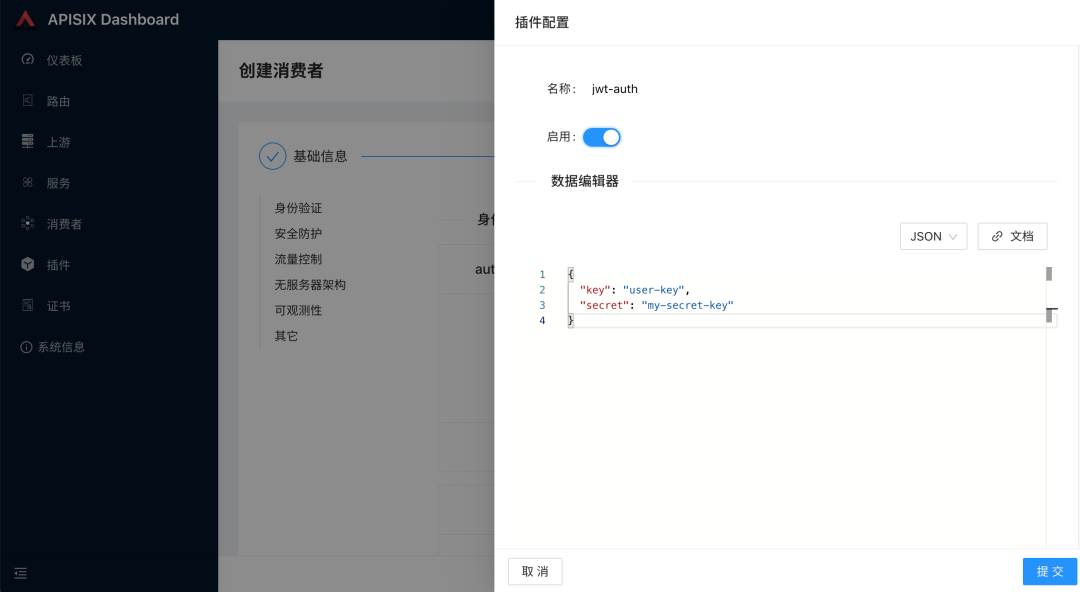
Configure JWT auth related properties on the plug-in configuration page. Refer to the plug-in documentation https://apisix.apache.org/zh/docs/apisix/plugins/jwt-auth/:
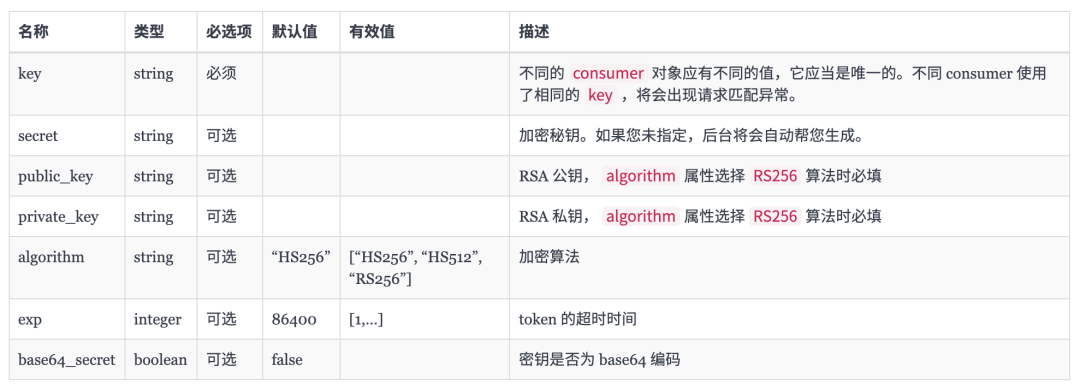
The configurable attributes are shown in the following table:
Then submit to create the Consumer, and then we only need to open JWT auth on the required Service or Route. For example, for the above nexus application, we only need to enable a JWT auth plug-in in in the ApisixRoute object:
apiVersion: apisix.apache.org/v2beta2
kind: ApisixRoute
metadata:
  name: nexus
  namespace: default
spec:
  http:
    - name: root
      match:
        hosts:
          - ops.qikqiak.com
        paths:
          - "/nexus*"
          - "/static/*"
          - "/service/*"
      plugins:
      - name: jwt-auth
        enable: true
      - name: redirect
        enable: true
        config:
          http_to_https: true
      - name: redirect
        enable: true
        config:
          regex_uri: ["^(/nexus)$", "$1/"]
      - name: proxy-rewrite
        enable: true
        config:
          regex_uri: ["^/nexus(/|$)(.*)", "/$2"]
      backends:
      - serviceName: nexus
        servicePort: 8081
It should be noted that the authentication attribute does not support JWT auth, so here we enable it through plugins. After re updating the above object, we will also test and verify the following:
➜ curl -i http://ops.qikqiak.com/nexus/
HTTP/1.1 401 Unauthorized
Date: Tue, 11 Jan 2022 08:54:30 GMT
Content-Type: text/plain; charset=utf-8
Transfer-Encoding: chunked
Connection: keep-alive
Server: APISIX/2.10.0

{"message":"Missing JWT token in request"}
To access our services normally, you need to log in and get the token of JWT auth. You can get it through apimix / plugin / JWT / sign of apimix:
➜ curl -i http://192.168.31.46/apisix/plugin/jwt/sign\?key\=user-key
HTTP/1.1 200 OK
Date: Tue, 11 Jan 2022 09:01:29 GMT
Content-Type: text/plain; charset=utf-8
Transfer-Encoding: chunked
Connection: keep-alive
Server: APISIX/2.10.0

eyJhbGciOiJIUzI1NiIsInR5cCI6IkpXVCJ9.eyJrZXkiOiJ1c2VyLWtleSIsImV4cCI6MTY0MTk3ODA4OX0.rdzMxM4QAKI444c3SC3u3ZqfW9rKnsqrdorLHCGqrQg
Note that we need to pass the identification key of the created Consumer when obtaining the token above, because there may be multiple different Consumer consumers, and then we put the token obtained above into the Header for access:
➜ curl -i http://ops.qikqiak.com/nexus/ -H 'Authorization: eyJhbGciOiJIUzI1NiIsInR5cCI6IkpXVCJ9.eyJrZXkiOiJ1c2VyLWtleSIsImV4cCI6MTY0MTk3ODA4OX0.rdzMxM4QAKI444c3SC3u3ZqfW9rKnsqrdorLHCGqrQg'
HTTP/1.1 200 OK
Content-Type: text/html; charset=utf-8
Content-Length: 8802
Connection: keep-alive
......
Expires: 0
Server: APISIX/2.10.0


<!DOCTYPE html>
<html lang="en">
......
You can see that it can be accessed normally. It can also be verified in the request parameters:
➜ curl -i http://ops.qikqiak.com/nexus/?jwt=eyJhbGciOiJIUzI1NiIsInR5cCI6IkpXVCJ9.eyJrZXkiOiJ1c2VyLWtleSIsImV4cCI6MTY0MTk3ODA4OX0.rdzMxM4QAKI444c3SC3u3ZqfW9rKnsqrdorLHCGqrQg
HTTP/1.1 200 OK
......
In addition, it can be put into a cookie for verification:
➜ curl -i http://ops.qikqiak.com/nexus/ --cookie jwt=eyJhbGciOiJIUzI1NiIsInR5cCI6IkpXVCJ9.eyJrZXkiOiJ1c2VyLWtleSIsImV4cCI6MTY0MTk3ODA4OX0.rdzMxM4QAKI444c3SC3u3ZqfW9rKnsqrdorLHCGqrQg
HTTP/1.1 200 OK
......