8, APP element event operation API
8.1. Pre code
from appium import webdriver
# server startup parameters
desired_caps = {}
# Equipment information
desired_caps['platformName'] = 'Android'
desired_caps['platformVersion'] = '5.1'
desired_caps['deviceName'] = '192.168.56.101:5555'
# app information
desired_caps['appPackage'] = 'com.android.settings'
desired_caps['appActivity'] = '.Settings'

# Declare our driver object
driver = webdriver.Remote('http://127.0.0.1:4723/wd/hub', desired_caps)
8.2. swip slip event
⚠️ Sliding from one coordinate position to another can only be between two points
- Method: swing (start_x, start_y, end_x, end_y, duration = none)
- Parameters:
1.start_x: Starting point X-axis coordinate
2.start_y: Y-axis coordinates of starting point
3.end_x: End X-axis coordinates
4.end_y. End point: Y axis coordinates
5.duration: total duration of sliding operation, unit: ms- Business scenario:
1. Enter settings
2. Slide from coordinate (148659) to coordinate (148248)
- Business scenario:
- Code implementation:
# Sliding has no duration
driver.swipe(188,659,148,248)
# Sliding lasts for 5 seconds
driver.swipe(188,659,148,248,5000)
8.3. scroll slide event
⚠️ Slide from one element to another until the page stops automatically
- Method: scroll(origin_el, destination_el)
- Parameters:
1.origin_el: element at the beginning of the slide
2.destination_el: element at the end of the slide - Business scenario:
1. Enter the setting page
2. Simulate the up sliding operation of the finger from the storage menu position to the WLAN menu position - Code implementation:
# Navigate to the storage menu bar
el1 = driver.find_element_by_xpath("//*[contains(@text, 'store')] ")
# Navigate to the WLAN menu bar
el2 = driver.find_element_by_xpath("//*[contains(@text,'WLAN')]")
# Perform sliding operation
driver.scroll(el1,el2)
8.4. drag drag event
⚠️ Slide from one element to another, and the second element replaces the original screen position of the first element
- Method: drag_and_drop(origin_el, destination_el)
- Parameters:
1.origin_el: element at the beginning of the slide
2.destination_el: element at the end of the slide - Business scenario:
1. Enter the setting page
2. Slide the storage menu to the WLAN menu bar with an analog finger - Code implementation:
# Navigate to the storage menu bar
el1 = driver.find_element_by_xpath("//*[contains(@text, 'store')] ")
# Navigate to the WLAN menu bar
el2 = driver.find_element_by_xpath("//*[contains(@text,'WLAN')]")
# Perform sliding operation
driver.drag_and_drop(el1,el2)
8.5. Application put in background event
APP is placed in the background to simulate hot start
- Method: background_app(seconds)
- Parameters:
1.seconds: time to stay in the background, unit: seconds - Business scenario:
1. Enter the setting page
2. Place the APP in the background for 5s - Code implementation:
driver.background_app(5)
- effect:
app Put in background 5 s After, show the current page again
9, APP analog gesture advanced operation
TouchAction is an auxiliary class of AppiumDriver. It mainly aims at gesture operations, such as sliding, long pressing, dragging, etc. the principle is to put a series of actions in a chain and send them to the server. After receiving the chain, the server parses each action and executes it one by one.
9.1. Pre code
from appium import webdriver
# server startup parameters
desired_caps = {}
# Equipment information
desired_caps['platformName'] = 'Android'
desired_caps['platformVersion'] = '5.1'
desired_caps['deviceName'] = '192.168.56.101:5555'
# app information
desired_caps['appPackage'] = 'com.android.settings'
desired_caps['appActivity'] = '.Settings'

# Declare our driver object
driver = webdriver.Remote('http://127.0.0.1:4723/wd/hub', desired_caps)
⚠️ All gestures are executed by the function
9.2. Finger tapping operation
Simulate a finger tap on the screen
- Method: tap(element=None, x=None, y=None)
- Method: perform() # sends a command to the server to execute the operation
- Parameters:
1.element: the element to be located
2.x: relative to the coordinates of the upper left corner of the element, the x-axis coordinates of the element are usually used
3.y: the Y coordinate of the element is usually used - Business scenario:
1. Enter settings
2. Click WLAN option - Code implementation:
# Tap the screen by element positioning
el = driver.find_element_by_xpath("//*[contains(@text,'WLAN')]")
TouchAction(driver).tap(el).perform()

# Tap the screen through the coordinate mode. WLAN coordinates: x=155,y=250
# TouchAction(driver).tap(x=155,y=250).perform()
9.3. Finger press operation
Analog fingers press the screen, press to leave
- Method: press(el=None, x=None, y=None)
- Method: release() # ends the action and leaves the screen with your finger
- Parameters:
1.element: the element to be located
2.x: the x-axis coordinate of the element is usually used
3.y: the Y coordinate of the element is usually used - Business scenario:
1. Enter settings
2. Click WLAN option - Code implementation:
# Press the screen by element positioning
el = driver.find_element_by_xpath("//*[contains(@text,'WLAN')]")
TouchAction(driver).press(el).release().perform()

# Press the screen through the coordinate mode. WLAN coordinates: x=155,y=250
# TouchAction(driver).press(x=155,y=250).release().perform()
9.4. Wait for operation
- Method: wait(ms=0)
- Parameters:
ms: number of milliseconds paused - Business scenario:
1. Enter settings
2. Click WLAN option
3. Long press the WiredSSID option for 5 seconds - Code implementation:
# Click WLAN
driver.find_element_by_xpath("//*[contains(@text,'WLAN')]").click()
# Navigate to WiredSSID
el =driver.find_element_by_id("android:id/title")
# Long press the element by element positioning
TouchAction(driver).press(el).wait(5000).perform()

# Simulate long press elements by coordinates
# Add wait (with long press) / do not add wait (without long press effect)
# TouchAction(driver).press(x=770,y=667).wait(5000).release().perform()
9.5. Long finger press operation
The analog mobile phone presses the screen for a period of time, and pressing it will correspond to leaving
- Method: long_press(el=None, x=None, y=None, duration=1000)
- Parameters:
1.element: the element to be located
2.x: the x-axis coordinate of the element is usually used
3.y: the Y coordinate of the element is usually used
4.duration: duration, which is 1000ms by default - Code implementation:
# Click WLAN
driver.find_element_by_xpath("//*[contains(@text,'WLAN')]").click()
# Navigate to WiredSSID
el =driver.find_element_by_id("android:id/title")
# Long press the element by element positioning
TouchAction(driver).long_press(el,duration=5000).release().perform()

# Long press the element in the coordinate mode. WiredSSID coordinates: x=770,y=667
# Add wait (with long press) / do not add wait (without long press effect)
# TouchAction(driver).long_press(x=770,y=667).perform()
9.6. Finger movement operation
Simulate the sliding operation of the mobile phone
- Method: move_to(el=None, x=None, y=None)
- Parameters:
1.el: positioned element
2.x: X-axis offset relative to the previous element
3.y: Y-axis offset relative to the previous element - Business scenario 1:
1. Enter settings
2. Slide the screen up - Code implementation:
# Navigate to storage el = driver.find_element_by_xpath("//*[contains(@text, 'store')] ") # Navigate to more el1 = driver.find_element_by_xpath("//*[contains(@text, 'more')] ") # Element mode sliding TouchAction(driver).press(el).move_to(el1).release().perform() # Coordinate sliding # TouchAction(driver).press(x=240,y=600).wait(100).move_to(x=240,y=100).release().perform() # Note that press connects to a move_to actually calls the swip method, which can be queried in the log without giving relative coordinates. - Business scenario 2:
1. Enter settings
2. Slide the screen up to see the "security" option
3. Access to security
4. Click screen lock mode
5. Click on the pattern
6. Draw patterns - Code implementation:
# Navigate to WLAN
el1 = driver.find_element_by_xpath("//*[contains(@text,'WLAN')]")
# Navigate to storage
el2 = driver.find_element_by_xpath("//*[contains(@text, 'store')] ")
# Slide storage to WLAN
driver.drag_and_drop(el2,el1)
# Navigate to user
el3 = driver.find_element_by_xpath("//*[contains(@text, 'user')] ")
# Note that drag is used this time_ and_ In the drop method, the incoming "storage location" still uses its original position on the screen, so the user can slide it up only when the storage slides to the user. Otherwise, the "storage location" needs to be relocated
# Slide user position on storage
driver.drag_and_drop(el2,el3)
# Click the security button
driver.find_element_by_xpath("//*[contains(@text, 'safe')] ". click()
# Click the screen lock mode button
driver.find_element_by_xpath("//*[contains(@text, 'screen locked')] ". click()
# Click the pattern button
driver.find_element_by_xpath("//*[contains(@text, 'pattern')] ". click()
# Draw four coordinates of the pattern: 1: (244967) 2: (723967) 3: (7231442) 4: (2441916)
TouchAction(driver).press(x=244,y=967).wait(100).move_to(x=479,y=0).wait(100)\
          .move_to(x=0,y=475).wait(100).move_to(x=-479,y=474).release().perform()
10, Mobile operation API
Operate some common setting functions of the mobile phone
10.1. Pre code
from appium import webdriver
# server startup parameters
desired_caps = {}
# Equipment information
desired_caps['platformName'] = 'Android'
desired_caps['platformVersion'] = '5.1'
desired_caps['deviceName'] = '192.168.56.101:5555'
# app information
desired_caps['appPackage'] = 'com.android.settings'
desired_caps['appActivity'] = '.Settings'

# Declare our driver object
driver = webdriver.Remote('http://127.0.0.1:4723/wd/hub', desired_caps)
10.2. Get mobile time
- Method: device_time
- Code implementation:
# Get the time of the current phone
print(driver.device_time)
- Execution results:
Wed Dec 27 08:52:45 EST 2017
10.3. Get the width and height of the phone
Get the width and height of the mobile phone. You can do some coordinate operations according to the width and height
- Method: get_window_size()
- Code implementation:
print(driver.get_window_size())
- Execution results:
{'height': 800, 'width': 480}
10.4. Send key to device
Simulate the operation of system key values, such as home key, volume key, return key, etc.
- Parameters:
keycode: the key code sent to the device
metastate: meta information about the key code to be sent, which is generally the default value - Business scenario:
1. Open Settings
2. Press the volume increase key several times - Code implementation:
for i in range(3):
    driver.keyevent(24)
Appium -- the keycode key value of Android
adb command use
adb shell input keyevent XX(EventCode) # enter the corresponding key value
adb shell input text "www.baidu.com "# send text to browser
| EventCode | KeyEvent | EventName |
|---|---|---|
| 0 | KEYCODE_UNKNOWN | Unknown key |
| 1 | KEYCODE_SOFT_LEFT | Left key |
| 2 | KEYCODE_SOFT_RIGHT | Right click |
| 3 | KEYCODE_HOME | Home key |
| 4 | KEYCODE_BACK | Return key |
| 5 | KEYCODE_CALL | Dialing key |
| 6 | KEYCODE_ENDCALL | Hang up key |
| 7 | KEYCODE_0 | Key "0" |
| 8 | KEYCODE_1 | Key "1" |
| 9 | KEYCODE_2 | Key "2" |
| 10 | KEYCODE_3 | Key "3" |
| 11 | KEYCODE_4 | Key "4" |
| 12 | KEYCODE_5 | Key "5" |
| 13 | KEYCODE_6 | Key "6" |
| 14 | KEYCODE_7 | Key "7" |
| 15 | KEYCODE_8 | Key "8" |
| 16 | KEYCODE_9 | Key "9" |
| 17 | KEYCODE_STAR | Key "*" |
| 18 | KEYCODE_POUND | Press "#" |
| 19 | KEYCODE_DPAD_UP | Navigation key up |
| 20 | KEYCODE_DPAD_DOWN | Navigation key down |
| 21 | KEYCODE_DPAD_LEFT | Navigation key left |
| 22 | KEYCODE_DPAD_RIGHT | Navigation key right |
| 23 | KEYCODE_DPAD_CENTER | Navigation key OK |
| 24 | KEYCODE_VOLUME_UP | Volume key plus |
| 25 | KEYCODE_VOLUME_DOWN | Volume key minus |
| 26 | KEYCODE_POWER | Power key |
| 27 | KEYCODE_CAMERA | Camera key |
| 28 | KEYCODE_CLEAR | Clear key |
| 29 | KEYCODE_A | Key "A" |
| 30 | KEYCODE_B | Key "B" |
| 31 | KEYCODE_C | Key "C" |
| 32 | KEYCODE_D | Key "D" |
| 33 | KEYCODE_E | Key "E" |
| 34 | KEYCODE_F | Key "F" |
| 35 | KEYCODE_G | Key "G" |
| 36 | KEYCODE_H | Key "H" |
| 37 | KEYCODE_I | Key "I" |
| 38 | KEYCODE_J | Key "J" |
| 39 | KEYCODE_K | Key "K" |
| 40 | KEYCODE_L | Key "L" |
| 41 | KEYCODE_M | Key "M" |
| 42 | KEYCODE_N | Key "N" |
| 43 | KEYCODE_O | Key "O" |
| 44 | KEYCODE_P | Press "P" |
| 45 | KEYCODE_Q | Key "Q" |
| 46 | KEYCODE_R | Key "R" |
| 47 | KEYCODE_S | Key "S" |
| 48 | KEYCODE_T | Key "T" |
| 49 | KEYCODE_U | Key "U" |
| 50 | KEYCODE_V | Key "V" |
| 51 | KEYCODE_W | Key "W" |
| 52 | KEYCODE_X | Key "X" |
| 53 | KEYCODE_Y | Key "Y" |
| 54 | KEYCODE_Z | Key "Z" |
| 55 | KEYCODE_COMMA | Press the key |
| 56 | KEYCODE_PERIOD | Key ' |
| 57 | KEYCODE_ALT_LEFT | Alt+Left |
| 58 | KEYCODE_ALT_RIGHT | Alt+Right |
| 59 | KEYCODE_SHIFT_LEFT | Shift+Left |
| 60 | KEYCODE_SHIFT_RIGHT | Shift+Left |
| 61 | KEYCODE_TAB | Tab key |
| 62 | KEYCODE_SPACE | Space bar |
| 63 | KEYCODE_SYM | Select input method |
| 64 | KEYCODE_EXPLORER | browser |
| 65 | KEYCODE_ENVELOPE | |
| 66 | KEYCODE_ENTER | enter key |
| 67 | KEYCODE_DEL | Backspace key |
| 68 | KEYCODE_GRAVE | Key ` ` |
| 69 | KEYCODE_MINUS | Key '-' |
| 70 | KEYCODE_EQUALS | Key '=' |
| 71 | KEYCODE_LEFT_BRACKET | Key '[' |
| 72 | KEYCODE_RIGHT_BRACKET | Key ']' |
| 73 | KEYCODE_BACKSLASH | Key '\' |
| 74 | KEYCODE_SEMICOLON | Key ',' |
| 75 | KEYCODE_APOSTROPHE | Key '' (single quotation mark) |
| 76 | KEYCODE_SLASH | Key '/' |
| 77 | KEYCODE_AT | Key '@' |
| 78 | KEYCODE_NUM | Key Number modifier |
| 79 | KEYCODE_HEADSETHOOK | Press the key Headset Hook |
| 80 | KEYCODE_FOCUS | Camera focus key |
| 81 | KEYCODE_PLUS | Key '+' |
| 82 | KEYCODE_MENU | Menu key |
| 83 | KEYCODE_NOTIFICATION | Notification key |
| 84 | KEYCODE_SEARCH | Search key |
| 85 | TAG_LAST_KEYCODE |
10.5. Operation mobile phone notification bar
Open the notification bar of the mobile phone to get the relevant information and element operations of the notification bar
- Method: open_notifications()
- Business scenario:
1. Startup settings
2. Open the notification bar - Code implementation:
driver.open_notifications()
10.6. Get the current network of mobile phone
Get the currently connected network of the mobile phone
- Method: network_connection
- Business scenario: get the current network mode of the mobile phone
- Code implementation:
print(driver.network_connection)
- Execution results:
6
| Value (Alias) | Data | Wifi | Airplane Mode |
|---|---|---|---|
| 0 (None) | 0 | 0 | 0 |
| 1 (Airplane Mode) | 0 | 0 | 1 |
| 2 (Wifi only) | 0 | 1 | 0 |
| 4 (Data only) | 1 | 0 | 0 |
| 6 (All network on) | 1 | 1 | 0 |
10.7. Set up mobile network
Change the network mode of the mobile phone and simulate the test cases under special network conditions
- Method: set_network_connection(connectionType)
- Parameters:
connectionType: the network type to be set - Business scenario:
1. Startup settings
2. Set the mobile network to flight mode - Code implementation:
driver.set_network_connection(1)
10.8. Screenshot of mobile phone
Capture the current screen of the mobile phone and save the picture in the specified format to the set position
- Method: get_screenshot_as_file(filename)
- Parameters:
filename: the image in the specified format under the specified path - Business scenario:
1. Open the settings page
2. Save the screenshot to the current directory and name it screen png - Code implementation:
import os
driver.get_screenshot_as_file(os.getcwd() + os.sep + './screen.png')
- Execution results:
Screen. Will be generated in the current directory PNG file
11, Script recording
11.1. Cognitive interface
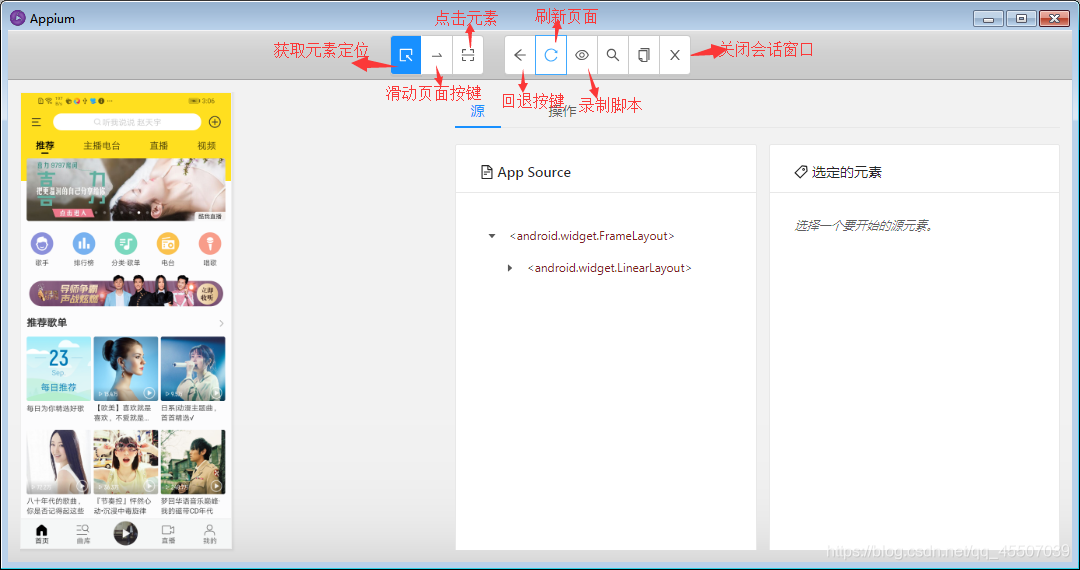
11.2. Click the start recording button to start recording the script
-
Click the first "select element" button on the left of the top navigation bar to select the search bar, and then click the "click" button on the right to operate (the recording process is to first select the APP element on the left of the recording window, and then record the operation mode on the right of the window).
-
After recording, click the "stop recording" button, and the operation code will be displayed synchronously in the upper right corner of the recording window. Select the code type, convert the template code into a formal code, and copy the code to pychart.
-
After the code is copied to pycharm, it is best to add the waiting time at each operation or page switching, otherwise it will not arrive at the next page in time due to network speed, APP design problems or other reasons, resulting in appium unable to obtain page elements and failure to locate elements, and an error will be reported when pycharm runs. After editing the code, click pycharm's run button, and appium will automatically run the script on the mobile phone.