This course focuses on the automated testing tool appium.
Let's take the android app test as an example to illustrate the basic usage of appium.
appium concept
appium installation configuration
A test sample
Appium concept
Appium is a mobile automation framework that can be used to test native applications, mobile web applications and hybrid applications, and is cross-platform. It can be used in operating systems of IOS, Android and firefox.
Appium uses the json wire protocol of Web Driver to drive the UI Automation Library of Apple system and the UI Automator framework of Android system.
Native applications refer to applications written in sdk of android or ios. Native applications look (look) and run (performance) best.
Mobile Web applications refer to web applications. HTML5 applications use standard Web technologies, usually HTML5, JavaScript and CSS.
Hybrid applications allow developers to embed HTML5 applications into a thin native container that combines the advantages (and disadvantages) of native applications and HTML5 applications.
appium chose the client-server design pattern.
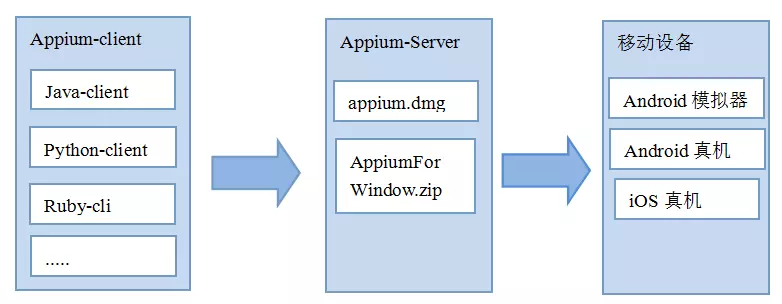
image
The above figure shows the tool principle of appium.
Client/Server Architecture
The core of Appium is the network server that exposes the REST API. It accepts connections from clients, listens for commands and executes them on mobile devices, and responds to HTTP responses that indicate execution results. The client/server architecture actually offers many possibilities: we can write our test code in any language with an HTTP client API, but it's easier to choose an Appium client library. We can put the server on another machine instead of the machine that performs the test.
Session
Automation is always performed in the context of a session. These client libraries initiate sessions with the server in their respective ways, but all end with a POST/session request to the server containing a JSON object called'desired capabilities'. The server then opens the automated session and returns a session ID for sending subsequent commands.
Desired Capabilities
Desired capabilities are sets of key-value pairs (such as map or hash) that are sent to the Appium server to tell the server what type of automated session we want to start. There are also various capabilities that can modify server behavior at automated runtime. For example, we can set platformName capability to iOS and tell Appium that we want iOS sessions, not Android or Windows sessions. We can also set Safari AllowPopups capability to true to ensure that we can use javascript to open new windows in Safari automation sessions. For a complete list of Appium capabilities, see capabilities doc .
Appium Server
Appium is a server written in Node.js. It can from Source code Build installation or install directly from NPM:
$ npm install -g appium
$ appium
Appium client
There are several client libraries (Java, Ruby, Python, PHP, JavaScript and C#) that support Appium's extension of the Web Driver protocol. You need to replace the usual Web Driver client with these client libraries. stay Here Browse the list of all libraries.
Appium.app, Appium.exe
Graphic interface wrappers with Appium servers can be downloaded. They pack everything the Appium server needs to run, so you don't have to worry about Node. They also provide an Inspector that allows you to view the hierarchy of your application, which is convenient for writing tests.
appium installation configuration
Appium-desktop installation
The original version of appium-server is no longer maintained, and the new tool is Appium-desktop.
Official address: http://appium.io/ Download the appropriate version
windows Platform Download: appium-desktop-setup-1.4.0.exe
Double-click to install, installation process does not require any settings
When the desktop is installed, a purple appium icon is generated and double-clicked to open it.
The default display of monitor host s and port s is consistent with that in Appium-Server. Click on the "Start Server V 1.7.2" button to start the service.
Note: Agents cannot be set in browsers
Traceback (most recent call last):
  File "C:\Users\liujiey\Desktop\test.py", line 20, in setUp

self.driver = webdriver.Remote('http://localhost:4723/wd/hub', desired_caps)

  File "build\bdist.win32\egg\appium\webdriver\webdriver.py", line 36, in __init__

super(WebDriver, self).__init__(command_executor, desired_capabilities, browser_profile, proxy, keep_alive)

  File "C:\Python27\lib\site-packages\selenium-2.48.0-py2.7.egg\selenium\webdriver\remote\webdriver.py", line 87, in __init__

self.start_session(desired_capabilities, browser_profile)

  File "C:\Python27\lib\site-packages\selenium-2.48.0-py2.7.egg\selenium\webdriver\remote\webdriver.py", line 141, in start_session

'desiredCapabilities': desired_capabilities,

  File "C:\Python27\lib\site-packages\selenium-2.48.0-py2.7.egg\selenium\webdriver\remote\webdriver.py", line 199, in execute

response = self.command_executor.execute(driver_command, params)

  File "C:\Python27\lib\site-packages\selenium-2.48.0-py2.7.egg\selenium\webdriver\remote\remote_connection.py", line 395, in execute

return self._request(command_info[0], url, body=data)

  File "C:\Python27\lib\site-packages\selenium-2.48.0-py2.7.egg\selenium\webdriver\remote\remote_connection.py", line 463, in _request

resp = opener.open(request, timeout=self._timeout)

  File "C:\Python27\lib\urllib2.py", line 394, in open

response = self._open(req, data)

  File "C:\Python27\lib\urllib2.py", line 412, in _open

'_open', req)

  File "C:\Python27\lib\urllib2.py", line 372, in _call_chain

result = func(*args)

  File "C:\Python27\lib\urllib2.py", line 1199, in http_open

return self.do_open(httplib.HTTPConnection, req)

  File "C:\Python27\lib\urllib2.py", line 1170, in do_open

r = h.getresponse(buffering=True)
  File "C:\Python27\lib\httplib.py", line 1027, in getresponse

response.begin()

  File "C:\Python27\lib\httplib.py", line 407, in begin

version, status, reason = self._read_status()

  File "C:\Python27\lib\httplib.py", line 371, in _read_status

raise BadStatusLine(line)

BadStatusLine: ''
Install python-client
python-client The project name is Appium-Python-Client.
Installation: pip install Appium-Python-Client
The project relies on selenium
Test in python: from appium import webdriver, import success indicates installation is complete
If you use other languages, install client s in other languages
Install JDK
The operation of app sdk requires JDK support, so you need to install JDK first.
You need to configure JAVA_HOME and set the path path path
Install Android SDK
SDK support is required for simulator testing. Platform-tools, such as adb, will be used if the real machine is tested. Therefore, it is recommended to install SDK.
Android SDK Download Address:
http://tools.android-studio.org/index.php/sdk
Select the corresponding platform version to download, here choose:
Install SDK:
1. Double-click for installation
2. JDK will be checked during installation
3. The SDK manager will be prompted to run after installation.
4. In addition to the default checks, select the versions that need to be downloaded, such as Android 7.0, Android 6.0, and so on. Here, choose Android 4.2.2 for download.
Set environment variables:
Set the environment variables below:
"My Computer" right-click menu - > Attributes - > Advanced - > Environment variables - > System variables - > New...
| Variable name | Variable value |
|---|---|
| ANDROID_HOME | D:\android\Android\sdk |
Find the path variable name - > Edit Add:
| Variable name | Variable value |
|---|---|
| PATH | ;%ANDROID_HOME%\platform-tools;%ANDROID_HOME%\tools; |
Create simulators:
1. Double-click AVD Manage.exe to start the AVD manager.
2. Click "Create..." Button to create an Android virtual machine.
3. Don't choose Device that exceeds the resolution of the computer screen. Target chooses the version downloaded from SDK, Skin chooses no skin and clicks "OK" to create it.
4. Select the Android Virtual Machine created in the AVD Manage tool and click "Start..." Button start.
Use Intel atom When simulating, it may occur

Starting emulator for AVD 'EMU'
emulator: ERROR: x86 emulation currently requires hardware acceleration!
Please ensure Intel HAXM is properly installed and usable.
CPU acceleration status: HAXM is not installed on this machine

//At this point, you can download and install HAXM in extra from sdk manager or https://software.intel.com/en-us/articles/intel-hardware-accelerated-execution-manager-intel-haxm
Exception: Not installed sdk
Traceback (most recent call last):
  File "C:\Users\liujiey\Desktop\test.py", line 20, in setUp

self.driver = webdriver.Remote('http://localhost:4723/wd/hub', desired_caps)

  File "build\bdist.win32\egg\appium\webdriver\webdriver.py", line 36, in __init__

super(WebDriver, self).__init__(command_executor, desired_capabilities, browser_profile, proxy, keep_alive)

  File "C:\Python27\lib\site-packages\selenium-2.48.0-py2.7.egg\selenium\webdriver\remote\webdriver.py", line 87, in __init__

self.start_session(desired_capabilities, browser_profile)

  File "C:\Python27\lib\site-packages\selenium-2.48.0-py2.7.egg\selenium\webdriver\remote\webdriver.py", line 141, in start_session

'desiredCapabilities': desired_capabilities,

  File "C:\Python27\lib\site-packages\selenium-2.48.0-py2.7.egg\selenium\webdriver\remote\webdriver.py", line 201, in execute

self.error_handler.check_response(response)

  File "C:\Python27\lib\site-packages\selenium-2.48.0-py2.7.egg\selenium\webdriver\remote\errorhandler.py", line 181, in check_response

raise exception_class(message, screen, stacktrace)

WebDriverException: Message: An unknown server-side error occurred while processing the command. Original error: Could not find adb Please set the ANDROID_HOME environment variable with the Android SDK root directory path.
A test sample
Create script
A sample test script:
import os
import unittest
from appium import webdriver
from time import sleep

# Returns abs path relative to this file and not cwd


class ContactsAndroidTests(unittest.TestCase):
    def setUp(self):
        desired_caps = {}
        desired_caps['platformName'] = 'Android'
        desired_caps['platformVersion'] = '4.2'
        desired_caps['deviceName'] = 'Android Emulator'
        //desired_caps['app'] = 'E://ContactManager.apk'
        desired_caps['appPackage'] = 'com.example.android.contactmanager'
        desired_caps['appActivity'] = '.ContactManager'

        self.driver = webdriver.Remote('http://localhost:4723/wd/hub', desired_caps)

    def tearDown(self):
        self.driver.quit()

    def test_add_contacts(self):
        el = self.driver.find_element_by_accessibility_id("Add Contact")
        el.click()

        textfields = self.driver.find_elements_by_class_name("android.widget.EditText")
        textfields[0].send_keys("Appium User")
        textfields[2].send_keys("someone@appium.io")

        self.assertEqual('Appium User', textfields[0].text)
        self.assertEqual('someone@appium.io', textfields[2].text)

        self.driver.find_element_by_accessibility_id("Save").click()

        # for some reason "save" breaks things
        alert = self.driver.switch_to_alert()

        # no way to handle alerts in Android
        self.driver.find_element_by_android_uiautomator('new UiSelector().clickable(true)').click()

        self.driver.press_keycode(3)

if __name__ == '__main__':
    suite = unittest.TestLoader().loadTestsFromTestCase(ContactsAndroidTests)
    unittest.TextTestRunner(verbosity=2).run(suite)
Desired Capabilities
desired_caps = {}
desired_caps['platformName'] = 'Android'
desired_caps['platformVersion'] = '4.2'
desired_caps['deviceName'] = 'Android Emulator'
desired_caps['app'] = '../../../sample-code/apps/ContactManager/ContactManager.apk'
desired_caps['appPackage'] = 'com.example.android.contactmanager'
desired_caps['appActivity'] = '.ContactManager'
driver = webdriver.Remote('http://localhost:4723/wd/hub', desired_caps)
-
deviceName: Which device to start, a real machine or an emulator? iPhone Simulator, iPad Simulator, iPhone Retina 4-inch, Android Emulator, Galaxy S4...
deviceName is viewed through adb devices
-
Platform Name: Which mobile platform to use? IOS, Android, or Firefox x x OS.
-
Platform Version: The system version of the specified platform. For example, the Android platform, version 5.1.
-
App: The path to the apk file. appium will try to install the app first.
-
appActivity: The Active name of the app to be tested. For example, MainActivity,.Settings. Note that native apps need to be preceded by activity.
-
appPackage: The Java package of the app to be tested. For example, com.example.android.myApp, com.android.settings.
appActivity and appPackage are generally provided by developers, and if they are not available, they can be obtained in the following ways
1. Open apk with winrar
2. Select Android Manifest. XML and right-click to view the file
3, view
Among them: m a n i f e s t "c o M. e x a m p l e. a n d r o I d. c o n t a c t m a n a g e r" is appPackage
Among them: a c t i v i t y. C o n t a c t M a n a g e r is appActivity
v e r s i o n C o d e
 v e r s i o n N a m e
 m i n S d k V e r s i o n   � t a r g e t S d k V e r s i o n   � n a m e   � l a b e l   � i c o n
 d e b u g g a b l e   � a n d r o i d   * h t t p : / / s c h e m a s . a n d r o i d . c o m / a p k / r e s / a n d r o i d       � p a c k a g e    m a n i f e s t   " c o m . e x a m p l e . a n d r o i d . c o n t a c t m a n a g e r   � 1 . 0    u s e s - s d k   � u s e s - p e r m i s s i o n   � a n d r o i d . p e r m i s s i o n . G E T _ A C C O U N T S     a n d r o i d . p e r m i s s i o n . R E A D _ C O N T A C T S   ! a n d r o i d . p e r m i s s i o n . W R I T E _ C O N T A C T S
 a p p l i c a t i o n    a c t i v i t y   � . C o n t a c t M a n a g e r
 i n t e n t - f i l t e r   � a c t i o n   � a n d r o i d . i n t e n t . a c t i o n . M A I N    c a t e g o r y     a n d r o i d . i n t e n t . c a t e g o r y . L A U N C H E R
appium Location Control
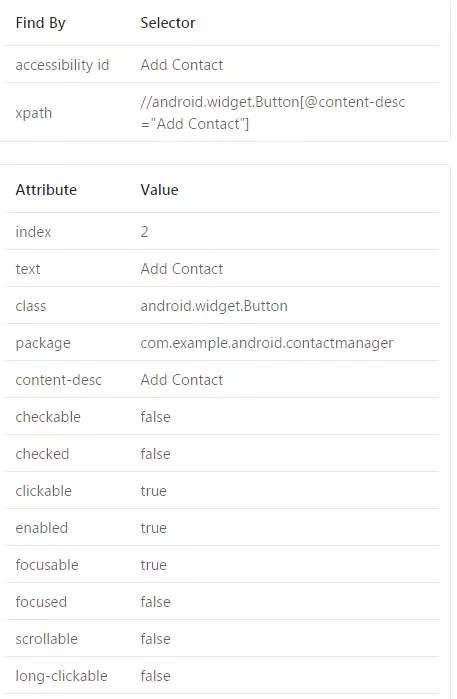
Here you can view the various properties of an object through the Inspector tool that comes with appium. You can also use uiautomatorviewer.bat from android sdk to locate
1. Start appium server
2. Start the simulator and install the APK to be tested: ContactManager.apk (just drag the file into the simulator)
3. Open ContactManager.apk in the simulator and place it on the page to be tested.
4. Click on the Start Inspector session Icon
5. Enter the following at name and value, and click start session to start

appium-1.PNG
platformName  Android
platformVersion  4.2
deviceName  Android Emulator
appPackage  com.example.android.contactmanager
appActivity  ContactManager
The interface is as follows

appium-1png.png
Recording script
Inspector provides simple scripting operations
1. Selecting Recording Scripts
2. Do some operations on the page, such as clicking, etc.
3. You can see that there are scripts on the page, just copy the scripts.
Location element information
Select an element to achieve positioning, and the right side of the page shows the specific content of the element.
Note: If you can't click the mouse to locate, you can choose uiautomatorviewer.bat to locate, or use the two together.
appium-2.PNG
id location
If the API Level of the target device is lower than 18, the UIAutomatorViewer cannot obtain the corresponding Resource ID, which can only be used when it is greater than 18.
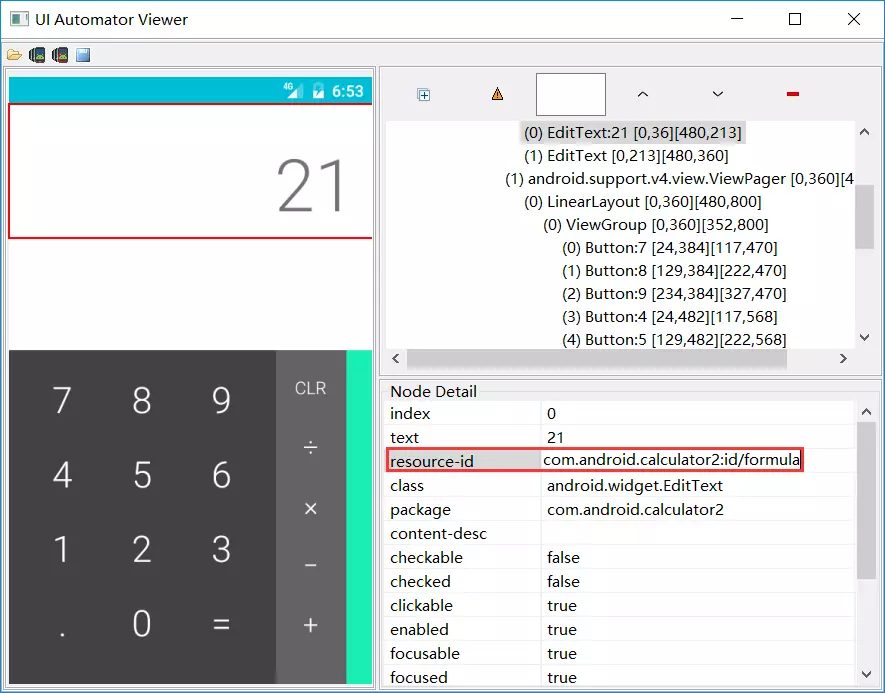
image
resource-id is the ID attribute we understand.
Usage method:
driver.findElement(By.id("com.android.calculator2:id/formula"))
name location
text is the name we're looking for!
Usage method:
driver.findElement(By.name("21"))
Accessibility ID Location
This method belongs to the location method of Appium extension.
In fact, our core is to find the contentDescription attribute of the element. It is the content-desc of the element.
Usage method:
driver.findElementByAccessibilityId("Add contact").click();
Android UI Automator location
This method also belongs to the location method of Appium (Android) extension.
That is to say, any attribute of an element can be positioned by the Android UI Automator method, but the uniqueness of this positioning method should be guaranteed.
Usage method:
driver.find_element_by_android_uiautomator('new UiSelector().text("Custom View")').click()       driver.find_element_by_android_uiautomator('new UiSelector().textContains("View")').click()
driver.findElementByAndroidUIAutomator('new UiSelector().description("equals")").click();
Note that the description() method uses the content-desc attribute.
find_elements_by_class_name method
Method:
- find_elements_by_class_name()
Locate all elements that contain this attribute through the element class name attribute
driver.find_elements_by_class_name('name')
appium API
sendKeys() method
Method:
- sendKeys()
Usage:
driver.findElements(By.name("Name")).sendKeys("jack");
pressKeyCode() method
In addition, the appium extension provides the pressKeyCode() method. This method is Android-specific.
Method:
- pressKeyCode()
The operation of sending a key code. A participant is needed.
driver.pressKeyCode(29); // The letter "a"
driver.pressKeyCode(3);//KEYCODE_HOME
switch_to_alert() method
Method:
- switch_to_alert()
Switch to alert window
driver.switch_to_alert()
click() method
Method:
- click()
Click on a control
element.click()
API Document Reference: http://blog.csdn.net/yangyinsong815/article/details/51235708
Now that all the knowledge points in the script have been explained, let's start running it. Make sure the simulator opens before running!
Real machine running
The simulator can't simulate the real mobile execution, and ultimately our case still needs to be carried out on the real phone.
The difference between real machine and simulator execution is that:
The real machine needs to open USB to debug all items