ListWidget list box component, which is somewhat similar to TreeWidget, except that TreeWidget can realize nested and multi field structure, while ListWidget component can only realize single field structure. ListWidget component is often used to display a single record, such as only IP address, user name and other data. The following notes are some basic operating skills that I often use in development, It includes the basic operation methods of list box components.
Common operation methods between nodes are as follows:
- ListView component and Application Foundation
- ListWidget initialization
- ListWidget change line (trigger event)
- ListWidget edit status settings
- ListWidget select all / deselect all
- ListWidget inverse selection (right error interleaving)
- ListWidget inserts / adds an item at the specified location
- ListWidget deletes the selected item
ListView component and Application Foundation: the function of this component is the same as that of ListWidget, except that ListView cannot realize editing and can only preview.
#include "mainwindow.h"
#include "ui_mainwindow.h"

#include <QListView>
#include <QStandardItem>
#include <QStringListModel>

MainWindow::MainWindow(QWidget *parent) :QMainWindow(parent),ui(new Ui::MainWindow)
{
    ui->setupUi(this);
}

MainWindow::~MainWindow()
{
    delete ui;
}

// Initialize the View component and populate the ListView component with data
// By:LyShark
// https://www.cnblogs.com/lyshark
void MainWindow::on_pushButton_clicked()
{
    QStringList data;
    QStringListModel *model;

    // Append data to ListView
    data << QString("192.168.1.1");
    data << QString("192.168.1.2");
    data << QString("192.168.1.3");
    data << QString("192.168.1.4");

    model = new QStringListModel(data);
    ui->listView->setModel(model);

    // Remove first address
    data.removeAt(0);

    // Refresh ListView again
    model = new QStringListModel(data);
    ui->listView->setModel(model);
}

// Realize interval initialization, one color for each line
void MainWindow::on_pushButton_2_clicked()
{
    QStringList data;
    QStandardItemModel *model = new QStandardItemModel();

    // Clear record
    model->removeRows(0,model->rowCount());

    // Append data to ListView
    data << QString("192.168.1.1");

    // Loop append
    for(int x=2; x<5; x++)
    {
        data << QString("192.168.1.%0").arg(x);
    }

    // Output to ListView record
    int nCount = data.size();
    for(int x=0; x<nCount; x++)
    {
        QString string = static_cast<QString>(data.at((x)));  // Strong conversion to QString type
        QStandardItem *item = new QStandardItem(string);

        if(x%2 == 0)
        {
            // Set color
            QLinearGradient linear_grad(QPointF(0,0),QPointF(200,200));
            linear_grad.setColorAt(0,Qt::darkGreen);

            QBrush brush(linear_grad);
            item->setBackground(brush);
        }
        // Append to mode model
        model->appendRow(item);
    }

    // Set model
    ui->listView->setModel(model);
    //ui->listView->setFixedSize(200,300);
}
The code runs as follows:
In the above code, most of us are using the View component. Next, we will specifically analyze the use details of the Widget component. The View component and the Widget component seem to be consistent, but there are essential differences. The general differences are as follows:
- The Widget component can directly operate a specific data set through a series of functions such as AddItem. The component also has the ability of direct editing.
- The View component works based on the Model mapping. Each time you operate data, you need to operate with the help of the QAbstractListModel data Model.
In short, the View component is suitable for browsing scenes with more data, because it is bound with a linked list structure, so it is more flexible in data display, while the Widget component is more suitable for use scenes with more data to update or modify.
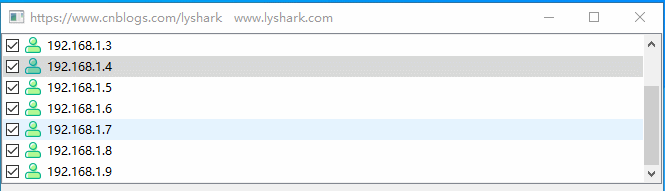
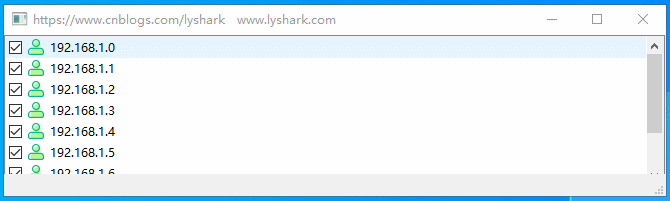
ListWidget node initialization: node initialization is to insert a qlistwidgettitem class into the widget component.
// Initialize listWidget
// By: LyShark
void MainWindow::on_pushButton_clicked()
{
    // Each line is a QListWidgetItem
    QListWidgetItem *aItem;

    // ICON for setting ICON
    QIcon aIcon;
    aIcon.addFile(":/image/1.ico");

    ui->listWidget->clear();
    for(int x=0;x<10;x++)
    {
        QString str = QString::asprintf("192.168.1.%d",x);
        aItem = new QListWidgetItem();   // Create a new item

        aItem->setText(str);                   // Set text label
        aItem->setIcon(aIcon);                 // Settings Icon
        aItem->setCheckState(Qt::Checked);     // Set as selected
        aItem->setFlags(Qt::ItemIsSelectable |  // Set to non editable
                         Qt::ItemIsUserCheckable
                        |Qt::ItemIsEnabled);

        ui->listWidget->addItem(aItem); //Add item
    }
}
The code runs as follows:
Text change in ListWidget line: when we click any list option in the line, we let it trigger currentItemChanged and update the changed line to the form.
// The currently selected item of listWidget has changed
// By: LyShark
void MainWindow::on_listWidget_currentItemChanged(QListWidgetItem *current, QListWidgetItem *previous)
{
    QString str;
    if (current != NULL) //You need to check whether the variable pointer is null
    {
      if (previous==NULL)  //You need to check whether the variable pointer is null
      {
          str="Current:"+current->text();
          this->setWindowTitle(QString(current->text()));
      }
      else
      {
        str="Previous:" + previous->text() + "; Current item:" + current->text();
        std::cout << str.toStdString().data() << std::endl;
        this->setWindowTitle(QString(current->text()));
      }
    }
}
The code runs as follows:
ListWidget editing status setting: by default, all files in the ListWidget component are non editable, and we can also open the editing property.
// Set all items to editable
// https://www.cnblogs.com/lyshark
void MainWindow::on_pushButton_5_clicked()
{
    int x,cnt;
    QListWidgetItem *aItem;

    cnt = ui->listWidget->count();
    for(x=0;x<cnt;x++)
    {
        aItem = ui->listWidget->item(x);
        aItem->setFlags(Qt::ItemIsSelectable | Qt::ItemIsEditable
                        |Qt::ItemIsUserCheckable |Qt::ItemIsEnabled);
    }
}
The code runs as follows:
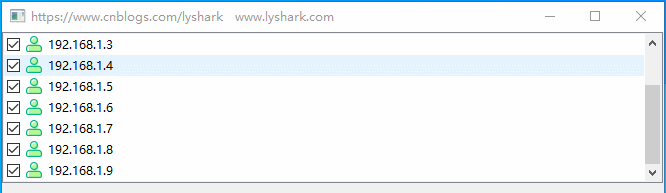
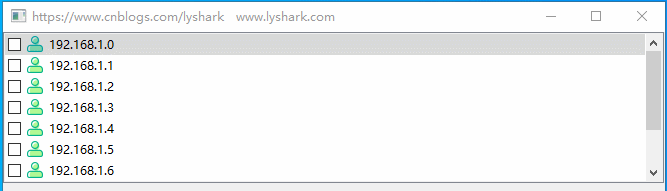
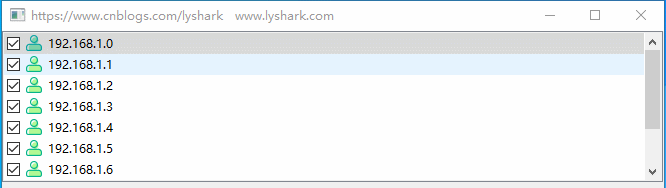
ListWidget select all / deselect all: select all, as the name suggests, is to select all the data in the menu. Use aitem - > setcheckstate (QT:: checked) to select, and then cycle counting.
// Select all button
// https://www.cnblogs.com/lyshark
void MainWindow::on_pushButton_2_clicked()
{
    int cnt = ui->listWidget->count();   // Get total
    for(int x=0;x<cnt;x++)
    {
        QListWidgetItem *aItem = ui->listWidget->item(x);  // Gets a pointer to an item
        aItem->setCheckState(Qt::Checked);                 // Set as selected
    }

}

// None
// By: LyShark
void MainWindow::on_pushButton_3_clicked()
{
    int cnt = ui->listWidget->count();   // Get total
    for(int x=0;x<cnt;x++)
    {
        QListWidgetItem *aItem = ui->listWidget->item(x);  // Gets a pointer to an item
        aItem->setCheckState(Qt::Unchecked);               // Set to unchecked
    }
}
The code runs as follows:
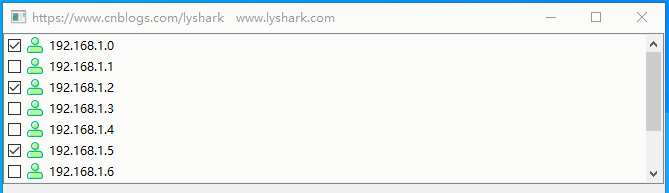
ListWidget inverse selection function: inverse selection means that after the user selects the menu, it will become unselected, unselected will become selected, and only one judgment needs to be added.
// By: LyShark
void MainWindow::on_pushButton_4_clicked()
{
    int x,cnt;
    QListWidgetItem *aItem;

    cnt = ui->listWidget->count();
    for(x=0;x<cnt;x++)
    {
        aItem = ui->listWidget->item(x);
        if(aItem->checkState() != Qt::Checked)
            aItem->setCheckState(Qt::Checked);
        else
            aItem->setCheckState(Qt::Unchecked);
    }
}
The code runs as follows:
ListWidget specified position insert / append insert: insert a new table item above the selected row and append to the last row.
// Insert an item at the specified location
// www.cnblogs.com/lyshark
void MainWindow::on_pushButton_8_clicked()
{
    QIcon aIcon;
    aIcon.addFile(":/image/3.ico");

    QListWidgetItem *aItem = new QListWidgetItem("Inserted data");
    aItem->setIcon(aIcon);
    aItem->setCheckState(Qt::Checked);
    aItem->setFlags(Qt::ItemIsSelectable |Qt::ItemIsUserCheckable |Qt::ItemIsEnabled);

    // Inserts an item above the current row
    ui->listWidget->insertItem(ui->listWidget->currentRow(),aItem);
}

// Add one item, and add at the end
void MainWindow::on_pushButton_7_clicked()
{
    QIcon aIcon;
    aIcon.addFile(":/image/2.ico");

    QListWidgetItem *aItem = new QListWidgetItem("New item");   // Add project name
    aItem->setIcon(aIcon);                                       // Settings Icon
    aItem->setCheckState(Qt::Checked);                           // Set as selected
    aItem->setFlags(Qt::ItemIsSelectable |Qt::ItemIsUserCheckable |Qt::ItemIsEnabled);
    ui->listWidget->addItem(aItem);                              // Add to control
}
The code runs as follows:
ListWidget delete selected item: deletes the currently selected item, and cleans up and releases memory.
// Delete selected item
void MainWindow::on_pushButton_6_clicked()
{
    int row = ui->listWidget->currentRow(); // Get current row
    QListWidgetItem *aItem = ui->listWidget->takeItem(row);  // Removes the item from the specified row without deleting it
    delete aItem;                                            // Free up space
}
The code runs as follows: