As the last article in this series, here's how Arduino simulates USB devices, such as keyboard and mouse. For example, if you do hardware plug-ins, you can use the functions provided by Arduino here.
Keyboard
First, let's take a look at a section of chestnuts provided in Arduino Chinese community 1
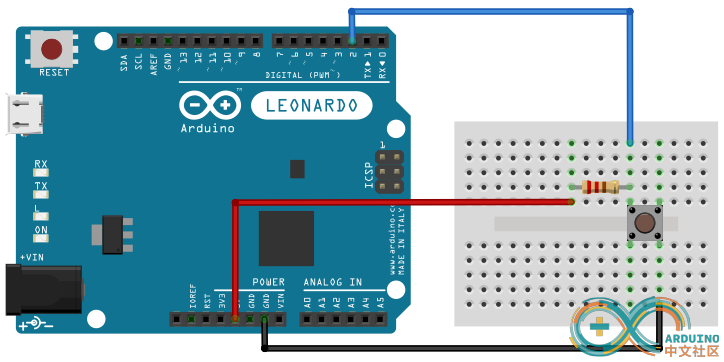
VCC 5V is connected in series with a 1K ohm resistor, and then one end of the resistor is connected to Arduino pin and the other end is connected to switch. The other pin of the switch is grounded. When the switch is not turned on, the potential of input pin 4 is low because VCC is grounded. When the switch is pressed, the VCC and ground are blocked, and pin 4 receives a high-level signal. Therefore, after each press of the switch, the counter increases by 1.
So we get a simple USB control code, which is roughly as follows:
#include "Keyboard.h"

const int buttonPin = 4;          // Key connection pin
int previousButtonState = HIGH;   // Previous key status
int counter = 0;                  // Key counter

void setup() {
  // Initialize the key pin. If there is no pull-up resistance, input is required_ PULLUP
  pinMode(buttonPin, INPUT);
  // Initialize analog keyboard function
  Keyboard.begin();
}

void loop() {
  // Read key status
  int buttonState = digitalRead(buttonPin);
  // If the key state changes and the current key state is high
  if ((buttonState != previousButtonState) && (buttonState == HIGH)) {
    // Key counter plus 1
    counter++;
    // Analog keyboard output information
    Keyboard.print("You pressed the button ");
    Keyboard.print(counter);
    Keyboard.println(" times.");
  }
  // Save the current key state for the next comparison
  previousButtonState = buttonState;
}
Back to the official documents, it provides the USB connection scheme of keyboard and mouse respectively. For the keyboard, the first thing to note is:
Non printed characters in ASC II table, i.e. EOF, buzzer and other control characters, cannot be processed.
In addition, Arduino supports the main control board based on 32u4 and SAMD series, such as SAMD21 connected to the computer. As for whether it's important or not, I think for those of us who focus on software, as long as we can verify the scheme, we don't need to spend too much time on the selection of embedded chip and main control board. If there are conditions, it is better for a friend who is mainly engaged in software and a friend who is mainly engaged in hardware to work together on equipment.
Oh, by the way, one more word. If you have used the USB module and have let the program run, it will be very difficult to try to modify the code at this time. Because Arduino will take over your mouse and keyboard, because the program processing efficiency is many times higher than manual. So you'll find that the mouse will wander around, or the keyboard will keep outputting characters.
The solution is, for example, to add a button when designing the circuit. When you press the button, start the USB hosting program. When you press the button again, turn off the USB hosting function, which is convenient for you to debug. In addition, before officially running the program, the official recommends that you use serial Print print the running results to verify whether the program is correct, and then connect it to the USB library.
Of course, you can also ignore these warning s.
Open keyboard simulation keyboard begin()
For Leonardo and Due boards, the meaning of this function is to start a virtual keyboard and connect it to the computer. If you need to terminate the connection, use keyboard end().
#include <Keyboard.h>

void setup() {
  // make pin 2 an input and turn on the
  // pullup resistor so it goes high unless
  // connected to ground:
  pinMode(2, INPUT_PULLUP);
  Keyboard.begin();
}

void loop() {
  //if the button is pressed
  if (digitalRead(2) == LOW) {
    //Send the message
    Keyboard.print("Hello!");
  }
}
Turn off keyboard emulation end()
There's nothing to say, just turn off keyboard simulation
Long press the keyboard press()
This is a very useful instruction for inputting a pressed key to the computer, just like you need to press WSAD for a long time in order to control the character to move back and forth, left and right in FPS game. Then release a key and use keyboard Release() or keyboard releaseAll().
#include <Keyboard.h>

// use this option for OSX:
char ctrlKey = KEY_LEFT_GUI;
// use this option for Windows and Linux:
//  char ctrlKey = KEY_LEFT_CTRL;

void setup() {
  // make pin 2 an input and turn on the
  // pullup resistor so it goes high unless
  // connected to ground:
  pinMode(2, INPUT_PULLUP);
  // initialize control over the keyboard:
  Keyboard.begin();
}

void loop() {
  while (digitalRead(2) == HIGH) {
    // do nothing until pin 2 goes low
    delay(500);
  }
  delay(1000);
  // new document:
  Keyboard.press(ctrlKey);
  Keyboard.press('n');
  delay(100);
  Keyboard.releaseAll();
  // wait for new window to open:
  delay(1000);
}
Tap the keyboard print()
Simulate knocking events, such as simulated text input. You can use this command. However, it should be noted that all keyboard related instructions need to be in keyboard Begin() is not valid until it is set.
#include <Keyboard.h>

void setup() {
  // make pin 2 an input and turn on the
  // pullup resistor so it goes high unless
  // connected to ground:
  pinMode(2, INPUT_PULLUP);
  Keyboard.begin();
}

void loop() {
  //if the button is pressed
  if (digitalRead(2) == LOW) {
    //Send the message
    Keyboard.print("Hello!");
  }
}
Knocking event keyboard with carriage return println()
Similar to the above functions, the difference is that there is an additional carriage return function.
#include <Keyboard.h>

void setup() {
  // make pin 2 an input and turn on the
  // pullup resistor so it goes high unless
  // connected to ground:
  pinMode(2, INPUT_PULLUP);
  Keyboard.begin();
}

void loop() {
  //if the button is pressed
  if (digitalRead(2) == LOW) {
    //Send the message
    Keyboard.println("Hello!");
  }
}
Release the key keyboard release()
It corresponds to the Press function, but release is to release specific keys
#include <Keyboard.h>

// use this option for OSX:
char ctrlKey = KEY_LEFT_GUI;
// use this option for Windows and Linux:
//  char ctrlKey = KEY_LEFT_CTRL;

void setup() {
  // make pin 2 an input and turn on the
  // pullup resistor so it goes high unless
  // connected to ground:
  pinMode(2, INPUT_PULLUP);
  // initialize control over the keyboard:
  Keyboard.begin();
}

void loop() {
  while (digitalRead(2) == HIGH) {
    // do nothing until pin 2 goes low
    delay(500);
  }
  delay(1000);
  // new document:
  Keyboard.press(ctrlKey);
  Keyboard.press('n');
  delay(100);
  Keyboard.release(ctrlKey);
  Keyboard.release('n');
  // wait for new window to open:
  delay(1000);
}
Release all keys keyboard releaseAll()
It is similar to the above function, but it releases all keys.
Send a single tapping command keyboard write()
The function is similar to that of print and println, except that it is a tapping instruction that sends only one key.
Keyboard.write(65);         // sends ASCII value 65, or A
Keyboard.write('A');            // same thing as a quoted character
Keyboard.write(0x41);       // same thing in hexadecimal
Keyboard.write(0b01000001); // same thing in binary (weird choice, but it works)
It should be noted that no matter the println, print or write commands, only ASC II printable characters can be sent. In other words, the keys you can hit on the keyboard, such as ABCD of characters, 1234 of numbers, or spaces, enter, Ctrl and so on. The character string stop character \ 0, article EOF character, buzzer and other control command characters cannot be used.
Mouse
After talking about the keyboard, we need to introduce the control of the mouse. However, the precautions and support are the same as the keyboard, so I won't go into too much detail here.
Turn on mouse to simulate mouse begin()
Start the mouse simulation. If you need to close the mouse simulation, you can use mouse End() closes.
#include <Mouse.h>

void setup() {
  pinMode(2, INPUT);
}

void loop() {
  //initiate the Mouse library when button is pressed
  if (digitalRead(2) == HIGH) {
    Mouse.begin();
  }
}
Mouse click event mouse click()
Send instant mouse click events, such as your usual left-click selection or right-click menu.
Function prototype
- Mouse.click()
- Mouse.click(button)
Parameter description
There are usually three keys to choose from, left, right, and CSCEC.
- MOUSE_LEFT (default)
- MOUSE_RIGHT
- MOUSE_MIDDLE
Close mouse simulation mouse end()
There's nothing to say, just turn off the mouse simulation.
Mouse movement event mouse move()
Move the cursor to the specified position.
Function prototype
Mouse.move(xVal, yVal, wheel)
Parameter description
- xVal: amount to move along the x-axis. Allowed data types: signed char.
- yVal: amount to move along the y-axis. Allowed data types: signed char.
- wheel: amount to move scroll wheel. Allowed data types: signed char.
#include <Mouse.h>

const int xAxis = A1;         //analog sensor for X axis
const int yAxis = A2;         // analog sensor for Y axis

int range = 12;               // output range of X or Y movement
int responseDelay = 2;        // response delay of the mouse, in ms
int threshold = range / 4;    // resting threshold
int center = range / 2;       // resting position value
int minima[] = {1023, 1023};  // actual analogRead minima for {x, y}
int maxima[] = {0, 0};        // actual analogRead maxima for {x, y}
int axis[] = {xAxis, yAxis};  // pin numbers for {x, y}
int mouseReading[2];          // final mouse readings for {x, y}


void setup() {
  Mouse.begin();
}

void loop() {
  // read and scale the two axes:
  int xReading = readAxis(0);
  int yReading = readAxis(1);

  // move the mouse:
  Mouse.move(xReading, yReading, 0);
  delay(responseDelay);
}

/*
  reads an axis (0 or 1 for x or y) and scales the
  analog input range to a range from 0 to <range>
*/

int readAxis(int axisNumber) {
  int distance = 0; // distance from center of the output range

  // read the analog input:
  int reading = analogRead(axis[axisNumber]);

  // of the current reading exceeds the max or min for this axis,
  // reset the max or min:
  if (reading < minima[axisNumber]) {
    minima[axisNumber] = reading;
  }
  if (reading > maxima[axisNumber]) {
    maxima[axisNumber] = reading;
  }

  // map the reading from the analog input range to the output range:
  reading = map(reading, minima[axisNumber], maxima[axisNumber], 0, range);

  // if the output reading is outside from the
  // rest position threshold,  use it:
  if (abs(reading - center) > threshold) {
    distance = (reading - center);
  }

  // the Y axis needs to be inverted in order to
  // map the movemment correctly:
  if (axisNumber == 1) {
    distance = -distance;
  }

  // return the distance for this axis:
  return distance;
}
Long press mouse press()
For example, when you pull a selection box or drag, you can usually achieve this function together with the move function. When you need to release, you can use mouse release().
Function prototype
- Mouse.press()
- Mouse.press(button)
Parameter description
- MOUSE_LEFT (default)
- MOUSE_RIGHT
- MOUSE_MIDDLE
#include <Mouse.h>

void setup() {
  //The switch that will initiate the Mouse press
  pinMode(2, INPUT);
  //The switch that will terminate the Mouse press
  pinMode(3, INPUT);
  //initiate the Mouse library
  Mouse.begin();
}

void loop() {
  //if the switch attached to pin 2 is closed, press and hold the left mouse button
  if (digitalRead(2) == HIGH) {
    Mouse.press();
  }
  //if the switch attached to pin 3 is closed, release the left mouse button
  if (digitalRead(3) == HIGH) {
    Mouse.release();
  }
}
Press the mouse button to release mouse release()
If a key in the mouse is pressed, use this function to release the key.
Function prototype
- Mouse.release()
- Mouse.release(button)
Parameter description
- MOUSE_LEFT (default)
- MOUSE_RIGHT
- MOUSE_MIDDLE
Mouse state detection mouse isPressed()
If a mouse button is pressed, or mouse If press sends a long press command, it returns true
Function prototype
- Mouse.isPressed();
- Mouse.isPressed(button);
Parameter description
- MOUSE_LEFT (default)
- MOUSE_RIGHT
- MOUSE_MIDDLE
#include <Mouse.h>

void setup() {
  //The switch that will initiate the Mouse press
  pinMode(2, INPUT);
  //The switch that will terminate the Mouse press
  pinMode(3, INPUT);
  //Start serial communication with the computer
  Serial.begin(9600);
  //initiate the Mouse library
  Mouse.begin();
}

void loop() {
  //a variable for checking the button's state
  int mouseState = 0;
  //if the switch attached to pin 2 is closed, press and hold the left mouse button and save the state ina  variable
  if (digitalRead(2) == HIGH) {
    Mouse.press();
    mouseState = Mouse.isPressed();
  }
  //if the switch attached to pin 3 is closed, release the left mouse button and save the state in a variable
  if (digitalRead(3) == HIGH) {
    Mouse.release();
    mouseState = Mouse.isPressed();
  }
  //print out the current mouse button state
  Serial.println(mouseState);
  delay(10);
}
Arduino analog USB keyboard https://www.arduino.cn/thread-81605-1-1.html ↩︎