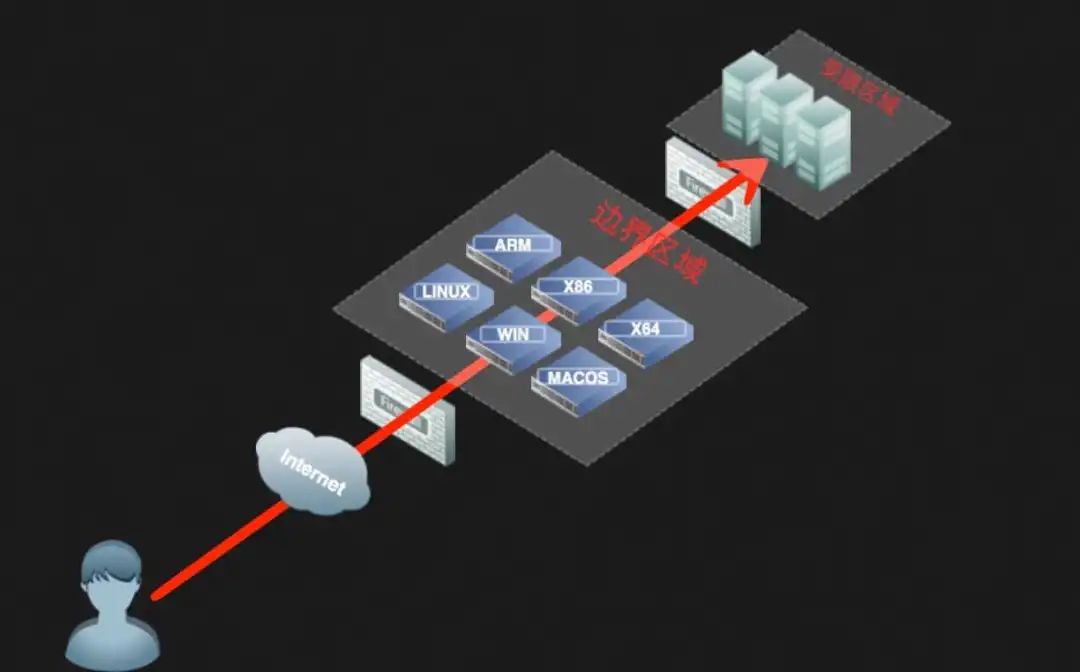
0x00 Preface
From the perspective of penetration, this paper summarizes several commonly used personal intranet penetration and Intranet proxy tools, and introduces their simple principles and use methods.
0x01 nps-npc
1.1 Introduction
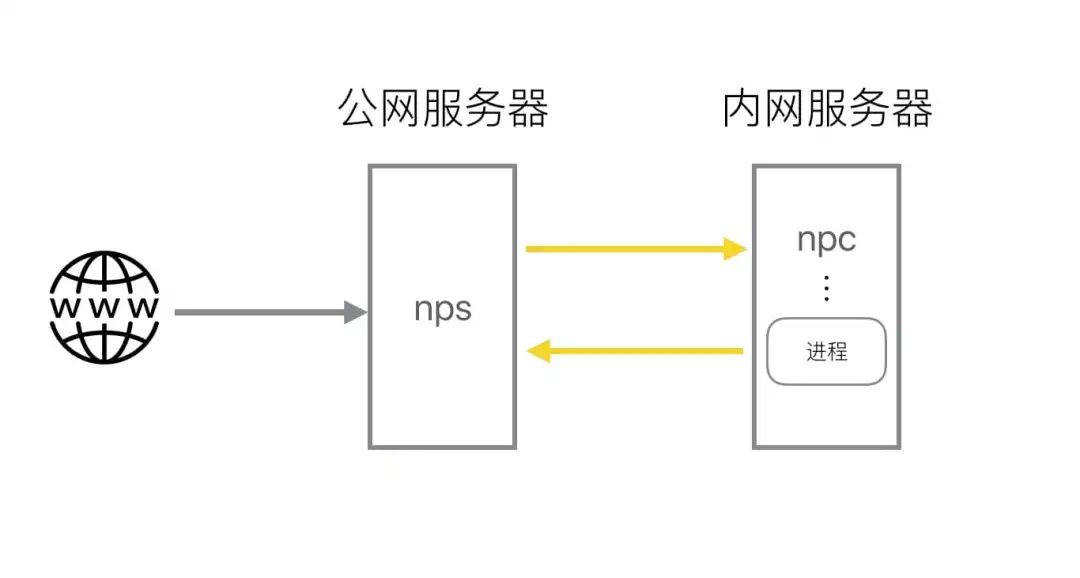
nps is a lightweight, high performance and powerful intranet penetration proxy server. At present, it supports tcp, udp traffic forwarding, and can support any tcp, udp upper protocol (access to intranet website, debugging of local payment interface, ssh access, remote desktop, intranet dns resolution, etc.). It also supports http proxy, socks5 proxy, p2p proxy for intranet, and has a powerful web management end.
- A public network IP server (VPS) running server (NPS)
- One or more servers or PCs running on the intranet (NPC)
1.2 Features
- Go Language Writing
- Support cross-platform
- Proxy supporting multiple protocols
- web Administrator
1.3 Usage
https://github.com/ehang-io/nps/releases
NPS
Installation Configuration
Find your own server version:
cd ~
wget https://github.com/cnlh/nps/releases/download/v0.23.2/linux_amd64_server.tar.gz
tar xzvf linux_amd64_server.tar.gz
cd ~/nps
There will be an NPs executable, a conf configuration directory, and a web page directory under the NPs directory. We just need to modify conf/nps.conf:
vim conf/nps.conf
You need to change the parameters below #web.
web_host= The server IP Or domain name
web_username= admin(Login User Name)
web_password= Your password
web_port=8080(web Manage Ports)
Modify #bridge to change NPC's connection port. For example, if we get a server with limited permissions and have a firewall, only some ports (80,443) may be able to go out of the network, we need to modify to go out of the network port.
##bridge
bridge_type=tcp
bridge_port=443  # Modify Connection Port
bridge_ip=0.0.0.0
start-up
#Mac/Linux
./nps test|start|stop|restart|status  Test Profile|start-up|Stop it|restart|state

#Windows
nps.exe test|start|stop|restart|status Test Profile|start-up|Stop it|restart|state
NPC
./npc -server=Your IP:8024 -vkey=Unique authentication password -type=tcp
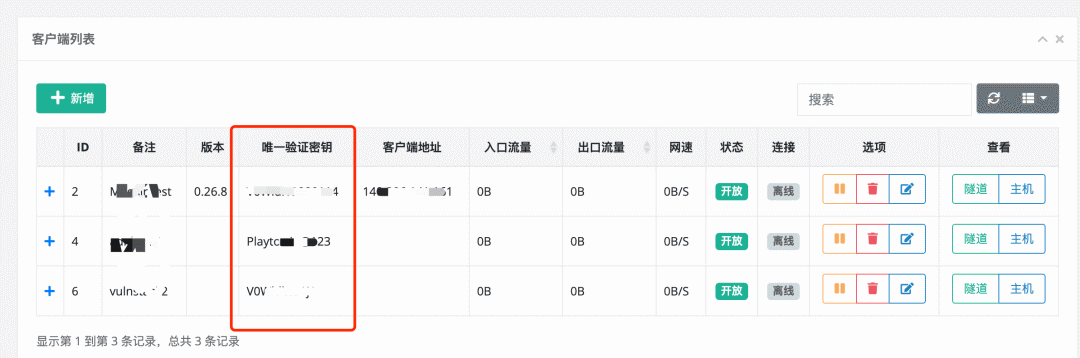
When you have created a new client, you can also see in +, detailed client connection commands:

web Administrator
Client connections can be added in the client interface in new ways, and the vkey s for each connection are uniquely distinguished.
Each client, after establishing a connection, can set up several tunnels of different protocols, one of which is a different proxy.
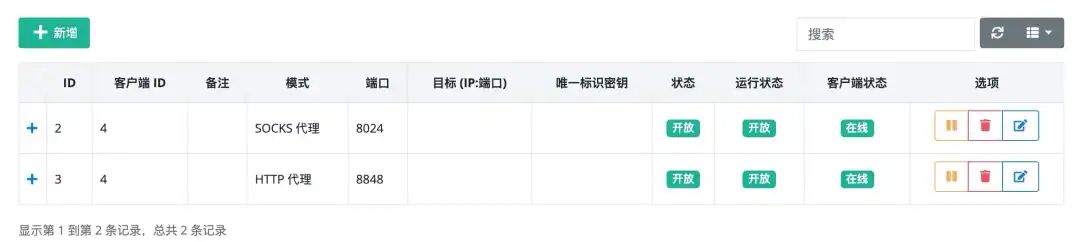
The proxy's internal network machines can be connected through different protocols and ports.
0x02 frp
2.1 Introduction
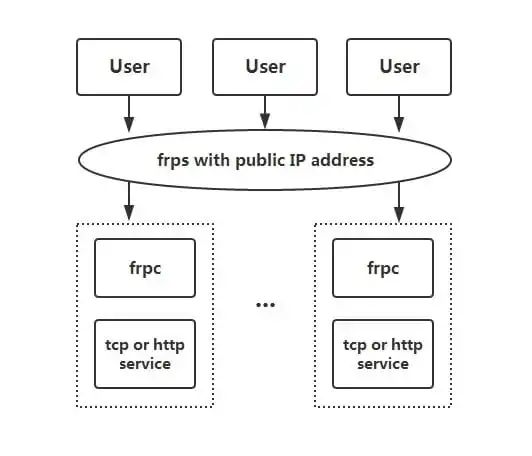
frp is a high-performance reverse proxy application focused on Intranet penetration, supporting TCP, UDP, HTTP, HTTPS and other protocols. Intranet services can be exposed to the public network in a secure and convenient way through transits with public IP nodes.
2.2 Features
- Client-server communication supports many protocols, such as TCP, KCP, and Websocket.
- Port reuse where multiple services are exposed through the same service end port.
- Cross-platform, but less support than nps
- A variety of plug-ins, providing many functions
2.3 Usage
Download: https://github.com/fatedier/frp/releases
The following are excerpts from: https://segmentfault.com/a/1190000021876836
1. Access home machines via rdp
1. Modify the frps.ini file. For security reasons, it's a good idea to configure authentication here. If the token parameter in the common configuration is consistent between the server and the client, the authentication will pass:
# frps.ini
[common]
bind_port = 7000
# For authentication, modify it yourself to ensure that the server side is consistent with the client side
token = abcdefgh
2. Start frps:
./frps -c ./frps.ini
3. Modify the frpc.ini file and assume that the network IP of the server on which frps resides is x.x.x:
# frpc.ini[common]server_addr = x.x.x.xserver_port = 7000# For authentication, modify it yourself to ensure that the server and client are consistent token = abcdefgh[rdp]type = tcplocal_ IP = 127.0.0.1 local_ Port = 3389remote_ Port = 6000
4. Start frpc:
./frpc -c ./frpc.ini
5. Access remote machines via rdp at:
x.x.x.x:6000
Start-Up Self-Starting
For Windows systems, for ease of use, you can configure the startup time to start silently.
1. Create a start_in the same directory as frpc.exe Frpc.vbs:
'start_frpc.vbs'Modify the path as appropriate CreateObject("WScript.Shell").Run """D:\Program Files\frp_windows_amd64\frpc.exe""" & "-c" & """D:\Program Files\frp_windows_amd64\frpc.ini""",0
2. Copy start_frpc.vbs file, open the following directory, note that the
<USER_NAME>
Change to your user name:
C:\Users\<USER_NAME>\AppData\Roaming\Microsoft\Windows\Start Menu\Programs\Startup
3. Right-click and paste as a shortcut.
2. Access corporate intranet machines via SSH
The deployment steps for frps are the same as above.
1. Start frpc with the following configuration:
# frpc.ini
[common]
server_addr = x.x.x.x
server_port = 7000
# For authentication, modify it yourself to ensure that the server side is consistent with the client side
token = abcdefgh

[ssh]
type = tcp
local_ip = 127.0.0.1
local_port = 22
remote_port = 6000
2. Access intranet machines via SSH, assuming the user name is test:
ssh -oPort=6000 test@x.x.x.x
3. Access Web services deployed on the intranet through a custom domain name
Sometimes you want others to access or test the Web services we set up locally through the domain name, but because the local machine does not have a public network IP, you cannot resolve the domain name to the local machine. You can do this through frp. The following example is http service. The HTTPS service is configured the same way, vhost_ Http_ Replace port with vhost_https_port, type set to https.
1. Modify the frps.ini file to set the http access port to 8080:
# frps.ini
[common]
bind_port = 7000
vhost_http_port = 8080
# For authentication, modify it yourself to ensure that the server side is consistent with the client side
token = abcdefgh
2. Start frps:
./frps -c ./frps.ini
3. Modify the frpc.ini file, assuming that the IP of the server on which frps resides is x.x.x, local_port is the port for the Web service on the local machine and binds the custom domain name www.yourdomain.com:
# frpc.ini
[common]
server_addr = x.x.x.x
server_port = 7000
# For authentication, modify it yourself to ensure that the server side is consistent with the client side
token = abcdefgh

[web]
type = http
local_port = 80
custom_domains = www.yourdomain.com
4. Start frpc:
./frpc -c ./frpc.ini
5. Resolve the domain name A record of www.yourdomain.com to IP x.x.x. If the server already has a corresponding domain name, you can also resolve the CNAME record to the original domain name of the server.
6. Access through browser http://www.yourdomain.com:8080 You can access Web services that are available on Intranet machines.
4. Simple file access services
By static_ The file plug-in provides a simple HTTP-based file access service to the outside world.
The deployment steps for frps are the same as above.
1. Start frpc and enable static_file plug-in, configured as follows:
# frpc.ini
[common]
server_addr = x.x.x.x
server_port = 7000
# For authentication, modify it yourself to ensure that the server side is consistent with the client side
token = abcdefgh

[test_static_file]
type = tcp
remote_port = 6000
plugin = static_file
# File directories to expose
plugin_local_path = /tmp/file
# The prefix that will be removed from the access url, and what remains is the file path to access
plugin_strip_prefix = static
plugin_http_user = abc
plugin_http_passwd = abc
2. Access through browser http://x.x.x.x:6000/static/ To view files located in the / tmp/file directory, you will be asked to enter a user name and password that you have set up.
Common Functions
Statistics panel (Dashboard)
View frp status and proxy statistics display through a browser.
Note: Dashboard has not been optimized for a large number of proxy data presentations. Do not enable this feature if Dashboard has slow access.
This functionality can be turned on by specifying the port used by the dashboard service in frps.ini:
[common]
dashboard_port = 7500
# dashboard username password, admin by default
dashboard_user = admin
dashboard_pwd = admin
Open the browser to access the dashboard interface through http://[server_addr]:7500, with the user name password defaulting to admin.
Encryption and Compression
These two functions are not turned on by default and need to be configured in frpc.ini to enable encryption and compression for the specified proxy using snappy:
# frpc.ini
[ssh]
type = tcp
local_port = 22
remote_port = 6000
use_encryption = true
use_compression = true
If your intranet firewall identifies and blocks traffic to external networks, such as prohibiting SSH protocols, set use_encryption = true, encrypting the communication between frpc and frps will effectively prevent traffic from being intercepted.
If the transmitted message is longer, set use_compression = true compresses the transmitted content, which effectively reduces network traffic between frpc and frps and speeds up traffic forwarding, but consumes additional CPU resources.
[TLS
Encrypted transmission via TLS protocol between FRPC and frps has been supported since v0.25.0. Configure tls_in common of frpc.ini Enable = true to enable this feature, which is more secure.
For port reuse, the first byte frp makes a TLS connection is 0x17.
Note: With this feature enabled, you do not need to set use_except xtcp Encryption.
Agent Speed Limit
It is currently supported to set proxy-level limits in client proxy configurations to limit the bandwidth that a single proxy can consume.
# frpc.ini
[ssh]
type = tcp
local_port = 22
remote_port = 6000
bandwidth_limit = 1MB
Increase bandwidth_in proxy configuration The limit field enables this functionality and currently only supports MB and KB units.
Range Port Mapping
Mapping multiple ports can be specified in the frpc configuration file and only tcp and udp types are currently supported.
This functionality is achieved through the range:paragraph tag, which is resolved by the client and split into multiple proxy es, each named after a number.
For example, to map the local 6000-6005, 6007 ports, the main configuration is as follows:
# frpc.ini
[range:test_tcp]
type = tcp
local_ip = 127.0.0.1
local_port = 6000-6006,6007
remote_port = 6000-6006,6007
When the actual connection succeeds, eight proxy s are created named test_ Tcp_ 0, test_ Tcp_ 1... Test_ Tcp_ 7.
0x03 ew
3.1 Introduction
EW is a portable network penetration tool with two core functions of SOCKS v5 service setup and port forwarding. It can complete network penetration in complex network environment. However, the tool is no longer updated.
3.2 Features
- Lightweight, C-language writing
- Multilevel agents can be set
- cross platform
- But only Socks5 proxy is supported
3.3 Usage
The following methods of use are all taken from: http://rootkiter.com/EarthWorm/
All the examples below, if the proxy port is 1080 without special instructions, are SOCKSv5 proxy services.
The tool has six command formats (ssocksd, rcsocks, rssocks, lcx_slave, lcx_listen, lcx_tran).
1. Forward SOCKS v5 Server
$ ./ew -s ssocksd -l 1080
2. Bounce SOCKS v5 Server
This is done in two steps:
a) First run the following command on a host A with public network ip:
$ ./ew -s rcsocks -l 1080 -e 8888
b) Start SOCKS v5 service on target host B and bounce back to port 8888 of public network host
$ ./ew -s rssocks -d 1.1.1.1 -e 8888
Success.
3. Multilevel Cascade
There are three ports in the tool to forward instructions, and their parameter formats are:
$ ./ew -s lcx_listen -l  1080   -e 8888
$ ./ew -s lcx_tran   -l  1080   -f 2.2.2.3 -g 9999
$ ./ew -s lcx_slave  -d 1.1.1.1 -e 8888    -f 2.2.2.3  -g  9999
These port forwarding instructions allow TCP-based services deep in the network to be forwarded to the root, such as SOCKS v5. First, two local SOCKS test samples of "secondary cascade" are provided:
A) lcx_ Usage of tran
$ ./ew -s ssocksd  -l 9999
$ ./ew -s lcx_tran -l 1080 -f 127.0.0.1 -g 9999
b) lcx_listen, lcx_ Use of slave
$ ./ew -s lcx_listen -l 1080 -e 8888
$ ./ew -s ssocksd    -l 9999
$ ./ew -s lcx_slave  -d 127.0.0.1 -e 8888 -f 127.0.0.1 -g 9999
Provide a local SOCKS test case of Level 3 Cascade for reference
$ ./ew -s rcsocks -l 1080 -e 8888
$ ./ew -s lcx_slave -d 127.0.0.1 -e 8888 -f 127.0.0.1 -g 9999
$ ./ew -s lcx_listen -l 9999 -e 7777
$ ./ew -s rssocks -d 127.0.0.1 -e 7777
Data flow direction: SOCKS V5 -> 1080 -> 8888 -> 9999 -> 7777 -> rssocks
0x04 ngrok
4.1 Introduction
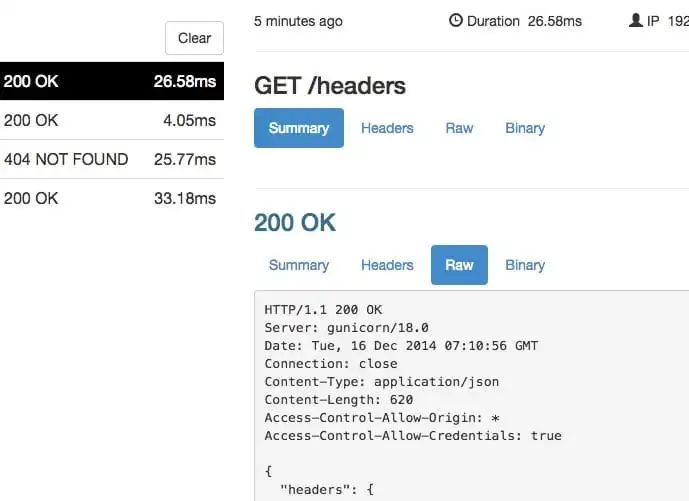
Ngrok is a reverse proxy that exposes the services of an intranet host to an external network by establishing a secure channel between a public endpoint and a locally running Web server. Ngrok can capture and analyze traffic on all channels for later analysis and replay, so ngrok can easily assist server program testing.
4.2 Features
- Official maintenance, generally stable
- Cross-platform, closed source
- With traffic recording and redirection
4.3 Usage
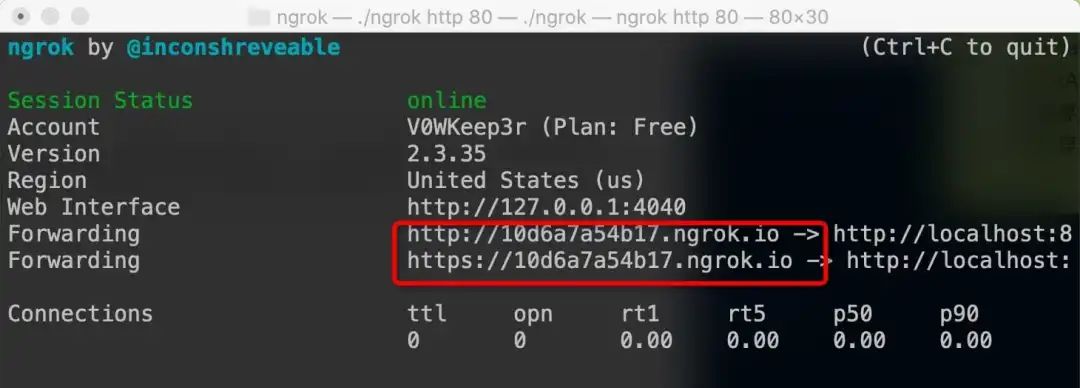
- Enter the ngrok website ( https://ngrok.com/ ), register your ngrok account and download ngrok;
- Run the following authorization command according to the authorization code given by the official website;
- ./ngrok authtoken 1hAotxhmORtzCYvUc3BsxDBPh1H_******************
- . /ngrok http 80 exposes the machine's 80-port http service to the public network and provides a public domain name.
Packets and traffic can be viewed through the UI interface of the official website (but for a fee=,)
You can also expose files and other TCP services on your intranet to the public through some commands.
Authorized Settings File Sharing
ngrok http -auth="user:password" file:///Users/alan/share
Unauthorized Settings File Sharing
ngrok http "file:///C:\\Users\\alan\\Public Folder"
Exposing the host's 3389 TCP port to the public network
ngrok tcp 3389
Reference for more ways to use: https://ngrok.com/docs
0xFF Reference Link
- Intranet penetration Intranet penetration
- Open Source Intranet Penetration Tool frp Simple Use Tutorial
- http://rootkiter.com/EarthWorm/