If you have written about ASP or PHP before, I believe you are familiar with Session based authentication (in fact, it is handled in combination with cookies on the browser side). This verification method is relatively early and the operation is not complicated.
a. The user opens (or automatically jumps to) the login page, enters your name and password, and logs in.
b. Submit to the server and compare whether the user name and password are correct.
c. If the verification is successful, write an ID to the Session. In fact, you can write anything in the Session. It can be used as the user login ID. After all, for each connection, Session is unique. Therefore, when verifying the "header" of the page, you don't have to care about what is stored in the Session at all. As long as there is a login ID, it's OK.
Of course, you would say, I'm K, ao. Is there a lot of problems with such verification? Indeed, cross domain authentication has problems, and single sign on is not easy to control. Therefore, many verification methods will be derived now. It's even complicated, so we know that as long as it involves authentication and authorization, it makes people dizzy. It's true. TM is very complicated.
However, you will also find that many Web applications still use Session to verify. Why? Because my project is so small that only five or six people may log in. Do I need to be so complicated?
Lao Zhou is not talented. He hasn't done any big projects, but many people have been hurt by small projects. Fooling customers with small projects has always been Lao Zhou's core competitiveness, which has been imitated but never surpassed. You might as well think that if you open a small shop and usually sell only a few colored DVD s that don't know whether they are genuine or not, there may be only a few employees in the shop and just a few operators for a management system. You said you would choose those complicated schemes to jump from a building for this authentication.
-------------------------------Galactic boundary------------------------------------
In the past, it was very simple for us to use Session in ASP. ASP files have something similar to C header files (inc files), which can be included in other ASP files. Then, write a few lines of code in the Inc file - check whether the Session contains the login ID. If not, go to the login page. Then, the page that needs to be verified includes the include file. In this way, the verification function is realized in a very simple but chaotic way.
In ASP In fact, you can also use it in the. Net core. Enable the Session function in the service container, then write a middleware, insert it into the header of the HTTP pipeline, check the login ID in the Session, and if not, Redirect to the login URL.
This is feasible, but there is a new problem - all incoming requests will be verified, which will cause the client to verify everything. Of course, you will think that Map When is OK, which makes the middleware conditional.
------------------------------M77 Nebula boundary----------------------------------
The above practice is not in line with ASP Net core design model. ASP.NET Core provides independent function implementation for authentication and authorization. Well, I've talked a few tons of nonsense. The positive film starts now.
Authentication and authorization are two different processes, but they are often used together. Therefore, many big partners are often confused. The key is that the words of the two goods are also very similar. I don't believe you see:
1. authentication
2. authorization
What about? Like it. I don't know what those foreign devils think. They make them so similar.
Lao Zhou tried to distinguish the two processes with a story - if you go to your friend's house to play. First, there must be someone in your friend's house, and after you ring the doorbell, he will open the door and let you in (verification); After that, you go in, but there are many rooms in your friend's house. You can certainly stand there in the general large living room. However, your friend's bedroom may not allow you to go in (authorized), unless you are particularly familiar with it.
Verification is whether you can enter other people's doors, and authorization is what you are allowed to do after entering the door.
-------------------------Crayfish star man dividing line------------------------
Here are some elements of these two processes.
A. Verify
Now we all know that there are many authentication methods on the website. You can log in with user name / password, QQ, Weibo, wechat and other accounts, and SMS verification code. QQ and wechat are authorized by a third party. In order to save the trouble of authorizing every access, the server providing authentication will send you a Token. You can use this Token next time you visit. Of course, this Token has a time limit. It can't be used when it expires.
This method will not expose user information, but it is not really safe. Others can not know who you are. They can also log in as long as they steal your Token. For example, some platforms will be open to developers' APIs. For example, the microblog open platform will assign you an App Key and a key, and then you need to pass these things when calling the API. If I know your App Key and key, I can still call the API as you.
Because there are so many verification methods, applications must have something to identify them, which is the same as we have a student number in school. So there is a noun called Authentication Scheme. Verification architecture, but translation into verification scheme is better. To put it bluntly, you just give you a name for this verification method. For example, the email verification code login is called "email auth". OAuth 2.0, as we often hear, is also a verification scheme.
Just having the name of the verification scheme is not enough. You have to let the program know how to verify. This requires a Handler for each scheme. This Handler is a class, but it requires you to implement the IAuthenticationHandler interface. In this way, there is a unified calling standard. When you select a scheme to complete the verification, you will call the Handler corresponding to the scheme to handle it. For example:
| programme | Handler | explain |
| Email-Auth | EmailAuthenHandler | Mail verification |
| Pwd-Auth | UserPasswordHandler | User name / password authentication |
Probably Microsoft also knows NET library is too integrated and the verification scheme is too cumbersome, so now the new version of ASP NET core's default library only retains some basic authentication schemes, such as cookies. This scheme is built-in and we don't need to write our own code (in the Microsoft.AspNetCore.Authentication.Cookies namespace).
In Microsoft AspNetCore. Under the authentication namespace, there is an abstract class authentication handler < Options >, which implements some basic functions. If we want to write our own authentication scheme, we can derive from this class. However, the scheme Lao Zhou will use this time is only a simple check of the Session. Therefore, it is not necessary to derive from this abstract class, but directly implement the IAuthenticationHandler interface.
Before implementing the verification logic, let's write a class as some options that can set parameters.
    public class TestAuthenticationOptions
    {
        /// <summary>
        /// Login entry path
        /// </summary>
        public string LoginPath { get; set; } = "/Home/Login";

        /// <summary>
        /// Deposit Session Key name of
        /// </summary>
        public string SessionKeyName { get; set; } = "uid";

        /// <summary>
        /// return URL Parameter name
        /// </summary>
        public string ReturnUrlKey { set; get; } = "return";
    }
Here, Lao Zhou only sets three options according to the project requirements. If you want to add options, it depends on your actual needs.
LoginPath: login entry. This attribute specifies a URL (generally a relative URL) that represents the page where the user enters the name and password to log in (MVC or RazorPages, which doesn't matter. It is determined by the URL route and your code).
SessionKeyName: this property sets the Key name when the login ID is stored in the Session. In fact, Session is similar to a dictionary object. Each item has a unique Key.
ReturnUrlKey: specifies a field name, which is usually attached to the parameters of the URL, indicating the path to jump back. For example, if it is set to "return", then if we want to visit https://localhost/admin/op However, this path (or page) must be verified, otherwise it cannot be accessed (actually including the authorization process), so it will automatically jump to https://localhost/Home/login , let the user log in. However, after successful Login, the user needs to return / admin / op, so add a parameter after Login:
https://localhost/Home/Login?return=/admin/op
When the login and verification are successful, jump back according to the return query field. If you set the "ReturnUrlKey" property to "back", the login URL is:
https://localhost/Home/Login?back=/admin/op
When implementing the IAuthenticationHandler interface, you can implement the IAuthenticationSignInHandler interface at the same time. The # IAuthenticationSignInHandler interface includes # IAuthenticationHandler and # IAuthenticationSignOutHandler interfaces. This means that you only need to implement the IAuthenticationSignInHandler interface, which contains method members of three interfaces.
InitializeAsync method: used during initialization. Generally, you can obtain the HttpContext associated with the current request and the authentication scheme information being used.
AuthenticateAsync method: the verification process. Lao Zhou's approach here just looks at whether there is a required Key in the Session.
ChallengeAsync method: once the verification fails, this method will be called to ask the client for verification information. The authentication information required here is to enter the user name and password. Therefore, Lao Zhou used some methods to Redirect to the login page.
ForbidAsync method: used when access is prohibited. You can directly call the ForbidAsync method of HttpContext.
SignInAsync method: called during login. Here, Lao Zhou just puts the user name into the Session.
SignOutAsync method: called when logging out. Here, just delete the user name in the Session.
These methods can be implemented by ASP Net core is automatically called internally, and can also be triggered manually through the extension method of HttpContext, such as SignInAsync, AuthenticateAsync, ChallengeAsync, etc.
    public class TestAuthenticationHandler : IAuthenticationSignInHandler
    {
        /// <summary>
        /// The name of the verification scheme can be named as needed
        /// </summary>
        public const string TEST_SCHEM_NAME = "some_authen";

        /// <summary>
        /// Options obtained by dependency injection
        /// </summary>
        public TestAuthenticationOptions Options { get; private set; }

        public TestAuthenticationHandler(IOptions<TestAuthenticationOptions> opt)
        {
            Options = opt.Value;
        }

        public HttpContext HttpContext { get; private set; }
        public AuthenticationScheme Scheme { get; private set; }

        public Task<AuthenticateResult> AuthenticateAsync()
        {
            // First, check whether the verification scheme matches the current scheme
            if(Scheme.Name != TEST_SCHEM_NAME)
            {
               return Task.FromResult(AuthenticateResult.Fail("Validation scheme mismatch"));
            }
            // Look again Session
            if(!HttpContext.Session.Keys.Contains(Options.SessionKeyName))
            {
                return Task.FromResult(AuthenticateResult.Fail("Invalid session"));
            }
            // Verification passed
            string un = HttpContext.Session.GetString(Options.SessionKeyName)??string.Empty;
            ClaimsIdentity id = new(TEST_SCHEM_NAME);
            id.AddClaim(new(ClaimTypes.Name, un));
            ClaimsPrincipal prcp = new(id);
            AuthenticationTicket ticket = new(prcp, TEST_SCHEM_NAME);
            return Task.FromResult(AuthenticateResult.Success(ticket));
        }

        public Task ChallengeAsync(AuthenticationProperties? properties)
        {
            // Jump to login portal
            HttpContext.Response.Redirect($"{Options.LoginPath}?{Options.ReturnUrlKey}={HttpContext.Request.Path}");
            return Task.CompletedTask;
        }

        public async Task ForbidAsync(AuthenticationProperties? properties)
        {
            await HttpContext.ForbidAsync(Scheme.Name);
        }

        public Task InitializeAsync(AuthenticationScheme scheme, HttpContext context)
        {
            // Get references to some required objects
            HttpContext = context;
            Scheme = scheme;
            return Task.CompletedTask;
        }

        public Task SignInAsync(ClaimsPrincipal user, AuthenticationProperties? properties)
        {
            // Get user name
            string uname = user.Identity?.Name ?? string.Empty;
            if(!string.IsNullOrEmpty(uname))
            {
                HttpContext.Session.SetString(Options.SessionKeyName, uname);
            }
            return Task.CompletedTask;
        }

        public Task SignOutAsync(AuthenticationProperties? properties)
        {
            if(HttpContext.Session.Keys.Contains(Options.SessionKeyName))
            {
                HttpContext.Session.Remove(Options.SessionKeyName);
            }
            return Task.CompletedTask;
        }
    }
In the # AuthenticateAsync method, first check whether the authentication scheme currently used is consistent with # TEST_SCHEM_NAME represents the same scheme name. This is to prevent binding TestAuthenticationHandler with the wrong authentication scheme. For example, my implementation uses Session to verify. If it is bound to the "email auth" scheme, there will be a logical error. After all, this kind of verification is not by e-mail.
Whether the authentication method AuthenticateAsync or the login method SignInAsync is implemented, do not check the user name and password, but put the user name and password verification on the login page or Controller. Because this custom # TestAuthenticationHandler is called in many requests that need authentication. If you check the user name and password here, don't you jump to the login page every time and let the user enter it?
B. Authorization
Once the verification is completed, the authorization process is reached.
The authentication process is identified by the name of the authentication scheme. Similarly, the authorization process can also contain multiple policies.
For example, authorization can be based on the user's role. Administrators have more permissions and non administrators have less;
You can authorize based on the user's age. Which games can't be played by people under the age of 15;
Alternatively, authorization is based on the user's credit score, and loans cannot be granted if the credit is poor; Good credit allows you to borrow money
......
The authorization process is to collect a series of claims to evaluate what permissions the user has. such as
Are you an administrator?
How old are you?
What is your credit value in the past three years?
Are you a VIP user?
What are your shopping points?
How many times have you bought in our store in the past year?
......
These statements come from many sources. They can be stored in the database and summarized when users buy things in the past, or they can be queried from the database during login verification. The processing code should comprehensively evaluate whether you meet the [requirements] of authorization according to these statements.
These [requirements] can be represented by the IAuthorizationRequirement interface. Interestingly, this interface does not specify any method members. You only need a class to implement this interface. For example, for user points, write a class called UserPoints, implement this interface, and add an attribute called PointValue to represent product points.
Then, you add the UserPoints class to the "Requirements" collection of an authorization policy. When processing the authorization evaluation, check the objects that implement the "iauthorizationrequirements" interface through the code to see whether they meet the conditions.
The user-defined authorization policy processing is to implement the IAuthorizationHandler interface. Let's see if the principle is similar. The custom Handler will be implemented during verification just now, and now the Handler can be implemented during authorization.
In the Session verification scheme, we don't need to write a custom authorization Handler. We just need to call the existing API to start the authorization function and register a valid policy name. We don't need to implement the , IAuthorizationRequirement, just use the extension method , RequireAuthenticatedUser. It means that as long as there is a logged in user name, after all, we have provided a valid user login name during authentication. Remember these lines in the AuthenticateAsync method?
            // Verification passed
            string un = HttpContext.Session.GetString(Options.SessionKeyName)??string.Empty;
            ClaimsIdentity id = new(TEST_SCHEM_NAME);
            id.AddClaim(new(ClaimTypes.Name, un));
            ClaimsPrincipal prcp = new(id);
            AuthenticationTicket ticket = new(prcp, TEST_SCHEM_NAME);
            return Task.FromResult(AuthenticateResult.Success(ticket));
In fact, we have added a declaration - Name, which is identified by the user Name. In the authorization policy, the program is looking for this declaration. As long as you find it, you can authorize it; Otherwise access is denied.
-----------------------------------Third cosmic boundary-----------------------------------
In program CS file, we need to register these service classes.
var builder = WebApplication.CreateBuilder(args);
// Enable Session function
builder.Services.AddSession(o =>
{
    // Shorten the time for the test
    o.IdleTimeout = TimeSpan.FromSeconds(5);
});
// This is used to check whether the user name and password are correct
builder.Services.AddSingleton<UserChecker>();
// use MVC function
builder.Services.AddControllersWithViews();
// Register the option class just defined, and you can use dependency injection
// Don't forget, or something big will happen
builder.Services.AddOptions<TestAuthenticationOptions>();
// Add verification function
builder.Services.AddAuthentication(opt =>
{
    // Add our custom authentication scheme name
    opt.AddScheme<TestAuthenticationHandler>(TestAuthenticationHandler.TEST_SCHEM_NAME, null);
});
// Add authorization function
builder.Services.AddAuthorization(opt =>
{
    // Register an authorization policy named“ demo2"
    opt.AddPolicy("demo2", c =>
    {
        // Bind to the validation scheme we defined earlier
        // The authorization process follows this verification
        c.AddAuthenticationSchemes(TestAuthenticationHandler.TEST_SCHEM_NAME);
        // The identity of the logged in user is required
        c.RequireAuthenticatedUser();
    });
});
var app = builder.Build();
Set the expiration interval in the Session to 5 seconds for testing.
The above code also registers a single instance UserChecker. This is just a test. Lao Zhou doesn't use the database, so he uses a class written "dead" to check whether the user name and password are correct.
    public class UserChecker
    {
        private class UserInfo
        {
            public string Name { get; init; }
            public string Password { get; init; }
        }

        // Simple and crude user information is only produced for testing
        static readonly IEnumerable<UserInfo> _Users = new UserInfo[]
        {
            new(){Name = "lucy", Password="123456"},
            new(){Name= "tom", Password="abcd"},
            new() {Name="jim", Password="xyz321"}
        };

        /// <summary>
        /// Verify that the user name and password are valid
        /// </summary>
        /// <param name="name">user name</param>
        /// <param name="pwd">User password</param>
        /// <returns></returns>
        public bool CheckLogin(string name, string pwd) => _Users.Any(u => u.Name == name.ToLower() && u.Password == pwd);
    }
After the App object is built, remember to insert these middleware into the HTTP pipeline.
app.UseSession();
app.UseAuthentication();
app.UseAuthorization();
app.MapControllerRoute("main", "{controller=Home}/{action=Index}");
Pay attention to the order. The authorization is after the verification, and the verification and authorization should be before the processing of Map MVC.
I used two controllers in the test project. The first is Home, which can be accessed freely, so authentication and authorization do not need to be considered; The second is Admin, which can only be accessed by users who have logged in correctly.
The Admin controller is very simple and only returns the corresponding view.
    [Authorize("demo2")]
    public class AdminController : Controller
    {
        public IActionResult MainLoad()
        {
            return View();
        }
    }
Note that the "Authorize" feature is applied to this controller, and the authorization policy used is specified as "demo2". It indicates that all actions in this controller cannot be accessed anonymously. To access, you must log in first.
The MainLoad view is as follows:
<h2>
    This is the management background
</h2>
---------------------------L78 boundary----------------------------
The Home controller allows anonymous access, including the user Login entry Login.
    public class HomeController : Controller
    {
        TestAuthenticationOptions _options;

        public HomeController(IOptions<TestAuthenticationOptions> o)
        {
            _options = o.Value;
        }

        public IActionResult Index() => View();

        public IActionResult Login()
        {
            // Get the returned URL
            if (!HttpContext.Request.Query.TryGetValue(_options.ReturnUrlKey, out var url))
            {
                url = string.Empty;
            }
            // Transfer with model URL
            return View((object)url.ToString());
        }

        public async Task<IActionResult> PostLogin(
                 string name,    //user name
                 string pwd,     //password
                 string _url,    //To jump back URL
                 [FromServices]UserChecker usrchecker   //Used to verify user name and password
            )
        {
            if(string.IsNullOrEmpty(name)
                || string.IsNullOrEmpty(pwd))
            {
                return View("Login", _url);
            }
            // If the password is incorrect
            if (!usrchecker.CheckLogin(name, pwd))
                return View("Login", _url);
            // Prepare materials for login
            // 1,statement
            Claim cname = new(ClaimTypes.Name, name);
            // 2,identification
            ClaimsIdentity id = new(TestAuthenticationHandler.TEST_SCHEM_NAME);
            id.AddClaim(cname);
            // 3,subject
            ClaimsPrincipal principal = new(id);
            // Login
            await HttpContext.SignInAsync(TestAuthenticationHandler.TEST_SCHEM_NAME, principal);

            if(!string.IsNullOrEmpty(_url))
            {
                // Redirect back to previous URL
                return Redirect(_url);
            }

            return View("Login", _url);
        }
    }
There are only two views in the Home controller. One is Index, which is the default Home page; The other is Login, which is used to display the Login UI.
The Login view is as follows:
@inject Microsoft.Extensions.Options.IOptions<DemoApp5.TestAuthenticationOptions> _opt
@model string

<form method="post" asp-controller="Home" asp-action="PostLogin">
    <p>
        user name:
        <input name="name" type="text"/>
    </p>
    <p>
        password:
        <input name="pwd" type="password"/>
    </p>
    <button type="submit">determine</button>
    <input type="hidden" name="_url" value="@Model" />
</form>
The Model type bound in this View is string, which is actually the callback URL parameter passed when the Challenge method redirects to this URL (/ Home/Login?return=/Admin/XXX). In the Login method, pass the URL to the Model attribute in the View through the View method.
The reason for using model binding is that there is no state between two HTTP requests:
For the first time, access / Home/Login in GET mode and pass the callback URL with the return parameter;
The second time, after inputting the user name and password, the PostLogin method is called when submitting in POST mode. At this time, login? Return = the URL passed by xxxxx has been lost and cannot be obtained again. It can only be bound to the Model, and then take values from the Model and bind them to the hidden element.
<input type="hidden" name="_url" value="@Model" />
When POST, it will be sent back to the server together with the hidden, so that the callback URL can be obtained in the PostLogin method.
----------------------------------------------------------------------------------------------------
After running the example, first open the default Index view.
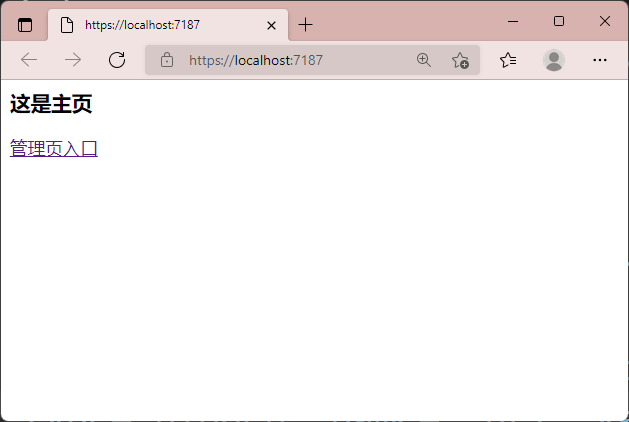
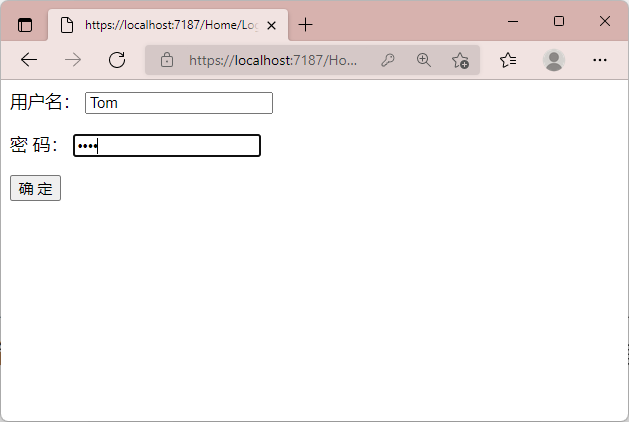
Click the "management page entry" link to enter Admin/MainLoad. At this time, because there is no login, you will jump to / Home/Login. Enter a correct user name and password to log in.
After success, jump back to the management background.
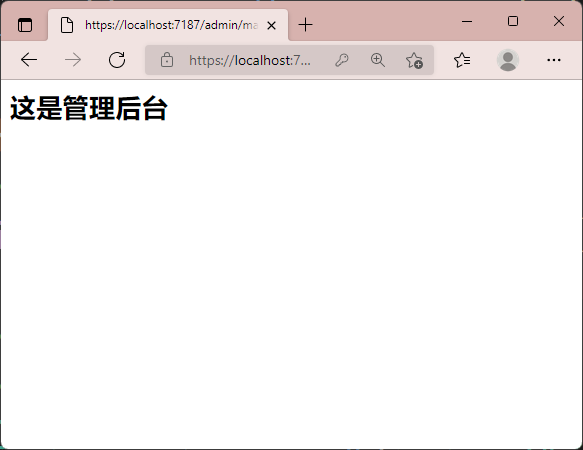
It will expire in five seconds. To access, you have to log in again. Of course, this is mainly for the convenience of testing. The actual application can be set for 15-20 minutes.
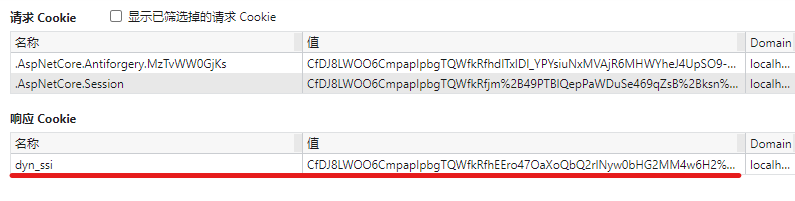
The Cookie that saves the Session ID is automatically completed by the runtime, and the generated Cookie can be seen through the developer tool of the browser.

The default Cookie uses the name aspnetcore Session, if you think the name is not tall enough, you can change it yourself. Set when AddSession.
builder.Services.AddSession(o =>
{
    // Shorten the time for the test
    o.IdleTimeout = TimeSpan.FromSeconds(5);
    o.Cookie.Name = "dyn_ssi";
});
Then, the generated Cookie used to save the Session ID will become: